Rome had lived long enough. It was time for them to die; no one stabs me in the back and gets away with it. The next phase of the game was all about planning how best to destroy them and secure my western borders permanently. But first of all, I'll put up my post-China map so that the reader knows exactly what my status was like at the time. This map is from 70AD when I made peace with them, 2 turns before their death.
This image has been lost.
So what exactly did I gain from my war against China? A lot of land mostly, and cities that proved to be very productive for me. I had considered putting my Forbidden Palace in Canterbury as soon as I founded that city there, and the conquests made against China made it a no-brainer. I rushed a courthouse and marketplace there shortly after this picture was taken and built it there in about 25 turns (completed in 380AD). An excellent site for my situation, and created early enough to have a big effect on my game. Sometimes I don't make good use of the Forbidden Palace, but in this game I really got a lot of use out of it.
Once the FP completed, all those former Chinese cities became highly productive parts of my empire. Missing out on Beijing was a bummer, but I had some nice ones all the same. Tsingtao, Hangchow (with the Colossus, remember) and Canton all became as strong as Nottingham and Hastings in time. The other cities were less useful, but still pull in additional income and shields. By this point, I was of course far ahead of anyone else on the power graph. For that reason, and because I was a deal breaker, no one wanted to trade anything with me. The only exception was Egypt, who continued to deal fairly with me and trade me incense. I would cultivate Egypt as an ally for the rest of the game.
The question remained of how to deal with the Romans most efficiently. There was no question about my destroying them with so huge an advantage (20 cities to their 6), but I didn't want it to take any longer than necessary. I decided I would use the commercial trait to its full advantage once again, by upgrading masses of cheap horsemen to knights and then crushing Rome with them. So I pillaged my iron source (yes, you can do that) and started building horsies in London and York. I really do love the mass upgrade tactic, and it works particularly well with the commercial trait (which by this point was adding a good 40-50 gold each turn to my income).
Of course the rest of the world didn't sit still while I was doing this. In 270AD the Zulus got into another war (my goodness, Shaka!) against the Amercians. I watched the fighting with casual interest on the world map; it appears as though the Zulus captured several cities by they kept flipping back to the Americans due to the horribly low culture of the Zulus. In 420AD Egypt also joined in the fight against Zululand. This war had no lasting consequence other than to slow tech down even further and waste more production in the AI civs.
By 470AD I had built enough horsemen to attack Rome and win a short, decisive campaign. So I hooked my iron back up again and upgraded them all to knights at 80g per upgrade:
|
Before: This image has been lost. |
After: This image has been lost. |
All told, I turned 17 horsemen into knights; that's a conversion of 510 shields into 1190 shields at a cost of 1360g. Not quite as dramatic or overpowering as the first upgrade, but still very strong indeed. It would have taken more than twice as long to build those knights manually, allowing me to launch my attack much earlier than what would otherwise have been the case. In 490AD I declared war on Rome and captured one of their 6 cities on the very first turn.
The Romans had no prayer, of course. To their credit though, they put up a very strong fight against me. They had a ton of legions, and my knights didn't do all that well against them even in the open field. The fact that Rome did not have their southern cities connected to their road network made things a bit trickey as well; it wasn't until my workers had built roads where they were missing that I could quickly get reinforcements up to the front. The city of Rome presented a special challenge; maybe it was due to the Great Wall being in it, but I took a fearsome slaughter trying to capture that city. According to the Civ3 editor the Great Wall does not increase the defense of the city it's built in, but I couldn't tell the difference here. Every knight assaulting it died (that was more than 10), and I had to fall back on my old swords to attack. The last sword was in the red when it killed the last defender, and I was sweating bullets. That monstrous city was finally mine in 550AD.
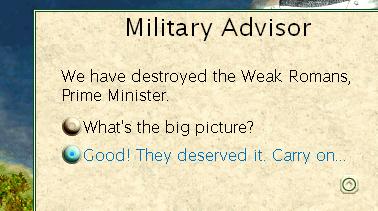
After that it was a simple matter of mopping up the last two cities in the north. I needed a few turns to rest up my decimated forces and get more reinforcements to the front though, so I didn't actually kill Rome until 620AD. I had let Caesar live before, but this had definitely been his time to die.
The game was over, so now it was time to win the game (why play it out for a spaceship win?) And the most efficient way to do that was through dominating the world - or at least my continent. So, with my western flank secured against all but a seaborne invasion, I began collecting my army for the drive to the east.


