
Playoff Game One Alternate Histories Spreadsheet
One of the recurring features of past seasons of AI Survivor have been our "alternate histories", running additional iterations on the same maps to see if the same events would play out again. Playoff Game One saw Catherine and Napoleon fail to conquer Frederick quickly enough to stop Mansa Musa from running away with an easy victory. Was that something which would unfold in each game? This was a topic that called for more investigation with alternate history scenarios. Following the conclusion of previous seasons of AI Survivor, I had gone back and investigated some of the completed games and found that they tended to play out in the same patterns over and over again. While there was definitely some variation from game to game, and occasionally an unlikely outcome took place, for the most part the games were fairly predictable based on the personality of the AI leaders and the terrain of each particular map. Would we see the same patterns play out again and again on this particular map?

The original inspiration to run these alternate histories came from Wyatan. He decided to rerun the Season Four games 20 times each and publish the results. The objective in his words was twofold:
- See how random the prediction game actually is. There's a natural tendency when your predictions come true to go "See! Told you!", and on the contrary to dismiss the result as a mere fluke when things don't go the way you expected them to (pleading guilty there, Your Honour). Hopefully, with 20 iterations, we'll get a sense of how flukey the actual result was, and of how actually predictable each game was.
- Get a more accurate idea of each leader's performance. Over 6 seasons, we'll have a 75 game sample. That might seem a lot, but it's actually a very small sample, with each leader appearing 5-10 times only. With this much larger sample, we'll be able able to better gauge each leader's performance, in the specific context of each game. So if an AI is given a dud start, or really tough neighbours, it won't perform well. Which will only be an indication about the balance of that map, and not really about that AI's general performance. But conversely, by running the game 20 times, we'll get dumb luck out of the equation.
Wyatan did a fantastic job of putting together data for the Season Four games and I decided to use the same general format. First I'll post the resulting data and then discuss some of the findings in more detail. Keep in mind that everything we discuss in these alternate histories is map-specific: it pertains to these leaders with these starting positions in this game. As Wyatan mentioned, an AI leader could be a powerful figure on this particular map while still being a weak leader in more general terms. Now on to the results:
Game One | Game Two | Game Three | Game Four | Game Five
Game Six | Game Seven | Game Eight | Game Nine | Game Ten
Game Eleven | Game Twelve | Game Thirteen | Game Fourteen | Game Fifteen
Game Sixteen | Game Seventeen | Game Eighteen | Game Nineteen | Game Twenty


(Note : "A" column tracks the number of war declarations initiated by the AI, "D" the number of times the AI is declared upon, "F" the points for finish ranking, and "K" the number of kills.)
This is the second time that I've had to write the alternate histories for Playoff Game One; I wrote the whole thing only to have the file wind up unrecoverable when my laptop suffered a massive hard drive failure. Thus I'm doing my best to remember how these games played out several months afterwards using the screenshots and Excel spreadsheet (all of which did survive fortunately). When we watched Playoff Game One on Livestream, the big question was whether Catherine and Napoleon would be able to defeat Frederick quickly enough to stop Mansa Musa from running away with the game economically. It didn't happen in the official Playoff Game One but what about the alternate histories? Well it basically didn't happen there either!  Mansa Musa stomped all over this game and proved to be ridiculously dominant on this map. If you want the short takeaway from this match, it was that no one else was able to snowball their position fast enough to stop the Mansa express from winning by culture. He was an absolute steamroller that the other leaders couldn't compete with.
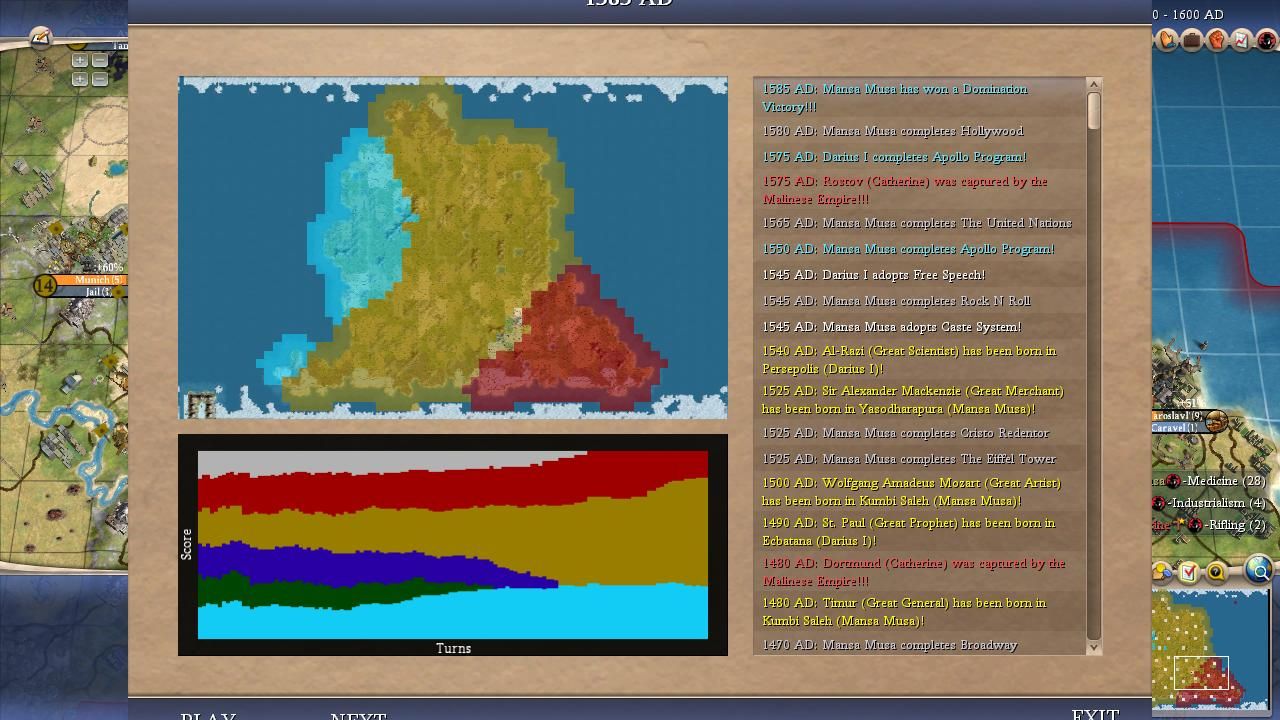
To put some numbers to Mansa's extraordinary position on this map, he won 16 times across 20 games including winning via Cultural, Diplomatic, and Domination routes. Oddly he didn't have a single Spaceship victory since he chose to head down the Cultural route over and over again. Mansa was enormously successful both due to his amazing starting position (with a grassland pigs, plains cow, and a grassland copper plus a nearby second city location with a gold resource and multiple floodplains) along with the unique diplomatic environment of this map. Mansa bordered Darius to the west and the Persian leader essentially never fought with Mansa at any point in time. I think they had maybe one or two wars total across 20 games - it simply didn't happen. To the east was Suryavarman who turned out to be shockingly weak on this map for reasons that aren't entirely clear. Suryavarman was the third-most popular pick to win or take second place on this map but for whatever reason he was a total dud, instead getting conquered by Mansa over and over again. This was a frequent way for Mali to snowball ahead on territory and once Mansa had two civ's worth of territory it was a certain game over situation for everyone else.
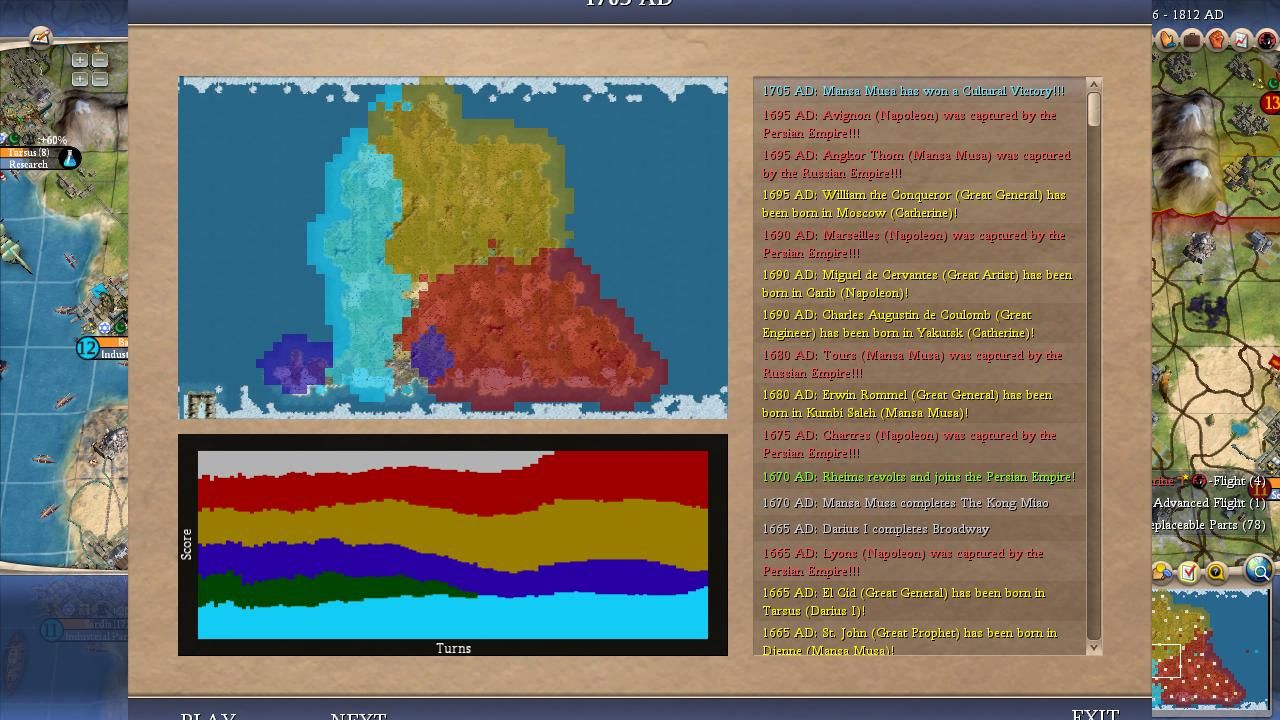
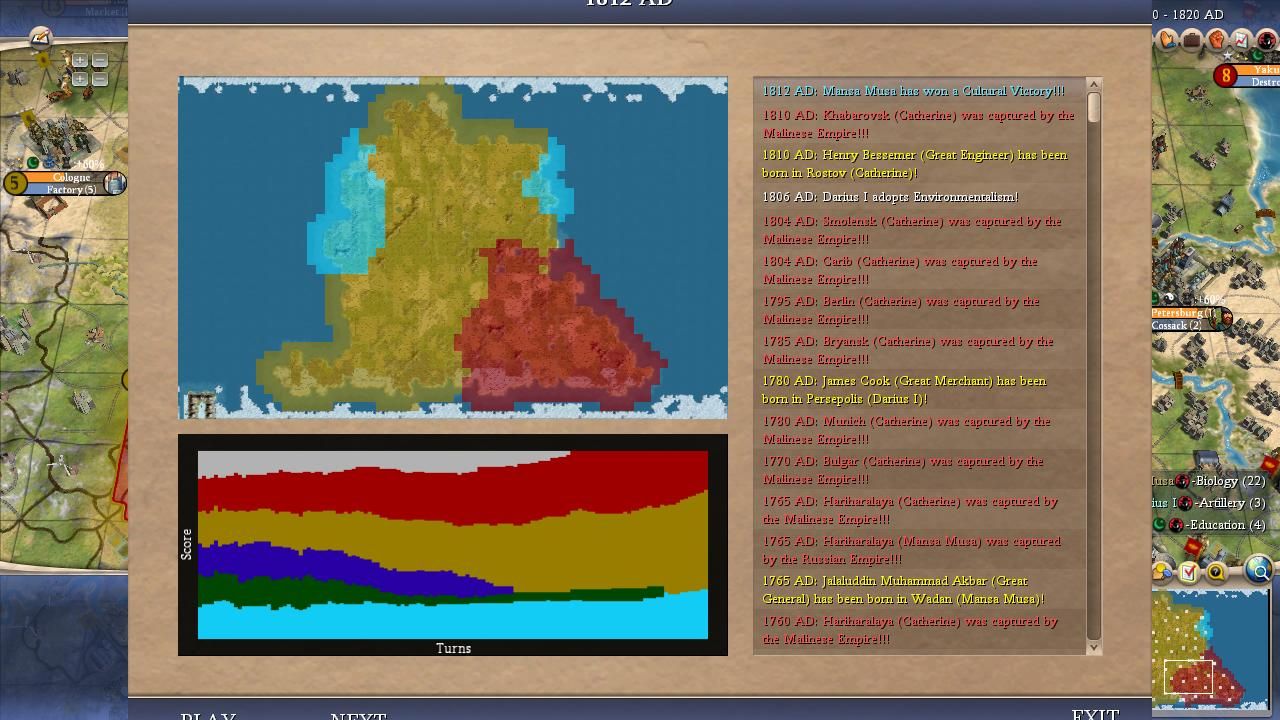
That left the south as the only direction from which trouble could appear. However, Mansa had a meat shield down there to protect him in the form of Frederick, with the German leader absorbing all of the early pressure from Catherine and Napoleon. Those two low peace weight leaders had no ability to reach Mansa's territory during the early stages of the game and by the time that they could reach him it was already too late. Catherine in particular was often quite strong and simply couldn't keep pace with Mansa's insane economy. I have to emphasize just how quickly Mansa was winning some of these games: he had victory dates that ended on Turn 250, Turn 259, Turn 227 (!) in a staggeringly fast Domination win, Turn 251, Turn 261, Turn 250 again, Turn 266, and Turn 259 a second time. That was EIGHT different victories before Turn 270 and an average Mansa finishing date on Turn 269. There was literally nothing that the other leaders could do with these matches ending so quickly. I repeatedly watched Catherine crush through Frederick and she would be researching the middle Renaissance techs when the game simply ended. Uh, that was certainly fast. At other times, Cathy or Napoleon would be running around with rifles and cavs only to find that Mansa already had tanks when they launched their invasions - whoops. Completely unfettered economic power was a terrifying thing to behold.
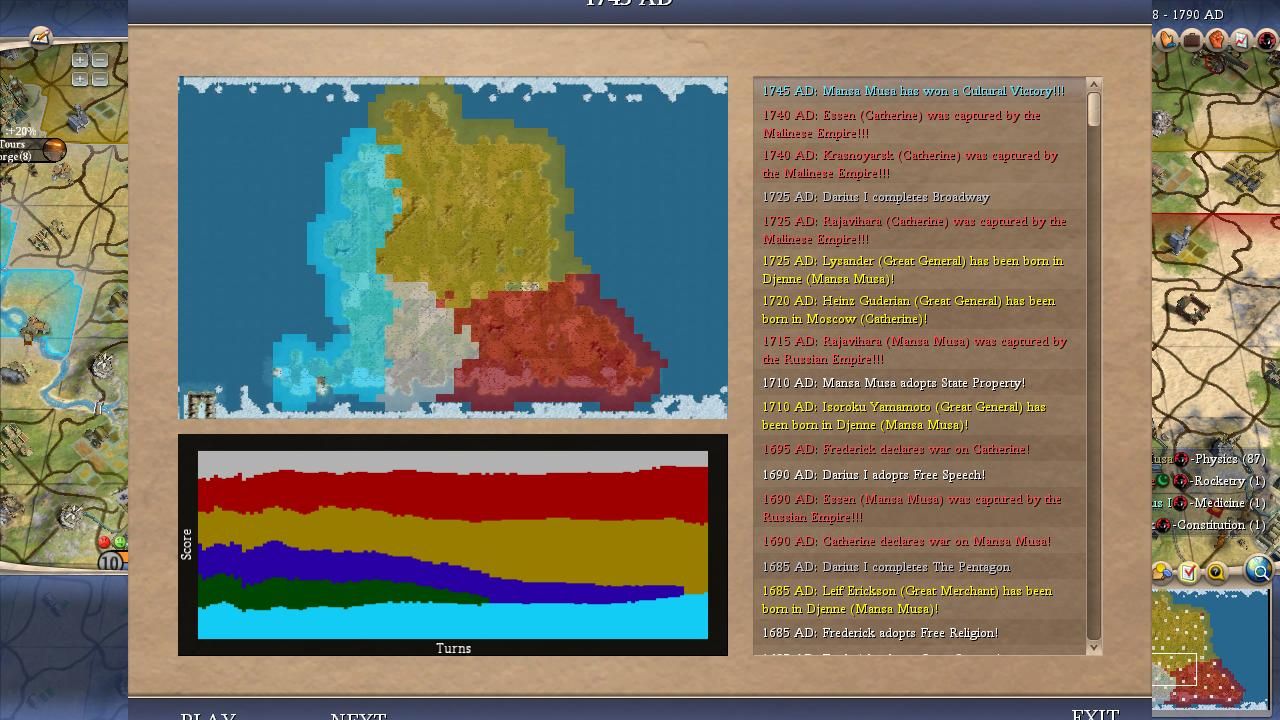
The only other leader who was competitive on this map was Catherine who did manage to achieve two victories, both of them as expected by Domination. Cathy had a bit of a slow start thanks to having her capital in a relatively commerce-poor part of the map, however she almost always came out of the landgrab phase with the most total territory under her control. Catherine would inevitably attack either Frederick or less frequently Suryavarman and she often had success in overrunning one or both of these opponents. She did better when her initial aggression was targeted against Suryavarman, largely because this removed the chance for Mansa to take the Khmer lands for himself. I believe that this was her recipe for success in both Game #10 and Game #14 though unfortunately my notes on these games were also lost when this laptop's hard drive failed. I actually think Catherine would have the most victories of anyone on this map if we were to swap out Mansa Musa for a random generic high peace weight leader. Put, say, Hatshepsut or Roosevelt in that spot and she likely wins half a dozen or more times. As for Napoleon, he reverted back to his usual self on this map with a truly horrible economy that was inevitably outscaled by Mansa and Darius. He was usually conquered at some point in the lategame when his units had fallen too far behind in technology and at no point was he ever a threat to achieve a victory. He was close to a second place finish in Game #13 and that was it.
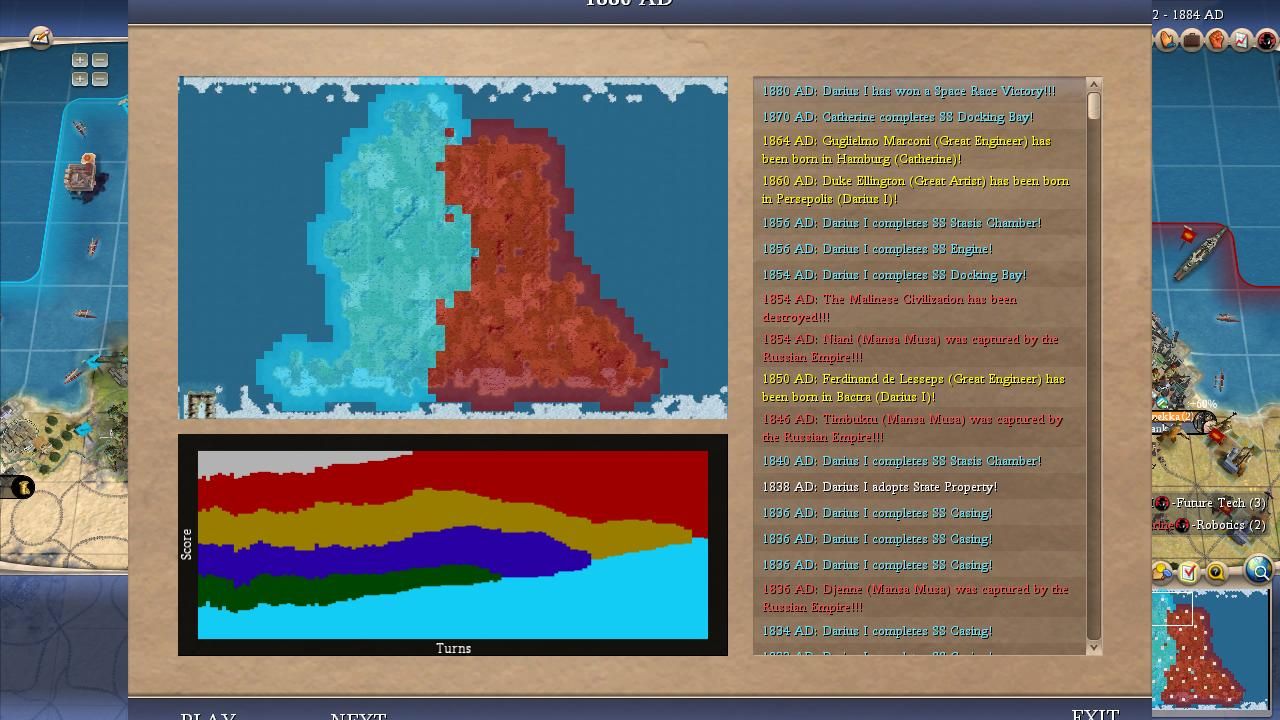
Darius also wound up winning twice by Spaceship under unusual circumstances. He limped to a Spaceship victory in Game #3 only because Mansa had paused his research to push for a Cultural victory and this was one of the rare games where Cathering was strong enough to fight at an equal level with the Malinese. Cathy captured one of Mansa's three Legendary cities and then fought him to a draw while Darius slowly teched to a Turn 340 finish. Game #4 was the only one of the 20 map replays where Mansa was eliminated thanks to another very strong Catherine performance, and it took so long for Cathy to defeat Mansa that Darius was able to reach a more advanced tier of military tech and win via space again. Outside of these rare occasions where Catherine knocked Mansa Musa off his perch, Darius was his usual self and largely sat in the corner researching in peace. He fought few wars (only 35 total) and was thoroughly passive, almost never acquiring more territory beyond what Persia settled in the initial landgrab. Darius was successful on this map only because he had Mansa next door as a fellow high peace weight leader who would never attack him. Don't let the numbers fool you, this was not an impressive performance at all.
Now for a look at the individual leaders:

Mansa Musa of Mali
Wars Declared: 20
Wars Declared Upon: 30
Survival Percentage: 95%
Finishes: 16 Firsts, 1 Second (82 points)
Kills: 17
Overall Score: 99 points
I largely covered the reasons for Mansa's success above but it bears repeating that this guy was a monster in this scenario. He was one kill away from cracking the 100 point margin and survived in a disgusting 95% of the alternate history scenarios. If there was one minor weakness to Mansa's performance on this map, it was his lack of second place finishes. He only took the runner up spot in 1 of the 4 matches where he didn't claim the overall victory, reflecting the fact that Mansa either won the game outright or wasn't strong enough to take second. This sample size was too small to draw any serious conclusions though. What everyone watched on Livestream was more or less what happened across the 20 map repeats with Mansa easily crushing everyone else.

Catherine of Russia
Wars Declared: 55
Wars Declared Upon: 9
Survival Percentage: 95%
Finishes: 2 Firsts, 13 Seconds (36 points)
Kills: 18
Overall Score: 54 points
Catherine certainly gave it her best shot with 55 offensive wars launched against only 9 defensive wars faced. She was by far the second strongest leader on the map and the only individual who ever really threatened Mansa; both of Darius' wins took place only because Catherine had knocked the Malinese leader out of the running. Catherine performed well on this map and usually managed to eliminate Frederick or Suryavarman or both in growing to one of the largest empires on the map. The big problem was that it was nearly impossible to pull off these conquests before Mansa had already clinched a victory elsewhere with his ridiculous economy. I watched repeated games where Catherine's military was growing and her territory was expanding... and then the game simply ended on Turn 250 or whatever because three Mansa cities had already gone Legendary. Attacking Mansa didn't work out particularly well for Catherine either since there were a bunch of games where Mansa had infantry as early as Turn 180 when all of the other leaders were still in the Medieval era. How do you beat that (?) Catherine narrowly edged Mansa for the most kills and still performed very well across the alternate histories, winding up with 13 second place finishes for her troubles. She advanced to the championship game with a top two finish in nearly every match, confirming the likelihood of the Mansa/Catherine outcome that we watched in the real playoff game. Mansa was simply too tall of a mountain for her to climb in the vast majority of games.

Darius of Persia
Wars Declared: 18
Wars Declared Upon: 17
Survival Percentage: 100%
Finishes: 2 Firsts, 6 Seconds (22 points)
Kills: 11
Overall Score: 33 points
Darius was the only other leader to score any kind of points in the alternate histories. This was heavily due to his fortunate starting position, with the similarly high peace weight Mansa Musa next door plus Frederick to serve as a target for Napleon in the south. The aggressive French leader did clash with Darius on a frequent basis, of course, and those wars tended to be stalemates for long periods of time that eventually tilted in Darius' favor as he advanced past the poor technology of Napoleon. This was the reason why Darius wound up with 11 kills, almost all of which came at the expense of the French leader. Darius had the rare distinction of being a leader with a 100% survival rate although this was somewhat of a small sample size fluke since he was knocked down to a single city remaining in Game #13 and lived only because Mansa wouldn't Open Borders with a victorious Napoleon. Try looking through the endgame replay screenshots above and you'll note that Darius almost never expanded out of his starting area on the western side of the map. Unlike Mansa, he did not expand and almost always ended the game in the exact same position that the Persians had occupied on Turn 100. This passive style of gameplay is the main reason why Darius so often disappoints viewers despite his amazing traits. He was a weaker, less interesting version of Mansa Musa who essentially tagged along in second place and occasionally backdoored his way into a victory.

Napoleon of France
Wars Declared: 42
Wars Declared Upon: 27
Survival Percentage: 30%
Finishes: 0 Firsts, 0 Seconds (0 points)
Kills: 4
Overall Score: 4 points
The remaining three leaders all performed horribly and failed to achieve any first or second place finishes. In fact, none of them were ever the least bit competitive for a first place finish though occasionally they came close to the runner up spot. Napoleon's Cinderella story from the opening round of Season Six saw him turn back into a pumpkin in this game with all of the usual problems that plague this leader. Napoleon's hyper-aggression served him poorly in this match as he was unable to score the same fast kills from the opening round while repeatedly tanking his economy with too many units and not enough infrastructure. Napoleon fought heavily with both Frederick and Darius in these games, and occasionally he could look decently strong in the midgame if he pulled off a conquest of the German territories. However, he inevitably fell so far behind in technology that later French wars would see maces and knights crashing into the rifles or infantry of Darius and Mansa Musa. Napoleon was eliminated 70% of the time and his elimination dates were heavily concentrated in the Turn 200-250 range as this was exactly when his earlier offensives stalled out and backfired. This was not a map where Napoleon could crank endless units and be successful, not against the far superior economies of the two northern Financial leaders.

Suryavarman of the Khmer
Wars Declared: 13
Wars Declared Upon: 26
Survival Percentage: 5%
Finishes: 0 Firsts, 0 Seconds (0 points)
Kills: 3
Overall Score: 3 points
Everything certainly went wrong for Suryavarman in this match where he was eliminated in 19 out of 20 games, including suffering the First to Die fate more often than anyone else in 11 different alternate histories. The poor performance of Suryavarman remains somewhat of a mystery to me despite watching all of these repeated matches. While it's true that Suryavarman lacked a river at his capital and there was a fair bit of jungle nearby, his capital wasn't THAT bad as far as openings go. For whatever reason, the Khmer struggled badly in game after game and usually came out of the landgrab phase with one of the lowest scores despite the Creative trait's free border expansions (a very bad sign). One issue was a lack of nearby copper for early axes and barbarian defense. Suryavarman always built a whole bunch of chariots and even though he had an iron resource all of four tiles away from his capital, there were a couple of games where he never managed to control that resource and was left metal-less. This was responsible for some of the fast early eliminations that Suryavarman suffered, like bowing out on Turn 102 in Game #1 and Turn 88 (!) in Game #12. Mansa Musa was the culprit both times and naturally both of those games turned into Malinese stomps. Thus Suryavarman was one of the most important figures in the outcome of these games, as his repeated weakness removed the only check on Mansa's economy and allowed Mali to dominate over and over again.

Frederick of Germany
Wars Declared: 12
Wars Declared Upon: 51
Survival Percentage: 10%
Finishes: 0 Firsts, 0 Seconds (0 points)
Kills: 0
Overall Score: 0 points
Frederick wound up in exactly the position that everyone expected, a pinata that was smacked again and again by the low peace weight duo of Catherine and Napoleon. In fact, there were even a handful of games where Suryavarman piled on as well to create a 3 vs 1 pummeling. This was more or less the worst setup possible for Frederick, a pacifistic individual who only wanted to be left alone but was instead invaded 51 different times. This unsurprisingly resulted in zero top two finishes and not a single kill for Frederick. He came extremely close in Game #20 where he knocked Suryavarman down to a single city remaining, only to have Catherine come piling in and completely eliminate the Germans before they could ever score that last hit. The only drama involving Frederick in this game was whether he would wind up First to Die more often than Suryavarman, and to his credit he narrowly won that competition with "only" 8 First to Dies as compared to 11 for the Khmer. This sample size wasn't large enough to state definitively that either was more likely to crash out first but the data that we do have narrowly favored Frederick. This doomed scenario was very much one that Frederick would like to forget.

Playoff Game One turned out to have some of the most straightforward alternate histories that I can remember watching. Mansa Musa was the clear winner in almost every game, Catherine was usually the second place finisher with Darius sometimes taking that spot when the Russians faltered, and the other leaders were all irrelevant and didn't matter outside of flipping a coin over whether Suryavarman or Frederick would be knocked out first. The actual playoff game that we watched on Livestream was typical in every respect, including the Cultural ending that closed out the bulk of these matches. If anything was out of the ordinary, Mansa Musa tended to win even faster (earlier than Turn 305) and in more dominant fashion as compared to the official game. Napoleon was also semi-competent in the real playoff game instead of getting crushed as he so often was in the alternate histories. Overall though, if you watched the Livestream match then you had an excellent feel for how all of the repeat playthroughs of the map went as well. This one was definitely not an outlier result.
Thanks as always for reading, I hope you enjoyed this look back at Playoff Game One!


