
Game Four Alternate Histories Spreadsheet
One of the recurring features of past seasons of AI Survivor have been our "alternate histories", running additional iterations on the same maps to see if the same events would play out again. Game Four saw one Russian leader rise and another Russian leader fall, with Stalin suffering the First to Die fate while Catherine emerged victorious. Was that something which would unfold in each game? This was a topic that called for more investigation with alternate history scenarios. Following the conclusion of previous seasons of AI Survivor, I had gone back and investigated some of the completed games and found that they tended to play out in the same patterns over and over again. While there was definitely some variation from game to game, and occasionally an unlikely outcome took place, for the most part the games were fairly predictable based on the personality of the AI leaders and the terrain of each particular map. Would we see the same patterns play out again and again on this particular map?
The original inspiration to run these alternate histories came from Wyatan. He decided to rerun the Season Four games 20 times each and publish the results. The objective in his words was twofold:
- See how random the prediction game actually is. There's a natural tendency when your predictions come true to go "See! Told you!", and on the contrary to dismiss the result as a mere fluke when things don't go the way you expected them to (pleading guilty there, Your Honour). Hopefully, with 20 iterations, we'll get a sense of how flukey the actual result was, and of how actually predictable each game was.
- Get a more accurate idea of each leader's performance. Over 6 seasons, we'll have a 75 game sample. That might seem a lot, but it's actually a very small sample, with each leader appearing 5-10 times only. With this much larger sample, we'll be able able to better gauge each leader's performance, in the specific context of each game. So if an AI is given a dud start, or really tough neighbours, it won't perform well. Which will only be an indication about the balance of that map, and not really about that AI's general performance. But conversely, by running the game 20 times, we'll get dumb luck out of the equation.
Wyatan did a fantastic job of putting together data for the Season Four games and I decided to use the same general format. First I'll post the resulting data and then discuss some of the findings in more detail. Keep in mind that everything we discuss in these alternate histories is map-specific: it pertains to these leaders with these starting positions in this game. As Wyatan mentioned, an AI leader could be a powerful figure on this particular map while still being a weak leader in more general terms. Now on to the results:
Game One | Game Two | Game Three | Game Four | Game Five
Game Six | Game Seven | Game Eight | Game Nine | Game Ten
Game Eleven | Game Twelve | Game Thirteen | Game Fourteen | Game Fifteen
Game Sixteen | Game Seventeen | Game Eighteen | Game Nineteen | Game Twenty
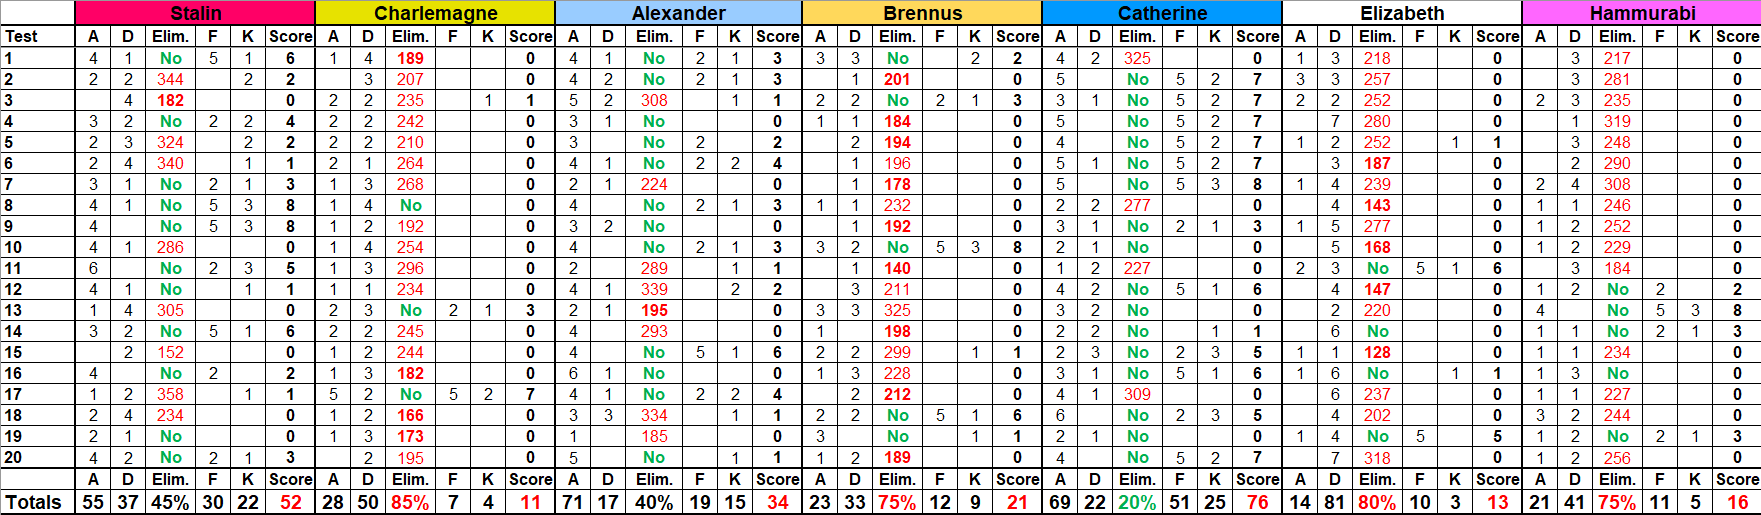
(Note : "A" column tracks the number of war declarations initiated by the AI, "D" the number of times the AI is declared upon, "F" the points for finish ranking, and "K" the number of kills.)
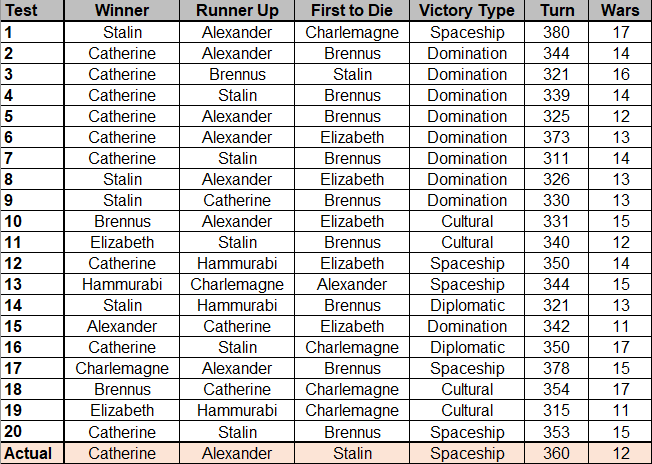
Game Four turned out to be pretty typical as far as what we watched compared to the most likely outcomes for the map. Catherine was most likely to win, Alexander was most likely to come in second place, and the high peace weight leaders (Charlemagne / Elizabeth / Hammurabi) repeatedly had a rough time. The only thing that was an oddball result was Stalin winding up First to Die; he was the second-best performing leader on this map after Catherine and almost never wound up being the first leader eliminated. Catherine was pretty fortunate to win the actual Game Four and I hadn't thought much of her coming into this match. I was expecting her to do significantly worse in the alternate histories and this was one area where I was completely wrong. There were a couple of major breaks that went in Catherine's favor in game after game which were difficult to predict ahead of time. The biggest was probably the settling pattern chosen by Charlemagne: the Holy Roman leader always sent his initial settlers to the west and allowed Catherine to claim the entire disputed border region. In every single game, Charlemagne claimed no land at all east of his capital and allowed Cathy to take all of it. There was no guarantee that this would be the case and it was the main reason why Catherine repeatedly emerged as a top contender.
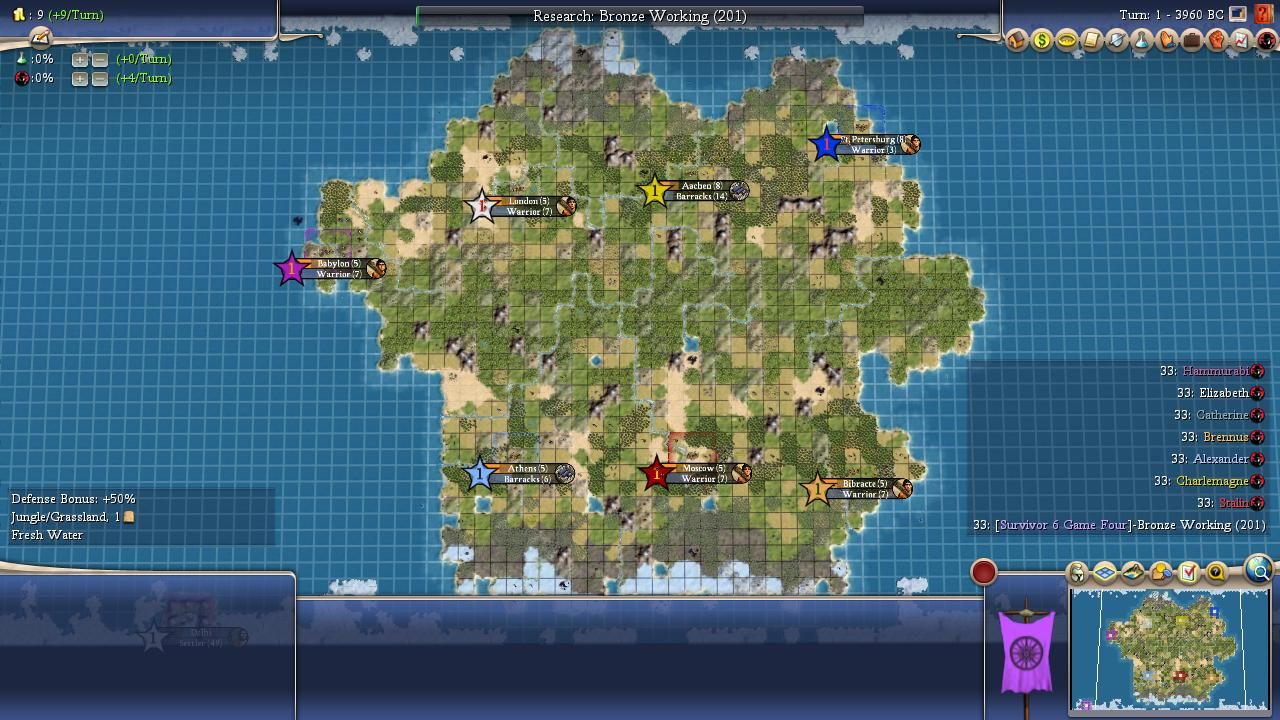
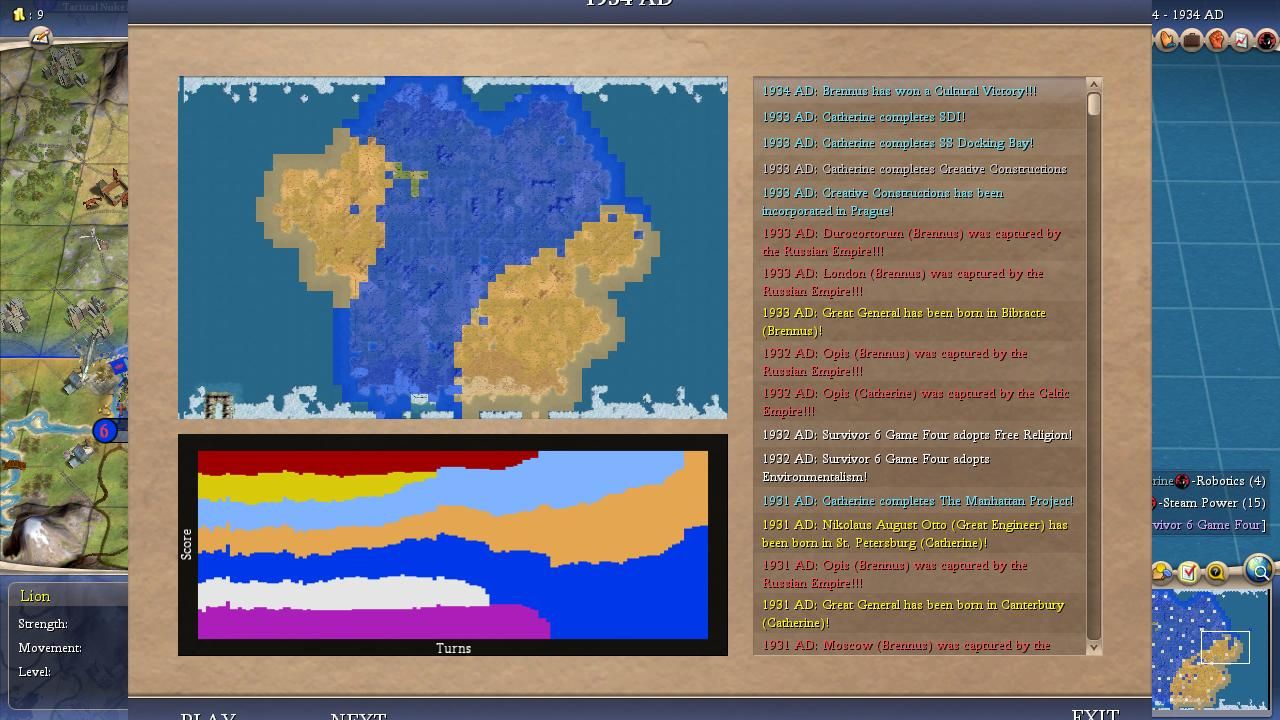
Not only was Cathy able to avoid getting squeezed on land, she often wound up with the most territory of anyone at the end of the landgrab phase. This was due to a small quirk of geography in the disputed area to the southeast of her starting position. That region was a fertile spawning area for barbarian cities and Catherine usually wound up being the one capturing them thanks to poor management of the local terrain by Brennus. Look at this small body of water:
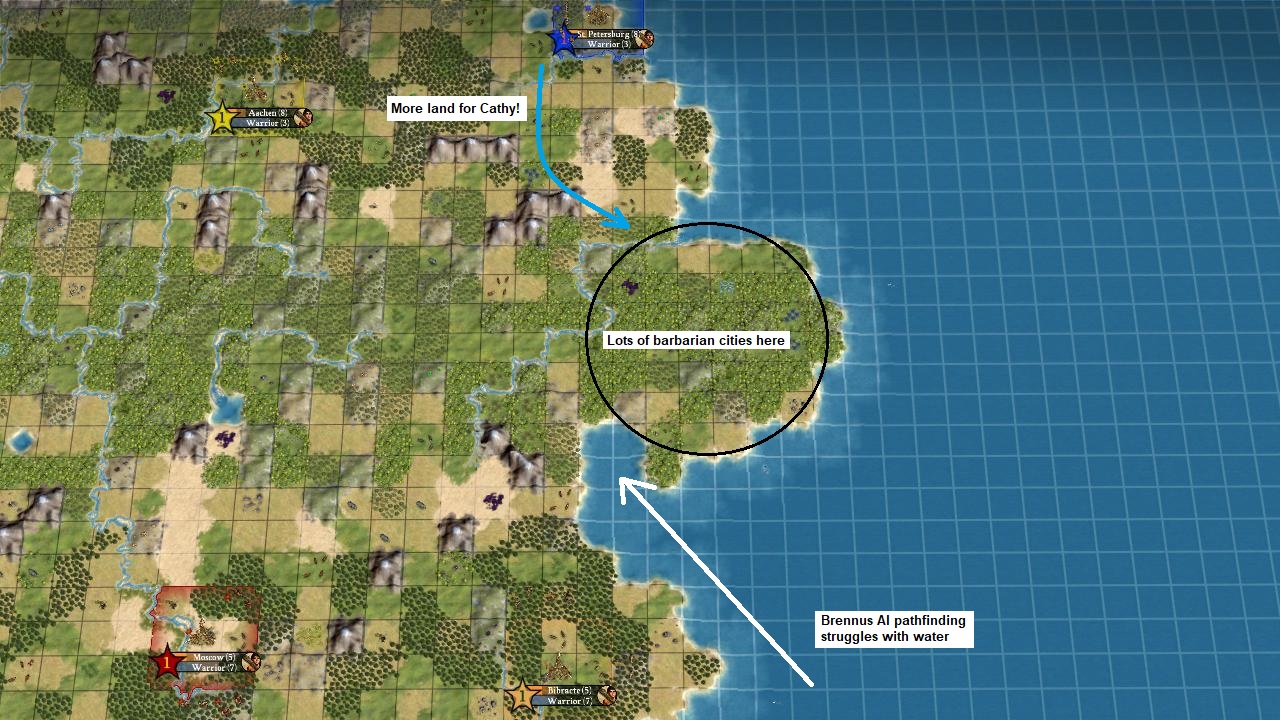
For no clear reason, the Brennus AI had serious pathfinding issues in terms of navigating around that little bay. Brennus would settle cities right up to the base of that river and then struggle to found any more cities on the eastern peninsula or capture the barbarian cities that inevitably sprang up there. Catherine had no such issues and happily settled or captured that territory for herself, and this was a major reason why she was so often the largest AI in the field. There were quite a few games where she was sitting towards the bottom of the scoreboard around Turn 75 and then picked up three or four additional barbarian cities to find herself on top by Turn 125. Catherine was quite a bit stronger in many of these games than she was in the actual Game Four, where she played second fiddle to Alexander for most of the game. The only thing that could torpedo Cathy's setup was an extended early war stalemate with Charlemagne that dragged them both down. This didn't happen that often (they fought a lot, usually with Cathy winning) but it did occur from time to time.
The other huge thing that I failed to anticipate about this game was the animosity between the high peace weight leaders. There was some expectation in the AI Survivor community that Charlemagne or Elizabeth or Hammurabi could have a decent outcome by working together against the four low peace weight leaders that made up the rest of the group. This did not happen in the actual Game Four and that pattern was repeated throughout the alternate histories. In particular, Charlemagne and Elizabeth warred constantly against one another and this tended to be a mutually destructive outcome given the diplomatic makeup of the rest of the field. Hammurabi was his usual inert self most of the time but he occasionally picked fights with Elizabeth as well. These three leaders were often divided by religion and they rarely proved able to unite together against their militaristic rivals.
The net result was a scenario where the low peace weight leaders dominated over and over again. Catherine had an 80% survival rate and 12 top two finishes while Stalin and Alexander both similarly survived to the finish more than half the time and took home 9 and 8 top two finishes respectively. By way of comparison, the Charlemagne / Elizabeth / Hammurabi trio all had survival rates of 25% or lower and managed a grand total of 8 top two finishes between the three of them. The kill count was a similar slaughter with Cathy (25) and Stalin (22) far exceeding the sum total of the three high peace weight leaders combined (4 + 3 + 5 = 12). Each of the high peace weight leaders was pounded in game after game and it was unusual for any of them to be competitive for the victory. The odd man out in the group was Brennus who was targeted repeatedly by both Cathy and Stalin despite his low peace weight. He ended up being the most likely to suffer the First to Die fate and barely out-scored the high peace weight trio despite what should have been a far better diplomatic situation.
A typical game on this map saw Catherine and Stalin emerge as the two dominant leaders on the scoreboard, with Cathy snowballing through Charlemagne and Stalin growing large by devouring Brennus. Elizabeth was rarely First to Die and could often be quite strong in the early game only to fall in the midgame as she was targeted for attack again and again by the low peace weight leaders. Alexander most frequently spent his games attacking Hammurabi and failing to make much progress; the Babylonian border cities tended to be placed on hills and Alex would ram units into those fortresses over and over again to little effect. The western part of the map was therefore usually a stalemate that left Alex far behind in technology. However, inevitably a runaway Cathy or Stalin (or both) would come join the war and steamroll their way through Hammurabi to knock him out of the game as well. Then Cathy and Stalin would face off in a lategame showdown for the victory, with Alexander backdooring into second place as one of the Russians eliminated the other. This was the reason why Alex claimed so many runner up finishes: he was very good at sneaking into second place while extremely far behind in tech as the two titanic Russians clashed with one another. Cathy eliminated Stalin or Stalin eliminated Cathy many, many times across these games - it was almost like the Epic Rap Battles of History video where it took a Russian to take down a Russian! 
With that said, it wasn't completely impossible for the other leaders to succeed. All seven leaders won at least one time in the 20 replays of this map which meant that other outcomes were merely unlikely, not impossibilities. Elizabeth genuinely did well on the rare occasions where she wasn't horribly dogpiled; she won twice and had a third victory snatched away at the last second in Game #16 when Cathy landed a Diplomatic victory with England's third near-Legendary city sitting on 49k culture! Hammurabi also had one game where he was completely untargeted and ran away technologically to capture a victory. Charlemagne's single victory came when he amusingly snowballed by conquering Elizabeth and then saw Stalin/Alex deadlock in a mutually destructive war for 100 turns while he pulled away. Brennus bizarrely won both of his victories via Culture when he managed to defeat Stalin and then hang on to the finish. These were not terribly likely outcomes but they could take place if the diplomacy broke in favorable directions for these leaders. More often, it was some combination of Cathy/Stalin/Alex who were the primary competitors for the top spots and the ones driving the action in the gameplay.
Now for a look at the individual leaders:

Catherine of Russia
Wars Declared: 69
Wars Declared Upon: 22
Survival Percentage: 80%
Finishes: 9 Firsts, 3 Seconds (51 points)
Kills: 25
Overall Score: 76 points
Cathy was clearly the top leader on this map for the reasons detailed above. She had the best survival rate, the most kills, and by far the most first place finishes. There was one stretch where Cathy won six games in a row and I thought we might have a true juggernaut on this map before the results evened out a bit in the last dozen games. Catherine tended to be in a strong place diplomatically as she was rarely targeted for attack by the other leaders and benefited from her low peace weight. She had multiple avenues for potential expansion through Charlemagne or Brennus or both; it certainly helped that her neighbors were weak and unpopular in most matches. Cathy never really had a bad game as she was never First to Die and she was typically strong even in the games where she ultimately suffered elimination. For example, in Game #8 she was the second-strongest leader before the runaway AI Stalin attacked in the lategame and knocked her out. This was a scenario where everything seemed to break in Catherine's favor and her potentially cramped starting position wound up not being a problem. Only in the few games where she was dogpiled or stuck in an endless unprofitable war with Charlemagne was Cathering unable to become a major power.

Stalin of Russia
Wars Declared: 55
Wars Declared Upon: 37
Survival Percentage: 55%
Finishes: 4 Firsts, 5 Seconds (30 points)
Kills: 22
Overall Score: 52 points
The other Russian leader was nearly as strong as Catherine and almost always emerged as one of the top leaders as well. Stalin had a top two finish in 9 of the 20 alternate histories; he took one of the top two spots in almost every game (9 out of 11) where he survived to reach the finish. Stalin's best games had one big thing in common: an early elimination of Brennus. This was the main path of expansion for Stalin and it was one of the reasons why Brennus had such poor results on this map. Stalin also spent a good deal of time clashing with Charlemagne or Elizabeth, however any conquests that Stalin made to the north tended to be culturally crushed by the other leaders in that region. He didn't gain anywhere near as much useful territory by heading north as compared to marching east against Brennus, and Stalin's games where he ignored Brennus tended to have weaker outcomes. Stalin rarely fought with Alexander and this was the weirdest aspect of the actual Game Four. Alex's early conquest of Stalin in the game that we watched was highly atypical and Stalin was only First to Die a single time across these 20 replays. (He was stuck in a 1 vs 2 against Alex and Brennus in that First to Die elimination in Game #3.) Anyway, this wasn't an amazing setup for Stalin but it certainly wasn't a bad one and he was a pretty good choice for the picking contest. We basically saw the worst possible outcome for Stalin and he did vastly better in the alternate histories, the only leader who could consistently challenge Catherine for first place.

Alexander of Greece
Wars Declared: 71
Wars Declared Upon: 17
Survival Percentage: 60%
Finishes: 1 First, 7 Seconds (19 points)
Kills: 15
Overall Score: 34 points
Alexander also had excellent odds to make the playoff round but his advancement almost always came via a second place finish. He only won a single time while finishing in second place in seven different games and this was not a coincidence or the result of bad luck. As mentioned above, Alex tended to fall extremely far behind in technology while slamming endless units into Babylonian or English or Holy Roman cities. This was not a recipe for success and he rarely would have been in a position to claim a top two finish based on his own efforts. However, Catherine or Stalin or both of them inevitably emerged as a powerhouse on the other side of the map, and then they would eventually intervene and crush Hammurabi or Elizabeth with their gigantic territorial edge. This left Alex in prime position to backdoor his way into second place in rather undeserving fashion. This was the pattern in Game #2, Game #5, Game #6, and Game #10; I've rarely written the word "backdoor" so many times in my notes. Basically, Alexander's teching was too bad for him to win outright but his low peace weight left him popular enough to be alive at the finishing date for a potential second place. Most of his eliminations came in the rare games where Elizabeth or Hammurabi pulled out a victory. Alexander was also insanely aggressive on this map with 71 offensive wars against 17 defensive wars. This was enough to get him a bunch of kills but not enough to win consistently. His results would have been completely mediocre if Cathy and Stalin hadn't been so dominant on this map and dragged his overly aggressive butt along with them.

Brennus of the Celts
Wars Declared: 23
Wars Declared Upon: 33
Survival Percentage: 25%
Finishes: 2 Firsts, 1 Second (12 points)
Kills: 9
Overall Score: 21 points
This was a profoundly strange set of results from Brennus. He barely outscored the high peace weight leaders despite having a favorable diplomatic environment and it really feels like he should have done better across these alternate histories. I think that his starting position wound up being a bit weaker than it looked initially just as Cathy's starting position wound up being stronger than anticipated. The failure of Brennus to settle the open terrain across that little inlet of water to his northeast was a major reason why he struggled. The Celts were rarely able to break out of the southeast corner of the map and that left them prey for other larger and more ruthless adversaries. Brennus did have the bad fortune to be located next to the two strongest leaders on the map in Catherine and Stalin, and the two Russians were not shy about invading Celtic territory. There were many games where each of them solo conquered Brennus or partitioned his territory between the two of them. Brennus only had one truly good match in Game #10 in which he bizarrely conquered Hammurabi first (!) and then split Stalin's territory with Alex before holding on for the win. His other victory in Game #18 was a white-knuckle affair as Brennus was in the process of dying to Catherine when he managed to get his third city to Legendary culture. I have no clue why Brennus won both of his victories by Culture which is not a victory condition that he typically pursues - probably a small sample size fluke. This wasn't a particularly good result for Brennus and I think that many other low peace weight leaders would have been able to do more with the same situation.

Hammurabi of Babylon
Wars Declared: 21
Wars Declared Upon: 41
Survival Percentage: 25%
Finishes: 1 First, 3 Seconds (11 points)
Kills: 5
Overall Score: 16 points
Hammurabi was the best-scoring and most likely to survive leader amongst the three high peace weight AIs in Game Four. He was only minimally more successful than the other two, however, and Hammurabi's slight improvement in performance was largely due to the fact that he was targeted less frequently than his peers. Hammurabi's corner starting position meant that he was more sheltered from attack and this kept him from seeing too much aggression, at least from everyone other than Alex. The Greek leader attacked Hammurabi constantly but the others largely left him alone... at least until the midgame when Hammurabi often faced dogpiles from Catherine and Stalin. This was the reason why he was never First to Die despite surviving to the finish in only 5 out of 20 games. Most of the time Hammurabi was his usual inert self, sitting back and building without making any proactive moves to improve his position. The one truly successful result for Hammurabi was Game #13 when he succeeded in an early conquest of Alexander together with Stalin, then was left untouched for the next 100 turns to build a gigantic tech lead. Hammurabi also likely would have won Game #14 via space if Stalin hadn't pulled out an unexpected Diplomatic victory. However, these were outlier results and Hammurabi was a weak, bullied leader in the vast majority of these games. Three of Hammurabi's five kills came in his single victory and the other 19 games were mostly a whole lot of nothing for the Babylonians.

Elizabeth of England
Wars Declared: 14
Wars Declared Upon: 81
Survival Percentage: 25%
Finishes: 2 Firsts, 0 Seconds (10 points)
Kills: 3
Overall Score: 13 points
Elizabeth was by far the most unlucky leader on this map when it came to their overall situation. She was the best techer in this field by a wide margin and often found herself in a strong position coming out of the initial landgrab phase. The fatal flaw for Elizabeth was her extreme unpopularity when it came to diplomacy, starting with her constant warring against putative ally Charlemagne and then only getting worse when it came to the low peace weight leaders. All of them dogpiled Elizabeth again and again and again with neverending invasions. She was attacked 81 times (!!!) while only starting 14 wars herself; outside of some AI Survivor matches involving Gandhi, it was hard to be in a worse situation than this. As a result, Elizabeth only survived to reach the finish in four games, and yet to her credit she won two of them, both by Culture. She nearly won a third time in Game #16 when Cathy landed an unexpected Diplomatic victory with the third English city sitting on 49k culture; poor Elizabeth didn't even get a second place finish for that excellent performance! When she did win, Elizabeth raced out to a huge tech lead and then gamely held on while running the culture slider as the other backwards leaders attacked her relentlessly. It was hard not to feel sympathy for Elizabeth in matches like Game #4 and Game #20 where she lasted until roughly Turn 300 before finally succumbing to the pressure of unending assaults. She was attacked seven times in both of those matches and then six times apiece in Game #14, Game #16, and Game #17. With any kind of more sheltered starting position, Elizabeth would have been one of the favorites to win on this map.

Charlemagne of Holy Rome
Wars Declared: 28
Wars Declared Upon: 50
Survival Percentage: 15%
Finishes: 1 First, 1 Second (7 points)
Kills: 4
Overall Score: 11 points
The Season Four champion had a rough time of things on this map. He had the fewest top two finishes, the worst survival percentage, and only a single victory to his name. Charlemagne's biggest problem was that he emphasized the wrong direction for his expansion and his aggression. He should have been looking to push to the east and contend with Catherine while playing nice with Elizabeth. Instead, his expansion was entirely directed to the west and he fought constantly with Elizabeth, therefore allowing Catherine to grow unchecked. Charlemagne wound up being at war with both Elizabeth and Catherine which inevitably led to his own demise. Unlike Elizabeth's excellent Financial trait, Charlemagne's poor economic traits (Imperialistic/Protective) and atrocious starting techs did him no favors from a developmental perspective. Typically Charlemagne's path to success in AI Survivor has come through founding his own religion and then making friends via religious diplomacy. That simply didn't happen in this game, as at least one other religion was usually founded by the high peace weight leaders (either Elizabeth or Hammurabi) and then Charlemagne would spend the whole game clashing with the leaders that he desperately needed as his allies. Holy Rome would inevitably get dogpiled and snowballed under by rival competitors, most often Catherine but also occasionally Stalin or Alex or Brennus. His one good outcome in Game #17 was the result of snowballing through Elizabeth's territory and then having the fortunate luck to see the low peace weight leaders deadlock in endless warring against one another. I was a bit surprised to see just how poorly Charlemagne performed on this map; he was totally ineffective and largely served as a speedbump on the path to conquest for his rivals.

One other aspect of this map that I'd like to highlight was the slow tech pace. Particularly in comparison to the speedy Cultural victories that we saw in some of the other alternate histories this season, Game Four had a ton of warring and some delayed finishing dates. The actual Game Four lasted until Turn 360 and, well, that was not uncommon in the repeat performances. None of the games finished before Turn 310 and several of them lasted beyond Turn 370. There were also a ton of wars overall and the 12 wars that we expericed on Livestream were at the low end of the spectrum. It was a bloody sequence of matches thanks to having a bunch of warmongering AI leaders and the net result was a high amount of eliminations. Compare the survival percentages from this game to the "no one dies" alternate histories in Game One for a striking difference. There were 83 total kills in the 20 alternate histories in this game as compared to a mere 39 kills in the alternate histories for Game One! (OK there was one additional leader in this game, 7 against 6, but you get the point.) These were noticeably slower and more violent matches than what I experienced on some of the other maps. They certainly weren't boring to watch.
Thanks as always for reading, I hope you enjoyed this look back at Game Four!


