
 |
Skulla Part Three: The Tormented Undead |
|
Skulla was shifting now from the linear Campaign mode into the more open-ended Adventure mode. I'm not a huge fan of how this is implemented in Reaper of Souls, with the way that the whole game simply turns into an endless item grind with no real finishing point. It's one of those things that sounds good on paper (and maybe it's great for those people who did endless Mephisto runs back in D2) but the setup has left me feeling unsatisfied since there's nothing really at stake beyond getting your DPS number up to higher and higher levels, no final boss to be defeated or challenge to be overcome. I've had to create my own goals while playing these characters, defining victory as building a character capable of clearing the bounties on the highest Torment difficulty level and able to finish Greater Rift 70. I'll be curious to see what changes Diablo 4 will make in this regard and how it handles its endgame content.

I finally had enough money to start customizing Skulla's appearance at the Enchantress into something that looked decent. Many of the cosmetic rewards in D3 make your character look hideously ugly, lots of bat wings and wooden pennants and the like, so I never wind up using most of them. I've also found that using a consistent color scheme comes out looking far better than trying to mix together half a dozen different dyes. For Skulla, I went with the red infernal dye for most of his outfit, combined together with the black abyssal dye for his boots and leggings. Almost all of the Necromancer gear gave him bizarre/outlandish helmets and ridiculously huge linebacker shoulder pads that looked terrible; instead, I transmogrified Skulla's head gear into the simple Leoric's Crown appearance that left his head visible. This was a small tribute to Sirian's Skeletorr character from Diablo 2, the skeleton-summoning king that inspired my original Skulla variant. Properly outfitted with these sartorial choices, I could get started with Torment I difficulty.
The first choice was where to assign his Paragon levels. I had 640 of these levels saved up from past characters and nothing in the gameplay stops you from using them all immediately. In fact, I could have granted Skulla all 640 Paragon points from the moment he started his quest at Level 1. However, my rule has been to disallow any use of Paragon levels until starting Adventure mode with a character, and then to allow only 50 Paragon levels per Torment difficulty level. There's no real need to do this, just the same sense of fairness that keeps me from using any of the hirelings to make the game a bit more challenging. For my initial 50 Paragon levels here in Torment I difficulty, I opted for the +25% life bonus (0.5% extra life per Paragon level) since that would provide the greatest boost to keeping Skulla alive. The Paragon system becomes a lot more interesting when you have to pick and choose which benefits to take, as opposed to getting everything instantly from the start of a new character.
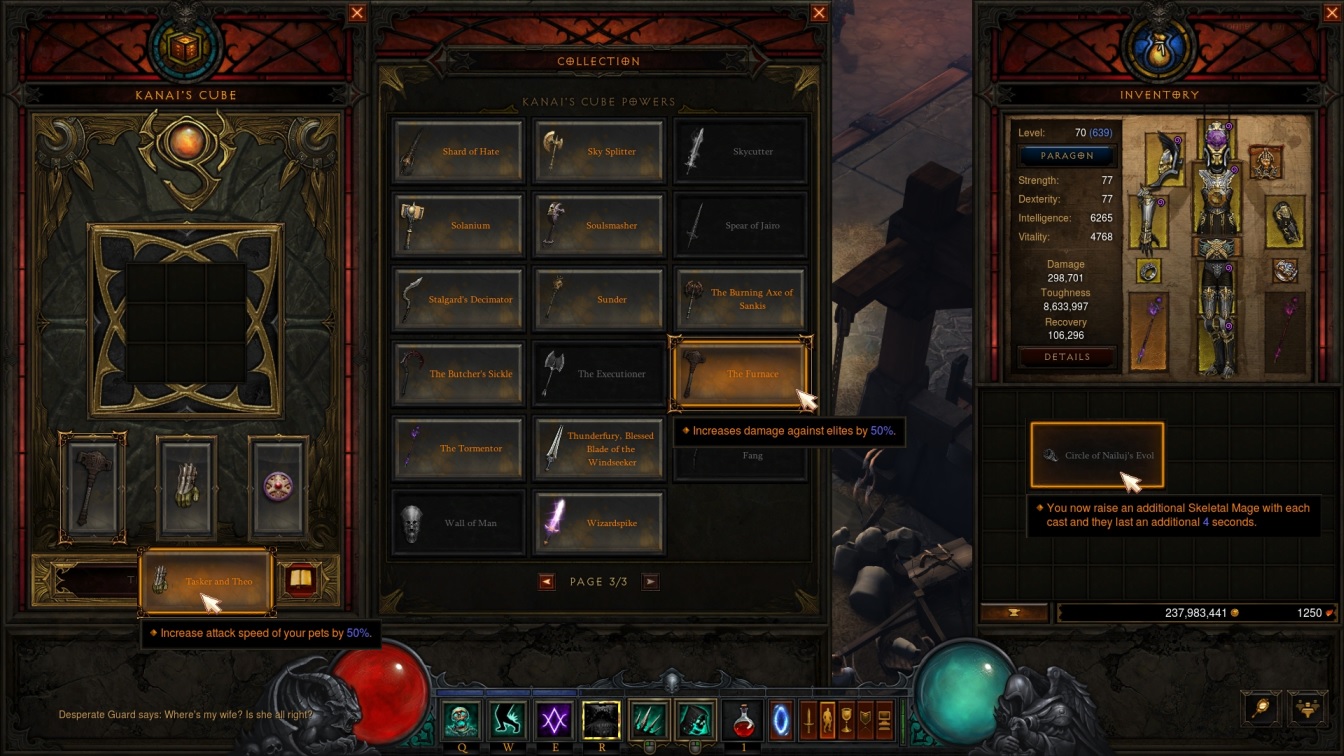
Next up was the question of what unique item properties to equip via Kanai's Cube. The armor slot had the only immediate no-brainer choice: Tasker and Theo provided 50% additional attack speed for my minions. That was an item which had been turned up much earlier by Snowbelle and it was a major help for Skulla to have it available instantly. (I suppose that I could have disallowed Tasker and Theo until Skulla found it himself but that seemed overly punishing. It takes so long to find the unique item properties for Kanai's Cube and extract them all that I view them as a collective pool for every character to share.) The other two slots had various item properties that I wanted but didn't have available yet. The weapon slot was intended for Reilena's Shadowhook, one of the very first legendary items that Skulla had found back in Act One, however that would have to wait until he cleared a full set of bounties and could extract it into the cube. In the meantime, Skulla would be using The Furnace: +50% damage against elites. Not bad but he could and would do much better there shortly.
The jewelry slot was another place where Skulla lacked what he really wanted. I ended up taking Countess Julia's Cameo (take no damage and instead heal from Arcane element) largely because it's very useful against Arcane Enchanted elites with their rotating purple laser beams. Skulla's longterm desired item was the Circle of Nailuj's Evol which would increase the duration of skeletal mages by 4 seconds and raise a second mage with each casting of the skill. Both aspects of that unique property would be amazing: the current duration of the skeletal mages was 6 seconds so the length would nearly double, and by raising two at a time it would be vastly easier to get up to the cap of 10. Rings can be tough to find and I had to hope that the Circle of Nailuj's Evol would show up sooner or later.

Master difficulty had been pretty easy for Skulla but I wasn't entirely sure what I would be getting from hopping up to the initial Torment difficulty. I needn't have worried here: Torment I proved to be a breeze as well. Skulla's minions were easily strong enough to hold the front lines and their damage output was more than good enough to ensure a fast clear pace. Monster health went up by a little over 50% in making the jump from Master to Torment I and that apparently wasn't a big enough gap to have much effect, especially not when Skulla was in the process of upgrading his own build with stronger legendary items and Paragon levels and Kanai's cube unique item properties. Just equipping Tasker and Theo's +50% minion attack speed was probably enough to handle the increased difficulty level on its own merits.
The immediate goal was to fulfill a complete set of bounties so that Reilena's Shadowhook could be extracted into Kanai's Cube. The crafting materials associated with the bounties always seem to be in short supply no matter what; I had 1000 Death's Breaths and 350 Forgotten Souls left over from Snowbelle's journey but I still only had one or two apiece of the act-specific crafting materials that drop from completing the bounties. While Skulla was carrying out missions in Act Three, he came across a Menagerist Goblin that dropped a new pet:

Much to my delight, the new pet was a ghost named Haunting Hannah!  Short of finding a skeleton for a pet, this was about the best that I could hope for from a thematic perspective. The pets don't have any combat functionality but will run around picking up gold that drops, and that can be pretty helpful at times when there's a lot taking place on screen. I had wanted a pet for Snowbelle and incredibly she never found one, seeing only a single Menagerist Goblin in her whole character run which unfortunately managed to escape. It was a stroke of good fortune to find a new pet while clearing Skulla's very first set of bounties and one that fit the undead theme to boot. Welcome to the team, Hannah!
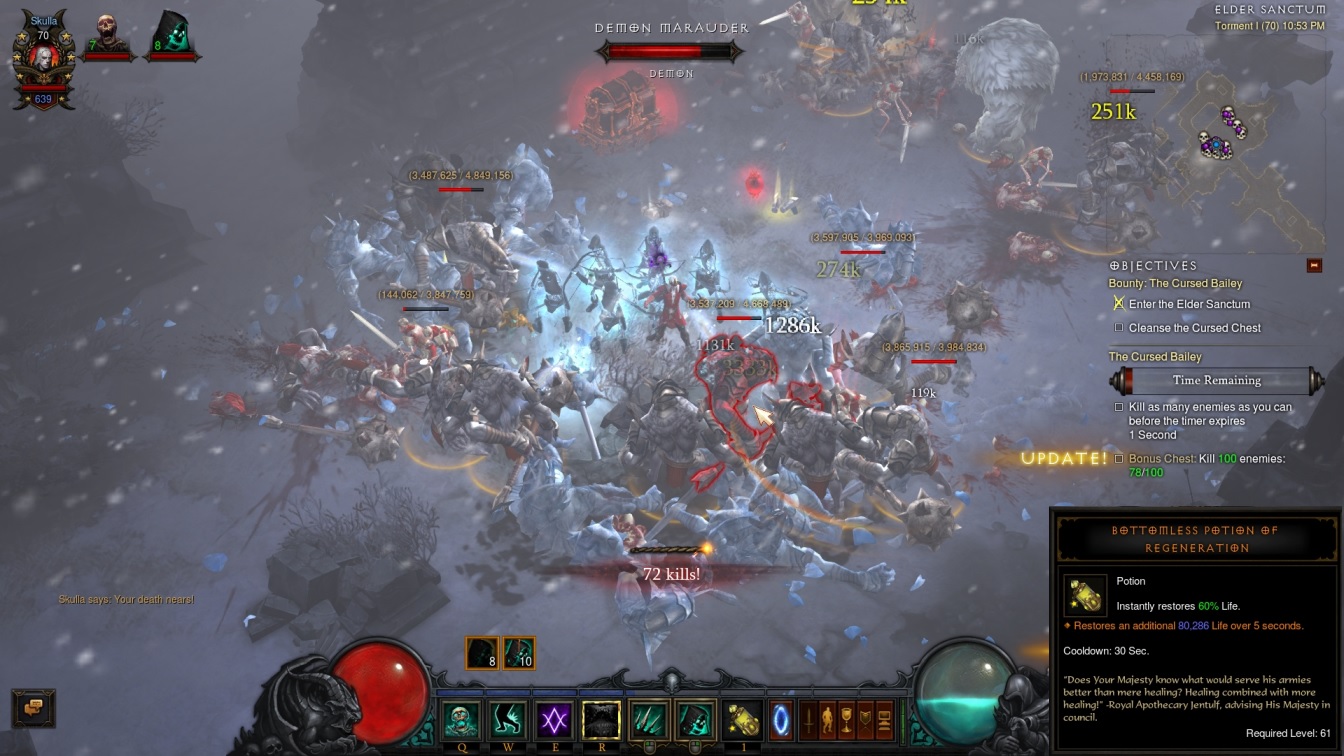
The remainder of the Torment I bounties proceeded accordingly without Skulla ever facing too much in the way of danger. He found himself in some epic-looking battles at times when massive numbers of enemies would crash against the stout wall of his skeletal minions. Fortunately these situations were cool-looking without being deadly, with Skulla having too much health and armor to face any serious threat. I could occasionally get the number of skeletal archers up close to ten when there were lots of corpses falling on the ground for Devour to consume, never managing to stay there for long though. The most noteworthy item to be found during this sequence was probably the Bottomless Potion of Regeneration, which carried an impressive-sounding but mostly useless additional 80k HP regeneration. While that might sound great, Skulla already had close to one million HP and getting an additional 80k health restored (over 5 seconds, not even getting the benefit up front!) wasn't too helpful. It was still better than the standard potion though so I went ahead and equipped it.

Finishing the last set of bounties in Act Five opened up the real goal of this initial pass through Torment I difficulty: extracting Reilena's Shadowhook into Kanai's Cube. This was a truly fantastic unique item property and better than anything else that I was likely to find in the weapon slot. The maximum Essence portion of the benefit added substantially to Skulla's damage output, as he had 240 Essence at the moment for +120% additional damage. That alone would have been amazing, however Reilena's Shadowhook also added 5 additional points of Essence generation per use of Bone Spikes. Since the base Essence generation from the skill was 11 points, another 5 points (for 16 total per casting) amounted to an increase of roughly 50%. The improved Essence generation was immediately noticeable, as Skulla had to spend significantly less time auto attacking with his Bone Spikes to fill up his Essence orb once it became depleted. Given Skulla's skill setup I suspected that I would be using Reilena's Shadowbook in the weapon slot of Kanai's Cube for the rest of his days, in the same fashion that Tasker and Theo was a permanent fixture in the armor slot. It was hard to imagine another option being better than this.
The addition of Reilena's Shadowhook was enough for Skulla to make the jump upwards to a higher difficulty. As I had done with past characters, I skipped Torment II and went right on to Torment III. Hopping up these two difficulty levels increased monster health by about 2.5 times while doubling monster damage, both of which I felt were well within Skulla's capabilities. This also meant that I could make use of 100 additional Paragon levels via self-imposed variant rule, and I chose to increase maximum Essence by the maximum of 50 points. This synergized with Reilena's Shadowhook (now adding 145% extra damage for 290 total Essence) and also made it easier to spam additional skeletal archers onto the battlefield. The other 50 Paragon levels went into the attack speed stat, gaining the full +10% benefit there. Remember that attack speed and casting speed are the same thing in Diablo 3, and faster casting would similarly get more minions into combat at a better rate.

Within the first five minutes of setting foot in Torment III difficulty, Skulla found his first legendary phylactery item - and it ended up rolling as ancient! As a quick refresher, legendary items have 10% odds to appear as "ancient" versions of the same gear, with correspondingly better stats to be found on them. The unique property of the Lost Time item wasn't useful for Skulla since he didn't have any sources of cold damage, however the base stats on the item were fantastic and demanded to be put to use. It was time to bid farewell to Skulla's two-handed staff and replace it with a one-handed weapon along with this amazing new phylactery. There was just one small problem: Skulla didn't have a one-handed weapon to pair it with yet! I was able to resolve this minor dilemma by forging a random legendary sword (Griswold's Perfection) and then use the Enchantress to roll a socket for the crucial Emerald to be placed inside. Even though Skulla was still some distance away from the top tier Flawless Royal Emerald, he still maximized his damage by socketing in the green gem. Total damge only increased from 361k to 384k on the character sheet but that was deceptive because Skulla was using a pretty crummy weapon. As soon as he could find something to replace the current sword he'd be in real business.

Now that Skulla was in Torment III, it was time to run more bounties again. That's the main thing to do in Adventure mode and Skulla would be carrying out an awful lot of those missions over the course of his journey. I always start in Act One and then go through the rest of the acts in order, for no particular reason other than having a bit of a linear mindset sometimes. It was fun to see Skulla get up to the full ten skeletal archers on occasion, such as during this brawl agaist Khazra goatmen in Act One. I tended to raise the skeletal archers right where Skulla was standing, and when a bunch of them were raised in the middle of a big fight, the net effect would be a sniper's nest of archers all surrounding Skulla's position. That could be quite handy because the archers would tank incoming projectiles and block them from hitting Skulla himself. If there was one issue with the minions, it was an inability to direct their arrows at a single target. The melee skeletons could be directed with the active portion of the Command Skeletons skill but the ranged skeletons had no such funtionality.
Skulla hit on a nice run of item luck while he was in the Act Two portion of this set of bounties. First he turned up Frostburn in the gloves slot, one of my all-time favorite items from Diablo 2 and worth equipping on Skulla for the moment purely for the stats even if the unique item property was useless for him. Frostburn had appeared via blood shard gambling in town, and the Promise of Glory legendary bracers (5% chance to spawn a Nephalem Glory globe when blinding an enemy) showed up immediately thereafter. This was another item worth wearing for the stats alone until Skulla could find a legendary item with a more useful unique property. He was already wearing Pride's Fall helmet (your resource costs are reduced by 30% after not taking damage for 5 seconds) only to replace it with an ancient version of the same item after it appeared in Act Three of this bounty hunt. Two other items deserved special mention:

One important item was the appearance of the first equipment in the Bones of Rathma set, the shoulders item named Rathma's Spikes. There were minimal stat gains here and Rathma's Spikes wouldn't have much of an effect just yet. It was the core set of equipment for Skulla's character build, however, with a massive 4000% minion damage bonus sitting there as the reward for putting the entire group of six items together. Too bad that the 2 item set bonus would be useless for Skulla since I was refusing to make use of Army of the Dead by variant rule. The visual appearance of Rathma's Spikes looked ridiculous (giant bones on the shoulders?) and I made sure to transmogrify the item back into something more sensible-looking.
In the short run it was the other item find which was more significant. Skulla came across a legendary mace named the Nutcracker, and although it had no unique property at all attached, it ended up rolling as an ancient item with higher stats. The weapon slot is the single most important item slot in the game and having an ancient item here was of paramount importance. Skulla rerolled the item at the Enchantress until he was able to get a socket present and then added his best Emerald after snapping the item comparison in the screenshot above. Total damage on the character sheet went up from 387k to 594k - yes, having a better weapon really was that important! Finding this new ancient legendary weapon had increased Skulla's damage output by roughly 50% at once stroke.

With all of these new item upgrades in place, Skulla blew right through the second half of Torment III's bounties. Just as he had replaced all of his items with better stuff after hitting Level 61, and then again with better rare items after reaching the experience cap at Level 70, Skulla had nearly completed the replacement of all his rare items with legendary and set items, therefore reaping the rewards for the correspondingly higher stats on the new gear. Finding ancient legendary items in both the weapon and off hand slots at such an early date had only expedited this process and sped it up that much faster. A good sign of Skulla's rising power curve was his ability to clear out a cursed chest before the timer ran out, even if just barely. I tend to push the envelope with my characters and put them in difficulties where they probably don't belong, often finding them only able to clear out 20-25 monsters before the timer runs out. Skulla was able to get the full 100 monster kills as the timer expired here, and that was a sign that he was ready for bigger and better things.

On it was then to Torment V difficulty where Skulla could take another accumulated 100 Paragon levels and assign them for the first time. I wanted to include a screenshot of what this looked like for anyone who might not have played the Reaper of Souls expansion for themselves. I went ahead and placed all 100 of those levels in the Offensive tree, maxing out critical hit chance and critical hit damage. Both of these are extremely useful upgrades to have in place and it's important to stack up as much as possible of both on the rest of your character's equipment. I was amused to note that I had grabbed 150 Paragon points from the Offensive tree while taking zero points from the Utility tree thus far. Some of the Paragon levels are far more useful than others and I had the rare situation here where I could actually take what I wanted. My single biggest complaint about this otherwise well designed system is the way that it forces the player to put 1/4th of all Paragon levels into each of the four trees. Seriously, why not let the player put the Paragon levels anywhere they want? For example, Skulla had no skills with a cooldown attached, making the cooldown reduction completely pointless. Yet he would still be forced to invest future Paragon levels into this ability rather than assign them elsewhere. This is already endgame content that's well beyond what newcomers will be seeing - why the need for this handholding? I don't get it.

Before doing another set of bounties, I decided to send Skulla into a Nephalem Rift for the first time. He cleared an initial standard rift to pick up a rift key, then embarked upon a Greater Rift at Rift 16 difficulty to get a sense of how he would fare. I was pretty confident that Skulla could handle this rift since it equated to Torment III difficulty, which he had been stomping all over during his last set of bounties, and sure enough, Skulla found himself running far out in front of the time limit. Note that the critical hits from the skeletal archers could deal as much as 30 million damage, enough to one-shot the monsters on this particular rift level. The choice of Rift 16 was no accident, as this allowed Skulla to get a guaranteed five upgrades to a legendary gem starting out at Rank 0. There was one legendary gem in particular that would be crucial for his character build:

That gem of course was Enforcer, the one that adds extra damage to minions. The base damage is +15% along with an additional 0.3% extra damage for each additional rank on the gem. I was confident that Skulla would be able to reach Rank 50 for a total of +30% damage on minions and had a good chance of getting another dozen or two ranks beyond that if all went according to plan. The secondary bonus unlocking at Rank 25 would reduce all damage taken by minions by 90%, and while that sounded great, it wasn't clear to me that it was even necessary. In stark contrast to the Diablo 2 version of the Necromancer, where the skeletal warriors and mages would die constantly, the minions of the Necromancer here in Diablo 3 seemed to be immortal. None of them ever died and it wasn't clear to me that Enforcer's secondary property would be needed. Obviously I would still use the legendary gem for the damage bonus but I wasn't exactly rushing to level up the thing to Rank 25.
After finishing that initial Greater Nephalem Rift, it was back to bounty hunting, always more bounty hunting. I occasionally did run a standard Nephalem Rift to break up the tedium and that was where the next item drop of interest appeared:

The boots from the Bones of Rathma set showed up to provide Skulla with the second item in the collection. The base stats on this item were quite nice and together with the previously found Rathma's gear in the shoulders slot, the boots unlocked the (useless for Skulla) two item set bonus. I wasn't complaining though; after all, I needed to find two of the items in the set before I could find all six of the items. One thing that might help in this regard was the Ring of Royal Grandeur after it popped up from a group of monsters in Act One. It has the unique property of reducing the number of items needed to active a set bonus by one, meaning that if Skulla could find one more Rathma item he would put the four item set bonus into play. I've often equipped the Ring of Royal Grandeur via Kanai's Cube while rarely having the actual item itself equipped on a character. This allowed Skulla to continue running Countess Julia's Cameo for the moment as he continued to search for the Circle of Nailuj's Evol.
One other note here: Skulla now had a legendary or set item equipped in every slot except his pants. After that early run of gambling success, I'd been gambling nothing but pants recently and failing to turn up anything of value. Poor Skulla - the man couldn't find a comfy set of pants to wear!

I did complete a full set of bounties for Torment V difficulty while this item grind was taking place. The clear pace was still healthy while being slower than the lawnmower mode that Skulla had been enjoying back in the first few Torment difficulties. Skulla had rolled Diablo as a bounty twice already in Act Four, a bit of a rarity since Big D doesn't seem to appear that often as a bounty target, and I enjoyed beating the stuffing out of him yet again. Diablo had been in for some rough treatment in these fights, repeatedly getting pasted by the skeleton army. (A far cry from Diablo 2 where act end bosses had a 10x damage bonus against minions and the initial Flame Nova would usually wipe out the whole skeleton crew.) Then there were moments like the one pictured above, with Skulla coming across a Gelatinous Sire goblin that kept splitting again and again. The odds of getting a non-standard treasure goblin seem to have been increased in the Reaper of Souls patches since I played Snowbelle, either that or Skulla was seeing a ton of the goblins that drop blood shards and gold and crafting materials. He'd already come across two menagerist goblins after not finding a single one with Snowbelle so I think there had been some tweaking under the hood since the last time that I'd played the game.
Malthael is another uncommon bounty target and Skulla was slated to face him as part of this Torment V set of mission goals. I hadn't seen Malthael yet and thought this would be a good challenge for Skulla. I went ahead and swapped Devour out in favor of the Leech curse just to be on the safe side, and went into the battle with the full skeleton crew in tow.

I don't really like facing Malthael because he has a ton of health and his damage output is enormously high compared to pretty much anything else in the game. If Skulla were a Hardcore character the smart thing to do would be to avoid ever facing him. Anyway, Malthael was somewhat tricky to tag with Skulla's curses because he kept moving around the small arena where this battle takes place. The minions took out about 25% of Malthael's healthbar without any trouble only for disaster to strike immediately afterafter: Malthael somehow pinned Skulla up against the wall as pictured above. I'm not exactly sure what happened here but Skulla was left completely unable to move!  The fallen angel was raining down blow after blow on poor Skulla and he couldn't do anything about it. If you look closely at the above image, Skulla's Final Servitude passive was triggered which meant that his HP had dropped to zero, saving him from death and then going on a 60 second cooldown. This would have been the end of Skulla if it weren't for the constant healing incoming from the active portion of Command Skeletons and the Cursed Ground version of the Leech rune. I still thought that Skulla was going to die here but fortunately Malthael relocates back into the center of the arena when he hits 50% HP and that gave me a chance to break free with Skulla. Whew, finally out of that corner.
However, Malthael's damage goes up even further in the second half of the battle as he continues to use more and more flashy attacks. This was when I made a deeply disturbing discovery: Skulla's minions weren't actually invincible after all. Malthael's blazing attacks were apparently strong enough to begin killing the skeletal warriors, wiping them from the screen after which they would start popping back into existence again, one at a time, every few seconds. Now remember that Skulla's powerful healing abilities were based on the assumption that his minions would be hitting and killing enemies constantly. Command Skeletons healed Skulla for each melee strike by the skeletons while the Leech rune healed Skulla each time the cursed target was struck. Two versions of the same thing, in other words. But if the melee skeletons were dead, they weren't hitting Malthael and therefore Skulla wasn't getting healed. Uh oh. I was frantically running in circles around the tiny space dodging Malthael's attacks, drinking from the healing wells and then drinking Skulla's Potion in the desperate hope of staying alive. Skulla's Final Service passive triggered for a second time just barely after the initial 60 second cooldown finished, thus wiping out his minions again to keep Skulla alive. Oh my goodness, this was way too stressful!

In the end, Skulla just barely managed to squeeze this one out without actually kicking the bucket. I didn't get any more pictures - sorry, too busy trying not to die! Obviously Skulla wasn't a Hardcore character but I still wanted to keep him deathless if at all possible. This battle was far too dangerous and it revealed how dependent Skulla was on his minions for healing. Whatever Malthael was doing, he had been the first opponent to start destroying the skeletons and that was a gigantic problem indeed. I realized immediately that I needed to prioritize increasing the Enforcer legendary gem up to Rank 25 to unlock that 90% damage reduction for Skulla's minions. I guess that secondary property wasn't pointless after all!

With that in mind, I spent the immediate future running different Nephalem Rifts with Skulla, first to scrounge up more rift keys and then several trips through Greater Nephalem Rifts to improve the rank of the aforementioned Enforcer gem. First up was Rift 20 difficulty to add another five ranks to the gem. This was the equivalent of roughly Torment IV difficulty and Skulla tore through it without any trouble. Take a look at that purple meter on the right side of the screen to see how far out in front of the finishing time Skulla was progressing. The skeleton army was not impressed by this collection of Bogan opponents. Skulla finished with 8:08 remaining on the clock and found a glowing green pair of gloves in the pile of loot that fell from the rift guardian's corpse. Could this be the next item in the Bones of Rathma set?

Well yes, or else I wouldn't have written about it.  (Skulla had turned up pieces of several of the other Necromancer items sets that I was holding onto in stash for no particular reason.) The really good news was the fact that Rathma's Macabre Vambraces had ended up rolling as an ancient legendary item! The actual stats weren't great (844 Intelligence was close to the lowest possible value) but I wasn't about to complain over this great stroke of fortune. The item originally had 8% cooldown reduction which I rerolled at the Enchantress into a much better +46% critical hit damage. Sadly the fourth affix was life on hit instead of Vitality, oh well. I could only reroll one affix, not two of them. At least the +9.5% critical hit chance was excellent, with +10% being the maximum possible value in that category.
Along with the Rathma items in the shoulder and feet slots, this made three total items in the set for Skulla. However, thanks to the Ring of Royal Grandeur that he was wearing on his left hand, this still unlocked the four item set bonus: 1% damage reduction each time that a minion hit an enemy, stacking up to 50% damage reduction in total. It was trivially easy to stack up this damage reduction and Skulla would typically hit the max value of 50% within about two seconds of combat being joined. All of the major class sets have some kind of damage reduction as part of the four item set bonus and this happened to be Rathma's version of that property. Given the incredible incoming damage on the upper Torment levels, I was sure that Skulla would need this moving forward.

With this extra damage reduction in place, I figured that Skulla would be ready to move up to the next Torment difficulty. I closed out this portion of his journey by doing one more trip through the Nephalem rifts, first a standard rift and then a greater rift at Rift 25 difficulty. The "Dread Presence" icon on the toolbar indicated that Skulla's damage reduction was in play, although that's one of those things that can be harder to notice working in action. Skulla hadn't really been in danger before (outside of the Malthael fight) and he remained out of danger now. Rift 25 was roughly equivalent to Torment VI difficulty and Skulla's clear pace was noticeably slower there. He still managed to get the job done without too much trouble, but finishing with 5:42 remaining on the clock was definitely slower than his previous jaunt through Rift 20. In the end it meant another five ranks for the Enforcer gem as Skulla continued the slow process of leveling it up.
As a last note, Skulla finally managed to find himself a pair of ancient legendary pants! They were from the wrong Necromancer set (and I really wished that I had rolled these excellent stats on the Rathma set pants) but they were a major setp up from his previous rare equipment. Skulla would be taking his stylish new leggings onwards to the next big increase in challenge level: Torment VII difficulty. Hopefully he would have more luck there continuing to find the remainder of the Bones of Rathma set and could start the process of looking for the Jesseth Arms weaponry.


