
Watch this game on YouTube (Playlist Link)
This is a quick writeup for my A Cold, Harsh Land game that took place on Livestream in the Fall/Winter of 2025. I'm always on the lookout for new variants or unusual setups that I can base a game of Civ4 around, and for whatever reason I had the inspiration to try a game on the Boreal map script. This has to be one of the least-used maps as it creates a wintry wasteland full of tundra and ice tiles. That was a perfect fit since the real-world seasons were rolling over to the coldest months of the years in the northern hemisphere, and this would end up serving as the basis for one of my more memorable Civ4 games. While I normally play on smaller map sizes to cut down on micromanagement, I though this was a good opporunity to dial the map size up to Large while also removing two of the default AI opponents. This would create a vast wilderness of low-quality terrain, endless swathes of plains forests and tundra forests akin to running a game in the middle of Siberia. The AI tends to struggle under these map settings so I debated whether to run the game on Emperor or Immortal difficulties before settling on the easier option. I would be glad that I did.
For the leader and civ choice, I debated a number of different options before deciding on Cyrus of Persia. Imperialistic trait would hopefully get my civ out to a fast start on expansion while I knew that the Charismatic trait would be really helpful for additional happiness. The Boreal map script only produces a small number of resource types and happiness resources tend to be slim pickings outside of gems. I had also thought about running one of the Celtic or Russian leaders for thematic fit but ultimately decided that they didn't have the traits or unique units that I wanted. Leaders like Boudica or Stalin would have committed me to a violent game of conquest and that wasn't what I was looking for here, not on a map this big where it would take forever to run over everyone else.
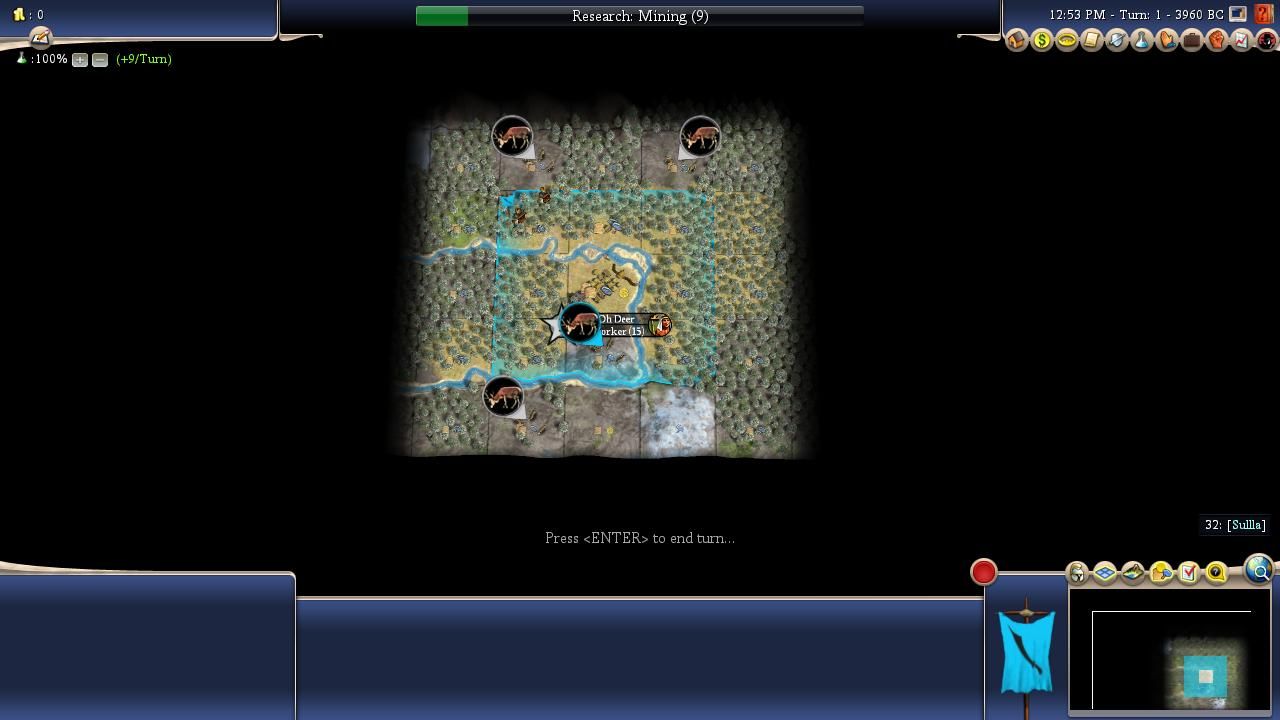
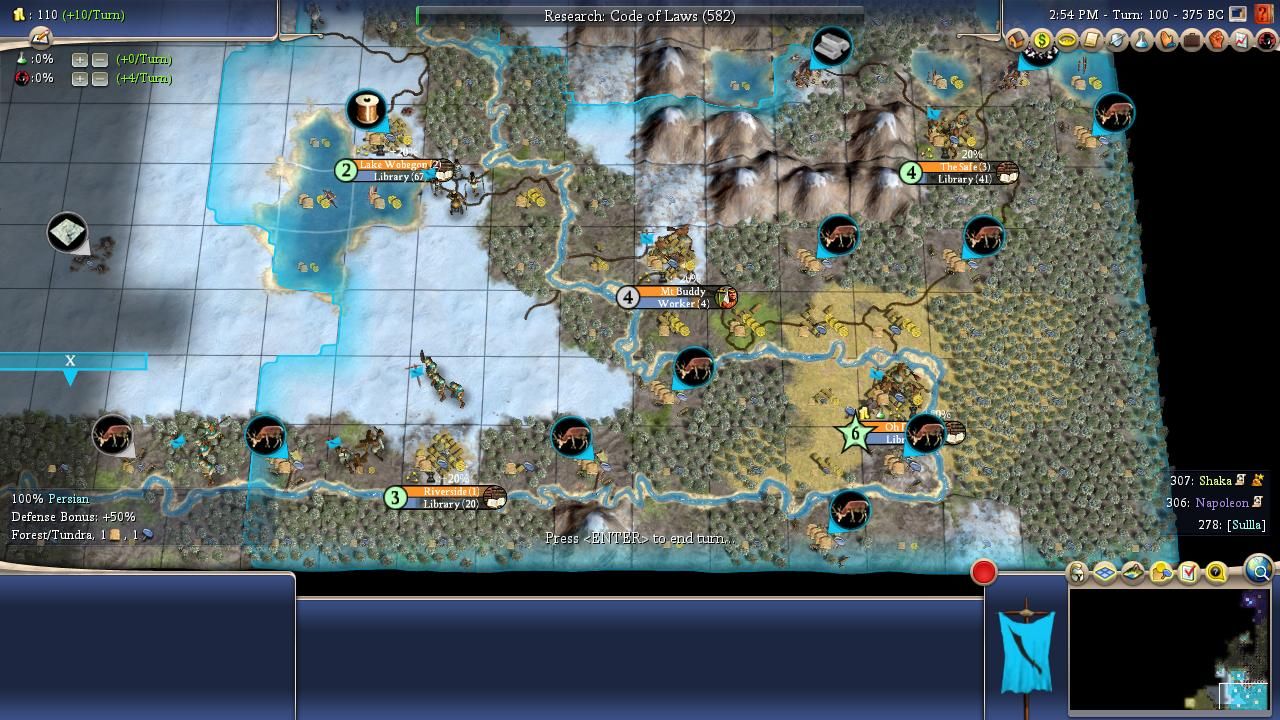
I moved my settler on the initial turn and founded the capital of Oh Deer on Turn 1. Although the initial starting screenshot didn't look that bad, by Boreal map standards at least, scouting reports over the following turns quickly revealed a bleak situation. I had spawned in the extreme southeastern corner of the map, with the map edge located a mere two tiles south and three tiles east of Oh Deer's central tile. There's no world wrap in either direction on a Boreal map by default (that option can be turned on but I hadn't done so) which meant zero possibility of ever expanding to the east or south. Expansion to the north was quickly blocked by an impassible mountain range while the northwest held a gigantic field of sheer ice, the largest contiguous patch of ice that I've ever seen in Civ4. Furthermore, the starting area contained exactly one grassland tile and about a dozen plains tiles... and that was it. Everything else - EVERYTHING else - was either tundra or ice. I have never seen anything this relentlessly bleak from the map generation before, not even the infamous Adventure Two dud start. That at least had lots of water tiles to work for food and commerce! What was I going to do here?
The only map feature with any promise whatsoever was the presence of the river that snaked past the capital. It ran off to the west in a straight line, looking like a poorly-disguised map edit from someone inexperienced with Civ4's wonky river placement system, and then off to the northwest before disappearing into the wilderness. Tundra tiles are among the worst in the game in Civ4, however they can be farmed and cottaged if they happen to be located next to a river. Away from fresh water, tundra produces exactly 1 food and no production and can't take any improvements other than forts and roads/rails, ugh. The river gave me some hope though and there was certainly no lack of deer resources to provide at least a small amount of food. (Get used to the deer resources, they are everywhere on this map script!) I trained an initial worker to start putting camps on the deer tiles while researching Mining into Bronze Working followed by Wheel tech. I had to identify the copper and horse locations quickly to deal with the inevitable barbarians which would be coming my way.
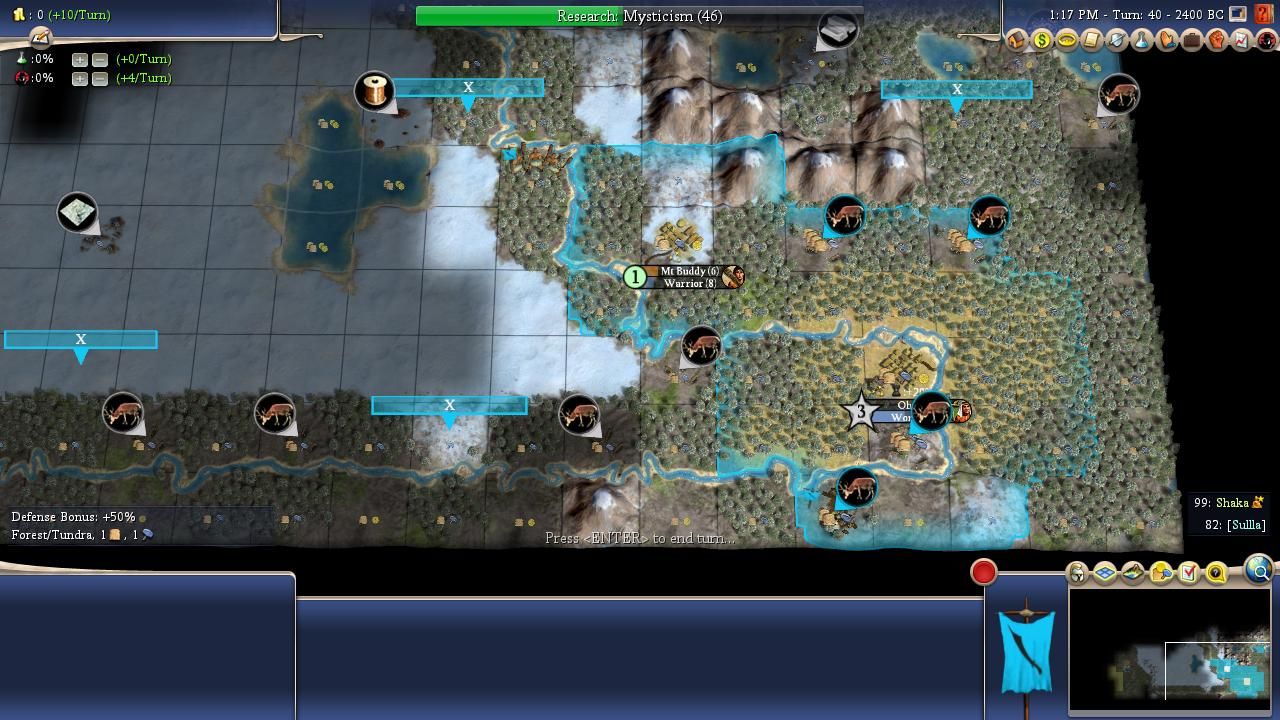
Oh yeah, and it turned out that Shaka was my closest neighbor, with his capital just on the other side of the ice field to the west. What had I gotten myself into?! 
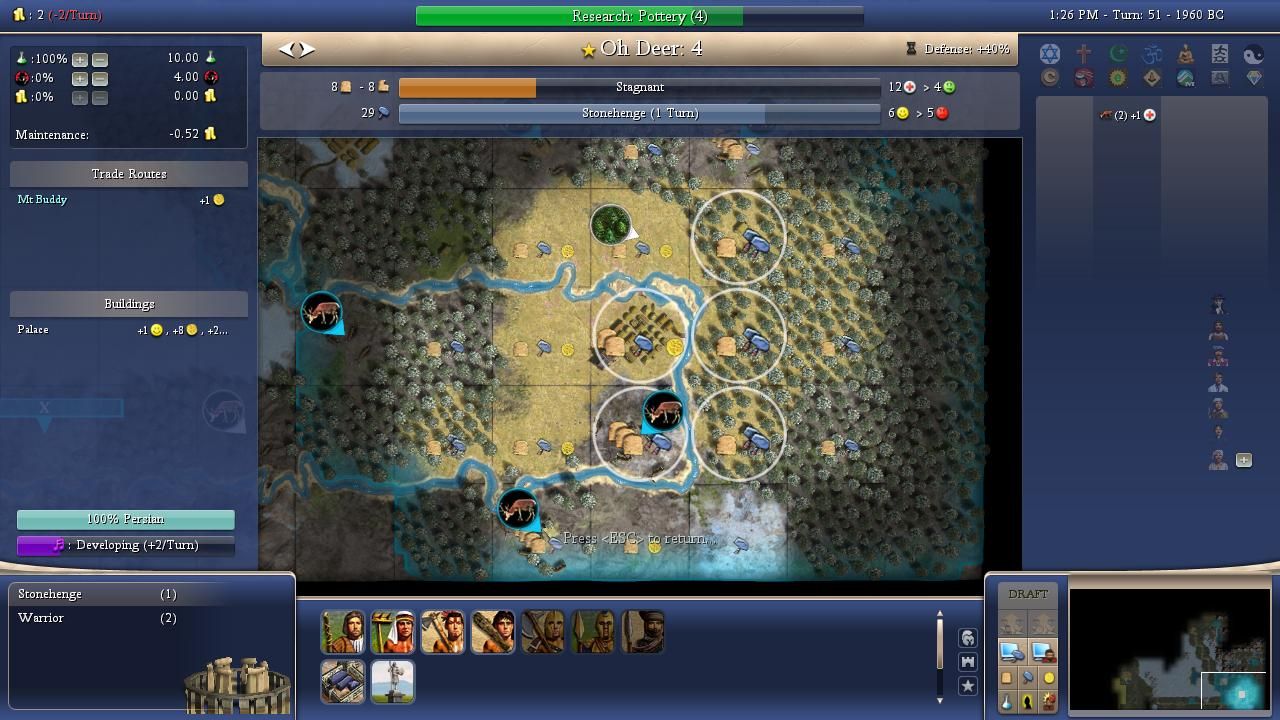
I sent my first settler to the Mt Buddy spot only three tiles away from the capital. This might look like a bit of a weak spot but it could share one of the deer resources with the capital and grow cottages later for Oh Deer while also being a safe and easy location to hold. I think this was the best spot available amongst a group of truly slim pickings. My next goal was chopping out Stonehenge at the capital since it would serve dual functions for my leader choice. Getting free border expansions was the primary benefit, a very big deal indeed on a map where food and production were at a premium, however Stonehenge would also grant an extra happy face from Charismatic trait in every city until it obsoleted. I could already see that there were exactly two happiness resources to be found anywhere near my starting position, gems and silver both located in the cul de sac north of Oh Deer, and that would be it for luxuries. A pair of workers did the usual pre-chopping thing and then cashed in five forest chops for a Turn 52 Stonehenge build. Although the pause to construct Stonehenge did slow my expansion pace a bit, I thought it was worthwhile given how valuable the wonder was on this map.
It was too bad that I wasn't in a position to go for the Great Wall (I lacked Masonry tech) since barbarians were already becoming a nuisance and nearly cost me this entire game. I could whip Imperialistic settlers for 2 population points in any city with 10 foodhammers in the box which allowed me to get the third city up and running shortly after the Stonehenge build. Unfortunately I chose to settle the northern gems and silver location next and this was a decision that backfired badly. My thinking had been to get those luxury resources online quickly so that I could increase the happiness cap, with the northern city plant also closing off a potential area where barbarians could spawn in my backlines. All of those were positive things to be sure, however I should have prioritized settling the copper resource above everything else:
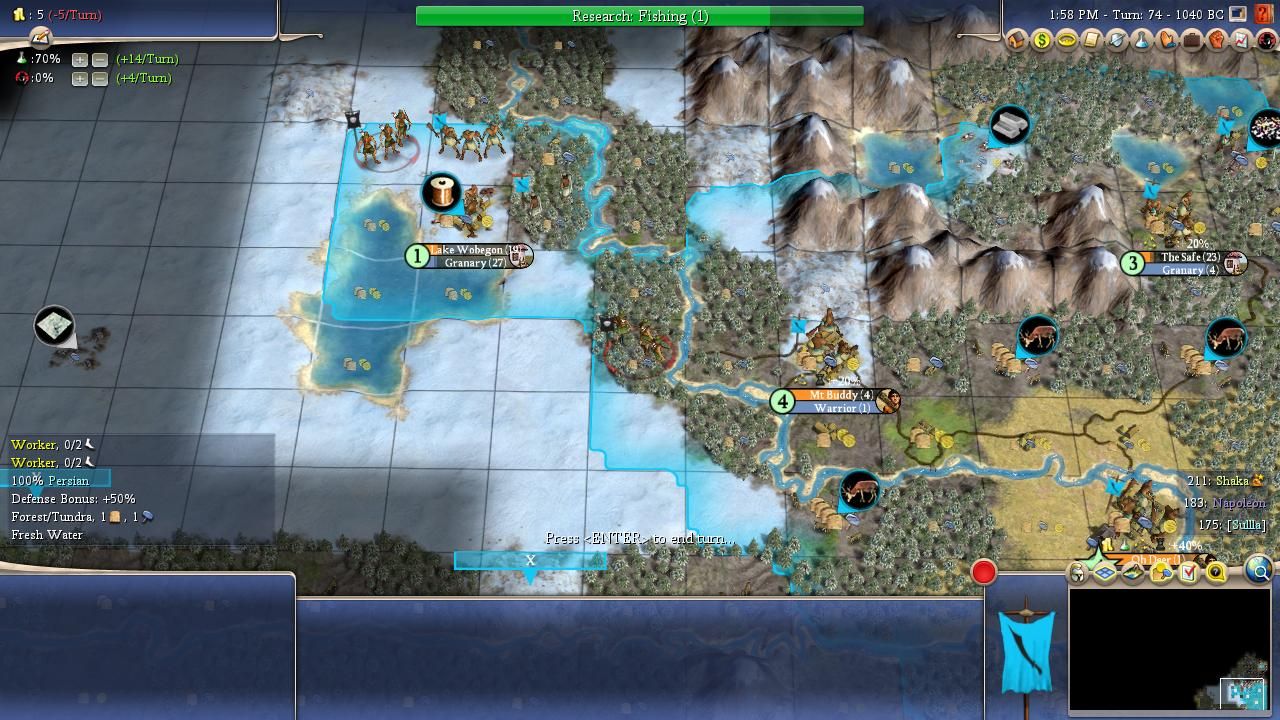
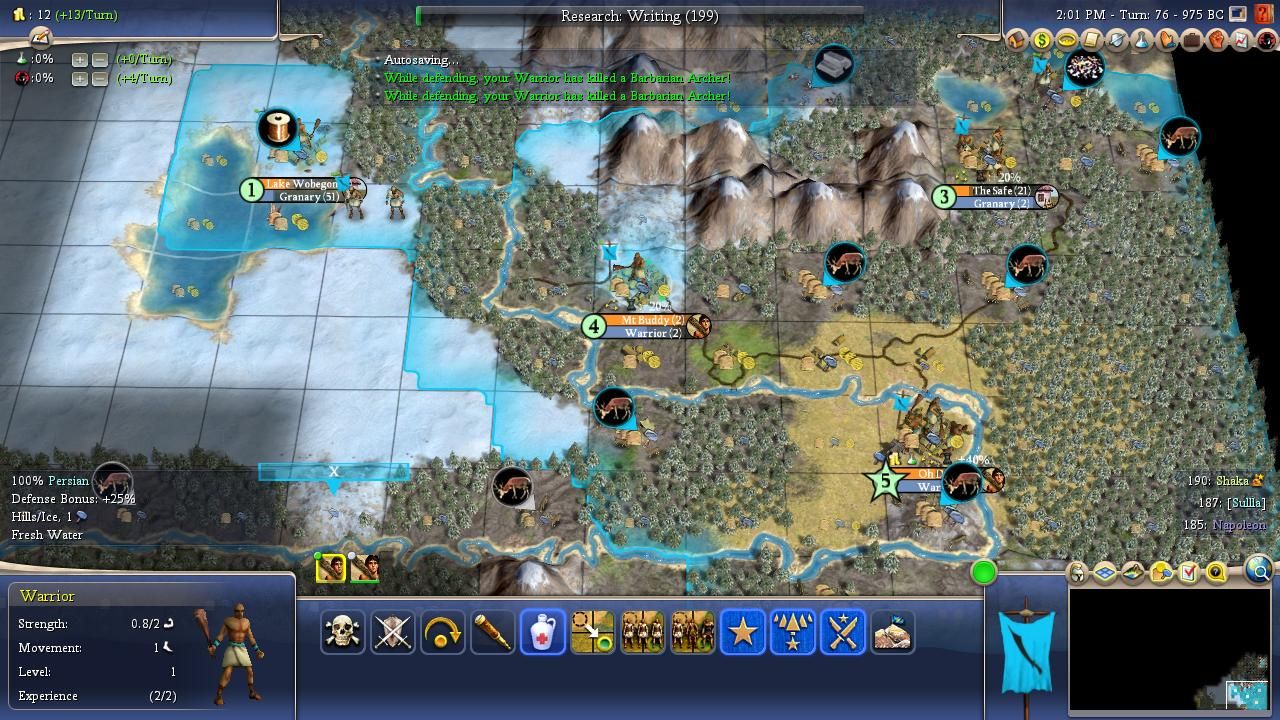
Barbarian archers began appearing and I had nothing better than warriors to face them. I lacked Archery tech and didn't have the gold to research it while also having confirmed that there were no horses within a thousand miles. It was that copper resource by the tiny western lake or bust, and my misprioritization of city sites looked like this might turn into a "bust" situation. I had a settler en route to grab the copper spot on Turn 67, with workers following behind to create a road connection, only to be forced to turn around when a barb archer appeared. I managed to kill that barb unit at the loss of a warrior and establish Lake Wobegon, only to have two more barb archers appear from the fog around Turn 74 - ack! I did not have the copper connected yet and could not whip out axes for defense, nor could I get an additional unit into Lake Wobegon itself which would be autorazed on capture. Losing that city would set me back enormously as I had no settlers in production and I would be denied copper for potentially a dozen or more turns as barbarians continued to wreck havoc. Thankfully I won a 50/50 dice roll at Lake Wobegon as the defending warrior defeated the attacking archer, a fortunate RNG result that basically saved my game. Then I was able to swarm the other barb archer with a couple of warriors, followed by getting out a few axes for safety. The biggest crisis of the early game was over.
I want to be clear here: this was a major strategic failing on my part which was bailed out by a lucky dice roll when it really counted. I tend to push the economic and growth curve side of Civ4's gameplay as hard as I can, with this being a situation where it clearly backfired. The barb archers appeared about 5-10 turns earlier than I was expecting and it could have destroyed my entire game. In retrospect, it definitely would have been better to settle the Lake Wobegon spot third and leave the northern safe spot for a little bit longer. That was backfill territory that no one was contesting and it could have waited a bit.
Afterwards, things calmed down a good bit and I was able to return to a normal Civ4 expansion phase. I always enjoy this part of the gameplay as the player juggles producing settlers to claim territory, workers to keep up with the need for improved tiles, and enough military to remain safe from barbarian threats. My new city plants all had to go in two directions: west towards Shaka along the southern river or northwest into the blackness along the northwest branch of the same river. I had lost my initial scout to a bear fairly early on and I lacked horses for chariots which meant that my scouting knowledge was subpar despite my best efforts. I did find out that Napoleon was located in the northeast corner of the map; great, just what I needed being neighbors with two different psychopaths! I only managed to establish half a dozen cities by Turn 100, something that felt terrible in abstract terms but wasn't all that bad given the atrocious terrain and corner starting position. The few cities that I did have were killing me from a maintenance perspective thanks to the awkward location of my capital and the difficulty of generating commerce anywhere.
Hopefully I was making at least some progress in that regard. I was treating my tundra cities as if they were fishing villages, connecting the deer resources for food and cottaging the riverside tundra tiles, then whipping every 10 turns for production. Plains and tundra cottages can't feed themselves, as each tile only produces 1 food and therefore translates into net -1 food per pop point, which capped out these cities at low sides. This made for a pretty sad group of towns but it was the best that I could do. The early Stonehenge build had generated a Great Prophet for me after 50 turns and as a result I decided that I would try to found Confucianism and then use the Great Person on creating a shrine. A big map like this one can generate a lot of shrine income if the player takes the time to keep spreading their religion around. That plan was dashed when another player founded Confucianism on Turn 111, literally on the same turn that I was about to begin my 100% research push towards the tech. This turned out to be a blessing in disguise as I headed for Mathematics / Currency instead and didn't wind up locked to an unpopular religion. As for the Great Prophet, it was too early to use him on a Golden Age so I went with the super specialist option instead, which legitimately helped out by giving me an extra 5 gold/turn at a point where I was pretty broke.
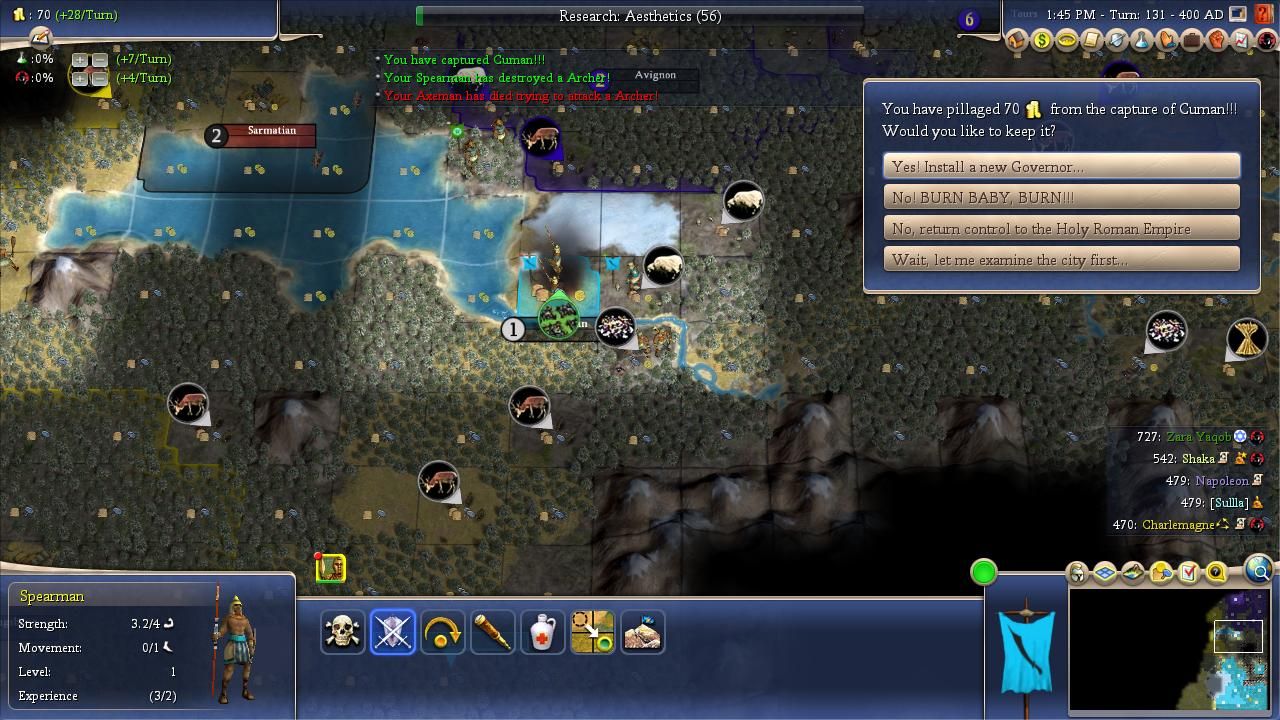
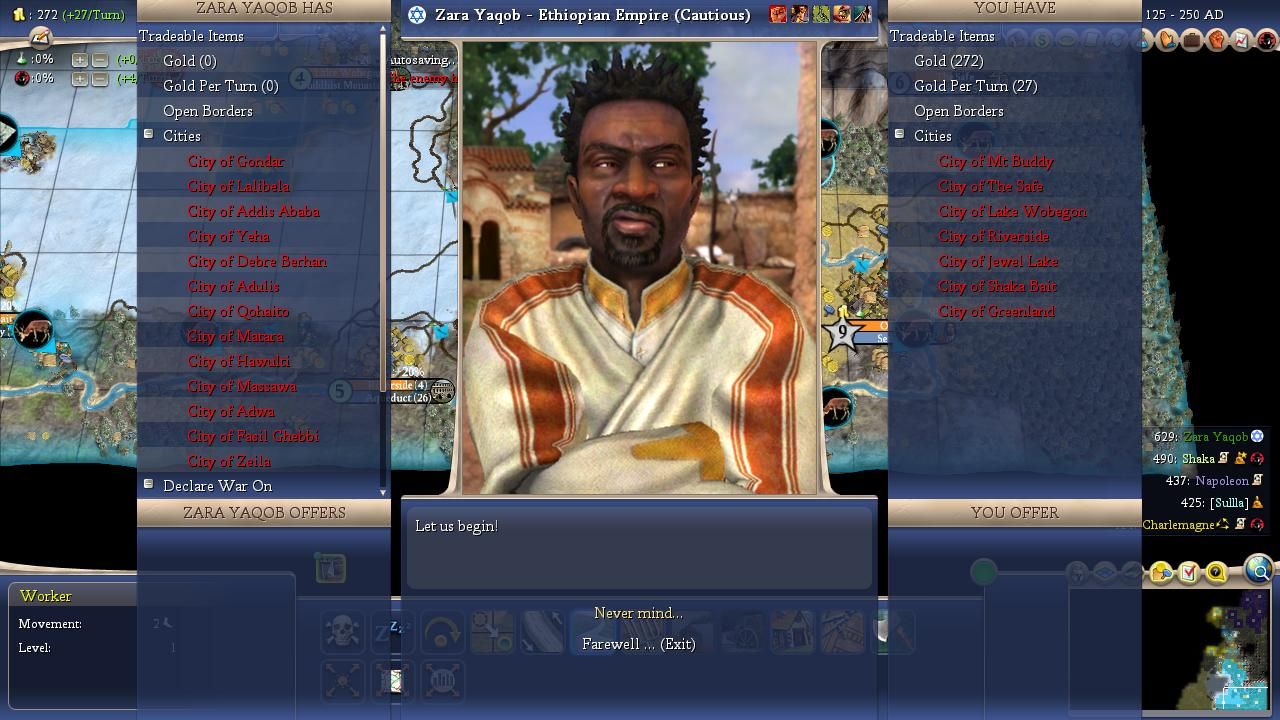
By Turn 125 I had met two more of the AI civs occupying this map, Charlemagne who was located to the northwest in between Napoleon and Shaka, and then Zara Yaqob who was somewhere further afield. Charlemagne was roughly on par with the Napoleon/Shaka duo, however Zara was much more concerning as he had a significant lead in the Demographics. At the time of our first meeting, I was working off of 8 cities while Zara had, uh, 14 of them stacked up on the diplomatic window. I'm not used to being this far behind an AI leader on Emperor difficulty and it was pretty disheartening to see just how big of a lead Zara had on the Food and Power charts. One thing that helped was finding a pair of barbarian cities located in the far north along Napoleon's borders. Due to the presence of another big mountain chain to the southeast, I spotted that seizing control of Cuman would likely allow me to backfill the remaining region to the south with my own cities. A handful of axes were sufficient to disperse the defending barb archers and I now had a claim on this portion of the map.
I could have taken Sarmatian as well but it didn't seem wise to capture a poor quality city which would introduce lots of border tension with Napoleon and Charlemagne. Indeed, with the barbarian threat receding it was increasingly the competing AI powers that I had to worry about. I was trying to avoid conflict as much as possible since I was in absolutely no position to fight anyone, with my civ's borders stretched out in a ridiculous line from the southeast corner and with no units better than axes and spears available. Ironically, I was helped somewhat by the presence of the massive ice field in the south since it gave Shaka no incentive to expand further east. Even the AI understands that there's no purpose in placing cities on a frozen ice shelf devoid of any food. I was hoping that this small lake, river, and then mountain range would provide a similar natural border with Napoleon in the north. I converted to Buddhism to appease Shaka (who had founded the religion) and Napoleon soon swapped to the religion as well; I was "Pleased" with both of them, which unfortunately didn't mean I was in any way safe since both of them will happily declare war on any non-Friendly civ.
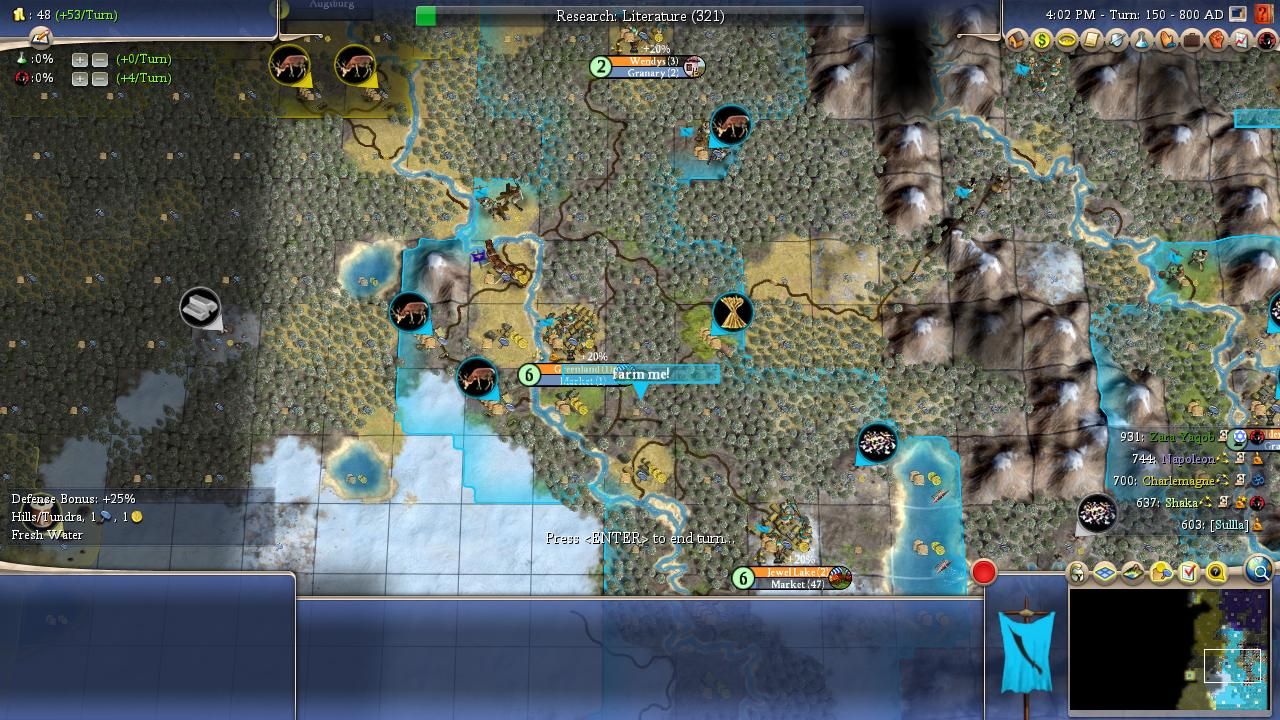
I was beginning to reach the natural limits of my expansion around this point on Turn 150. My borders now stretched all the way up to the former barb city, albeit in shaky fashion past Greenland and Wendy's, then I had another city further east at Hidden Valley and room for maybe one or two more cities north of that before hitting Napoleon's borders. I want to be clear, by the way, that the resource icons were indeed turned on when taking these screenshots! Everything away from these river valleys was exceptionally poor terrain, with no food beyond dry tundra tiles and a handful of plains. I would eventually found a city next to the western silver resource because it could borrow a deer tile from Greenland and work the two freshwater lakes, everything beyond that to the west though was too weak to support any city at all. It looked like I would end up with about a dozen cities in total which didn't feel like enough to be competitive on this map. I suspected that I would need to do some pointy stick expansion if I was serious about trying to win.
My positive relations and lack of border tension with my two neighbors started to pay off around this time. First Napoleon declared war on Charlemagne on Turn 161 followed by Shaka attacking Zara only four turns later. I breathed a sigh of relief at the start of both wars simply because my Persians were not the target. I was chopping out the Great Library at the time (which soon produced a Great Scientist for an Academy in the capital) and remained in no position to get tangled up in military combat. Napoleon's war with Charlemagne soon deteriorated into a grinding war of attrition, with Napoleon slowly capturing cities from the Holy Roman Empire but taking huge casualties in the process at each one. I didn't really understand how Napoleon was able to capture anything when fighting with swords against Protective longbows but it seemed he was using a whole bunch of suicide catapults to level the odds. Shaka's invasion was a much worse idea since Zara was the game's most dominant AI power. I think Shaka took one city at first only to see the tides of war quickly reverse. Soon enough the Zulu armies were in full retreat and that was bad news indeed given that Zara looked to gaining even more territory for himself.
I couldn't do anything about that just yet though so I held out hope that Shaka would put up a good fight as I continued to strengthen my own civ. Most of my cities were still working their way through the basic infrastructure: granaries, forges, libraries, marketplaces, and courthouses. One downside to my leader selection was the fact that none of these buildings were discounted in cost and therefore it took quite a while to construct them all. I also decided to construct Moai Statues and then the Heroic Epic at that captured barbarian city in the far north. Renamed Deer Space 9, it would also build the Colossus as well to wring some minor additional commerce out of the lake tiles that a number of my cities were working. At least there was no competition for that particular wonder given its coastal requirement.
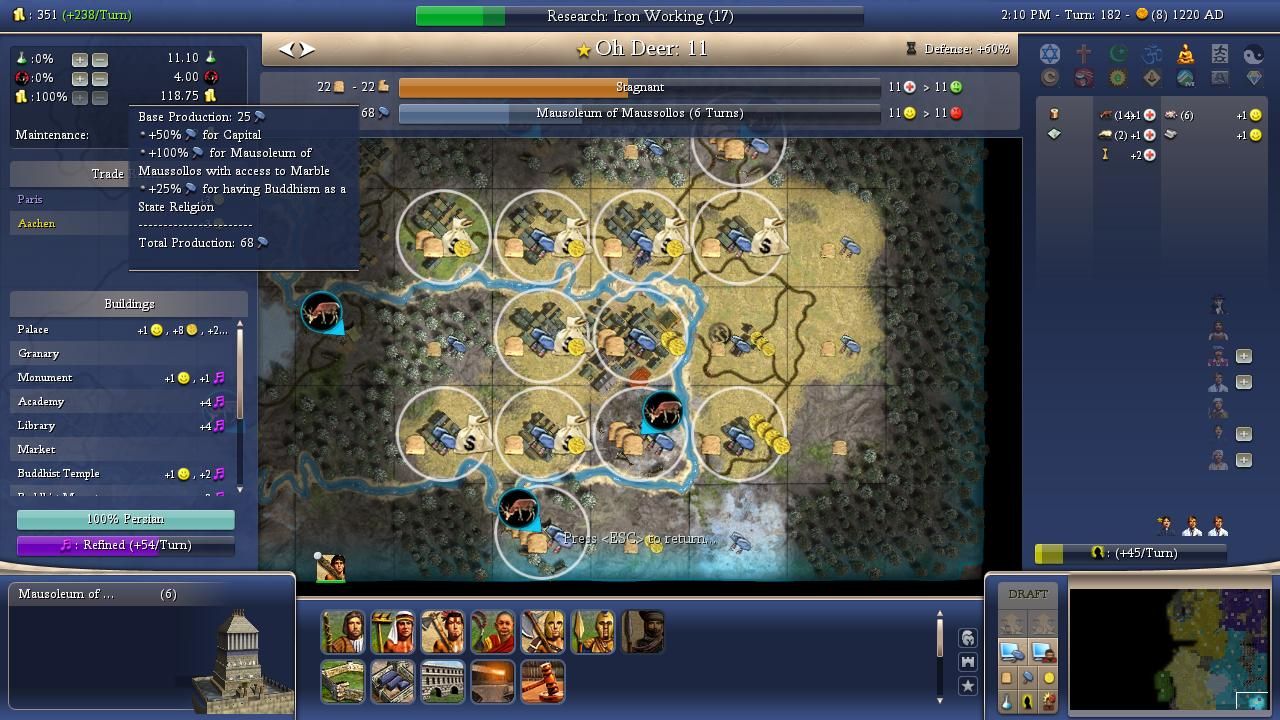
The capital then popped out a Great Artist on Turn 182 and this was the perfect time to use him on the initial Golden Age. The extra production allowed Oh Deer to complete a late Mausoleum wonder a few turns later, helped out by the AI leaders mostly refusing to research Calendar tech because there were no associated plantation resources on this map. I also used the Golden Age to swap into Bureaucracy and Organized Religion civics which were big helps in producing stuff on this horrible map. The forge plus Organized Religion combination powers up your building whips by 50% and that makes a large difference when having to whip out the expensive buildings like markets and later universities. Once the Heroic Epic was done and my basic infrastructure was knocked out elsewhere, I started training some military in earnest for the first time. The world was getting to be a dangerous place and I couldn't hope to turtle in the corner with a handful of axes and spears much longer.
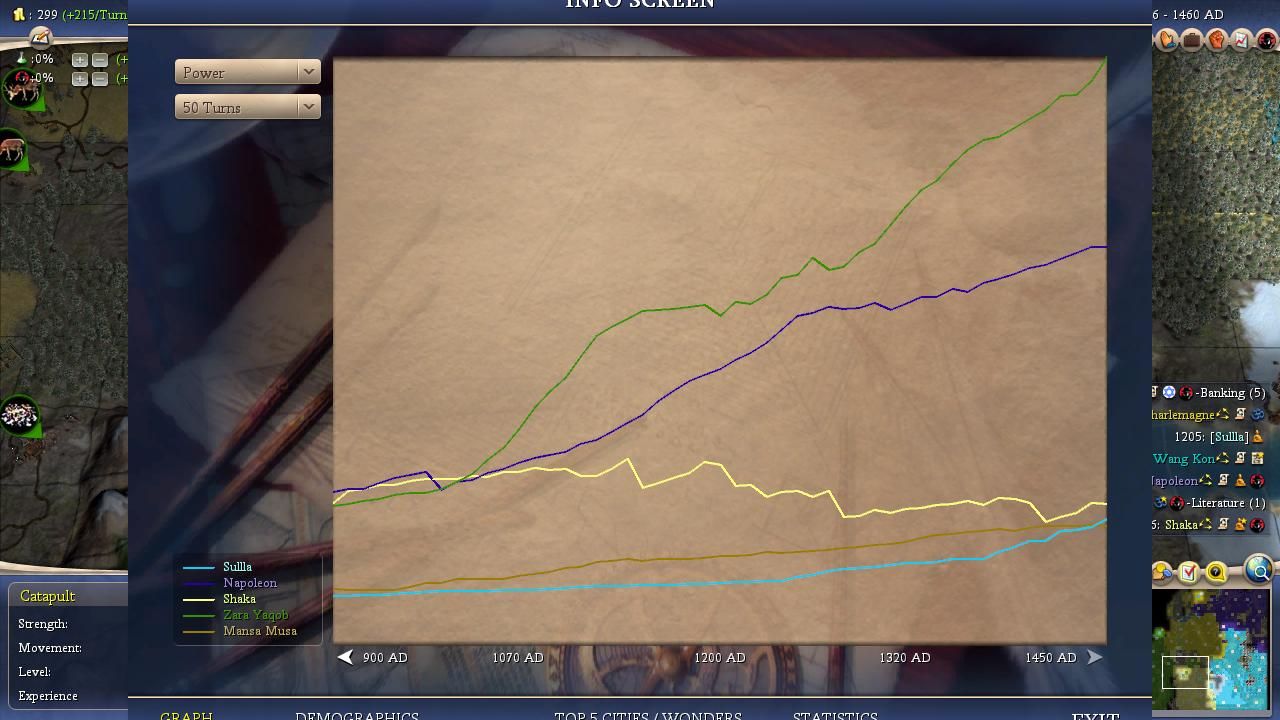
I also needed to get a move on because Shaka was starting to collapse to the growing power of Zara's armies. We've seen this so many times in AI Survivor games and I knew what was happening out there even without having full vision as one Zulu city after another began to fall. Finally my exploring warrior was able to find Zara's main doomstack and, uh oh, that was terrifying.  There was something like 80 units in the main stack alone and dozens more running around nearby in smaller ministacks. The Power bar chart on the Demographics screen was if anything even more disturbing. Yeah, Shaka was getting his butt stomped and all of those captured cities were swelling Zara into what might be an unstoppable position. I had to do something to salvage this mess and the only realitic option was attacking Shaka myself to capture some of his territory. That would help make me stronger and prevent Zara from getting everything even though it did mean selling out Shaka who had been, shockingly, a good friend throughout the whole game. Poor guy.
Thus I built up my forces as best I could given the limited production available in my territory. Shaka had two horse resources and I wanted to trade for his spare source so that I could train some knights. Unfortunately when I discovered Guilds and went to make the trade, I found that relations with Shaka had dipped low enough that he wouldn't send me his extra horses - ack! This meant that I had to rely on maces and catapults which were much weaker tools; you really don't want to fight into enemy longbows without having knights or something better available. Maces + cats can get the job done but never quickly or without serious casualties along the way. That was all I had though so I went to work on pumping out maces.
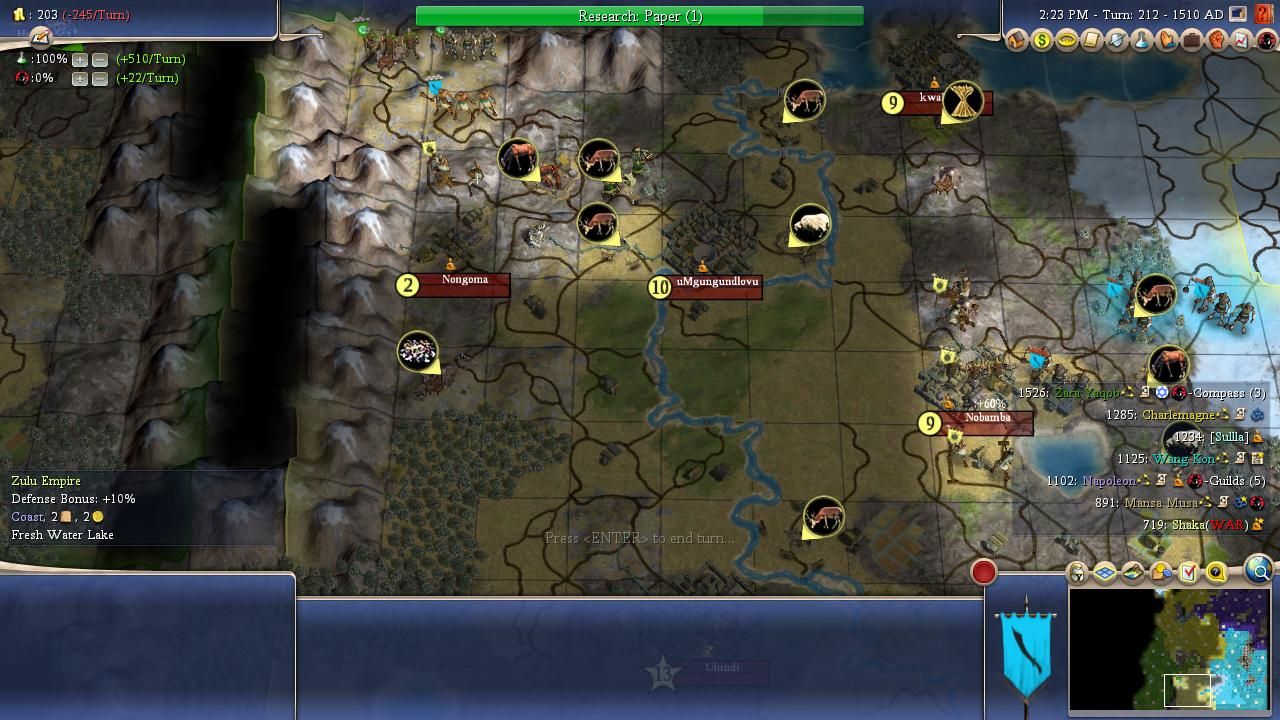
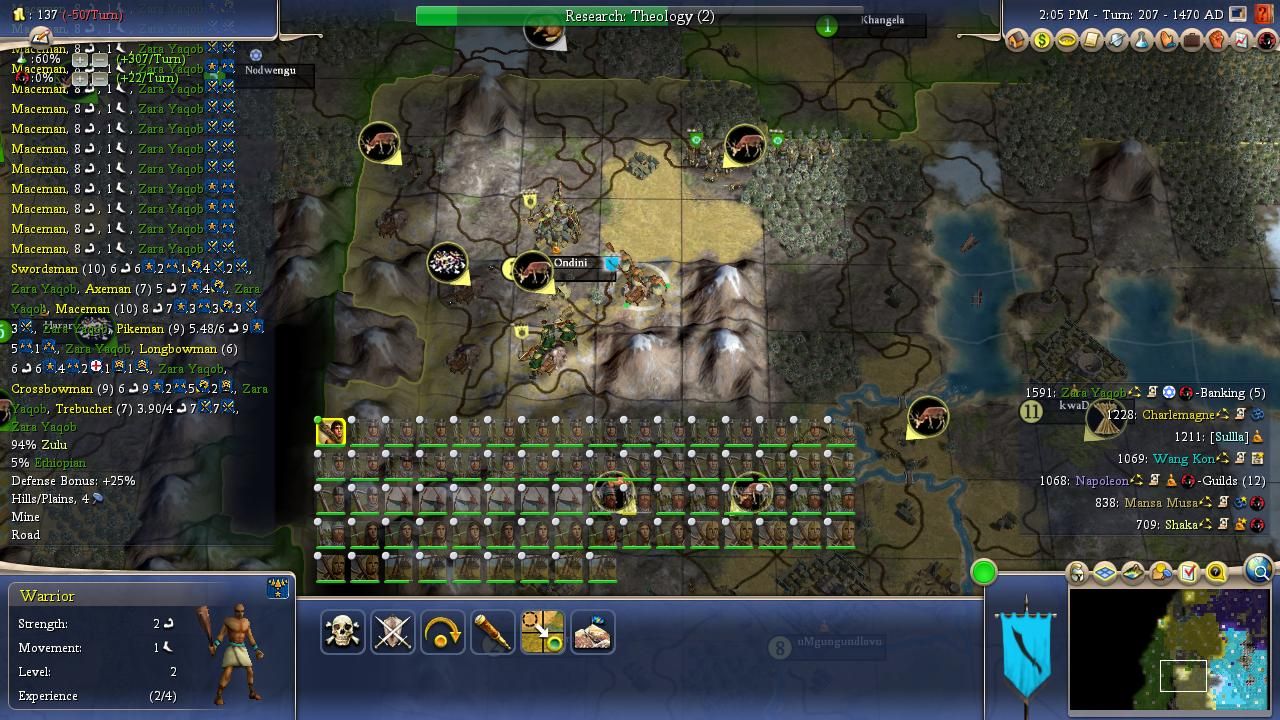
I therefore declared war somewhat reluctantly against Shaka on Turn 210. I really couldn't afford to wait much longer as Zara's vanguard was approaching the Zulu core off to the west where I had a scouting warrior tagging along to track the progress of their army. My goal was capturing Nobamba which held one of Shaka's horse resources; if I could take and control that spot, I would be able to build knights now and cavalry later which looked like they would be sorely needed. The initial invasion force held 10 catapults and 6 maces, with more maces trickling in behind the initial stack since I knew I would have to spend a series of turns bombarding down the defenses at Nobamba. I thought that Shaka was pretty much finished by the time that I sent in my attack, only to be sorely mistaken here. Shaka was *NOT* done yet and he counterattacked my reinforcing stacks over and over again, with me foolishly having forgotten to bring along a few pikes for defense against his horse archers. That's the weakness of a slow-moving stack like the one I was forced to use here, as it provides lots of time for the defenders to whip out more units to meet the threat. By the time that I had my full army assembled and the cultural defenses reduced at Nobamba, the place was stuffed with nearly a dozen defending units, sigh.
With the defenses down, I sent in some catapults for collateral damage and then began the grim process of using maces against fortified longbows. That's when I stumbled upon a fantastic sequence of RNG luck, much better than I deserved to roll. I think that I won a pair of combats in the 20-30% range back to back, then several more 50/50 coinflips. The net result was that I captured the city with far fewer casualties than should have been the case; in fact, I almost certainly would have come up well short of having enough units to take the place under normal dice luck. This was another place where I didn't plan as well as I should have, caught off guard by Shaka's tough resistance. I thought that this would be an easy task of vulturing some land and wasn't expecting the tenacious defending by what remained of Shaka's empire.
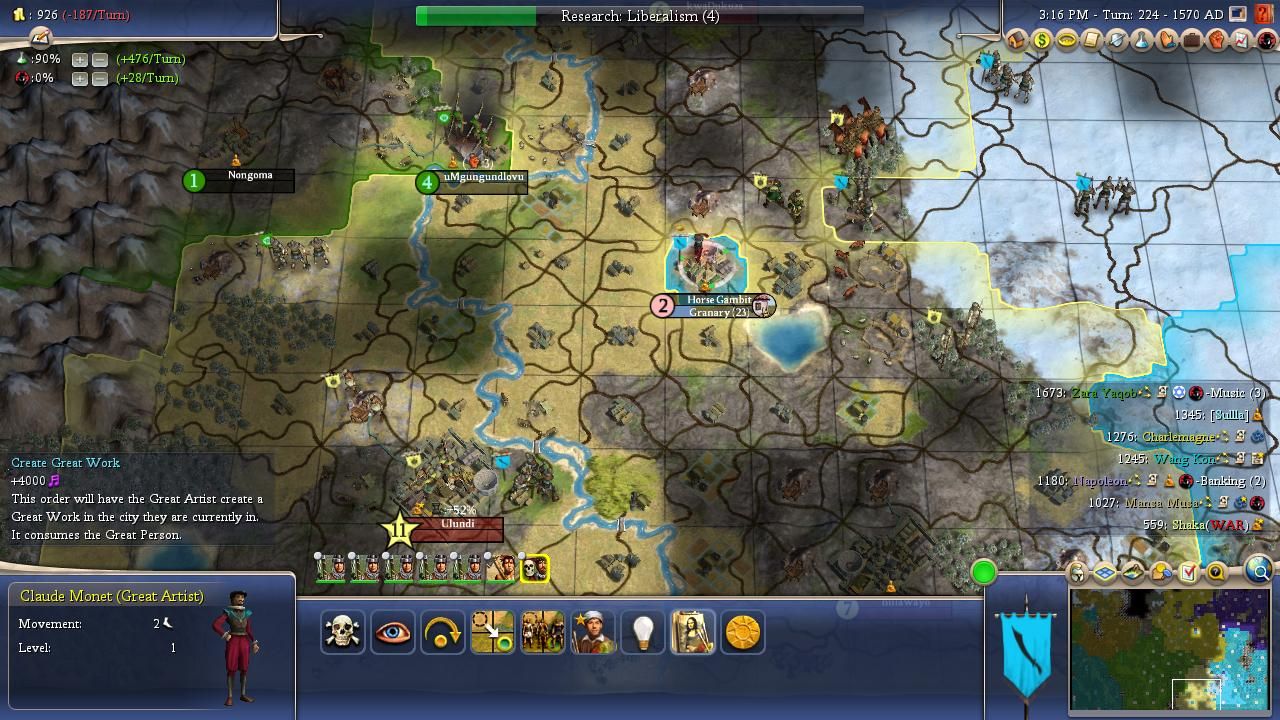
That unexpected bout of luck gave me control of Nobamba, now renamed Horse Gambit, but I desperately wanted to gain control of Shaka's capital of Ulundi as well. He had earlier built the Buddhist shrine inside and Buddhism was the world's most spread religion to make that location a very juicy prize indeed. Unfortunately Shaka discovered Engineering tech right around this point and threw up castle defenses in his remaining cities, which meant it would take even longer to reduce the walls at each spot. I also had to maintain a garrison at Horse Gambit, since Shaka kept trying to recapture it, plus he continued to attack the reinforcing units that I was slowly walking down to the besieging force outside Ulundi. Meanwhile, the clock was ticking as Zara was still advancing nearby and capturing what remained of Shaka's northern core. This was annoying enough that I burned a Great Artist on a culture bomb at Horse Gambit, not so much to gain control of the tiles here but to throw up instant 60% defenses for the units holding the place. The culture bomb wouldn't hurt either for controlling this area vis a vis Zara after Shaka was gone.
I wasn't able to attack Ulundi until Turn 229 due to the need to grind through those castle defenses. While my luck here wasn't quite as good as it had been at Horse Gambit, it was still better than average as I was able to take the Zulu capital and lay claim to that Buddhist shrine. I'd have to continue spreading the religion around to my remaining cities that lacked Buddhism as well as maybe using some missionaries on Napoleon. Speaking of which, he captured Charlemagne's capital two turns later to gain a decisive edge in their long-running struggle. I kept expecting Charlemagne to fight off Napoleon's technologically backwards units and it kept failing to happen. Controlling Ulundi meant that I was essentially guaranteed of taking Shaka's city further to the east, and during the time it took me to siege down that spot as well, Zara captured all of the northern Zulu cities. This meant that I stole the AI Survivor kill credit:
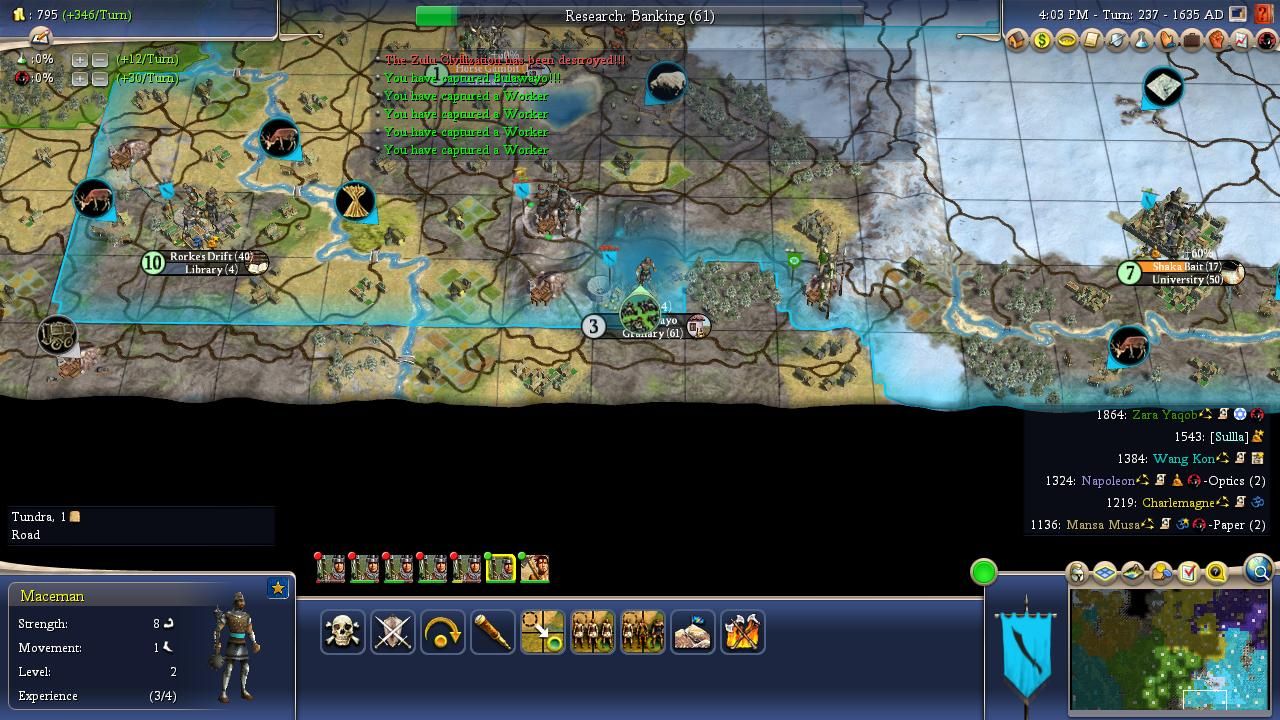
Zara definitely deserved the scoring point since he took most of Shaka's cities but I was content with what I'd been able to get. Although I had only claimed three cities from the Zulus, I gained the critical access to horses along with the Buddhist shrine that already had roughly 40 cities worldwide following the religion. I had also bought more time for my civ to continue developing and scaling, taking advantage of the fact that the human player simply does better at working with rough terrain like this as compared with the AI civs. Now here was the bad news: Zara had gained 8 cities from the Zulus and ballooned out to Runaway AI status. His stats were off the charts in every ranking except technology, and he was sure to take the tech lead eventually with this big of an advantage in territory and population. I also now bordered Zara directly and his military could squash me like a bug without batting an eye. I needed a plan to deal with Zara and I needed it right away or else this game could still be lost due to a single bad dice roll of AI war plotting.
Fortunately I did have a plan...


