
Picking up from the first page of the report, I had successfully managed to take a trio of cities from Shaka and improved my position in the wider state of the game. The big problem was that Zara Yaqob had captured about triple that same number of cities from Shaka, strengthening his Ethiopia from the top AI power into the Runaway AI (TM) which posed a dire threat to win the game. I could not possibly fight Zara and his monstrously large military, and furthermore we were now direct neighbors which was sure to stir up some border tension. Unfortunately Zara is also one of the AI leaders who will declare war at "Pleased" relations which meant that I wouldn't be safe unless I could get him all the way up to "Friendly" status. I spotted that I could swap into his favorite civic of Theocracy to gain some diplomatic points, however that still would leave me far short of reaching the roughly +10 relations needed to become friends. There were some suggestions from the Livestream viewers that I could switch into Zara's religion of Judaism to gain further diplomatic favor. That wasn't a bad idea but I spotted an even better option:
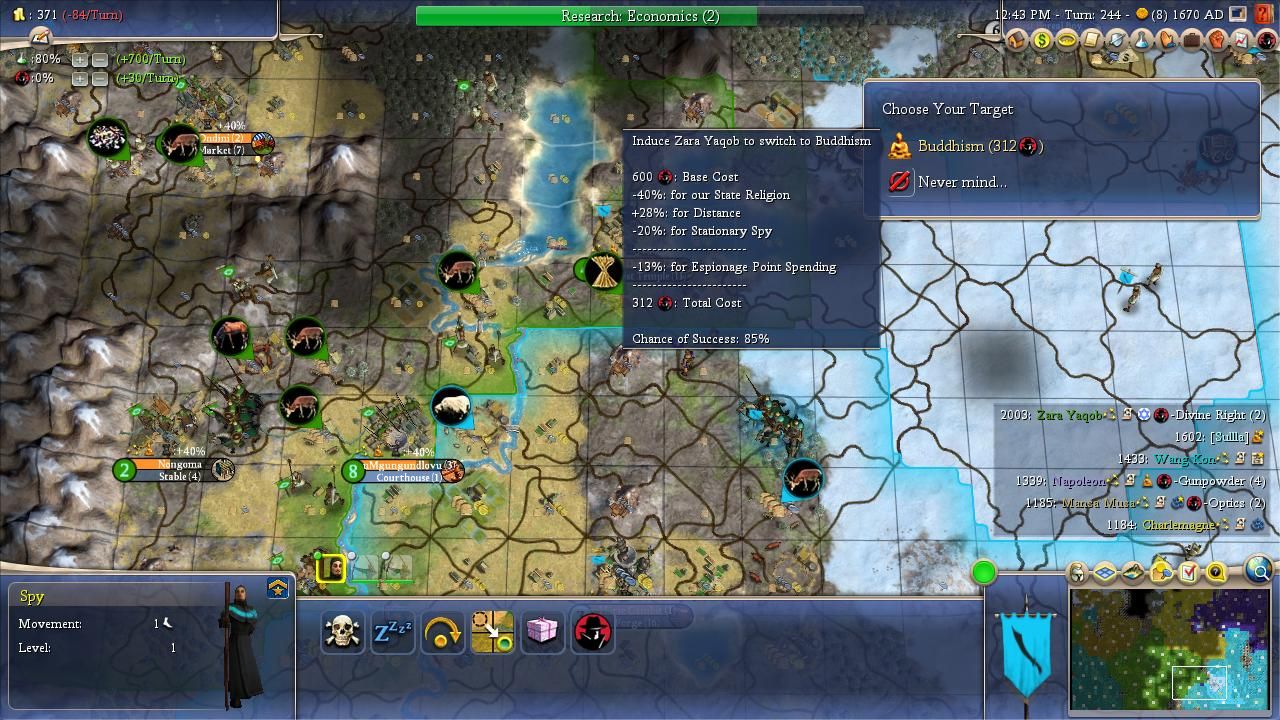
Rather than convert into Zara's religion, I could use a spy to make him convert into mine!  It wasn't really practical for my civ to swap into Judaism since almost none of my cities followed the religion and changing out of Buddhism would antagonize my other neighbor Napoleon. Furthermore, there wasn't even anyone else on the map running Judaism, which was the minority religion of Mansa Musa that had randomly spread throughout Ethiopian territory. Zara had actually captured a whole bunch of Buddhist cities by virtue of taking over most of Shaka's territory, and then he had also inexplicably refused to research Code of Laws techs for ages and ages while warring. This meant that Zara was slow to build courthouses and therefore was weak in terms of espionage; shockingly, I had a big lead in espionage over him despite making no real effort to build the espionage stuff. I realized that I could use a spy mission to convert him to Buddhism while also flooding his territory with Buddhist missionaries. I suspected that I could keep Zara in my religion without too much effort and that should be enough to reach "Friendly" diplomatic status. Zara has one of the highest "shared faith" diplo bonuses in Civ4 and I would even get an extra diplo point for being the owner of the Buddhist shrine.
Thus I trained a single spy and sent it across the border where it succeeded on its 85% dice roll and managed to convert Zara for mere pennies on the dollar, only 312 espionage points. This is honestly way too cheap as these spy missions can force a civ with 30 cities into a turn of anarchy at an absurdly minimal investment into espionage. We usually take this stuff off the table for our Multiplayer games between humans; the only reason it usually doesn't work against the AI is because they all spend so heavily on espionage all the time. In any case, the plan worked here and I was able to get Zara to the coveted "Friendly" status a dozen turns later:
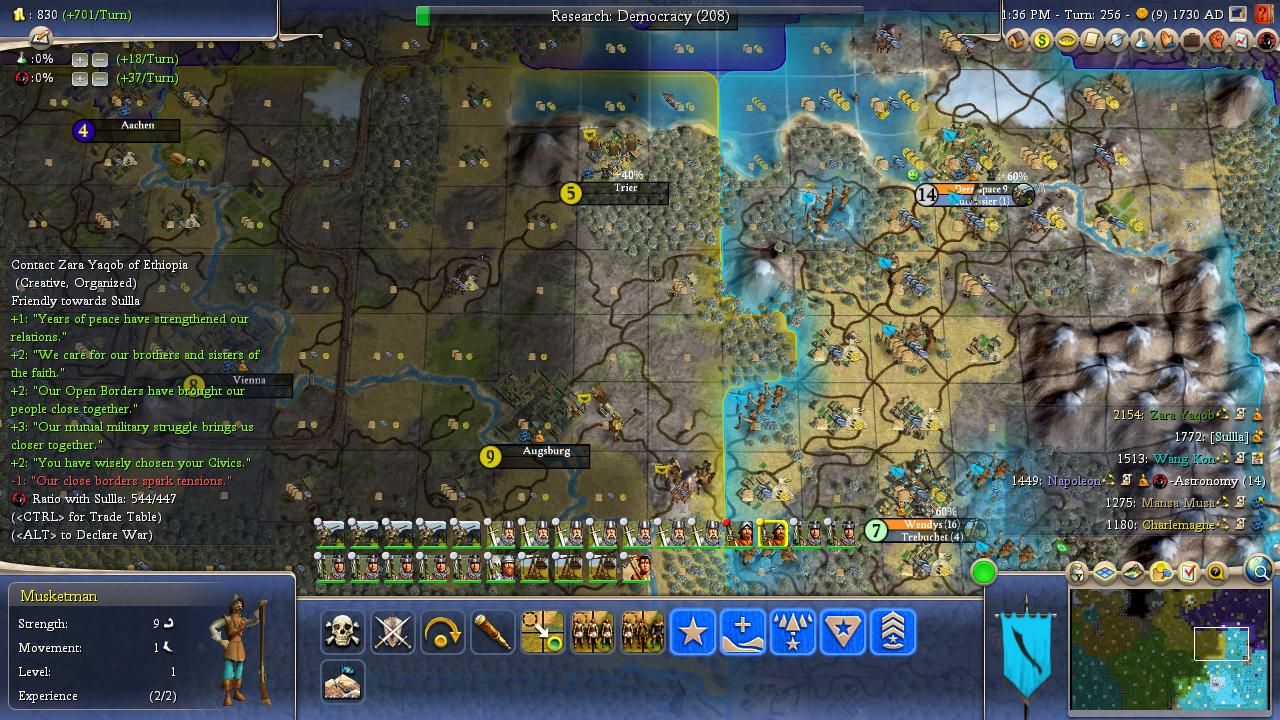
This established a magical shield of protection with Ethiopia: so long as our relations remained at "Friendly", Zara would never begin plotting war against me. It was exactly what I needed since Zara's military represented an existential threat and I could not afford to have him come after me. Over time, our shared faith bonus would grow up to +8 which was easily enough to maintain the friendly status. I wasn't taking any chances though as I continued sending more Buddhist missionaries to Zara's cities until every one of them had been converted to our shared religion. It wasn't even a bad economic move since I had the Buddhist shrine in Shaka's former capital and would soon add Wall Street there for some massive shrine income. I think the shrine had well over 50 cities following the religion at this point and the number was still going up.
Back at home, I had used a Scientist + Artist pair of Great People to fire off a Golden Age on Turn 240. I had earlier built the Mausoleum so this resulted in a dozen of turns of Golden Age largesse, which was then extended out to 24 turns since I also constructed Taj Mahal during this same period. Earlier I had claimed the Liberalism prize at the tail end of the Shaka war, using it to grab Military Tradition, and I was pushing through the top of the Renaissance tech tree to pick up the various goodies located there. I wanted the bonus commerce from Printing Press, the ability to construct lumbermills on this map's bountiful forests from Replaceable Parts, and then Universal Suffrage and Emancipation civics from Democracy tech. Yes, this felt like a Uni Suffrage map instead of a Representation one given that there simply wasn't enough food available for much in the way of specialists. This was due in part because I opted for Free Market over Mercantilism as I was actually getting a lot of trade route income from Zara, Mansa, and Wang Kon. And while I didn't really want to run Emancipation, enough AI civs headed in that direction that I eventually had to employ it as well; it did have good synergy with Uni Suffrage. Since I was the first to Democracy tech, I would also slowly build the Statue of Liberty which held great value given that the whole map was a single continent.
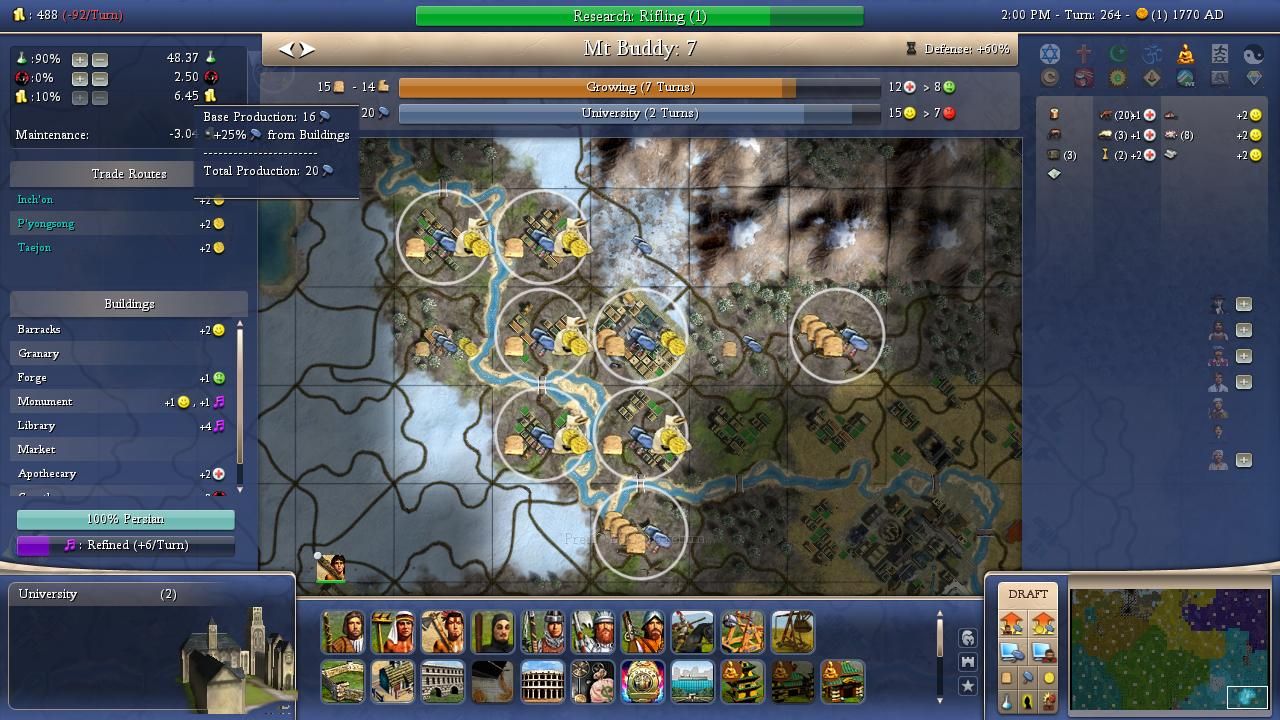
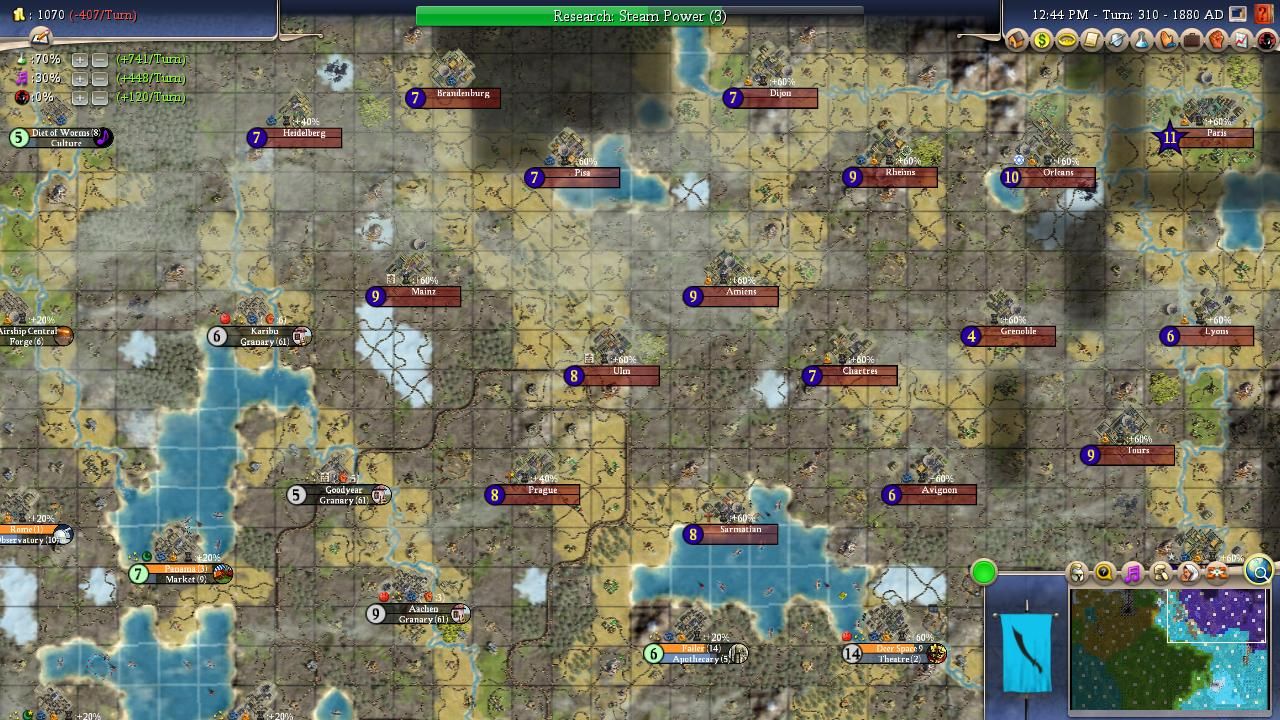
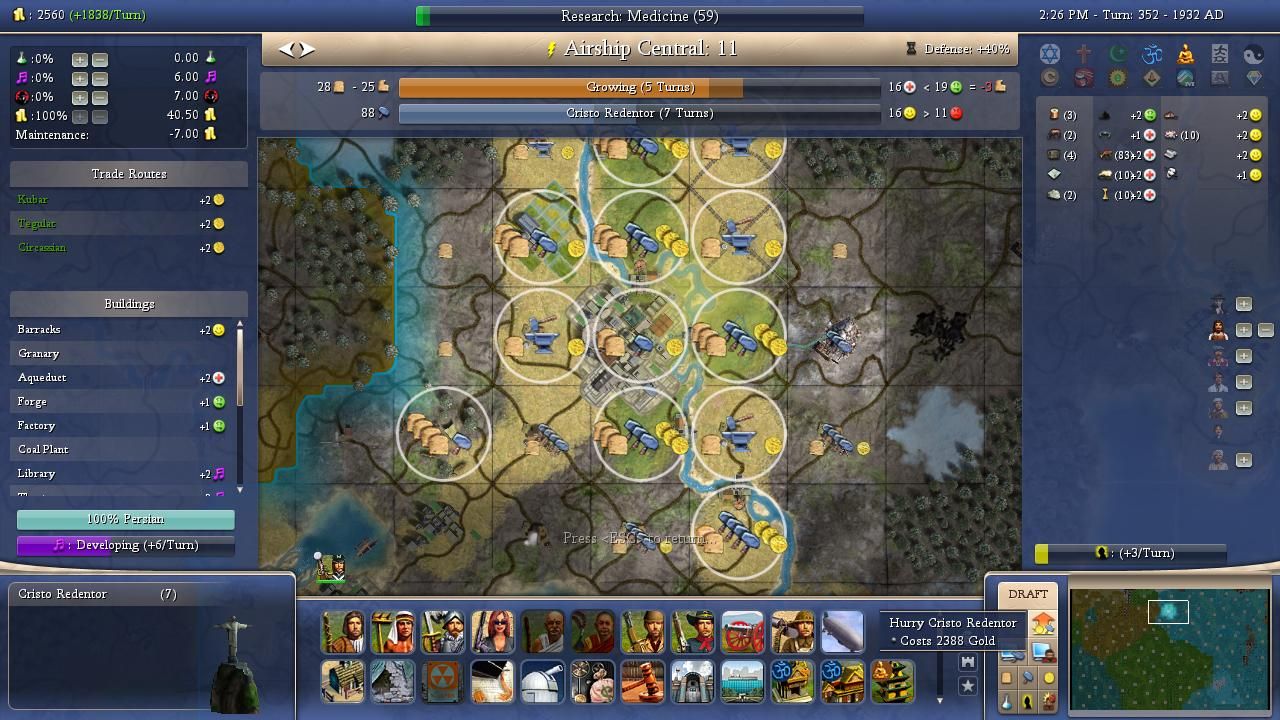
Here's a quick peek inside one of my core cities as the second Golden Age was coming to an end. Mt Buddy had been my second city and I was extremely pleased at how it had developed over the course of the game. The two deer resources were sufficient to support five riverside tundra cottages, all of which had matured into towns by this point and were producing 1/2/7 yields with the boost from Uni Suffrage and the Golden Age. I would later be able to add a levee here and maintain that 2 production yield even outside of a Golden Age. I had enough production to reach 20 shields/turn and build a university in a decent timeframe rather than having to whip everything as earlier. This truly terrible bit of land was paying for its own maintenance costs and producing about 50 beakers/turn, simply remarkable. I love wringing value out of poor-quality terrain and there are few maps better suited to that than this Boreal one.
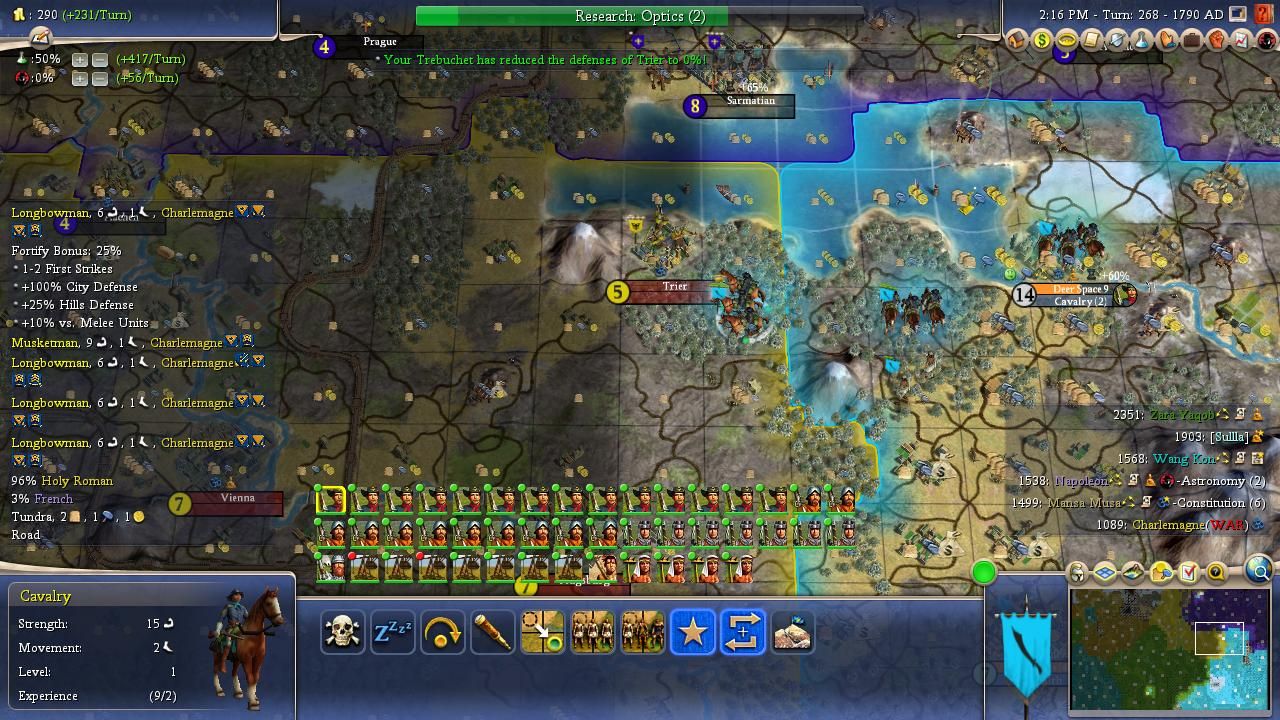
The other civic that I was using at this point was Nationhood as it was another perfect tool for getting value out of weak cities. Nationhood's drafting mechanic doesn't care if a city is a tundra wasteland, it only needs to reach size 6 before popping out a conscript infantry unit. I had been using Nationhood to draft out a bunch of muskets while the Heroic Epic city of Deer Space 9 cranked out knights and then cuirassiers. I knew that I needed more territory to compete with Zara and once again it looked like one of my neighbors was drawing the short straw. That would be Charlemagne who was finally starting to collapse in his endless war against Napoleon. They had been fighting for over 100 turns without interruption at this point and the strain was basically breaking the Holy Roman Empire. It had also left Napoleon far behind technologically but at least the French were gaining territory in the process. I was carefully monitoring the conflict and waiting for a good opportunity to vulture more cities for myself; I had to wait here for a bit because I had just barely hit the "Friendly" threshhold with Zara and I didn't want to drop him back down to "Pleased" status by getting -1 diplo point for declaring war on his friend Charlemagne. Finally my relations ticked up another point with Zara and I could launch my attack safely; I dumped two turns of income into upgrading all my knights and cuirassiers into cavs, then let loose the hounds of war.
What followed was not a real military campaign, more like a police action against a hopelessly backwards nation. Charlemagne had mostly longbows along with a scattering of muskets to defend his cities from attack. They were facing off against my cavalry-based invaders and even Protective trait wasn't going to do much to help them against that threat. I've written innumerable times about how the cavalry vs longbow matchup is always a slaughter in Civ4 and that held true yet again this time around. Charlemagne was exhausted from his lengthy war against Napoleon and could only put up the most feeble of resistance as my cavs galloped from city to city. It took an even dozen turns for me to capture the southern half of his empire and eliminate the Holy Roman leader:
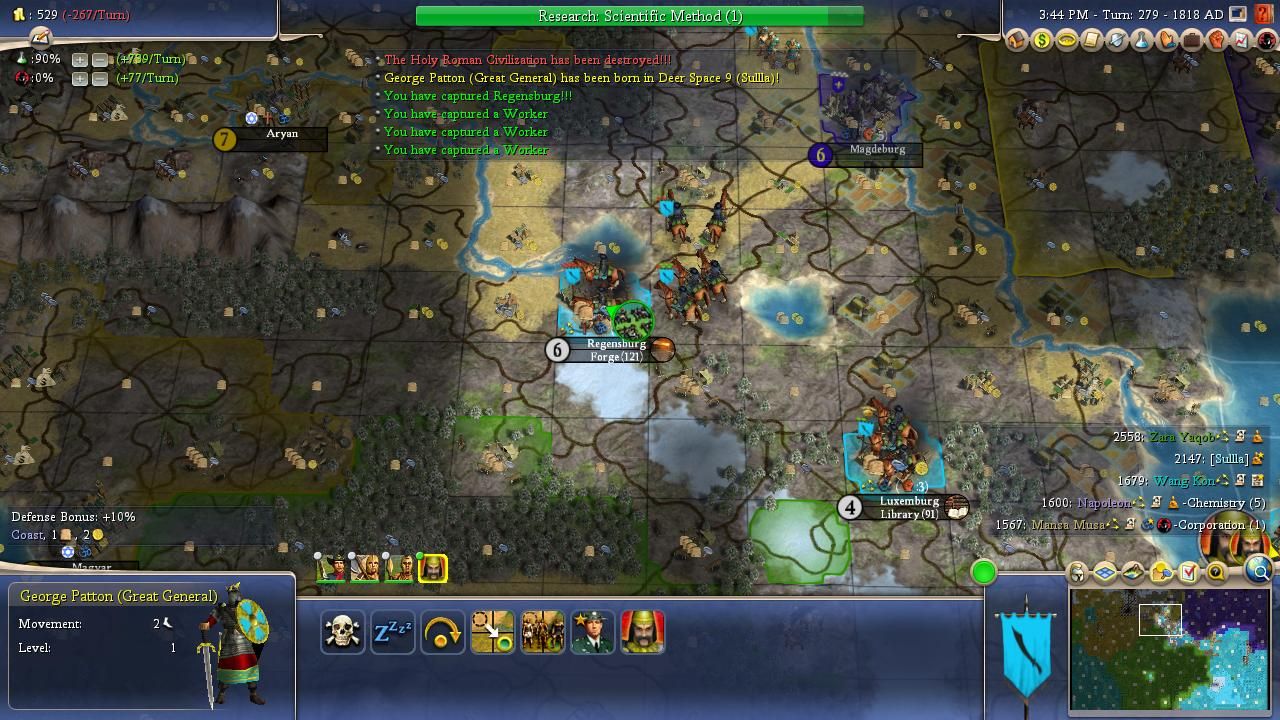
It was another case of my civ stealing the AI Survivor kill credit though at least this time I really had taken roughly half of the Holy Roman cities. Whereas I had gained two critically important cities from Shaka, the Buddhist shrine city along with a source of horses, most of the captures from Charlemagne were of lesser quality. While there were a couple of solid cities near where his capital had been, many of these new acquisitions looked like Luxemburg and Regensburg, low food spots with way too many tundra tiles in their borders. I also had considerable cultural pressure on many of these new cities, with my borders stretched out into an awkward horizontal line between Zara to the south and Napoleon to the north. This remained an unstable situation and I knew that I couldn't rest on my laurels here; I was going to have to settle with Napoleon at some point since I could never trust the crazy warmonger to remain peaceful.
While the war with Charlemagne was wrapping up, my long-running Statue of Liberty build finally completed; I would mostly assign an Engineer specialist in each city since they all needed the extra production. My research had been pushing towards Communism tech after I picked up Democracy and Rifling, and when this finished on Turn 287 I initiated the three Great Person Golden Age. The entire purpose of this Golden Age was to swap into State Property civic which was a dream fit for this map setup. There were nowhere near enough of the corporate resources to make any of the corporations viable (too bad none of them run off deer resources!) while the lack of distance maintenance and extra food on watermills and workshops could not have been more helpful. Now I could start constructing the godly State Property watermills everywhere for additional food and production; my many river valleys saw dozens of the things constructed over the following turns. Next I would pick up Physics tech for the free Great Scientist and airships before making the push to Biology for even more food.
Strategically though, it was Napoleon who continued to have my attention. I had neutralized any threat from Zara via diplomatic means but Napoleon remained at "Pleased" relations which was no guarantee of safety with the nutcase French leader. It was also obvious from a quick glance at the map that Napoleon was by far the most logical choice for further expansion. Our territory overlapped across a wide front and seizing control of Napoleon's land would leave me with lots of backline cities that didn't need defending. Furthermore, Napoleon was technologically backwards and had a sociopathic AI personality which meant that he could never be trusted not to invade down the road. Even though Napoleon had been a good ally thus far, I couldn't count on him remaining that way and thus began the buildup for my own attack. He actually began plotting war at this time and I used my airships to track where his stack was assembling. At first his doomstack was gathered at Charlemagne's former capital of Aachen, then it wandered off to the west and it became clear that Mansa Musa was the target. This was perfect: the core of Napoleon's army was out of position, off attacking another foe in the hinterlands. I assembled my own forces and prepared for a devastating sneak attack.
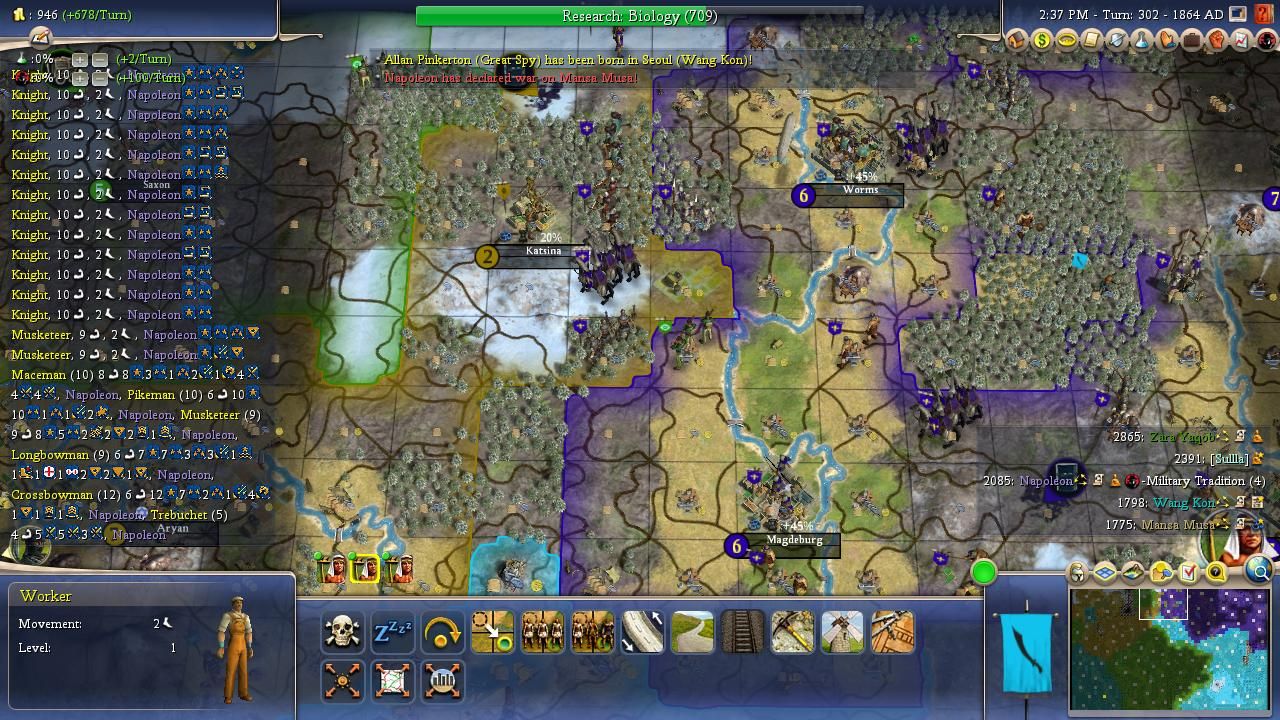
When Napoleon crossed the border and attacked Mansa on Turn 302, I was ready and launched my own counter-invasion on the same turn. Magdeburg fell on the first turn to my massed cavalry and then the drafted rifles zoomed in behind using the captured roads. We named this spot Airship Central due to the airships pouring inside and then my cavs raced northward to take the city of Worms as well. Capturing these two cities gave me control of the entire battlefield and the airships flying overhead revealed every tile as though I were playing with map hacks. Napoleon's doomstack took Mansa's city of Katsina and then turned around to face the new threat from my Persians. He was caught in a terrible strategic position, with his army cut off from the rest of his civ by the two captured cities and the presence of the Persian military. I was able to pounce on both the French reinforcements trickling in from the east as well as the core stack that was over by Mansa's territory:
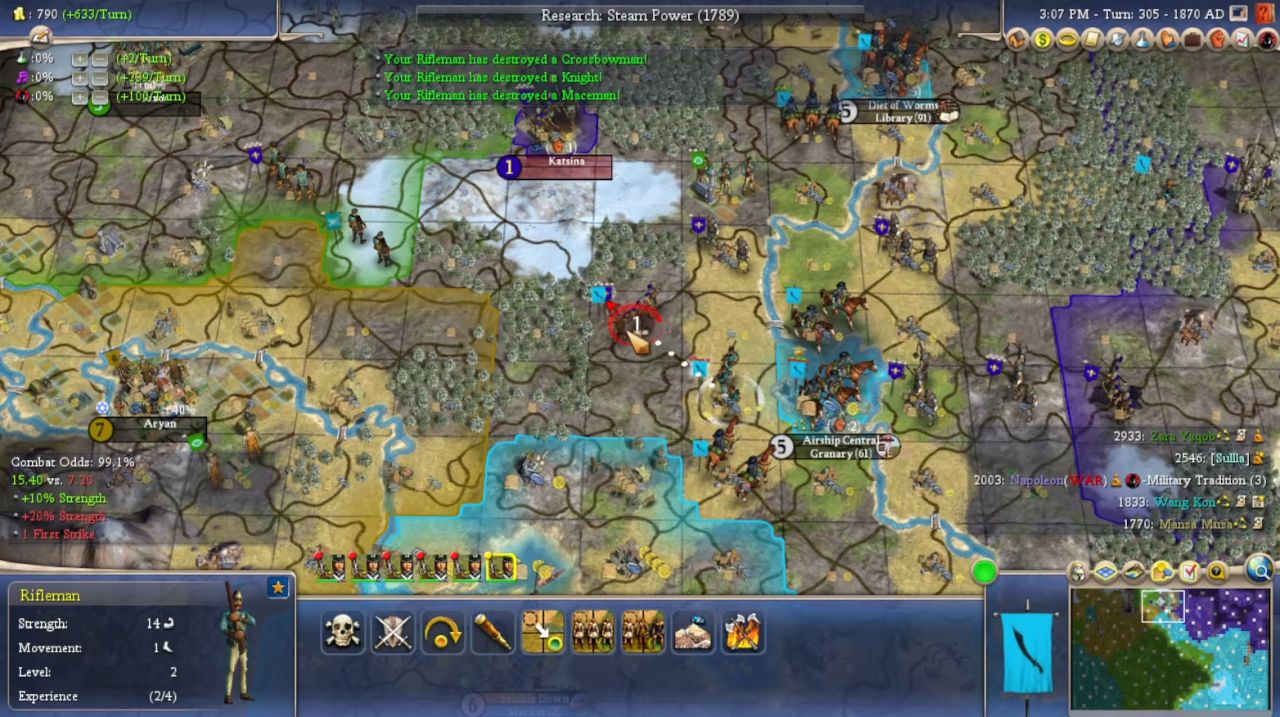
The French doomstack foolishly left itself positioned on completely exposed flat ground and the result was an absolute slaughter. My airships trimmed some health off of the top defenders (mostly knights) and then the core of my military went to work, about 30 cavalry and another 30 drafted rifles gunning down everything in their path. The combat was brutally one-sided as Napoleon's medieval force came up against an opposing army with superior technology, and the river by Airship Central ran red with French blood. I had to turn the combat animations off because there were so many fights taking place that it would have taken forever to watch them all. Persian units killed, and killed, and killed some more until I had even used up all of the attacks from the earlier drafted muskets.
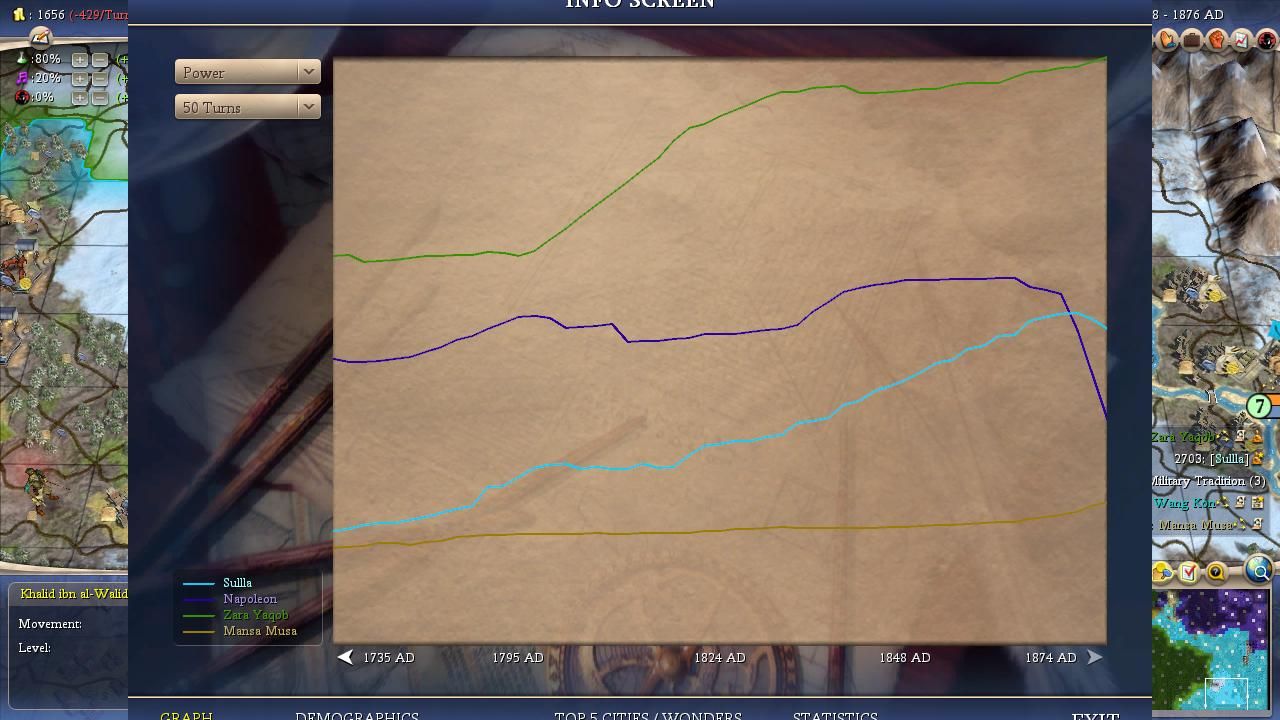
The net result was that I took minimal casualties while Napoleon lost his entire mobile army. Everything outside of the garrison defenders of his cities was wiped out over the course of three turns of fighting. It took more than an hour of real-world time to achieve this result but the "shark fin" on the Power chart was worth the effort:

And that was essentially all she wrote for Napoleon. With his field army defeated and his cities defended by outdated longbows and musketeers, there wasn't much that he could do to stop the Persian hammer from falling. Tactically speaking, my entire military was over by Airship Central in the far west, since they had needed to be in the same spot as Napoleon's army to wipe it out swiftly and brutally. Because my military started this campaign in the far west, my conquest of France proceeded from west to east with Karibu being the next city to fall as captured in this image. From there, my cavalry advanced slowly but steadily further eastwards, taking a city every turn or two and moving based on whatever made the most sense from the local geography. This was the blitzkrieg warfare that the AI struggles to defend against in Civ4, with my cavalry charging right into full cultural defenses against the longbows or musketeers located inside. I had three or four promotions on most of my cavs by this point and that meant most of these fights were taking place in the 80-90% range. I lost a few cavs here and there, only to be replaced by fresh reinforcements as the offensive continued onwards.
As new drafted rifles arrived at the front lines, I was able to supplement the main cavalry push with some rifle attacks from the south. Drafted rifles took Aachen and Goodyear, then would later grab Prague as the cavs focused on targets further north. A third offensive later would push north from Deer Space 9 to capture Avignon. About halfway through the war Napoleon reached Military Science tech and began spamming grenadiers. These units were noticeably tougher due to their higher base strength of 12; I kept hitting any grenadiers in the open field with airships to force them to heal and minimize the mischief they could cause. Casualties were higher once I had to chew through those French grenadiers while still not being high enough to stop the ongoing attack. I was also suffering significant war weariness from killing so many enemy units and capturing so many of Napoleon's cities; this forced me to dial the culture slider all the way up to 40% and essentially stopped any technological progress from taking place. It had to be done though, I had to finish stomping through Napoleon's territory.
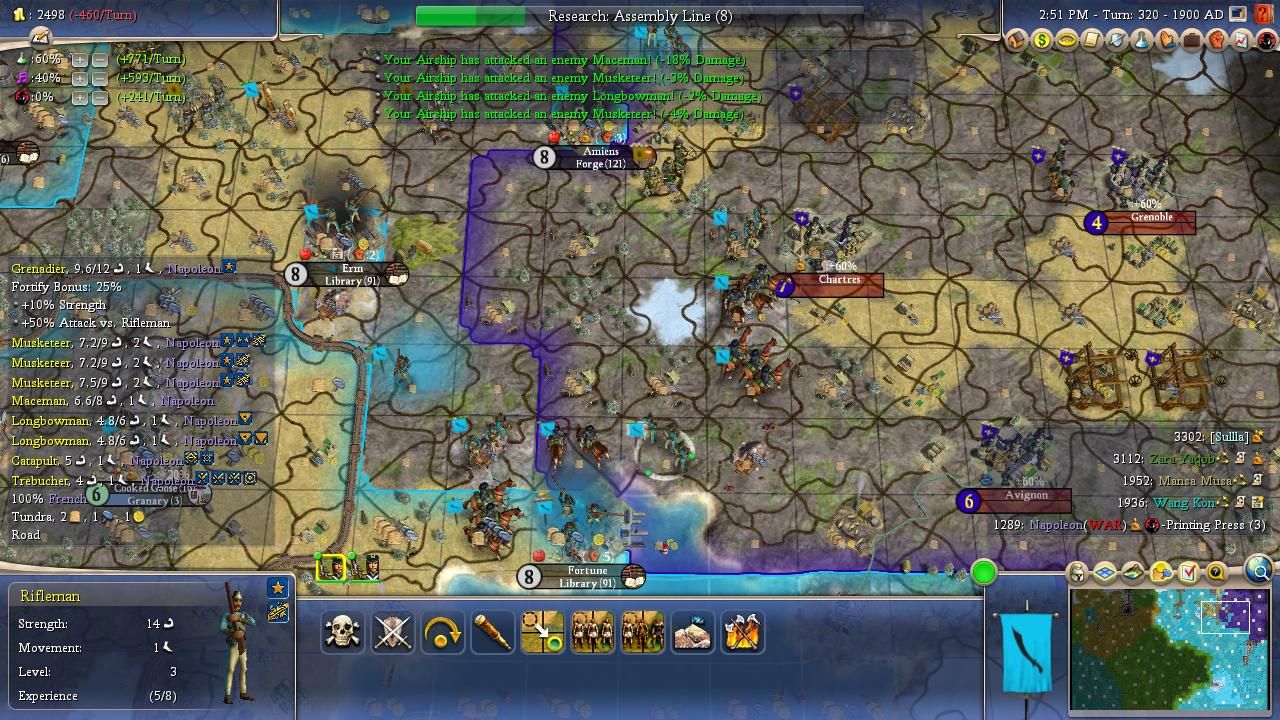
By Turn 320 I had already made it through half of the French domains as Napoleon had fallen back to his original core. The war was moving quickly in calendar terms, as this was still only 18 turns since the conflict began, but it was dragging badly in real world terms. It had taken more than an hour to wipe out the French doomstack, then several additional hours in a separate Livestream session to proceed through the conquest of France. This kind of thing does matter as I don't have the same free time to devote to Civilization as I did back when I was a college student marathoning through Civ3 and Civ4 games. We were hitting four hours of continuous combat on the clock by the time that my cavs arrived at the gates of Paris in the far northeast. Happy as I was to see the French capital fall, I was growing more and more exhausted and ready for this fighting to end. Ultimately it took another 4.5 hours over the course of one long Livestream to complete the job and eliminate Napoleon:
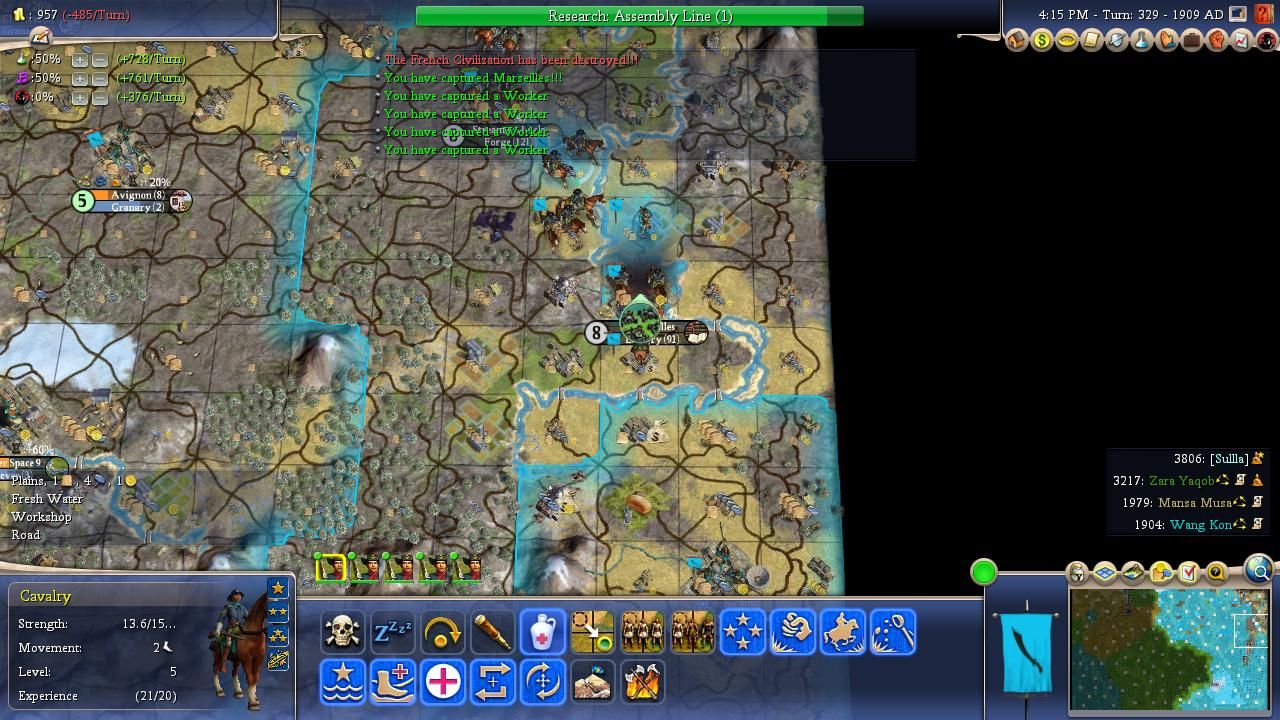
What a long and grueling process. Tired as I was, the whole war had been an unbelievable success. Over the course of 27 turns of fighting, I had captured fully 24 cities from Napoleon which neatly doubled the size of my civ. Now I had 50 cities flying the Persian banners (!) which made my civ even larger than Zara's Ethiopia. With this much land and population at my disposal, plus this game only being on Emperor difficulty, I was confident that I could beat the remaining AI civs to a victory condition of my choice. While Domination wouldn't have been too hard to pull off, I had absolutely no desire for an even larger brawl with Zara's massive empire. No thank you, let's not spend another eight hours chewing through Zara's 200 units and 40 cities, please. Since I wasn't set up for a Cultural victory and it was unlikely that I could get Mansa or Wang Kon to vote for me in the United Nations, that meant a good old Spaceship ending looked like the path forward.
For his part, Zara declared war on Wang Kon back on Turn 321 while I was in the middle of my campaign against Napoleon. This was noteworthy because Zara had been going for a Cultural victory, turning off research to run the cultural slider, and he swapped his teching back on again once the fighting began. I wasn't worried about Zara's potential cultural strategy because this food-poor map didn't give him much in the way of cottages or specialists. Zara's third city was only gaining a little over 100 culture/turn which left him eons away from the 50,000 culture he would need for an outright victory. In a worst case scenario, I also could have invaded since one of his potential Legendary cities was near our shared borders, though I didn't think that would prove to be necessary.
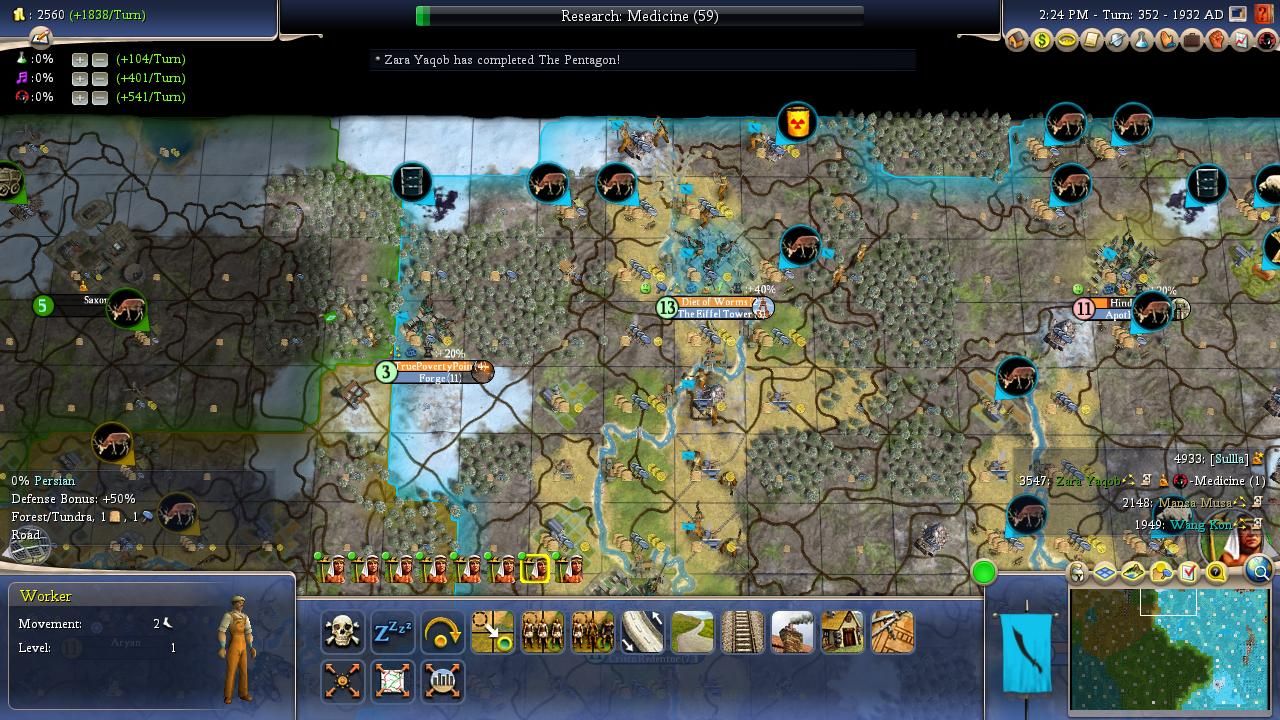
Nevertheless, I didn't want to take any chances and that meant denying Zara access to the key culture-enabling wonders of the Modern era. He managed to construct Broadway which was a bit concerning, and then we spotted via espionage production tracking that another city was getting close to finishing a wonder. Fortunately that wonder was the Pentagon, which was a powerful military wonder but didn't do anything to advance a cultural gameplan. My cities were spending the turns following the conclusion of the French war building factories, coal plants, and lots of health buildings to offset the pollution from those power sources. This map had absolutely no corn or rice resources, plus no bananas or cows or fish or clams, which left every city feeling a real health crunch once the factories started going up. I had a single crab resource from a freshwater lake and I was quite glad to have it! Later I would construct the Three Gorges Dam which helped to solve the pollution from all those coal plants. I also had about three dozen workers who were kept very busy reconfiguring Napoleon's captured cities into more productive setups, plus throwing down lots of watermills, windmills, and workshops for bonus production. The arrival of Railroad tech meant more jobs for those busy, busy workers since I can't bear to automate them outside the extreme lategame when everything important has already been done.
Anyway, I made certain to build Eiffel Tower to deny its effects to Zara, with the bonus effect of getting an extra happy face from Charismatic in every city thanks to the universal broadcast towers. I also built Rock N Roll and was able to trade for Zara's hit musicals from Broadway to keep my cities happy. Cristo Redentor was another key wonder to keep out of Zara's hands and I made sure to build that as well, with a little assistance from Universal Suffrage civic. Yes, you can use the civic to cash-rush wonders and they weren't really that expensive thanks to my earlier construction of the Kremlin. It's too bad that spaceship parts can't be cash-rushed (they could at times during Civ4 pre-release testing!) but that's disallowed since they are classified as projects.
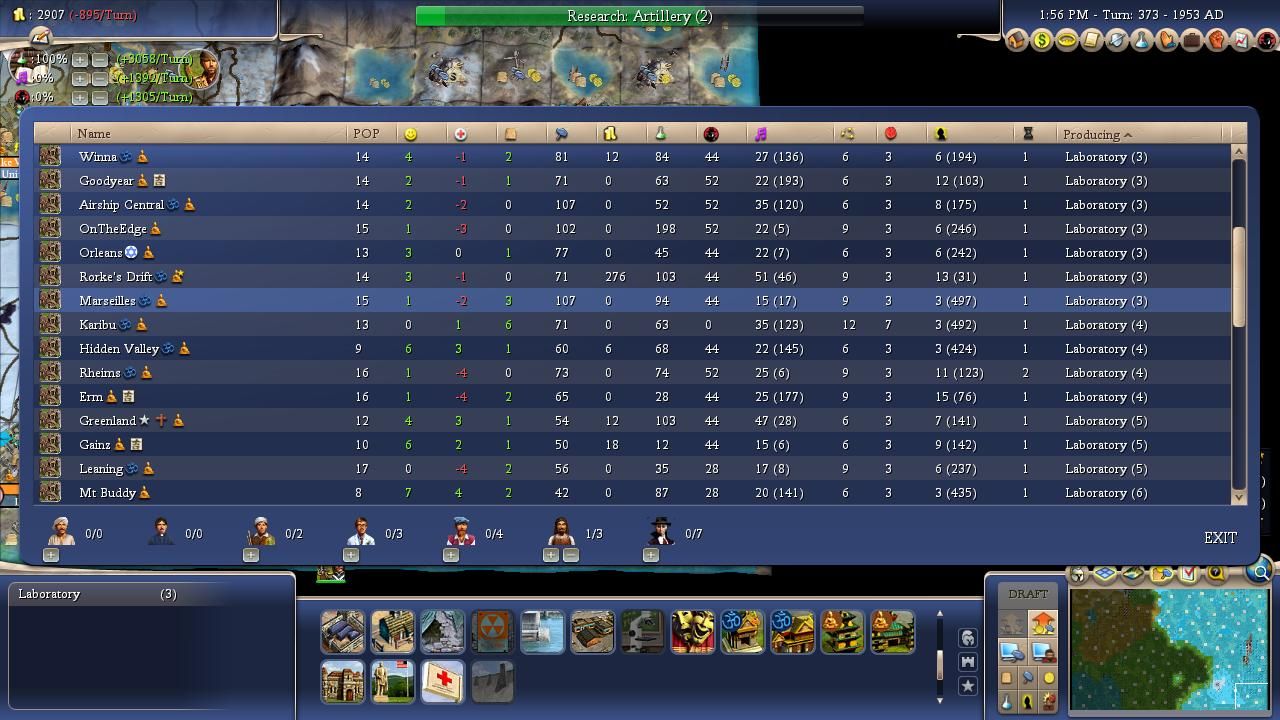
Once I had my pollution situation under control, I headed next for Superconductors and labs on the tech tree. The labs are the last building that increases science output and that's really the only thing that I needed at this point. I actually learned something new from the Livestream chat here, that you can queue up production in each city quickly from using the F1 city list, neat! Cristo Redentor granted me a free swap out of the venerable Nationhood and into Free Speech civic which also helped boost my research rate. As cities finished their infrastructure, I was able to swap them over to Wealth builds until researching at a positive cash flow at 100% science, then I put even more cities after that onto Research builds to swell my science rate even higher. Along with the labs finishing, that pushed my science rate from its previous top mark of 2500 beakers/turn up to a sustained 4000-5000 beaker output. Zara had no chance to compete with that and he fell far behind in the space race, with his best cities also barely cracking 20,000 culture. This game was just about finished.
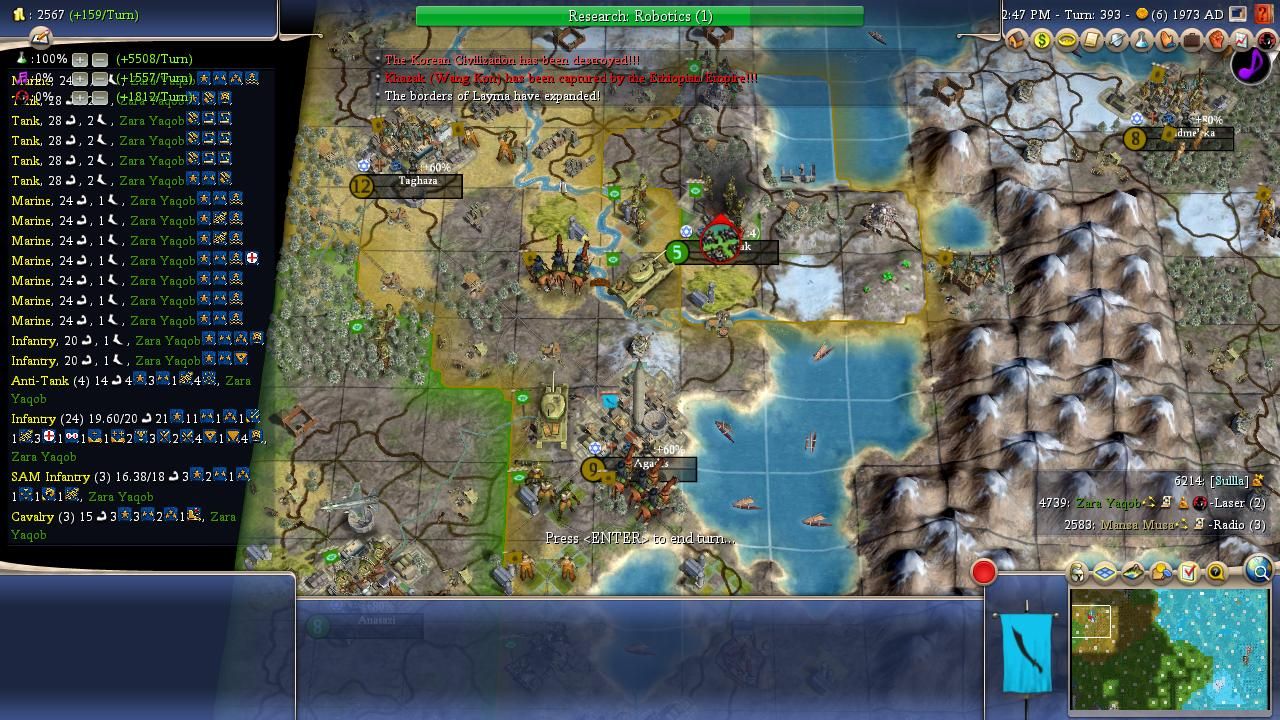
We amused ourselves during these turns by watching as Zara finished ripping the guts out of poor Wang Kon. The Ethiopians were stalled out for long periods of time by the rough terrain along their border, however eventually Zara made his way into the Korean core and began picking off one city after another. He finally took the last one all the way on Turn 393 as we watched along from airship surveillance. During this span, I had one of the former French cities pop a gold resource from its mine to create the only gold source on the whole map, then built the Internet wonder which delivered... Archery tech, heh. Well I guess I never did research that one! More importantly, I also managed to get a low-odds Great Merchant from the capital who could be combined with the Great Engineer from Fusion tech and an Artist and Scientist who were sitting around for the final 4 person Golden Age. That helped speed along the final spaceship parts and spaceship techs, though I still had to wait out the pointless 10 turn spaceflight duration afterwards - argh!
So that was all she wrote with a late, late Spaceship victory on Turn 408:
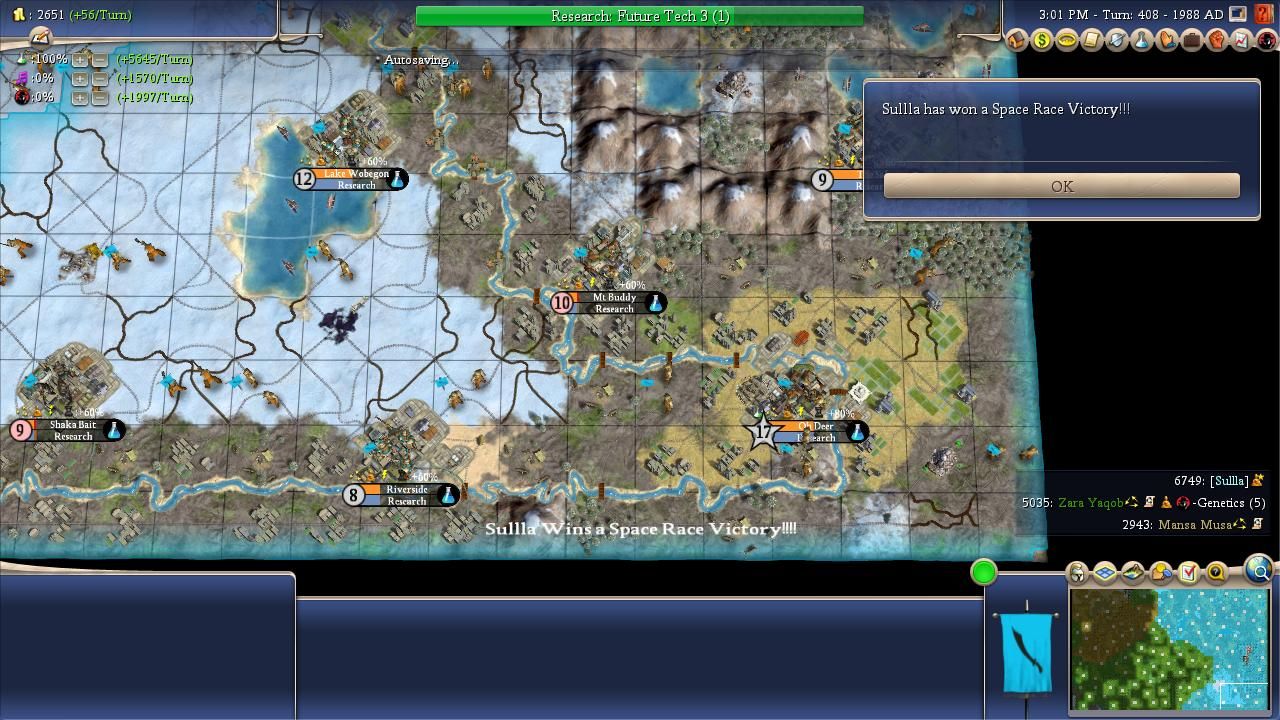
The whole game understandably had a slow tech pace due to the incredibly harsh map conditions, this simply wasn't comparable to a more normal game with more fertile surroundings. I really enjoyed this game and it was certainly memorable given the unbelievably poor tundra and ice surroundings. I think that I clearly had the worst starting position on the map which turned out to be a good thing since it made the whole thing more entertaining. The last few hours of the gameplay were anticlimactic but that was understandable; the downside to playing on a big map is that everything takes longer and things definitely drag in the later stages. Still, there's a certain amount of grandeur that comes from seeing huge empires with dozens of cities and stacks with close to a hundred units clashing against each other. I don't want to experience that stuff in every game but it is fun once in a while for a change of pace. This was one of my most popular Civ4 games on YouTube so clearly it resonated with the folks watching along! As always, thanks for making it through this report.


