The last part saw a large-scale battle take place over the city of Frankfurt, which ended in a decisive victory for my forces. On the turn after I captured the city, teh initiated a strategic withdrawl of his remaining units back to the saftey of Mainz:
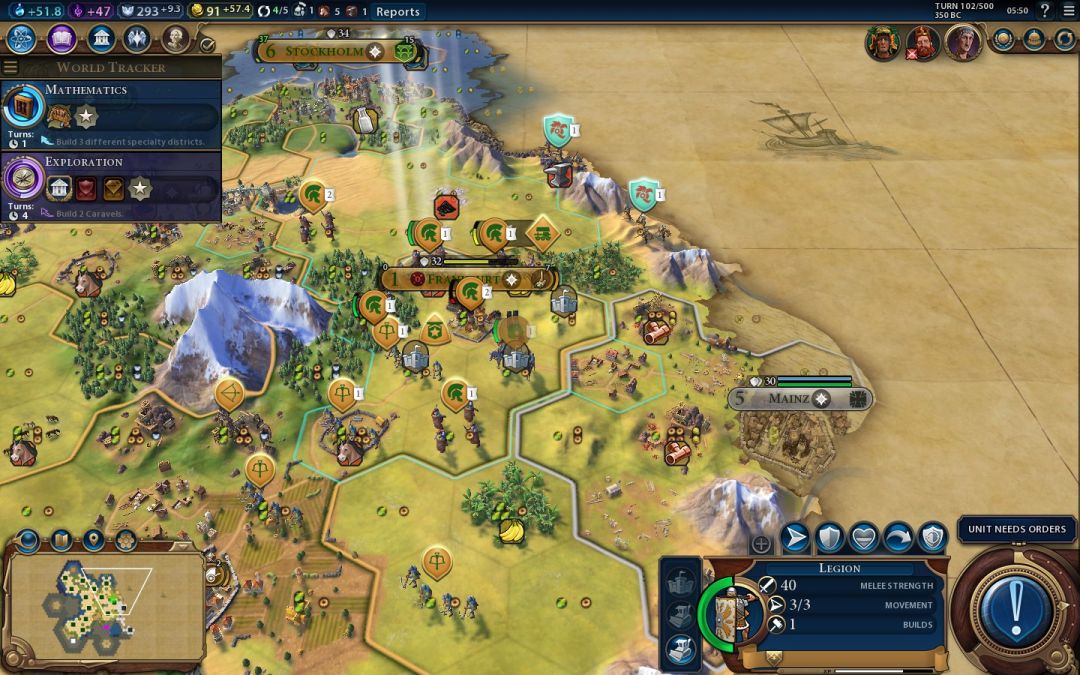
I think this was probably the best decision for him, forcing me to move into range of Mainz's walls if I wanted to continue advancing. They would shoot with the force of a crossbow at a ranged strength of 40 and were no joke. I took advantage of this brief respite to heal some of my units and shuffle them into the positions that I wanted for the upcoming assault on the next German stronghold. Just to provide an idea of what my original homeland was doing at this point, here's a picture of the capital starting up a district project for the first time:

Roma had just finished its Industrial district this turn, and I had the choice of going on to an Armory (5 turns) for the Gunpowder boost, or a Market (4 turns) for more gold and half of the Guilds boost. Instead, after looking at the Great Person screen, I opted to run this Commercial district project. I calculated the numbers and saw that Yuris was going to get a Great Merchant in 5 turns, and I wouldn't quite have enough faith to steal it away via Patronage. That was unacceptable to me, so I decided to build this project in 4 turns and then snatch the Great Merchant right out from under his nose. I might even get enough Great Merchant points to land the guy outright; if not, it looked like it would be an easy faith purchase. Now why did I care about this? Aside from the +1 trade route that the Merchant himself granted, I wanted to push ahead to the Mercantilism civic for two awesome policies located there: Triangle Trade (+4 gold/+1 faith per trade route) and Logistics (+1 movement for all units that start the turn in your borders). The boost for Mercantilism civic is to earn a Great Merchant, and this was my only chance to get one in a very, very long time. The first Great Merchant from the Classical era only costs 60 Great Merchant points, and the next one from the Medieval era would cost 240 Great Merchant points. It was worth it for me to build this project to ensure I land that Merchant.

Teh somewhat oddly attacked one of my crossbows with a horseman out of the fog on the following turn with no action from his other units. As it turned out, the horseman took only slightly less damage than the crossbow in this combat! That was the horseman's 36 strength against the crossbow's 34 strength, since it had 30 (melee) strength base and then gained +4 strength from having two of my other units standing adjacent to it. That was a nice little surprise to see how even when teh managed to get a horse unit on top of one of my crossbows, it still didn't do much damage. (This was a result of the horseman being a generation behind in military technology. Horses crush archers but then only have a modest advantage against crossbows. I will say that I think crossbows are a little too strong though; I would nerf their melee strength to 25 so that they are hard-hitters but very fragile when actually put in melee danger.)
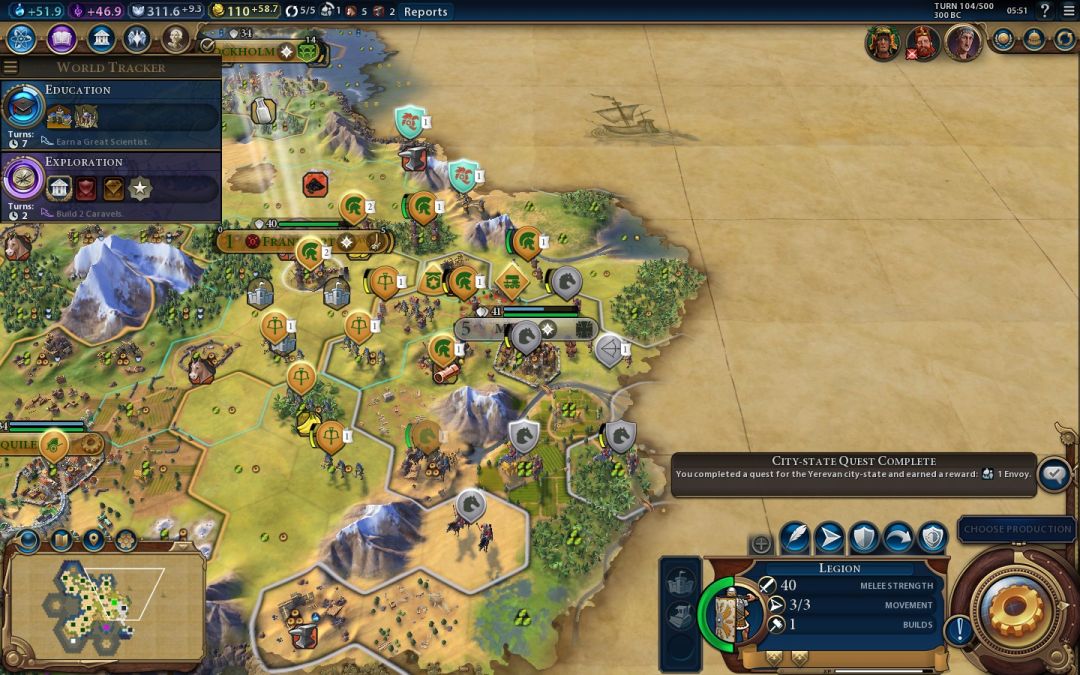
As for that unfortunate German horseman, I shot it with both of my crossbows and then finished it off with one of my own horse units. After ordering a general advance across the whole front, the tactical situation looked like this:

|
Sullla: I was faced with an archer inside the city of Mainz and three more horsemen behind it, one of them at half health. I was actually intending to have my own horseman unit circle around to the south of Mainz and place the city under formal siege, but it doesn't look like that's going to happen now. Two of my crossbows were able to fire on Mainz this turn, and together they removed almost half of the fortifications (27/50). Critically, cities recover 20 HP each turn when not under siege, but the walls do not recover health between turns. They stay damaged until the city spends production rebuilding them, and that's not an option until the city avoids taking damage for three straight turns. With that in mind, I am cautiously optimistic that I can capture Mainz next turn, especially if it remains at 30 strength. The legion with the siege engine will attack and remove the last of the city walls, then four crossbows can all fire against the unprotected city, then two more legions can attack. I'm reasonably confident that that will be enough. If not, then we'll take Mainz on Turn 105 instead. The only unit of mine in any danger is that horseman on the hill tile. In restrospect, I probably should have moved the Great General down a tile southwest so that the horseman would get the +5 strength bonus, but I wanted the two legions at the top of the screen to get the extra movement point. Right now it doesn't look like they're going to play much of a role in this attack, so that was likely a mistake. Oh well. The horseman will get the hill defensive bonus and +2 strength for being next to the crossbow. Teh can attack it with two horsemen and the city of Mainz (which has the strength of a crossbow); I don't think the archer can shoot over the mountain, although he could move the archer out of the city if he wants to get in another shot. If he wants to commit everything to kill another horseman, I'm OK with that trade. Aquileia will finish its chariot next turn, and I'll be able to upgrade that into a knight instantly when Stirrups research completes (and it's a one-turn tech). I have the replacement units for my two horsemen just about ready to go. Teh's military power was just over 150 at the start of this turn. Let's see: he had 4 horsemen (35 power each) and 1 archer (25 power). That works out to... 165 power, with a little bit less in total because of the damaged horseman to the east. Seems like that matches up pretty closely. This is basically his remaining military, and I think I can handle it without any serious issues. |
For someone that only had access to two horse resources for a handful of turns and no Encampment districts, teh certainly seemed to have a lot of horsemen. He would have benefitted here from more ranged units, but teh had been trapped by the Civ6 tech tree: having unlocked crossbows at Machinery tech, he could no longer build archers anymore. And after the general slaughter of archers outside Frankfurt, the German archery corps were severely lacking in manpower. I wasn't quite sure what teh was going to do here tactically; while I did have a huge advantage in units, the terrain also made attacking difficult for me. Here was teh's response on Turn 104, in what became another one of the game's more interesting tactical puzzles:
|
Sullla: Teh did not do what I was expecting. My guess was that he would go after the horseman in the exposed position on the hill to the south, but I think he came up with a better tactical response. Instead, he went after the legion with the battering ram by attacking out of the city with a horseman and shooting it with his archer. Then he had his city fire on one of my crossbows. That was a smart response, as the battering ram was the biggest danger to him since it held the potential to take down the city walls instantly at Mainz. Teh did make one mistake though: I don't know why he had the city of Mainz fire on a full health crossbow. He should have had the city also fire at the legion with the battering ram, which might have been enough to kill it when the horseman attacked. If the horseman was able to kill the legion, that would have also destroyed the battering ram, and slowed this siege down significantly. That would certainly be worth the price of the horseman making a suicide attack. Overall then, this was a good response that almost came up deadly. With none of my units actually getting killed though, I could begin formulating my response. First of all, I went ahead and attacked with the legion/battering ram combo, instantly taking out what remained of the city walls: 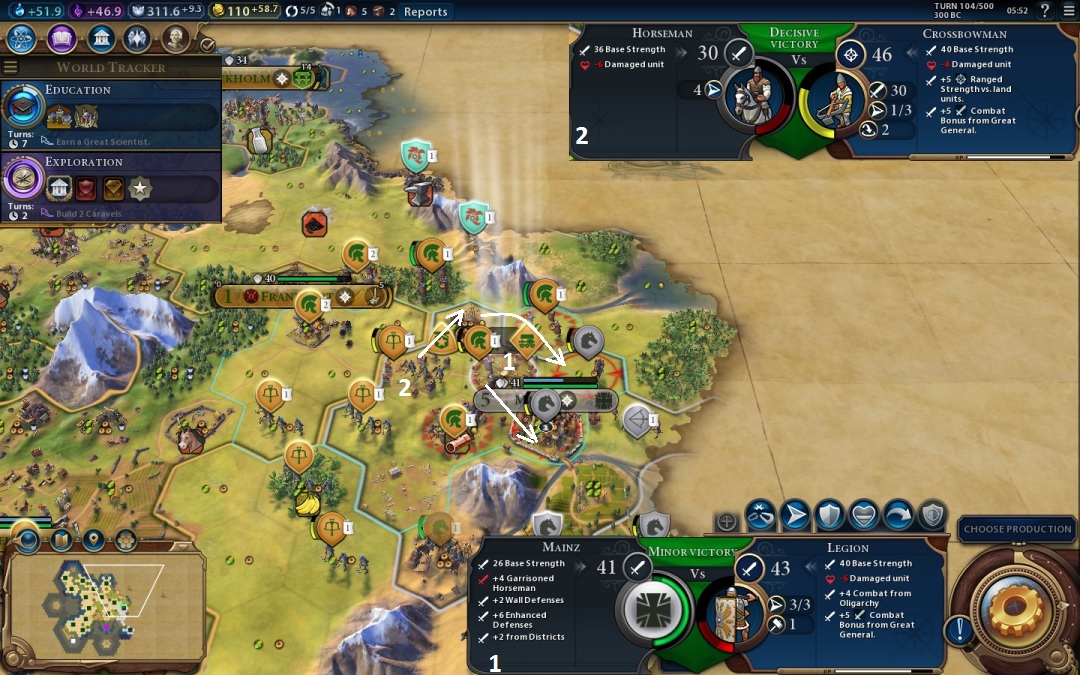
This redlined the legion in question though, and essentially left that unit (and its accompanying battering ram) dead meat if I couldn't find some way to capture Mainz this turn. Taking the city was going to be a tall order, and I had no idea if I would be able to manage it. Still, eliminating the city walls at Mainz was the critical first goal. Frankfurt and Mainz are teh's powerfully defended border cities, and if I could take them, his core would be completely open to attack. A sacrifice might be necessary here for success. Regardless though, the walls of Mainz were now officially down. Next I wanted to get the northeast legion in position to attack Mainz this turn, and I needed to eliminate the damaged horseman northeast of the city to occupy that tile. I moved my injured crossbow a tile northeast (onto a hill - thanks Great General!) and took the hovered shot in the hopes that this would result in a kill. It was very close on the expected damage, and I guessed that this was about 50/50 on whether the horseman would actually die. Much to my relief, the horse unit fell and I was able to shuffle the northeast legion into position. 
With the walls down, now my crossbows fired away for as much chip damage as possible against the city. Unfortunately they had to work through that -17 penalty against cities and their promotions did nothing here. Still, the Great General made a noticeable difference, and every bit of health that they could chip away would help my legions in their upcoming attacks. I also moved the healthy crossbow in the south a tile to the east, then couldn't shoot against Mainz because the tile directly west of the city was a hill tile. Archers/crossbows can't shoot over hills unless they themselves are standing on a hill. So that was a bit frustrating, two crossbows down in the south that were unable to take part in this fight due to terrain. If it required another turn to take Mainz, I'd be able to get them into the fight next turn by continuing to rotate my whole force slowly in a clockwise direction. 
Then it came time for the moment of truth. Were my legions strong enough to capture the city? I wasn't worried about attacking that archer; it was irrelevant if I took the city, and if I fell short, that legion with the battering ram was going to die regardless. So first I attacked with the legion northeast of the city, and I did pretty much the expected damage there, knocking Mainz down into the red. If you look at the other combat hover at the bottom of the screenshot, this one said that I would come up just barely short of capturing the city. Argh! So very close indeed. But crippling the city would still be the best option here so that it would be weaker next turn, and there's always a chance for attacks to do slightly more or slightly less damage than indicated. With that in mind, I went ahead and attacked anyway with the legion west of the city, and... 
Holy crap, that actually worked?! Tactically speaking for next turn, that poor German archer is completely doomed. The only tile it can reach is the one southeast of Mainz, where it will easily die to crossbow bolts or a legion attack or whatever. I feel sorry for that poor guy. It can shoot my damaged legion, but I don't think it can do enough damage to kill my unit. The legion has 21 HP remaining, and the -8 strength penalty is countered by standing on defensive terrain and having a Great General nearby. I think the archer will come up just short on enough damage to kill it (barring a good dice roll on teh's part). Then there are two full strength German horses and a half-strength one sitting to the south; we'll see what teh decides to do about them. He was really cranking out the horses while he had the resource connected. I did check and Yuris is not trading him a horse resource, which means no more horsemen for him. I'm going to try to pillage his iron resource off to the south next to stop him from training swords. (One other smaller question: why is teh healing that damaged horseman on the one tile outside his culture? Surely he could move into Cologne to the southeast and heal at double the rate. I don't understand that move.) |
That last attack on Mainz was the single luckiest combat roll of the game for me, and it happened to pop up in a very noticeable fashion. There's actually a decent swing in the damage formula; if two units with exactly the same strength fight one another, each will take anywhere between 24 and 36 damage, with 30 damage being the average result. This must have been a combat where I rolled at the top end of that range, and it was very welcome indeed. Then again, I certainly had plenty of combats where the official odds said that I would get a kill and then came up just short of finishing off a unit. This is one of those things that tends to balance out in the long run, if not always in a small sample size. One thing I learned as a result of this turn of fighting is that a battering ram doesn't actually have to be linked to a unit to do its work, only be touching a city to grant all attacking melee units the anti-walls bonus. That certainly would have been helpful to know here! I would keep it in mind for the future.
This was a very good turn for me overall. While I think I played it well tactically, that one bit of good dice luck ended up making a huge difference in the tight contest for Mainz. Teh was now down to three cities remaining, and I had been killing his army in huge numbers over the last half dozen turns. Even with Hansas and favorable unit production policies, he couldn't keep this up forever. His power rating was back down to about 115 again, and I estimated that the four remaining units I could see were about all that was left of his current military. The capture of Frankfurt and Mainz was starting to feel like the beginning of the end for teh. I didn't see how he could stop my army at this point, and the conquest of Germany increasingly felt like a foregone conclusion.
Turn 105 saw more fighting against German horsemen:

|
Sullla: For starters, note the Great Person popup - ha! Looks like that Commercial district project was enough to claim the Great Merchant without even needing to spend faith on patronage. I'll get to that in a minute. First, the tactical aspects of this turn. Teh managed to come up with yet another horseman, which I guess he completed in his capital just before I captured Frankfurt. I honestly have no idea how he managed to produce this many horses in the brief time that he had a second horse resource connected. Perhaps you can still finish a queued horseman build if you lose the resource, you just can't start another new one? I'll be curious to find out what he was doing when this game is over. [Note: after the game we confirmed that this was true: the resource check for units only takes place when starting a build, not on a per-turn basis. Teh was able to finish building horsemen that he had queued up before losing Frankfurt.] Anyway, teh has built a lot of them. An archer and four horsemen barred my path forward. That poor archer... I legitimately did feel sorry for him this turn. Teh did not opt to take a potshot at me, instead using the archer's turn to move across the river. This was probably not the best decision. Might as well get some free damage out of a doomed unit rather than shuffling it to no purpose. After moving my injured legion back to Frankfurt for safety and healing, I took my damaged crossbow and moved southeast to set up this shot: 
I was trying to redline this unit so that the legion inside Mainz could attack and finish it off. Well, either I underestimated the damage of my crossbow or I rolled slightly high on damage, because this crossbow successfully pulled off the one-hit kill. I'll take it! 
Next, I took my legion east of Mainz and moved it to the tile that the archer vacated. That allowed two more of my crossbows to get into the fight, and I opted to have each one fire against a horseman. I had the unpromoted one hit the weaker horseman on the jungle tile, while the highlighted promoted crossbow went for the full strength horseman and got in some good chunk damage. Interestingly, that horseman had the maximum possible fortify bonus of +6 strength, which means three full turns sitting on this tile without moving. Very interesting. Was teh simply trying to block my path forward with a wall of units (?) I'll have to ask him after the game what he was trying to pull off here. Then with the horses injured, the legions went in for the kill: 
First I used this legion to finish off the weaker horseman in the jungles, as killing this unit would remove a support bonus from the healthier horseman to the west. I attacked again with a damaged legion and did score the kill, although I took further damage in the process. I was really pushing my advantage here, looking to get those horses off the map as quickly as possible while I had the advantage. As I've said a couple times before, finishing off kills is a huge deal in Civ6, since individual units are much more valuable than in Civ4 and it's relatively easy for injured units to limp away, heal, and then get back into the fight later. I wanted to remove these irreplaceable horsemen from the battlefield while I had them on the run, before teh could regroup and supplement them with something else. My legions will have plenty of time to heal later after Germany is gone. (For that matter, I have fresh legions rotating up from the back and chariots about to upgrade to knights and join the battle. I should be OK.) 
Finally, using that vacated tile southeast of Mainz again, I attacked with another legion to weaken the horseman, and then finished it off with the legion that moved onto the desert hill tile at the start of the turn. (My own horseman who had started on that tile moved down to teh's iron, which I will pillage next turn.) The net result of all this was an archer and two more horsemen killed without losses, and with no units lost or in danger of being lost on my side. Here was the tactical map after moving everything: 
I have a crossbow on the front lines now. Ordinarily that would be worrying, but I think the unit should be fine. It can only be attacked by a single German unit, and the crossbow will get the Great General bonus and hill bonus and unit support bonus. I think the crossbow will actually have a melee strength of 44 here to the 36 strength of the horseman. Similarly, my horseman on the iron tile can also only be attacked by a single German horseman. I've successfully managed to push over the rough terrain where the peninsula connects to the main part of the continent, and my units control both of the one-tile choke points. Now I just need to cross through the belt of jungle and cross that river, then I'll be in teh's heartland. His second city (Cologne) is on the tile southwest of the bananas, in the identical location as my Ravenna. I will probably try to surround the city next turn and then attack it on Turn 107, but we'll see what happens. |
In addition to cutting my way through more German units to the south of Mainz, I also successfully used the Commercial district project in my capital to snipe the first Great Merchant away from Yuris. The four turns of production I put into the project ended up being worth 32 Great Merchant points, allowing me to grab the Great Merchant in the nick of time. The Great Person screen went from looking like this on Turn 104 to looking like this on Turn 105. I posted a messy version of the district project formula in my thread, which lurker rho21 helpfully cleaned up in this fashion:
District Projects
Cost = 25 * (1 + 14a)
GPP = 10 * (1 + 7a) [or 5 * for theater/carnival]
where a = max(techs/67, civics/50)
I immediately burned the Great Merchant for an additional trade route, which Arretium began working on a trader for. I would have three new trade routes the following turn after swapping into Merchant Republic, and Constantinople was getting close to finishing another Commercial district. Techwise, I finished my second chariot this turn and Stirrups was about to finish next turn for those chariot to knight upgrades. Gunpowder was next, due in about 5 turns or so, and then I would be able to convert my legions into muskets with 55 strength.
Teh actually also finished a Great Person on the same turn, claiming a Great Engineer that will essentially give him a free early game wonder of his choice. Perhaps a bit late to matter now... I was curious to see what he chose to build with the Engineer, if anything. The next Great Engineer was another very useful wonder-building one. We ended up having excellent Great People throughout this game, none of the early dud candidates appearing. I also wasn't too far away from recruiting the next Great General with faith patronage, which I planned to take as soon as it was available. No sense waiting with this game almost over, and there was nothing else for me to spend faith on at the moment.

The offense continued to grind onwards as I pushed towards Cologne. Teh did indeed attack my crossbow on the hill with his horseman, and I was correct in the combat theorycrafting last turn. My crossbow took only minor damage while his horseman lost about half of its health. Thank you very much defensive and unit support bonuses. Anyway, I went ahead and moved my forward legions up a tile, revealing the city of Cologne and clearing out some space for my crossbows to maneuver. The combat odds suggested that the crossbow on the hill would be just short of killing the damaged horseman, so I used this full strength crossbow instead. The odds held true and this was enough to land the kill. The other horseman retreated back into Cologne, and this was indeed the best move that teh could make in this situation. The horseman increased the defensive strength of Cologne to 38, making the city a much tougher nut to crack. I promoted some of my units and shuffled others forwards as best I could, in particular moving the horseman up since there didn't appear to be much of a need to pillage that iron tile. This was the situation after moving everything:

|
Sullla: Here's the final positioning around Cologne. I also went ahead and upgraded my two chariots to knights at a too-cheap cost of 90 gold apiece. The highlighted knight will be able to get into the action in another turn or two, and should be able to help me capture teh's final cities. The other one probably will be too slow to make it, but we'll see what happens. Note that I did all of this before swapping governments and civics, so that I could continue to enjoy the Oligarchy bonus for one last turn of fighting, and the Professional Army discount upgrade costs. 
With Exploration civic in hand, it was time to ditch Oligarchy after many long years of useful service. Farewell lion-shaped government icon; you served Rome very well indeed. Now Merchant Republic was beckoning, and it was time to make use of significantly more policy cards: 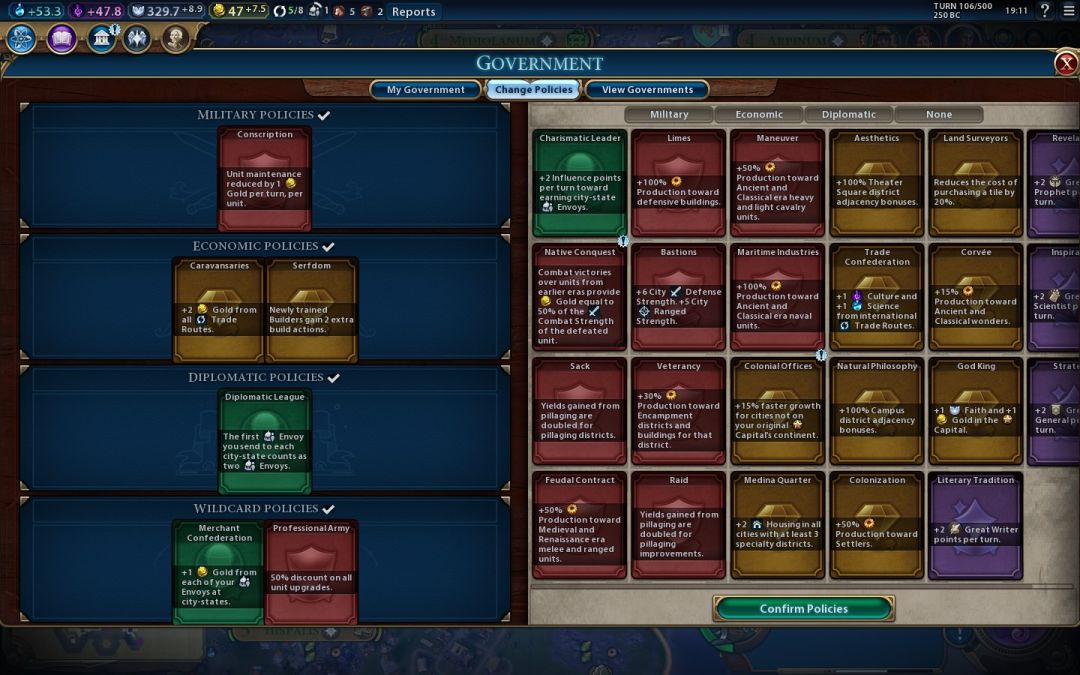
Here's what I came up with. Conscription and Caravansaries for sure, and then Serfdom to boost all those builders I've been holding 1 turn away from completion. In the Diplomatic slot, I wanted Diplomatic League to get the 2 for 1 deal with Kumasi, and then Merchant Confederation was actually the best available option for one of the Wildcard slots. I'll move that back into the Diplomatic slot at my next civics change. Then for the last slot I wanted Urban Planning, except that it was apparently obsoleted by that new Colonial Offices policy. What the heck - those two aren't similar at all, and Colonial Offices mostly sucks! Give me back Urban Planning! Seriously Firaxis, what the heck. I ended up slotting in Professional Army to the last spot, and I already think that was a mistake. I was thinking I could use it for any upgrades I might want to do before my next civics swap... except that I've already upgraded everything that can be upgraded right now. I'll have Civil Service in 4 turns, before I get to Gunpowder for the next upgrade (legion to musket) in 5 turns. That means Professional Army was a complete waste of a policy slot. D'oh. |
It felt oh so good to reach a more advanced government and unlock all those additional policy card slots. Losing the Oligarchy combat bonus on my legions was a bit sad though; that +4 strength bonus had seen my boys through many difficult and daring moments. The new policies were mostly economic in nature, and in particular I would be able to benefit from all of those additional trade routes once I had the chance to finish knocking out the actual trader units. I was now up to eight potential trade routes while the other players in the game had only only one or two apiece. Even better, Triangular Trade policy was on the horizon for +4 gold and +1 faith per trade route. I was also about to produce about five more builders with that Serfdom card in place, which would go back to the work of improving my territory. The northern Roman cities in particular were about to get a significant upgrade.
The following turn saw another repetition of the same annoying issue that took place at Stockholm and Frankfurt: a city building walls on the same turn that I was about to capture it:

|
Sullla: Cologne built city walls between turns, shot my legion, and then teh attacked and killed it with a horseman. I'll take small solace in knowing that the legion would have survived OK had it not been for Cologne sprouting city walls between turns. That's three total units lost in the war against teh (1 horseman, 1 crossbow, and 1 legion) and two of the three dying only because a city completed walls halfway through a siege. Ah well. Somewhat surprisingly, Cologne remained under siege although I don't know how any of my units are exerting zone of control over the tile immediately east of the city. Perhaps something a bit buggy there. In any case, this was a perfect chance to test that battering ram mechanic. I deliberately didn't place the battering ram on the same tile as the damaged legion last turn, on the chance that it would be attacked and killed somehow. Now I still had it free to move on my turn. My first thought was to shoot the horseman and kill it with crossbows, only to find that I could only shoot it from two places, the tiles immediately northwest and west of the German horse's current position. The jungle terrain blocked anything two tiles away from reaching with ranged shots. The crossbow immediately next to the horse unit lacked a promotion, and came up just a little short of the one-shot kill. Instead, I decided to go after Cologne first and see if I could take it, then deal with the horseman after that. 
I began by moving the battering ram a tile southwest next to the city. That used up both movement points and prevented any linking with the legion on that tile. Then I decided to test that mechanic by shuffling my full health legion onto the marsh tile west of the city and throwing it against Cologne. As the combat mouseover suggests, it worked just as Athmos and fahbs suggested: 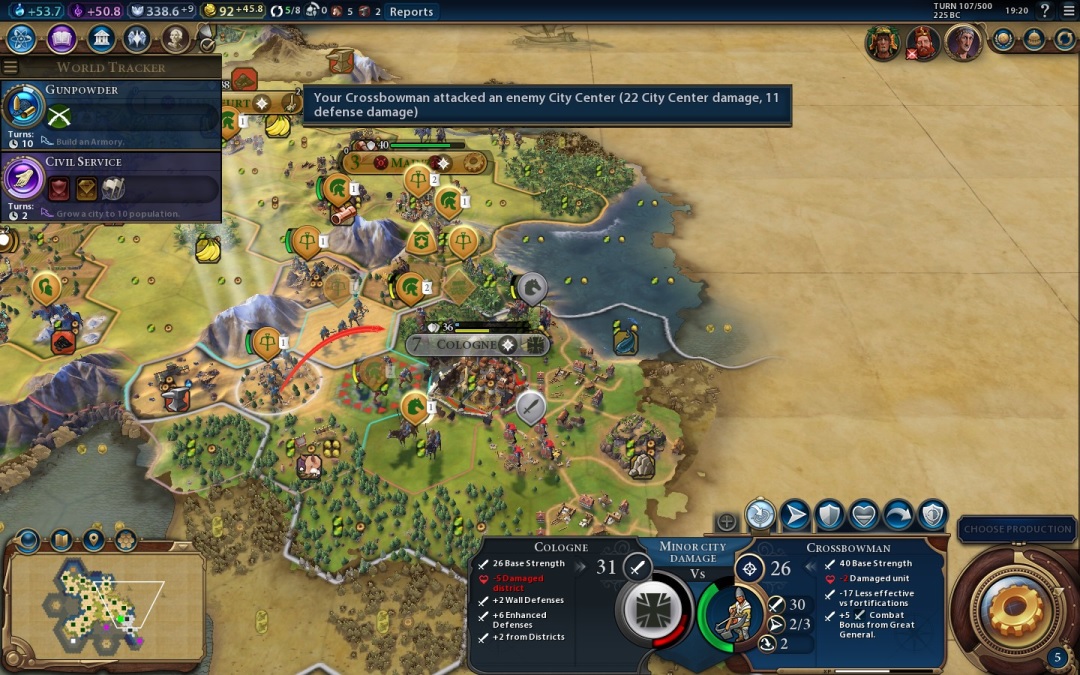
The legion took out about 38/50 of the health on the walls. Next I fired on the city with these two crossbows to the west, which could shoot over the marsh tile west of the city. They stripped away the remainder of the city walls and did some helpful chip damage against the city itself. That left me with two melee attackers left to assault Cologne, first the Roman horseman to the south and then the damaged legion to the northwest: 
I decided it would be better to send in the horse unit first, which would allow the legion to be the one that took the city and therefore clear another tile in that tangled jungle region for maneuvering. The horse did 60 damage and nearly took Cologne itself, then I sent in the legion for the finishing blow. Cologne was captured at size 5 with an Industrial district intact, and by virtue of the Roman unique ability, a road instantly appeared to this city that ran back across the iron hill to the west. 
Now there was just the matter of cleaning up the injured German horseman. I shuffled the unpromoted crossbow a tile to the southwest into the jungles and then took the shot that I'd had available since the start of the turn. That did 48 damage and as expected left the horseman crippled but not quite dead. I would have preferred to get in another shot with a crossbow for the finishing blow here, however the jungle terrain prevented my two-promo crossbow in the north from having an available shot. As a result, this legion had to attack despite the river combat penalty, and took almost 20 damage for its trouble. Oh well, it was worth it to clear that unit from the field, and this legion is extremely close to a promotion anyway. I can't remember if this attack gave it enough XP to promote or left it just barely short. 
Here's where things stand right now. I did not attack the German sword, as I lacked any available way to take the city and also go after the sword. Despite its higher attack value from Oligarchy government, the sword is probably less dangerous than the swarms of horses I've been seeing previously from teh. Horses can move 4 tiles and ignore zones of control, which swords only get 2 moves and have no such luxury. The German sword can only attack Cologne itself (which it will not be able to recapture) or the healthy horse and legion to either side of the city. I'm not concerned about what this unit can do. It can't even run away because it only gets 2 moves and all my units get 3 from the Great General. Now that I've pushed past all the rough terrain of hills and jungles and rivers, I'm on a flat grassland plain where my numbers and great maneuverability should allow me to mop up any remaining teh units with ease. That is, if he even has anything left at this point. Capturing Cologne also cut off his iron supply, which means no more swords for him. It's pretty much spears or crossbows at this point. I'm sure the capital has city walls by now, so I might try to capture Ulm first before it can get its own walls up. Teh is likely running Limes policy to build the walls at double speed, although strangely he doesn't appear to be in Bastions to give his city walls extra strength and firing power. My first knight is also on the field now off to the west, and I'm only 4-5 turns away from discovering Gunpowder and beginning to upgrade my legions to muskets. That's roughly when I will pop the second Great General too, so my muskets will also be able to benefit from the movement and strength bonus. If this has been pretty one-sided so far, it will be hilariously so if I can start deploying muskets with 3 movement points and 60 strength. |
It cost me another unit, but I managed to wrestle Cologne away from teh's hands. This left him with only two cities remaining, and as far as I could tell that sword was the only German unit still alive. I felt bad for my legion who had fallen though; I'm pretty sure that he would have lived if it hadn't been for the walls completing between turns. ("He had one day left until retirement!") Now the road was opened to teh's capital of Aachen, quite literally since there was a road running off to the east where I knew it had to be located. The end of this campaign was turning into a bit of an anti-climax, with the major battles already fought and essentially nothing more that teh could do at this point.
By the way: I very much would have liked to present teh's side of this conflict, using his commentary and some more of his awesome screenshots of unit movements. It would make this more interesting to read about what he was thinking when he was moving his units back and forth during some of these clashes. Unfortunately, teh stopped updating his spoiler thread after he signed peace with Yuris, and therefore there's no record of his turns during this period. I don't blame him either; playing turns when you're losing in a game is a stressful and frustrating experience, as you watch the cities and units that you worked so hard to create getting taken away or destroyed. Very few people are willing to keep writing in detail about that process as it takes place. As a result, while I certainly don't fault teh at all, that's the reason why these last few sections have been so one-sided from my point of view.
Speaking of other players, with the German campaign in its final stages, the last remaining player in this game belatedly decided to start getting involved:
|
Yuris: 4 turns away from Stirrups. Soon my Knights shall rule them all... Turns out Knights need Iron. Who knew. Will have to do with Horsemen for now. But I'm taking this seriously now - cities start working on Horsemen as they finish districts. With Sulla conquering TheArchduke, I need to do my own conquest asap, otherwise he will run away with twice the land of everyone else. I had to vacate Frankfurt after teh showed up with a Heavy Chariot and I didn't have any counter to that. Still, that war went well enough. Problem is, Sulla seems to be steamrolling teh now after taking out TheArchduke and easily capturing Stockholm. My attack may have contributed to teh's problems by slowing down his development. If he can't stop Sulla, the game is over - I won't be able to compete with Sulla's 3x territory with my 4 cities. My first Knights will be ready in about 10 turns (6-8 to finish them, more to bring them in position, and no way to speed it up.. did I mention I hate Civ6 movement rules?), I think it's going to be too late for them to play a role. But yeah... follow Sulla vs teh for now, don't mind me in my corner. Basically the current plan is to finish the first round of Knights, shout "Hail Mary", and attack whoever is more convenient to attack at the time.  
I don't know if "this" will be very successful, but I do think it's my best chance of slowing Sulla down (if it's not too late already). One knight is slacking behind because I couldn't build a road from Lisbon to the front.. did I mention I hate Civ6 movement rules?) |
Those posts from Yuris were written over the course of about two weeks, which I've condensed togther here for easier reading. Yuris had apparently decided at a fairly early date that he would go for a knight attack, and then was caught completely off guard by the iron requirement for knights. As it turned out, he was able to build them because I was trading him iron, a rather ironic situation that I'll discuss in more detail in a minute. Yuris had also been thrown off by the expensive cost of knights (180 production each) which his production-starved cities were not able to turn out in any kind of reasonable time frame. His initial plan had been to attack teh, and yet by the time the knights were ready, teh had nearly been eliminated from the game and I controlled almost the entire map. Whoops. Now Yuris was forced to launch a desperation attack against my civ in the hopes that it would rescue any slim chance at a victory.
This was my reaction to Yuris' movement up to my northern border:

|
Sullla: OK, so the main news for the turn is Yuris moving a bunch of knights up near my northern border. We'll get to that in a minute. First of all though, let's try to eliminate that sword that teh was moving back towards his capital. If it managed to set up shop inside his capital, it would boost the defenses significantly and make everything harder to capture. I moved two crossbows into position and fired on the sword: 
I expected this second shot to get the kill. Unfortunately, I must have rolled poorly on the attack and the sword lived with 1 or 2 HP remaining. (By the way: I really wish you could see how much health enemy units have. As far as I know, you can never see the exact number. All I know is that this sword survived with fewer than 5 HP, because it had -10 strength from taking damage.) This forced me to use a legion to finish it off, and so I used the legion with green health northeast of Cologne to do the dirty deed. That legion had enough XP for a promotion, which will allow me to restore it to full strength next turn. This movement also revealed teh's capital for the first time: 
Aachen is a very fine city at size 8, and the Great Engineer that teh claimed a few turns ago is still hanging out inside the city. It appears to be in the process of building city walls based on the little graphic surrounding the city, and so I think I'm going to try and rush this location down before they can finish. Hopefully they won't complete next turn. Obviously how I play this also depends in some part on what Yuris is doing in the north. I do think I can take Aachen and Ulm fairly quickly and put an end to this war in the south. But that leaves out the one complicating factor: Yuris. 
Aztec power has been spiking in recent turns, and went from 192 to 384 over the last few turns. That is almost certainly four knights (4 * 48 = 192 power exactly), with one knight built from each of Yuris' four cities. I expect that he is going to attack me next turn based on the positioning of these units on my border. (If Yuris was planning on a surprise attack, he's certainly failed by moving everything up next to me.) Let me discuss the tactics of this first, then we'll get to the broader strategy. There are two knights and a mostly irrelevant Eagle Warrior positioned over by Mainz, and then another knight and Eagle Warrior over by Frankfurt. I used this turn to heal/promote some of my units and shuffle a trio of crossbows into position. I have a legion that will be full strength in Frankfurt next turn along with a reinforcing knight, plus a legion and a bunch of crossbows near Mainz. Because I was still moving units into position (and because Yuris is still paying me 10 gold/turn), I did not opt to declare war on Yuris this turn. That leaves him the first strike, but he can't attack those crossbows with any of those units, and Mainz itself should be fine for a turn with 42 defensive strength, plus the ability to heal back 20 HP between turns. I kind of hope Yuris does throw his knights against that city to soften them up for my ranged units. The main thing I need here is to stall for time. I'm only 3 turns away from finishing Gunpowder tech (with an armory about to complete in my capital for the boost), and then I can upgrade my legions to muskets. I can also swap into Bastions policy for +6 melee strength on the next turn if it looks necessary. Together they would give every city a defensive strength of 51, and a city with a musket sitting inside would have a defensive strength of 61. Even knights will struggle mightily against that. I'm also only about four or five turns away from hitting my second Great General, which will boost muskets with further combat strength and movement. (I would be just about to pop it right now if I had picked Strategos policy a few turns ago, argh!) So while this is a threat I have to take seriously, I don't think there's cause for panic. Strategically though... this just makes me sigh. 
I have more than double the score of anyone else, more than the score of all other players combined. I'm teching at 2.5 times the speed of Yuris, and researching civics at better than triple his speed. In order to build this army he's destroyed his economy, and the Aztecs are now losing 5 gold/turn. Yuris has 4 cities and I have, what, 15 I think? This is very obviously never going to work. Since I went to bed last night thinking that we were about to wrap this game up, I'm slightly annoyed this morning that apparently I still have to slog through more turns of a very obviously won game before it comes to a conclusion. So I guess I have to break the army of all three other players in this game, one after the other? Apparently so. I also need to point out one other thing: Yuris can only build knights because I'm trading him iron for 5 gold/turn. On the merits of it, this is an obvious strategic error from me. I sent him iron, then he used it to build a powerful unit and attack me with them. However, I don't think it's quite as straightforward as that. I traded Yuris iron about 10 turns ago, under the thinking that if I sent him the resource he would be indebted to me for the supply and would not attack me to maintain the source. I also could make very good use of that extra income, as I was furiously upgrading units for use in the war against teh. Indeed, the money Yuris was sending me allowed me to convert all my archers into crossbows very quickly, helping to turn the tide of that conflict and crush the German army. While that was going on, Yuris sat on the sidelines (very slowly) building his knights. If he had moved immediately to help teh, then I might have been in genuine trouble. Instead, Yuris waited until my war with teh was effectively over before making his move. Typical Yuris - he always seems to misread the metagame in his MP endeavors. If sending Yuris iron caused him to sit on the sidelines for an additional 10 turns, then it was absolutely worth it from my perspective, as by now it's essentially too late. Teh is crushed and Yuris is standing alone in a war he can't possibly win. Now with that said: if you had told me 10 turns ago that Yuris would use the iron to build knights and attack me with them, then yeah, I wouldn't have made that trade. |
As my post at the time indicated, this was more annoying than a serious threat. These Aztec units might be able to take a city or two in a best case scenario, but I had muskets on the imminent horizon and well over a dozen total cities at this point. There was no realistic way for this invasion to defeat me before I could produce enough units to counter and push it back. I was somewhat exasperated that I would have to push back yet another threat from the last remaining player before this game could be put to rest. That said, what was annoying to me makes for more entertaining reading for you, so let's dive into the nuts and bolts of this attack, shall we?
On the next turn, Yuris declared war on me in his extremely telegraphed attack:

|
Sullla: Note that Yuris loses access to a luxury and to my excess iron, which means no more knights for him. (His "second" iron is visible at the top of that screenshot, and it's not located in his borders.) Let's see what we had here. Three knights, three horsemen, and two Eagle Warriors, plus that random Eagle Warrior off in my territory to the far west. I get about 335 military power from that group, and Yuris was reading at 384 power, so he either has one more knight somewhere or a couple of random older units. But this should be the bulk of his army right here, more or less. If I kill this, I win the war and then it's just a matter of walking up to Yuris' capital and ending the game. Since my Great General was over in the south, I had to start by moving my units in that theatre of war first: 
Aachen did not finish city walls this turn, which kind of surprised me. I moved up some units next to the city and prepared to attack it next turn (when I again suspect that the walls will likely be done). I'll have the battering ram next to the city next turn though, and thus any walls will be short lived. Because I didn't have the city under siege and several of my units were still moving into position, I opted to pillage the trade route with my three-promotion legion. That gave me a very welcome 60 gold, which will help turn more legions into muskets in a few turns. I ended up moving the two crossbows over here and taking potshots at Aachen, along with sending the horseman 5 tiles due east. The final situation in the south looked like this: 
The two crossbows took out about 40 HP from the city. Aachen will of course heal back 20 HP between turns since it's not under siege, but every little bit of chip damage helps. If the city doesn't build walls between turns, I think I can take it next turn. If it does finish walls, then I'll spend one turn destroying the walls (and putting it under siege), then capture the German capital on Turn 111. Either way, it won't be much longer. Ulm should be easy to take after that; since it has much lower production, I don't think it will be finishing walls any time soon. (Now watch them finish next turn and make me look like a fool, heh.) Teh also had a military power rating of zero this turn: no units at all. 
Now for the main action of the turn. Yuris attacked with his two knights and did about 80 HP worth of damage to the city of Mainz. He was not able to put it under formal siege thanks to the tricky geography in this region, and so Mainz should heal back 20 HP at the end of my turn. (I think; unless it already healed back 20 HP at the start of my turn. Not sure when that happens.) The top priority was downing one of the two knights this turn and clearing out some space in this area for my crossbows to work. I have the superior ranged firepower in this area and the defender's advantage, but that wouldn't matter if my units ended up getting choked on top of one another and unable to fire. First things first. I took the two-promotion crossbow and fired at the most dangerous unit in range, the knight northeast of Mainz: 
That knocked the knight below half health. I was hoping that it would damage the knight enough that my legion inside Mainz could attack out of the city and kill it. See, I wanted a unit inside Mainz last turn for the defensive bonus, since I was expecting an attack, but I didn't want a unit inside Mainz at the end of this turn because if the city fell any unit inside would be destroyed. My moves this turn were designed to avoid leaving a unit inside the city unless I had no other choice. Anyway, my preferred move wasn't going to work: the legion would be unable to kill the knight northeast of the city. Therefore I had the one-promotion crossbow on the jungle tile shoot the Eagle Warrior for 48 damage. Interestingly, the Eagle Warrior had the Tortoise promotion which gave it +10 strength against the crossbow bolt. However, that meant that it lacked the Battlecry promotion, and my legion inside the city easily cleaned it up. So why did I care about attacking the Eagle Warrior? Wasn't that unit unimportant? Well, killing the Eagle Warrior allowed my legion to get out of the city and remove an enemy unit in the process. That allowed a knight to move 4 tiles into Mainz: 
And then kill the Aztec knight with a handy assist from the Great General and the support bonus from the legion. The odds said I would come up just barely short of enough damage to win this combat, but it was extremely close and worth taking the shot. Fortunately the dice were kind here and I claimed the kill. This gave me a nearly full health knight on the tile northeast of Mainz, limiting the tiles from which the city could be attacked to two: northwest and west of the city. I believe that Mainz should be able to hold out another turn, and that will give me another turn to clear out units and fire my crossbows, etc. Even if Mainz would fall, I should be able to take it back fairly easily with the units I had amassed around it. Ideally, I would have moved the remaining crossbow into Mainz and fired at the horseman unit, then killed it with my fresh knight in the west. However, that crossbow was not in range of the Great General at the start of my turn, and thus it only had 2 moves on this turn, not 3 moves. I could move into Mainz, but not move in there and fire, and so there was no point moving into a place where the unit might get killed if the city fell. I opted to heal in place this turn, and I'll have the 3 movement next turn to move and fire. Meanwhile, I finished Civil Service civic this turn, opening up a policy swap:
I kept Conscription, Caravansaries, and Merchant Confederation to keep my economy running along at a decent clip. In the Economic column, I dropped Serfdom in favor of Meritocracy now that my current wave of builders had completed. Meritocracy is an amazing policy with its +1 culture per specialty district; along with monuments, it often proves enough culture to get through the civics tree with few or no Theatre districts. (It was already worth about 8 culture/turn for me, and will be significantly more once the German cities come out of occupation.) In the Wildcard section, I grabbed two Military policies. Bastions was designed to beef up my city defenses, with an additional +6 defensive strength everywhere. Unfortunately after making this selection, I discovered that the policy only applies to city walls, not all city defenses. Well, that was a bit of a disappointment. Still, it will be helpful at Aquileia, and I learned something useful for future Civ6 games. Not entirely a waste, although I could have taken a better policy. The other policy I took was Maneuver: +50% production on Ancient and Classical mounted units. Why that policy? Well, I told you last turn I had a trick up my sleeve if Yuris attacked me: 
Why hello there Mr. Forest Chop! Why yes, I would like a horseman for free with significant overflow, thank you very much. 
Another horseman for free! You shouldn't have. That resulted in 2 horsemen immediately, and Arpinum can complete another horseman with the overflow in 2 more turns. Aquileia and Arpinum also started horsemen, each due in 3 turns. And Ravenna will chop another forest, which will be worth at least one more horseman, possibly two more with all of the overflow. What's the deal with all the horsemen? Well, they're cheap to build at only 80 production and they have enough speed to reach the front lines quickly with their four movement. The Great General boosts them up to 41 strength, and that's plenty for what I need right now. Just give me some more cheap units to hold the lines while my highly promoted crossbows do the real work. I finished two horses this turn and I should have five more completing in the next three turns. This might be overkill but I see no reason to take any chances. I'm sending the current horses up to the front lines until I get them under control. That random Eagle Warrior in my back lines can't take any cities and is therefore not that scary. There are even multiple builders around to repair tiles as they are pillaged. I will probably chase it down with some of these horses in a few turns, hopefully before it can pillage any districts. 
Here's the current state of the front lines. As I said, Mainz can only be attacked from two tiles, and I think even attacking with two knights won't quite be able to capture the city. Yuris may be able to kill my northeast knight if he attacks with both of his knights, but then both Aztec knights would surely die on my turn. All three crossbows should be able to fire next turn, and therefore I should be positioned for quite the counterattack. Frankfurt is a bit dicier, so I moved my knight inside the city to give it a defensive rating of 48 strength. Then I intended to move my legion onto the forested hill to the west to block movement from the Aztec horseman, only to find that I had already swapped position with the knight, and that left the legion with only 1 movement point left. Whoops. The best move I could make at that point was to drop a fortification and fortify in place, although I should have placed that one tile further east to cut down on the mobility of the Aztec units in this region. Yuris has made a somewhat unfocused attack by going for these two cities at once; I've started to roll up his flank at Mainz already, and I should be able to make further progress next turn. While I won't say the danger is completely passed yet, I'm feeling better about my position after this turn. Overall, I added 70 military power this turn from the two horsemen while Yuris lost 75 power from the knight and Eagle Warrior. He has to win these trades overwhelmingly in order to have any prayer of success, and so far that's not happening. Remember: it's much easier to defend in this game than it is to attack. |
This turn went well for me from a tactical perspective, in particular that one knight by Mainz winning a very close battle to finish off an Aztec knight. I also had the foresight to set up a civics swap for this turn, allowing me to grab the +50% production card on Mounted units and chop out a whole bunch of horses. I would have gone for knights instead, except that I didn't have the policy card (Chivalry) that boosted production of Medieval/Renaissance mounted units yet. (It's placed in an odd position at the bottom of the civics tree at Divine Right with a whole bunch of religious stuff.) Horsemen were good enough for what I needed here, more physical bodies to push back the Aztec incursion.
Yuris' reaction in his spoiler thread didn't exactly brim with confidence: "So much for being first to Knights. Expect a concession within 5 turns. I think attacking now and hoping for the best was the only option I had left when I saw Sulla killing TheArchduke and carrying on to steamroll teh without a pause....." Of course, I couldn't read this at the time, and with no concession yet forthcoming, I went back to work with my units:

|
Sullla: Yuris decided to throw three units against my knight in order to kill it, using both of the yellow health Aztec knights and his horseman. While that's a sad fate for my boys in armor, this is still very much a winning result for me. Yuris has just admitted defeat: by going after my units instead of my cities, he's admitting that he doesn't have enough force to capture anything. And that reveals this little war for exactly what it's been all along - completely pointless. OK, so none of my cities are going to fall anymore. No more worrying about that. Now it's just a matter of cleaning up the Aztec army, and I should have a mop and bucket handy. I had seven total units in this theatre of war, and six of them were in position to make attacks this turn. (The legion by Frankfurt only has 2 movement points and can't reach anything to attack. If I'd positioned it a tile east last turn like I wanted, I could have played this turn differently and better with another attack available.) I started by using my crossbows behind the city to get in some free damage: 
With Mainz in no danger, I could move into the city with my crossbows and fire freely. The two promo crossbow went after the knight northwest of Mainz, after I hovered over the the northern Aztec knight and realized that it wouldn't do enough damage to get the kill. The other crossbow attacked the weakened horseman in the east for lack of other targets to hit. That redlined the horseman but wasn't quite enough to finish it off, so I attacked and killed it with my legion on the tile east of Mainz: 
Unfortunately that revealed another full health knight across the river to the north, and that likely means my poor legion is dead next turn. It will cost Yuris both of his knights to get the kill, but he can terminate that legion if he wants to. I did know there was a fourth knight out there somewhere from power tracking. Well, if Yuris opts to kill that unit using his two knights, I will claim it was a cunning bait, or something like that. I mean, I can afford to lose units right now. He can't. Off to the west of Mainz, I moved my third crossbow onto the desert hill tile and fired another bolt into that Aztec horseman, then attacked it with the two-promotion legion in the area. That allowed me to set up this final hovered attack with my knight to finish off the redlined Aztec knight: 
Here's the situation after moving everything. I killed a knight and horseman this turn, as well as crippling that remaining horseman in the red. That poor unit cannot escape now, and will likely either launch a suicide attack or just pillage that mine. Looking at this again, my northern legion might be able to survive attacks from those two knights; I do have the support bonus from two units plus the Great General, and it does have about 70 HP remaining. I'll cross my fingers and hope for good luck. Regardless, I've lost only one unit so far and Yuris has lost close to half his army. And that's with half my army off still cleaning up the remnants of German territory. This war is over for all intents and purposes. If you look over at Aquileia, I had a builder connect a source of niter this turn. This will allow me to upgrade legions to muskets as soon as Gunpowder tech finishes researching, which will be... next turn! Heh. Well, I actually need to wait two more turns for the civics swap so that I can use the Professional Army discount, but you get the idea. Very soon my highly promoted legions will all be sporting firearms and a base strength of 55. 
Over in German territory, I did not capture Aachen, although I did set myself up to take it next turn. If I'd had the Great General down here, I might have been able to capture it. Instead, I decided that it was more important to keep Boudica up in Mainz to try and keep that exposed legion alive, and since I wasn't going to be able to take teh's capital, I opted to pillage another trade route with my three promo legion. That cashed in for a sweet 100 gold - worth it! I should be able to take the city next turn even if it does pop out city walls on the interturn. |
This turn's combat ensured that none of my cities would be falling to Yuris. Half of the Aztec knights that had been built so laboriously by Yuris were now gone, and the flower of the invading army had been crippled. The one remaining question was whether the exposed legion to the northeast of Mainz would be able to survive, in a symbolic gesture of sorts for this game. Yuris attacked it with his knights between turns, and...
|
Sullla: My legion lives! 
I started by shuffling the two promotion crossbow a tile east and shooting the yellow health Aztec knight, then moved the one promo crossbow into Mainz to set up this shot against the knight in the jungle tile. I wanted to avoid finishing off that knight with a melee attack, due to the rough terrain and the awkward positioning for future turns. (Not to mention it requires 2 movement points to enter the jungle with a melee attack; much simpler to use a crossbow to finish this guy off.) In case you're wondering why all the shuffling with the crossbows, I wanted to open up the tile southeast of Mainz. That allowed me to move the redlined legion there using two movement points, and take a promotion with the third movement point for the 50 HP heal. I'll outfit that legion with a gun next turn and after a couple turns of healing, he'll return to the front lines for more action, with both Battlecry and Tortoise promotions in hand. 
With the crossbows done, it was time for the melee attackers. I had the western legion at full health in the previous picture move two tiles and then attack the crippled Aztec horseman with the third movement point. That was an easy victory, and it set up my knight to make the hovered attack against the one remaining Aztec knight. This was another easy victory that scratched another Yuris unit off the playing field. After moving everything in this theatre, here was the final overview: 
The Aztec army has been completely routed. * Attacking is much harder than defending. It's genuinely tough to capture cities unless the attacker has a significant edge in units or technology. I also don't think Yuris played this too well from a tactical standpoint. His initial move across the border threatened two different cities at once instead of concentrating on a single target. He ended up losing a lot of health on critical units by attacking the city of Mainz, then suddenly changed tactics and began attacking units instead, then failed to get a kill and lost more health on his core of knights. Yuris was also unable to put any of my cities under siege, and the inability to surround a target clearly hurt him. Now to be fair I don't think this attack ever had much chance of success, and I'm sure that Yuris knows that too. He probably just wanted to make things interesting here in the final turns of the game. But here in my own spoiler thread, I'll take the moment to enjoy crushing this attack so thoroughly, and with barely a pause in my ongoing conquest of Germany. Speaking of Germany: 
There were no city walls again this turn in Aachen, and that meant that the conquest of the city was a foregone conclusion. I honestly thought that teh would finish them before I could complete this siege; whatever he was building here, it didn't manage to finish. I shot the city with both crossbows (after moving down the Great General to boost their strength) and then used this horseman to finish off the capture. Why the horseman? Taking the city gave it enough XP to earn a second promotion, and that allowed the yellow health legion to spend a turn healing in what was now friendly territory. It will be close to full strength now and ready for more action. I also moved the three promotion legion and the battering ram towards Ulm, which I will begin attacking next turn. The new overview after taking Aachen: 
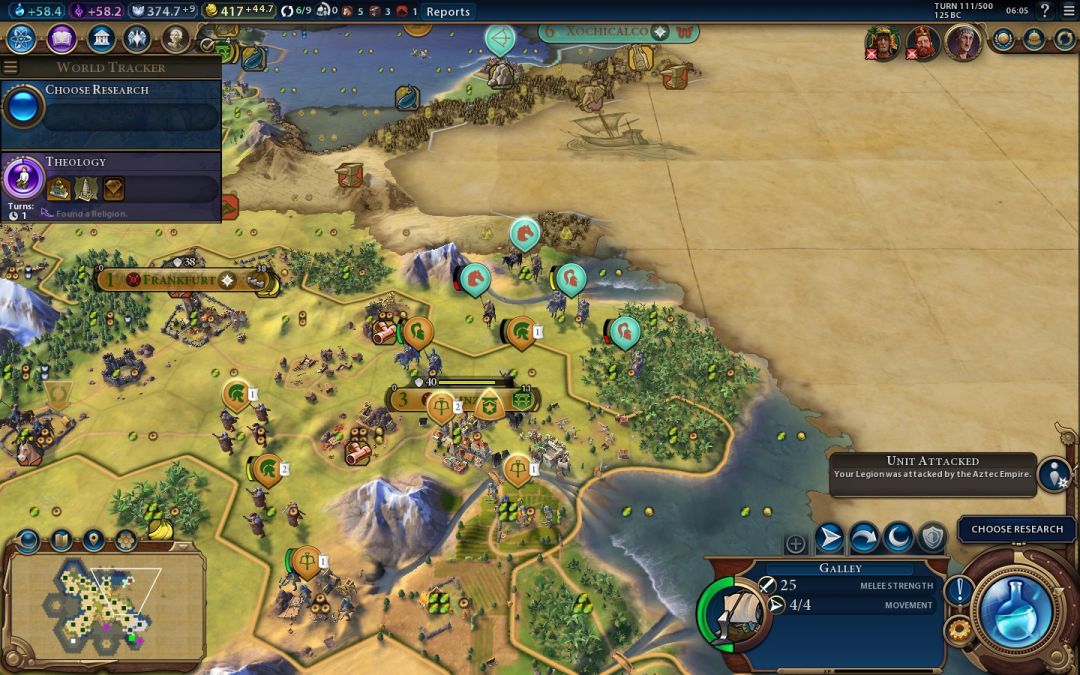
I will probably come up a bit short of being able to take Ulm next turn, as the legion is the only melee unit that can attack. Both crossbows can shoot of course, and the galley will allow me to put the city under formal siege so it won't heal. Teh should be eliminated on Turn 113. The city state of Kumasi has some units wandering around, but since they're all warriors I think I can safely ignore them. There's also that Great Engineer skirting around, which I've been totally ignoring. I can't capture the unit and that makes it pointless to chase after. Aachen itself is a fantastic city, size 6 with hills galore and three completed districts: Campus, Commercial, and Industrial. Once I get rid of the occupation penalty, this will immediately be one of the best cities in my empire. I will have to waste one of the hill tiles to put down a Bath district, otherwise this looks just about perfect. Too bad the game will be over before I get to enjoy much of this. 
Yeah, I didn't forget about you, random wandering Eagle Warrior! 
I also finally had enough Great Person points to recruit my long-awaited second Great General via faith patronage. Genghis Khan Temujin will be arriving at a perfect time, just as I upgrade legions into muskets, since the muskets will no longer get the era bonus from Boudica. Great Generals in Civ6 work on units from the same era and one era later on the tech tree. Boudica is a Classical era General, and thus her bonus works on Classical and Medieval units. This includes legions, horses, crossbows, and knights - but not archers or warriors or muskets. Temujin is a Medieval era General, and his bonus will work on Medieval and Renaissance era units. No good for legions or horses anymore, but opening up usefulness on muskets and bombards. I actually recruited this Great General at the start of my turn, hoping I could transfer it to Mainz and make use of the bonus right away. However, when you recruit Great People via Patronage they start out unavailable to move on that initial turn. Well, I'll reposition to Mainz next turn and Temujin will be in the field soon enough. |
I described this turn in my thread as "pretty much the definition of fun in a Civilization context", and it was very satisfying indeed. Not only did I capture the German capital and move towards teh's final city, I also decisively crushed the remaining half of Yuris' army without losing a single unit in the process. I took a particular pleasure in demolishing those units from Yuris, which had forced this unnecessary combat at the tail end of this game. Use my own iron resource against me, will you? Take that!  Now I was going to outfit my legions with muskets, with the new second Great General, and push onwards to take Yuris' capital for the outright Domination victory. He had essentially no forces left, and it was time to put this game to bed.


 Yep, I rolled on the high end of damage and had just enough to capture Mainz. It had to have been by the slimmest of margins, just a few HP either way. Needless to say, this was a FANTASTIC result for me, with the cultural borders flipping around in my favor and Mainz now under my control. Teh just lost his second-best city and none of my units ended up dying in the attack. Wow.
 In fairness, a strength differential of 33 suggests that the losing side will take about 112 damage on average, making this a likely outcome. And I did have the promotion advantage, the Great General, and the floodplains defensive penalty for the archer working in my favor. It was just a shock to see a defending unit go from 100 to 0 in a single blow like that. A pleasant shock, heh. Even better, this crossbow now earned enough XP to qualify for a second promotion; it won't even have to stop for healing, just promote back to full health and keep on trucking.
 I should have slotted in Strategos here again and speeded along that Great General a little bit faster. While it wouldn't make much of a difference, this game won't last much longer, and even a few turns sooner might be enough to help conquer teh. Ah well, not going to cost me the game or anything, just a bit sloppy. I had been planning on using Urban Planning in that slot and didn't spend enough time thinking when I failed to see it.
 I was hoping for a couple more quiet turns to finish off teh and then a concession from Yuris that the game is over. Instead, it looks like Yuris wants to try his luck against me too, which means no quick exit from this game. Instead, I'll need to slog my way to a formal victory condition (Domination), since apparently this is the one game where no one is willing to concede that I've won a long time ago. How over is this game? The score doesn't lie:
 At least he will be completely unable to build more knights the moment he declares war.
 Oh, and what's this?
 It was attacked by both knights and survived with 2 HP left. Having the Great General here and the support bonus from the adjacent knight and crossbow was just barely enough to let this guy survive. And look at the tactical positioning here. Yuris has exposed himself badly to try and claim this kill, and he wound up falling just short. Now his two knights are deep in my territory, seriously injured, and have no chance of retreating. Uh oh. What was that I said last turn about grabbing a mop and bucket? It's cleanup time on the northern front.
 I lost one knight to kill four knights, two horsemen, and an Eagle Warrior. The path has now been opened to move forward and begin advancing on Yuris' cities. And that was despite something like half my army being off fighting the remnants of teh's empire during this whole process. Yuris didn't even pillage any tiles or districts, unless you count the one desert hill mine that he pillaged with his backlines Eagle Warrior last turn. I think this illustrates a couple points that I've made throughout this game:
 This guy pillaged my iron mine last turn, which would have been a lot scarier if I didn't have three other sources of iron. And if I were building anything that required iron right now, which I'm not. I cornered this Aztec unit with a pair of horsemen, the western one coming out of Ravenna via that forest chop a couple turns ago and the eastern horseman newly produced from Arpinum this turn. Minor tactics note: I moved my horses next to one another for the modest +2 strength bonus. Every bit counts after all. While this pair of attacks wasn't enough to kill the Eagle Warrior, it did cripple the thing down into the red health area, and there's literally nowhere for it to go next. Although now that I look at this, I should have attacked from the fort tile off to the west, to prevent the Eagle Warrior from moving in there on its turn. It's still going to die regardless, but that was sloppy tactics on my part. Ah well.
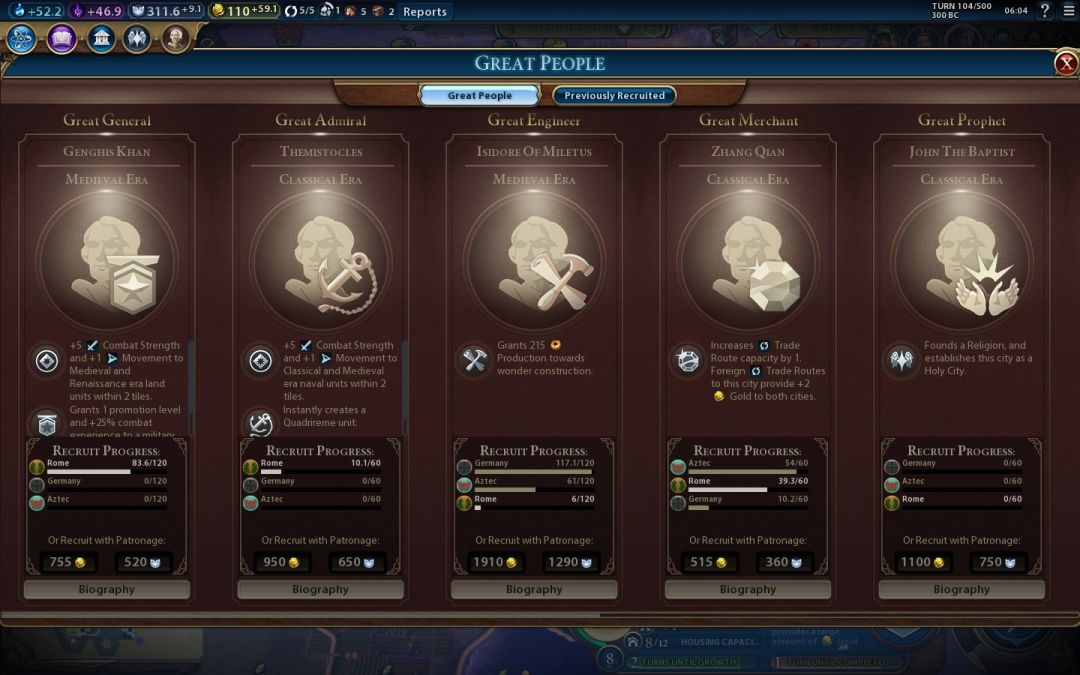