I entered the Industrial Age proper with the discovery of Industrialization on Turn 146:
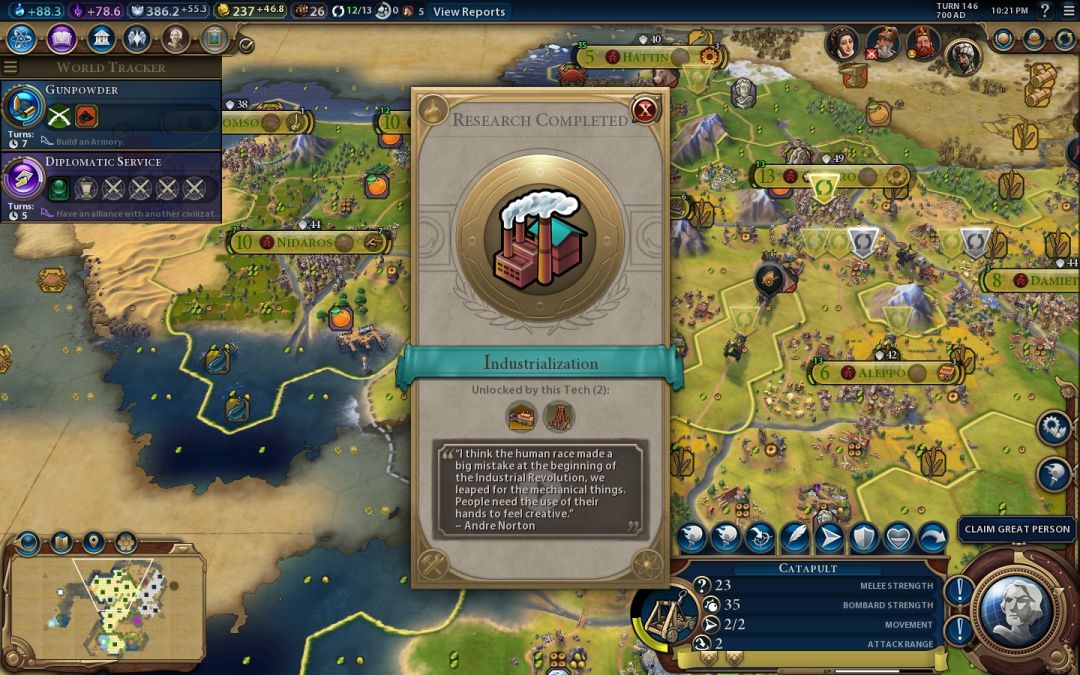
That's almost always the first tech taken in the Industrial period, as the benefits are simply too great to pass up. It's an easy beeline and the +1 mine production along with factories are amazing for almost any gameplan whatsoever. I had actually researched half of this tech earlier, and then had to wait for about a dozen turns to complete the third workshop for the boost to complete the tech. This was a result of poor planning on my part: I had built the first two workshops early on, and then belatedly realized around Turn 130 that I didn't have a third Industrial zone completed anywhere on the map, leaving me no chance to get the third workshop done! I had too many captured cities with AI-chosen districts, and I hadn't grown enough population to select my own yet. I had also been a bit too zealous with throwing down districts the moment they were available to lock in the cost, which left me with no flexibility when I belatedly realized that I needed another Industrial zone. Yet I could not justify spending another dozen turns of research on Industrialization when I could get the tech for free with the construction of another workshop. The end result was a bungled strategic move on my part which would needlessly slow my rate of factory construction, and this would have consequences down the road. Civ6 rewards long-term planning, and I hadn't done a great job here.
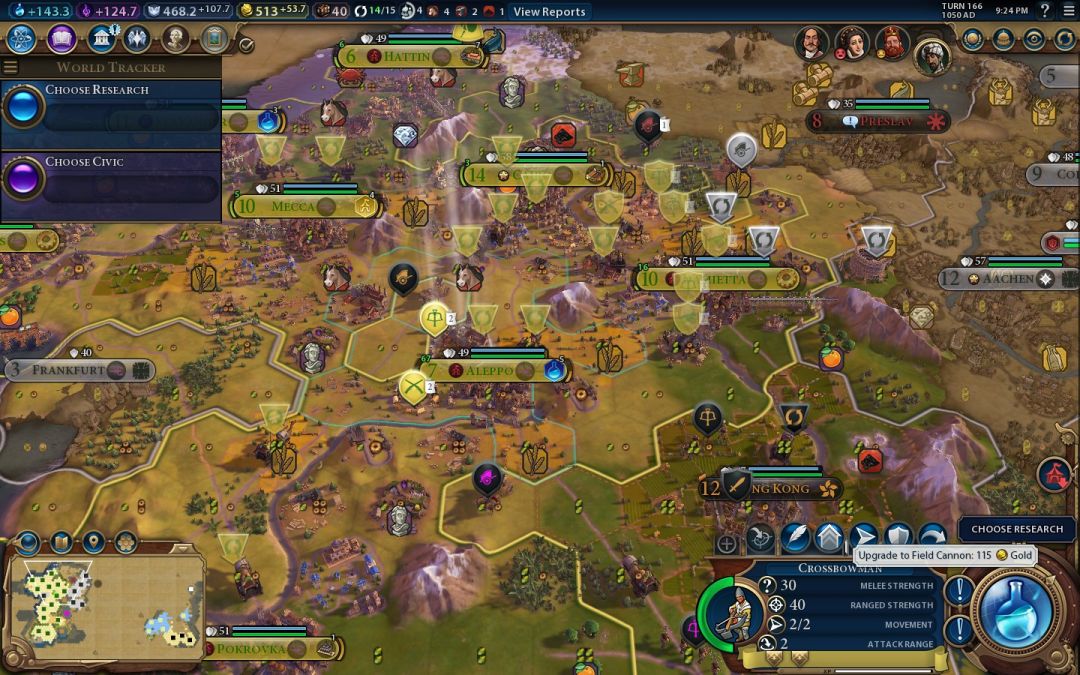
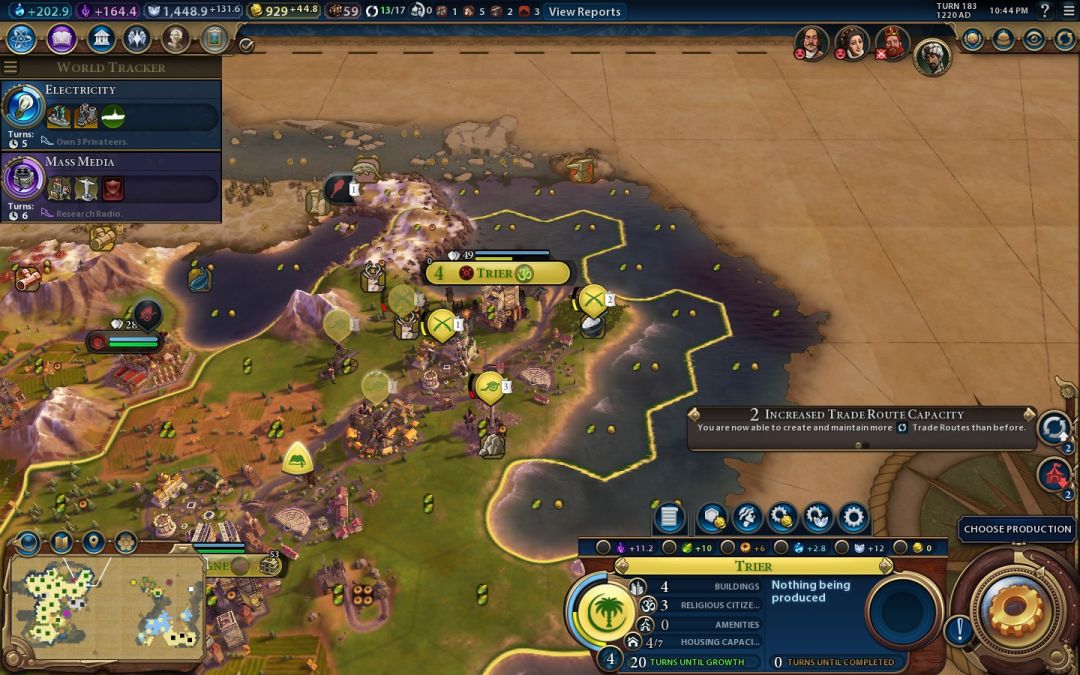
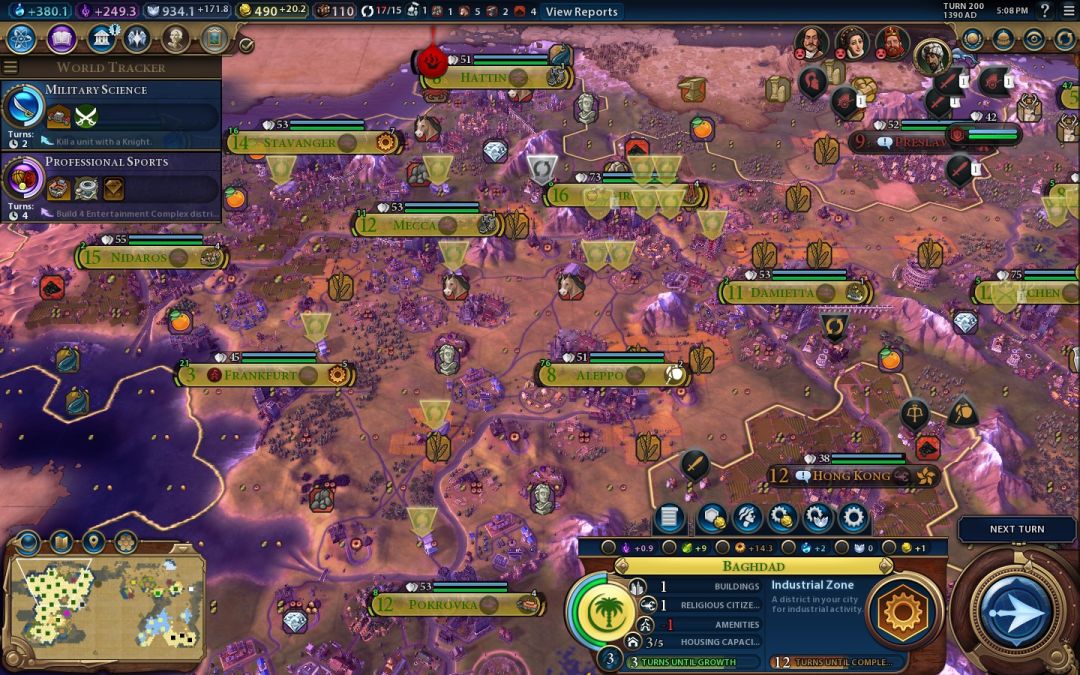
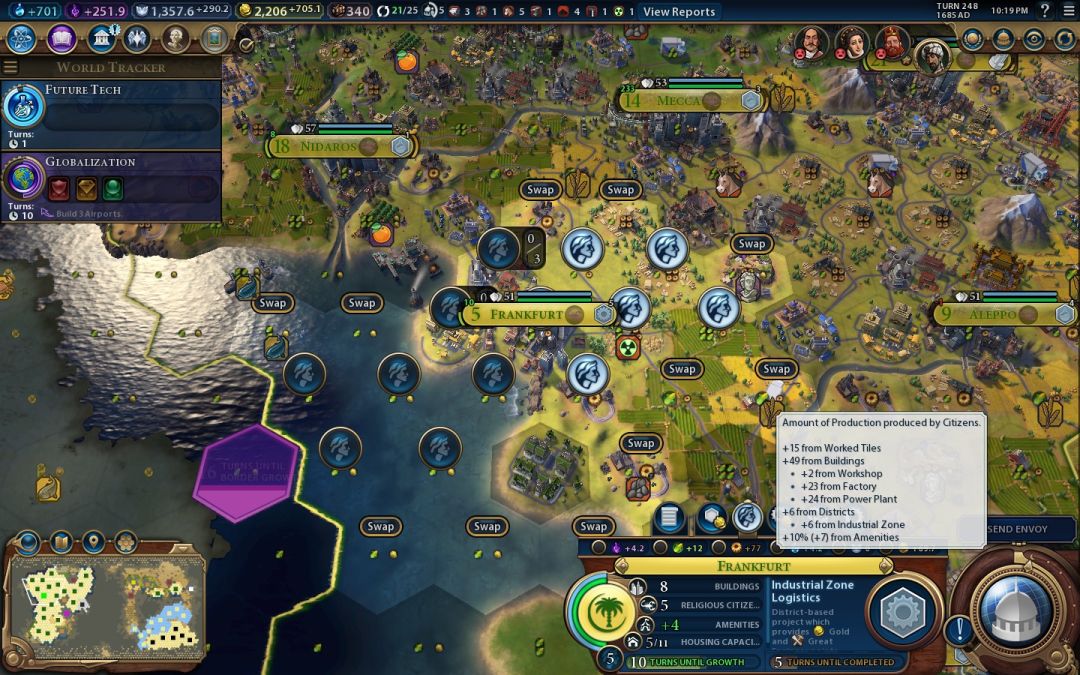
You might also notice that there are a lot of the little "needs amenities" tent symbols over my cities in the above screenshot. Happiness would prove to be another major challenge in this game, as I had so many cities that the luxury resources on the map couldn't keep up with them. My previous experience with a larger empire had been my Some Like It Hot game, but I'd been playing the Aztecs there, who have the unique bonus of luxuries applying to 6 cities instead of 4 cities, plus I had built the Colosseum in that game. That wonder hadn't been in the cards here, as Frederick took the wonder at an early date. As a result, I was unprepared for the amenity crunch that ensued in this game, which hit very hard indeed. I had zero Entertainment districts anywhere in my entire civ - whoops. Fortunately the unhappiness penalty is relatively minor in Civ6, reducing growth by 15% and all other tile yields by 5%. Not great but bearable. It would take a long time before I managed to sort this issue out though.
I had also contacted France and Russia over on the other continent right around the same time that I was wiping out Greece. I made some trade deals on the initial turn, including importing luxuries from Catherine for some of my surplus luxuries to help deal with the amenities crunch. On that first turn of contact, you can negotiate from a neutral position without any of the positive or negative modifiers kicking in yet. On the very next turn though, Catherine's opinion of me sharply changed:

Well, I can't say that opinion was unjustified.  This is one thing that I think Civ6's diplomacy system gets right: I absolutely was a warmonger in this game, and Catherine was correct to distrust my civilization. Are the screws on a little too tightly here? Yes, but I don't think the idea itself is necessarily wrong. There should be diplomatic penalties for repeatedly waging war, and the game does enforce them pretty well. Catherine and Peter wouldn't buy my resources after this or offer me much of anything on the trade screen. I think they were offering me 1 gold piece for my excess luxuries, which was pretty funny. It was a sharp contrast to the Commercial Free Programming succession game, where we had excellent relations with most of the AIs and reaped a huge windfall in resource trades. Anyway, while this system needs more calibrating to remove some of the silly "era" penalties that make wars in the lategame too punishing, I do think it's on the right general track. (Civ6 also needs some kind of diplomatic victory condition to make diplomacy matter more than it does now, although that's another topic for a different day.)
Earlier, I had recruited a Great Engineer whose special ability was a pair of the wonder production charges. I had captured a Greek settler at their last city, and seeing that Petra was still unclaimed by anyone on this map, decided to burn the Great Engineer in a sweet location:
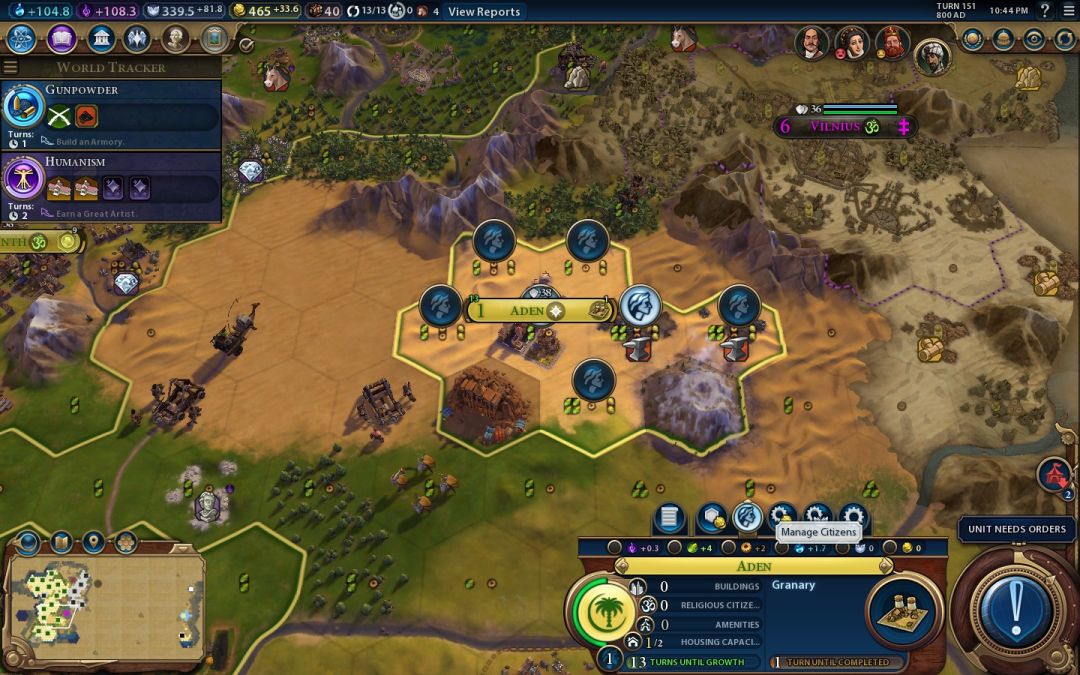
Ah, now that's how to make use of a desert region of the map! Aden was next to the natural wonder that doubles local tile yields, and that along with the double iron resources combined to create a very Petra-licious location indeed. I had high hopes for this city, although due to my chronic shortage of funds I was not able to spend enough gold to buff this city into a truly powerful state - not enough gold to purchase all those desert hill tiles for example. This city was also founded too late in the game to turn into a spaceship-producing city the way that I wanted. I needed to have this running 50 turns earlier, as I would have to spend too long building the first few districts and the basic infrastructure, and by the time that was done the game was already rapidly reaching its endpoint. Still, this was a very fun city to build and a nice use of an otherwise unneeded Great Engineer. I wonder if anyone else targeted this spot on the map for a city?
I discovered The Enlightenment civic on Turn 156, which is one of the big targets for any game pursuing a Spaceship victory condition. This civic holds the Rationalism policy that doubles the beakers of all Campus district buildings, instantly changing libraries from 2 beakers/turn to 4 beakers/turn and ditto for universities and research labs. The Enlightenment also contains Free Market policy (the same +100% bonus for Commercial district buildings) and Liberalism (+1 amenities in all cities with 2 specialty districts). I needed all three of these policies for my empire! I found that I did not have enough policy slots for everything that I wanted, unfortunately an all too common an occurance. This was helped enormously by the arrival of Great Merchant Adam Smith two turns later, who has the extremely nice +1 economic policy slot ability. After recruiting him, my policy setup looked like this:
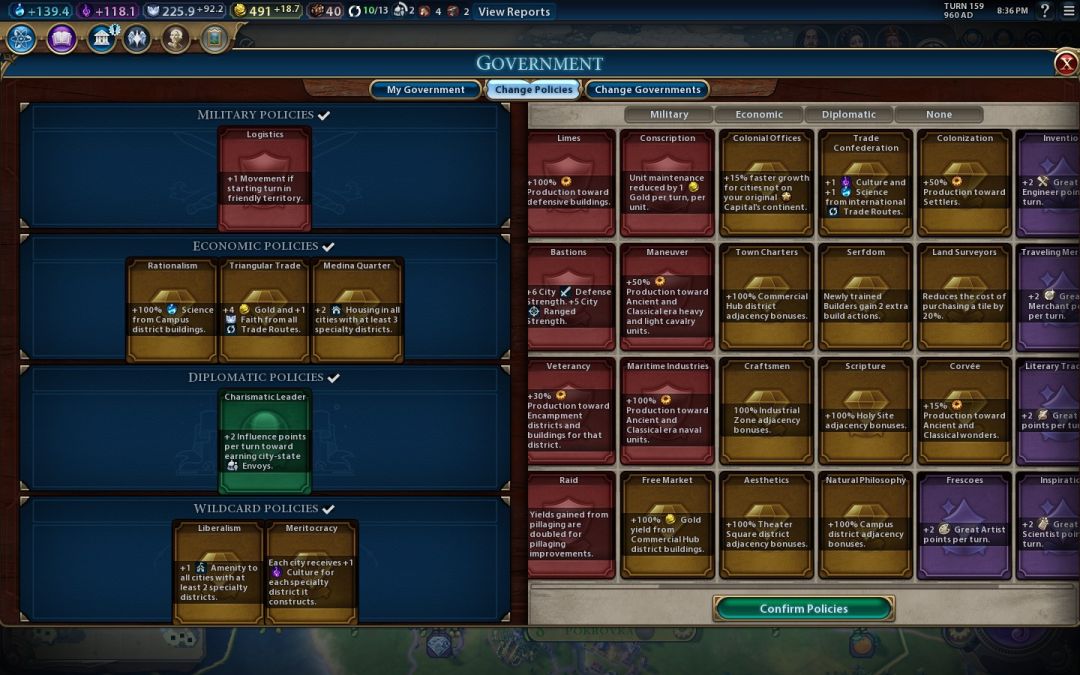
I'm in a Merchant Republic of course, continuing my gameplan of going for maximum economic policy slots at all times. I had still been using Conscription (unit maintenance reduced by 1 gold) and Caravansaries (+2 gold per trade route) for wealth generation, and had struggled to make a profit even with them. Now I was able to upgade to Triangular Trade's superior trade route yield and swap over to Logistics in the military policy slot. That is a deceptively powerful policy due to the way that the movement rules work in Civ6. Here in the Industrial Age, roads cost 0.75 movement and most units have 2 movement points. You move a unit along roads, and after two moves, they are stuck sitting there with 0.5 movement points, unable to go further. That's no better than in the Ancient Age. But with Logistics policy in place, that same unit starts with 3 movement points. After two moves, the unit still has 1.5 movement remaining, and can move two more tiles along roads. As a result, the Logistics policy DOUBLES movement along internal roads, from 2 moves to 4 moves, and that makes a gigantic difference. It also applies to builders and speeds them up enormously, allowing them to move onto a hill tile and mine on a single turn instead of requiring two separate actions. I love this policy and it makes Civ6 so much smoother to play. (It's so much better that I think 3 moves should become the default for all units if the designers insist on keeping the crummy movement rules in this game.) If you've never tried this one before, test it out and see what a difference it makes. It's a surprisingly strong choice.
Elsewhere, I am naturally running the new Rationalism policy to boost my science output. I am also using both Medina Quarter for housing and Liberalism for amenities, as I needed them in equal supply. I've already highlighted my sad amenities situation in this game, and housing always seems to be in short supply everywhere in Civ6. Getting two more points of housing typically means another specialty district, which serves as a huge boost to the city's overall output, especially in those captured cities where I had to work around the AI's suboptimal district choices. Finally, I also need to mention the Meritocracy policy, which provides +1 culture from all specialty districts. This is another one that I had overlooked in earlier games, and indeed it's not very good with a small empire of high population cities. However, this policy is amazing for a widely spaced sprawling empire like the one I had here, with tons of districts of all types. When I adopted this policy for the first time to try it out, my culture doubled instantly, and I was kicking myself for not adopting it sooner. I had 14 cities at this point and roughly 40 districts, which means that Meritocracy was providing more than a third of my total culture. Very nice indeed.
Note that I was not running Serfdom policy at the moment for the +2 builder action bonus. I microed this for all I was worth, training builders without the policy in place and swapping off them with 1 turn to go, then swapping back into the policy to complete 3 or 4 of them at once, then swapping back out of Serfdom again. I enjoy the frequent civic swaps in this game; I loved playing Spiritual leaders in Civ4, and this is a lot like that. Changing policies frequently seems like it can be a very useful tool for items like the builders, if a bit micro-intensive.
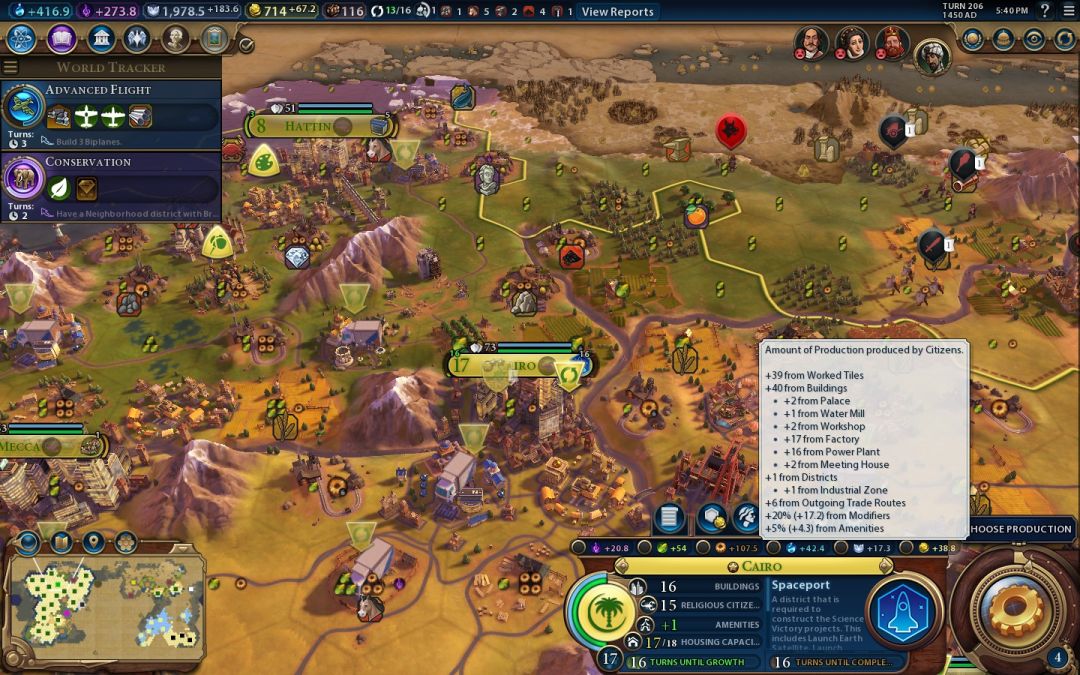
I also spent a few odd turns in Professional Army policy to upgrade my units to the next tier of technology, crossbows to field guns and cannons to bombards. I had gotten slightly lucky when a Great Scientist randomly provided the boost for Ballistics tech (the one that unlocks field guns), since the boost is to build two Forts in your territory using a military engineer, and I had none to speak of. I didn't even have an Encampment district anywhere in my many cities, which was surely a mistake. Cairo was building an arena in the above picture to help with my amenities situation, and that was a definite blunder as well. I should have built an Encampment district instead, since there's a lategame policy that boosts spaceship part construction by 15% if the city has a military academy present (Integrated Space Cells). The encampment district buildings also provide production and housing, which Cairo could have used as well. Or I could have started Ruhr Valley at an earlier date in the capital, which I would construct eventually but after this needless delay. My long term planning definitely could have been a lot better.
Anyway, the plan was to attack Frederick and conquer his territory as well. I was the big bad warmonger and everyone hated me already, it's not as though I had a lot to lose. In particular, I wanted to capture the Colosseum which was taunting me a single tile outside my borders. I certainly could use the happiness that it provided! In preparation for the war, I went ahead and dropped a few more envoys into Preslav, enough to swing it from Frederick's control over to mine. I did not need the distraction of another opponent to fight, even a city state. On Turn 168, I declared war (with an "Egregious" warmonger penalty according to the diplomacy screen) and rolled across the border:
Aachen proved to be a tough nut to crack. For starters, I was unable to put the city under a full siege and it kept healing back 20 HP per turn. I'm not sure why that happened, as I had a pair of muskets occupying all six tiles immediately surrounding the city center. I'm assuming it's because the Encampment district interfered with the siege in some way (?) I confess that the zone of control rules still confuse me in this game. In addition, you may have also noticed the damaged bombard unit sitting on the Colosseum in that picture above. The AI goes after siege units like crazy in this game, and Aachen's 57 strength rating was enough to do some real damage to my bombards. The first unit died before I could get the walls down, and then that German chariot somehow moved across the river to attack my other bombard, followed by the city targeting the second bombard as well. I don't even know how that chariot managed to get up there given that the musket unit and the river should have been able to block that movement. The city of Aachen managed to kill my second bombard on the last interturn before I could capture it, with the redlined city surviving with like 5 HP remaining. Argh! That was going to slow my advance on the remaining German cities, and with Frederick already holding Civil Engineering civic, his cities were all able to self-defend themselves. Not good.
Aachen did fall on Turn 173. It was the best city that I had captured yet, with 5 districts intact: Holy Site, Encampment, Entertainment, Campus, and Commercial districts. Frederick's ability to build one district above the normal population requirement seemed to have helped him here. (Side note: the population requirements for districts are one of the things killing the AI's performance right now. More on this in a later article.) I healed up my units and pushed north to Cologne. At that second city, I was able to form a Corps for the first time:
I had a field cannon that had been bombarded into the red, and I decided to merge that unit with another field cannon to see what would happen. Somewhat to my surprise, the combined units proved to be significantly stronger, plus they kept all of the promotions of the unit with the higher level of experience. I think that this is due to the way that the combat calculation works in Civ6; for those who haven't seen this posted somewhere, the key factor is the difference in combat strength between the two units engaged. The delta, in other words. Every 10 points of difference means 50% more damage dealt and 50% less damage taken, and every 17 points of difference means 100% more damage dealt and 100% less damage taken. In other words, while units at equal combat strength will each deal about 26 points of damage to each other, a unit 10 points stronger will deal 39 damage and take 17 damage, while a unit 17 points stronger will deal 56 damage and take 13 damage. Once the difference reaches 30 points of combat strength, it's all one-hit kills for the weaker unit. As a result, even 10 additional points of combat strength make a very big difference, and it seemed to send my field guns over a tipping point from scratching the defending city to dealing real damage. I would end up pairing two other field guns into a corps, and then pairing two muskets into another corp to get the boost for Mobilization civic. I wish that the corps and armies were enabled from the start of the game (and that the AI would use them more!), as they provide a nice way of working around some of the sillier aspects of One Unit Per Tile.
While this war was taking place, I had finished Chemistry tech on Turn 177 and opened up research labs. Those are the most crucial tech building for a Spaceship victory, with each one providing a full 10 beakers/turn with Rationalism civic in place. With techs being relatively inexpensive in Civ6, they power through the later stages of the tech tree in a hurry. There's also the question of whether to go for power plants at Electronics or research labs at Chemistry first. I think that it's better to get the research labs done first, largely because the power plants are in a more awkward part of the tech tree for any non-archipelago map, up there with all the naval stuff. I'm open to being persuaded otherwise with more evidence. My core cities would now start on their research labs, followed immediately by their power plants. I compounded my earlier mistakes at the capital by having it start on a research lab here, when it should have been building Ruhr Valley instead. Other cities could carry the research load - the capital needed to be focusing on production! Ah, the benefits of hindsight.
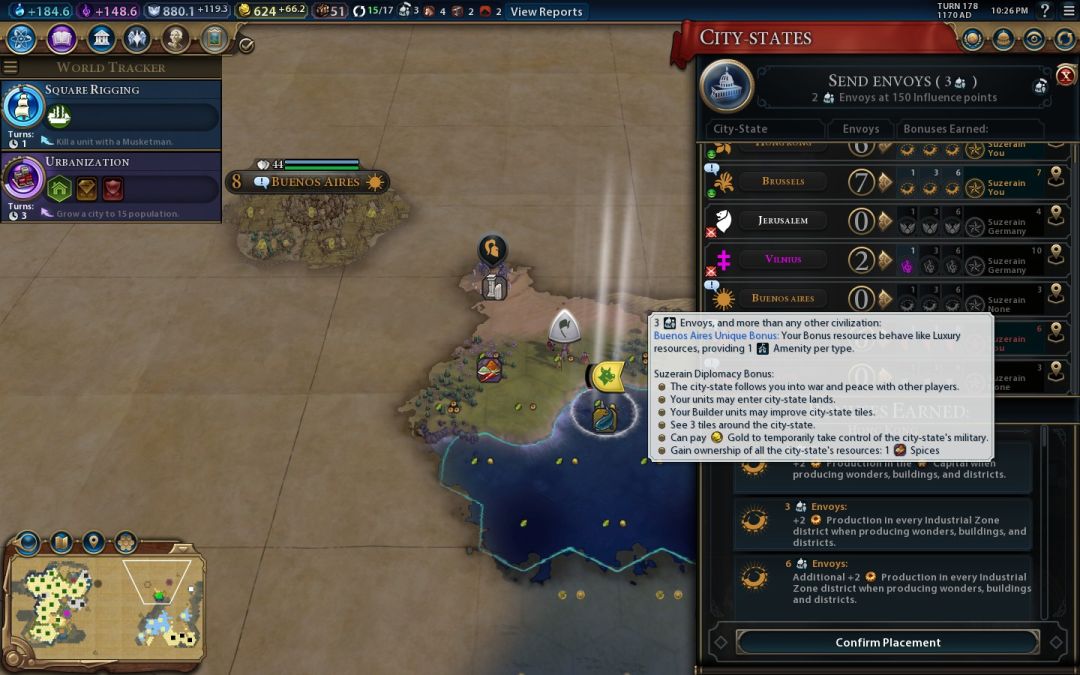
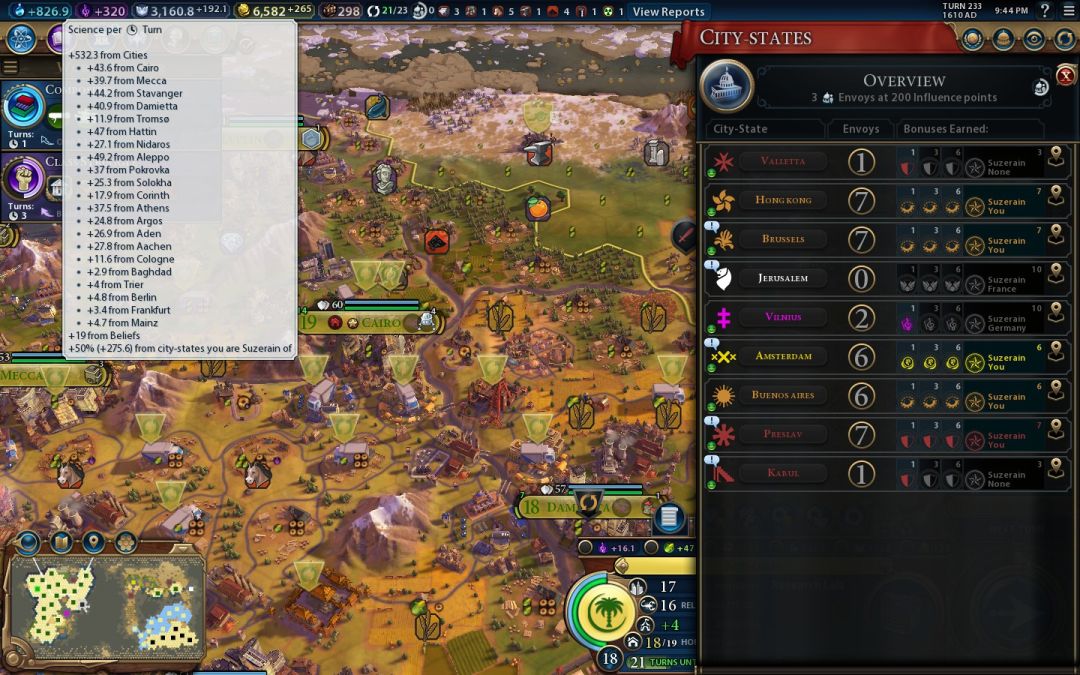
Check this out. My scout unit from the early game, the one that I had been using for zone of control purposes way back at Nidaros, was still alive and had been exploring the other continent. He barely survived an attack from a barb unit, and as a result I took to the seas for safety. Then what did I find to the north but an unescorted German settler, out in the open, just begging to be captured. I have no idea what Frederick's AI was doing here.  He could have settled on this very tile in a pretty good location. Instead, I would capture the settler with this nearly-dead scout and found my own city here. Furthermore, I'd also had the good luck to find Buenos Aires, another Industrial city state with an amenities boost for its suzerain bonus. Perfect! I snapped them up and took advantage of the small boost in happiness that came from their friendship. (This is why I like to save up a few envoys. You never know when an AI will try to snipe a crucial suzerainty away from you or an opportunity will arise like this.)
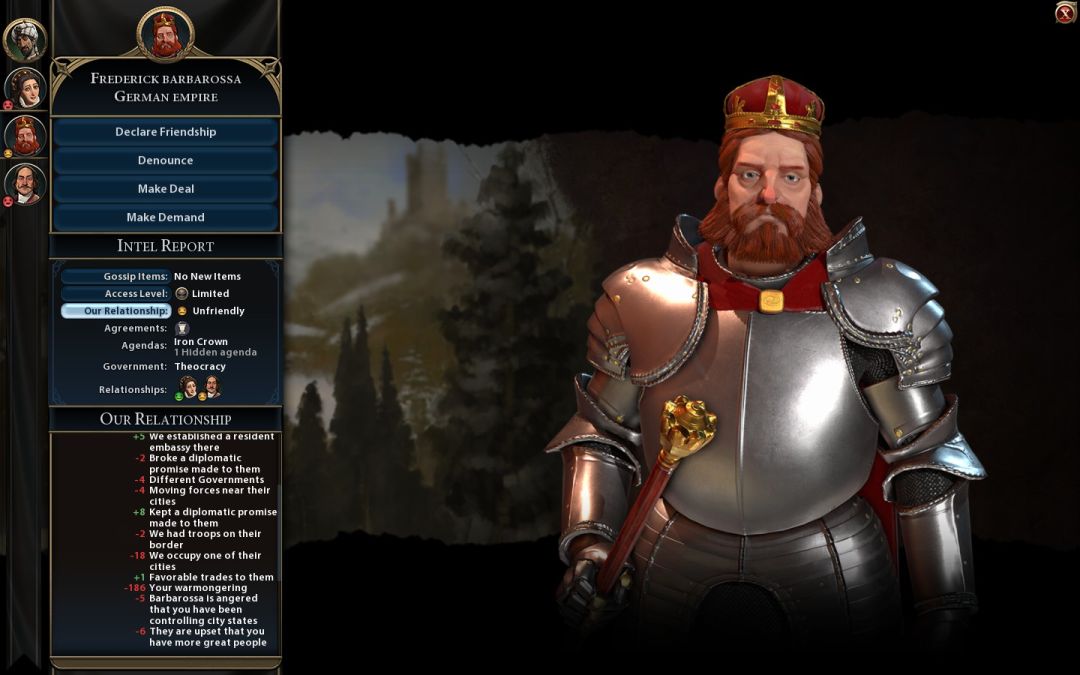
Trier was the last German city in the northern part of the continent. Frederick had a handful of widely scattered cities elsewhere, including Frankfurt which was still surrounded by my culture on the western coast. I had simply ignored it when I declared war, opting instead to press into Germany's core, knowing that I could always come back for it later. With his three best cities in my hands, Frederick was willing to sign a highly favorable peace treaty, ceding me the three captures along with all of his remaining non-capital cities and his entire treasury. I couldn't beat that with a stick and happily signed peace. The AI is a little too generous at giving cities away right now; I think Frederick should have been willing to cede his captured cities and maybe one more location, but certainly not to give me everything the way he did. The AI should make the player work for territory a bit more than this. That said, the peace treaty did allow Frederick to survive to game's end, so perhaps Barbarossa had made a wise decision after all. I was highly amused by our diplomatic relationship after signing peace: I had a penalty of -186 for warmongering! 
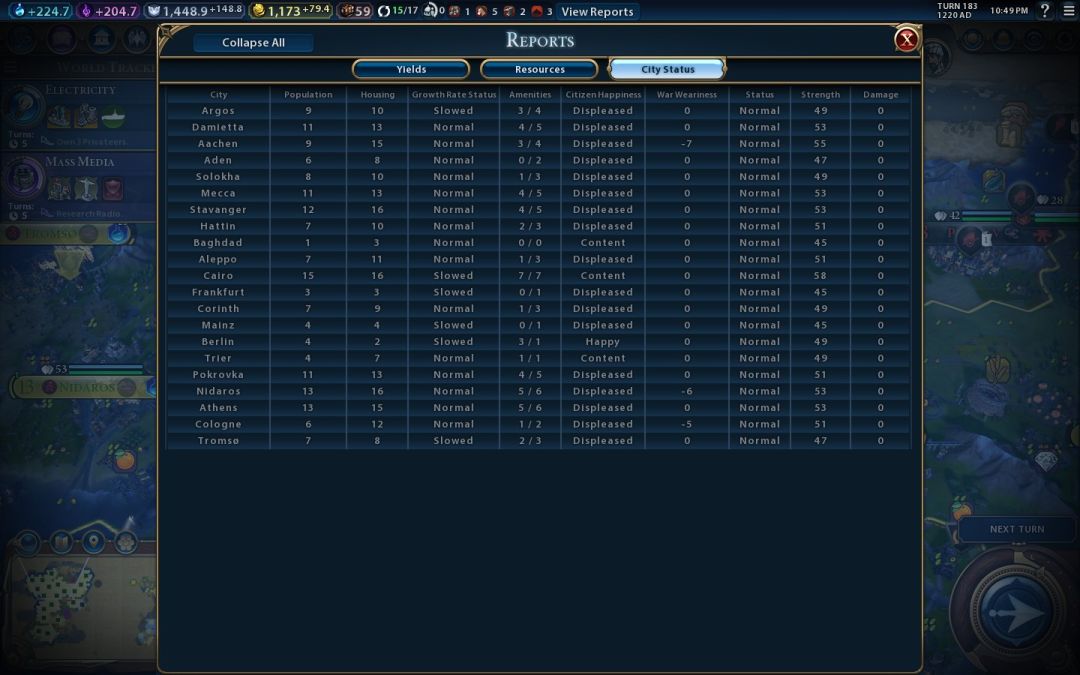
The starting continent was now entirely under my control. Outside of some tundra in the extreme north and south, everything was part of my empire. I even controlled all of the city states with the exception of Vilnius, where Frederick had apparently been concentrating his envoys. It was late enough in the game that there was no need for additional territory. The goal moving forward was researching the spaceship techs and then constructing the actual spaceship. This particular screen listed all 21 of my cities at the end of the German war; I wanted to highlight the war weariness indicator on the right side. Notice how a small number of cities have a gigantic war weariness penalty while all of the others are unaffected? I've read the formula for war weariness, and this is indeed how the numbers shake out, adding a big happiness penalty to one city at a time, starting with cities that have foreign nationals in them. It's a very strange way to implement this concept, however, crushing the development of my captured German cities while leaving my actual core cities completely untouched. The war weariness formula also seems to favor having a large number of cities, as the penalty is linear (hitting one city at a time) and does not exponentially affect all cities at once. With a big empire, it looks like you can fight for a very long time without suffering much in the way of penalties, while small empires will feel the pain right away. Is this really the way that the mechanic is intended to work? Seems like more fiddling with the numbers would be a good idea, as I doubt this was the goal.
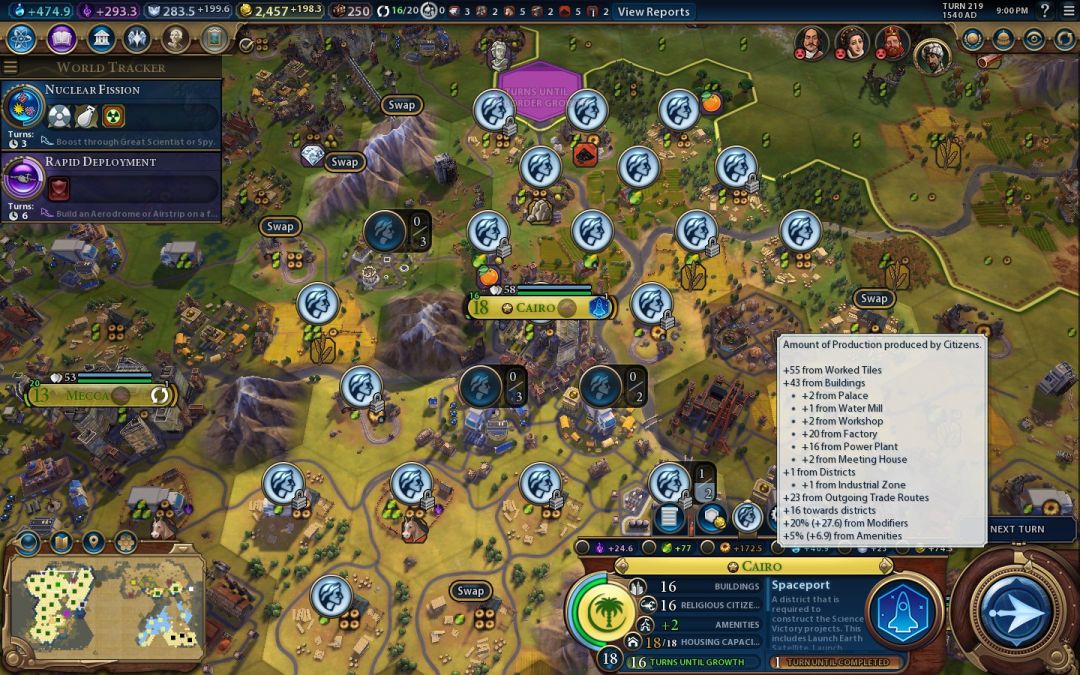
Note that my science rate has climbed over 200 beakers per turn, and that number was escalating quickly as research labs completed. I went from 203 beakers/turn on Turn 183 to 345 beakers/turn on Turn 190. Almost doubled the research rate in seven turns - that's the strength of those research labs. It's also important to keep in mind that the raw numbers for science are a lot lower in Civ6 than in Civ4, or even in Civ5. Even the most expensive techs cost less than 2000 beakers to research, and nearly everything has a boost that can knock off half of that. Once your empire hits 300-400 beakers/turn, you're beginning to reach terminal velocity. More research above and beyond that level doesn't really help that much for a Spaceship victory, as there still remains the question of building the (very expensive) spaceship itself. Of course, you can't start building the parts until you have the techs, but I think the general point that there's a limit to how much science is really useful remains intact.
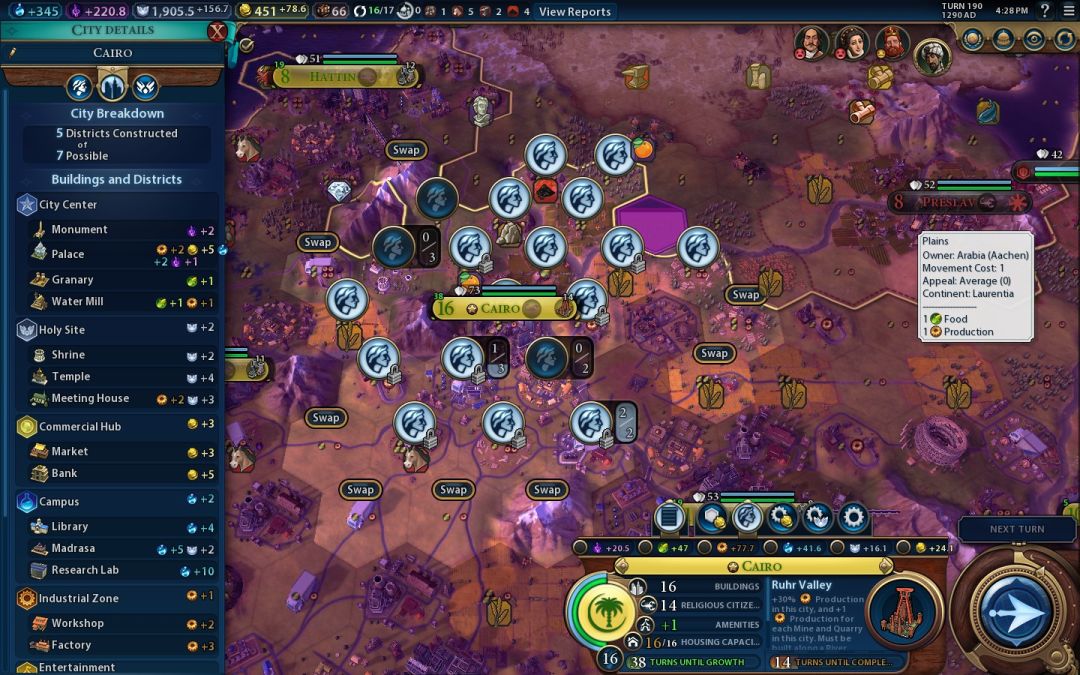
This is a picture of Cairo as it now belatedly started Ruhr Valley, with an estimated finishing date of Turn 204. The city itself had filled out its infrastructure beautifully, and I loved seeing all the buildings on that city breakdown screen. Why this vital information is hidden in a sub-sub-menu is an interface mystery to me... Anyway, there were a couple items to note here. The city itself was size 16 and working just about every tile available in my very cramped setup here. I would later swap some of these tiles held by other cities back to the capital to provide additional production. Note that the Madrassa unique building is NOT getting the doubled beakers from Rationalism the way that a normal university would; a standard university would be sitting at 8 beakers/turn. I guess that the designers forgot about this unique building when they implemented the Rationalism policy.  Well, at least everyone else playing this game would be in the same boat.
I had also skipped building a power plant and a stock exchange in this city. It was around this point in time that I realized my capital had to get a move on, since the end of the tech tree was beginning to approach faster than I had expected. There was no time to devote 8 turns to building a power plant. I needed Ruhr Valley immediately, and then it would have to be straight on to the Spaceport. This was probably the single biggest mistake in my game: underestimating how fast I would finish the ending techs, and getting caught with my capital not ready yet on the production side of things. Lesson learned.
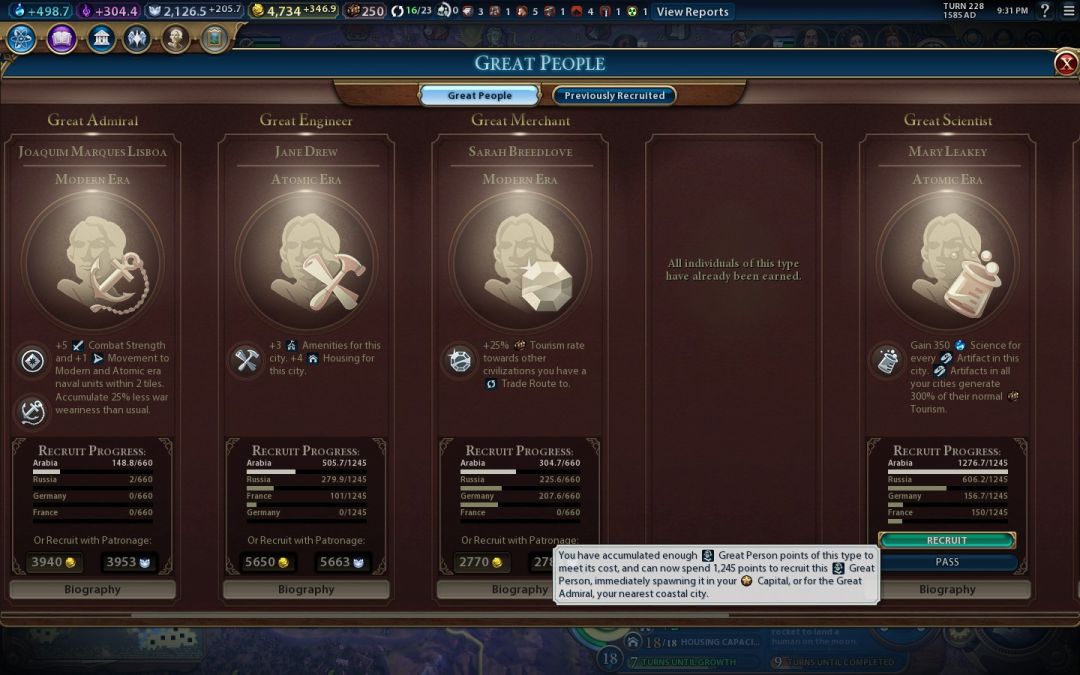
Instead, in this game Alfred Nobel provided the boost for Rocketry tech, and I finished it on Turn 197. That should have been the signal to start on a Spaceport immediately, however Cairo was still working on Ruhr Valley, and passing up on that wonder would only delay everything down the road. I had to keep building the thing. While this was going on, I began focusing more closely on the Great People screen and started getting into the Patronage game in earnest:
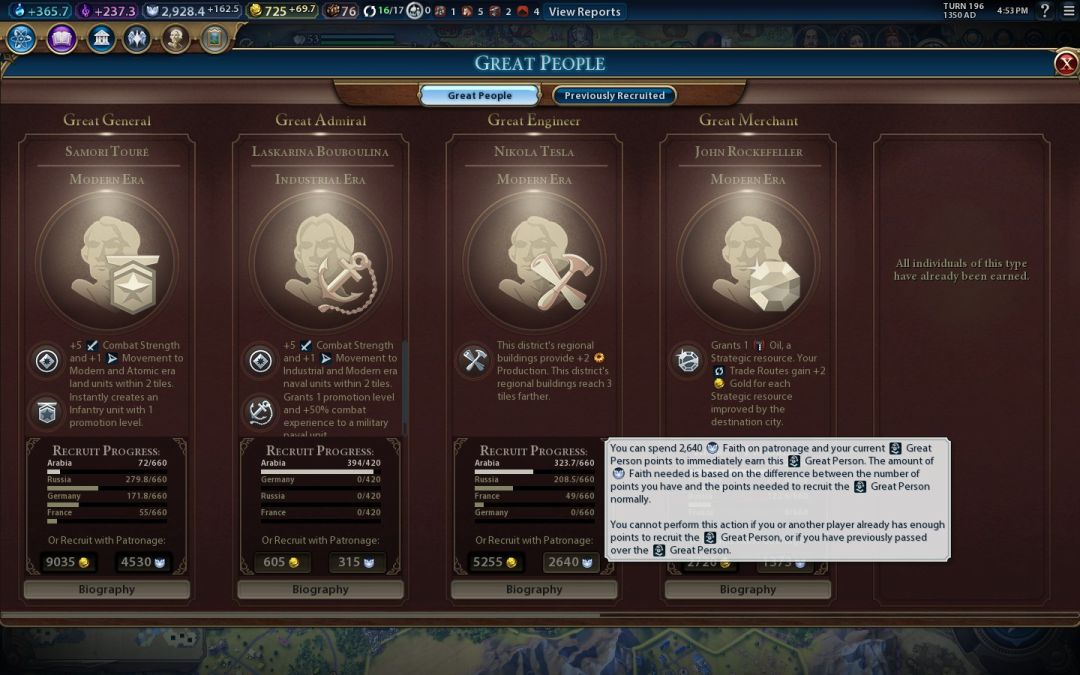
The main use of faith in the lategame is for purchasing Great People via patronage. All of my cities were converted to The Way of the Lobster at this point, and I didn't need any more missionaries or apostles. Whatever faith Catherine and Peter were running on their continent stayed over there, and that was fine with me. No, I needed to start using faith to grab the critical Great People that would speed along construction of the spaceship parts. All of the key Great People for the spaceship are either Engineers or Scientists, and because I was producing quite a bit more Scientist points than Engineer points at the moment, I decided to concentrate on patronage of Great Engineers. This would all be so much easier if the game would tell the player what Great People are coming up next down the pipeline, of course. I can see the full list of Great People outside of the game, but there's no indication which of the three potential Great People is going to pop up first in each era, or when the game is going to switch from the current era to the next one. It's all frustratingly opaque and random, since some of the Great People are ENORMOUSLY more useful than others.
Here's how the game should work: once your civ enters a new era, you have the option to purchase any available Great Person from that era or any previous era, with the Great People from later eras being more expensive. Each Great Person can only be recruited once, and when they're gone, they're gone. This simple change would convert the whole system from the current guessing game into a real strategic choice, and allow for targeted pushes for the most desirable Great People. It would also be a lot more fun - I hate having to spend accumulated points on a terrible Great Engineer that builds walls in a city (really?!) and have no choice to pass because the AI will take forever to recruit any Great Engineer at all. This system is so close to being awesome right now - please fix this Firaxis.
I finished Suffrage civic on Turn 200; here's an overview from the round date number:
Most of the pictured cities were finishing up power plants or had just completed them and were now backtracking for various infrastructure projects. I also have to note what a contrast existed here from my first game of Civ6 in Adventure One. In that game, I was frustrated because it felt as though everything took forever to build in the lategame. That was not the case here at all: even the very expensive power plants and research labs took no more than a dozen turns in my core cities, and often considerable less than that. The problem had been me, not Civ6, back then. I simply hadn't understood how to play the game well enough yet. Civ6 does not suffer from the "everything takes forever to build" problem at all, not if your cities have Industrial districts and overlapping factories/power plants plus internal trade routes and good builder tile management. Even with no Slavery civic, things build quickly in this game. I thoroughly love how fast it all moves; I can play a full game and reach the end of the tech tree in well under 300 turns. It might not be everyone's cup of tea, but I enjoy it.
In terms of policies, I had swapped into Democracy government on this same turn when it became available. This gave me an extra economic policy slot that I mostly used for Public Works, the lategame builder boost policy (+2 actions and +30% production). I've found builders to be very cheap with this policy in place, and I cranked out a lot of them over the following turns to finish improving the rest of the tiles in my empire, particularly in the captured German cities which were still getting up to speed. Most of the core cities could produce them in 2 or 3 turns, very nice. The other new policy that I rotated into use was New Deal, which is worth +4 housing and +2 amenities in all cities with 3 specialty districts... and -8 gold in those cities as well. Note that this has caused a major dip in my income, down to only 20 gold/turn! Yikes. Well, that would be temporary as it turned out, and the New Deal policy was well worth it for the housing and amenities. I suspect that most any peaceful game approach is going to want this policy card for the lategame. Sure enough, with this policy in place and some belated Entertainment districts scattered here and there, I had finally solved my happiness issues for good.
One thing I did not need: an enemy spy sabotaged the Industrial district at Cairo on Turn 201. Argh!  Why the capital, and why my Industrial district? I finished Ruhr Valley on Turn 204, and then needed to spend one turn apiece repairing the workshop and the factory. That meant that I wasn't able to start the Spaceport until Turn 206:
I had finished Rocketry tech nine turns earlier - what an optimization disaster. This delay was going to set back my launch time for sure. Just didn't plan well enough, sigh. I do wonder about the numbers here displayed by the interface: it says that I'm getting 107 production/turn, but it also says that the Spaceport (which costs 2000 production) will be finished in only 16 more turns. Something was clearly off here. I suspect that it wasn't including the bonus production from city states, as I had the full 6 envoys dropped into three different Industrial city states, and that was worth +12 production in every Industrial zone, plus another +6 production in the capital. The interface is clearly incorrect here, so I don't know exactly where the extra production was coming from. At least the ETA on the Spaceport displayed correctly.
I was diligently continuing to chase after the tech and civic boosts, and I was able to land most of them. The really crazy ones I skipped, like all the stuff involving airplanes. There doesn't seem to be enough time to get the Aerodrome districts up and running and build the planes themselves before you can simply research the techs normally. Maybe if Firaxis decides to increase the tech costs that will change, we'll see. I was humming along at well over 400 beakers/turn now and new techs were coming in faster than I could make use of them. The need to build the Spaceport districts was the current bottleneck, not research itself.
Note that I was researching Conservation civic in the previous screenshot, which finished on Turn 208. I had only taken that to open up the possibility of constructing a national park, which I decided would be a waste of faith that could be better spent on patronage of Great People. However, I realized that Conservation civic also allowed builders to plant forests, and this game was the first time that I discovered just how useful that ability can be. Forests add +1 production to a tile, and that tile can them be lumbermilled for an additional +1 production. After discovering Steel tech, lumbermills get another +1 production, and if they are riverside they get yet another +1 production. In short, post-Steel lumbermills are 2/3 tiles on grassland and 1/4 tiles on plains. That's... actually really good!  And if the lumbermills are next to rivers, then they're 2/4 grassland tiles and 1/5 plains tiles, exactly the same as mined hills. Since flatground tiles always seem to be much more common than hill tiles, this is a very big deal indeed. It means that *ANY* city can be a good production city in the lategame, even if it lacks hills for mines. All you need is enough population to work the tiles, as hills can be mined and flatground can be forested/lumbermilled for nearly the same effect. I've been playing my last few games wishing that I could somehow get more production in my non-hilled cities, and there's been an answer here all along that I was missing.
I'm not sure if the wider Civ6 community is aware of how amazing the planted forests and post-Steel lumbermill combination can be. I never see anyone posting about how important Conservation is as a civic, and I think that's a major oversight. This is fully as important as the farming boost at Feudalism/Replaceable Parts. Civ6 therefore allows almost infinite customization of cities, as hills can be farmed for food or flatland can be forested/lumbermilled for production. You can set things up any way that you like. Of course mines are always going to be better (since they get improved earlier on the tech tree, provide adjacency benefits to Industrial districts, and only take 1 builder charge to set up rather than 2 charges) but this is still a big deal. We're almost back into Civ4 territory here with the ability to reshape cities on demand, and that's a very exciting possibility to me. I wish that I had figured this out before the very ending stages of this game!
Here's another peek inside the capital as the Spaceport district completes to demonstrate this in action. The forests north of the river up by the coal resource and the plains forests at the south by the horses have all been planted by builders and lumbermilled. Together they increased the base production at this city coming from tile yields from 39 production to 55 production, an increase of almost 50 percent. I had even more dramatic gains in some of my smaller cities that were mostly flatland and had struggled to build anything for most of the game. Suddenly I could toss forests about willy-nilly and give them a real industrial base. Along with my triple Industrial city state allies, every city could now build things quickly, regardless of the starting terrain. In some ways that's bad, and trade routes certainly exacerbate this further with the ability to import food and production into a city separate from the map. On the other hand, the lid doesn't come off until the later stages of the game with more advanced technology, and it does drive home the critical fact that expansion the key to being strong in Civ6. This isn't really different from Civ4, where even the most marginal locations on the map become worth settling in the later stages of the tech tree, with State Property civic and Biology farms and so on. Now if we can ever get the AI to expand properly, we'll have a real challenge here.
I continued working on the spaceship projects in Cairo over the following turns. Cairo would be constructing most of them, along with the city of Dalmietta where I was setting up a second Spaceport district. I'm not sure if that was the proper place for another Spaceport at all, due to the cramped location, but it did have my second-highest production and it seemed to be the best location out of a generally weak lot. I should have done a better job of picking out another Spaceport city at an earlier date and working to set it up properly. Oh well. At least Dalmietta had an Encampment district for the small boost to spaceship part construction.
I also pushed to the end of the culture tree and Globalization civic. Ecommerce policy provided +5 production and +10 gold for international trade routs, which was more than I could get from domestic ones. I was moving all of my traders over to Cairo and Dalmietta as their current routes ran out, of course. I also tried out International Space Station policy for +10% science per city state that you are suzerain of. That one actually worked too well, as it shot my science up to 827 beakers/turn:
Wow!  Of course this was truly overkill, as it was clear by now that I was going to finish the entire tech tree before I could finish building the spaceship parts. I went ahead and swapped this policy out in favor of one of the gold-boosting or faith-boosting policies, since they were what I needed to accumulate more Great People via patronage. At least this picture shows all of the surviving city states here at the end of the game, along with France and Russia's expansion on the minimap. They spread out quite well to cover their little subcontinent, then appeared to stall out there and made no attempt to go after that northern region with the collection of city states. I was running Gunboat Diplomacy policy here (+4 envoy points per turn) as well as burning through a lot of the old civics that grant a free envoy, and as I result I was really snapping up suzerain control left and right. I don't think the AI civs were even in tier 3 government yet. If this game had Civ5's old city-state based diplomatic victory, I would have won in a cakewalk.
I finished the tech tree on the same turn that I completed the Moon Lander, Turn 237:
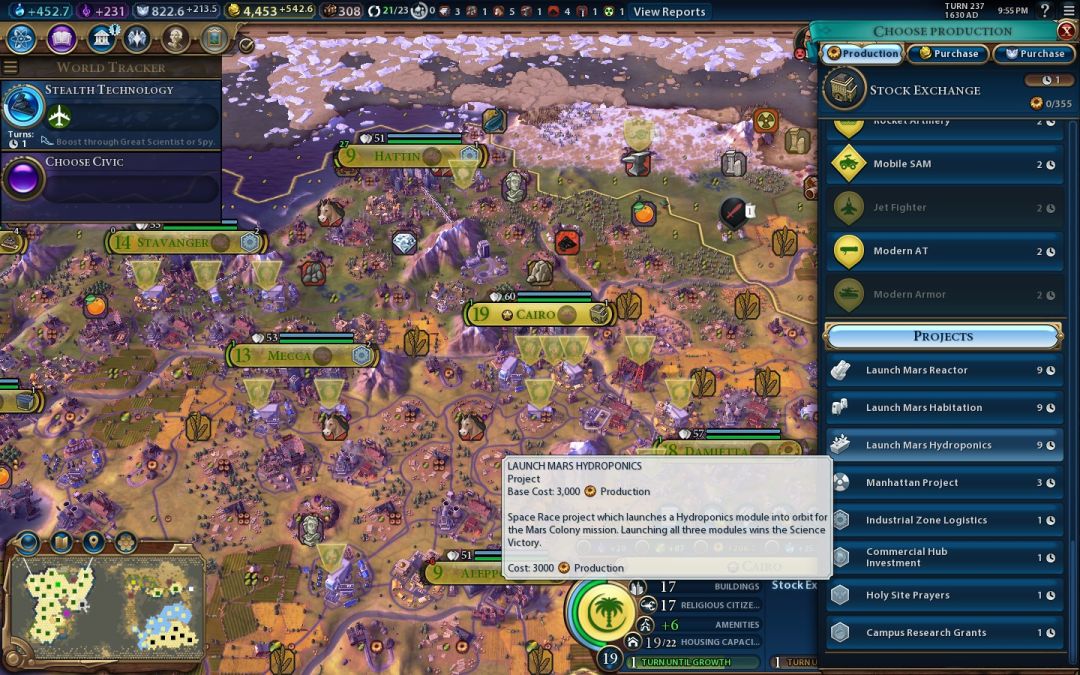
Now I had the task of building the final trio of 3000 cost Mars mission projects. Cairo could do them in 9 turns apiece, Dalmietta in 16 turns. The clear plan was to have both cities start on parts immediately, with Cairo finishing first and hopefully being able to rush the third and final part along to completion with some kind of Great Person. There was just one problem: the Great People were not playing along! I seemed to be running through a huge slog of thoroughly useless abilities while waiting for anyone related to the space race to appear. Alan Turing (Scientist, Turn 206): boosts Computers tech, something I've had for ages. No good. Alvar Aalto (Engineer, Turn 216): city provides +1 appeal to tiles it owns. Are you kidding me?! Seaside resorts aren't that great. Robert Goddard (Engineer, Turn 218): +20% towards space race projects. Finally someone useful! That was 4200 faith well spent there.
Unfortunately, this was far more common:
Mary Leakey: extra science for a city with artifacts in it, and extra tourism in that city. Not very useful for someone heading off to space. Jane Drew was the latest dud over in the Great Engineer category, with a benefit that would have been nice for a One City Challenge but nothing I wanted here. I would recruit her on Turn 234 to pass on to the next name on the list. Janaki Ammal (Scientist, Turn 235): gain 400 science for each adjacent rainforest tile. Yes, that will be very useful for someone who's already completed the tech tree. Erwin Schrodinger (Scientist, Turn 239): triggers the eureka for three technologies from the Atomic or Information era. Again, I had already long since researched these technologies. Why couldn't I pick the actual Great People I wanted instead of being forced to cycle through all these duds? Why did I have to keep taking Great People from the Modern and Atomic ages when I had been in the Information age for dozens of turns?  It was all very frustrating, even as I spent money and faith like water running through a sieve. (Will everyone else get the same Great People in the same order? I'll be curious to find out.)
In the end, I would end up recruiting all six Great Engineers in the Modern and Atomic eras, as well as all six Great Scientists in the same two eras. I think that the advancement of Great People to the next era is triggered by a certain number of the civs in the game hitting that period in time, and since the various AIs were so far behind in tech, I was forced to claim every Modern Great Person before being able to recruit any of the Atomic ones, and then all of the Atomic ones before being able to recruit any of the Information ones. What a pain in the rear. All this while, I had been running the Campus Research Grants and Industrial Zone Logistics projects everywhere, which provided additional Great Person points to fund my patronage habit. I was like a rabid fanboy who couldn't get enough of those Great People - they all had to be mine right away.
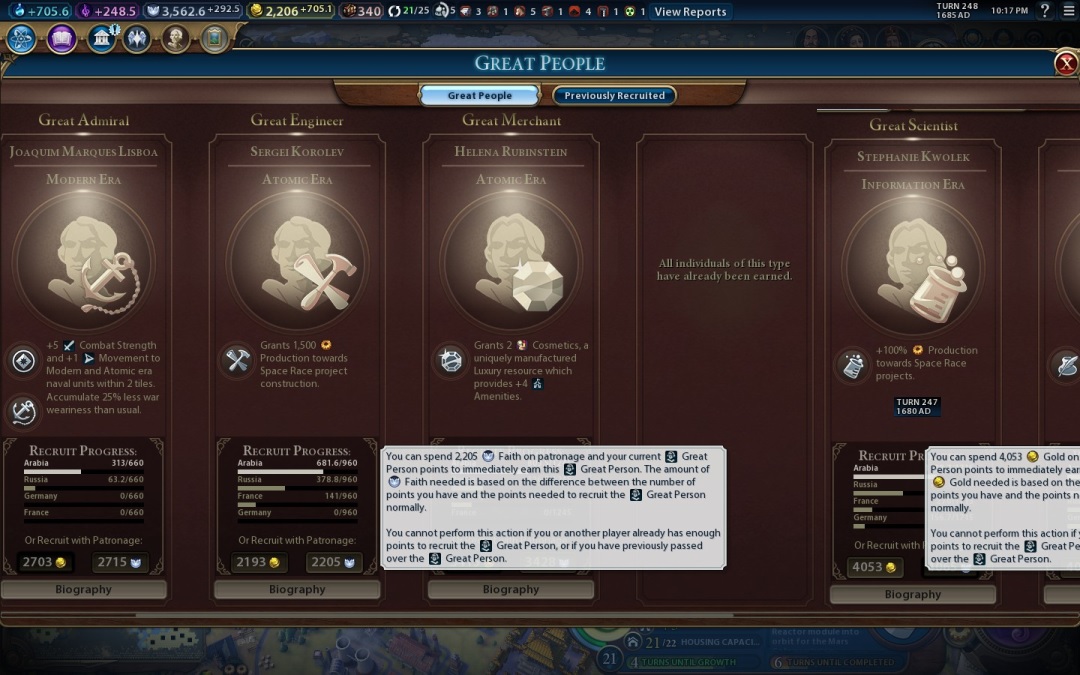
Finally I made it to a pair of useful Great People. Stephaine Kwolek granted +100% production towards space race projects, and Sergei Korolev provided a flat 1500 production boost. This was what I had been waiting for, but note the date in the corner: Turn 248. I was nearly finished the remaining spaceship parts at this point, and much of the benefit of these Great People was going to go to waste. It certainly would have been nice to reach them a little bit sooner! Anyway, I burned Kwolek's ability immediately, and used Korolev on the third spaceship part under completion in my capital. To my surprise, it insta-completed that particular part! I had not been expecting that. I suppose that the +100% production bonus was applied to the 1500 flat production of the second Great Person to complete the part in a single turn. Well, I'll have to remember that for the future. As a result, Dalmietta would finish the second (now the final) spaceship part, needing 3 more turns to complete its work.
One more thing to highlight before wrapping up. Frankfurt was that little city that Germany had planted in my backlines, and which I had ignored until getting it in the peace treaty that ended the war. I hadn't thought much of this dry location with most of its tiles occupied by other cities, and didn't devote too much attention to it. However, because it was located near my core and picked up a lot of factory/power plant bonuses, it was able to construct its Industrial zone in relatively short order, and then mine or lumbermill its few existing tiles (although it looks like I missed one, heh). At the end of the game, this pitiful little city was pumping out 77 production/turn and churning out Industrial Zone Logistics every 5 turns. As I wrote in one of my other reports, the fishing towns are absolutely back in Civ6. With some elbow grease, you can make just about any terrain into a net positive for your empire.
Here's the final overview shot:
On the last turn, I turned off my gold and faith generation policies in favor of science ones, just to see how high I could get the beaker count. It came out to 1337 beakers/turn, and I did not manipulate that number in any way with specialists. Haha, a leet result indeed! It was worth the various missteps in the endgame just to see that number come up on the final turn.
Final result: Spaceship victory on Turn 251. That was a dozen turns better than I did in my previous Aztecs game and I could have shaved more turns off the launch date with better planning ahead of time. I had the whole tech tree done on Turn 237, which means that a better executed production sequence likely should have finished around Turn 240. I take the blame for that, as I was too slow to build Ruhr Valley in my capital and too slow to get started on the initial Spaceport district. I was caught off guard by how quickly the tech tree finished once all of those research labs were done and I had the powerful lategame policies enabled from the civics tree. I'm sure that I could have done more in terms of the city micromanagement as well; for example, I could have chopped some of the remaining old growth forests, and harvested some of the resources at these cities to shave off a turn here or there on the final builds. I also realize now that I could have flipped into Communism once I recruited my final Great People for the global 10% production bonus. (You want to stay in Democracy before that because the 50% patronage discount is enormous.) That said, I've never been as good at optimization as some of the other members of our community. I like exploring new variant paths, not perfecting a single approach down to the smallest details. This was also something like my sixth game of Civ6 to be completed, and it's still very much a learning process for me, especially in the lategame. I did better than my one previous spaceship game and on a harder map, so I can't be too disappointed with the results.
I will be very curious to see what kind of result we get from the rest of the community with this game. I hope that it proves to be a challenge for a lot of players; I deliberately designed it to be a tough map. I expect that the winner will have a victory down in the Turn 220-230 range, since we have such a strong stable of Civ players at Realms Beyond. There were certainly opportunities to expand faster, conquer the AIs faster, and snowball harder than I did in this game. On the other side of the coin, I also think we'll have a lot of players who struggled with this game, many of whom will probably not report their games. (We always have a lot more reports for easier games than harder ones, which is understandable.) I'm hoping this will be a good measuring stick for me in terms of where we should set the difficulty level for upcoming events. Depending on how the community does with this game, we could go in a number of different directions. I do hope that a number of people gave this one a chance - it was great fun for me, and I continued to learn more new things about Civ6's gameplay.
As always, thanks for reading. I'll see you on report day. 


