
 |
Part Four: Not One, Not Two, Not Three, Not Four... |
|
The title here is a reference to an infamous interview given by basketball superstar LeBron James after he signed with the Miami Heat in the summer of 2010. When prompted by an interviewer asking if he thought his new team would win a championship, LeBron responded by claiming that they would win "not one, not two, not three, not four..." and implying that the Heat would win seven or eight NBA titles. This was widely and rather deservingly mocked on social media, as a group of new teammates who had never played a single game together were confidently declaring that they would win half a dozen or more championships. However, with the benefit of hindsight it turned out that the LeBron-era Miami Heat largely lived up to that boast, reaching the NBA Finals four years in a row while winning two titles. While the team never came close to winning seven or more championships, they dominated the NBA for four years while piling up a playoff series record of 14 wins against 2 losses in the process. If that was failure, we should all be so lucky.
I figured that this interview soundbite would also serve as a mantra for Spyderman as he did his best to climb the ranks of the Torment difficulties. He had proved by the end of the last section that he could dominate Torment I difficulty, as demonstrated by the thorough evisceration of the Butcher in less than 30 seconds. I knew that it was time to move up to a higher difficulty level in search of greater challenges. To shed some light on the various difficulty levels, let me post this screenshot of a table detailing what changes as the difficulty level increases:

I included the URL in the screenshot in case anyone wants to check out this website for themselves. Normal difficulty is listed on the left, followed by Hard, Expert, Master, and then all of the Torment difficulties up to Torment XVI. One of the first things to note is that the scaling is not identical between all of the various difficulty levels. For instance, from Torment I up to Torment VI each step in difficulty shares the same increase: 60% greater monster health and 45% greater monster damage. Then starting at Torment VII there's a clear shift, with the following difficulty levels going up by 120% greater monster health and 41% more monster damage (which is interestingly a slightly smaller increase in the damage scaling). This is also reflected in the equivalent Greater Nephalem Rift equivalent level, wherein the difficulties start out being equal to three rift levels and then change over to five rift levels starting at Torment VII. This is a pretty handy way to keep the relative difficulties in mind, with Hard = GR1 and Torment I = GR10 and Torment VII = GR30 and so on.
Obviously the experience and gold provided by enemies increase along with each difficulty level. Some of the other things on this table are a bit less straightforward, however. The Legendary drop percentage is how much the chance to find legendary items goes up over the base rate, with a noticeably higher percentage within the Nephalem Rift areas. This is still only a chance for legendary items to drop, not a guarantee, although playing on higher difficulties does mean that they'll show up a lot more frequently. Death's Breath is the chance for an elite mob to drop a Death's Breath crafting material upon being defeated; when "2nd" starts showing up, that means a single Death's Breath is guaranteed to appear and there's a chance to have a second one drop as well. The Greater Rift key functions the same way involving the chance to get a second or third Greater Rift Key from completing a Nephalem Rift, as does the Keywarden machine drops from those particular bosses. Finally, the Horadric Cache materials are how many of the bounty crafting materials appear from each act. These are the Khanduran Runes (Act One), Caldeum Nightshade (Act Two), Arreat War Tapestries (Act Three), Corrupted Angel Flesh (Act Four), and Westmarch Holy Waters (Act Five) awarded in Adventure Mode after finishing a full set of bounties. The default number at Torment I difficulty is 6 crafting materials per set of bounties, and that wouldn't go up to 8 crafting materials until reaching Torment VII difficulty. Similarly, the chance for a legendary item to appear as part of a set of bounties would increase from 10% at Torment I difficulty up to 100% at Torment VI difficulty. Getting to Torment VII difficulty for the increased crafting drops and the guaranteed chance of a legendary item was going to be a high priority.

Spyderman had been crushing Torment I difficulty so thoroughly that I skipped him over Torment II difficulty and went straight on to Torment III. The monsters on this new tier of opposition had 156% more health and dealt 110% more damage, basically 2.5 times the previous HP and a little more than double the damage dealt. Standard critters now had about 7-10 million health while elites appeared in the 100-200 million HP range. The picture above shows Spyderman clearing out a cursed chest, one of many small events that can be found while exploring the landscape in Diablo 3. This event challenges players to kill 100 enemies in 30 seconds; the player is guaranteed one chest for undertaking the event at all, and a second chest if it can be completed before time runs out. Spyderman had no trouble meeting the dictates of the event, with well over a hundred enemies downed before the timer hit zero. His little spiders were dealing about 170k damage per bite right now, with larger damage printouts occuring from the Sash of Knives projectiles. The cursed chest event is a decent proxy for the relative strength of your character as compared to the enemies in that area, and Spyderman was easily passing the test. Hmmm, Torment III didn't seem too tough at the moment.

As another test, I decided to have Spyderman attempt a Greater Nephalem Rift (after he picked up the key from the standard Nephalem Rift pictured above). These are the timed challenges whereby the player has 15 minutes to defeat enough enemies to summon the Rift Guardian and then defeat that opponent. Part of the reason why I didn't think that Spyderman would fare well in Torment difficulty was due to the timed nature of these rifts. Sure, he might be able to defeat the monsters eventually with his spider jars, but could he win fights quickly? I had my doubts when I was doing the planning for this character. I picked a Rift Difficulty of 16 for this attempt, equivalent to the same Torment III difficulty that Spyderman was testing out. Could he manage to summon and then defeat the Rift Guardian before time ran out?
It turned out that I had been overly cautious with Spyderman. He tore his way through the opposition without breaking a sweat, with the spiders having no difficulty chomping their way through enemy mobs. The damage over time element of the Corpse Spiders skill didn't turn out to be a problem at all, as any large group of enemies would bunch up together and then have their lifebars eaten away by the spider pack. If anything Spyderman was probably better at dealing with larger groups of opponents, since it took several seconds to get his damage up and running with repeated spider jars, something that was inefficient at dealing with isolated targets. The net result was that it only took half of the allotted time to reach the Rift Guardian (Tethrys on this occasion) and score the kill:

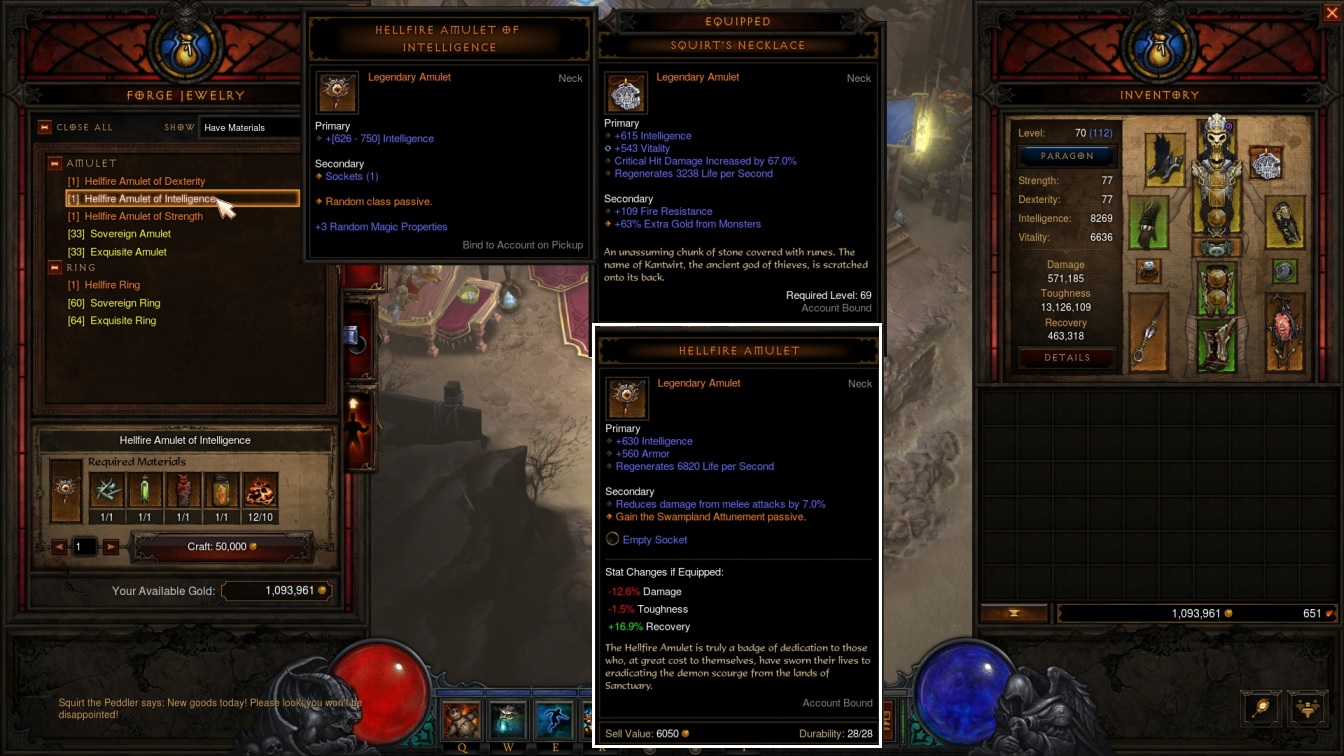
This lovely pile of loot was Spyderman's reward for emerging victorious. He hadn't needed anywhere close to the full 15 minutes to clear the rift, and this was a sign that I could bump up the difficulty level a bit further. The legendary gem that dropped in the aftermath of victory was Mirinae, Teardrop of the Starweaver, a gem that had a chance to smite nearby enemies for a big boost of Holy element damage and heal Spyderman in the process. If I could get the gem up to Rank 25, the smite was guaranteed to go off every three seconds. Mirinae would be a weaker option for a lot of other character builds, which rely on their skills to deal damage and could select a more useful effect for their three allowed legendary gems. However, Spyderman had a low offense setup and anything that added more direct damage was a pretty strong choice. Mirinae looked to be a nice addition to his overall setup, and it wasn't as if he needed to remove some other legendary gem to put it to use. The Gogok of Swiftness was the only legendary gem that he had socketed at the moment. I decided that I would craft a Hellfire Amulet and put Mirinae into the resulting socket, while also increasing the overall difficulty level of the game.

This led to a search for the crafting materials needed to create a Hellfire Amulet, known as "organs" due to being various different body parts. The first requirement was the plan for the amulet itself, which can be bought from Squirt the Peddler in Act OneI for a cool 5 million gold. (Do not buy the cheaper 2 million gold crafting plan, as this is for a level 60 item that will always be inferior. I learned this the hard way because the game does not tell the player.) The Hellfire Amulet itself then requires special crafting materials that can only be obtained through a series of hidden end-act boss refights against enemies like Diablo and Azmodan and so on. In order to access these boss refights, the player has to track down a series of keys held by Keywardens, with four of them scattered across the four non-expansion acts. The Keywardens are surprisingly easy to find since Adventure Mode shows where they are located with a little key icon, then points a purple arrow towards them on the minimap. I took Spyderman on a quick tour of the four acts and hunted down the Keywardens in turn. This was a way to ease into Torment V difficulty level (I had skipped a difficulty level once again) where the Keywarden bosses had spawned with about 750 million HP apiece. With Spyderman having increased four difficulty levels in short order, enemies now had about six times the health that they did on Torment I while also dealing four times as much damage. Spyderman dropped out of the lawnmower mode he had been enjoying recently and was back to a healthy challenge for the first time in ages.
The boss refights are accessed by taking the keys dropped by the Keywardens back to Act One and opening red portals hidden in a rundown shack. These bosses are fought in pairs of two, such as Leoric fought together with Maghda, and they all have hard Enrage timers right around three minutes. Spyderman didn't have the damage required to kill the bosses on Torment V within that time limit so he dropped back down to Torment I difficulty to plow his way through these encounters with ease. That provided the crafting materials that he needed for his Hellfire Amulet:
There aren't a lot of ways to acquire rings and amulets in Diablo 3, with these Hellfire recipes being the only true endgame crafting setup for jewelry. (Gambling for them with Kadala can also be a good option, if somewhat pricey in blood shards.) The special crafting materials from the boss refights are actually relatively easy to get and don't present much of an obstacle for players. No, the biggest thing that makes the Hellfire Amulet expensive is the requirement of 10 Forgotten Souls, the crafting material that requires salvaging a legendary item to obtain. On the positive side, Hellfire Amulets will always have the correct primary stat present (since there are three different options for the player to pick between) and they always roll with an empty socket to use on a legendary gem. They also roll a random passive skill for your character's class which is basically like getting a fifth passive skill for free. Hopefully the game will give you something useful for your character build or else it's back to crafting another one at the cost of 10 more Forgotten Souls.
Spyderman ended up getting a pretty bad result overall from his Hellfire Amulet roll. He ended up with almost the minimum Intelligence possible (630 on a possible range from 626-750) and two mediocre primary affixes in the form of additional armor and life per second regen. The amulet slot has a chance to pick up several other superior affixes that aren't available on some of the other equipment slots. Here's the ranking order of the most desired affixes on gear in Diablo 3:
1) Critical Strike Chance
2) Crtical Strike Damage
3) Attack Speed
4) Primary Stat
5) Vitality
After that it doesn't matter too much, with Armor and Health Regen being semi-decent but not great options. Most of the armor slots can't contain critical strike chance/damage or attack speed, which makes primary stat and Vitality the best options on them. But amulets can roll all of those options and you may notice how losing the +67% critical strike damage off Spyderman's current amulet was showing up as a big decrease in overall damage output. This would likely still come out as more damage in total once the effects of the Mirinae legendary gem were factored in, but I could have done a lot better here. I'd have to reroll another Hellfire Amulet eventually. In the meantime, I could use the Enchantress to improve on the situation:

Ah, there we go!  This time luck was with me as I was able to reroll the +560 Armor into the maximum possible critical strike damage affix of +100%. This can roll anywhere from 51-100% so I had basically hit on a 99th percentile result here. It would have been better if possible to get the max possible critical strike chance (+10%) since there are other ways to get critical strike damage but few options to boost the base crit chance. However, beggars can't be choosers and this was quite nice indeed. The tradeoff for Spyderman ended up coming in the form of his survivability, since he was going from +543 Vitality on his old amulet to nothing on his new amulet. His damage was going to be much higher though with the addition of Mirinae, and Spyderman had picked up a semi-useful passive skill in the form of Swampland Attunement (gain 120 resistances for each enemy with 20 yards). It was time to get out there and start hunting bounties again.

Spyderman traveled from act to act chasing down the various bounty tasks in Adventure Mode. I was starting to get more of a feel for Torment V difficulty as he spent more time there, figuring out how much health and damage the various different enemies could be expected to have. This is a picture from another cursed chest in the Arreat Crater in Act Three, with chaos and carnage ensuing on all sides. Standard monsters seemed to have about 20-30 million HP on this difficulty with the beefier normal critters coming in around 50-60 million. Elites were rolling with 300-400 million health and the major act end bosses had over a billion HP by now. Crazy high numbers as I've mentioned before; I still don't know why the designers didn't keep things more manageable on that front. Note that Spyderman was nowhere close to defeating 100 enemies at this cursed chest before the timer ran out, as he lacked sufficient damage to kill these beefier opponents in time. That wasn't too big of a deal, just another indication that he was in more dangerous territory than before.
The one place where I was stepping lightly involved the big act end bosses due to their Enrage timers, skipping them and rerolling the bounties when they came up. Many of these bosses effectively have a death switch whereby they auto-kill the player if victory isn't achieved within three minutes. For example, Belial simply hits his little platform with endless lightning strikes that can't be survived. I think this whole setup is really dumb, as it transforms this whole portion of the gameplay into a DPS-based "gear check" rather than a test of genuine player skill. It doesn't matter how talented the player might be, if they don't have a sufficiently high damage output then the boss battle cannot be won. Dumb as this may be, it's a natural outgrowth of having huge amounts of life regeneration built into the gameplay of Diablo 3. Since characters regenerate back up to full health in a matter of seconds when out of combat in classic Halo style, there are no resources to conserve any longer. If the enemy boss can't effectively one-shot the player with an instant kill move, the player will quickly return to full health and the battle becomes impossible to lose. So this was the obvious solution, putting a timer on the big fights and making it so the player auto-loses after a certain point. It's effectively a longer, slower version of an instant kill move. Of course, the net effect is that the gameplay shifts as a result from a focus on survival to a focus on outputting the maximum DPS at all times, and that strikes me as a bit ridiculous. I hope that future Diablo games will try to do something to bring back resource conservation as a concept as in the earlier games.

At the end of collecting one set of bounties, Spyderman discovered two pairs of set boots. The first such set of boots turned out to be exactly the same as what he was already wearing, the Helltooth Greaves, except that it had rolled as an Ancient item, woohoo! That beautiful gold border is always a pleasure to see on the rare occasions when it pops up. Obviously it outclassed the current set of non-Ancient Helltooth Greaves that Spyderman was wearing, with the expected 1/3 higher Intelligence (+589 against +477) and Vitality (+599 against +470). The new boots also contained +123 resistance to all, and I was able to reroll +10% movement speed into +465 Armor with the Enchantress. Boots are not an item that can roll critical strike chance/damage or attack speed, making this a very nice find indeed.
The other pair of set boots was the first item to appear from the Arachyr's set. It was a bit unfortunate that this had dropped in the wake of the Ancient version of the Helltooth Greaves, as the stats were outclassed by the other new legwear. Why couldn't this have been the item to roll as Ancient? The more important part of this item came in the form of the set bonuses, however, which would unlock a permanent spider queen that left behind webs dealing 4000% of weapon damage. The four set bonus would add the Toad of Hugeness rune and a healing property to the Hex spell that Spyderman used all the time, and the maximum six item set bonus would increase the damage of the Corpse Spiders skill by 9000% (!!!!!!) That is not a typo, that's a 9000% (90 times damage) bonus. And in theory, that could be further boosted by the Ditch Diggers legendary pants by another 100% since Corpse Spiders count as primary skill. This was literally the perfect item set for Spyderman if I could find all of its relevant pieces. You're probably thinking that I designed his character build with the intention of using this set eventually, but no, I didn't even know this item set existed when I first planned out his skills. True serendipity in action here. Spyderman had a ton of work needed to complete this set and this would become his overriding character goal. For now, the Arachyr's Stride boots were saved in stash.

Before going on that item diversion, I had mentioned how Spyderman was trying to avoid bosses with an Enrage timer out of fear that he didn't have enough damage to defeat them before three minutes was up. There are a few major bosses that don't have any such Enrage timer though, and those were the ones that I ended up seeing frequently while pursuing bounties. Leoric is one such example, with the Skeleton King never changing up his AI patterns or pulling out some kind of autokill move no matter how long the battle takes. He relies on the same two or three moves over and over again, charging forward with melee swings of his axe or pausing to summon more skeletal minions. Leoric does have a ton of health, however, sitting at roughly 2.3 billion HP when Spyderman faced him. It felt as though this battle took forever, but Reaper of Souls keeps a little clock in the top-right corner of the screen while playing, and from the screenshots that I took the whole thing only lasted about 2.5 minutes. It looks like Spyderman would have been able to finish this battle before the ticking timer ran out after all.
Leoric dropped a unique potion upon defeat, the Bottomless Potion of Fear. The non-standard potions are extremely rare item drops that effectively replace the basic red health potion. All of them still retain the 60% health restoration on a 30 second cooldown while adding some kind of secondary effect. The Bottomless Potion of Fear also terrorizes anyone immediately next to the player for 4 seconds, a minor effect that could come in handy. Since it was strictly better than the default potion, Spyderman went ahead and equipped it in his potion slot.

Another major boss that Spyderman was confident enough to face was Adria. She's one of the three major bosses from the expansion, and yes, this is canonically supposed to be the same Adria from the town of Tristram in the original Diablo. (I definitely don't buy this game's retcon that Adria was secretly working for Diablo the whole time but whatever.) Adria has a handful of different attacks: shooting purple-colored missiles that leave a patch of red blood on the ground where they hit, teleporting next to the player, and spinning in a circle as pictured above. The biggest danger when facing Adria comes from a series of little blobs moving around on the ground, which travel in random fashion and damage the player if they make contact. Adria is listed as having a "soft Enrage" timer, in the sense that the little blobs will slowly fill up the room over time and make it harder and harder to move around. I didn't find it too hard to dodge them though, and despite my worst fears that this might turn into another auto-loss scenario, Spyderman handled it pretty well. Although it took a little while to carve through Adria's 3.6 billion health, she did keel over in about three minute's worth of real world time. (Note the 11.2 million damage printout above - that was the smite effect from Mirinae kicking in and going critical. Not too shabby.)

Spyderman spent most of his time hunting bounties because he had a constant need for their associated crafting materials. It often felt like he was on a treadmill where he would complete a set of the bounties in all five acts, only to pick up six new legendary items in the process that had to be extracted for Kanai's Cube, therefore ending up right back at square one again. For quite some time he was getting new legendary items faster than I could collect the crafting materials needed to melt them down into the cube. Occasionally I would try a Greater Nephalem Rift to do something different, and I honestly would have preferred to spend some more time in them if Spyderman didn't need the bounty crafting materials so badly. This was the tail end of one of those few Greater Rift runs, with Spyderman taking on the Rift Guardian at the end of it. Voracity appeared to be a variation on the poison-based boss Ghom from Act Three, and his health was low enough that he was defeated fairly quickly. He had only 1/6th the health of Adria from a bit earlier by way of comparison. This was Rift Difficulty 19, three higher than the previous attempt from Spyderman, and comparable to Torment IV difficulty. Spyderman managed to finish this run in 7:01 with more than half the time still remaining, indicating that he could complete a more difficult rift without much trouble. The resulting legendary gem was Bane of the Trapped, which might be useful if Spyderman could get into the super lategame but not as useful as his current gems for the moment.

Despite needing to spend a lot of Death's Breaths on extracting legendary item properties into Kanai's Cube, I did have enough of them to upgrade a rare item into a legendary item on occasion. I was in the process of trying to fill out the last remaining intentory slots with legendary or set items, replacing the few rare items that were still left over. I used Kanai's Cube to upgrade a rare helmet and ended up with the Ancient version of the Helltooth Mask, excellent!  It came with a huge boost of +958 Intelligence, 6% increased critical hit chance, and a tasty socket for gem usage. The third primary affix was an increase to the damage of the Sacrifice skill, useless for Spyderman, I rerolled that into the health regen pictured above. This was a mistake and I should have rerolled until I was able to get Vitality from the Enchantress, especially given that this was an Ancient item that could have as much as +1000 Vitality on it. Health regen can be picked up in other ways and is not as valuable as an affix. (I actually forgot that I had done this and was reminded to go back and fix this when reviewing these screenshots. I rerolled this into +900 Vitality eventually.) Fortunately the socket allowed me to add a Flawless Royal Amethyst, the highest tier possible of that gem type. This was worth +23% additional life and increased the total Toughness rating despite losing out on the +605 Vitality from the prior rare helmet. Of course, better yet would have been getting the socketed amethyst plus an even larger bonus to Vitality, something that I did eventually remedy as mentioned above.
I wasn't sure whether to praise or curse my luck with these Helltooth items. On the one hand, I had two Ancient items with excellent stats that were better than my existing gear. On the other hand, both Ancient items were part of the wrong Witch Doctor set! I wanted them to show up as part of the Arachyr's set, not the Helltooth set. Ideally, I would keep these two items in place for the two item set bonus while filling out the Arachyr's set in the shoulders, torso, legs, and hands slots. Somehow I had ended up with three different items from the Helltooth set, and they were extremely useful despite not being the best fit for this character. I suppose this was primarily good luck even if it was slightly frustrating at times.

It was about this time that I realized I had dropped the Ring of Royal Grandeur into Kanai's Cube a little while back. Since I had three items from the Helltooth set, I could equip that item property in the jewelry slot and get the four item set bonus: after applying Necrosis to an enemy, you take 60% reduced damage for 10 seconds. That sounded pretty sweet and much better than anything Spyderman was using in that Kanai's slot at the moment. I am not certain if the reduced damage applies exactly one time for each enemy, or if it can be continually refreshed against the same target repeatedly - this obviously matters a great deal against bosses. I believe it's the latter but don't know for sure as there is no status icon that appears while the Necrosis damage reduction buff is in effect. I had to guess as to when the damage reduction was kicking in and when it wasn't, far from ideal. Anyway, Spyderman also picked up an improved legendary item for his gloves slot, an old friend in the form of Magefist. In addition to bringing critical hit chance and critical hit damage, Magefist also had a nice passive of 20% additional damage from fire skills. I believe that this synergized with the fireballs tossed out by the Fire Brand property equipped via Kanai's Cube, not certain though. It was worth equipping even if the unique property ended up having no effect.

With the Helltooth set bonus in play, I felt confident enough to increase the difficulty level again up to Torment VI. Note that this group of elite Flesh Shamans had appeared with 400 million health, a further increase in tankiness that required more time for Spyderman to cut his way through. The little spider minions hadn't noticeably increased their damage as a result of that extra set bonus and were still sitting at about 150k from a normal hit and 500k from a crit. By the way, did you know that the jars themselves from the Corpse Spiders skill also deal damage? The damage from the pottery containers is miniscule but it does exist - that's the "3123" printout above. I'm sure that dealing 3123 damage to an opponent with 402,227,456 HP was highly intimidating! At one jar thrown per second, it would only take 35 hours to defeat that enemy.  Good thing the spiders themselves were a lot deadlier.
I actually found the shoulders to the Jade Harvester set down here, giving Spyderman one item from each of the four Witch Doctor sets:

There they are together in a composite screenshot to display all of the comparative set bonuses. The Arachyr's set is based around the use of "creature" skills, which fortunately includes Corpse Spiders. I think that the intention is to use it for Locust Swarm and Piranhas in a non-variant build with Hex providing some crowd control support. The Helltooth set is for pet summoning, granting huge bonuses to Zombie Dogs, Gargantuans, and Piranhas a second time (with that last one considered to be the strongest damaging Witch Doctor skill). The Zunimassa set is more specialized and focuses specifically on the use of the Fetish Army skill, although I suppose it could also be used for Zombie Dog or Gargantuan builds, if less effectively. Finally, the Jade Harvester set is based on the use of the Haunt skill in conjunction with Soul Harvest. All four sets do some cool stuff and have fun properties, making me want to experiment with them to some extent.
But there's a serious problem here: because the sets are so ludicrously overpowered, they make it impossible to create a viable character build that does *NOT* use one of these four sets. This is why CelticHound at Realms Beyond correctly referred to Reaper of Souls as having character "loadouts" as opposed to character builds. You can have an Arachyr loadout or a Helltooth loadout or a Zunimassa loadout or a Jade Harvester loadout. But that's it, you can't have anything else, not and have it be effective at the highest levels of play. This greatly limits the skills that Witch Doctors can employ since everything has to be based around the use of one of these four sets. For example, if I want to use Acid Cloud as a damaging skill, I basically have to use it along with Wall of Death thanks to the way the Helltooth set is designed. Similarly, if you like the Haunt skill, I sure hope that you like Soul Harvest as well. Ultimately I think that these sets are a net negative for the gameplay, as they straightjacket each class into a narrow handful of potential build paths. It's truly disappointing that Reaper of Souls opens up so many doors in terms of itemization only to close them again by forcing every character into the choice of four item sets for each class. I geninely don't understand this from a design perspective; did the developers simply fall in love with their own cleverness when creating these set bonuses?
In less depressing news, let's close out this section with another boss fight:

I wanted to increase the difficulty level up to Torment VII, as that would increase the haul of bounty-based crafting materials from 6 to 8 in each Horadric cache. Getting a third more crafting materials from each bounty run would significantly speed up the process of extracting legendary properties into Kanai's Cube. However, I needed to make sure that Spyderman would be viable on Torment VII difficulty where there would be a major jump upwards in monster health and damage. My self-imposed test was to take on the challenge of fighting Malthael again on Torment VI difficulty. Malthael is one of my favorite bosses because he doesn't have any of that Enrage timer nonsense to worry about. Instead, the fallen angel simply packs a ton of health (7.7 billion HP!) and very, very high damage. This tends to be a lengthy battle that requires precise execution to pull off, and I had to stay on my toes to keep Spyderman out of the worst of Malthael's attacks. The picture above was an example of the bullet time attack from the boss, firing off a swarm of light blue projectiles in every direction. This was one attack that Spyderman could readily dodge by keeping his distance.

When Malthael gets low on health, he begins doing his ultimate attack. His wings sweep backwards and then everything to his front and sides gets raked with a massive blast of red energy. The only safe place to stand is directly behind Malthael when he pulls out this move. The screenshot above captures this attack just as it's about to be launched, with Spyderman very much in the wrong position out in front of Malthael. There isn't a ton of warning when this attack is about to begin and I wasn't always able to dodge in time. Eating a full attack ate through more than half of Spyderman's health orb, and I wondered if he would have perished if the damage reduction from the Helltooth set wasn't in effect. (Was it acting at all here? With no status bar indicator I still don't know.) The picture above also managed to catch one of the smites from the Mirinae legendary gem going off, in the form of a bolt of holy light striking down from above. Anything that kicked in more damage was helpful here. Spyderman needed to drink from his potion several different times as well as use the health shrines at the sides of the room. It was a difficult battle to be sure but his Spirit Vessel passive skill never kicked in, meaning that he never hit zero HP at any point in time. That passive skill does have a status bar icon thankfully. After about five tense minutes of real world time, Spyderman emerged victorious.
Next up I would be taking him to a major new difficulty tier in the form of Torment VII. This was the difficulty level at which I could realistically start to unlock the secondary property on legendary gems at Rank 25, and hopefully finish cutting through the backlog of legendary items being extracted into Kanai's Cube with the higher crafting item drop rate from bounties. And of course, Spyderman would keep an eye out for another item in the Arachyr's set to start unlocking the set bonuses there. How much longer until he could access his own personal Spider Queen?


