
 |
Part Five: Enter the Spider Queen |
|
I finished the last section by detailing how Spyderman defeated Malthael on Torment VI difficulty and prepared to enter Torment VII. There's a significant jump between those two difficulty levels, as the respective Torments start becoming significantly further apart (five Greater Rift levels as opposed to three Greater Rift levels) upon hitting Torment VII. Monsters would have 120% more health on Torment VII, more than double their previous lifebars, as well as the standard increase of roughly 40% higher damage output. The big incentive for jumping up to Torment VII was the greater payout in terms of Horadric Cache bounties: eight crafting materials per bounty cache as opposed to six crafting materials. This would noticeably speed up the rate at which Spyderman was extracting his legendary items into Kanai's Cube and allow him to spend more time in the Nephalem Rifts where the rewards were more valuable. I was largely skipping up to Torment VII before Spyderman was fully ready, spending almost no time at the previous difficulty level, and I expected that he would be parked there for quite some time.

Spyderman began his Torment VII journey by doing much the same thing that he had done on earlier difficulties, hunting bounties in Adventure Mode. I had to be careful which bounties he undertook, however, as most of the major act end bosses were unkillable at his current power level. Spyderman lacked the damage to defeat them before their Enrage timers went off and autokilled him in humiliating fashion. Fortunately, unlike in the traditional campaign mode where characters progress along a linear path, in Adventure Mode characters can chase after whatever bounties they want, avoiding anything that looks too challenging. (Hardcore mode appears to be much easier in Diablo 3 than in past games, as you can easily dodge anything too dangerous for your character pretty much indefinitely.) I had to reroll the bounties a number of different times by creating new games in order to skip unwanted bosses, especially for Act Two and Act Three which almost always seemed to include some type of major boss fight. Instead, Spyderman spent his time learning about some of the weird side bounties like this task that involved hunting down a fish-person named Senahde. It could take some time to find the bounty targets in each area but the whole process was a lot easier and safer than trying to kill Belial or Azmodan.
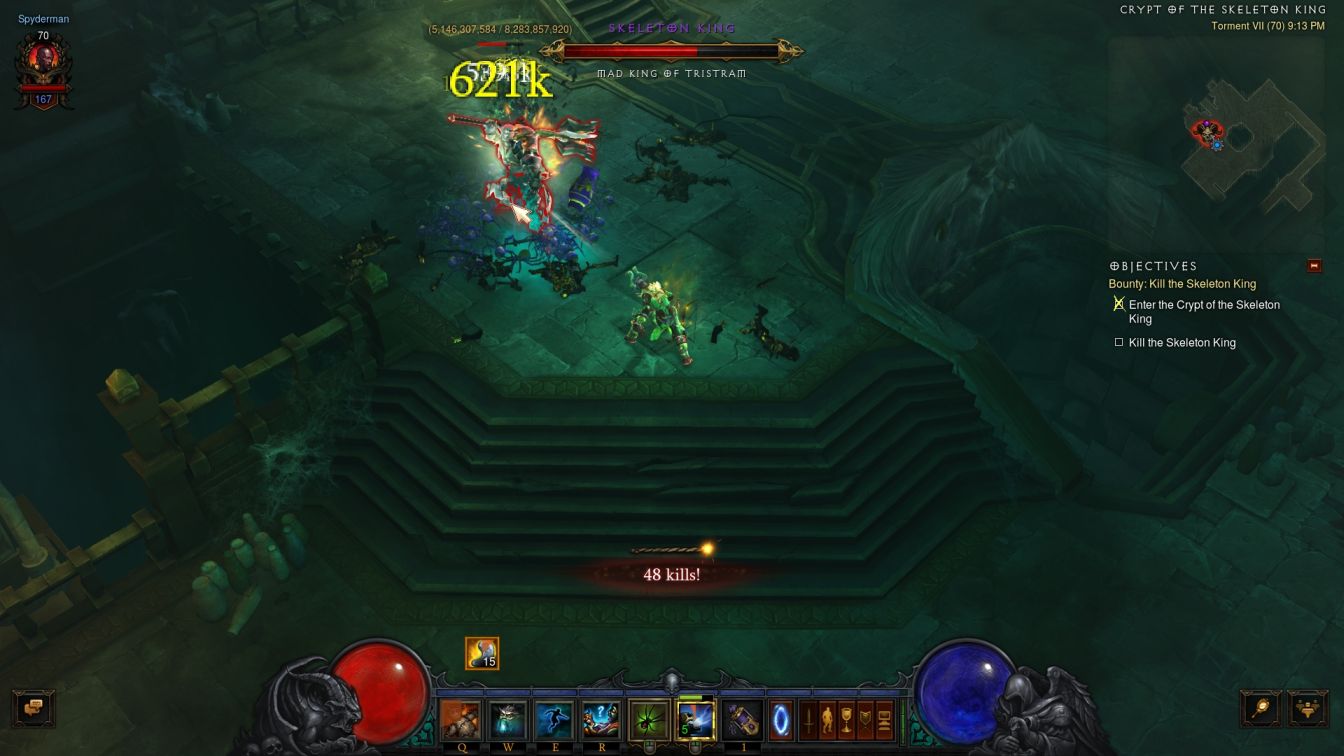
One boss that lacks any kind of Enrage timer is Leoric and therefore he's someone that I've spent quite a bit of time pursuing for bounty purposes. He's also extremely easy to defeat and serves as a friendly welcome to a new difficulty level. Here on Torment VII, Leoric was packing 8.2 billion HP and that was quite a hefty total. It took a full five minutes of real-world time for Spyderman's minions to take him down, fortunately with no danger whatsoever. As I've written before with regards to this boss, even eating a full combo from Leoric wasn't enough to drop Spyderman's health below about the halfway point, and therefore by virtue of Diablo 3's combat system it was impossible to die. Spyderman's gear was simply too good and life regen took care of the rest.
A little bit earlier, Spyderman had defeated a very rare type of treasure goblin known as a Menagerist. It had dropped a little item called "The Bumble" into Spyderman's inventory and I had no idea what it did. This appeared to be some sort of stuffed doll and I was baffled by the whole experience. I tried to use the item and it had no effect so I moved on and forgot about it. When I looked this up later, I discovered that the Menagerist drops non-combat pets that players can assign to accompany their characters. I had been unable to use my reward item because I'd been looking at my stash at the time, which caused the item to move back and forth from stash to inventory rather than simply using it. Once I closed the stash and right-clicked it, I was greeted with the new pet:

The Bumble turned out to be a yeti-like creature of some kind, lots of shaggy white fur and toothy fangs. It was honestly pretty adorable though and I was very much on board with having a new non-combat follower for Spyderman. These pets are ignored by all of the monsters and serve a helpful purpose by picking up any gold that drops in battle, saving the any need to walk over it with your character. We've come a long way from needing to pick up gold one tile at a time in the original Diablo. It did take a little while to get used to having the Bumble as a follower, with Spyderman trying to attack the white yeti several different times before I caught myself. Eventually though, I grew used to the new pet and greatly enjoyed the free gold collection. One less thing to worry about.
This closeup screenshot also gives me a chance to discuss Spyderman's fashion accessorizing. Diablo 3 makes it easy to customize the look of your character, between the chance to dye your gear in roughly two dozen different colors at the Enchantress or replace the look of an item with another item entirely. I had tested out a couple of different color schemes for Spyderman before deciding on varying shades of green. The Witch Doctor class is probably the closest thing that Diablo 3 has to a Druid, and the various different animals used by the Witch Doctor's skills had me thinking of a nature-based color setup for him. The other alternative would have been black and purple to match his spiders, and when I tried that it came off looking pretty terrible. I actually hate the way that pretty much all of the Witch Doctor helmets look in this game and had settled on this serpent thingy as the best of a bad lot. It would do for the moment.
While running a new set of bounties in Act Three, Spyderman had a near-death experience:
Check out that life globe and the flashing red tint on the sides of the screen to indicate that he was about to perish. The situation here was an elite mob with Arcane Enchanted and Poison Enchanted abilities which had together stacked up a whole bunch of damage in that narrow doorway. The elites had also spawned with the Vortex ability, which occasionally sucks in your character towards them. Spyderman had been pulled at a terrible moment and landed right in that doorway where he was poisoned and simultaneously zapped by about four different arcane energy beams. I only managed to get this image because I was frantically reaching for the Potion button on the "1" key and hit the screenshot key right next to it (rebinded to the "~" key as mentioned before). Now as it turned out Spyderman did not actually go down to zero health here, which I know for sure because his Spirit Vessel passive skill never triggered. He's also not as low on life as you might think in the picture above, which actually corresponds to about 20-25% health instead of the 5-10% health that it appears. The interface deliberately makes it look like your character has lower health than they actually do, which is something that I appreciate because it provides that split second of extra warning time to help prevent disaster. Spyderman had just enough time to get off his Spirit Walk skill and dash away to safety. In any case, this was another sign that Torment VII difficulty was no joking matter for Spyderman right now. He had to watch himself.
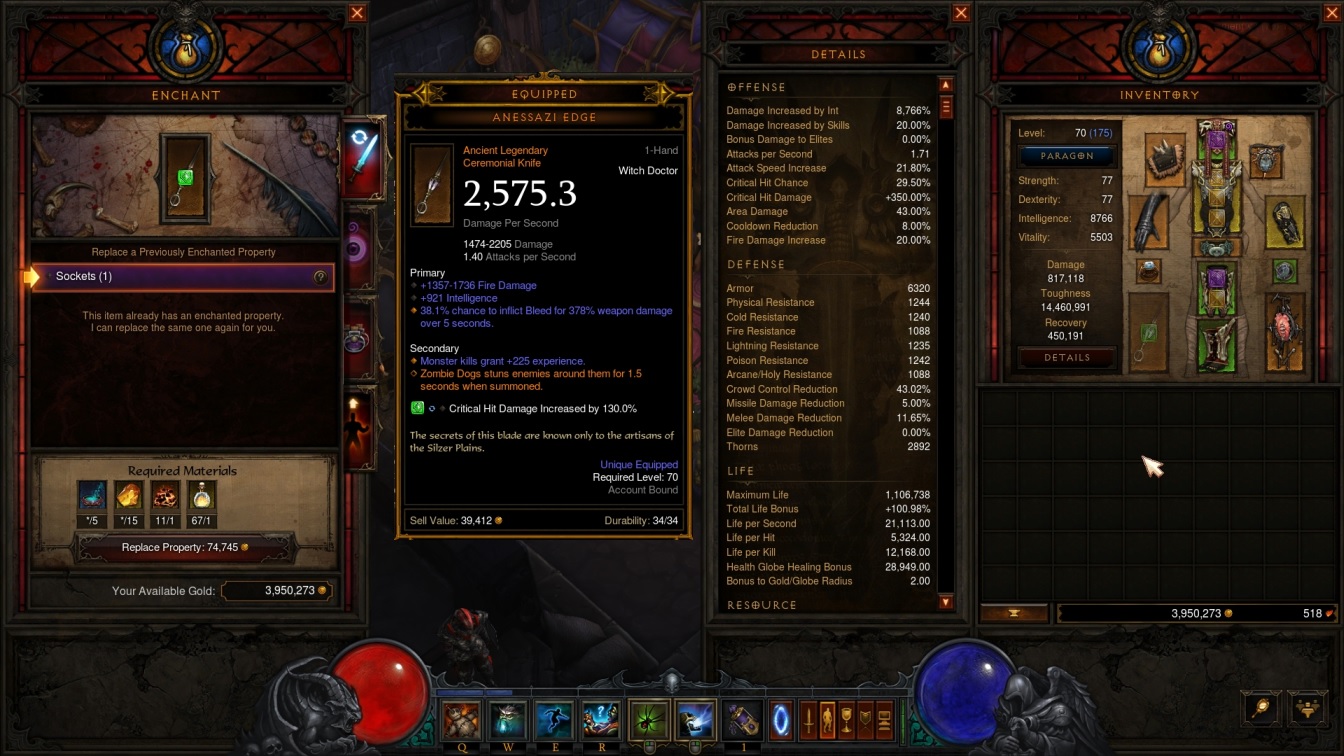
I had belatedly realized that I should be converting my accumulated gems and gold into a Flawless Royal Emerald for use in a socketed weapon. It takes a ton of both of these to get the top tier gems, as the highest gems that will drop are the Imperial classification and it takes 27 of them (81 gems of the far more common Marquise type) to create a Flawless Royal version. Since all of these gems have to be combined together at the Jeweler there's also a sizable cost involved, roughly 10 million gold if converting from Marquise up to Flawless Royal. I had created Flawless Royal versions of a Topaz and two Amethysts before realizing that I should prioritize getting an Emerald version as well. Emeralds grant Dexterity in most items (therefore not useful for Spyderman) along with adding +130% critical strike damage when socketed into weapons. This is extremely powerful and basically makes a socketed Flawless Royal Emerald mandatory for all weapons. I went back to Spyderman's Anessazi Edge dagger and rerolled it at the Enchantress until I could add a socket, then dropped in the new Emerald. The change was immediate: crit damage went up from 220% to 350% and the base Damage rating on the character screen similarly increased by a huge amount, from 662k up to 817k. That was an increase of more than 25% in raw damage simply from adding the Flawless Royal Emerald! The big tradeoff was losing the Vitality on Spyderman's weapon in order to add the socket, a reflection of the fact that the Anessazi Edge weapon had rolled with some bad initial affixes. I'd have to find a better weapon eventually.
During the same trip to town, I also managed to gamble up a legendary item in the bracers slot from Kadala, replacing one of the last remaining rare items in Spyderman's gear setup. I was able to reroll the item to get +450 Intelligence and Vitality along with 5.5% greater crit chance, and that along with the new socketed Emerald with its boost to crit damage made a huge different in total damage output. The damage rating on the character screen was now all the way up to 902k in town, and higher than that out in the field:

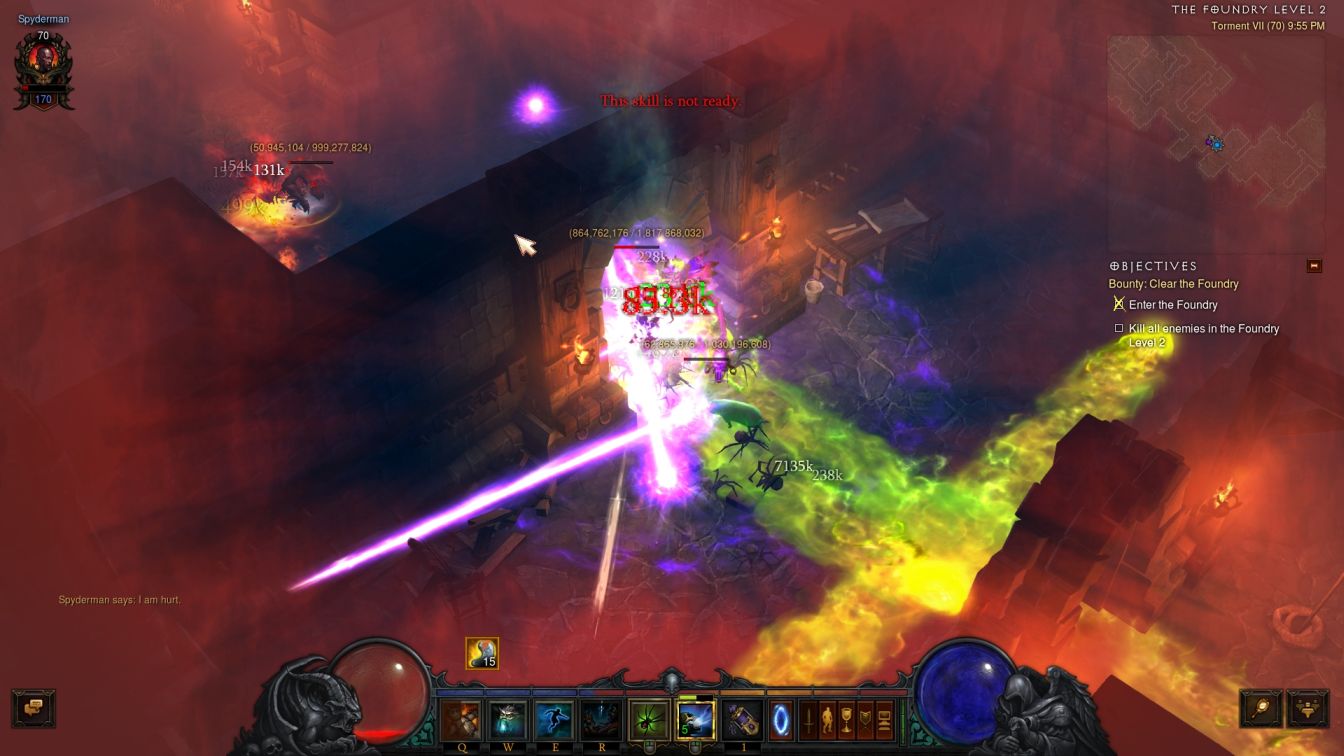
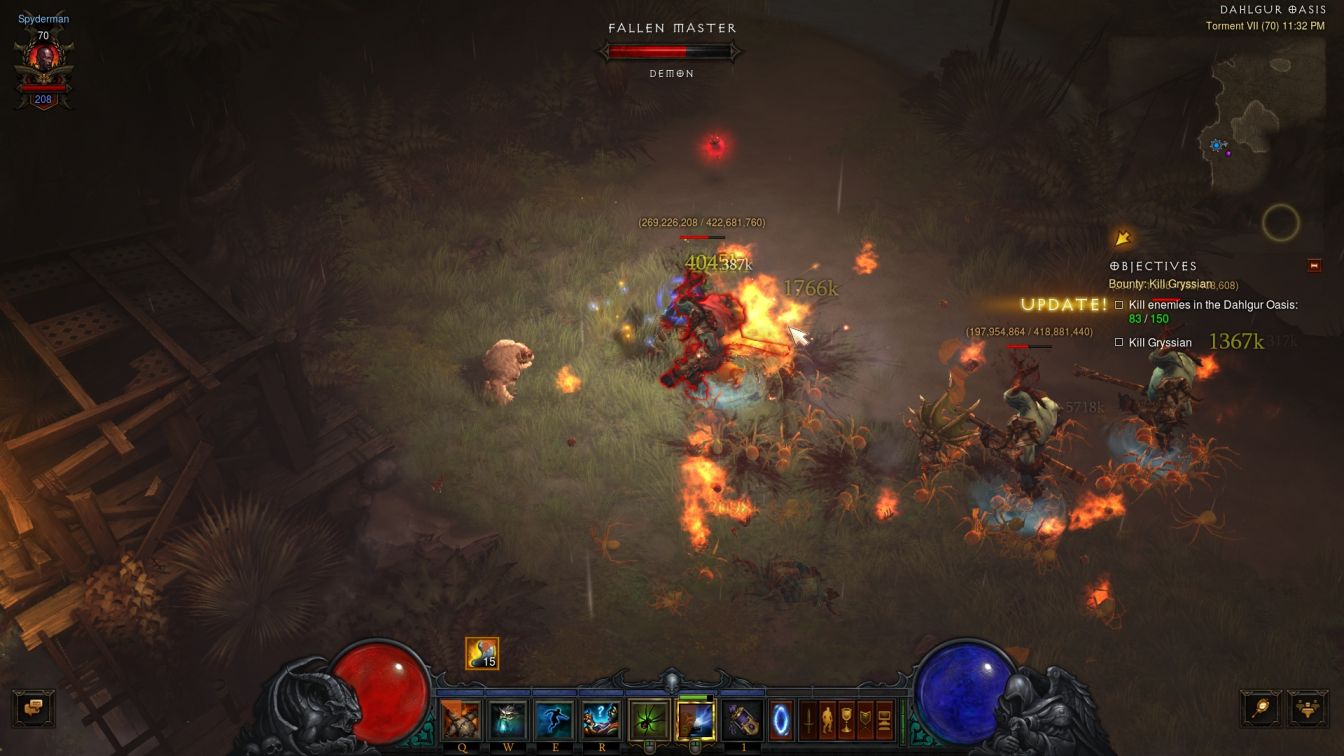
The damage rating reached 1.16 million with Soul Harvest fully stacked and the Gogok of Swiftness kicking in its own 15 stacks of Swiftness. Note that the Toughness and Recovery numbers were also far higher here as compared to the above screenshot due to those stacking buffs. This also provides a good opportunity to check on the health of standard monsters here in Torment VII difficulty, which were rolling 100 million HP on weak critters like these skeletons and as much as 200-300 million HP on tougher normal opponents. Elites typically had about 800 million HP and bosses were all into the billions by now. Fortunately the spider minions were also continuing to scale up in damage, anywhere from 200k-400k on a standard attack and then 600k-1000k on a critical hit. The chance for a critical hit was right around 30% at this point and they were becoming pretty commonplace, always easy to see due to the yellow damage printout. One thing that's not easy to see in these screenshots is the speed of the spider attacks, which were landing constantly as Spyderman kept tossing more jars. Against a single opponent, the spiders could easily land more than a dozen attacks per second and that damage did add up over time. I'll also point out the 27.9 million damage attack on the left side of the screenshot, which was from the legendary gem Mirinae going off and landing a crit (which also healed Spyderman for the 33.6k health pictured). Although those legendary gem procs were random and couldn't be counted upon, they were welcome when they did show up.

Spyderman continued to run across different treasure goblin types during his travels. This was the aftermath of a successful battle with an Odious Collector, the goblin type that drops crafting materials upon being defeated. In addition to the standard Replaceable Parts (white), Arcane Dust (blue), and Veiled Crystal (yellow) crafting materials, this Odious Collector also yielded 11 Death's Breaths and 5 Forgotten Souls. Those were highly valuable materials that were in short supply and I was very pleased to see them show up. Here on Torment VII difficulty there was a 90% chance for any elite group to drop a Death's Breath upon defeat, but the need to use them for virtually every type of endgame crafting meant that I always needed more of them. Forgotten Souls normally require salvaging a legendary item to obtain and therefore were even harder to get. I think that I had about ten of them in total at the time of this encounter and the five that had dropped were a priceless find.
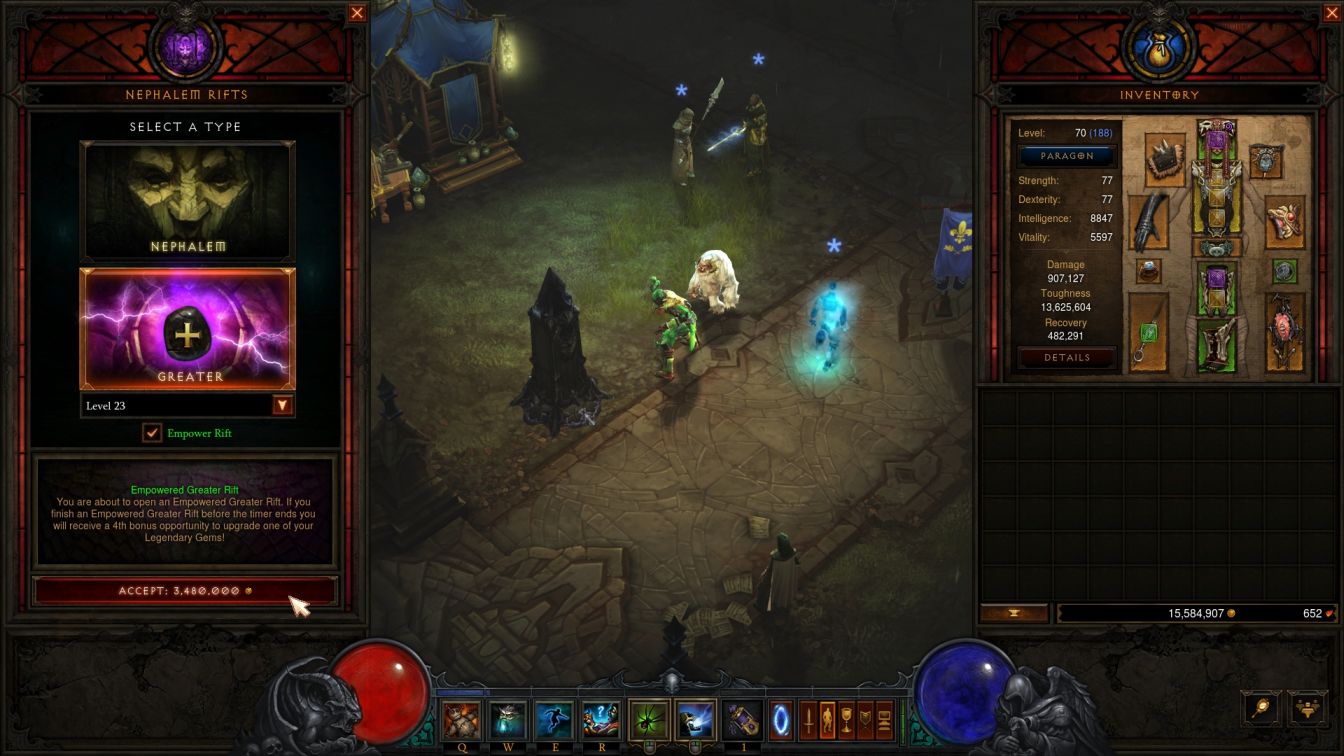
Most of Spyderman's time was spent pursuing bounties due to his constant need for more of the Horadric Cache crafting materials. He was getting more of them from each set of bounties, eight instead of six, but this was largely countered by the fact that more legendary items were also dropping on this higher difficulty. At least the list of extracted powers in Kanai's Cube was slowly growing over time. It was rarer for Spyderman to head into the Nephalem Rifts as pictured here, and this was the first time that he paid gold to "empower" a Greater Rift. The main reason to undertake a Greater Rift is to upgrade a legendary gem to a higher rank, and successfully completing the rift within the 15 minute time limit grants a base three chances to upgrade a legendary gem. Completing the rift without dying grants a fourth chance, and paying to empower the rift offers a fifth chance. This is the main way for players to spend gold in the extreme lategame, and empowering the Greater Rifts gets very expensive indeed at higher levels. Spyderman had the money to burn and I was looking to upgrade the Mirinae legendary gem a bit further so I figured I might as well go for it.
I had chosen Level 23 for this Greater Rift which was slightly above Torment V in difficulty. It was quite a bit below Spyderman's current difficulty while still high enough to get 100% odds on upgrading Mirinae for all five potential ranks. Dropping down from Torment VII to Torment V meant that the monsters had about one third of the health that Spyderman had become accustomed to facing, and as a result he absolutely shredded his way through this Greater Rift, finishing in 7:16 with more than half the potential time remaining. The Rift Guardian had spawned as the "Crusader King", a reskinned version of Leoric, with the critical distinction of having only 1.1 billion HP this time. With barely an eighth of the health possessed by the Torment VII version of Leoric, he went down in mere seconds. I was able to upgrade Mirinae from Rank 8 to Rank 13, adding more damage to each Smite proc and getting closer to unlocking the gem's secondary property at Rank 25.

While gambling for chest armors at Kadala, Spyderman managed to land Arachyr's Carapace - excellent! This was the second item that he'd found in the Arachyr's set and it even arrived in the perfect inventory slot, replacing Spyderman's rare chest armor. This was the final rare item that he removed and from this point on all of his gear would be legendary or set items. (Once you hit this point in the gameplay, you can ignore all non-legendary items because it's impossible for a magical or rare item to roll better stats than what you already have. Grab them and salvage them without worrying about the individual affixes.) As for the new chest armor, I rerolled an affix that increased Haunt damage by 11% in favor of getting additional armor and wound up with the item indicated above. With three sockets for adding gems, the Arachyr's Carapace was packing almost 1200 Intelligence in total along with a healthy amount of Vitality. Great stuff all around.
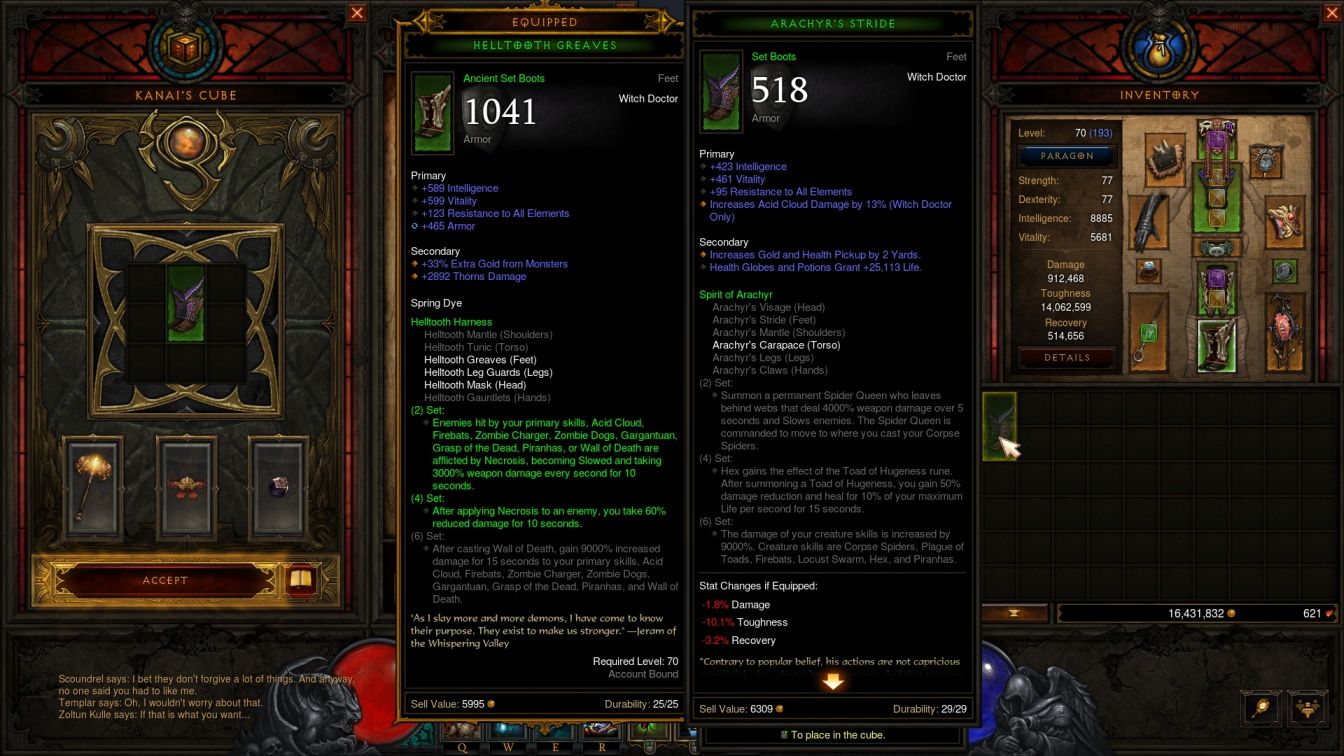
Now I just needed to put on the boots in the Arachyr's set from earlier to land the first set bonus for having two items, right? Well, not so much. Spyderman already was wearing the boots from the Helltooth set in that inventory slot, and those boots were actually an Ancient version with the higher stats that come from rolling as Ancient. I was also getting the four item set bonus for the Helltooth set and I wanted to keep that in play if possible. What I really wanted was to have another Arachyr item but in a slot other than the boots. Fortunately there was a Kanai's Cube recipe for that:

At a very expensive cost of 10 Death's Breaths and 10 Forgotten Souls, I could randomly roll the Arachyr's Stride boots into another item from the same set. It wouldn't appear as an Ancient item but I could live with that for the moment. I just needed to dodge getting another Arachyr's Carapace in the chest slot or landing Arachyr's Visage in the helmet slot since I also had an Ancient version of the Helltooth set there, same deal as the feet. That gave me 60% odds to get what I wanted and those were good enough to be worth taking. What did Spyderman get?

Arachyr's Visage in the helmet slot, of course. Argh! Hopefully you can see why I didn't want to equip this item: -11.7% Damage, -7.8% Toughness, and -20.0% Recovery. It would also require me to give up the four item bonus from the Helltooth set in the process. That was not something I was willing to do - Spyderman would have to find something else. But I was able to salvage a few more legendary items that had recently dropped and get up to exactly 10 Forgotten Souls for another try at the same cube recipe. What did Spyderman land on this second attempt?
Back to the friggin' boots again!  I had just spent 20 Forgotten Souls to wind up right back where I had started. I didn't know whether to laugh or cry. This was hardly an impossible result from the odds (landing 2/5 odds twice in a row is 4/25 = 16%) but it certainly was frustrating. Anything other than the inventory slots where I already had Ancient Helltooth gear would have been fine, and it was like the game was taunting me here by sending Spyderman right back to those same boots again. Unbelievable. I'd have to go through the long process of finding ten more Forgotten Souls and try again, that or find another Arachyr's set item naturally in the meantime.

I had better item luck to report elsewhere. The Depth Diggers legendary pants appeared during one of Spyderman's bounty hunting expeditions, and while the stats on it weren't good enough for him to want to drop the Helltooth Leg Guards that he was currently wearing, I could extract the unique property of this new item into Kanai's Cube. The Depth Diggers grant 100% additional damage to primary skills that generate resource, which for Spyderman would be one of his four signature skills that generated mana. It was possible to get this effect from the Corpse Spiders skill by switching over to the Blazing Spiders rune, the one rune that I hadn't tried yet due to the completely manaless nature of Spyderman's setup. However, it was exactly what he needed here to put this new effect from the Depth Diggers to use. I was sorry to be giving up the Sash of Knives unique property, which had been highly useful for adding extra damage up to this point. Perhaps Spyderman would be able to find an Ancient legendary version of the Sash of Knives someday and equip it once again. For the moment though, I switched over to the Depth Diggers with the Blazing Spiders rune. After all, the whole point of this character was using his spiders to deal damage.
The new Blazing Spiders had an orange color in contrast to the purple Widowmaker spiders that I had been using for most of Spyderman's history. They provided some flashy fire graphical effects in the process that were fun to see in practice. I also remembered at this point that the spiders would get another 20% boost in damage from the Magefist gloves that Spyderman happened to be wearing by chance, since their damage type had switched from physical to fire in nature. The increase in damage from the spiders was immediate, with crits now dealing about 1.5 million damage as opposed to the 600k-1000k that I had highlighted in an earlier screenshot. The clear pace picked up noticeably for Spyderman even with the loss of the Sash of Knives daggers.
Spyderman went back into the Nephalem Rifts next, as he continued to work towards upgrading the Mirinae legendary gem towards Rank 25 where it would unlock its secondary property. While going through the standard Nephalem Rift in search of a Greater Rift key, he found a legendary axe named the Sky Splitter and it happened to roll as Ancient! It appeared with the standard boost to damage along with more than 900 Vitality and Intelligence. This was an improvement over the current Anessazi Edge weapon that Spyderman was using, where I'd had to drop the Vitality to get a socket into the item. This time I could replace a useless "resource costs reduced by 8%" affix instead, with the Enchantress yielding this final result:

The damage comparison was very slightly negative due to the removal of that Bleed ability. However, this was more than compensated for by gaining 942 additional Vitality, plus a unique property that was actually useful. Spyderman was never going to employ the Zombie Dog stun on the Anessazi Edge while in contrast the Smite property on the new Sky Splitter axe was pretty darn good. Yes, it didn't actually show up 16% of the time due to the way that proc coefficients work in Diablo 3, but it still kicked in some exact damage here and there. The graphical effect for this unique property was almost identical to the Smite granted by Mirinae, each of them showing up as slightly-different colored lightning bolts that struck down from the sky. I fondly retired the Anessazi Edge into Kanai's Cube to extract the unique property and made good use of the new axe. (I also took this opportunity to reroll the affix on Spyderman's helmet from life per second regen into Vitality. I hadn't caught this until writing the reports for Spyderman, a not uncommon case where the act of writing about a game taught me more about how to play it at the same time. I always enjoy it when this happens.)

I've mentioned the Greater Nephalem Rifts a bunch of times without talking too much about what takes place inside them. Obviously the basic goal is to kill enough enemies to fill up the progress bar on the right side of the screen, with elite mobs dropping little medallions that fill up extra chunks of the bar when picked up. When the bar is completely full and hits the 100% mark, the Rift Guardian shows up for a final boss fight. All of this is pretty straightforward and easy to understand, but there are some smaller features of the rifts that deserve mentioning. For starters, the dungeon layouts in the Greater Rifts are highly linear in nature, rarely doing much in the way of diverging between multiple paths. This makes it easier to spend all of the time inside fighting enemies as opposed to wandering around trying to figure out which way to go. It's not uncommon to be engaged in one continuous fight from the start of a floor to the end of it, racking up a huge massacre bonus along the way.
The Nephalem Rifts also contain souped-up versions of the standard shrines known as Pylons (in a nod to the Starcraft series). All of the Pylon effects are incredibly powerful with the tradeoff of having a very short duration, as little as 30 seconds in some cases. Some of the Pylon effects include vastly increased damage, complete invulnerability for your character, and extremely fast movement and attack speed. The effect pictured above comes from a Conduit Pylon, which causes your character to shoot out high damaging lightning in every direction. The lightning will smash any breakable objects and deal heavy punishment to any monsters nearby; the effect was so strong that I had trouble keeping Spyderman's Soul Harvest stacks up because he couldn't get close enough to the enemies to cast the skill before they were dead. Needless to say, having good Pylon luck can have a significant effect on the clear time for a Greater Nephalem Rift. Spyderman was testing himself with a Rift Difficulty of 30 here, equal to Torment VII difficulty, and these Pylon effects helped him to finish with 4:23 remaining. It looked like he could have done a somewhat harder rift which was good to know.
Finally Spyderman had enough Forgotten Souls stored up in inventory to attempt to reroll his Arachyr's Stride boots once again into another set item. Would the third time be the charm?
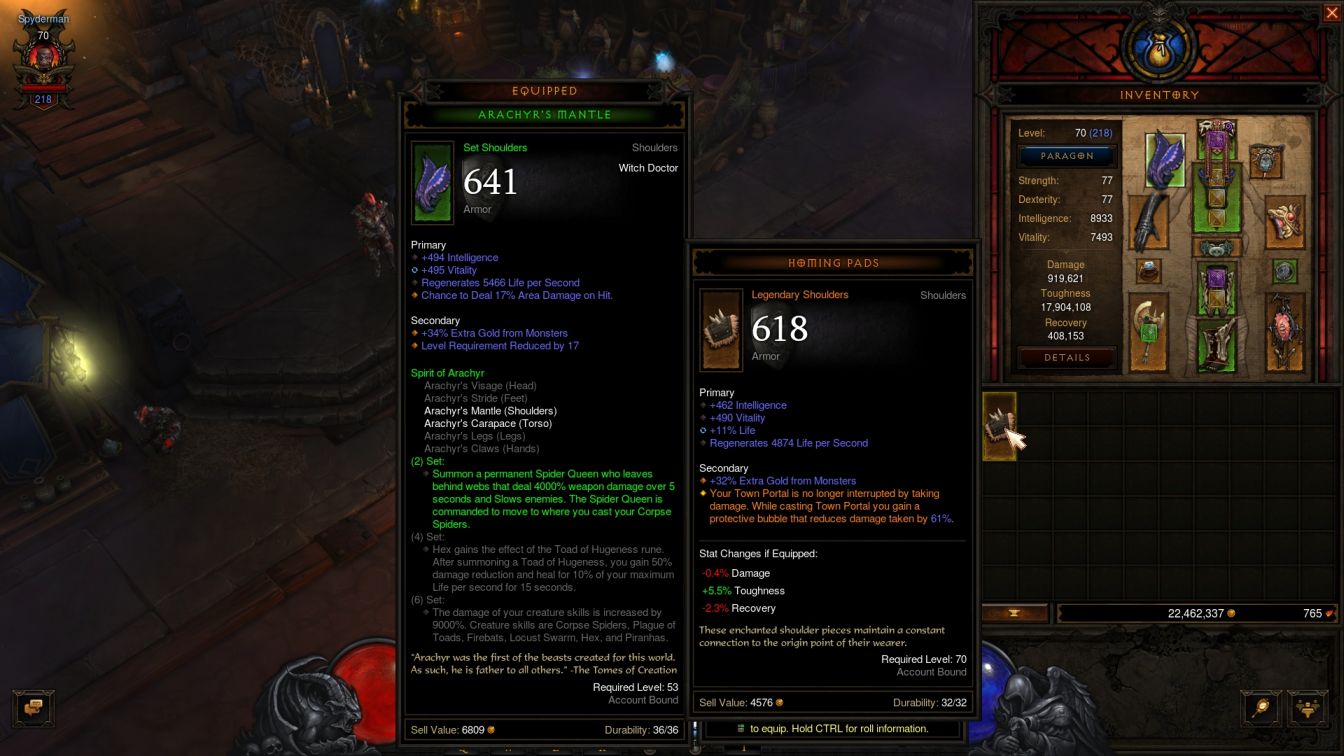
Yes it was, woohoo!  He ended up getting the Arachyr's Mantle item in the shoulders slot, which was a place where I was perfectly fine with replacing my existing item. The base item roll was not great here, starting out with Intelligence, resist all, life per second regeneration, and chance to deal area damage as the four primary affixes. I ended up picking the resist all affix as the one to remove since Spyderman already had tons of resistances from his Intelligence, ending up with the result seen here. He ended up breaking even on Damage as compared to the old Homing Pads legendary item, while coming out behind in Toughness due to losing the +11% life bonus. Spyderman also lost the unique property associated with channeling a Town Portal, but whatever, I didn't care about that. With two items in the Arachyr's set, Spyderman had now unlocked his own Spider Queen:
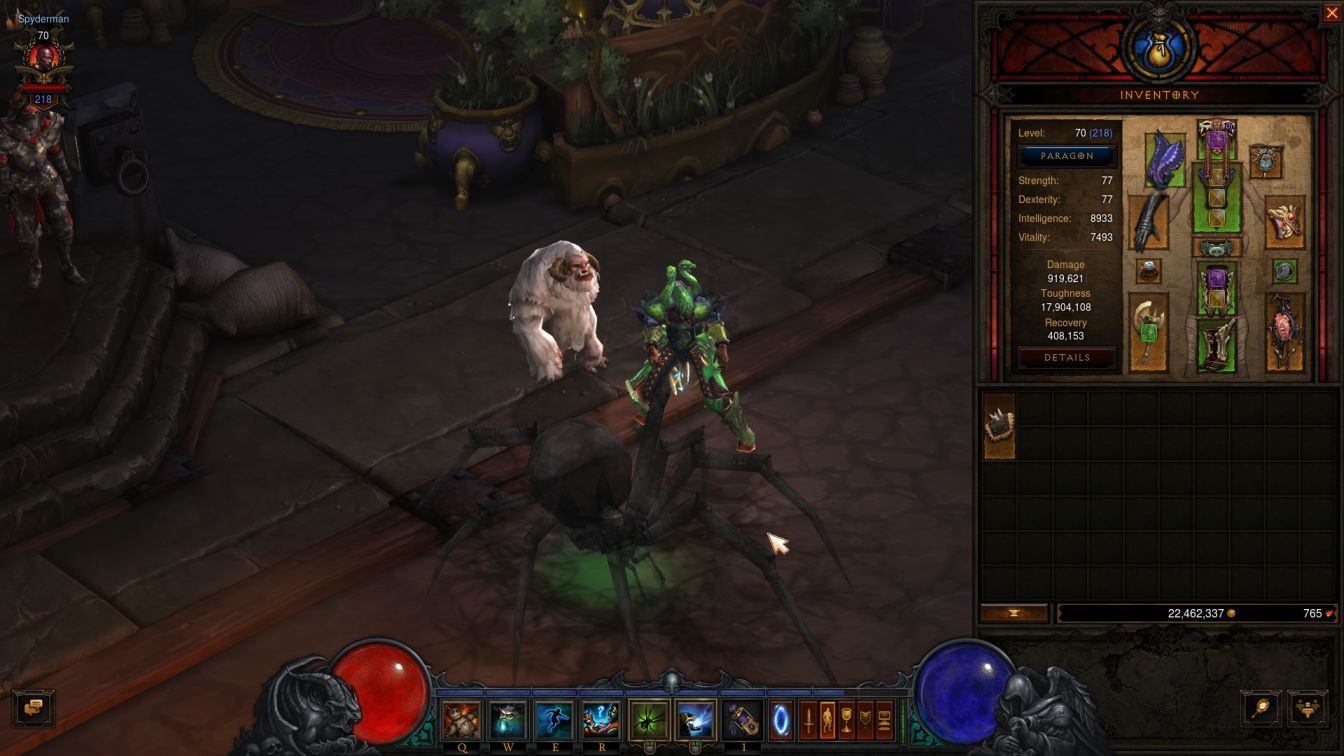
That was more like it. Spyderman's entourage was continuing to grow and had now reached a party of three. This new set property functioned in an interesting way, with the Spider Queen not attacking itself in direct fashion. Instead, the queen would lay webs on the ground that dealt heavy damage (4000% weapon damage over 5 seconds) and slowed anyone who tried to cross over them. The Spider Queen also moved to wherever my mouse cursor directed her with the tossing of additional spider jars, giving me a good deal of control over her actions as a player. It was possible to lay down a field of spider webs to slow incoming enemies if desired, although in practice the webs from the queen were too small in size to block anything but the most narrow of passageways. The queen was most useful for providing another source of significant damage, as the monsters would happily walk right over the webbing and suffer serious injuries as a result. This was a fantastic addition to Spyderman's overall setup.
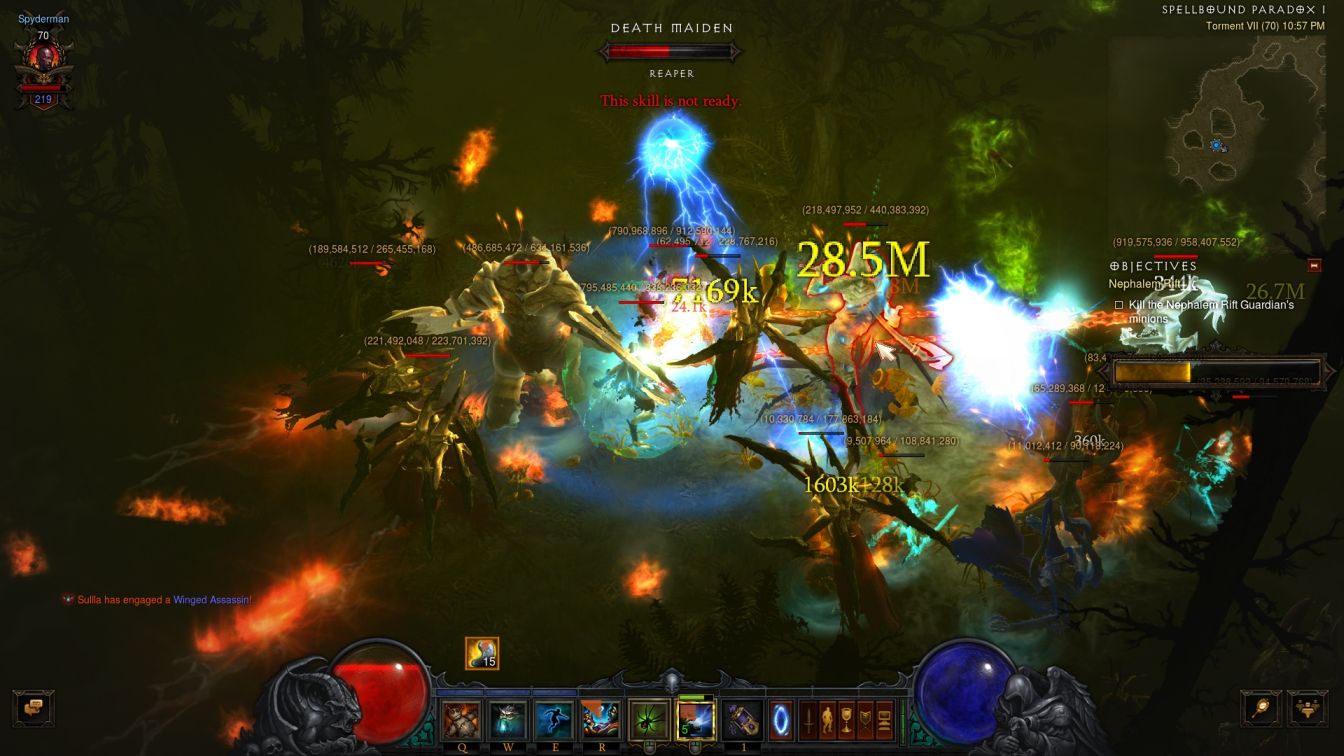
Big fights can get pretty chaotic in Diablo 3. A number of the enemies in this Nephalem Rift had high mobility and made it impossible to create a clear front line, with the combat zone becoming a disorganized mess as a result. It's difficult to see in this screenshot but the Spider Queen had created a webbing field to the right of Spyderman's position in the center of the screen, and that was eating away at the health bar of the elites with their Fire Chains ability over there. I was watching Spyderman's health orb and waiting to see if he would need to pop Spirit Walk for a quick escape, which fortunately hadn't been necessary as yet. This was a situation where the 60% damage reduction as applied through the Helltooth set's Necrosis ability was doing some real work, greatly cutting down on the damage that Spyderman would otherwise have been taking. He could basically stand in the middle of this mob and not be overly threatened.
After finishing this Nephalem Rift and using the key that dropped to complete a subsequent Greater Nephalem Rift, Spyderman was able to finish upgrading Mirinae to Rank 25:
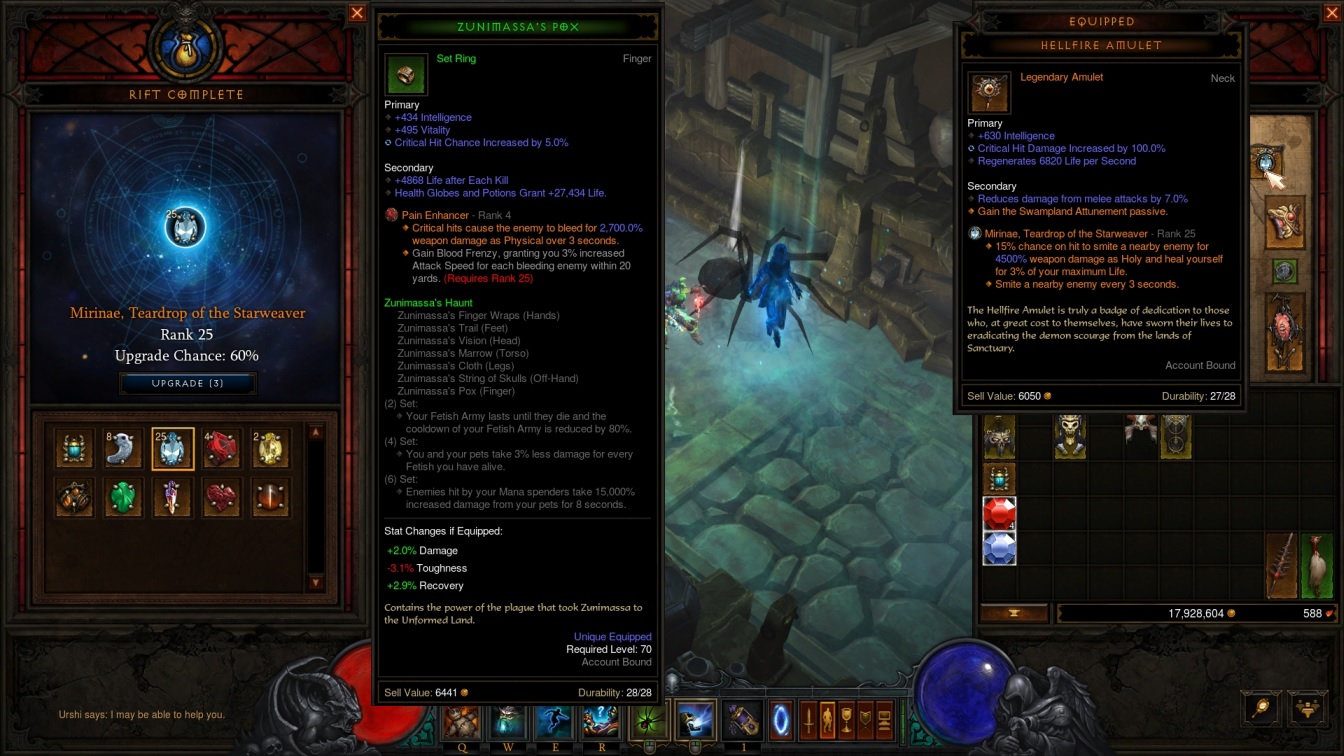
As mentioned a couple of times previously, each legendary gem unlocks a secondary property when it reaches Rank 25. This secondary ability does not increase as the rank on the gem goes up, unlike the primary ability, but the static benefit can often be quite powerful in its own right. For the specific case of Mirinae, the primary property has a chance on hit to smite a nearby enemy for 2500% weapon damage, with that damage going up by 80% for each rank of the gem. Here at Rank 25 the damage had nearly doubled up to 4500% weapon damage whenever the smite ability appeared. The secondary ability that Spyderman had just unlocked on the gem caused Mirinae to smite a nearby enemy every three seconds independent of the on-hit effect. Mirinae is not one of the best options for extreme high end characters due to its low proc coefficient (causing it to trigger less than 15% of the time) and the relatively slow nature of the three second interval on the secondary property. However, for a character making use of the low offensive setup of the Corpse Spiders skill, it was a helpful addition to Spyderman's overall build. Besides, he had only unlocked ten of the legendary gems thus far and didn't even have access to the gem that I most wanted. I'd have to complete more Greater Nephalem Rifts to keep unlocking the rest of the bunch.
In addition to Mirinae, Spyderman was still using the Gogok of Swiftness which was in fact a good fit for his character build due to the attack speed based nature of the Corpse Spiders skill. Legendary gems can only be socketed into jewelry and that limits the player to a maximum of three. For that third spot, Spyderman was using Pain Enhancer as the most useful of what he had unlocked thus far. Pain Enhancer was not the ideal longterm option for Spyderman due to its short range nature, although at very high ranks with enough crit chance it would eventually outperform Mirinae. I wanted to replace this with the Simplicity's Strength gem, which would increase the damage done by all primary skills and therefore boost the damage of Corpse Spiders directly. Spyderman would have to find it first though.

Since Spyderman had an Ancient item for his weapon slot, I figured that he should have an Ancient item in his off-hand mojo slot as well. A series of gambles with Kadala turned up this beautiful item - was I skeptical about the gambling mechanic earlier? I take it back; the system is actually a great way to turn up additional items in whatever slot might happen to be most needed. Wilken's Reach had spawned with 7% mana cost reduction in its last slot and I was able to reroll this with the Enchantress into getting Vitality instead. The picture above is a great comparison demonstrating how the Ancient items roll about a third higher for all of the stats. With higher base damage, higher Intelligence/Vitality, and essentially the same crit chance and cooldown reduction, Wilken's Reach was a major upgrade over the prior mojo. I felt sad to be losing the Spirit Walk unique property on Shukrani's Triumph, but it wasn't something absolutely necessary and the stats on the new item were simply better. This is also the reason why no one really uses two-handed weapons at the upper tier of Diablo 3, as the combination of a one-handed weapon and an off-hand item deliver superior stats in nearly all cases. Ideally at some future date Spyderman would want an item that had the same kind of stats as Wilken's Reach along with a useful unique passive. Obviously the Grasp of the Undead skill was of no use to him.
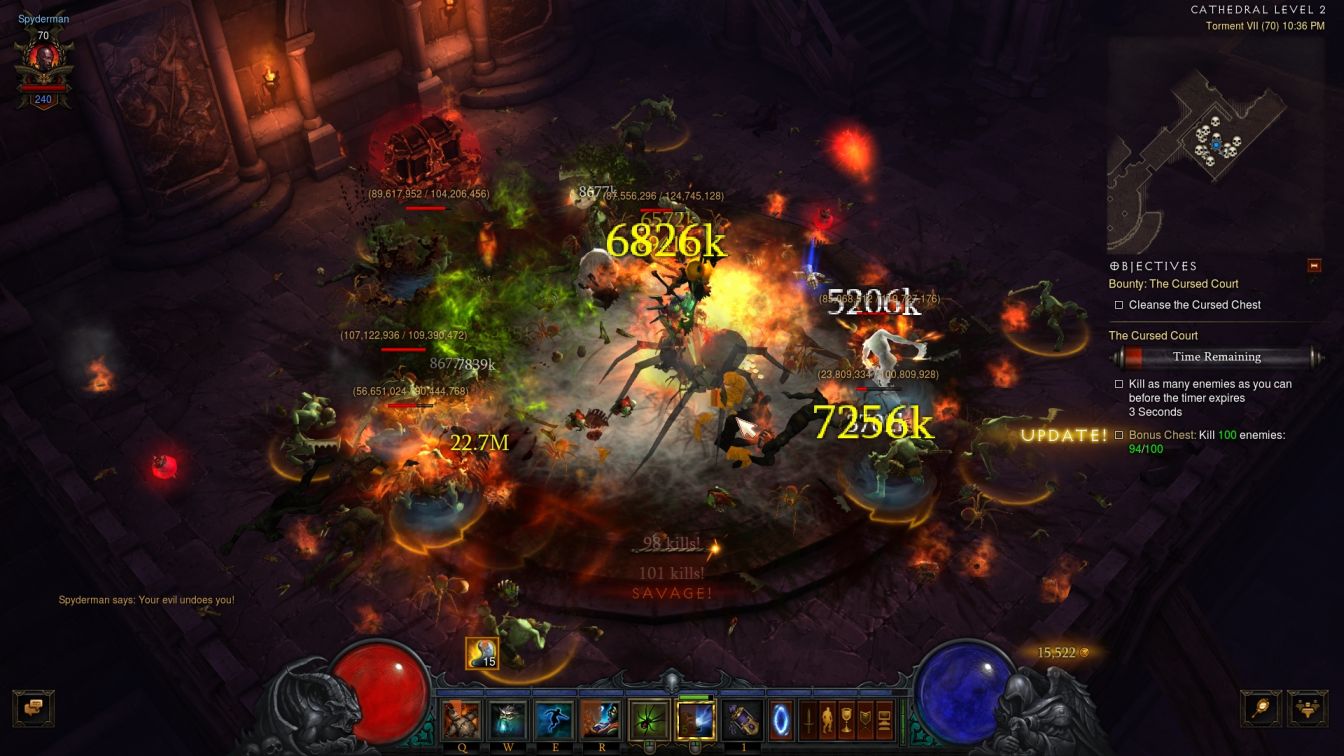
I ended up doing one more run through the full set of bounties with Spyderman. He was clearly getting close to finishing with Torment VII difficulty after spending quite some time there, and he had come a long way since he first started out while needing to tiptoe around all of the major bosses. Adding the Flawless Royal Emerald to his weapon, switching over to the Depth Digger unique property, and unlocking his Spider Queen with the second Arachyr's set item had all significantly increased the strength of this character. That added power could be seen in small vignettes like the image above, where Spyderman had enough damage to complete this cursed chest event just before the timer ran out. Note the solid mass of webbing from the Spider Queen in the center of the raised platform, where I had been spamming the Corpse Spiders to deal with the monsters as they spawned. Anything that tried to walk up there took heavy damage and then perished. Because I had remained on the same difficulty level for a while, I could see Spyderman getting visibly more powerful as he scaled up in strength while the monsters remained at the same level. This was highly satisfying and it was the real reason why I kept playing this character. What otherwise could have been a tedious grind for better items was still proving to be a lot of fun.
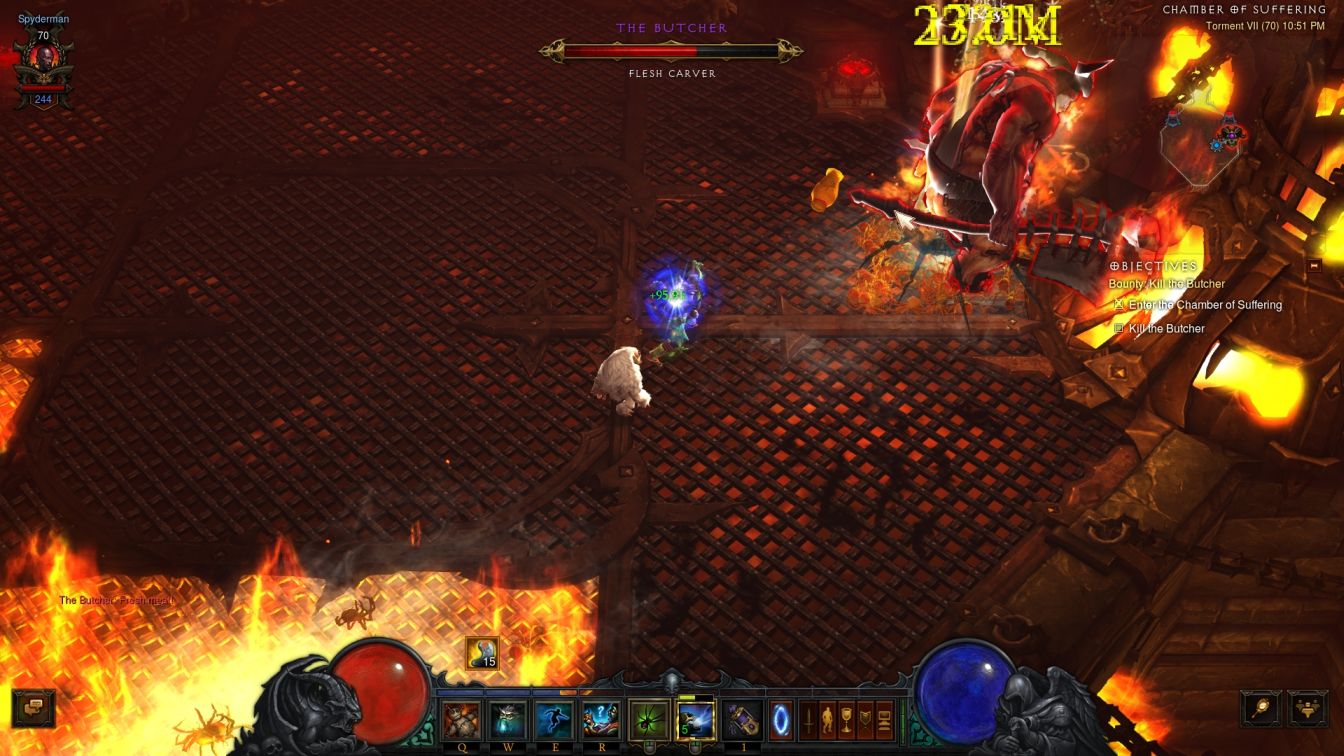
And what better way to close out this section than by taking on another one of the major act end bosses with a hard Enrage timer? I had been dodging these customers for ages on Torment VII difficulty, and I thought that Spyderman had finally reached a point where he could handle this challenge, just as he had done at the end of Torment I difficulty earlier. Well, as usual I had overestimated the opposition, or alternately underestimated Spyderman, as he had no problem defeating the Butcher in about one minute of real world time. I think that part of the issue here is that the passage of time during a tense boss fight feels faster than it actually is. A battle that lasts 90 seconds can feel long and draining while not coming particularly close to the three minute Enrage trigger at all. I was often surprised when I went back and looked at screenshots (all of which have the timestamp in the top right corner) to find that less time had passed in boss fights than I actually thought. Overall then, Spyderman was more than ready to increase the difficulty level and add to the challenge factor yet again.
How long would he end up spending at Torment VIII difficulty? It would largely depend on how long it took to collect the remaining parts of the Arachyr's set. Spyderman would pick up another animal minion when he had four components of the set, and then there was that massive 9000% damage bonus for completing the whole thing. I didn't know quite what that would look like, but I was awfully eager to find out.


