Bindi the solo Monster Wrangler continued her quest as she discovered out of nowhere that there was another villain named Zoma who had to be defeated in an entirely separate world. It was amusing watching the cut scene where Zoma made his grand entrance, as the Hero character was magically revived so that the king of Aliahan could shower him with praises. That guy didn't do a darn thing, sheesh! Anyway, Bindi could now travel to the Castle of the Dragon Queen where there were three different friendly monsters to recruit, one available at each time of the day (morning, evening, and night). Needing to know what time to show up to collect each monster is one of the more irritating parts of that gameplay mechanic. Bindi picked up the Sphere of Light and then plummeted down into the Pit of Giaga to enter into the underworld of Alefgard.
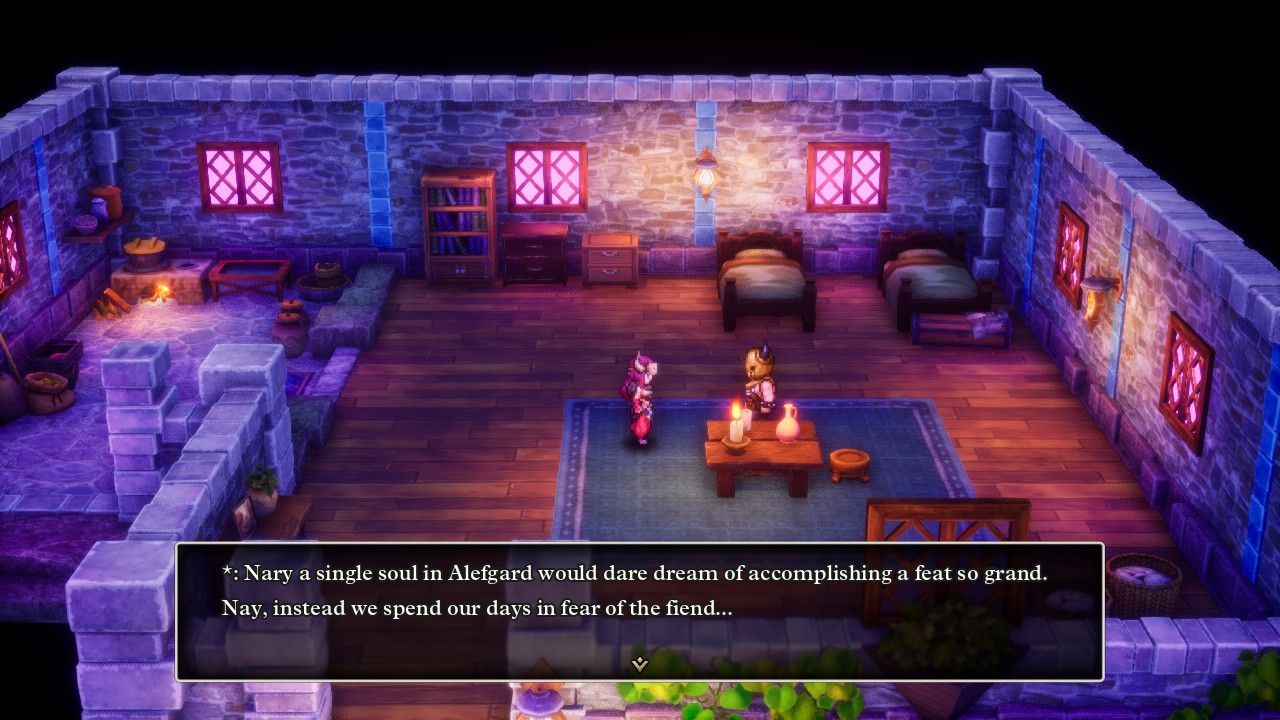
I should have mentioned this in my solo Hero report, but everyone in Alefgard talks using this "old timey" speech pattern. It seems to be based on the Jacobean language of the King James version of the Bible, lots of "thees" and "thous" and so on. This is a reference to the old NES Dragon Warrior games which inexplicably used this king of language for their English translations. Nintendo of America apparently thought that this would help drive sales, which it definitely did not do, and instead caused everyone to talk in this ridiculous fashion. Given how the HD-2D remake uses cringe-worthy local accents throughout the overworld, this isn't much of a surprise and it seems to be the dialect that the developers chose for the underworld.
The first task for Bindi was obtaining the Metal Wing Boomerang, the best boomerang in the game with 50 more points of Attack than her current Swallowtail. The Metal Wing Boomerang is a reward for completing the tier 9 version of the monster arena, the hardest version of this gameplay mechanic before reaching the postgame content. First Bindi had to make her way over to the town of Cantlin where the monster arena was located, though that wasn't too difficult given that she could sail nearly all the way there. Then she had to ensure that her monster team was strong enough to complete the tier 8 and tier 9 arenas, which it definitely was not since Bindi hadn't collected any of the friendly monsters in the underworld yet. I made two detours to recruit a pair of key monsters, the tier 4 Slime which was located in a secret spot north of Tantegel, and then the tier 3 Mermaniac pictured here. This creature was hanging out in the Tower of Rubiss, though fortunately only on the first floor where it was easy to walk over and recruit him. Once they had both been added to the team, Bindi could try her hand at the arena challenges:
Unlike all of the previous monster arenas, these were quite difficult to finish. I discovered through trial and error that it was useful to have a physical attacker (Splatrick the Slime), a spellcaster (Trixie the Prestidigitator), and most importantly some kind of healer (Mercurio the Mermaniac). The monster team has to fight its way through four battles in a row, with no HP/MP restoration between fights, and there's simply too much enemy damage to make it through all four contests without having some healing along the way. Unfortunately there's a tremendous amount of randomness in these battles, both because the opposing monsters aren't always the same foes as well as due to the inability to control your own team's actions. The player can give their Pokemon general instructions but they ultimately decide what to do on their own. For instance, I would always tell the Mermaniac to remain on healing duty, but the stupid thing would often let his teammates drop down into the red on health before he took any action. Then there was also the randomness of simple battle RNG: sometimes the enemy team would all focus one target and insta-kill the Prestidigitator, after which Bindi was basically guaranteed to lose. Or there were enemy status ailments which might or might not land; I remember one battle where the whole team was paralyzed and that was another game over.
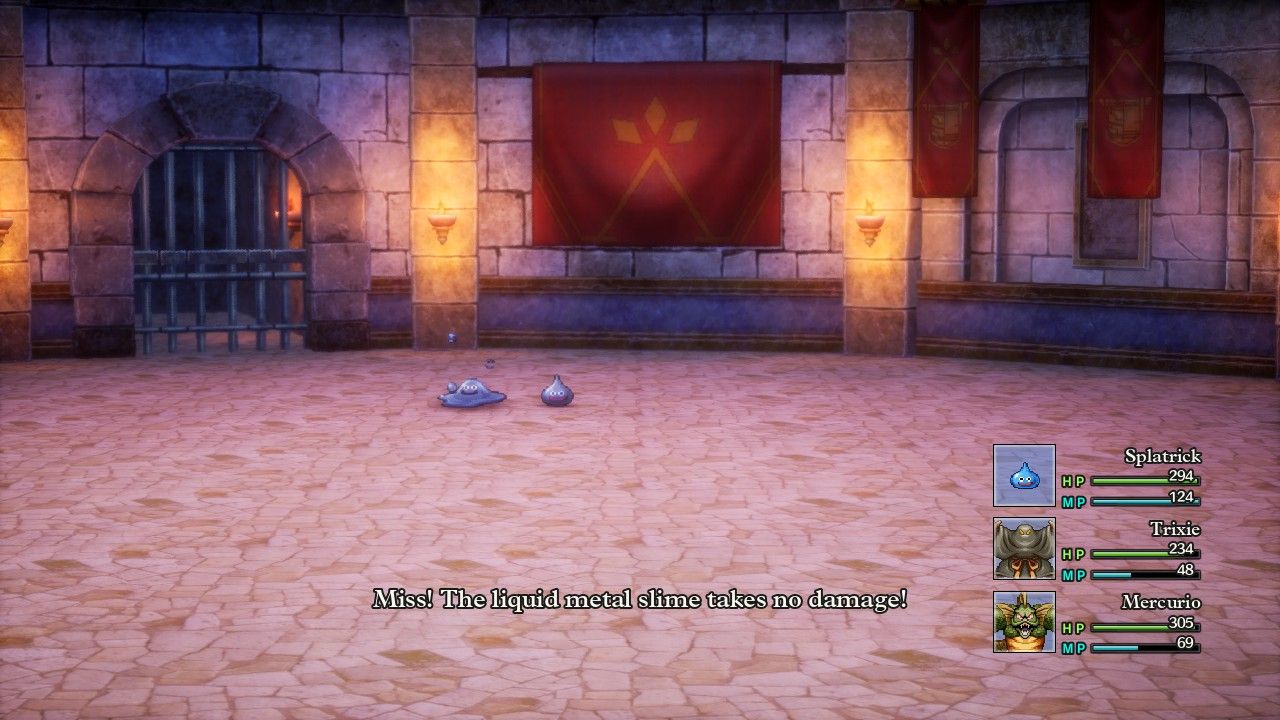
The end result was a need to re-run the arena battles several times over because the results varied so widely in terms of RNG. Bindi failed the tier 8 arena several times in a row before breezing right through it when all of the random factors lined up perfectly for a change. Then the tier 9 arena proved to be somewhat easier than the tier 8 version, or at the very least there didn't seem to be any noticeable difference between them. It helped when Bindi rolled the Metal Slime encounter pictured above (which was not guaranteed to be one of the enemy teams) since they dealt very low damage and could be killed without much trouble. Overall, it took about five tries at the tier 8 arena and three tries at the tier 9 arena, but Bindi was able to claim her Metal Wing Boomerang. She also gained the Magic Bikini and swapped over to the swimsuit sprite graphic, plus another copy of the Mod Rod so that she could return to the Faerie Village for more Special Medicine purchases whenever she wanted.
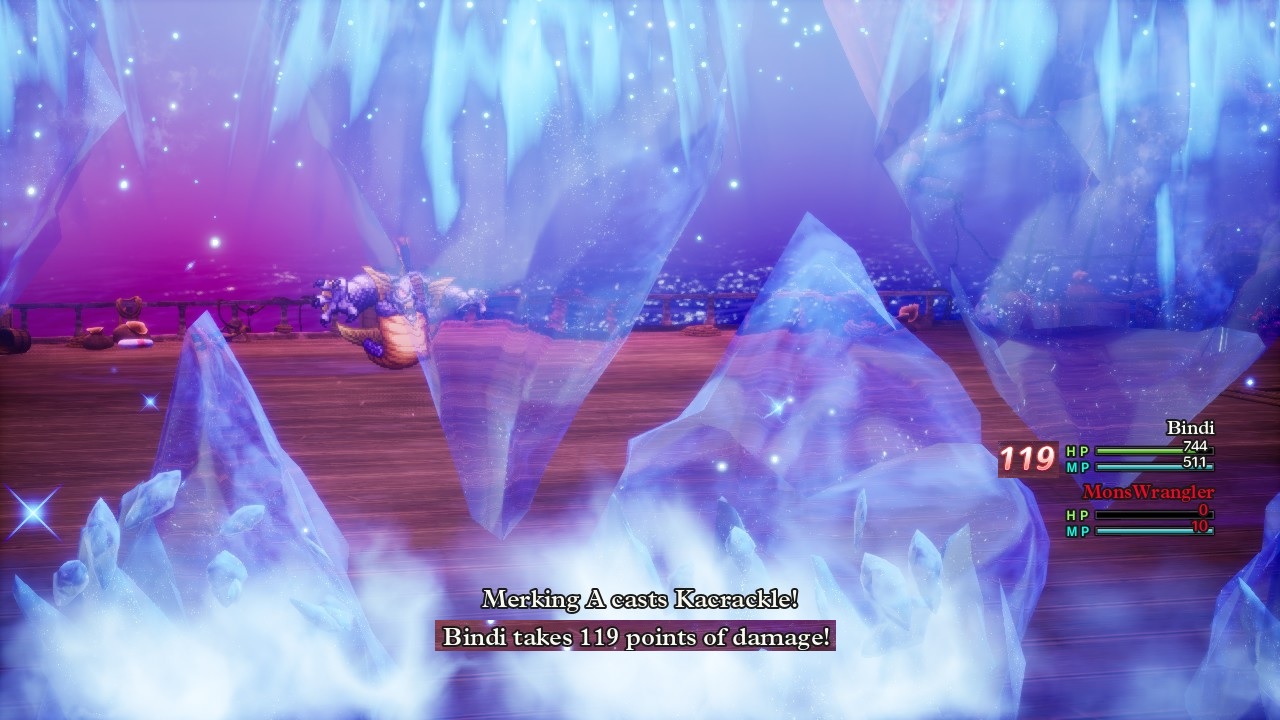
Like I said, Bindi switched over to the Magic Bikini since it had slightly higher Defense than her previous Epic Apron, plus it reduced spell damage by 33% instead of the 25% on the apron. Or at least it was supposed to reduce spell damage; I noticed pretty quickly that Bindi was taking huge amounts of damage whenever she was hit by a spell. In fact, she seemed to be taking MORE damage than should have been dealt, not less! For example, the Kacrackle spell when cast by an enemy is supposed to deal 88-116 damage. Here it was dealing 119 damage and at other times I saw the numbers go as high as 140 damage. What in the world was happening?! My best guess was that there was another side effect from being Cursed while wearing that Shield of Shame. The evil shield seemed to have made Bindi *WEAK* to all spell damage, taking 25% increased damage and overriding any protection that she would have otherwise gained from equipment like the Magic Bikini. That was a serious drawback to wearing the cursed shield - whoops! 
Thus Bindi was extremely strong against physical damage at the moment while being glaringly weak against elemental damage. I didn't intend for that to happen, however I was afraid to take off the Shield of Shame since I didn't want it to be destroyed. Interestingly, it was only spell damage that seemed to be magnified by wearing the Shield of Shame; damage from enemy abilities and breath attacks was unaffected, not getting the 25% boost. Of course damage from those hostile abilities wasn't being mitigated either, but at least it wasn't magnified.
Now Bindi began the lengthy process of hunting down all of the various goodies scattered across Alefgard. The player can go literally everywhere aside from Zoma's Citadel right from the outset which means that these can be undertaken in any order. There are about 80 sparkle locations, 25 secret spots, 25 friendly monsters, and 20 mini medals to collect - better get to work. I've mentioned before that this is a pretty relaxing and chill thing to experience while playing the game, though it does make summarizing it difficult for a writeup.
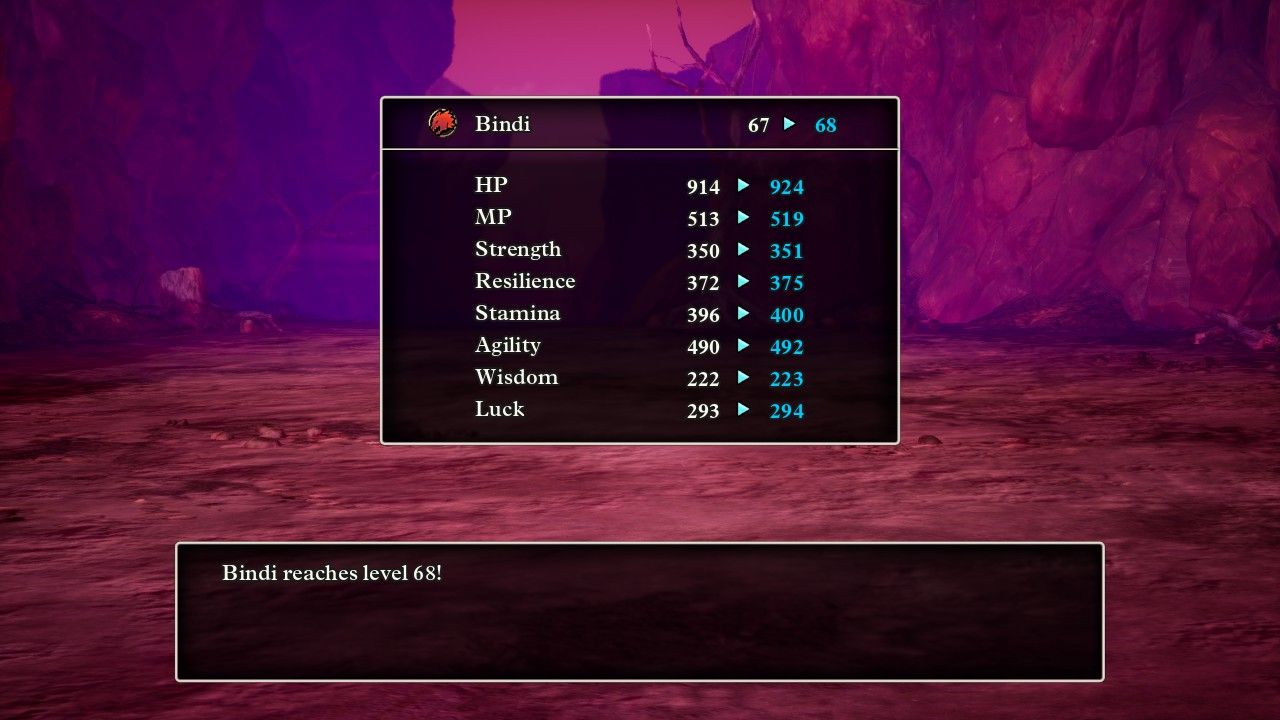
One thing that I'll mention was the stat increases that Bindi was gaining when she leveled up. Like the Hero class, the Monster Wrangler also stopped requiring increased XP to level right around hitting Level 50, remaining locked at roughly 85,000 experience required for each new level thereafter. This meant that Bindi leveled very quickly in Alefgard where it was common to receive 5000 XP per battle and sometimes well over 10,000 XP. Her stat gains, however, were nowhere near as impressive as the solo Hero. The key stats that I was watching were Strength, Resilience, and Luck, and this particular level was quite sad with only a single point of Strength and Luck gained. While these stat gains were worse than an average level up, it was still rare for Bindi to gain more than 3 points in any of these stats, whereas the solo Hero had been banging out 6-7 more points of Strength with each new level. I wasn't sure exactly where Bindi would finish at Level 99, clearly it was going to be nowhere near my previous solo character though.
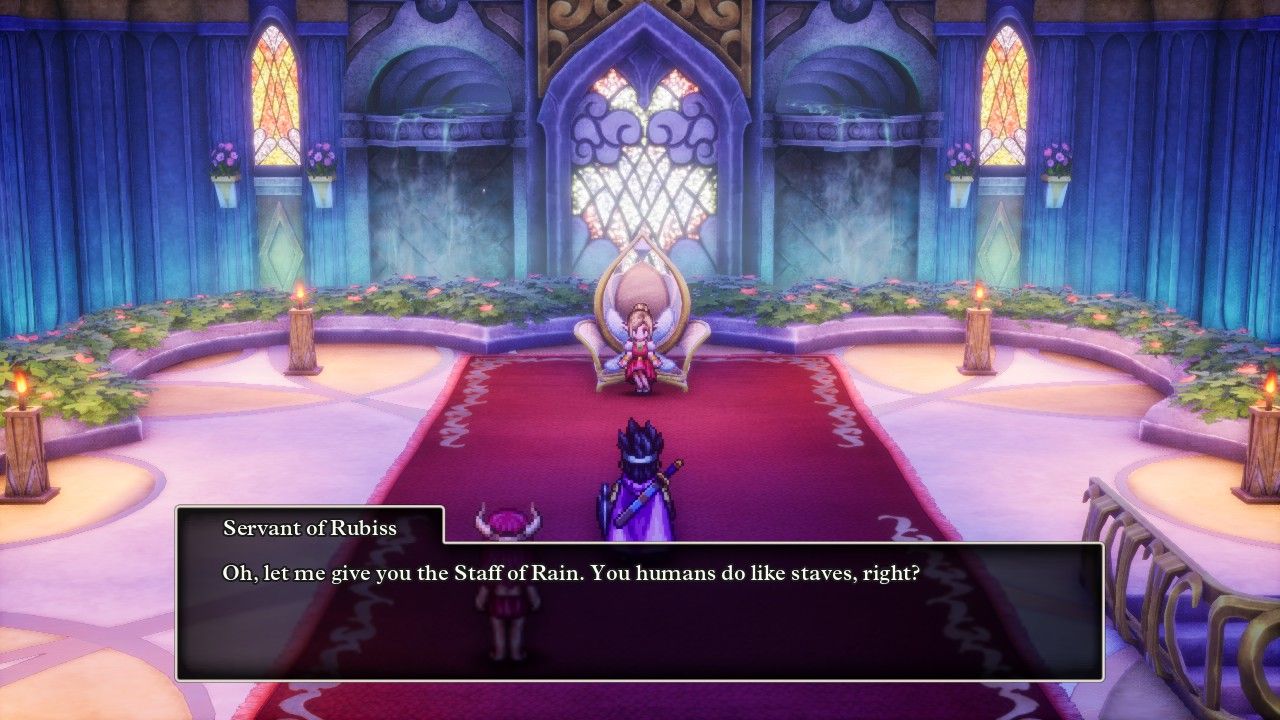
Considering that Alefgard is a pretty big place, there's remarkably little that the player actually has to do in terms of the main plot line. The goal is to collect three plot token items: the Sunstone, the Staff of Rain, and the Sacred Amulet, then use them to create the Rainbow Drop to access Zoma's Citadel and beat the final boss. That sounds like normal video game fare, however it takes no effort whatsoever to obtain two of those three objects. The Sunstone is literally sitting in a kitchen in Tantegel Castle while the Staff of Rain is simply handed to the player by this faerie in the Shrine of the Spirit. Thus the only thing the player really needs to do is get the Sacred Amulet at the top of the Tower of Rubiss, then go to the ending dungeon. Everything else is an optional side quest of some kind: running the Craggy Cave and Talontear Tunnel dungeons, forging the Sword of Kings and Auroral Helmet for the Hero (which Bindi couldn't even use), and so on. It's really weird how the end of the overworld consists of a series of tightly plotted sequences, then the underworld feels like this slapdash thing thrown together at the last minute. The original developers in 1990 probably ran out of time here which would explain why Alefgard feels oddly devoid of content.
Most of my time at this point in the gameplay was therefore spent hunting down all those collectables hidden across the underworld. There were some highlights worth mentioning, such as when Bindi found the Blessed Bikini outfit at the secret spot and swapped over to that "armor" (if I can call it that). The Blessed Bikini did not have the 33% reduction from spell damage on the Magic Bikini... but the Shield of Shame had turned off that property anyway, while the Blessed Bikini could boast a higher Defense rating and the additional property of healing 1 HP per step taken. Several of the high-end armors in DQ3 have that ability and the gameplay seems to think it's really good; I've found it to be "nice to have" but not really useful since it does nothing in combat.
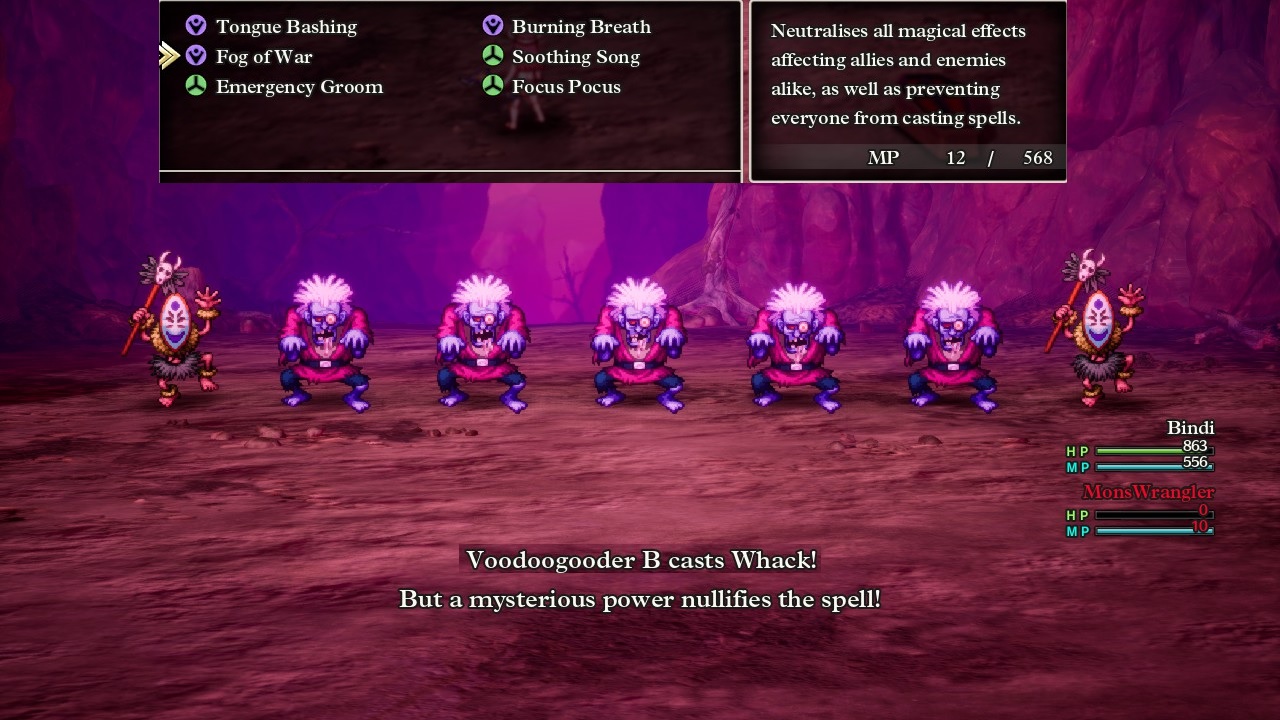
Then there were the rewards for reaching 100 monsters collected, the final threshold for this particular collectable quest. The formal rewards from Monty were the Empress' Whip and the Glombolero, both of them useless garbage for Bindi. The Empress' Whip had lower Attack value than the Metal Wing Boomerang and only hit a group of enemies instead of everything, meaning that there was no reason ever to use the thing. The Glombolero was an armor with low Defense value, no elemental defenses, and the property of cutting MP cost of spells in half - even more useless. Far more interesting was the final Monster Wrangler ability which also unlocked upon recruiting 100 friendly monsters. This was called Fog of War with several unusual properies. It functioned as a global Fizzle spell, silencing both allies and enemies alike for the next three turns, and notably Fog of War always succeeded with no chance for failure. This was excellent for Bindi since she couldn't cast spells herself and her abilities were not classified as spells, therefore functioning normally with Fog of War in effect. This ability also canceled out any buffs or debuffs that were in effect at the time of use, which also felt like it could be situationally very useful. Although Bindi didn't need Fog of War at the moment while fighting through random encounters, I planned to keep it in her back pocket for upcoming bosses.

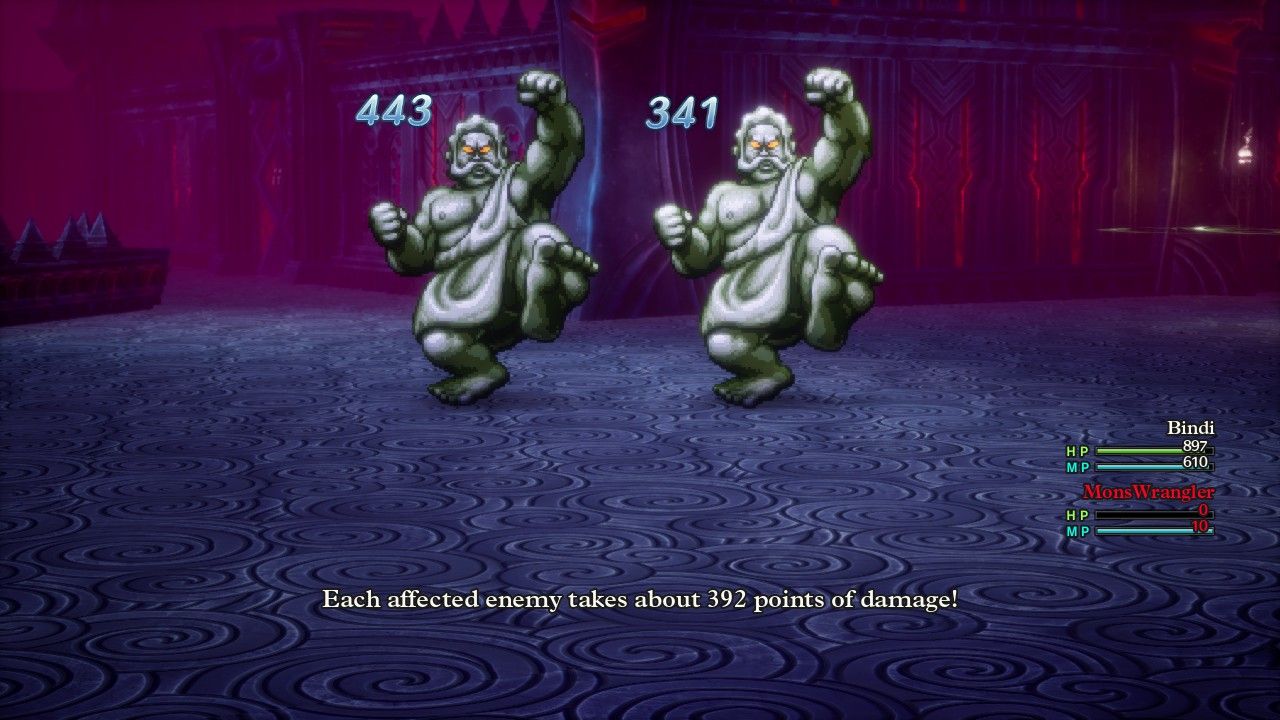
Damdara, Cantlin, Kol, and Rimuldar: Bindi traveled to the four corners of Alefgard snapping up every bit of loot she could find. By the time that she ventured inside the Talontear Tunnel, she had collected all 109 recruitable monsters that can be found outside of Zoma's Citadel, even including the second friendly monster inside the Tower of Rubiss. With that many critters having joined the team, Monster Pile-On was consequently powered up to an impressive extent. I had continued to record its damage and now the per-tick damage had exceeded the 100 mark, such as this Great Troll getting hit five times for 538 damage (107.6 average damage per tick). When the ability hit the full five times it was enough to one-shot virtually every non-boss creature in Alefgard, though Monster Pile-On still wasn't great at dealing with large groups of opponents due to the way that it was uncontrollable and tended to spread out its damage. And while the damage certainly wasn't bad, Monster Pile-On didn't feel anywhere near as game-breakingly powerful as I had been led to believe before playing this character. So what was the deal here - why did this skill feel a bit underwhelming?
The immediate answer to that question is that Monster Pile-On had its damage nerfed in one of the patches for DQ3 - thanks for pointing this out, SirSystemError! Apparently it was significantly higher in the release version of the game and much of the commentary that I found online dated back to that earlier prenerf period. But even leaving that aside, Bindi's experience with Monster Pile-On was also a reflection on the differences between a normal game and a solo game. Bindi's level was much, much higher as a solo character than it would have been in a normal party setting, plus she was getting every single stat-boosting seed which might have been spread amongst multiple characters normally (or might not have been RNG manipulated to always get the maximum value). This resulted in Bindi's base stats being vastly higher than a normal Monster Wrangler would have possessed, which therefore meant that abilities scaling off the Strength stat were far stronger than they would be normally. Conversely, Monster Pile-On deals damage completely independent of stats or level, making it perfect for characters with lower levels and lower stats. Even better, the player can class change a character into a Monster Wrangler and instantly deal huge damage right away at Level 1, since Monster Pile-On only cares about the number of recruited monsters. All of this explained why Monster Pile-On was amazing for non-variant parties while merely being good but not great for Bindi's own use.
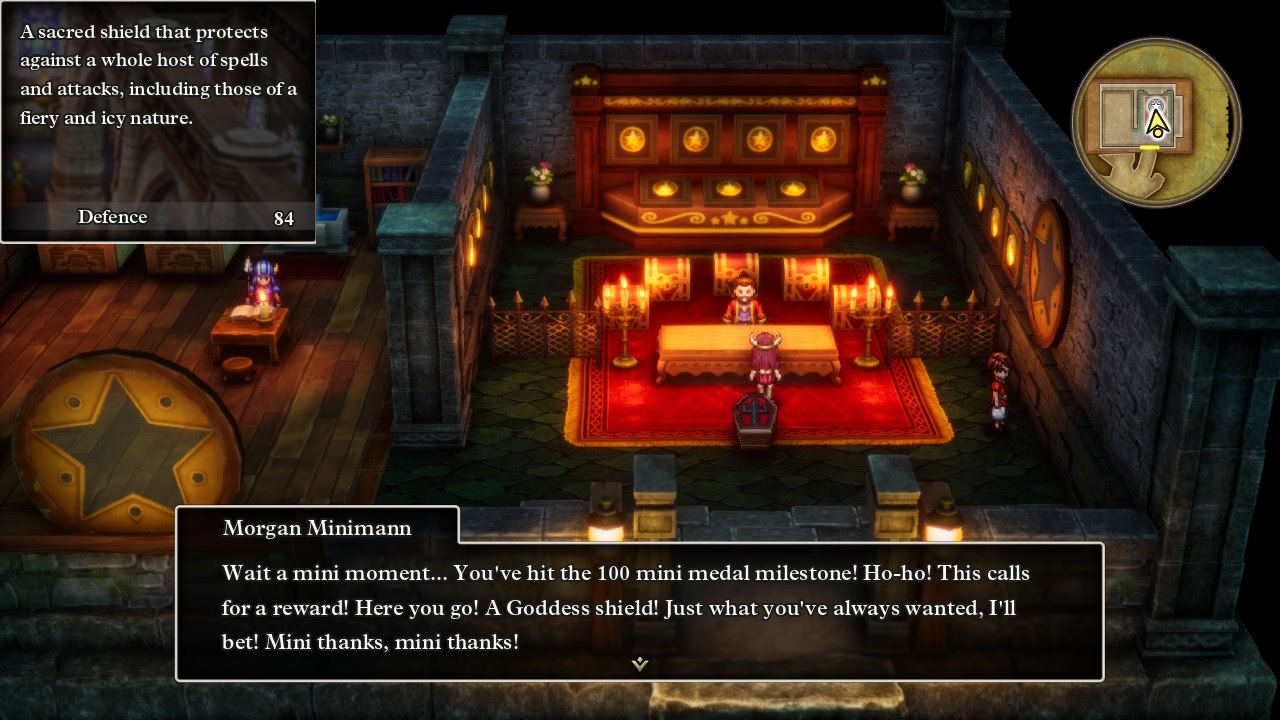
There are exactly 100 mini medals that can be found outside of Zoma's Citadel which together unlock the final rewards before the postgame content. Bindi had eagerly grabbed the first few mini medal prizes, the Thorn Whip and Leather Dress and Edged Boomerang, then she didn't care about the vast majority of them. She hadn't claimed anything from the 20 medal reward to the 95 medal reward because none of them were useful for her. However the 100 medal prize was finally something she wanted: this pictured Goddess Shield which was her intended endgame shield. The Goddess Shield can be equipped by nearly every class (though oddly not the Warrior or Martial Artist) and has high Defense along with the property of reducing all spell and breath attack damage by 25%. This was finally the time to remove the cursed Shield of Shame, which cost Bindi about 2000 gold at the chapel. I was in for a pleasant surprise though: removing the Shield of Shame did not destroy the item! That's a definite change from earlier versions of DQ3 and I would have taken the darn thing off earlier had I known it. Now Bindi could swap back over to the Magic Bikini for a combined 58% reduction in enemy spell damage so that she'd stop getting plastered by hostile Kacrackle and Kasizz spells.
With all of the optional content completed, Bindi began climbing up to the top floor of the Tower of Rubiss. The monsters inside provided excellent experience and she appreciated her newfound protection against elemental damage given how many hostile spellcasters were hanging out in the tower. The first boss of the underworld was waiting outside the shackled form of the goddess Rubiss:
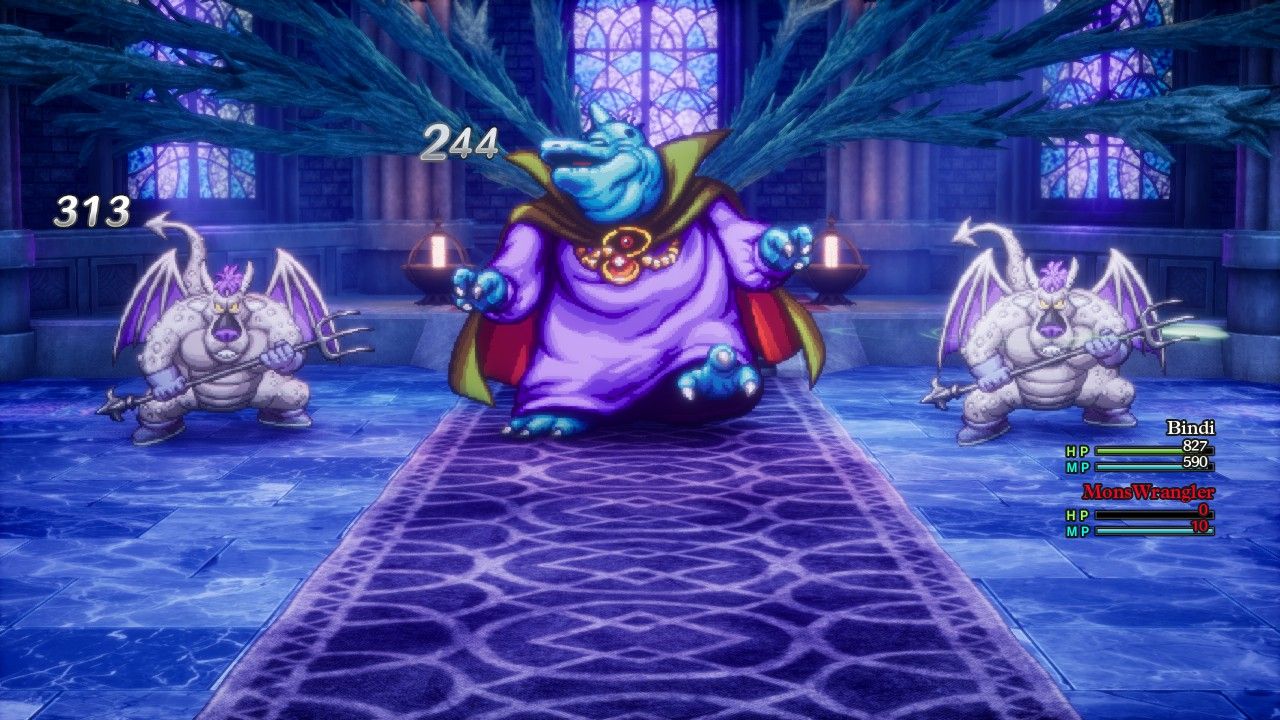
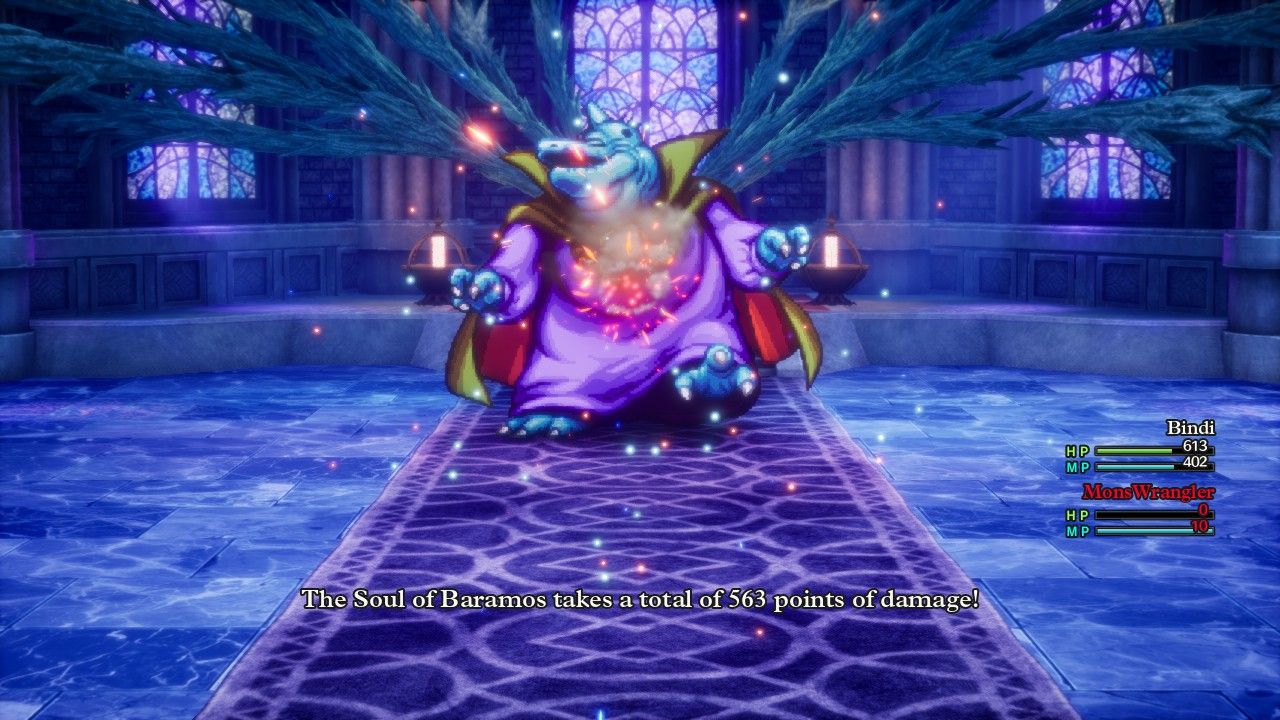
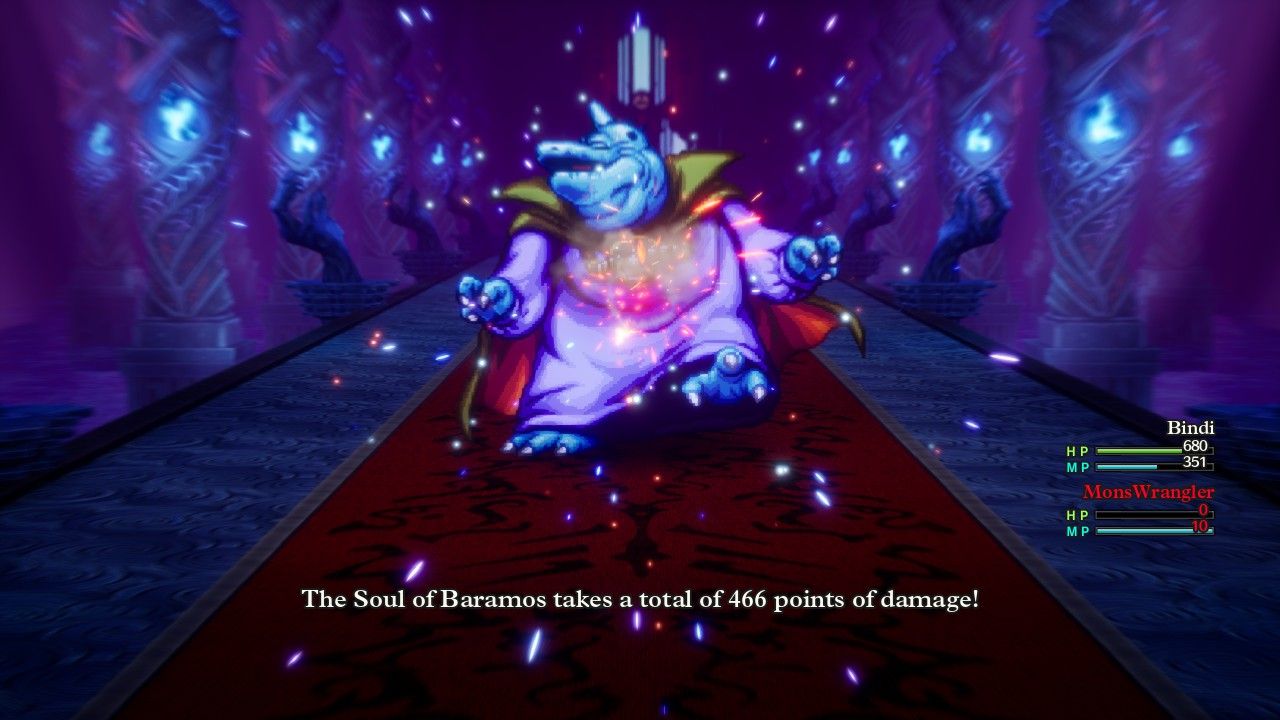
This is the Soul of Baramos and it's one of the tougher bosses to be found in DQ3. While this blue-colored version of Baramos has less health and doesn't regenerate like the original version, it comes with a pair of Ashdemon minions to complicate the fight. I had earlier thought about the best way to approach this enemy and decided that a buffed-up version of the normal boomerang attack was the way to go. Bindi started the battle by using Oomph Powder into Wild Side, which would then result in a pair of boomerang attacks conducted at double strength for 4x normal damage. This would be enough to clear the Ashdemon minions in a pair of attacks, while still dealing damage to the Soul of Baramos itself. Unfortunately I took this screenshot without the Oomph Powder in place so the actual damage was more like 600 for the first Ashdemon and 500 for the Soul of Baramos, which was then repeated a second time via Wild Side. This consistently wiped out the two Ashdemons without issue; so far, so good.
The Soul of Baramos was employing all three main types of damage: physical attacks, spellcasting, and breath attacks. I had equipped Bindi with double Asbestos Earrings to pull the teeth out of Baramos' Inferno breath attacks; they helped cut the damage from a base 80-100 down to 20-25 which essentially neutralized Inferno as a threat. More serious was the Kaboom spell which the Soul of Baramos loved to spam. This is the tier 3 explosion element spell which has 96-140 base damage when cast by an enemy. Bindi was wearing the Magic Bikini and Goddess Shield which should have reduced the damage by 58%. However, I consistently saw Kaboom hitting for more than 100 damage against Bindi - argh! Obviously the description on one of these items must have been incorrect: either the Magic Bikini or the Goddess Shield only fuctioned against fire/ice element spells, not explosion element spells. I suspected it was the Magic Bikini because Kaboom's damage seemed to have been reduced by 25% which would have been consistent with the text on the shield. This was certainly disappointing and made the battle notably more difficult.
So Bindi was on pace to win a close battle when this happened:
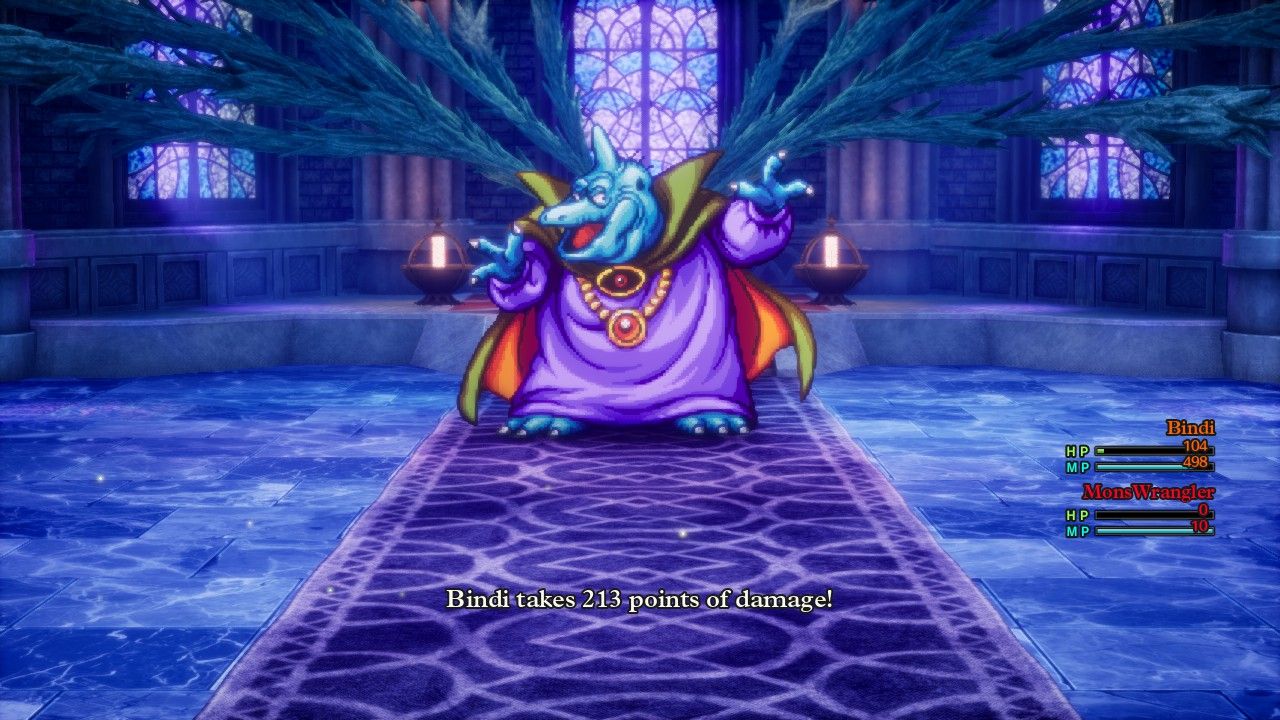
What the heck - a Desperation Strike?!  The Soul of Baramos also has the monster critical hit ability?!? This was not listed in the boss reference portion of my DQ3 spreadsheet, and frankly that thing has so many omissions that I'm going to need to rework it during my next playthrough. Unfortunately Baramos could indeed break out a monster crit whenever he felt like it and the blasted thing dealt more than 200 damage whenever it showed up. There was very little that Bindi could do about this since the desperation strikes were so random. She died during my first attempt at the boss when the Soul of Baramos pulled out a pair of these monster crits when he was close to death, snatching a victory for the forces of evil at the last minute. Fortunately DQ3 is exceptionally generous when the player gets a game over situation and I could simply retry the battle over and over again. My second attempt failed when the Soul of Baramos paralyzed Bindi for three turns immediately after the battle started - OK, I couldn't do much about that. The third attempt failed when the Soul of Baramos hit her with THREE monster crits that together dealt 600 damage out of her 999 HP lifebar! Sheesh was that ever unfair. I really hate the monster crits since there's nothing that can be done to stop them and these bosses can seemingly pull them out whenever they want.
Aside from the desperation strikes, the other real danger in the battle was clearly the Kaboom spell. The Soul of Baramos loved to spam this spell, casting it nearly every round, and it was consistently landing for about 100 damage at a time. I responded by having Bindi cast the Bounce spell out of the Staff of Strife, however the Soul of Baramos had the same "smart AI" as the original Baramos and simply stopped casting Kaboom once a shield of reflection was in place. Pretty clever of the designers to put that AI tweak in place. So while it was still preferrable to have Bounce protection in place to stop the Kabooms, it wasn't totally effective as Baramos shifted over to more physical attacks and Infernos and the occasional desperation strike.
Thankfully Bindi had one last tool that functioned better here:
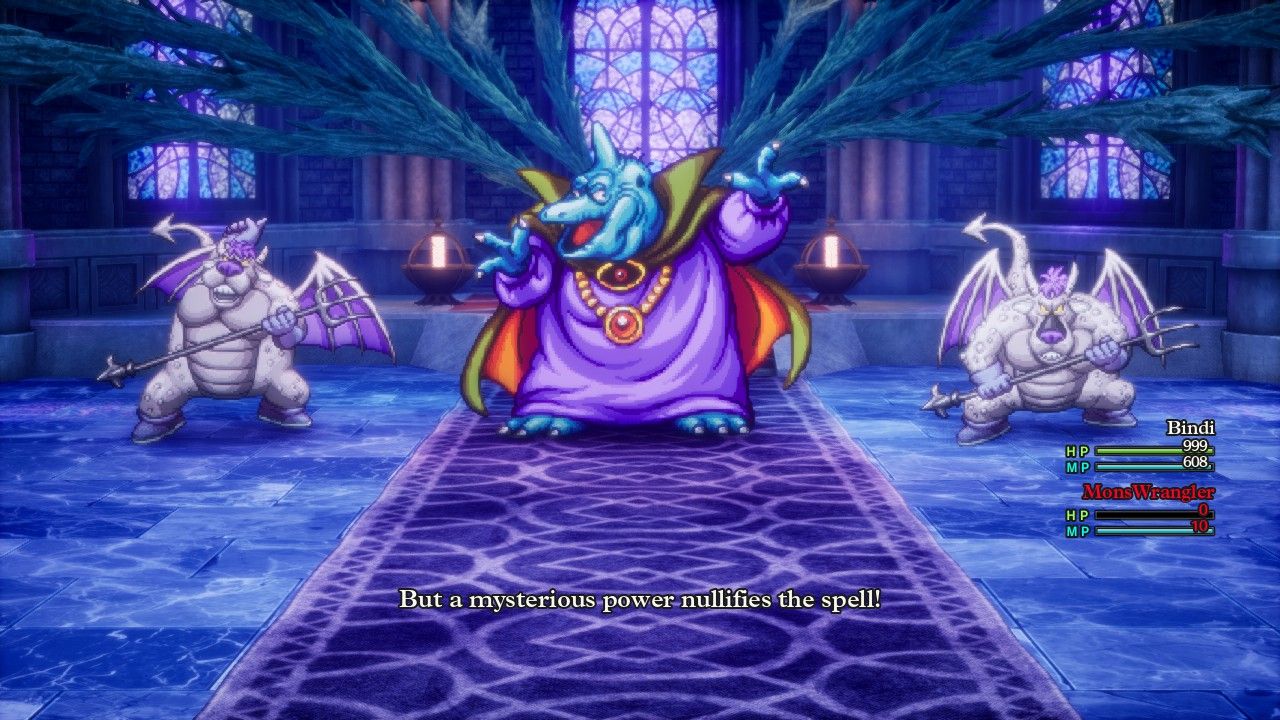
Fog of War! The most recent Monster Wrangler ability nullified all spellcasting, and because this was an obscure ability that the developers evidently hadn't thought about, the Soul of Baramos and its minions would go right on trying to cast their spells into the fog where they were blocked. The big limitation here was that Fog of War only lasted for three rounds which forced Bindi to renew it often. Nevertheless, this was the final piece of the puzzle as it neutralized all of the damage coming from Kaboom. The Soul of Baramos' physical attacks were only dealing 20-30 damage, Inferno was only dealing 20-30 damage, and that meant the only remaining threat was from desperation strikes which I could only pray wouldn't appear. (I also could have swapped over to the Shield of Shame to cut down on the physical damage, but that would require restarting from the last save point before starting the Tower of Rubiss. I was hoping to avoid that.)
Therefore the battle played out in this fashion: Fog of War on the first turn, blocking any Kabooms and the buffing spells that the Ashdemons tried to put on their master. Bindi then used Oomph Powder on the second turn, then Wild Side on the third turn, followed by renewing Fog of War and then boomeraging the two Ashdemons to death before Oomph/Wild Side ran out. There was usually time enough to do that, then Bindi could drop the Oomph buff and just keep Wild Side + Fog of War in effect, followed by spamming Monster Pile-On against the lone Soul of Baramos. The only way that he could beat her was to use a bunch of monster crits and, thankfully, that did not happen. I put this strategy together correctly on the fourth attempt at the battle, which not only defeated the boss, but crushed him with more than 600 HP remaining. He failed to use a single desperation strike on this attempt and I can only conclude that their appearance seems to be highly random. I was more than happy to pocket the victory though, fortunate RNG or not.
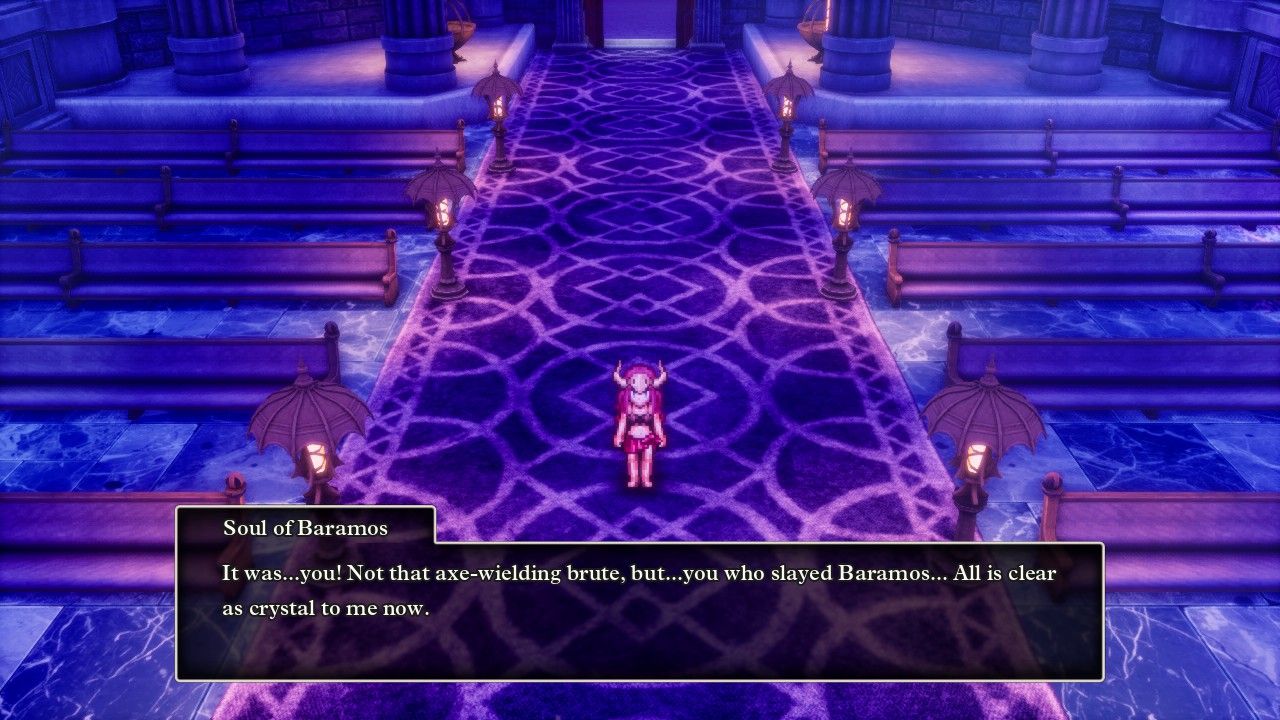
Bindi's victory over the Soul of Baramos resulted in a cut scene playing where the goddess Rubiss was freed, including this ridiculous image of Bindi in her bikini outfit standing by herself in a deserted chapel. I was really curious about what had been going on with the spell damage in that boss fight and spent some time afterwards testing the various mechanics of Bindi's gear setup. I soon discovered that I had been wrong earlier: the Shield of Shame was *NOT* causing an increase in the elemental damage that Bindi had been taking. Instead, it was the Magic Bikini itself, which turns out to have *ZERO* elemental defenses whatsoever, in contrast to what all of the information online claimed. In fact, wearing any bikini equipment apparently increases damage taken from ice element by 25% (thus accounting for the numbers I had seen earlier) while doing nothing to provide protection against fire or wind or explosion elements. I guess that was a minor joke on the part of the developers, the women take more damage from being cold while wearing swimsuits. I should have been tipped off by the item description on the Magic Bikini itself. While DQ3's in-game descriptions are horribly vague and never provide exact numbers, they do at least tell the player when equipment holds some kind of elemental protection. The Magic Bikini text simply reads "Some say this bikini is imbued with magic such is the unusual level of protection it provides". Someone online obviously interpreted this to mean that the item provided spell defense and then everyone has been copying that same mistake ever since - I guess no one actually bothered to test what was happening in practice?
I was kicking myself after realizing this error since I could have saved Bindi a lot of time and effort. She could have equipped the Epic Apron for the Soul of Baramos fight and cut down the Kaboom damage by 25%, which might have avoided the need to use Fog of War in the first place. Instead, I had sold that equipment since I didn't think it was needed any longer, argh! I swapped over to the Dragon Mail for the moment since that would reduce all fire element damage (spells and abilities) by 33% and it didn't look like there would be much need for the various bikinis on future characters. Meanwhile, I also tested out the Goddess Shield in isolation and that item absolutely did work as advertised, reducing all enemy spell and breath weapon damage by 25%. The Goddess Shield at least was the real deal.
Bindi had everything that she needed at this point to create the Rainbow Drop and cross over the magical bridge to Zoma's central island. She grabbed the treasure chests inside the final secret spot of the game near Zoma's Citadel and then headed into the big dungeon. There's a miniboss challenge on the first floor of the citadel that I didn't write about in my previous solo Hero report, a forced battle where the party confronts six of these pictured Stone Guardians in a row. The party fights two of them, then another two when the first pair are defeated, then a final two statues. This wouldn't be a miniboss combat worth mentioning except for the fact that the Stone Guardians can also break out the monster critical hit, named Brutal Strike when they use it but exactly the same thing as the Desperation Strike that I had seen on several bosses. A bad stretch of those crits could easily spell doom for someone who lacked healing like Bindi.
Fortunately I did have a plan ready to surmount this obstacle. Bindi switched back to the Shield of Shame again to cut the damage from this all-physical battle in half, then initiated combat by buffing up with the Oomph Powder + Wild Side combo. Now hitting with four times her normal attack power, Bindi was able to one-shot the statues in each round of combat by taking out their 560 HP lifebars before they had a chance to react. Oomph Powder ran out against the last pair so it took two rounds to finish them off, with Bindi never seeing a single monster crit. Nice and smooth.
Zoma's Citadel is one of the longest dungeons in the game, even longer if the player gets lost in the endlessly looping passageways before finding the secret stairs behind the throne. The monsters inside this dungeon were also suitably nasty for Bindi to deal with, many of them spellcasters using some of the game's most powerful elemental abilities like Kaboom and Kafrizz and Kacrackle (the spell names in this game are still terrible). The random encounters were bad enough that Bindi used Fog of War where needed and several times dropped as low as 200/999 HP, though she was never outright wiped out in combat. Zoma's Citadel also held the final two friendly monsters before hitting the postgame content, culminating in Sky the Soaring Scourger on the third basement level for monster #112. When I tested Monster Pile-On, the final per-tick damage averaged around 110 which meant that the overall typical damage was about 440. Double casting Monster Pile-On with Wild Side in effect would therefore average 900ish damage per round, though again it could go well above or below that number depending on how many times the ability landed. The damage from Monster Pile-On supposedly goes back to its old pre-nerf values if the player finds every friendly monster in the postgame content; I'll have to test that out at some point for curiosity's sake.
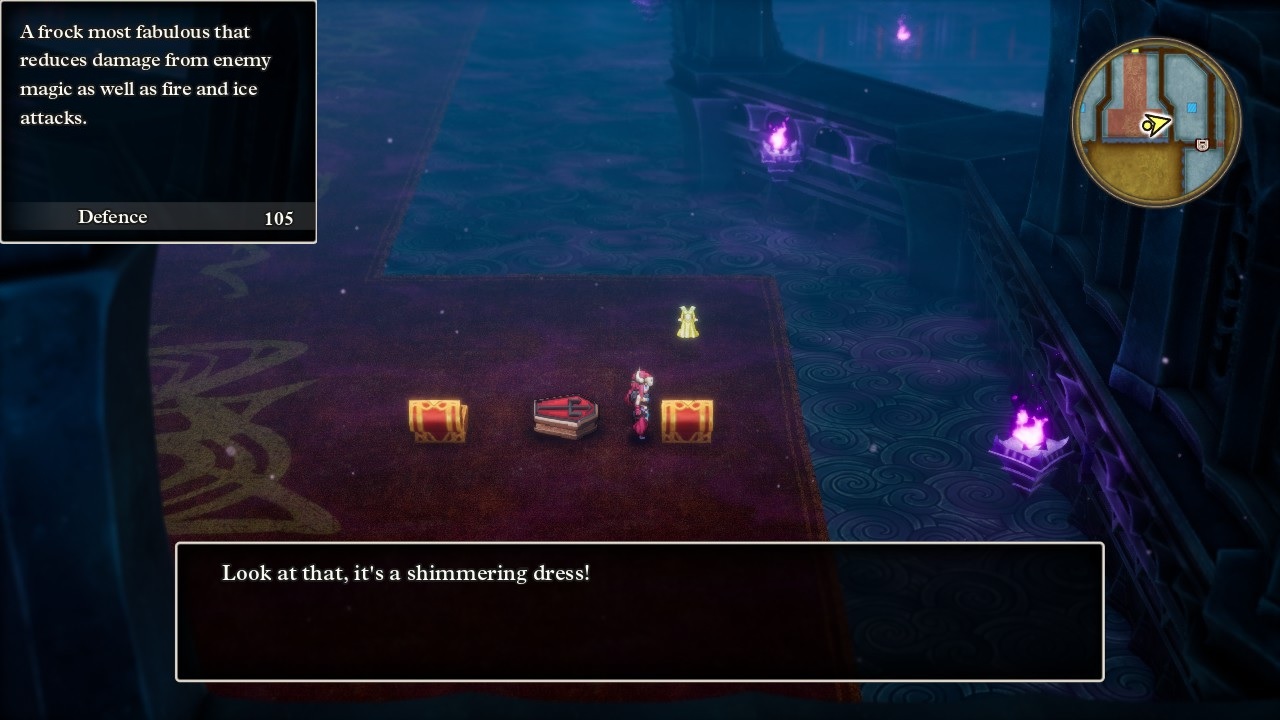
The fourth basement level of Zoma's Citadel also contained the ultimate armor for Bindi, the Shimmering Dress. This fabulous equipment reduces all spell damage by 33% along with all fire and ice breath attacks. It's particularly important because the Shimmering Dress plus Goddess Shield plus double Asbestos / Antifreeze Earrings can completely block all fire or ice element damage from all sources. No matter what spell or ability the enemy might be using, this equipment setup neutralizes the element completely. Best of all, every class in the game can equip the two earrings along with the Shimmering Dress... if they happen to be a woman. This is the reason why all of my solo characters must be female, since men are not allowed to equip the Shimmering Dress and it's superior to everything else here in the lategame. This is awful from a gender essentialism perspective (really developers? do you honestly think men have never worn dresses across the span of human history, or can't do so today if they want?) but for gameplay purposes there's really no choice other than to keep picking women characters.
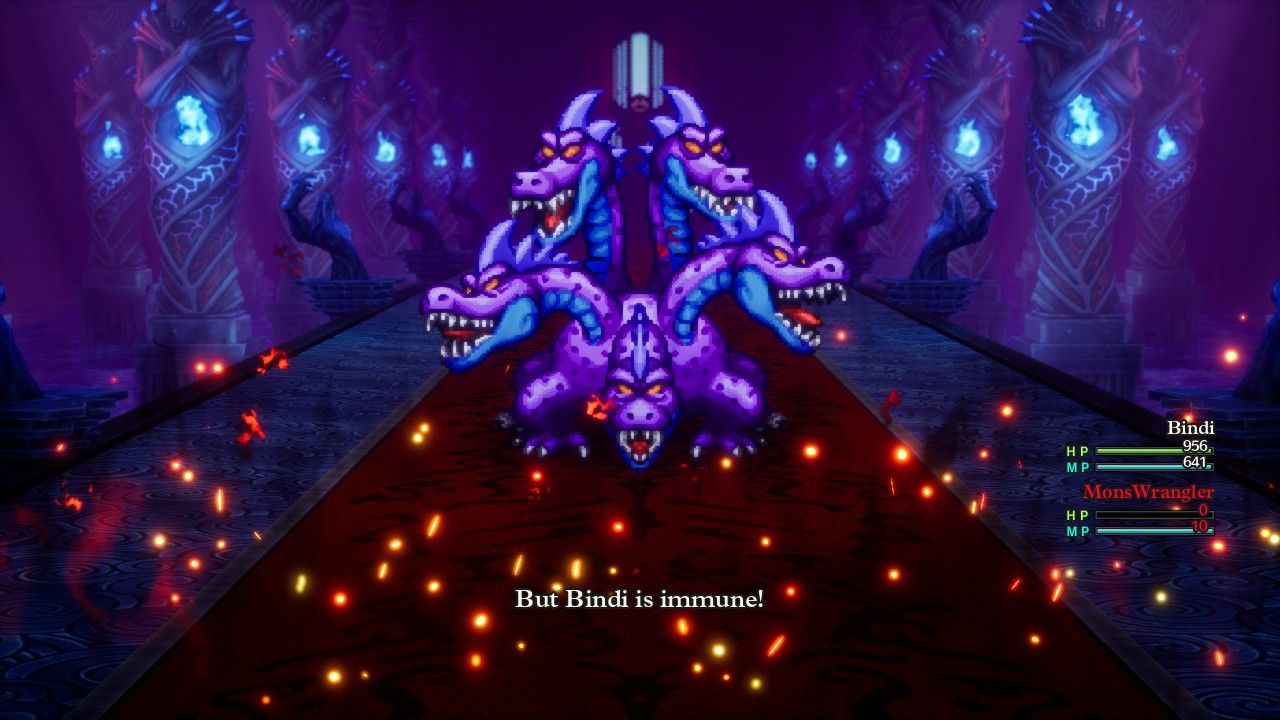
The final floor of Zoma's Citadel turns into a boss rush situation, as Bindi had to confront three major bosses followed by Zoma himself. Thankfully there's a teleportal leading back to the dungeon entrance here in the HD-2D remake which allowed Bindi to save the game and adjust equipment as needed for each battle. The first opponent was King Hydra, fresh off having roasted poor Ortega in an earlier cut scene, and this was clearly the easiest opponent of the group. The purple hydra used several different status attacks with Sweet Breath (sleep) and War Cry (fear), plus it could lock out spellcasting with Bindi's own Fog of War ability. Bindi didn't care about that last part since her abilities were not classified as spells and she was able to avoid the various status stuff nearly all of the time. King Hydra had relatively little direct damage, relying on its Inferno breath attack (which Bindi's new gear setup completely nullified) along with the occasional physical attack that dealt about 35-45 damage. Nothing here was particularly dangerous and Bindi relied on her Wild Side into double Monster Pile-On combo to attack. The hydra regenerates about 100 HP per round and had 5800 health to work through but the battle was never in doubt. I even used Wild Side to double-heal the chip damage that Bindi was taking, therefore finishing off the boss with 966 HP remaining. Not exactly a squeaker there, heh.
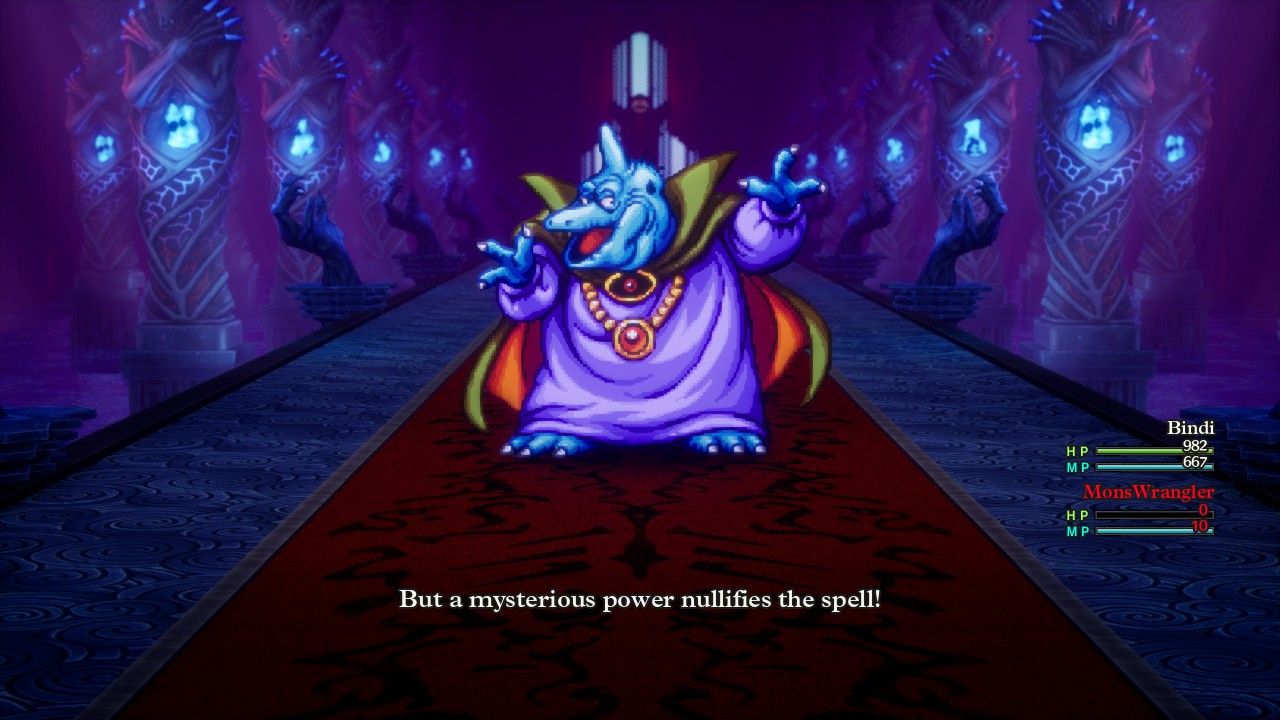
Next up was a Soul of Baramos refight, with this battle looking very similar to the previous one in the Tower of Rubiss. This time the blue dinosaur lacked his two Ashdemon minions, compensating instead by having more health and sometimes getting to act three times per round instead of twice. Otherwise the boss fight was essentially identical to before which meant that Bindi already knew what to do. She cast of Fog of War into Wild Side and then maintained the pair of buffs at all times while hitting with Monster Pile-On whenever possible. From that point the battle was largely up to RNG, as the Soul of Baramos could still break out his ridiculous Desperation Strikes for 200+ damage at any point in time. They were literally the only threat for Bindi since Baramos' Inferno breath attack dealt no damage into her new equipment setup and his physical attacks were landing for a mere 20 damage.
Dragon Quest 3 seems to have a lot more randomness to its boss fights than a game like Octopath Traveler, more akin to Final Fantasy 5 in that regard. This battle was a case in point, as my first attempt at the Soul of Baramos saw him paralyze Bindi twice and hit her with no less than FOUR of his Desperation Strikes, sheesh! Bindi nearly won that battle anyway though the fourth monster crit was enough to seal her doom with the Soul of Baramos sitting in the red zone on health. For her second attempt, Baramos failed to paralyze Bindi and never used a single Desperation Strike, making for a vastly easier boss fight. I have no clue what dictates the appearance of those monster crits and it appears to be purely random chance. In any case, this translated into an easy victory with Bindi having lost barely 300 HP in trashing the Soul of Baramos, who at least has a cool death animation to watch.
The last boss of this trio was the Bones of Baramos which presents an entirely different challenge. This boss doesn't use any spells and it barely uses any abilities either. Instead it physically attacks, over and over again, at a ridiculously high attack value. The Bones of Baramos has by far the highest Attack stat in the whole game at 545; Zoma is the second-highest at 390 and this is even higher than the Xenlon superboss in the postgame content at 542. Dealing with the Bones of Baramos required bringing the highest Defense setup possible, with Bindi equipping the Shield of Shame to cut all physical damage in half, plus double Spirit Bracers in the accessory slots for another 34 points of Defense. This was enough to bring her up to 700 Defense - and that still wasn't nearly enough, as the Bones of Baramos was hitting for 40-50 damage at a time with its normal attacks, yikes! Remember, this thing hits two or three times per round, plus can break out its special Double Up ability which doubled that damage into the 80ish range. Even with the Shield of Shame, Bindi's 999 HP was taking a massive pounding and couldn't last long. Trying to heal up the damage was also utterly impossible as the Bones of Baramos far exceeded the capacity of what Special Medicine could recover.
The only possible option was therefore to damage race the Bones of Baramos, killing the monster before it could kill Bindi in turn. There was nothing that I could do aside from fire off Wild Side into double Monster Pile-Ons and hope for the best. The Bones of Baramos has a very low health total for this portion of the game, only 2960 HP which is less than the Orochi, however it has a massive amount of health regen at 300-400 HP restored per round. This makes a long drawn-out fight impossible to win for most classes; the party must burst down the Bones of Baramos as quickly as possible to minimize the effects of that healing. It had the effect of making Monster Pile-On much less effective, as a round where 900 damage was dealt only translated into about 550 HP worth of progress made after factoring in the boss' healing. And any round where Bindi had to renew Wild Side was a round where she went backwards 350 HP on average, getting further away from defeating this foe.
Ultimately there's not a lot of strategy to the Bones of Baramos battle. Either a solo character statistically has enough damage to kill the boss and overcome its healing in time, or their numbers aren't high enough and they'll never be able to prevail. For Bindi, the damage from the Wild Side plus Monster Pile-On combo was right on the edge of viability, close enough that random factors determined the outcome of the battle. Bindi lost my first attempt as she fell just short of enough damage to defeat the boss; I was tracking the health of her opponent and it would have died on the next round when her health ran out. For the second attempt, Monster Pile-On rolled higher on its average damage and barely scraped over the finish line:
I didn't get a good picture of the death explosion but that was Bindi prevailing with a mere 77 HP remaining. She would not have survived this round of combat to get another attack off, not unless she managed to dodge at least one of the Bones of Baramos' attacks at 1 in 8 odds from her Phantom Mask helmet. Whew, this fight was really close and it would have been utterly impossible without the Shield of Shame cutting all physical damage taken in half. I think most of the solo classes can get past this opponent but I'm very concerned about a couple of the low offense characters who might run into a massive brick wall here. Those are problems for another day though.
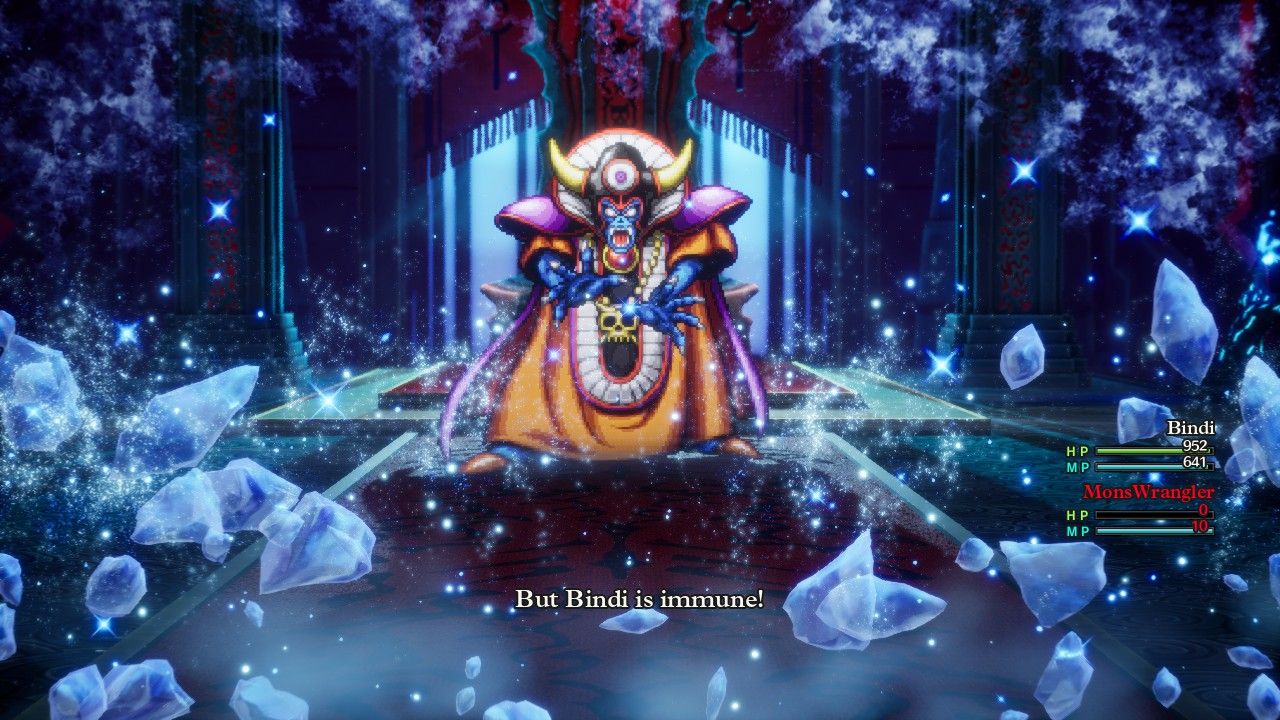
The experience from slaying the Bones of Baramos actually leveled Bindi to Level 99, which was a serendipitous moment that I did not plan for. Bindi carefully selected her equipment for the final boss of the game, swapping the Goddess Shield back in along with a pair of Antifreeze Earrings to defend against the heavy ice element attacks used by Zoma. She made sure to use the Sphere of Light on the first turn of the combat, as this definitely was not a character that could deal with the unnerfed "blue" form of the boss. As for Zoma himself, the final boss has high stats and likes to spam the Kacrackle spell and C-c-cold Breath attacks, but he was completely ineffective against the equipment setup that Bindi had brought. Both of those cold attacks dealt zero damage whatsoever and that neutered nearly everything that Zoma could do. His physical attacks landed in the 40-50 damage range against Bindi but that was survivable.
And... that was pretty much it as far as Zoma was concerned. Bindi had the proper gear setup to pull his teeth and there wasn't much that Zoma could do at that point. He doesn't regenerate health though he did have a hefty 8300 HP lifebar to cut down so this dragged out into a more extended fight. Bindi maintained her Wild Side buff at all times, renewing it whenever Zoma dispelled it with his Disruptive Wave ability that he used about every 3-4 turns. Sometimes Zoma would use this ability on the same turn that Wild Side was going to run out anyway, making it useless in practice. Double Monster Pile-On kept hitting for good damage and I occasionally had Bindi use the Sage's Stone with Wild Side in effect. The Sage's Stone is an item found in this same dungeon that can cast the Multiheal spell endlessly, restoring 80-90 HP to the whole party. It was effectively an infinite version of the Special Medicine item for Bindi and with Wild Side in play it would heal her for about 170 health. This was easily enough to offset the damage from Zoma's physical attacks and I thought that Bindi would be able to win the battle with more than 900 HP in reserve.
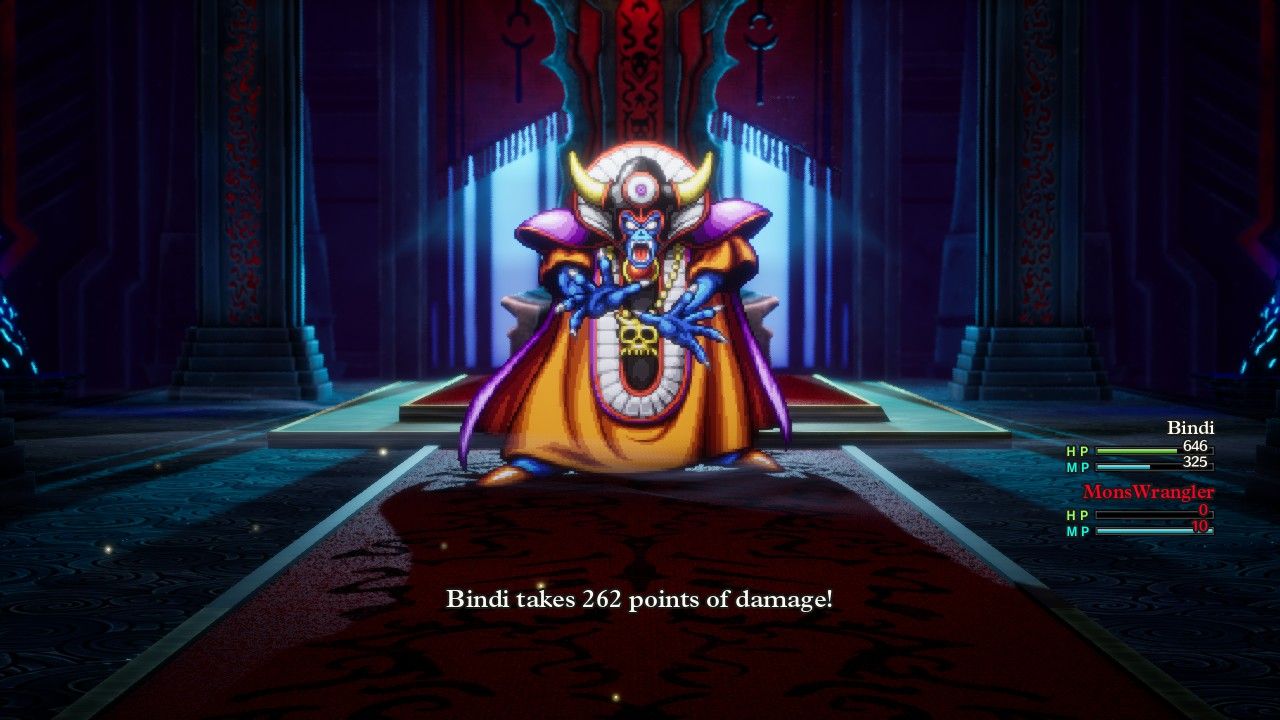
But then Zoma did this: he pulled out his own Desperation Strike for 262 damage. Seriously, are you kidding me? *ANOTHER* undocumented monster critical strike on the final boss of the game?!  My next solo character playthrough REALLY has to update all the boss reference materials, since the ones that I have right now are woefully incomplete. The good news was that Zoma didn't start using this ability until his health was in the red portion, corresponding to under 25% health remaining. I planned to heal up the damage from that first Desperation Strike since the Sage's Stone could nearly offset it while Wild Side was running, only to have Zoma use a second Desperation Strike for another 250+ damage to Bindi. OK then, I guess that's how it's going to be. I stopped trying to heal Bindi and finished things off with a final pair of Monster Pile-Ons:
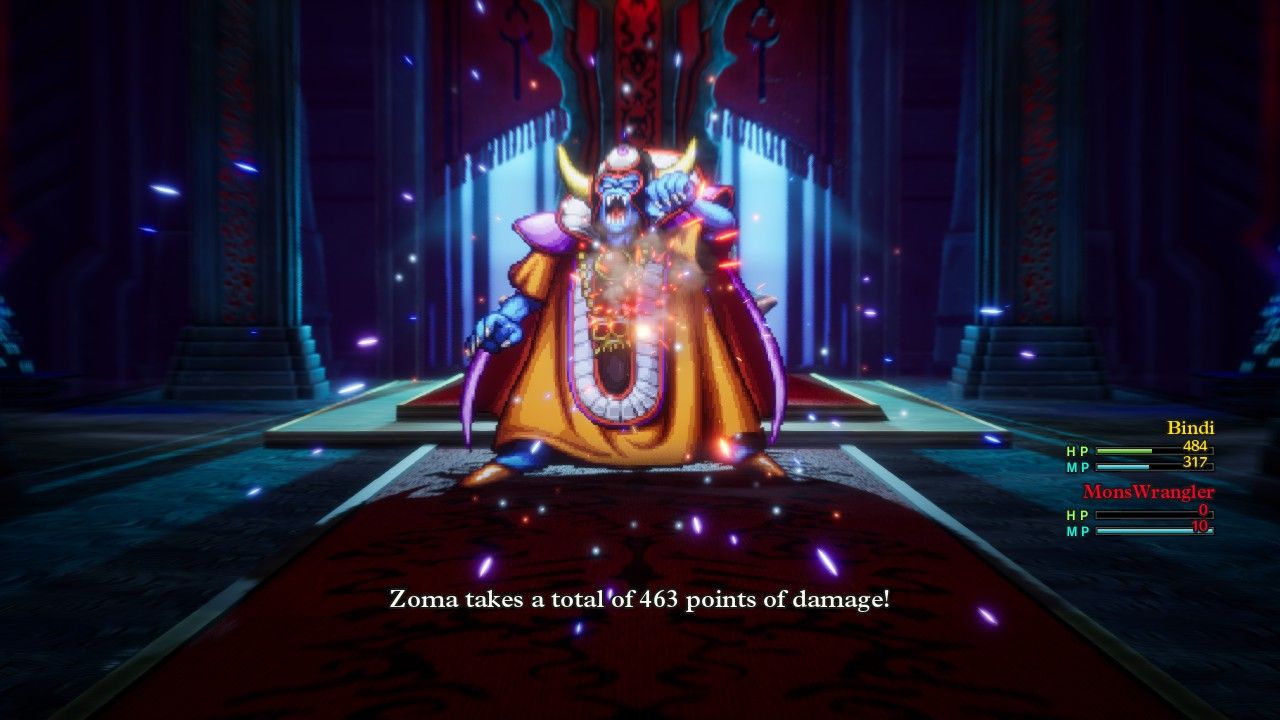
The King of the Underworld was laid to rest without further ado to complete Bindi's journey. Don't be fooled by Bindi's health displaying in the yellow, this was a very easy opponent and the battle would not have been even remotely close without that pair of monster crits getting pulled out at the last moment. It's kind of funny how the final boss in the game isn't particularly difficult at all here in the HD-2D remake of Dragon Quest 3. Outside of those cheese Desperation Strikes at the end, there was nothing that Zoma could do to threaten Bindi. The biggest issue would have been running out of MP since this was a long fight, though I'd made sure to bring some Elfin Elixirs in Bindi's personal stash had they been needed. Whatever the developers were going for here in terms of a final boss, it didn't work.
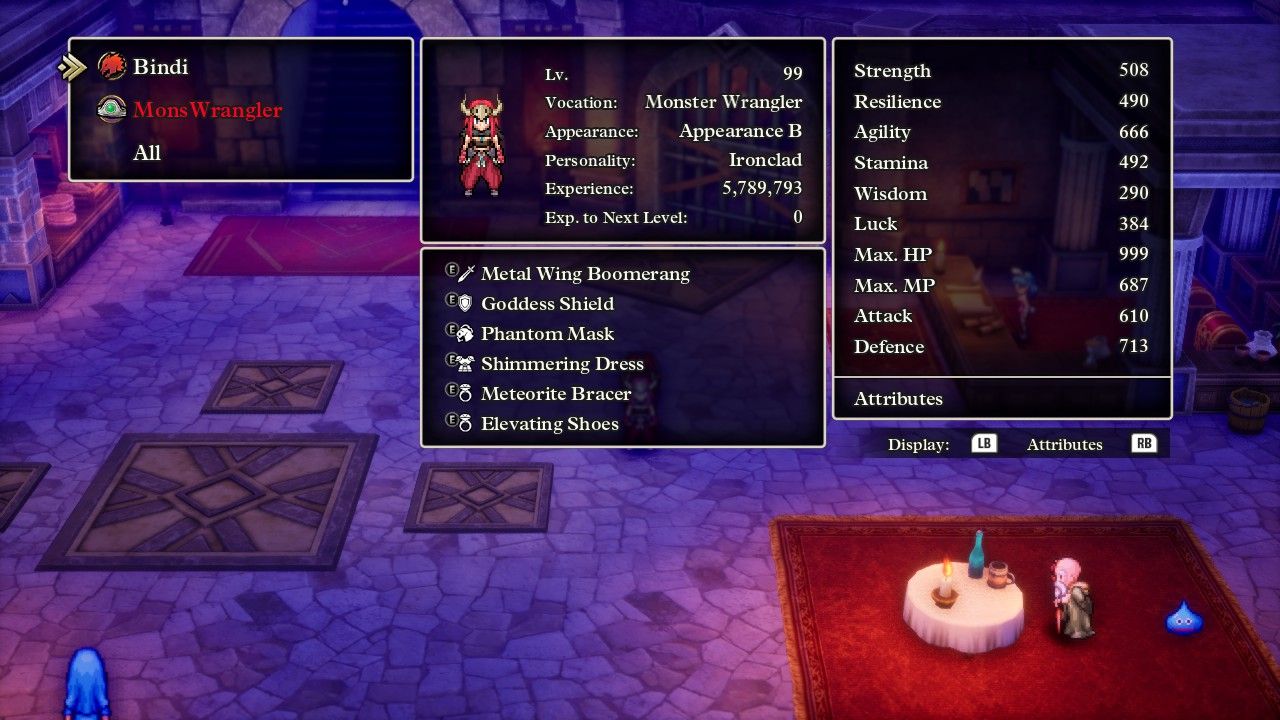
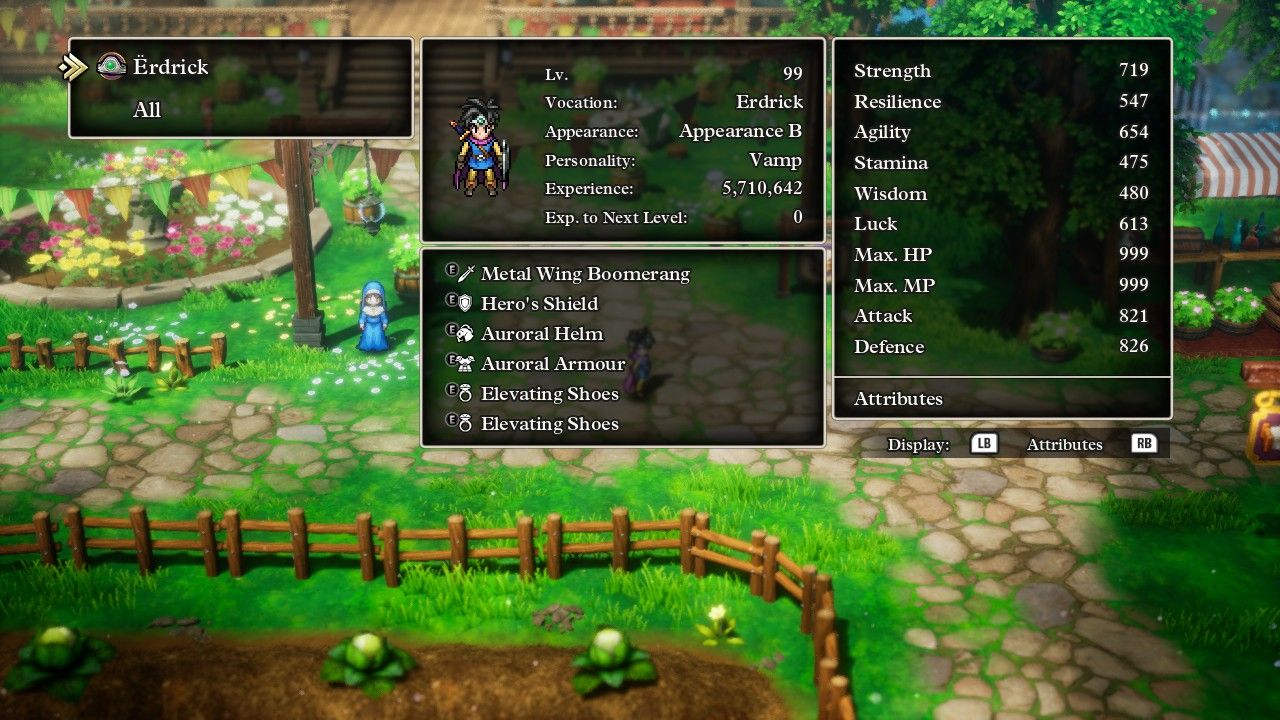
I took a final screenshot of Bindi's stats at the monster arena in Cantlin while she was wearing her most common equipment setup for the endgame. I mentioned at the outset of the report that the other classes simply cannot compete with the base stats of the overpowered Hero class, and that was certainly the case for this playthrough (click here to see the solo Hero's ending stats for comparison). The Hero ended up with more than 200 additional points of Strength, and that was with Bindi having the Ironclad personality with a 10% bonus to Strength growth! The Hero is just an absolute monster in the Strength department. Bindi was able to get within 50 points of Resilience, though that was her top stat for the Ironclad personality while my solo Hero wasn't emphasizing that stat at all. Agility and Stamina were both surprisingly close, then the Hero clobbered Bindi with 200 more points of Wisdom and almost 200 additional points of Luck (after removing everyone's Elevating Shoes bonuses). The Luck stat was particularly important because I was testing to see if a solo character with Bindi's base stats and a personality with a Luck penalty could still make it to the expected Luck threshold by game's end. Bindi just barely managed to reach that target: the expected Luck for a Level 99 character is 328 and she finished with 334, whew! This gave me a better sense of where solo characters will end up at the end of the game after using all of those Luck seeds. It looks like there's a healthy margin for error here given that Bindi's Monster Wrangler class had low innate Luck, plus she had taken a penalty to the stat, and nevertheless still made the target.
I chose to play the Monster Wrangler class second because I had the impression that it was also pretty overpowered and would fly through the game easily. While I don't think the class is bad by any means, as it turns out the Monster Wrangler looks to rate as more middle-of-the-pack than overpowered for a solo game. Wild Side may have been outstanding, however Monster Pile-On was only a solid ability and lacked the crazy damage output that it supposedly had before being nerfed. It was also a huge issue that Monster Pile-On's damage couldn't benefit from Oomph Powder, and if Bindi did want to use that buff, she'd have to try to juggle Wild Side and Oomph at the same time which was awkward. Throw in the inability to heal along with mediocre base stats and this was only a "good but not great" class for a solo game. I'm looking forward to trying some other classes and seeing how they all stack up!
As always, thanks for reading along - I hope this was entertaining. On to the next solo class.


