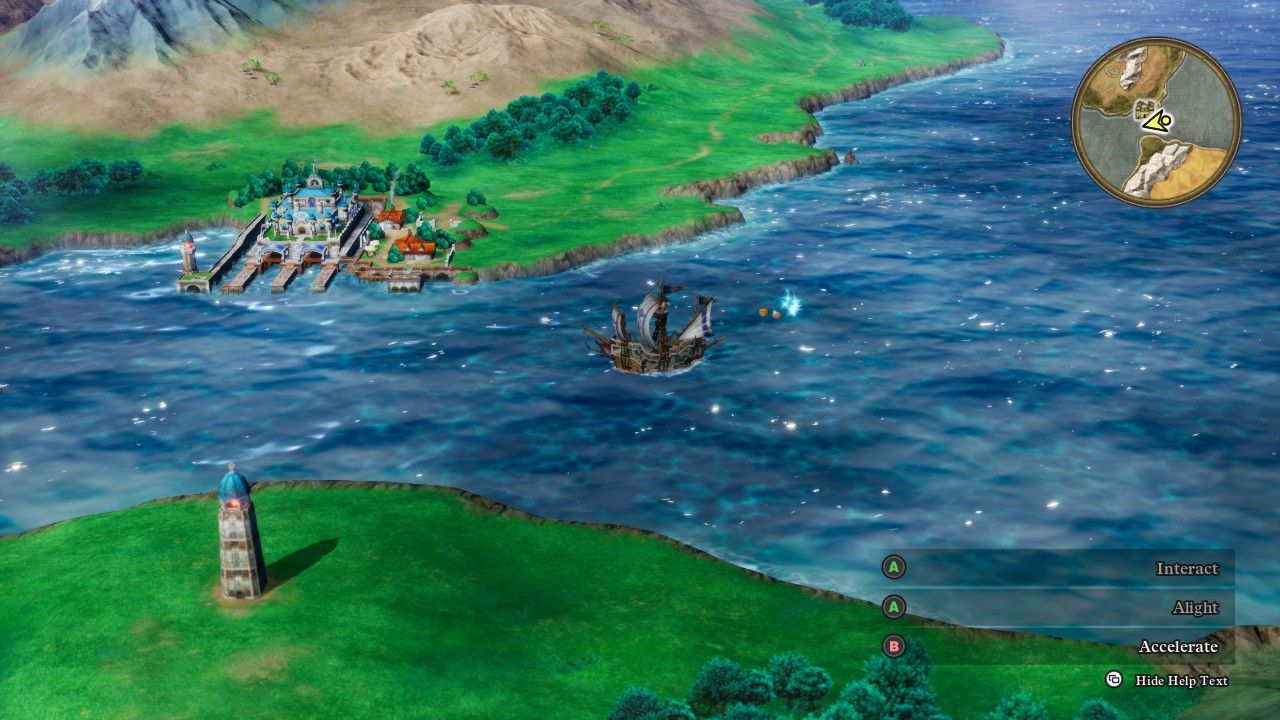
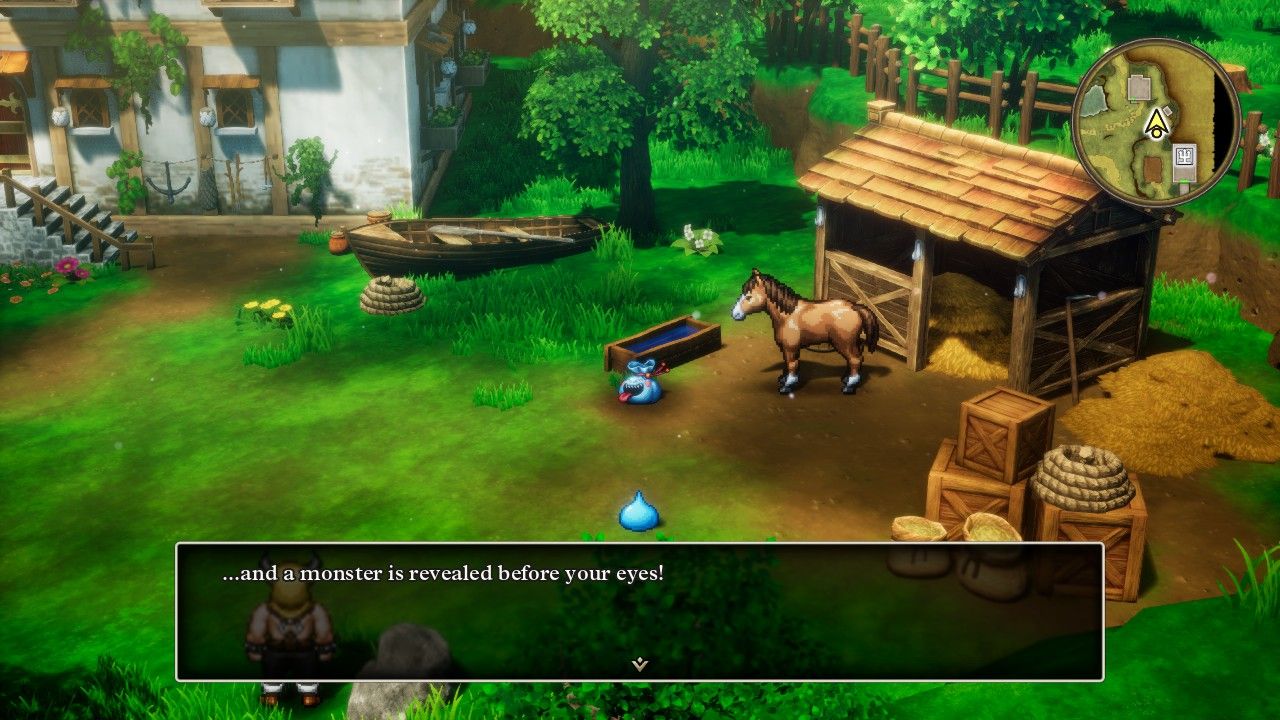
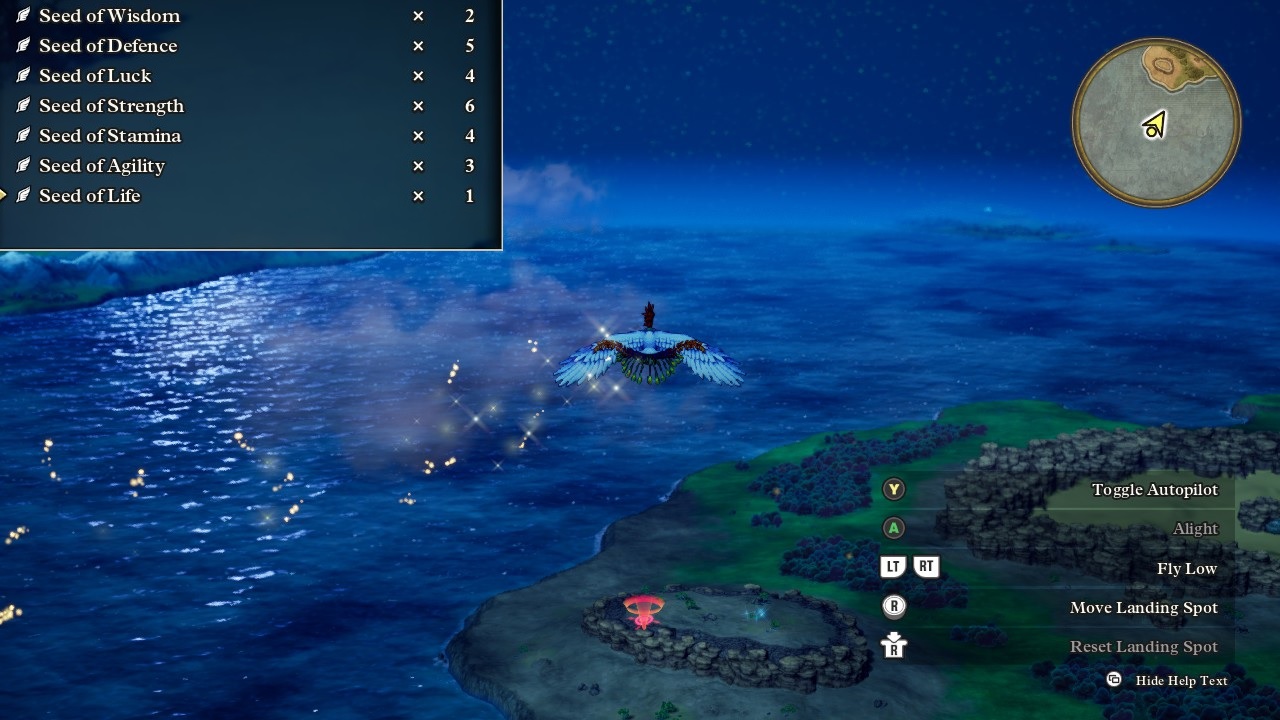
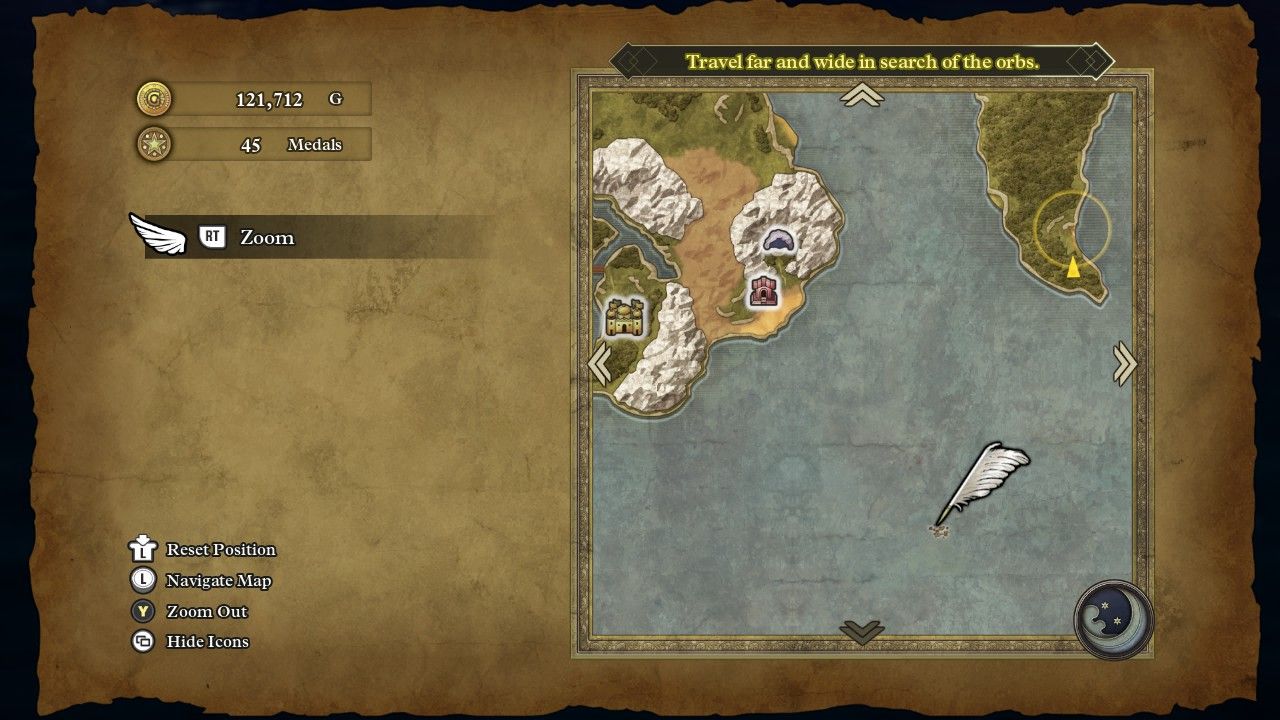
Erdrick finally had her own ship and she could set sail on the seven seas to explore the rest of the world map. The ship in DQ3 isn't like the limited ship in the original Final Fantasy that could only dock at ports; this thing can genuinely travel and land almost anywhere on the map, with only a handful of areas blocked off by high cliffs. The world of DQ3 is quite large and there are vast expanses of empty space without much taking place, which have been helpfully filled in with sparkles and secret spots to make travel more interesting. I should point out again that most of the sparkles are completely useless, yielding up only outdated equipment that sells for a relative pittance. In fact, the ocean sparkles have an unusually high amount of total junk in comparison to the land-based sparkles. I still wanted to reach all of them during this initial solo character playthrough, just in case I would find something that might be useful for Erdrick or another character later on.
After scouring the Mediterranean clean of its sparkles and secret spots, I made a special side trip over to this world's version of North America. There's exactly one town to be found there, located deep in the interior of the continent near where the headwaters of the Mississippi River would be located. That village was named "Soo" in the NES translation which was a pun on the Sioux people; this, uh, did not age well and it has been rechristened "Persistence" in the HD-2D remake. The village now has a Puritan theme to its characters, and yet it still features teepees and totem poles and other symbols associated with different Native American peoples so this place is a truly incoherent mess now. I traveled here with Erdrick because it had an upgraded boomerang for sale, the Swallowtail, with an additional 28 points of Attack and no elemental properties. This was a noticeable damage upgrade and the Swallowtail would remain Erdrick's default weapon for a long time to come.
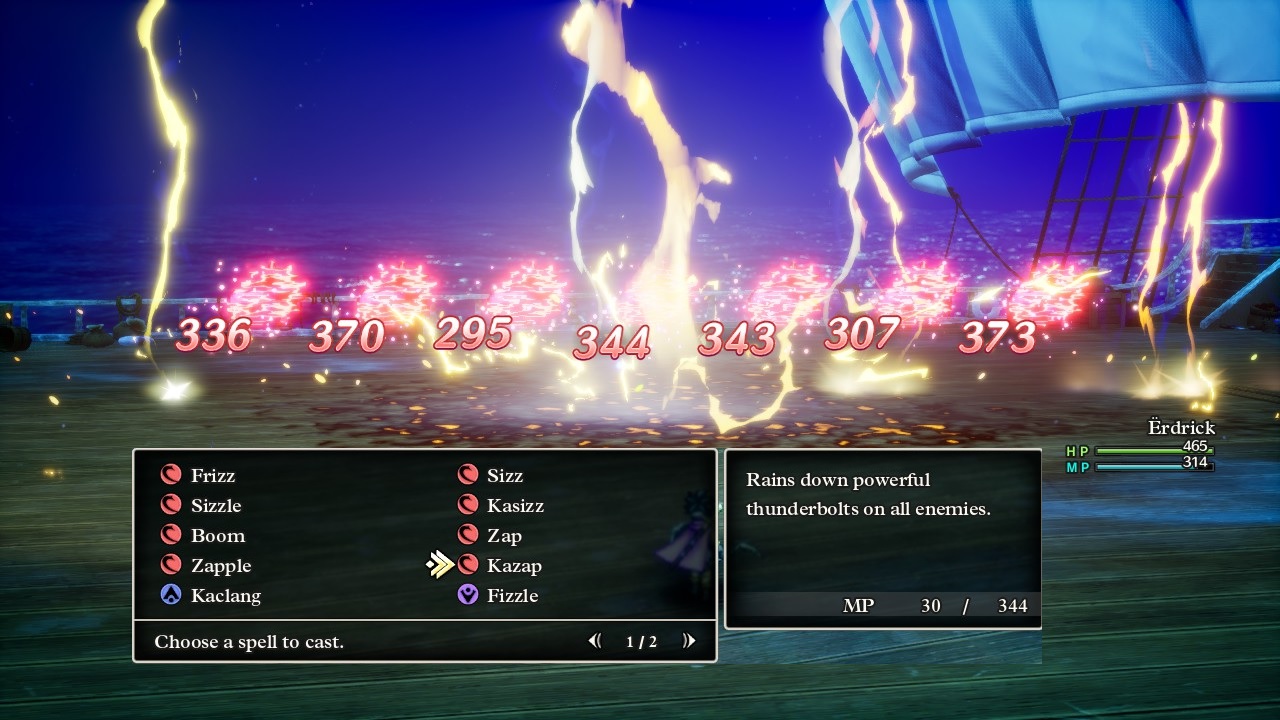
There's a water-based collection of monsters that the party faces while sailing around on the high seas, and Erdrick would be seeing a lot of these foes as she voyaged around the world. They were pretty easy to defeat and gave solid XP payouts of 1000-2000 per battle so I didn't mind fighting the critters that popped up along the way. Erdrick soon reached Level 38 and learned one of her final remaining spells, the pictured Kazap that hit everyone on screen with lightning element damage. This is actually the highest damaging offensive spell in the entire game, slightly beating out the single-target fire spell Kafrizz and outperforming the top explosion magic spell Kaboom by nearly 50%. The Hero is the only class in the game to have access to this spell, and in fact no other class can access lightning magic at all. Only the overpowered Hero, of course! If you're wondering which elemental damage type the most enemies are weak against, well, it shouldn't surprise you to hear that a whole lot of stuff doesn't like lightning damage. The only thing that balances out Kazap is its casting cost of 30 MP though Erdrick had enough accumulated magic points that she could use it whenever she wanted.
This is also a good time to discuss how spell damage interacts with the Wisdom stat. Remember how each character's critical strike chance gets boosted (or decreased) by comparing their Luck stat against a predetermined table of values? The exactle same table is used is used for the Wisdom stat, and for every 1 point of Wisdom above the number on that table, the damage of the spell being cast gets boosted by 1%, up to a maximum cap of 60% additional damage. Thus Kazap had a base damage of 175-225 but could deal up to 280-360 max damage with a heightened Wisdom stat, which Erdrick of course had due to eating all of those Wisdom seeds. It also helped that these Sea Slimes were weak against lightning element and took additional damage (thus the red text on the damage numbers) to make the overall effect even more spectacular. Erdrick's boomerang attacks were plenty good enough for most combats in the sea but she could also break out this spell whenever she felt impatient or annoyed.
For the next few hours, nothing particularly important happened as Erdrick dove into side-quest mode while she hunted down buried treasures all over the world. There are about 120 sparkle locations that can be accessed at any point in time and in any order once the ship becomes available; chasing them down in systematic fashion occupied quite a while for Erdrick. She started by traveling south down the eastern coast of Africa, where there was a village named Theddon that had been completely wiped out by the Archfiend Baramos. Everyone in the town is dead, however it can be visited at night to speak with their ghosts (during which time the normal town music plays and feels quite disorienting). Erdrick was collecting all of the usual goodies as she went, mini medals and recruitable monsters and seeds and whatnot, then was able to purchase the Magical Armor in Theddon which reduces all spell damage by 33%, very useful stuff.
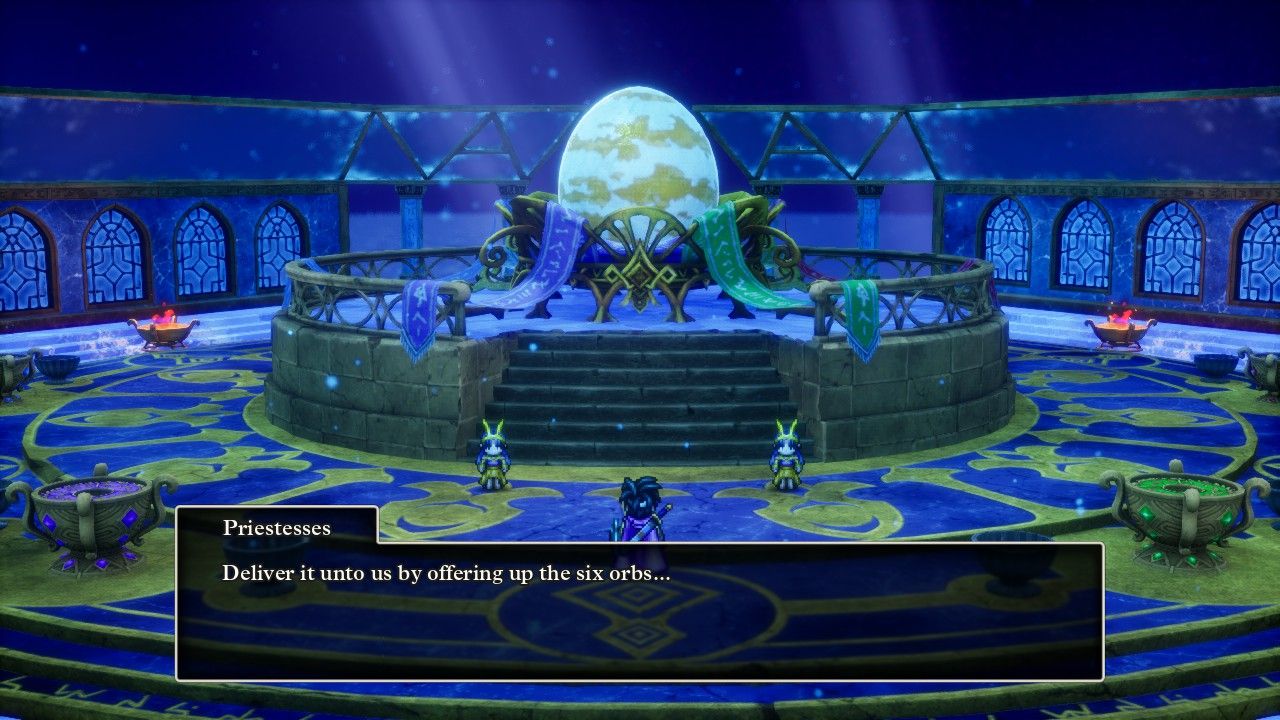
Then she continued further south and grabbed all of the sparkly and secret locations in the vast southern ocean. There's a small version of Antarctica down there which houses the Shrine of the Everbird; the main questline at this point is to collect six orbs hidden across the world to revive a magical flying bird. This area looks great in the HD-2D remake even if the two girls protecting the egg were reminiscent of the two faeries from the classic Mothra movie with Godzilla. (Maybe that's even what the designers were going for here, I don't know.) Northeast of the frozen Antarctica was this world's version of Australia, containing the town of Lanson where everyone speaks with (bad) Aussie accents. That town sells an item called the Fading Jenny which turns the party briefly invisible; this is used to recruit some monsters that don't like your appearance, as well as sneak into the castle town of Edina in the British Isles. Edina contains this infamous puzzle:

The player has to push these three rocks into the diamond tiles in the back without getting them stuck or pushing them into the water. Decades and decades after playing this game on the NES, this stupid rock puzzle was one of the things that I most remembered about Dragon Warrior 3, heh. Let the record show that I was able to finish the puzzle while playing the game on Livestream without having to look up the solution online! It's not really that hard but sheesh, do I remember getting stuck here in the pre-Internet age for quite some time. Anyway, the quest reward for solving this puzzle was the Bottomless Pot (the Vase of Drought in the NES translation), which then gets used in the ocean north of Siberia to raise a small underwater shrine containing the Ultimate Key inside. That allows the player to unlock every door in the game and it's necessary to advance the plot eventually, though the player can continue skipping it for some time if desired.
I claimed the Ultimate Key eventually though Erdrick wasn't in any hurry to do so. First she finished up with the shipwrecked treasure remains in the southern oceans, including visiting the tiny island of Lozamii which is located here on the world map. Lozamii is another optional area that's extremely easy to miss as there's nothing telling the party to sail down there; it was a one-tile island in the NES game that held a couple of seeds and nothing else of relevance. Here in the HD-2D remake, Lozamii has been reimagined with a Polynesian theme (even though it's located near the frigid South Shetlands in real life), with warm tropical beaches and a lazy island feel. It was the perfect place to chill out at the end of a gaming session and do some RNG manipulation of seeds:
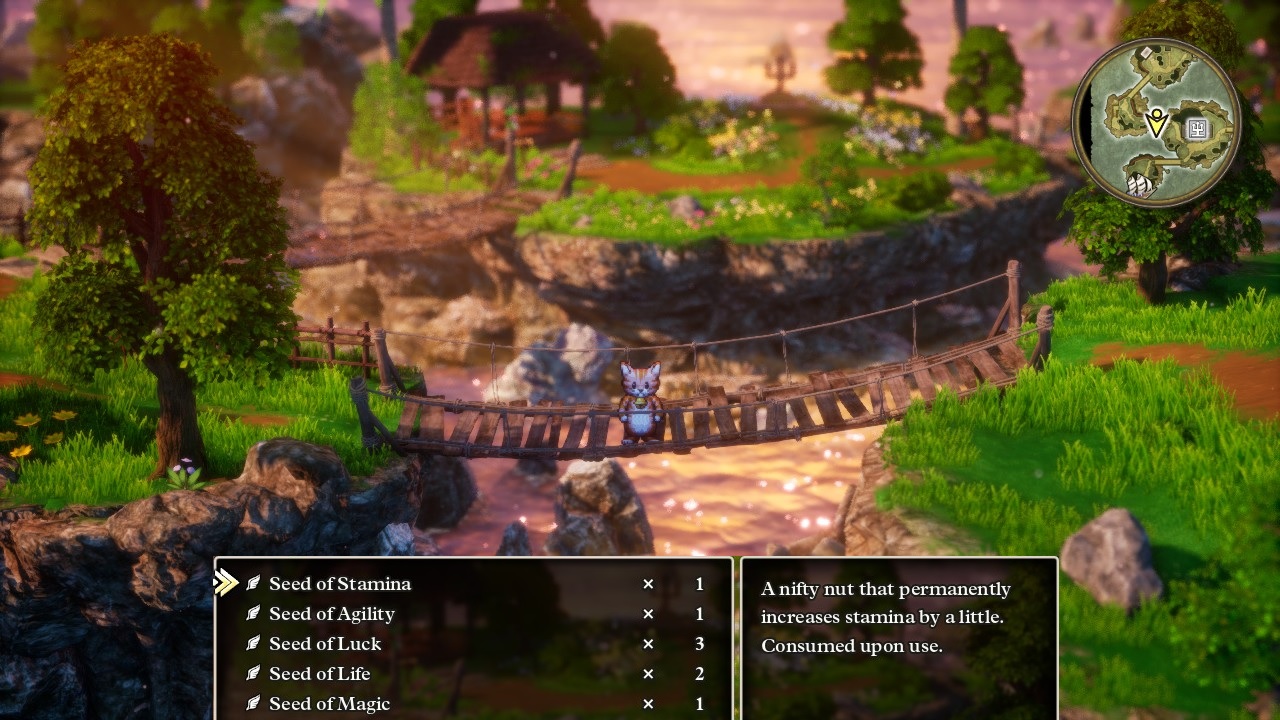
While wearing a cat suit, of course!  This is a little easter egg in the game, an armor item named the Cat Suit that transforms the appearance of your characters when equipped. Erdrick found a copy on one of the tiny islands east of Aliahan, though it was already outdated and she preferred to wear the Magical Armor for actual combat. All of these seeds had to be rerolled to get their maximum stat value, with Erdrick saving the game after each successful seed usage, and this could take a shorter or longer period of time depending on how friendly the game's RNG was feeling on any given night. Even running at triple normal speed I could get stuck here for a while, sometimes failing the 1 in 3 dice roll eight or nine times in a row. Seeds of Life were the worst since they have a range of 2-5 HP gained from usage, forcing 1 in 4 dice rolls instead, blargh. Over a bunch of repetitions, 1 in 4 odds were notably much worse than 1 in 3 odds. It's also worth pointing out that Seeds of Stamina do exactly the same thing as Seeds of Life: each point of Stamina is essentially worth 2 HP so getting three more Stamina converts into 6 more HP eventually. The Seeds of Wisdom are therefore strictly superior to the Seeds of Magic, as the latter only adds 2-3 max MP while the Seeds of Wisdom grant up to 6 additional MP while also boosting damage from spells via the Wisdom damage formula mentioned above. I guess the Life/Magic seeds have the advantage of getting the bonus instantly though that's pretty minor given how quickly solo characters level up where they'll reap the bonus from the Stamina/Wisdom seeds.
After finishing up with the southern ocean, Erdrick then began wiping clean the northern seas as well where there was plenty more junk to be claimed. This pattern felt a bit random, however that was the order in which the sparkle locations were listed in my reference spreadsheet and I had to follow some kind of order here or go crazy. After Erdrick had looted the entirety of Europe and the frozen coastline of what would have been Russia, I brought her back to Theddon again to claim the first of the six orbs. In the NES version of this game, the player simply had to find the Ultimate Key and come back here to unlock a jail cell door where the ghostly prisoner inside would hand over the Green Orb. The HD-2D remake has the same prisoner but also added a new boss fight:
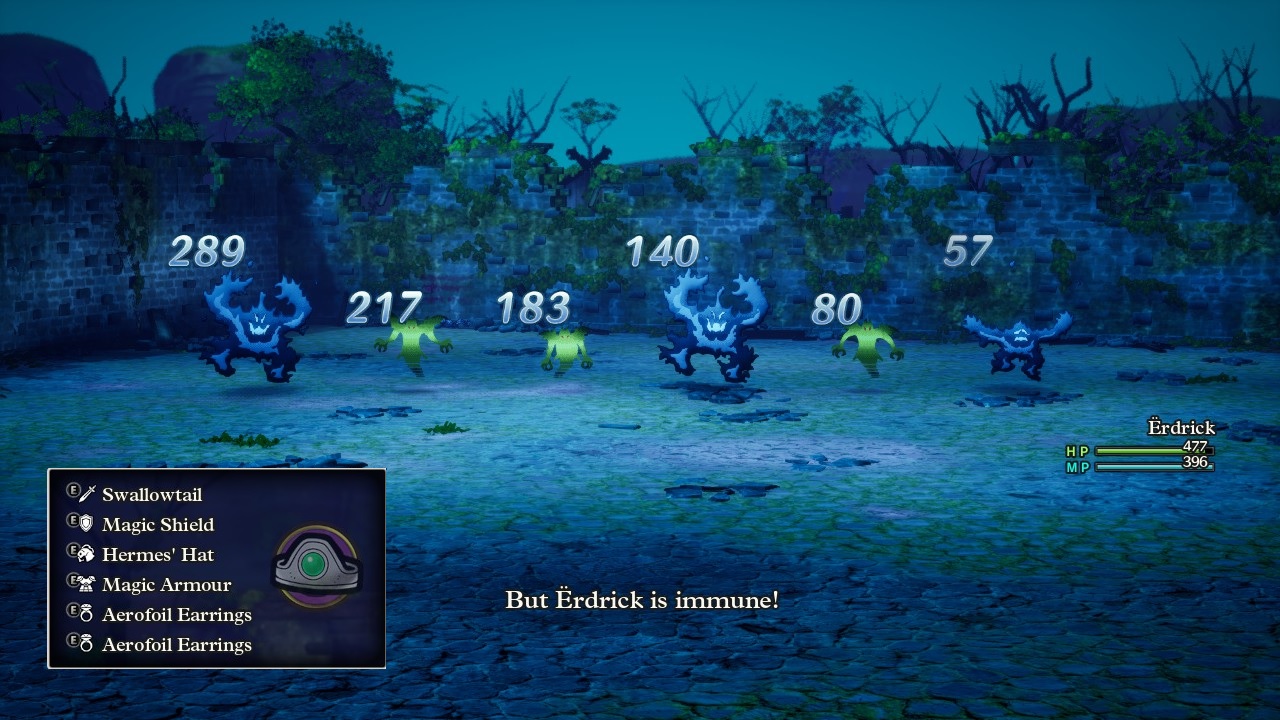
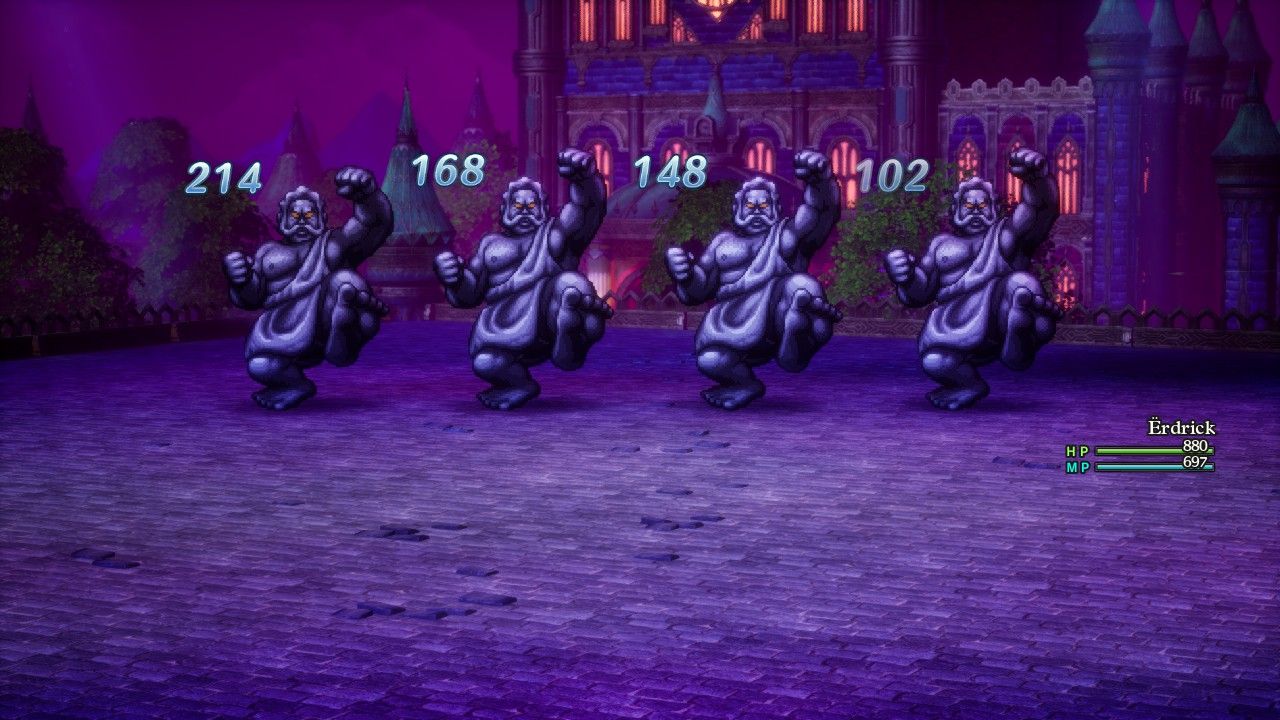
Erdrick was confronted by six enemies at once, three Phantasm ghosts and three Dying Fires. The ghosts like to cast the tier 1 explosion spell Bang while the Dying Fires employ heavy wind element damage, between the tier 2 wind spell Swoosh and the same Wind Sickles attack that Erdrick had seen back in the Pyramids. They can also cast the instant death spell Whack which Erdrick countered by putting some Diamends in her inventory, items that shatter to stop the successful casting of a death spell. I had strategized for this battle ahead of time and equipped Erdrick with her Magical Armor, the Hermes' Hat which reduces wind element damage by 33%, and then a pair of Aerofoil Earrings which each reduced wind element damage by a further 25%. Together this was enough to completely negate all wind damage entirely, with Swoosh and Wind Sickles both dealing zero damage whenever they appeared. As for Bang, it was a tier 1 party-wide spell that hit for 12-18 damage normally, reduced by another third from the Magical Armor down to 8-12 damage. Erdrick could certainly survive that.
The gimmick in this battle is that both the Phantasms and the Dying Fires can summon more reinforcements at any time. This makes single target damage impractical since the monsters will just keep bringing in more of their friends, though I suppose really high attacks that could one-shot these things might be able to kill them fast enough to stop the new additions. For Erdrick, the obvious answer was Kazap since it hit everything on screen and both enemy types were weak against lightning. However, while that would work for the Hero, it wouldn't work for anyone else and I decided to test to see how doable this battle would be without that overpowered option. Instead, I had Erdrick use some Oomph Powder and then get to work boomeranging the group. I was pleased to see that this worked perfectly well, with one additional Dying Fire getting summoned but otherwise the area-of-effect damage from the boomerang defeating these enemies quickly enough to stop them from multiplying. It looks like good defensive itemization and access to at least some form of multitargeted damage should be sufficient to deal with this boss fight.
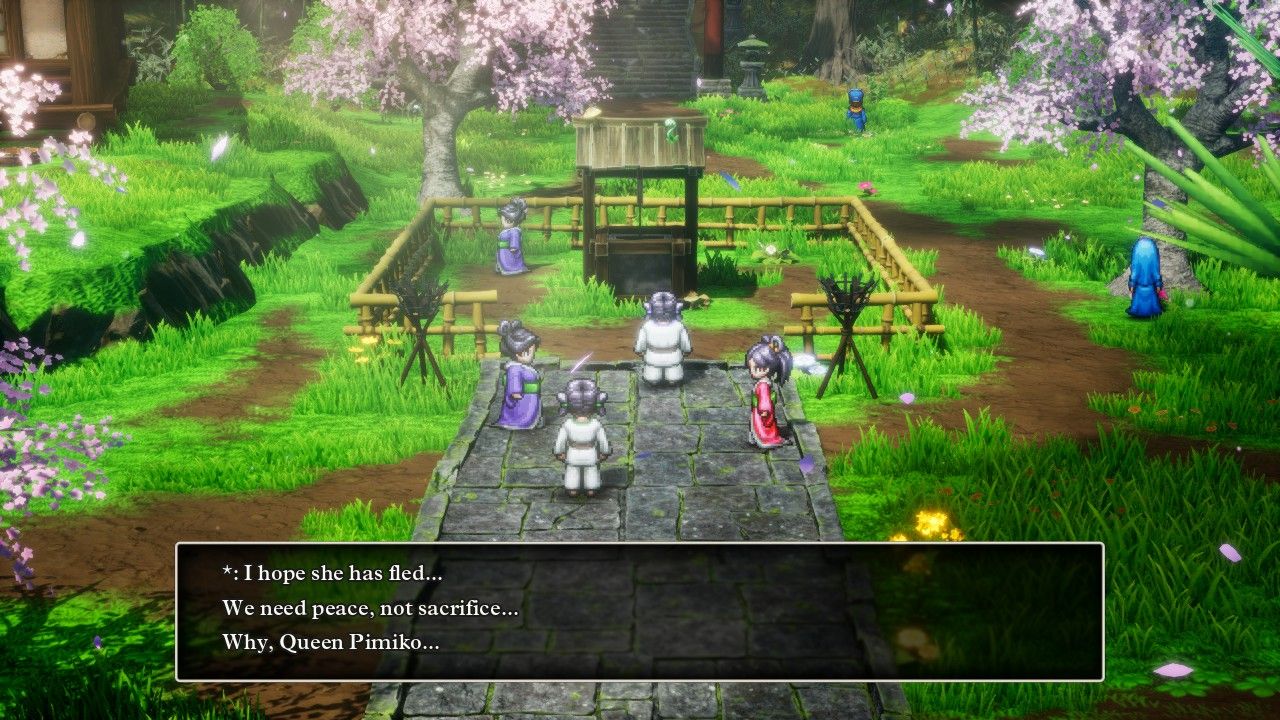
With the first orb sitting in her pocket, Erdrick continued onwards in search of the remaining five. This was a genuinely confusing task in the NES version of the game, as the gameplay didn't even tell the players that they had to find orbs in the first place, much less where they were located across the vast world. Here in the HD-2D remake, there are giant yellow circles on the minimap indicating where all of them can be found and a series of quest objectives pointing the way forward, though to be fair these can be turned off in the options menu if desired. These cheet sheets in the sky led Erdrick onwards to the island nation of Jipang which was based on... I mean, does it honestly require explanation? Everyone in Jipang speaks in haikus and the problem here is that Queen Pimiko has to keep sacrificing young girls to a terrible monster named the Orochi to prevent the village from being destroyed. This place looked absolutely gorgeous with the cherry blossoms falling in the background even if everything here was yet another cultural stereotype.
The Orochi hides out in a nearby volcanic cave which served as the first dungeon that Erdrick had tackled in a while. The monsters inside were predictably fire-based for the most part and the underground region looked absolutely hellish, with explosions of fire in the background and lava running alongside the walkways. There were also Metal Slimes hiding out here as potential random encounters, with Erdrick having one fun battle where she managed to kill three of them (two by critical hits) for a big payout of 12,400 XP, very nice. The Orochi was patiently waiting on the bottom floor and Erdrick prepped for the boss fight by loading up on fire-resistant gear:
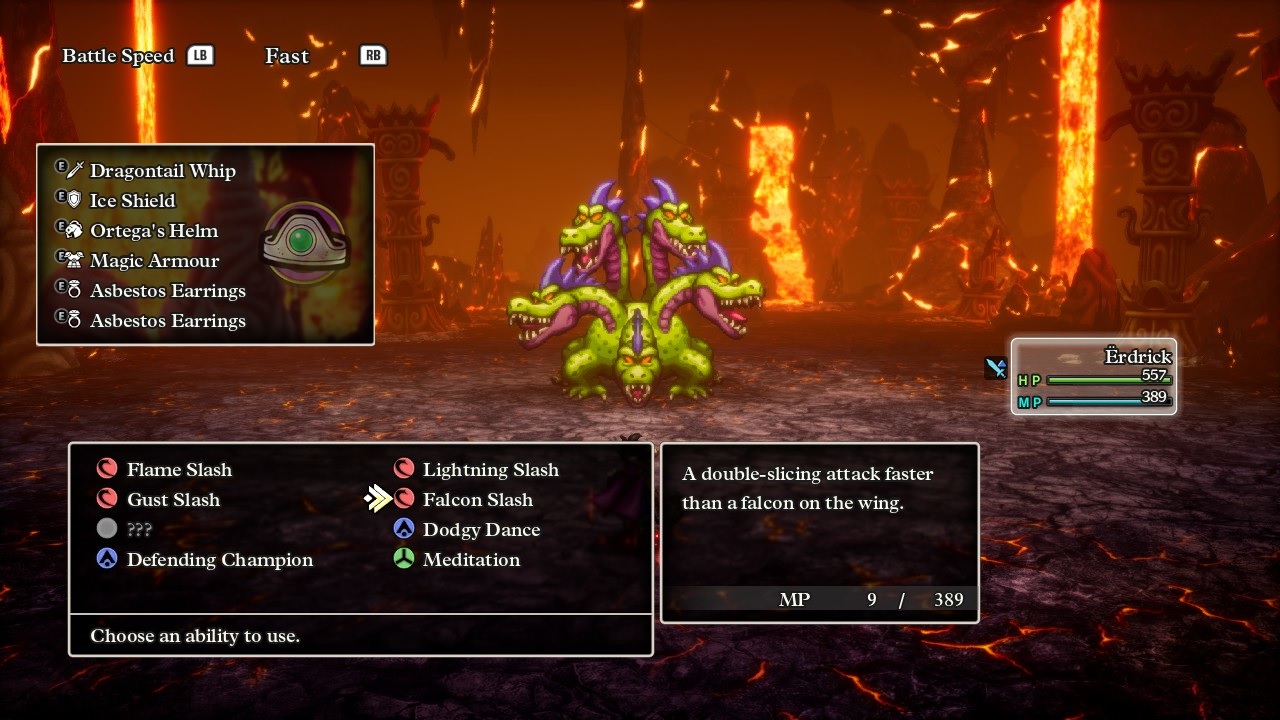
There are six different types of damage in DQ3 (physical, fire, ice, wind, lightning, and explosion) and each of these can come in two different forms: spell damage or breath damage. Breath attacks are not considered to be spells, as they don't cost MP for monsters to use and they do not get reflected by the Bounce spell. Itemizing for boss fights requires picking the correct equipment for the elemental damage type as well as spell versus breath damage types; the Magic Armor for example reduced all spell damage by 25% but did nothing for breath attacks. The Orochi uses entirely fire element-based attacks and none of them are classified as spells, instead Wildfire and Burning Breath and Inferno all being various forms of breath attacks. Erdrick had the Ice Shield + double Asbestos Earrings which each reduced fire damage of both types by 25%, for a sum total of 75% reduction. I actually made a mistake here and should have brought the Fur Hood which cuts fire element damage by a further 12%. Nevertheless, the fangs of the Orochi were completely pulled here as Wildfire went from 40-60 damage down to 10-15 damage and even the mighty Inferno was reduced from 80-100 down to 20-25 damage. That was not dangerous stuff for Erdrick and I could have gotten the numbers even smaller with better planning.
On the offensive side of things, Erdrick made certain to use her Oomph Powder to double her attack and then broke out her Falcon Slash ability. This had unlocked all the way back at Level 30 and I hadn't had much of an occasion to use it thus far, with Falcon Slash attacking twice for physical damage at 75% of the normal Attack value. I had tested earlier and Falcon Slash did more damage than hitting an elemental weakness with one of the Flame/Lightning/Gust Slashes, especially with Oomph Powder taking the damage up around the 700 mark. The Orochi only had 2300 HP and couldn't stand up to that kind of a pounding for long, soon retreating from the combat into a dark portal that led back to Jipang. When Erdrick gave chase, she found herself in the palace where Queen Pimiko was bleeding from newly sustained injuries. Hmmmm, suggestive! That led to a second fight with the Orochi (after I saved the game) which played out in exactly the same way as the first one. I think this boss will be pretty easy for solo characters since the area-of-effect properties of the Orochi's breath attacks don't matter as much for a single character, plus the fire element damage can largely be neutralized with proper itemization.
The defeated Orochi produced the Purple Orb and then it was back to wandering around the world map for Erdrick. She crossed over to the Americas in earnest now, with the New World largely being untapped wilderness with only the one town of Persistence and a handful of shrines dotting the landscape. There were more friendly monsters to recruit in secret spots and Erdrick's total ticked over 50 collected thus far, which yielded a reward of two seeds of each stat type: two seeds of Strength, Defense, Stamina, Wisdom, and Agility. While this will probably get tedious over time, I was still enjoying this collectathon for the moment, plus I would need those critters for future arena combat and arena rewards.
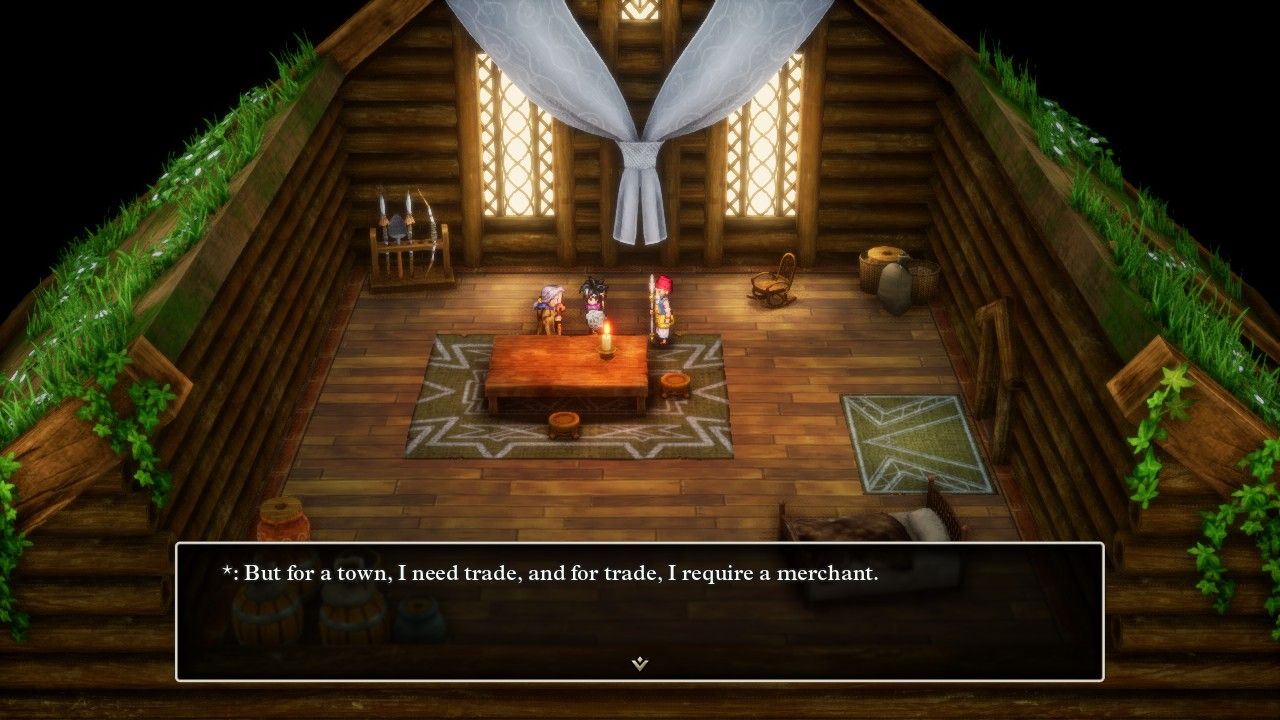
On the eastern coast of North America, roughly where New England would be located in the real world, there's an unusual event that takes place in DQ3. On a small patch of cleared ground, the player finds an old man who's starting up a new town and wants the party to bring a Merchant character to help him out. You have to create a new Merchant character, bring him or her to this spot, and then permanently leave them behind where a new town will develop over time. This was a harder process in the NES game where the Return spell didn't work here and this low-level Merchant would have to be brought over from Persistence, though it's trivial now with the Zoom spell. I named my Merchant "Shanty" and was amused when he said he'd never forget the time spent with Erdrick, yes, all 30 seconds they spent together, heh. The new town (which would now be named "Shantyburg" after my Merchant) grows over time at preset intervals, usually every time the player collects another orb. This entire side quest did exist back in the NES game which was stunning to my Livestream chat, since it really feels like a mechanic that would be added in one of the remakes. There was a lot of genuinely groundbreaking stuff in Dragon Warrior 3 which is why it's remember so fondly (and been remade FOUR different times!)
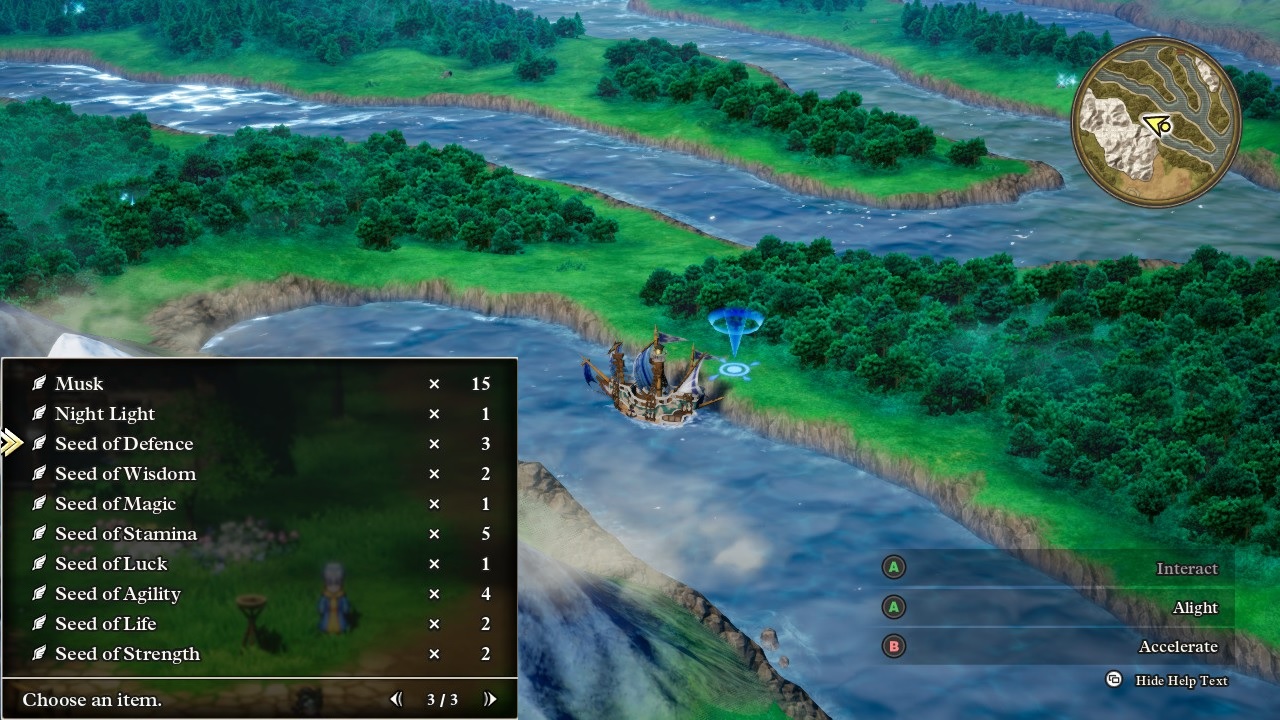
Aside from that diversion though, Erdrick spent a lot of time sailing around the map and uncovering sparkling and secret spots. Like, a loooooot of time doing this. There were three different sparkly locations visible in the screenshot that I took above in the middle of North America's river system, and then two more of them just off screen that I couldn't get into the same picture. In fact, the Persistence region alone has nearly 20 sparkly spots (!) in this otherwise deserted portion of map. There were many, many more of them to be found further north in "Grimland" and the Canadian archipelago, then a bunch more running along both the eastern and western coasts of South America. There's also a Pirate Den down near real world Tierra del Fuego where the Red Orb is just sitting unguarded in a basement. I would have thought that the HD-2D remake would add some kind of boss fight, or something of any kind, but nope, it's literally just there to be picked up for free, same as in the NES game. Well OK then, I guess some parts of this world-saving quest were going to be easier than expected.
As Erdrick thoroughly explored the map, she found more seeds. Lots and lots of the stat-boosting seeds to pump up her numbers. I hope you don't think the 19 seeds in that screenshot were the sum total of what she found since that was the byproduct of only a single gaming session. All told she ended up with somewhere in the range of 50-60 of those things, each of which then required the same RNG save-scumming to get the max value roll. I had gotten much better at rerolling these seeds over time, running the gameplay at triple speed and memorizing the controller inputs to select them as fast as possible, followed by reloading the game on a non-perfect result. I was able to reduce the time down to about 15 seconds per roll before reloading and trying again. While this certainly helped a lot, it could still be a tedious process at times. I had one Seed of Magic fail the 50/50 dice roll (getting a value of 2 MP on a roll of 2-3 max MP added) *NINE* times in a row which is 1 in 512 odds before hitting on the tenth try. With so many seeds rerolling I was guaranteed to get some bad RNG streaks at times, but still, come on!
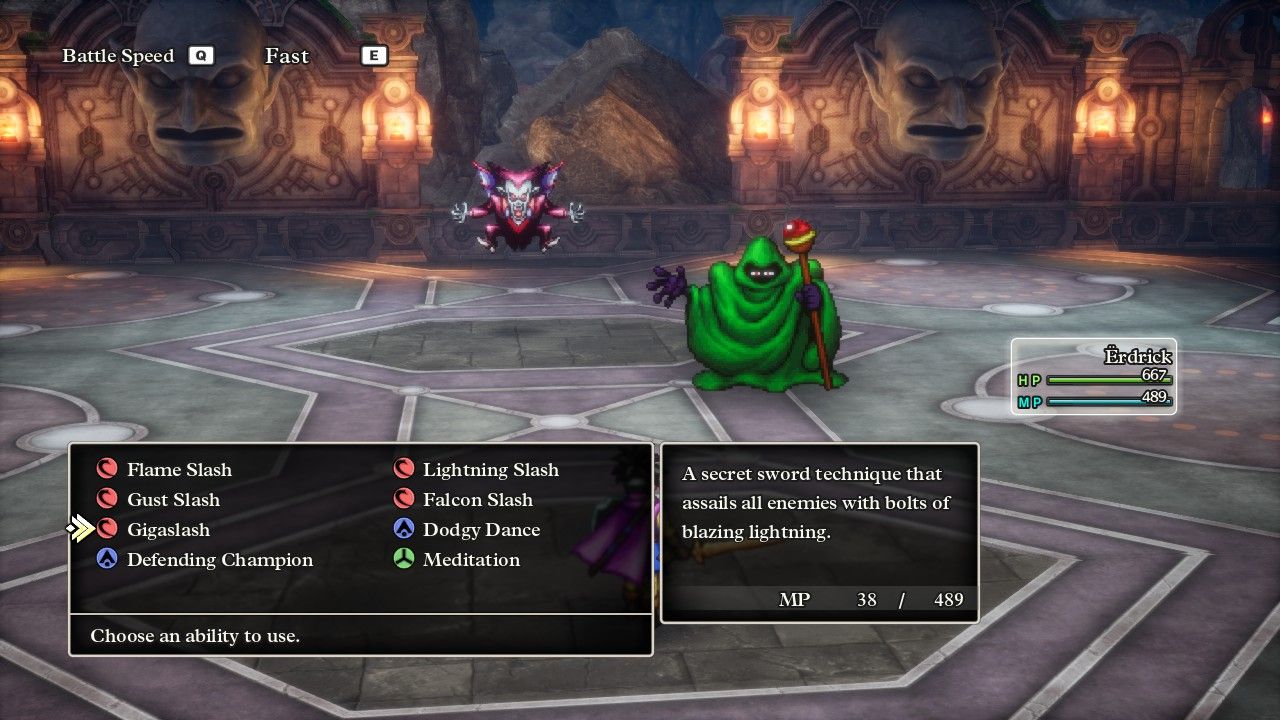
Eventually it was all done: the whole New World cleaned out of sparkly and secret locations. This was the point where I sent Erdrick into the dungeon with the coolest name in DQ3: Gaia's Navel. This gimmick here is that only one character can enter the dungeon instead of the whole party, with the guard at the entrance asking Erdrick if she was brave enough to attempt the challenge alone. Ummm... yeah, I think that she'll be OK going in solo.  Since the gameplay assumes that only one character will be present, the monsters inside Gaia's Navel were noticeably easier than the ones she had been fighting for some time now. I belatedly realized that I probably could have come here earlier with Erdrick, something that I'll remember if I do more of these solo challenges. She breezed through the several floors of the dungeon and, instead of claiming the Blue Orb unopposed as in the NES version, had to face this pictured boss fight. It was time to try out the final Hero ability named Gigaslash which Erdrick had recently learned at Level 45. I had to use two screenshots here for the report, one to show the two bosses...
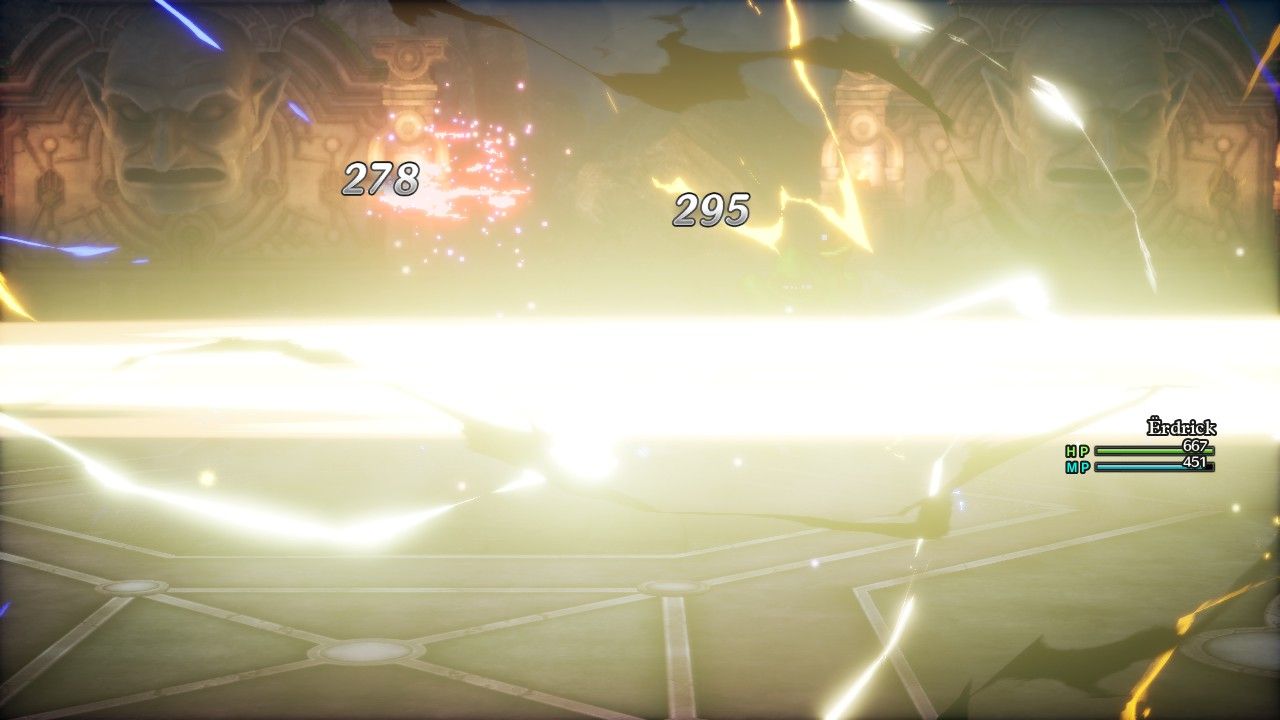
And another screenshot to show the Gigaslash itself. This is a weird ability, with its in-game description stating that it "rains lightning down" on foes but which actually deals physical damage instead. Gigaslash also does not deal damage based on the Attack value of the Hero (such as the elemental slashes that inflict 130% of current Attack value), instead dealing a fixed 300-400 damage to all targets. That's a massive amount of damage under normal conditions, however because it doesn't appear to scale with the Attack value of the Hero, it can be outperformed in the lategame by other options. Erdrick had so much Strength that Falcon Slash was already a clear competitor against single targets, though Gigaslash was better here since it removed the Madvlad minion instantly. It's also a very big deal that Gigaslash does *NOT* double its damage with Oomph Powder (since it doesn't use the Attack stat) which further limits its usefulness. Anyway, despite those limitations the Hero isn't supposed to have this ability until much, much later in the gameplay and these poor enemies didn't really know what hit them.
The boss in the green cloak here was named the Chiromancer and he can be a bit of a tough customer in a non-variant game. As his appearance suggests, he's a spellcaster that will fling the Swoosh and Zing and Frizzle spells around, plus can cast Oomph on himself and then melee with doubled attack strength. Erdrick wasn't your normal character taking on this dungeon, however, and she absolutely mopped the floor with the Chiromancer. Her defensive itemization nullified all of the spells that the evil mage wanted to cast and his attacks were pinpricking Erdrick's 600-something health total for barely 10 damage at a time. She didn't even need to use Oomph Powder here, instead simplying Gigaslashing into two Falcon Slashes to secure the kill. Yeah, I'll have to route here earlier for other solo characters as this wasn't even an interesting fight for Erdrick.
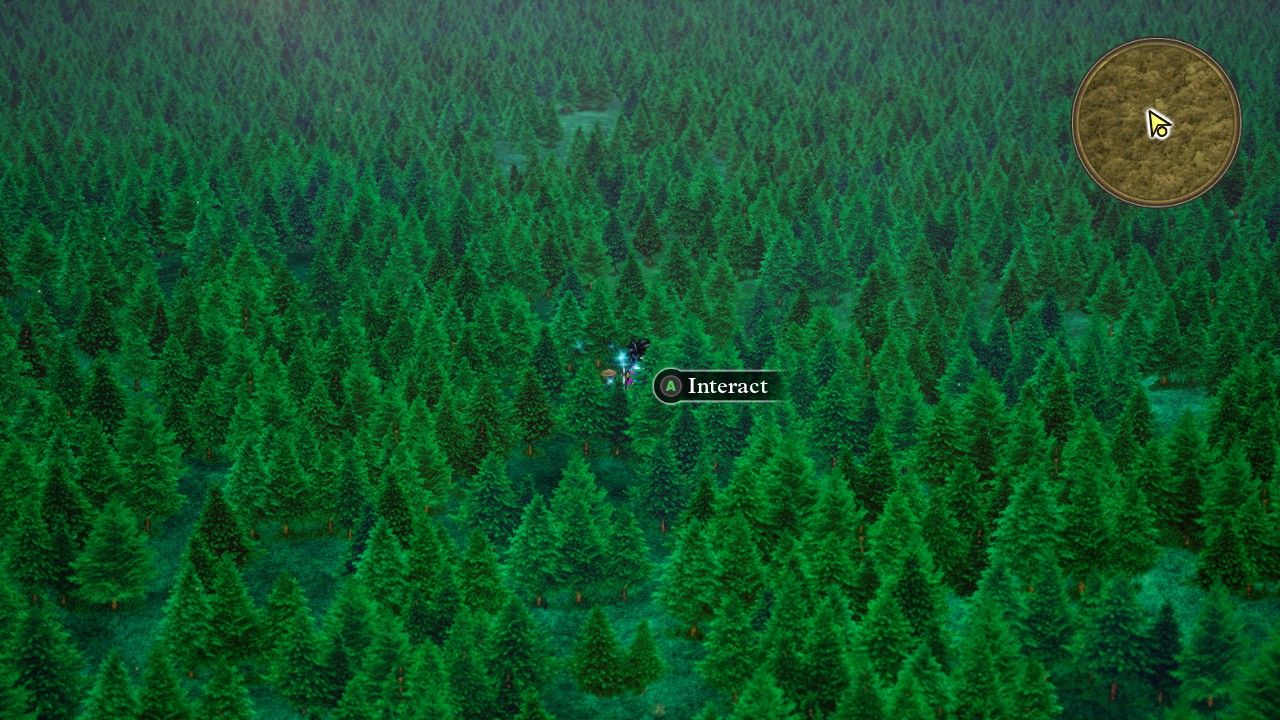
I used my next DQ3 gaming session to wrap up a few loose ends. The last remaining part of the overworld map that I hadn't explored was this area, a gigantic forested region that corresponds to Siberia in the real world. I'm unaware of whether this place has an official name (I'd been thinking of it as the Great Forest) as it comprises a truly enormous wilderness area with no towns to visit and only a single shrine at its northern tip. This is one of the most remote parts of the game even with the Zoom spell's fast traveling properties and it contains some of the most difficult enemies outside of dungeons. In particular there's a monster lurking here named the Rockbomb which will literally blow itself up with the Kamikazee spell after a few rounds of combat, instantly wiping out the party if it lands successfully (fortunately it can miss). I had saved this area until the end due to its challenging nature, but now Erdrick explored her way through the forest as well to claim the final remaining seeds that were available. She had leveled to the point where this wasn't too dangerous, only getting wiped out once by a Rockbomb and then instantly reloading from the previous battle's autosave to lose no progress, whew.
There was another optional dungeon that I had essentially forgotten about earlier and belatedly cleared out now. This was Fifer's Spire which has as its unique prize something named the Echo Flute: playing it will "echo" if there's an orb nearby. This is another artifact of DQ3's NES origin, back when players would often have no idea where to go or what to do, and the flute no longer serves any real purpose since there's a constant set of objectives leading the party directly to all six orbs. The tower itself was a visual treat though, winding upwards across multiple floors and then across tightropes up on the top level, where Erdrick could see down to the floors that she had just ascended in the background. There was a mini medal and a couple of seeds to claim here, otherwise the place was uneventful.
Erdrick had now visited everywhere that was reachable with the ship and therefore initiated the lengthy fetch quest sequence which would lead her to the final Silver Orb. This begins by taking a teleportal to a shrine near Manoza, the only city to be found in this world's equivalence of South America. The theming in this town is based on Brazil, albeit a very somber Brazil as the graveyard is overflowing with people who have been killed and the local king is acting in strangely tyranical fashion. Talking to the townspeople will reveal that the king is an imposter who can be demasked using the Mirror of Ra, which always reveals an individual's true nature, and which can conveniently be found in a nearby cave. So if you're wondering, "Isn't this exactly the same plot that the developers used in Jipang?" the answer is yes, yes it is. Manoza also contains a monster arena with the next three tiers of competition and since Erdrick had been collecting all of the recruitable monsters along the way, it wasn't hard to complete them all. While the tier 5 and tier 7 rewards weren't that interesting for Erdrick (since unfortunately the Hero class can't equip the Flowing Dress), the tier 6 reward yielded a prize with three Seeds of Agility, three Seeds of Wisdom, three Seeds of Luck, and the Dragonsbane Claws which had a higher Attack value than anything that Erdrick possessed. All of that stuff was highly useful and made the monster grinding worthwhile.
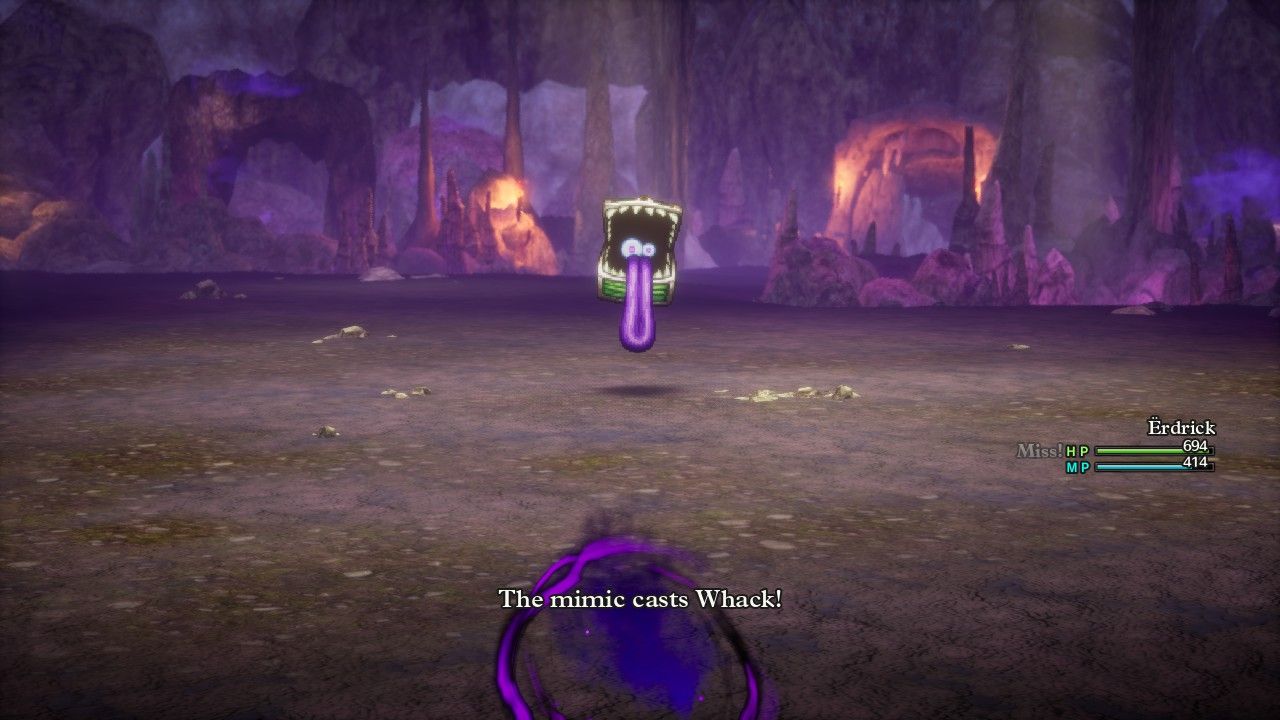
The uncreatively named Manoza Cave dungeon had some impressive XP payouts for winning battles, with Erdrick routinely claiming 3000 and even sometimes 4000 experience per victory. At least these solo characters level really fast in DQ3. This dungeon had lots and lots of treasure chests scattered on the second basement floor, about half of which turned out to be Mimic chests. There's a Mage spell that can reveal whether or not a chest is a Mimic, however Erdrick didn't have access to that knowledge and instead opted to kill everything. The Mimics will spam the instant death spells Whack and Thwack, which Erdrick protected against by having an item called a Diamend in her inventory; the item will shatter and prevent the death effect from taking place. None of these spells ever successfully landed though so either Erdrick was really lucky or there was some kind of hidden protection taking place under the hood.
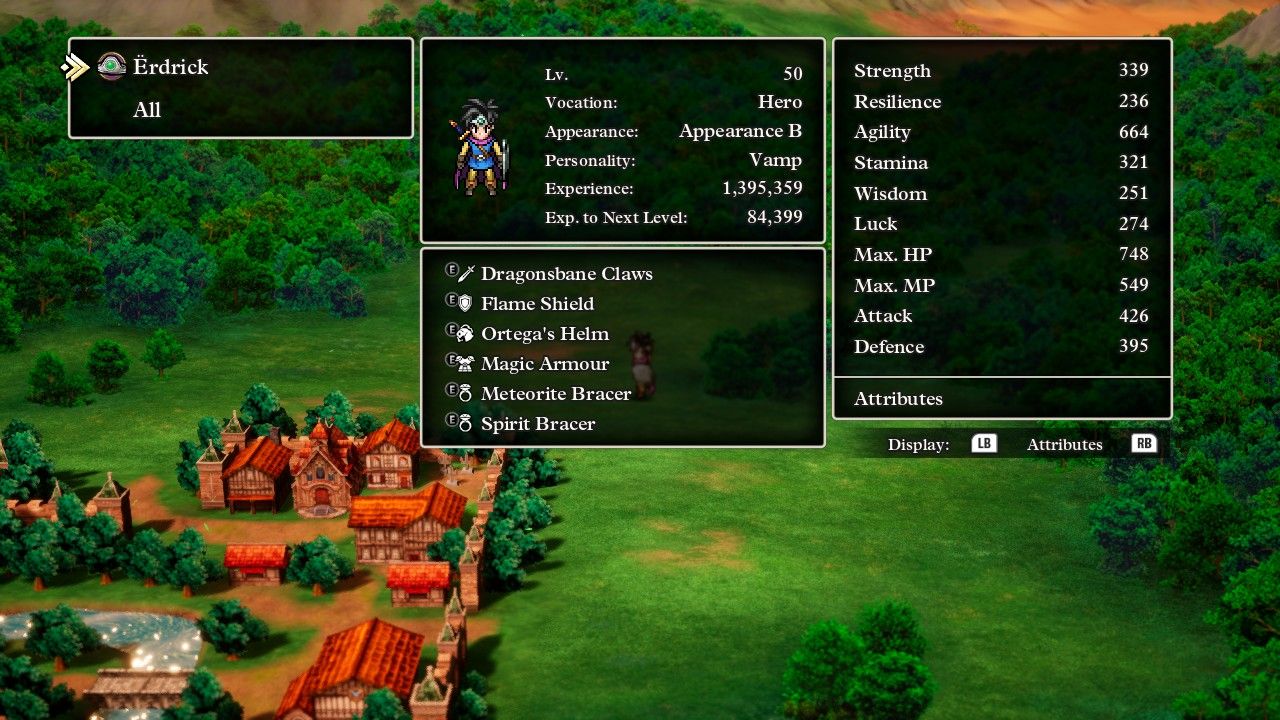
Erdrick leveled to the nice round number of 50 while finishing up that dungeon so I thought I'd show a picture of her stats. To get a sense of the impact from personality bonuses and all those seeds, the Hero's Strength score is supposed to be around 250 at this level while Erdrick was nearly a hundred points higher than that. She was also on pace to max out the HP gauge at 999 before the game was over, suggesting to me that the Stamina stat might not be as important as I had first thought given that solo characters will likely hit the maximum cap via seeds regardless. The good news was that there was a lot of room to push these numbers higher if necessary, Erdrick could theoretically grind for another 40+ levels and gain hundreds of more points in the stats of her choice via farming seeds off random monster drops. They aren't common with 1 in 64 odds to drop following a battle but if absolutely needed she could fight, say, Ursa Majors for their Seed of Strength drops and gain hundreds of more points in the stat.
All of this stuff was weighing on my mind because the next boss looked to be the single biggest roadblock opponent in Dragon Quest 3:
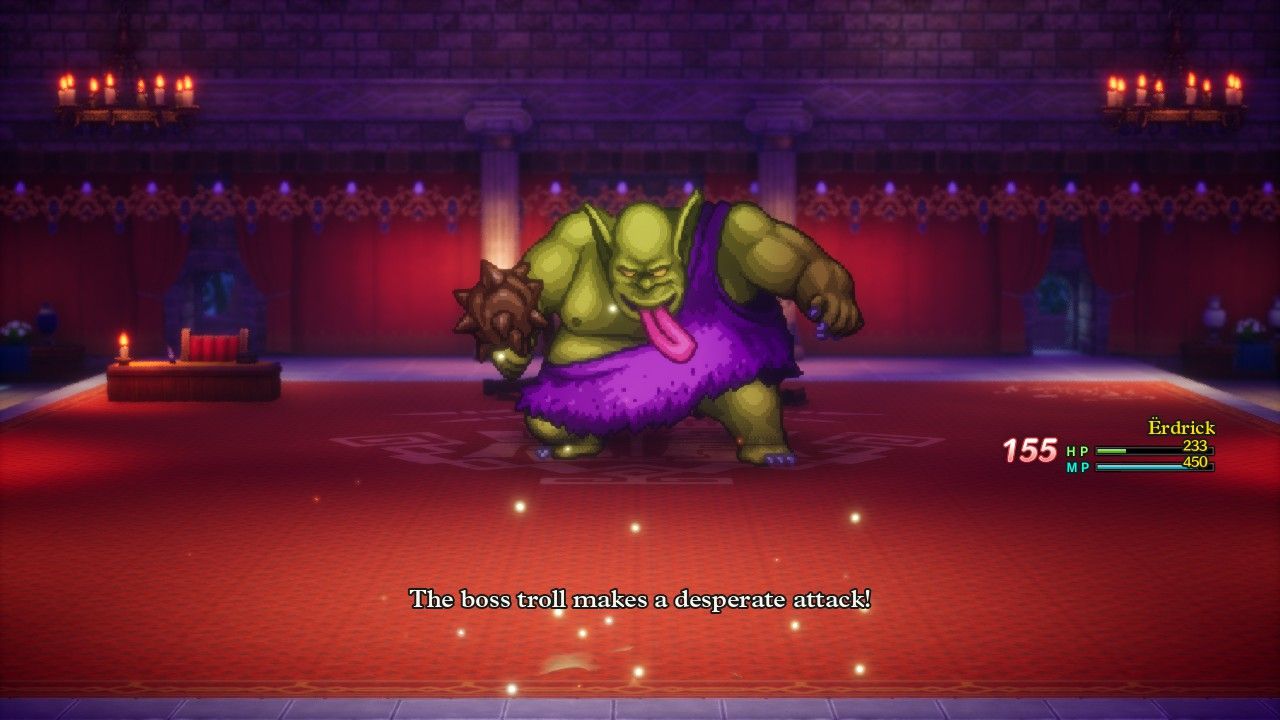
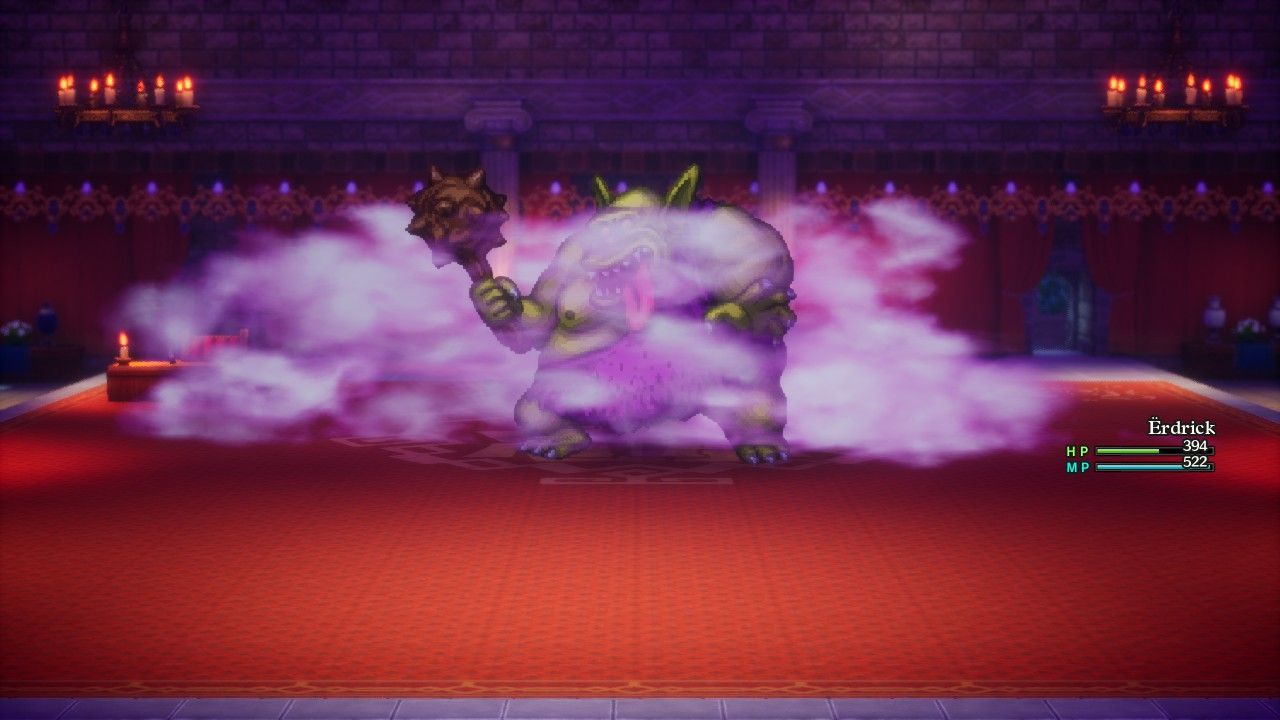
The king of Manoza was actually a disguised Boss Troll, revealed by Erdrick's Mirror of Ra and then immediately plunged into a boss fight. The Boss Troll is a simple opponent: he gets two actions each round and mostly uses them to attack the player, over and over again. This is a bad thing becase physical damage can't be mitigated in DQ3 (unlike all those fire and wind element abilities that Erdrick had been blocking against earlier bosses) and the Boss Troll hits quite hard. His normal physical attacks were hitting for about 40-50 damage at a time and he could amplify their damage by casting Kasap which debuffs the Defense of its target by 25%. The Boss Troll could also cast the Fuddle spell which tries to confuse the player, and I generally preferred when he would use either of those spells since they could both miss and they constituted a round where the Boss Troll was not attacking. Worst of all, this enemy will start using his Desperation Attack when he falls under half health remaining; this is the monster version of a critical strike and Erdrick would get pounded for 150-200 damage at a time whenever it appeared since (remember) crits ignore the target's defensive rating. Even with some 750 max HP to work with, Erdrick couldn't take many of those hits before succumbing.
Now this ultimately wasn't that big of a deal because Erdrick had the Fullheal spell and could jump back up to max health whenever she needed. However, there are only three classes in the game that have access to this spell and other non-Heroes might not be so lucky. I wanted to use this opportunity to experiment a bit with the boss for future strategizing because there's a gigantic problem lurking in the gameplay for solo class challenges: THERE IS NO ITEM THAT FULLY RESTORES HEALTH IN DRAGON QUEST 3!!!  That's right, there are no Elixirs from Final Fantasy, no Refreshing Jams from Octopath Traveler, nothing better than the Special Medicine that heals 80-90 HP when consumed. Obviously that was nowhere near sufficient to tackle a boss like this, though I suppose it could potentially handle the first half of the battle before the Desperation Attacks started showing up. This is a big, big, big problem that will likely make some of these classes impossible to complete with a solo character.
What exactly can the player do to get past this situation? For starters, solo characters could grind for higher levels and additional seeds which would definitely help against the non-Desperation Attack portion of this battle. Erdrick had about 400 total Defense and I estimated that she could have mostly nullified the normal attacks from the Boss Troll if she'd been able to reach about the 500 mark in that category. It wouldn't help against the Desperation Attacks since they ignore Defense though, which would require other solutions. Characters could try equipping the Cloak of Evasion for 12.5% evasion and then the Phantom Mask for another 12.5%, though the Hero class unfortunately couldn't equip that second item. Together they would provide 25% odds of dodging the Boss Troll's attacks, and then the Dazzle spell can be cast out of the Sandstorm Spear to put the boss into Dazzle status where it has a further 50% odds to miss its attacks. I tested this with Erdrick and found it to be unreliable, with Dazzle landing a little better than half the time but then unfortunately only lasting for a round or two before expiring. Still, with some repetition of the battle and some RNG luck, it should be possible to dodge a good portion of those Desperation Attacks which are the whole danger in this fight.
The other potential solution is simply killing the Boss Troll as fast as possible before the party's health runs out. Unfortunately the Boss Troll has a massive healthbar of 5500 HP, which is almost double that of the Orochi - the final boss of the whole game only has 8300 HP! This makes an offensive route significantly harder to pull off, though there are other classes that can deal more damage than the Hero and will likely need to take that path. As far as Erdrick was concerned, she used her Oomph Powder and was hitting with Falcon Slash for roughly 750 damage per strike. Even though this felt like good damage, it still required EIGHT rounds at that pace to take down the boss, not counting the rounds needed to use Oomph Powder and then reapply it after the first usage ran out - sheesh! All told, Erdrick easily won the battle by restoring her health twice with Fullheal and I did get some ideas about how to itemize and strategize for this opponent with future characters. That said, this is going to be a massive challenge and I do not look forward to seeing that grinning green face when playing characters that lack healing options.
The reward for defeating the Boss Troll was the Mod Rod (named the Staff of Change in the NES version) which temporarily changes the appearance of the party when used. There are about a dozen different sprites that your characters can turn into, everything from town merchants to dancing girls to dwarves and even slimes. As amusing as this may be, it doesn't really serve a gameplay purpose aside from the shop in the Faerie Village finally being willing to sell items to the party when shifted into the form of elves or dwarves. That's the only place in the game to purchase the Elfin Elixir that fully restores all magic points, at a whopping 40,000 gold cost, and why isn't there a similar item that restores all HP?!? Anyway, the player can also use the Mirror of Ra to reveal that there are other monsters in disguise hidden all over the world, who then become recruitable monsters for the arena after exposure. I ran around doing this for a little bit, which technically could have been done before fighting the Boss Troll.
Then it was time for a fetch quest sequence in classic Zelda fashion. First the Mod Rod was traded to the old man in Grimland in exchange for the Boatman's Bone item (sadly losing the wacky nature of the Mod Rod almost immediately after getting it). The Boatman's Bone spawns a Ghost Ship somewhere in this world's version of the Mediterranean, a small dungeon full of undead and water-based enemies containing the Lover's Locket. This locket is then used to get past the narrow waterway at Olivia's Promontory which otherwise blows your ship backwards with a magical wind. Once the locket has reunited two sad ghosts, Erdrick could sail onwards to the Shrine of Shackles which contains the Mountaincleaver sword formerly held by one of Ortega's companions. Then the Mountaincleaver must be hurled into the volcano of the Necrogond which will cause it to erupt and open a path forwards to the final dungeons of the overworld. Got all of that?
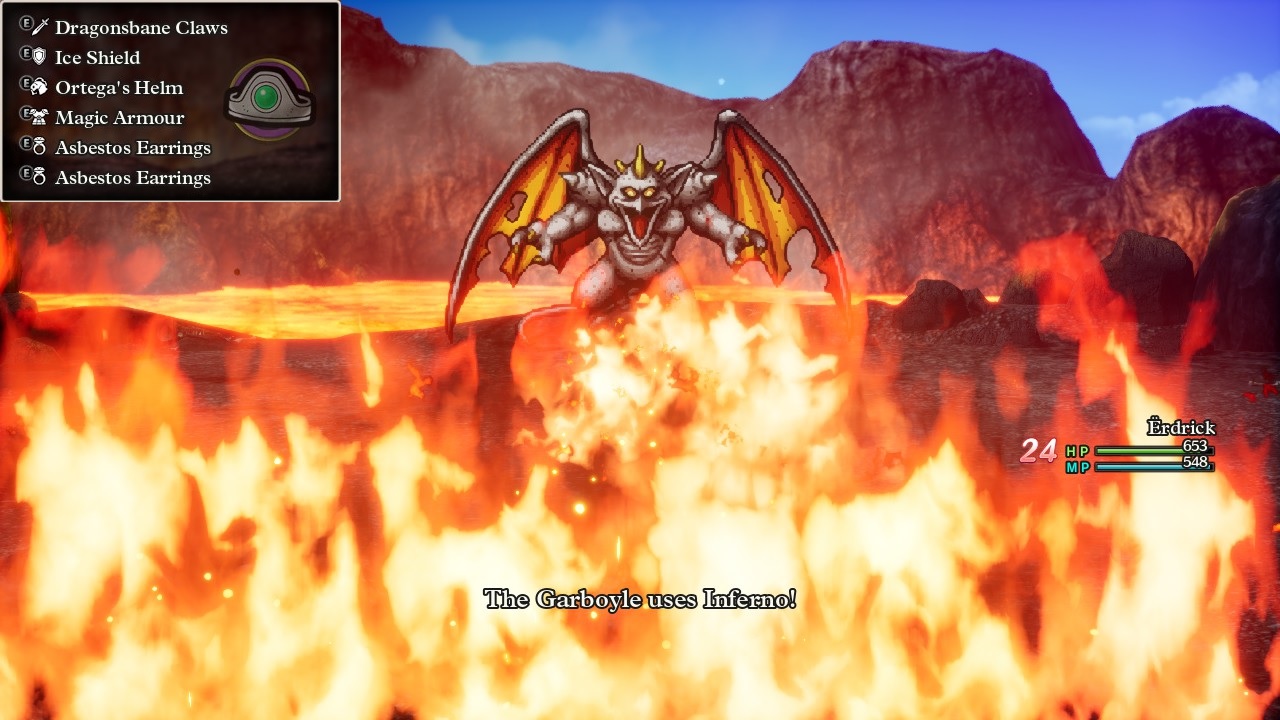
This is the same volcano that Ortega plunged into earlier, by the way, and the HD-2D remake of Dragon Quest 3 has added a boss fight here against the creature that faced the Hero's father. That opponent was the pictured Garboyle who predictably uses lots and lots of fire element damage. In fact, nearly all of the Garboyle's damage is fire-based between the spells Frizzle and Kasizz along with the breath attacks Wildfire and Inferno. The only non-fire spell that this thing uses is Boom which wasn't too scary as the tier 2 explosion magic spell. Erdrick brought a reprise of her Orochi gear for this battle: the Ice Shield, Magic Armor, and double Asbestos Earrings. Together they provided 75% protection against fire-based breath attacks and complete immunity against fire-based spells, which was good because this boss absolutely spammed the ever-loving daylights out of the Frizzle spell which would have done roughly 50-60 damage per casting if unprotected. Inferno's damage was similarly cut from 80-100 down to the pictured 24 damage. The boss fight wasn't a total cakewalk because the Garboyle could sometimes take as many as three actions per round, plus it broke out a buff at the tail end of the battle that doubled all of its magic damage. Erdrick still won on the first attempt and didn't need to use any healing spells, making this boss infinitely easier than that stupid Boss Troll.
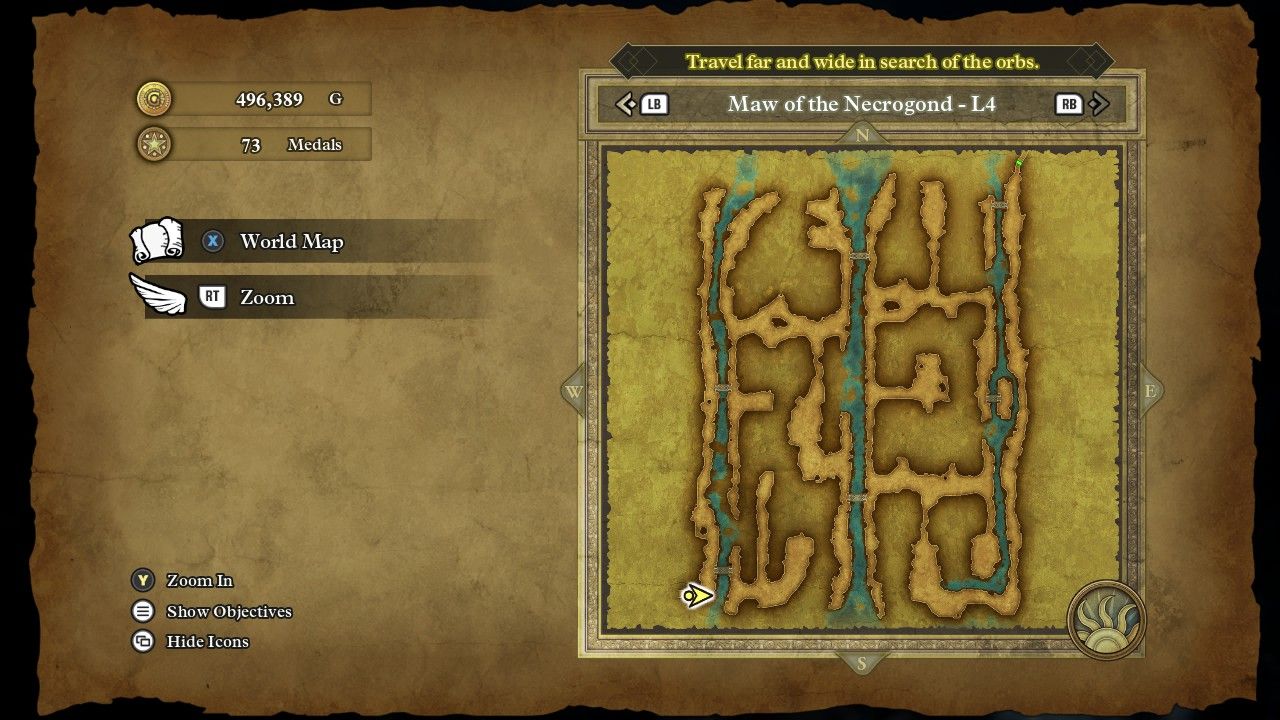
There's a lengthy walk from the volcano to the entrance to the penultimate dungeon of the overworld, another place with an awesome name called the Maw of the Necrogond. This is one place where the fast travel mechanic via the Zoom spell trivializes some of the challenge from the NES version of the game, as Erdrick could walk into the dungeon and the teleport back to a town for healing and immediately teleport back again at no cost. The Maw of the Necrogond was a very big dungeon in the NES version of the game and it's absolutely GIGANTIC here in the HD-2D remake, with the miniscule size of the arrow on the automap pictured above hinting at just how big a single one of the dungeon's six floors happened to be. Seriously, this place took nearly an hour to complete while running the gameplay on double normal speed the whole time! There are seven or eight different monsters that can appear inside, and although they can rearrange themselves in a bunch of different patterns, I was getting quite tired of seeing the same faces over and over again by the end of this place. On the plus side, the experience gains were excellent and Erdrick gained no less than five levels before she reached the finish.
The Maw of the Necrogond also contained some useful treasures hidden throughout this vast network of caves. There was a Thunderbolt Blade inside, the best weapon in Dragon Quest 2 though severely outclassed by a bunch of stuff in this game, which casts the Boom spell when used in battle. This wasn't so great for Edrick who knew the superior Kazap spell but it might be useful for a different solo character. The Spiked Armor was also potentially interesting, a suit of armor that reflected 50% of physical damage taken back at the attacker. Obviously that was way better in a solo game than in normal gameplay and Erdrick held onto it in her equipment bag for potential bosses later. There was also the Thinking Cap for the helmet slot, which not only had higher Defense rating than anything in Erdrick's possession but also increased her Wisdom stat by an eye-popping 40 points (!) That was enough to ensure the full Wisdom 60% bonus damage on spells if Erdrick wanted to head down that route, though her physical attack continued to be superior in most every situation. Finally, this was not guaranteed but Erdrick also hit this lottery ticket:
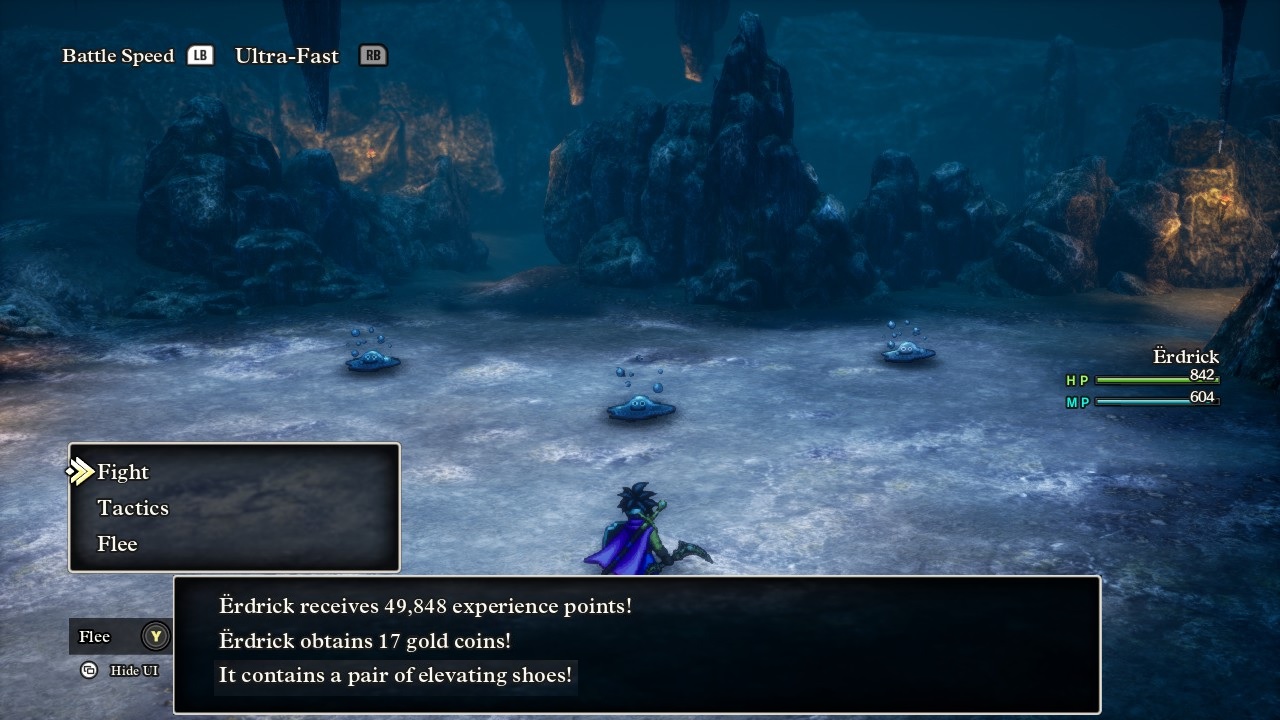
One of the dungeon floors contains Liquid Metal Slimes as an enemy, known as Metal Babbles in the original NES translation. These are the upgraded version of the Metal Slimes from earlier in the game, monsters with a mere 6 HP but an impossibly high Defense rating of 1536 and immunity to all elements. While they typically run away from battle, if the player can manage to land a kill on one of them (usually via a critical hit) then the payout is worth an insane 49,484 experience points. Erdrick saw a number of these things while clearing the dungeon and ended up defeating three of them in three separate battles for the big XP reward. I didn't think much of this until the third battle gave me the message that the Liquid Metal Slime had dropped a treasure chest - what?! That was a 1 in 64 odds result! It produced the Elevating Shoes accessory which is probably the single best accessory in the game. The Elevating Shoes grant 50 Luck (!) along with a passive bonus of 1 experience point per step taken. Even though Erdrick needed about 100,000 XP for each level now, passive experience gain was still passive experience gain and I would have worn the item for the Luck bonus anyway. What an insane reward via pure dumb luck!
At the other end of the dungeon was a tiny shrine that contained the Silver Orb. That brought Erdrick's tally to five of the six needed, with the final orb not requiring any dungeon-grinding or combat at all. Instead, she merely needed to return back to Shantyburg:
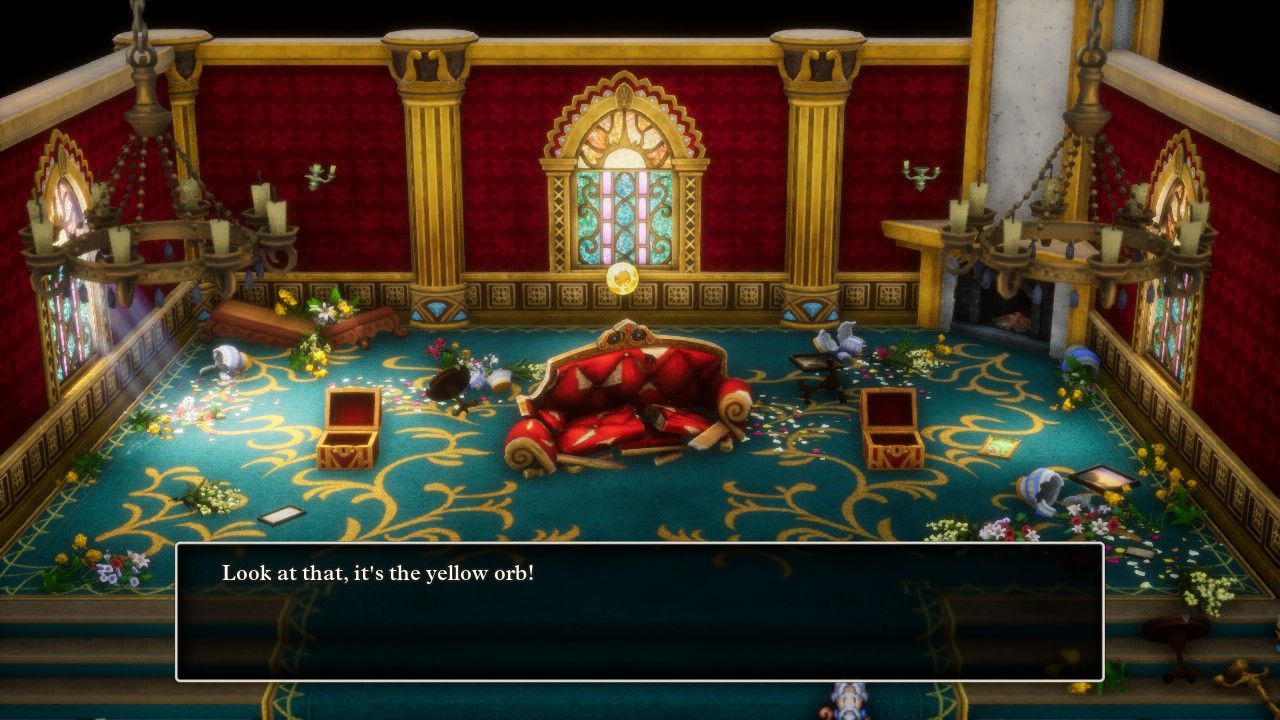
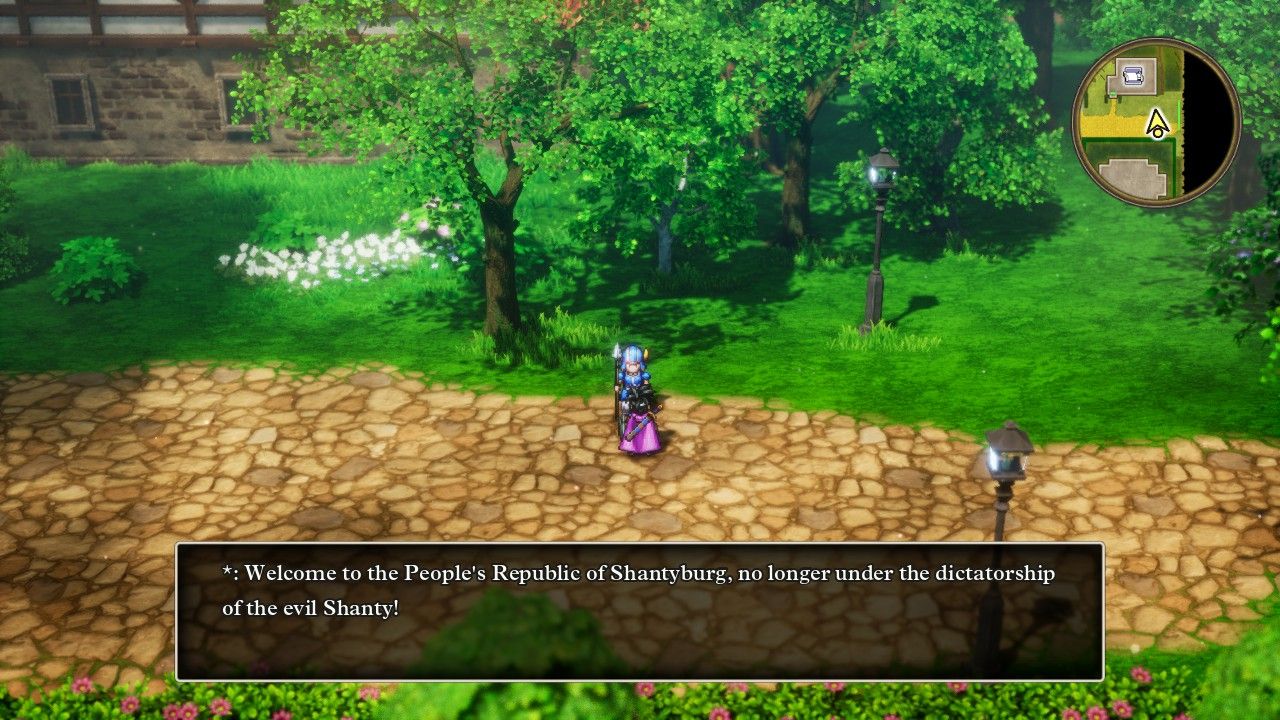
It turned out that Shanty, the Merchant that Edrick had left behind to build the immigrant town, had let power go to his head. Maybe it was the giant cabaret club that Shanty built on the south side of town or maybe it was the ruinous taxes that he imposed. Whatever the case, Erdrick stumbled upon people plotting to overthrow Shanty during her previous visit to the town, followed by returning on this trip to find Shanty's government overthrown by a people's revolution and Shanty locked up in the town jail. I laughed out loud when I read this dialogue from one of the town guards about becoming the People's Republic of Shantyburg - good luck with that, heh. Shanty had the decency to find the Yellow Orb before sparking off a proletariat revolution which was pocketed by Erdrick to complete the set. Now she could return to the frozen South Pole and awaken the magical bird Ramia:
There's a fun cutscene of the crane-like bird awakening and then the party can finally fly for the first time. This was kind of a wasted mechanic in the NES version of the game because the player would get access to Ramia after all this time and effort... only to use it for visiting exactly two places before the overworld was completed. Here in the HD-2D remake, the developers added a whole bunch of mountaintop locations that can only be reached via flight, places that the players has been walking past for the entirety of the game and now finally can access for the first time. There are about 25 sparkle locations and a dozen secret spots tucked away in these places, very much worth the time and effort to track them all down. I pasted in the seed collection that Erdrick amassed purely from these locations, 25 of them in total worth an awful lot of stats after I dedicated about 15 minutes of rerolling them all into max values. One stubborn Seed of Agility failed the 1 in 3 dice roll THIRTEEN times in a row which was a new record for this playthrough, sheesh.
There were useful treasures to be found in these spots as well, starting with another pair of Elevating Shoes. I never expected to have more than this single copy of the accessory but, having been blessed with that extra item from the Maw of the Necrogond, Erdrick simply opted to wear both of them at once. I can only imagine how ridiculous she looked wearing four shoes at once - the legendary Hero, folks! That was worth 100 bonus Luck though, easily enough to make the increased crit rate noticeable, and I confirmed that she was indeed gaining 2 XP with every step taken. I'd use the double Elevating Shoes for random encounters and then swap over to defensive accessories for boss fights. Erdrick also picked up a Blizzard Blade with 101 Attack to become her new weapon for single target damage, and then she also found the best helmet in the game for a spellcaster, the Duplic Hat, which sadly the Hero class cannot equip. The Duplic Hat causes all spells to take effect twice which is exactly as broken as it sounds; sadly it would have to wait for a different playthrough to see use.
Baramos' Lair can only be reached via flight and sits in the middle of a swamp where central Africa is located on the real world map. This dungeon is nowhere near as big as the Maw of the Necrogond though it does share a number of the same monsters inside, with only a handful of new enemies like these pictured Living Statues. Although Baramos' Lair can seem confusing on the first playthrough, it turns out to be a rather linear dungeon that lacks much in the way of interesting treasures to find. The developers also conveniently added a teleportal right before reaching Baramos himself that takes the player back to the entrance. This makes it easy to go back, heal at an inn, and save the game before facing off against Baramos, which is convenient since DQ3 doesn't have in-dungeon save spots or anything like that. The throne room where Baramos hangs out looks really impressive:
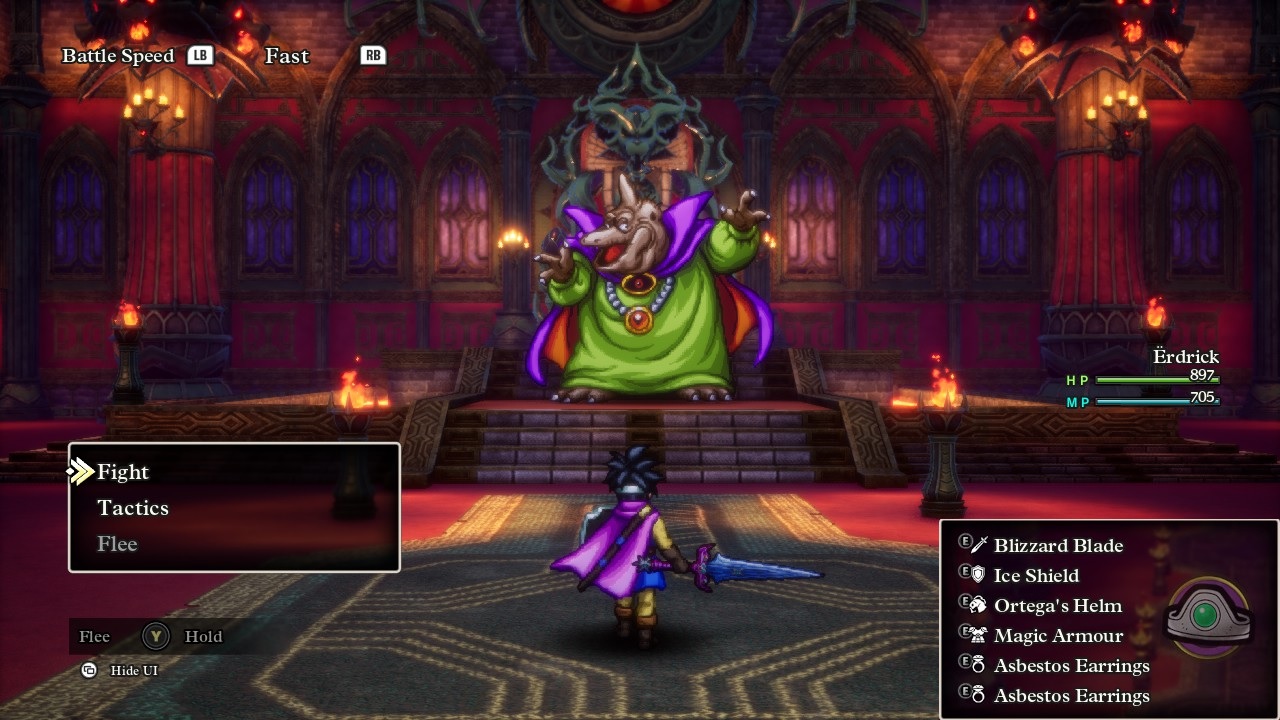
I wasn't planning on taking a screenshot here, but then I saw Erdrick standing there completely alone with the big baddie rising up in front of her, posing and aura farming for all she was worth, and I just had to include this image in the report, heh. Baramos was basically a spellcaster as he didn't attack that often and preferred to toss big area-of-effect spells in Erdrick's direction. He had a couple of status attacks to try with Dazzle and Fuddle, plus an instant death move in Blasto which would end the fight if it landed, then Kaboom (explosion) and Kafrizz (fire) for group damage plus the same Inferno breath attack that I had recently seen from the Garboyle. I thought about equipment options to bring and ended up with something almost identical to what Erdrick used against the Garboyle. She had complete immunity against the fire damage of Kafrizz, 75% damage reduction against the Inferno breath attack, and 33% damage reduction against the explosion spell Kaboom from the Magic Armor. In retrospect, maybe I should have brought the Tempest Shield over the Ice Shield, which would have increased damage from the Baramos' fire attacks but cut the damage from Kaboom accordingly:
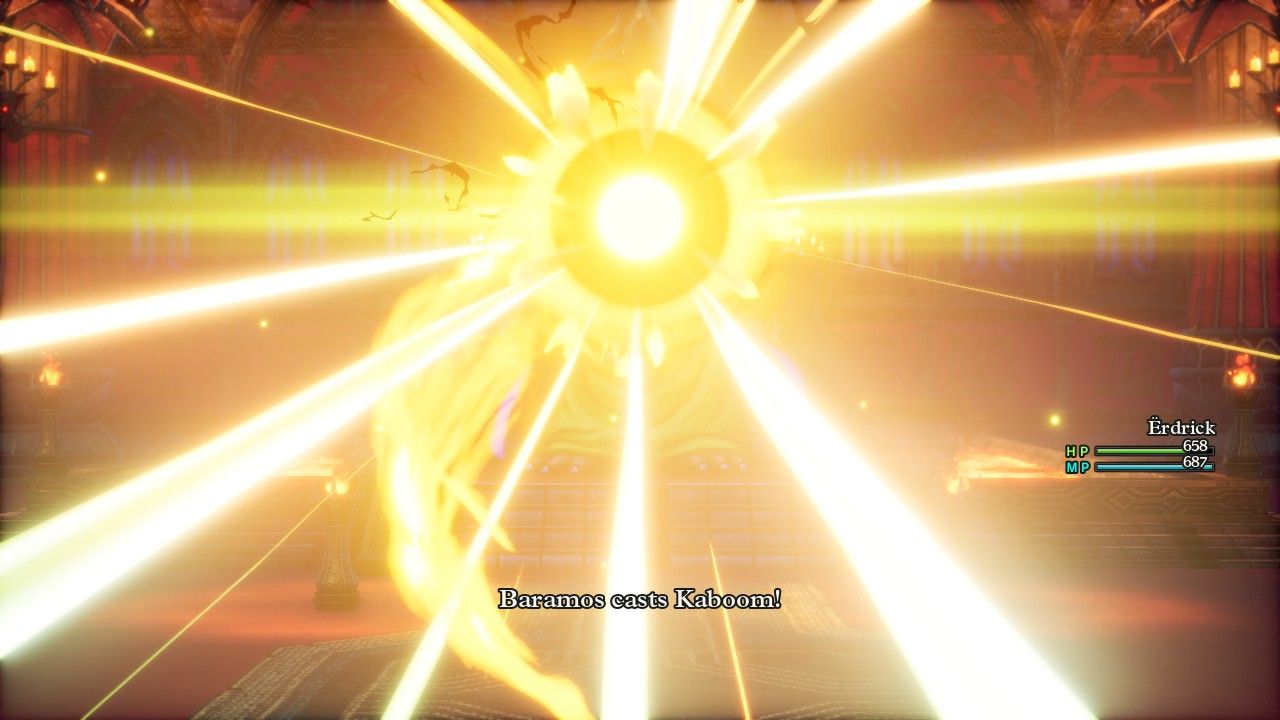
Because Kaboom ended up being the biggest threat in this boss fight, as seen hitting here for 84 damage at a time. Kaboom is the tier 3 explosion element spell, hitting the whole party (irrelevant for a solo game) for 96-140 damage when used by an enemy. Even with the damage cut by 33% from the Magic Armor, I still saw Erdrick take more than 100 damage when Baramos rolled high on his spell damage, ouch! Then again, an unnerfed Kafrizz would have dealt 132-158 damage to Erdrick and by stacking the fire resistance gear she was also blocking the damage from Inferno as well so maybe I did bring the correct equipment after all. What I really wanted was to equip the Flowing Dress armor, which Erdrick had in inventory and reduces fire, ice, and explosion damage by 33%, but which is unfortunately not usable by the Hero class. Ah well, I guess it's not the best class at absolutely everything in this game. To be clear, Baramos was getting two and sometimes three actions per round which made it incredibly important to minimize the damage he was doing via itemization ahead of time. Bringing the wrong items to this fight would leave even Erdrick's overpowered Hero class dead in a hurry.
For her offense, Erdrick brought three instances of Oomph Powder to double her Attack vaue and then relied on hitting with Falcon Slash. This dealt about 850 damage on average and could spike over 900 damage if Erdrick was able to land a crit on one of the two blows. Erdrick was using the Blizzard Blade that she had found earlier, which I thought might deal extra damage because Baramos has a weakness to ice element; unfortunately it wasn't clear if she was getting a damage bonus from this property. If Erdrick was dealing more damage from the ice element on that blade, the effects had to have been pretty minor. Baramos has an additional annoying ability whereby he regenerates 64-84 HP per round (and yes he did this in the NES version of the game as well!) Nevertheless, Baramos was still a lot easier than the Boss Troll once Erdrick had the bulk of his magic damage blocked. I attempted to fight this battle without using healing magic on the first attempt... and succeeded with 258 HP still remaining! That was great news for future variants that might not have the Fullheal spell ready to break out at a moment's notice.
Afterwards, Erdrick returned in triumph back home to Aliahan having completed her epic quest. There's actually an extra gift bestowed upon the Hero by the local king if they manage to defeat Baramos without any companions present, which for some reason is the Bastard Sword weapon. Was the king trolling her about her missing father with that name? Anyway, everyone was getting ready to celebrate the victory when:
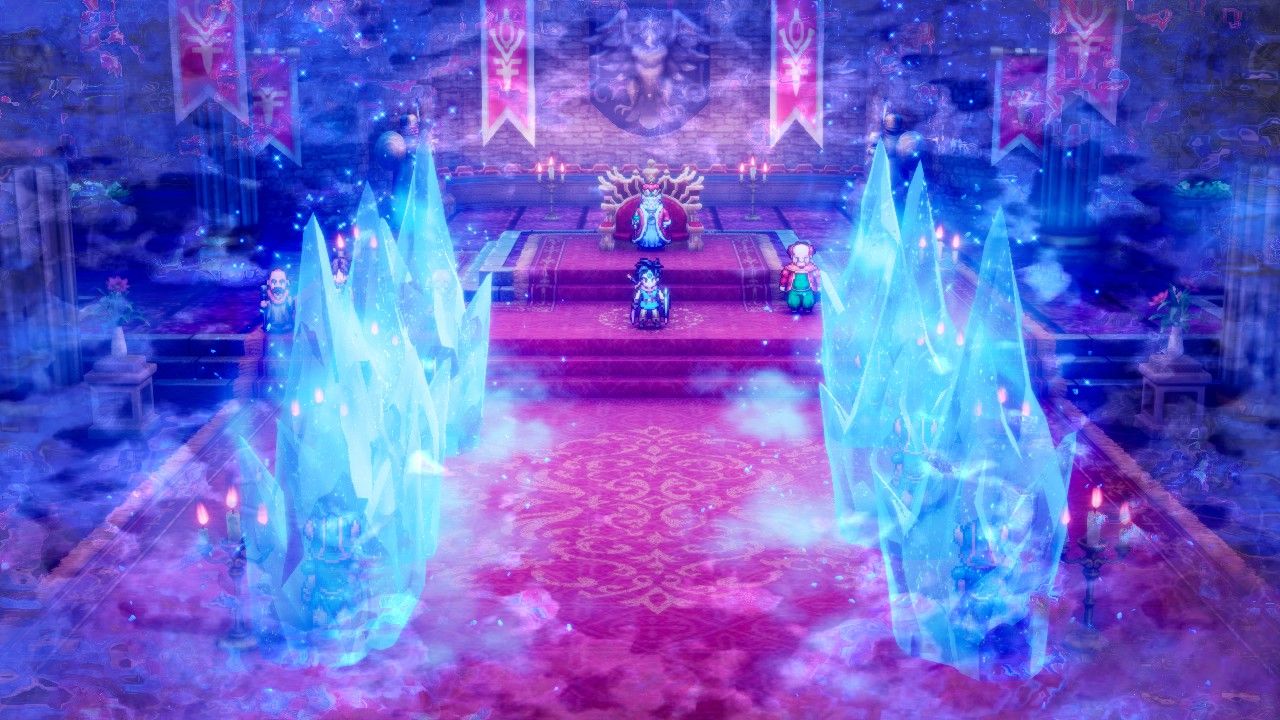
These massive ice crystals appeared out of nowhere and murdered the six trumpet players who were playing the game's epic fanfare theme. No, not the trumpet players - they only had two weeks left until retirement!!!  A shadowy figure appeared and announced themselves as Zoma, ruler of the underworld, who planned to kill everyone on the planet and plunge the world into eternal darkness. Then after giving a proper villain monologue, Zoma provided the sterotypical evil laughter and disappeared from view. Well then. It appeared as though Erdrick's quest wasn't entirely finished after all, which we'll have to wrap up on the next page of this report.


