
It might seem strange that I've written up a short report of a very old game, and not even a PC game at that. But the original Final Fantasy is not only one of the best RPGs of all time, it also lends itself very easily to variant play of all sorts. The game lets you determine your party from among six different classes before starting; unlike most games, the six classes are actually well balanced for the most part. You choose from Fighters (strong physical attack and armor, but expensive to equip and no magic), Black Belts (strong attack but weaker defense, no need for any equipment but no magic), Thieves (high agility, probably the weakest class), Red Mages (good in all areas but not great in any, can use most weapons/armor/white and black magic), White Mages (uses white healing magic, horrible attack and defense), and Black Mages (uses black attack magic, horrible attack and defense). Each of these classes can be upgraded later in the game to a stronger version of the same one - for instance a Fighter becomes a Knight and a Red Mage becomes a Red Wizard - but they keep the same general strengths and weaknesses.
I know that's a lot of information to throw out there, but you can see that the basic classes present in all medieval RPGs are there. As I said before, the classes are balanced pretty well between different strengths and balanced groups are clearly the way that the game designers want you to go. But you can choose ANY group you want to start the game, which allows for an enormous amount of replay value. Want a group of muscular lugs who can barely tell one end of a sword from another? You can set up such a group and play a no-magic game with ease. Or how about a group that will never use any weapons, ever? That's possible too. The beauty of this game is that it is still possible to beat it even with very strange party designs.
But don't let that fool you into thinking this is an easy game. It's not. This game was made in 1987, back when games were supposed to be challenging instead of showcases for fancy CGI sequences. This game is HARD. If you don't know what you're doing, you WILL get punished and you WILL lose in short order. Even after you've played the game many times, there are still things like cheap one-hit kills, bosses with ridiculously strong abilities, enemies that can paralyze/stun/stone/whatever your characters, and so on. Don't expect to find an elaborate story in this game either - Final Fantasy provides a basic background framework but leaves most of the story up to you, the player. I honestly feel that one of the biggest problems with modern games is that they create overly elaborate "stories" which leave no room for the player to determine things on their own (Moo3 suffers greatly from this problem, for example). But I'm getting too far afield here...
One of the oldest challenges to this game is to complete it with a party of four white mages. This is very difficult, since white mages have no strong physical attacks, no offensive magic, and can equip no armor. They cannot deal damage to anything except undead and they will take high damage back in return from just about anything. Completing the game at all with a party of white mages is a great challenge, but it's been done many times before. I did it myself about 7 or 8 years ago, when I heard about it for the first time. So I thought, why limit it to just using white mages? Why not "go beyond" and make it even harder by imposing additional restrictions on such a party? :)
I decided I would keep it pretty simple - after all, this is already a difficult variant to start with. When looking at the various guides online, they all seemed to concur that certainly spells were necessary to win. In particular, it was mentioned often that the spell RUSE was needed to complete the early parts of the game. (RUSE is an early spell which increases the evade of the caster. Use it multiple times on the same character and they cannot be hit.) I decided first I wouldn't use the spell RUSE at all and see how things went. Then I thought, why not broaden that to all the other spells that are considered "necessary" to win? Here's a typical example of what someone else says are needed to win with four white mages: "Be absolutely sure to get FADE with all four characters. WALL and LIF2 are also excellent spells. HEL3, CUR4 and HRM4 are necessary, and HEL2 helps if you can fit it." Almost everything mentioned in the above quote are high-level attack and healing spells. Why not restrain from ALL of them and see what happens? I decided that I would never class change to white wizards and would complete the game with four white MAGES (considerably more difficult). And finally, I would restrict myself only to the CURE and HARM spells, nothing else. That would give me the use of only six spells the entire game: CURE/CUR2/CUR3 and HARM/HRM2/HRM3. All items with spell effects would remain in play of course (or else the game would be impossible), but for the early stages of the game I'd be playing practically a no-magic variant - with white mages! This was the kind of challenge I was looking for. Now take a look at the happy little people that made up my party (at the end of the game):
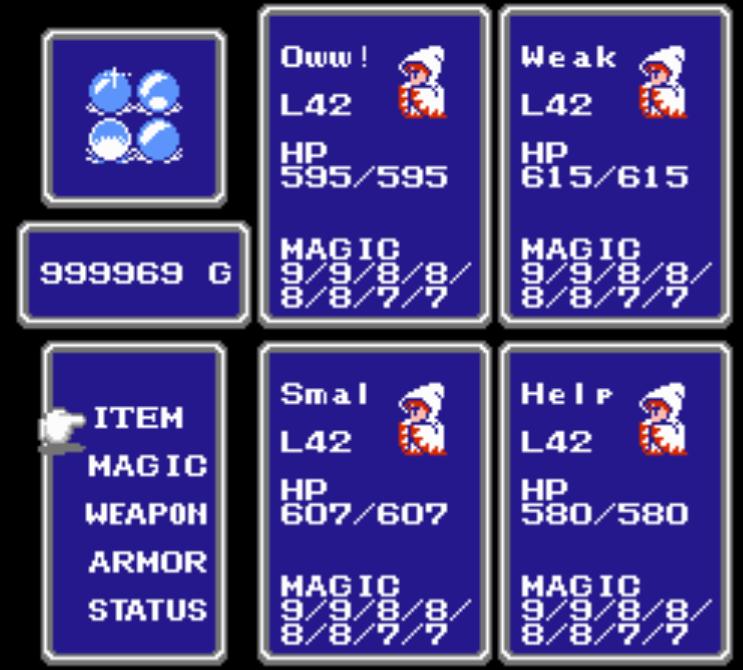
I hope you like the names; with only 4 characters allowed per name you can't do too much, but I thought they were appropriate for a group which was routinely carved to pieces by enemies. I also apologize for the overly large images, but there isn't anything I could really do to shrink them down. I should also explain what the CURE and HARM spells do here. CURE restores about 30hp to one of your characters, CUR2 anywhere from 30-90hp, and CUR3 anywhere from 50-200hp. HARM damages all undead for 20-80hp, HRM2 hits undead for 40-150hp, and HRM3 60-250hp. All those figures are rough ones from my memory, not the actual encoded values. Essentially, I could heal myself and attack undead with magic - and that was it.
I'll go through the game briefly, since most readers will be unfamiliar with the game, and elaborate a bit more about the ending (where all my pictures are from). The early stages of the game aren't too tough, since white mages can use iron hammers which do as much damage as a Fighter's rapier. I killed a bunch of imps and then Garlard without too much trouble. Getting to Pravoka and getting the ship was similarly easy; I had my pirate ship by level 4. Of course at this time my weak characters started to show and I was routinely carved to pieces by the enemies around Elfland, so a long process of building up to level 10 followed. At that time I was strong enough to enter the Marsh Cave, where I reached the first of the Three Great Challenges in my quest (yes, I reserve the right to capitalize that).
My mages were strong enough to deal with the enemies in the Marsh Cave without issue (and when the occasional undead popped up... mmm, that was easy). The problem was the boss guarding the Crown (the item you are supposed to get there), which consists of 2-4 wizards. Each wizard has 80hp, and my attacks against them always did 1hp of damage. Their attacks against me typically did 25-50hp, and my characters only had about 100hp at this time. I hope you can see the problem. Any draw other than 2 wizards was cause for an instant reset, with no chance of winning. Against two wizards, I had to hope for a series of critical hits (the only way to do more than 1hp of damage at a time) and lots of misses on their part. On about the 15th try, I got lucky and managed to win. I'd like to say it was skill, but it was mostly pure luck in getting a lot of critical hits to take out the first wizard and then slowly wearing down the other one.
Now I could challenge the next boss, the "Dark Elf" called Astos. Astos has a number of lethal spells and 168hp - and again, I could only do one point of damage at a time to him except for critical hits. Ouch. This was a problem. After getting ripped to shreds more than ten times and never coming even CLOSE to killing Astos, I decided that I had two options. Either spent an excruciatingly long time building up levels until I was strong enough to win, or bend my variant rules to allow the extra spell MUTE, which nullifies magic attempts if cast successfully. I opted for MUTE, bought the spell, and killed Astos the very next time I fought him without losing a single character - or even coming close to losing one. Yes, I guess I chickened out, but that was the only other spell I would ever use. I stand by my results for this game with a group of white mages using only the CURE, HARM, and MUTE spells. Here's a picture from the end of the game showing this (all characters had the same spells):
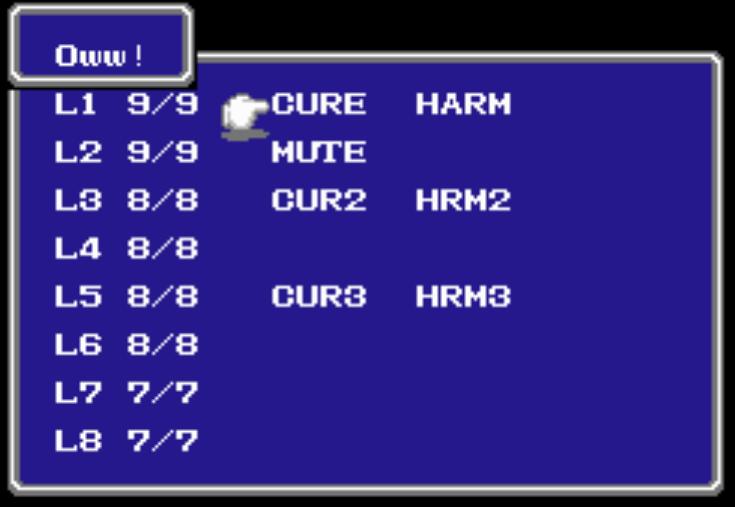
Keep in mind that at the time I certainly could not cast these spells that many times, or even use CUR3! With the completion of the Marsh Cave and Astos, I was finished with the first of the Three Great Challenges. The next part of the game was easy; the Earth Cave presented few problems other than the time that I was killed by a group of wizards appearing as random enemies (you can't run from them) and the time I was stoned by a group of cockatrices. I was able to level up by fighting the mummies in Astos' castle repeatedly and HARMing them to death. At this time I also bought CUR3 and HRM3, completing my spell total for the game. Note that although I had a party of white mages, who are supposed to be healing/support characters, I could not actually bring my characters back to life with the LIFE spell. Once they died, they were dead until I got back to a clinic. The First Fiend Lich, being undead, was easily killed and I went on to the next part of the game.
I got the canoe and used it to get to the Castle of Ordeal. Naturally I picked up the uber-weapon Zeus Gauntlet there, which would be used in just about every single roung of combat ever again for the rest of the game. The Zeus Gauntlet, when used it battle, hits all enemies with LIT2, a medium-strength lightning attack. This would do far more damage than my pitiful attacks with hammers, and would form the bulk of my group's offense for a very long time. I picked up the useless tail (we're not going to class-change in this game) and prepared for Great Challenge Number Two: the Ice Cavern. Once I got the floater from the Ice Cave and could use the airship, the game would be easy. I could (and would) grab all the items with effects when used in battle and become at least a credible offensive force. But the Ice Cave was the difficult obstacle standing in the way of that. The number of times I was cut down by random FrGiants, FrDragons, Mages, and Sorcerers is not important (hint: the number was pretty high). What is important is that eventually I was lucky enough not to hit these enemies and made it through the dungeon in one piece. The Eye was easy to kill; MUTE on the first round and then go to work with the hammers. A long time later, he was history.
Now I had the airship, and I used it to remove the Mage Staff, Thor Hammer, Heal Staff, Heal Helmet, Defense, and several Ribbons from the game's dungeons. I won't go into what all of these do here, but suffice to say that when used in battle they have very helpful effects. After collecting these items, I went back and killed off the next two Fiends, Kary and Kracken, without difficulty. Fighting in the Sea Shrine was good to raise experience, since I could use both the Thor Hammer and Zeus Gauntlet on the enemies there. This might be a good time to mention that I had no use of the EXIT spell, requiring me to walk out manually from every dungeon I went into rather than warping out by way of spell. This meant fighting the Blue Dragon in the Mirage Tower twice - once going up, then again when coming down with more goods. On the trip in which I hauled out the Black Shirt, White Shirt, and Bane Sword only one character survived the second battle with the Blue Dragon - with fewer than 100hp left! That was a thrill getting out of there alive, but I just managed it by the skin of my teeth.
Tiamat was a bit more difficult of a fight. The guides out there for Final Fantasy tell you to kill him with the spell BANE - which has about a one in ten chance to kill Tiamat automatically. Some white mage guides have come up with elaborate strategies to win centering about use of the Bane Sword (which casts BANE when used in battle). This seemed very unsporting to me, so I resolved not to use it. Using my items in battle, I pinpricked Tiamat for 15-30hp of damage with each attack (Tiamat has 1000hp) and survived as best I could. After a very long battle, I won with three characters still alive. That brings us to the end of the game, where my pictures are all taken from. It also brings us to the Third and Final Great Challenge, actually beating the game - and specifically Chaos, the final enemy. First, take a look at the way that I had my characters equipped going into the Final Dungeon:

Weapons above, Armor below

People who are familiar with the game will understand what I've done here automatically, but I'll explain things a bit for the rest. Everyone first has a Silver Hammer, the best weapon that a white mage can equip (with one exception, to be covered later). It's not a particularly strong weapon; actually, it's a very weak one. I would be doing no attacking for the entire second half of the game, for the most part. Everyone also has an item which does direct damage when used in battle; Oww! has the Thor Hammer (LIT2), Weak has the Black Shirt (ICE2), Smal has the Zeus Gauntlet (LIT2), and Help has the Mage Staff (FIR2). Oww! - being first in line and the most likely to be hit - has the Defense, which casts RUSE when used in battle (remember that spell?) Oww! would use the Defense multiple times to start all major battles and greatly increase his evade. Everyone except Smal has a healing item, either a Heal Staff or a Heal Helmet, which can be used to restore some hp when used in battle. Everyone except Help has a Ribbon, an item which cuts all damage from magic and special attacks in half. I noticed that the character without the Ribbon (there are only three in the game) died at an enormously increased rate compared to the other characters - it's that good. Finally, there are some other odd items like the White Shirt (which increases evade of all characters when used in battle) and the ProRing (which protect against instant death attacks). That was probably pretty tedious to read through, so I apologize for that.
Now the problem with beating the game is dealing with Chaos, the final boss. Chaos has 2000hp, is immune to all status-changing effects, fully resistant to all elements, has the highest defense and attack in the game, and uses a devastating series of magic and special attacks against your party. Did I mention that he also has the spell CUR4, which completely restores his hit points to full when used? And that you have to go through the longest dungeon in the game to reach him, while fighting all four Fiends along the way? Yea, that would present a pretty significant Great Challenge.
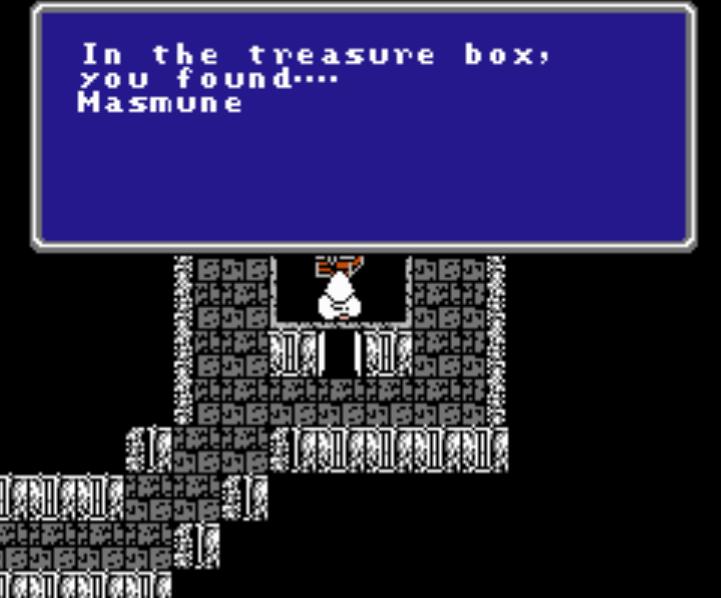
I prepared by leveling up to level 42, for a simple reason. At level 42, a white mage equipped with the Masmune (the best weapon in the game) can get 4 hits per attack instead of 3. My plan for defeating Chaos was simple: get the Masmune and attack all-out with it, doing everything possible to keep the character using it alive. There simply would not be enough time to kill Chaos in the nickel-and-dime approach I used on other bosses by slowly wearing down their hit points with items used in battle. I had to hit hard and hit fast before he healed himself back up to full life. The beauty of the game Final Fantasy is that the Masmune can be equipped by all classes, making such a thing possible. The game designers really knew what they were doing when they made this one.
Trekking through the Temple of Fiends Revisited is no picnic; I died many times before even making down to the bottom levels where the Masmune is located. But when I finally did make it there... ahhh, the reward of seeing this screen was sweet indeed:
Now I could equip it on one of my characters and actually attack enemies again. I hadn't actually attacked someone in ages, this was a whole new deal here! Help had the highest strength, so he got the Masmune and also a Ribbon to keep him alive longer. Here's what his stats looked like after getting beefed up with the fancy new sword:

For comparison, his damage was 25 before equipping the Masmune, heh. In Final Fantasy, you can do an extra hit for every 32% you have in the "to hit" column. Kind of weird, but it works for the game. As planned, I have 96% which allows me to get exactly 4 hits per attack (if they all hit). And I would need every one of those four hits when going up against the monster that is Chaos.
Well, I suppose I should provide a picture of the big monster himself. Here's a shot from one of the rare times when I actually reached him with all four characters alive. Most of the time... I did not have such a good survival rate.

What, are you surprised I didn't win the first time I reached Chaos? You shouldn't be; luck as much as anything determines victory against him. I did a lot of damage, he healed himself to full with CUR4, I was nearing killing Chaos when he used CUR4 for the second time and erased all the damage I had done. Then he used NUKE on me (also for the second time) and wiped out the party entirely. Ummm... you lose, try again. Chaos always uses spells in the same order, but it's random when he casts the spells. Every battle plays out differently, with no way to control what he will do. If he goes through the spells too fast, there's simply no way to do enough damage to kill him before he heals himself up to full again. At least not with my variant setup. For reference, Help would do anywhere from 10-50hp of damage (no critical hit) to 150-350hp of damage (with a critical hit) when using the Masmune (the odds of a critical hit were about 50%). Again, the damage that would be done was random, with no way to predict what would happen. Since Chaos has 2000hp, I had to wait to get lucky with a lot of high-damage hits against him in order to win - while also hoping he didn't go through his spells too fast. This is where begging and prayer come into play. :)
Finally, I got lucky and was able to defeat Chaos; it was about the 8th battle I had fought against him. I actually killed him after his first CUR4 but before his second:

Hooray! (Notice that this was not the same battle against Chaos as the above screenshot.) Smal was the unlucky one to lack a Ribbon and was thus killed before I even reached Chaos (Tiamat killed him with BANE on the previous floor). The total number of trips through the Temple of Fiends Revisited was probably about 25 before I managed to win. So if you wonder what I was doing instead of playing in Epics 25 and 26... look no further. Total number of deaths for the party was too high to count, probably closer to 100 than 50. Maybe higher; I wasn't exactly keeping track. :)
Thus ends this trip through Final Fantasy. If you don't think it sounded that difficult, you're welcome to try it yourself. My next goal will be to take a solo Black Belt through the game, with the variant rule of never being able to equip weapons or armor. But that's a project for the future, since I need a break from this game for now. I hope you enjoyed reading this guide, and if you've never played the original Final Fantasy before, I urge you to track down a copy somewhere. It's far better than any RPG made in the last few years.

- Sullla


