
The revamped Berserkers team had finished up with the Earth Cave and restored light to the first of the four orbs. The next portion of the gameplay is the collection of dungeons that T-Hawk named the midgame troika many years ago: Gurgu Volcano, the Ice Cave, and the Castle of Ordeals. Out of these three it's nearly always best to tackle the Castle of Ordeals first despite the fact that the designers didn't intend for players to head there until having the airship. It's surprisingly easy to reach this dungeon by sailing due south from Elfland and hopping onto the conveniently-placed river with the CANOE, easier than using the airship parking area off to the east in fact. The Berserkers were all Level 13 by this point and Nuke had picked up LIT3 during the stopover in Crescent Lake though he still lacked sixth-level magic charges for the moment.
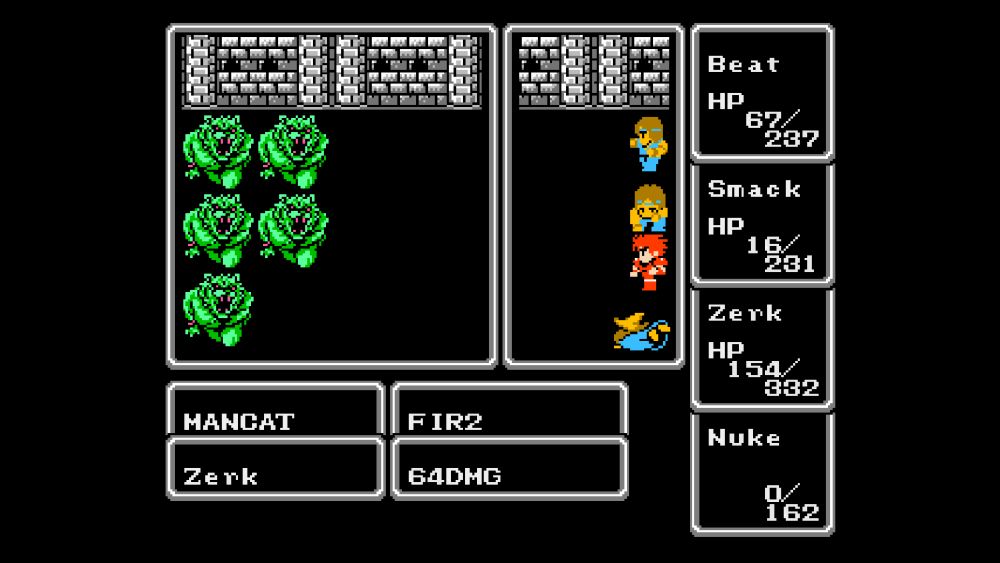
The Castle of Ordeals is quite short in comparison to the Earth Cave or Gurgu Volcano. That was good news for the Berserkers as the monsters inside were a dire threat to this party due to a lack of any equipped armor or elemental / status protections. Some of the enemies could be overwhelmed quickly by the group's offense, foes like Zombulls or Mummies or Medusas (all weak against fire element), with the Berserkers killing them before they could do anything too nasty. But other monsters were incredibly deadly since they could hit the whole group with multi-targeted spells or innate abilities with no way to defend against them. These Mancats were the worst, five monsters with heavy resistances that each had 75% odds to cast FIR2 on the first round of combat. I think four of them used FIR2 in this pictured random encounter and instantly wiped the whole party. R. Goyles were nearly as bad since they could also cast FIR2 although only at 50% odds apiece. The Berserkers had no choice but to try running from these battles and when that option failed it generally led to restarting from the Tent save outside the castle.
Fortunately there really isn't much to this area, not for a player who knows the path through the teleporter maze at least, and the Castle of Ordeals has some very nice treasure for the taking. The best of these is probably the Zeus Gauntlet which casts LIT2 when used in combat, something that Nuke would be utilizing on virtually every turn where he wasn't casting something more powerful. I also gave him the Heal Staff which casts HEAL in battle, something that wouldn't see too much use at least initially because the Berserkers would typically take more damage than they could heal via the staff. The other useful weapon was an Ice Sword for Zerk which added 6 Attack and enough Accuracy to reach his third hit. He'd been starting to get eclipsed by the Black Belts, mostly because they were critting at roughly 4x the Fighter's rate now that crits have been fixed, and this new weapon was enough to push Zerk back out in front again offensively for the moment.
Another hard fight took place against the pair of MudGOLs defending the Zeus Gauntlet since they hit so hard (44-88 base damage) and resisted all three of the game's main elements. I was lucky that the second MudGOL wasted its turn casting FAST instead of simply attacking which likely would have killed Beat. The other monsters that most worried me were these guys:

Ah yes, the infamous Sorcerers with their insta-kill melee attacks. This appears to be due to an error in how the game was programmed: Sorcerers are the only enemy with a status attack (instant death), but no attack element. All of the other killing abilities in Final Fantasy have some kind of element associated with them, like BANE (poison/stone) or RUB (death) or QAKE (earth) or ZAP! (time), which means that the element can be resisted by stuff like the Ribbon or the WALL spell. Since Sorcerers have no element on their attack, however, there's nothing that blocks their death status attacks aside from rolling a successful save via Magic Resistance. This is probably a mistake on the part of the developers but it's unclear how it would be fixed so Ozmo seems to have left it alone. The one piece of good news is that there was apparently another related bug in the original game that caused status effects to hit more often than they should, effectively getting a chance to inflict status effects even on misses. That's been fixed in Final Fantasy Renaissance and it may have helped here since none of these Sorcerers landed their deadly blows. The Zombie Dragons at the end of the castle were much less nerve-wracking and died quickly to FIR3 plus melee blows, leaving the group with the TAIL in their possession. It took about six or seven tries in total to make it through the whole place without being wiped out somewhere along the way.
Gurgu Volcano was the next target for the party, once again delaying the dreaded Ice Cave for as long as possible. I was a bit concerned about this dungeon due to its large size and the lava floors which would deal extra damage to the Berserkers whenever they walked over them. It turned out that I didn't need to worry that much and the group mostly handled the volcano with flying colors despite their continued lack of any defenses. The three melee characters continued to hit extremely hard and could kill most of the enemies that appeared in a single blow. For larger monster groups, I had four charges of ICE2 to hit the ice element weakness on most foes plus infinite castings of LIT2 out of the Zeus Gauntlet. I was even able to take advantage of the Ice Sword's ice element property, something that was bugged in the original game and now has been fixed in Final Fantasy Renaissance. (All of the weapons with elemental properties do nothing in the base game, the Coral Sword and Were Sword and so on.) What's supposed to happen, and does now happen, is that 4 is added to the Attack value of the character using a weapon that hits an elemental weakness. This effectively meant that Zerk had an Attack of 33 instead of 29 with his Ice Sword, an increase of about 15% more damage - not bad.

As the picture above indicates, I also had Nuke use the Heal Staff whenever there wasn't a more urgent need for some kind of damaging spell. The Heal Staff casts a free HEAL spell in battle which restores 16-32 HP to each member of the party. Heal Staff and Heal Helmet usage is almost always a staple of lategame Final Fantasy parties since there are no consumables that restore more than 30 HP outside of the world map and 99 of those Heal potions will run out before the end of the final dungeon. Even for a group like the Berserkers, I found plenty of opportunities to get in some healing with this item that helped preserve the supply of potions. Final Fantasy Renaissance even updates the interface to display how much health is being restored, a nice touch that the base game lacks.
Thus things were pretty straightforward as the Berserkers systematically cleaned out the treasure chests on the huge second floor of the volcano. They needed two trips to get everything, with the first one cut short by an encounter with six Scorpions who rolled a "Monsters strike first" round and pounded Nuke into the ground before I could get off one of his multi-targeted spells. That forced a retreat back to the clinic in Crescent Lake but otherwise the Berserkers pretty much slaughtered everything in their path. Hard hitters like Fires and Grey Worms didn't really feel that dangerous because every melee blow did huge damage to this group - just had to kill them on the first or second round and everything was golden. The third trip into the volcano made it down to the other big collection of chests on the fourth or fifth basement level, and this group cleaned out everything there as well even though they had no need for any of the equipment. All of this fighting yielded rich experience, enough that the whole party hit Level 16 right as they were descending down to the final floor to face Kary.
And that's when I noticed this:

Smack and Beat were suddenly getting 5 hits on their attack, not the expected 4 hits. This was a recurrence of the same issue that I'd spotted back in Elfland where they were getting 3 hits instead of the usual 2 hits. What was going on here? When I looked at the status screen, I figured out what was happening: Ozmo apparently changed the mechanics for Black Belts so that they get an extra hit with every 16 points of Accuracy instead of gaining two extra hits with every 32 points of Accuracy. That explained why the Black Belts had picked up a third hit at Level 5 (when they reached 16% Accuracy) and again here at Level 16 with 50% Accuracy. More on this in a minute. As for Kary, she started the battle by casting a FIR2 that hit everyone but failed to double its damage against anyone, thus dealing a very survivable 30-50 damage against each character. Then she never managed to get a second attack before Zerk, who had been FASTed on the first round, banged out a 7 hit attack that dealt 632 damage (!) on his second swing. Kary only has 600 HP so she collapsed instantly for an easy victory. Well OK, that certainly worked!
Regarding the Black Belts and this changed number-of-hits formula though: it's a really big deal. Here's a quick chart that I whipped up showing the damage output of Black Belts under the old system and this new system:

Those two columns on the right are average damage against a target with zero Absorb; obviously the offensive output would be lower against heavily armored opponents. I highlighted the points in time where Black Belts get the additional extra hit, Levels 5-9 and Levels 16-20 and Levels 26-31 (also Levels 38-41 and Levels 48-50 if you want to get into extreme endgame content). This is not a minor increase in damage either as Black Belts are dealing substantially more total damage under this revamped formula, pulling even with Fighters at a much earlier date rather than lagging behind for ages and ages. The whole point of the Black Belt class is supposed to be that they're very weak early on before scaling into absolute monsters in the endgame. This mechanics change scales them up at a much earlier date and significantly shifts the power balance between the various physical classes.
From a bird's eye point of view this feels like a good change to me: it smooths out the power curve for the Black Belt class much more evenly as opposed to the old system where the class would get absolutely massive increases in damage at Level 10, Level 21, and Level 32. However, here's the problem: this is *NOT* a bug fix or an error that was always around in the base game. The to-hit formula is one of the things that actually worked correctly in Final Fantasy and Ozmo has gone ahead and tinkered with it into something else. As such, I DON'T think this belongs in the "Classic Mode" which is supposed to contain bug fixes and nothing else. It's a good change for the class but it's a genuine alteration to the mechanics; my recommendation would be to move it over to the Renaissance Mode and leave the original formula intact for Black Belts.

In any case, the Ice Cave was up next and I was once again surprised by how well the Berserkers handled it. The party managed to avoid any random encounters with the packs of Frost Wolves that often lurk on the first floor, instead getting several battles against Wizards which weren't that tough anymore. Each of the melee characters could kill a single Wizard and the Zeus Gauntlet had good odds to take out the rest. The undead that can paralyze the party (Spectres and Images and such) died readily to castings of FIR2 and didn't seem to have that much luck at getting their stun attacks off. Fixing the bug that caused them to be able to inflict their status abilities even on misses has definitely lowered them as a threat in Final Fantasy Renaissance. The Berserkers also avoided seeing any Frost Giants but did face several different battles against pairs of Frost Dragons. In each case, the dragons chose not to use their Blizzard ability (which has 50/50 odds in each round of combat) which reigned in the damage they could do. More melee blows and FIR3 charges cut them down to size before they could decide to use their breath weapons.
That's not to say that things couldn't have fallen apart quickly; I often feel as though the Berserkers are a house of cards that could come crashing down at any moment. The Berserkers ran into three Sorcerers at one point and killed them all before any of them could attack - thank you turn order RNG! Elsewhere there was a battle against four Mages with "Monsters strike first" which could have been horrendous. Mages also have 50/50 odds to cast a spell on each round of combat, with the first spell in their sequence being the instant death RUB, however all four chose to use their weak physical attacks instead. Then Nuke went first on the next round of combat and blasted them all into oblivion with his only charge of LIT3 - whew. The EYE cast XXXX on one of the Black Belts and the spell fortunately missed (it had about 35% odds to hit and instantly kill Beat) followed by the creature dying on the initial round of combat to a FASTed Zerk. I was even able to get in a fair amount of Heal Staff usage in the less dangerous fights to keep health up. Just like T-Hawk's Berserkers, this group also cleared the Ice Cave on the very first attempt and with only some 25 Heal potions used.
With the airship in hand, the Berserkers were able to class change into their upgraded forms:

I'm really glad that the Magic Defense bug associated with Masters has been fixed; in the base game, Black Belts gain 4 Magic Defense per level up but Masters only gain an unintended 1 Magic Defense per level. Since Black Belts gain nothing from changing classes, they actually weaken themselves in Final Fantasy by becoming Masters! Now that Nuke was a Black Wizard, I made sure to hop over to Melmond to pick up the WARP spell and fill out his sixth-level magic with RUB and QAKE. I tried to think of a place where STUN would have been useful and just couldn't find any situations; any boss that I would want to paralyze would have over 300 HP where the spell would fail. From there it was over to the Caravan to purchase the BOTTLE and then off to the Waterfall which is a short dungeon with some very useful treasures inside. I think that players are intended to head here later on, after getting hints about the place from some of the robot NPCs, but there's nothing stopping the party from entering as soon as they have the airship.
Amusingly enough, I think the Waterfall caused me more problems than the Ice Cave this time around! Beat kept getting focused by enemy attacks again and again no matter what I did. He started in the lead spot as normal, then I moved him to the second position after he took some heavy damage, then I moved him to the third spot after he kept getting hit some more. The monsters just would not leave him alone for whatever reason and this made it harder to keep health topped off with the Heal Staff. (It's much better to have the enemies space out their damage across the whole party for Heal Staff purposes.) I also had Zerk get turned to stone by one of the Cockatrices, the first time any of the Berserkers had suffered that status condition. Even with these rather comical setbacks, the group still made it to the end of the short dungeon where they found this weapon:

The Defense's ability to case RUSE when used in battle was less useful for this group which cared more about its actual stats as a weapon. The sword had exactly enough Accuracy to take Zerk to 96% where he picked up his fourth hit plus added slightly more Attack as compared with the Ice Sword. Now normally this is where the Fighter class would jump way out in front of the Black Belts again, remaining the top offensive force until the Black Belts hit Level 21 and gained their 6th hit. However, that wasn't really the case in Final Fantasy Renaissance anymore, between Beat and Smack having 5 hits instead of the usual 4 hits and with critical hits having been fixed. The Defense has an index number of 32 which meant it was getting 32% crit chance in the base game rather than the 5% that it's supposed to get. Now that this bug has been corrected, Zerk really didn't look that impressive as compared with the two Black Belts who were getting crit chance equal to twice their level (36% at the moment for Level 18). I continued to find it noteworthy how fixing this bug has shifted the relationship between classes, making Black Belts much stronger relative to Fighters than ever before.

The party made a brief stop in Gaia to pick up OXYALE and a belated Catclaw for Nuke (something that he would almost never use) before venturing over to Onrac to tackle the Sea Shrine. This is another one of the easier of the game's major dungeons thanks to how readily the Zeus Gauntlet and Thor's Hammer shred all of the water-based creatures inside. The Berserkers hadn't been into the Mirage Tower to acquire Thor's Hammer yet but that didn't really matter as their damage output was easily enough to overwhelm all customers. The two Black Belts continued to output incredible damage thanks to their high crit rate and this only increased when they reached Level 21 and picked up their sixth hit. It's wasn't as dramatic as in base Final Fantasy where the class jumps from four hits to six hits in one go but it was still noticeable. Zerk was hardly a slouch either while attacking with the Defense and then Nuke had the option of using the Zeus Gauntlet or healing with the Heal Staff on each turn of combat; rarely did he need to dip into his own spellbook.
There were a lot of battles in the Sea Shrine like the one pictured above, GrSharks that had zero Absorb and simply collapsed like bowling pins despite their hefty 344 HP total. The Berserkers tended to fare better against fewer total opponents since their lack of armor meant that there wasn't much difference in terms of the strength of incoming blows. The worst monsters turned out to be the Lobsters, believe it or not, as they could show up in groups with as many as nine enemies present and they could hit up to three times on each attack. I started out in the normal fashion by having the party ascend to the top floor of the Sea Shrine to grab the treasures and the SLAB up there. This took two trips since a pack of Ghosts killed Beat on my first trip into the shrine. Then it was down to the bottom floor where the Berserkers also needed to make two separate retreats (with the WARP spell helping out tremendously), both times when big mobs of Lobsters / Sea Snakes / Sea Trolls managed to roll a "Monsters strike first" round against the Berserkers. That was a terrible outcome for them since they couldn't stand up to much of anything - the Berserkers always needed to kill their foes before they were killed in turn!
This was effectively a form of stealth leveling though I did make sure to clean out all of the treasure chests in the whole shrine. The only thing worth holding onto was the Mage Staff for Nuke which would be a lot more useful once the party was outside an underwater dungeon where everything was resistant to fire element. The fifth total trip into the Sea Shrine managed to make it down to the bottom floor without anything too bad happening, thanks to Nuke landing a clutch LIT3 against a pack of Lobsters and an ICE3 against a random encounter with Waters. This meant it was time to face the Water Fiend:

Kraken is infamous in this game for being absolutely terrifying if he chooses to attack and utterly useless if he tries any of his other potential commands. Here in the Sea Shrine, Kraken has 25% odds to waste his time on INK (a pointless blinding ability) versus 75% odds to attack which can hit up to 8 times at a base value of 50-100 damage per hit. As the screenshot above indicates, the Berserkers did not get lucky here as poor Zerk was flattened with an immense 624 damage blow. I had aimed the initial FAST at Smack (since Beat was more likely to be targeted) and he responded with an equally ludicrous 12 hits / 722 damage blow at the start of the second round of combat which immediately ended the fight without Kraken getting a second turn. This was the same experience that T-Hawk had against Kraken when playing this same variant, bodies collapsing everywhere from pure offensive action on both sides. It certainly made for a memorable conclusion to this dungeon.
The last remaining town to visit was Lefein and it was finally worth heading there now that the SLAB would translate what the people were saying. The Berserkers needed to head there regardless to pick up the CHIME so that they could make it into the Mirage Tower and of course I purchased the NUKE spell at the hidden magic shop while the group was there. Here's how I filled out the character Nuke's last remaining spell slots:

This is also a nice way to showcase how Final Fantasy Rensaissance adds a helpful description of what the spells actually do, something the base game conspicuously lacks. Anyway, ICE3 and NUKE were no-brainers to grab as the only direct damage options available at the seventh and eighth tier of spells. I couldn't really see myself ever casting BLND and wasting a powerful spell slot on blinding a monster but the alternative was BRAK which basically did the same thing as RUB. Probably still would have been better though. SABR was purchased for novelty purposes now that it's actually been fixed (it was bugged and did nothing in the base game); this spell would be infinitely more useful if it didn't have to give its Attack / Accuracy bonus to the caster and could be used on another party member. At the eighth rank, I preferred STOP and ZAP! over XXXX since the latter spell was single-target only while the other two would hit everything. While it was still pretty unlikely that I would ever want to cast these spells over blasting the monsters with NUKE, at least they all functioned properly now.
One further word about the role of the Black Mage Nuke in the party since this seems like an appropriate moment. I had a special place in my heart for this guy because he was the only member of the party where I ever had to make some kind of decision. The other three characters basically attacked, every round, every battle, for the whole game. Nuke actually had to think about whether to use one of the items-as-spells for some additional damage, or try to get in some healing with the Heal Staff, or dip into his stash of spell charges if the situation was serious enough. The sad thing is that almost all of these fancy spells were pretty useless in practice. It was always more important for Nuke to be casting FAST in boss fights than any of his own damaging spells and the Zeus Gauntlet or Mage Staff were usually plenty for random encounters. T-Hawk remarked that a Red Mage would have filled this role better than a Black Mage and that's probably true - I picked the Black Mage in this slot mostly for thematic purposes. Still, there were always those handful of encounters that absolutely demanded a big ICE3 spell or whatever and Nuke shined in those moments, even if most of the time he was merely supporting the punching meatbags in front of him.

On to the Mirage Tower and the Sky Palace to light the final remaining orb. I tackled this large dungeon in three separate trips, starting with one to clean out the chests in the Mirage Tower, then a second trip for the first two floors of the Sky Palace, and then the last venture grabbing what remained and heading to the fiend's altar. The monsters in the Mirage Tower weren't too difficult as they lacked any instant-kill abilities and the Berserkers had enough health by now to avoid dropping in a single battle. Most annyoing were the Chimeras with their Cremate ability that hit the whole party for 50ish damage since no one could equip a Ribbon. I found that QAKE was surprisingly good at killing some of the enemies with no elemental weaknesses like the Catmen above. The Blue Dragon guarding the entrance to the Sky Palace was mostly a big joke because he kept dying in one hit before he ever had a chance to do anything. Then again, there was one trip up the tower where the dragon actually got a turn and proceeded to zap everyone with a Thunder ability that did roughly 200 damage to each character, ouch! I guess it was a good thing he kept getting flattened so quickly in all the other fights.

The Sky Palace had a different monster mix albeit one that still didn't seem to hold any truly dire threats, not on the initial floors anyway. The Berserkers were initially focused on grabbing all of the loot and fortunately there's a lot of key treasures in these dungeons even for characters that can't wear armor. Zerk was able to upgrade first to the Sun Sword (slightly higher damage than the Defense) and then the far superior Xcalber once the party brought out ADAMANT on the second trip. Even this legendary weapon didn't really put Zerk on an equal footing with the two Black Belts, not since their crit rate was so much higher than his; they had simply outscaled the Fighter class by this point in the gameplay. Other useful pickups were the White and Black Shirts plus two Heal Helmets which I gave to Zerk and Smack. Now I could have the whole party heal with Beat alone attacking when there was a single monster left, that sort of thing. This was particularly easy when GrNagas popped up - I never realized before that these things are a total joke! They have an Attack of 7 (yes, really) and a spell list of the following options: RUSE-MUTE-SLOW-DARK-SLEP-FIRE-LIT-HEAL. Was this some kind of elaborate prank on the party of the developers having these things in the Sky Castle? That was an easy healing opportunity whenever they appeared. I had one encounter with Sorcerers on the fourth floor but managed to kill them all with only two attacks faced, neither of which killed a party member.
So this group was cruising along, never having faced anything all that dangerous on their path through the Sky Palace, when I fought a single random encounter on the bridge on the top floor and...
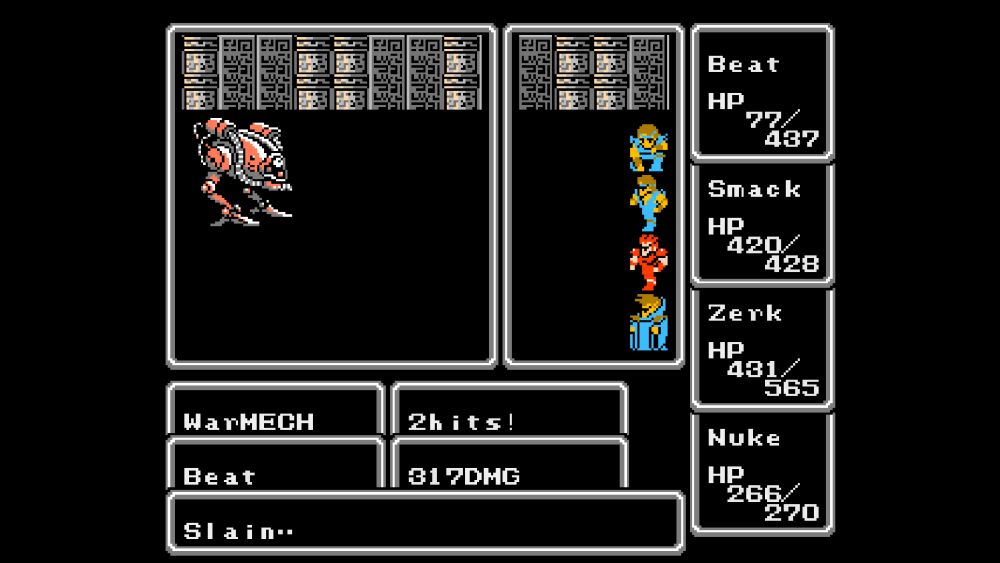
What the heck, are you kidding me?!  The infamous 1 in 64 odds and Warmech shows up in the single fight that the Berserkers rolled right before facing Tiamat. Even worse, this was a "Monsters strike first" battle where Warmech hit Beat for 300-something damage on the surprise round, then finished the job on the first full combat turn with the pictured 317 damage blow. Ugh, there wasn't a whole lot that I could have done about that. At least I had aimed the FAST spell at Smack and the combination of the remaining Black Belt and Zerk managed to crush the enemy machine before it could get a third turn off. I suppose it could have been worse, two castings of NUCLEAR would have wiped the whole party from full health. The surviving Berserkers did get 10,000 XP for their trouble which poor Beat missed out on. Now I really had no choice but to press onwards and defeat Tiamat as well since it would be way too long to walk the whole rest of the way out of the dungeon. But would three party members be sufficient to defeat the fourth and final fiend?

Yep, they didn't have any trouble at all. Nuke spent the first two rounds casting FAST on the other party members and Smash responded with this ridiculous 13 hit / 874 damage printout. Tiamat only has 1000 HP so that was pretty much all she wrote for this battle. (The developers clearly underestimated how much damage the players could do and should have set the health totals for the bosses higher; virtually all of the remakes of Final Fantasy have done this to some degree.) Tiamat hit the whole party with Thunder followed by a nasty melee blow that nearly killed Zerk but it simply wasn't enough and she never managed to get a third turn. Overwhelming offense had carried the day yet again.
The whole party other than the unfortunate Beat reached Level 25 by the end of their trip through the Sky Palace. I spotted that the Black Belts would pick up their seventh hit at the following Level 26 (again not something that would have happened in the base game) and therefore I sent the Berserkers back to the Sea Shrine for a bit of fighting to grab that one additional level. Afterwards, it was time to brave the Temple of Fiends Revisited. I wasn't sure if the party was strong enough to complete the game entirely; my thinking was that I'd see how they were doing and could potentially WARP out with Nuke if the run was faltering, possibly even grabbing the Masmune before leaving if I could make it deep enough into the temple. Here's what the team was running in terms of equipment heading into the final dungeon:

Zerk had Xcalber and Nuke had a Catclaw for weapons, not the Black Mage ever attacked, while the Black Belts naturally fought with their fists. I had Light Axes in extra inventory slots for the Black Belts and Thor's Hammer in a spare spot for the Fighter although I'm not sure that I ever used any of them across the entire game. It was almost always better for each character to attack since they would inevitably wipe one target off the board entirely with their incredible melee strikes. Nuke had most of the "items as spells" along with the Wizard Staff for amusement purposes; monsters will always cast the FIRE spell in this game when confused for whatever reason. On the armor side, no one had anything equipped of course and I had spaced out the healing items so that the party could triple heal with the Heal Staff and double Heal Helmets as needed. Smack was missing a healing item and therefore had the Defense sword and White Shirt in case the Berserkers wanted to turtled up and recover health in a battle. I knew I'd be doing at least some of that in the final dungeon to conserve Heal potions. Finally, the Power Gauntlet actually does work here in Final Fantasy Renaissance by casting the spell TMPR in battle though it was always preferable to cast FAST instead in any dangerous boss fight and there was no need to boost Zerk's Attack in any non-boss random encounter. Sadly the thing still couldn't find a purpose here.

Onto the Temple of Fiends Revisited itself. I know that T-Hawk had a number of problems here with his Berserkers group but I seemed to have better random encounter RNG with my group. There was an initial battle with a Worm that died in one hit, followed by some FrGiants on the second floor who landed a couple of melee blows but nothing more dangerous. The Berserkers then hit a group of three Gas Dragons and I was holding my breath but the enemies only got off one melee attack before the party dropped them, never having to face their POISON breath. The Phantom fell in less than a second to one of the Black Belts, I didn't even bother to note which one. On the way down from the miniboss fight, the Berserkers hit this group of three Frost Dragons and took a few melee hits without getting tagged by their Blizzard ability. Then there was a Chimera/Jimera pair who fell before they could launch their Cremate abilities. I'm not exactly sure if this was good luck or simply enough offense that the monster attacks didn't matter very much. In any case it was working and I hadn't needed to spend more than a handful of Heal potions thus far.
The Earth floor and the following elemental stages are noticeably easier than the initial parts of the Temple of Fiends. These are good places to heal up as needed before facing the four Fiends revisited at the conclusion of each one. Out of those four, Lich and Kraken are the most dangerous opponents due to their spellcasting and ridiculous melee attacks respectively. Lich in particular will cast the NUKE spell 75% of the time on the first round of combat and I doubted that my Black Mage had enough Magic Defense to stop the spell from doubling its damage and wiping him out. Thus all I could do was pray that the Berserkers would drop the undead fiend before he could do the same to them...

But I need not have worried because Beat had my back and landed the non-FASTed one-hit kill immediately.  This was another place where the Black Belts getting that extra seventh hit likely made a real difference; would Beat have had enough damage to land the kill with only six hits here? Quite possibly not, especially since each additional hit was another chance for the attack to go critical. In any case, it was on to the Fire floor where the team was able to heal up against the relatively weak monsters inhabiting the place:

Longtime players of Final Fantasy are familiar with this setup: leave one enemy alive, have one character spam the White Shirt for additional evasion while the remaining three characters all use their Heal Staff / Helmets for HP restoration. It turns out that this works just fine even when the whole party lacks any armor at all and triple HEAL spells grant about 70 HP back to the whole party. I was able to keep the team topped off on health and avoid the need for any Heal potions at all through this tried-and-true method. As for the next fiend, Kary is the least dangerous of the bunch when it comes to the refights. She cast FIR3 which did about 70 damage to the whole party but that wasn't exactly a threat by this point. She died on the first round as well before Nuke could even get his FAST spell off.
The Water floor was another low-danger area where the Berserkers could heal off the damage from that FIR3 and prepare for the upcoming bout with Kraken. The water Fiend does 70-140 damage per attack and can hit up to eight times, easily enough offensive power to one-shot any character in the party. I was hoping for one of two things to happen: either that the Berserkers would act fast enough in the turn order to kill the octopus before it could get off an attack, or else that Kraken would waste its turn doing something other than attacking. Here in the refight, Kraken has 48/128 (38%) odds to cast LIT2 and then another 32/128 (25%) odds to waste his turn even more completely by using INK. This means that the odds are slightly under 50% for Kraken to attack on any individual round of combat which was going to turn the whole fight into a big dice roll. Anyway, the Berserkers lept into combat hoping for good luck and...

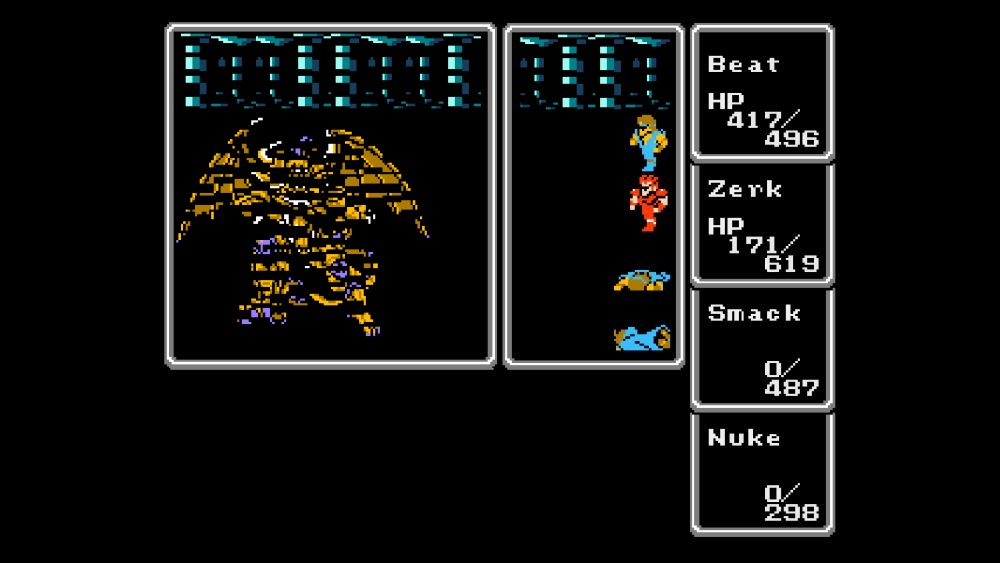
OK, that wasn't what I wanted to see.  Poor Nuke was beyond dead from that massive blow which meant no more FAST spells for the party to use against upcoming bosses. Even worse, there went any chance of grabbing the Masmune and then escaping via the WARP spell to come back another time. It almost didn't matter that the three melee fighters combined their attacks together and finished off Kraken as the soul of the party had been removed.
Well, nothing to be done at this point other than continue forward and see if the three remaining characters would be sufficient to complete the dungeon. I decided that it was worth the time to grab the Masmune to increase Zerk's damage output, not least because the enemies on the Air floor didn't seem to be that dangerous. The surviving Berserkers kept hitting a lot of Worms and Vampire/WzVampire groups which could all be defeated easily enough with melee strikes. The only thing that really concerned me were Sorcerers and none of them popped up in random encounters on this trip. Zerk gained 11 additional Attack plus a fifth hit from equipping the Masmune, still not enough to equalize him with the Black Belts but definitely worth making the trip to unlock. Then it was back around to the hallway where Tiamat was lying in wait. I had no FAST spells or other magic to deploy for this fight, leaving nothing but pure melee swings to rely upon. The Black Belts were wailing away on the evil dragon when she decided to break out the poison smoke for her first action:

Oh yeah, Tiamat has 50% odds to cast BANE on the first round of the refight. That's a triviality for a normal party where Ribbons and WALL spells block the poison/stone element from landing but a deadly threat indeed for an unprotected group like the Berserkers. Smack failed his resistance roll and died instantly followed by the other two characters surviving to carry on the fight. Zerk then took a nasty hit for 400 damage on the following combat round before the combination of Beat and Zerk defeated the boss. So now the two surviving party members had made it up to Chaos and the final battle, however what chance did they really have with only two of them? They had no ability to heal, no armor, no elemental or status protections, not even the FAST spell to boost their damage. I gave them up as goners and just held down the attack button while running fast forward on the emulation.
In the actual battle, Chaos led off with ICE3 which did solid damage to both characters. He followed that up with a melee attack, then a CRACK that missed both characters, then two more rounds of attacks that knocked Zerk down to low health. Smack and Zerk were doing little in the way of damage when they didn't roll critical hits, with Zerk doing as little as 30 damage in one round that I saw. Not that I was paying too much attention, mind you, as I didn't think they had any chance whatsoever. Chaos blasted the pair of them with LIT3 and that meant he was getting close to the CUR4 in his spell rotation which would wipe out all damage taken completely. It looked as if this was all but wrapped up... then Smack and Zerk both decided to land a whole bunch of crits on the same round, each of them dealing 500+ damage to the final boss, and Chaos collapsed before I could even get the victory screenshot:
There he was collapsing into dust after the battle was won, the best that I could do given that I wasn't on top of the action earlier. I was pretty unsatisfied with this outcome even though the Berserkers had emerged victorious - my team had just surmounted the final barrier and I had barely been paying attention! Thus I decided to run the Temple of Fiends a second time to see if I could do a better job with the final boss. The initial floors went smoothly again, the Phantom and Lich each dying from a single hit before they ever had a chance to act. This time Kraken decided to cast LIT2 rather than attack which allowed everyone to make it safely to the bottom floor. Tiamat used her THUNDER ability instead of BANE which dealt a lot of damage without killing anyone.
And thus the second time around the Berserkers were at full strength when taking on Chaos. This time the final boss led off with CRACK which unfortunately killed Beat instantly while the other three characters managed to succeed on their death saves. Beat landed a big hit before his death though and in fact the three melee characters did about 1400 damage in total on the first round of combat. Nuke went first on the second round and landed the FAST spell on the remaining Black Belt, then Smack brought the team home with the big 14 hit attack:

Yeah, that was more like it!  That was the victory that I wanted to win the first time around. Doing it a second time helped prove that it hadn't just been fortunate RNG powering the party (if anything they'd been a bit unlucky against Kraken and Tiamat), the Berserkers really were strong enough to complete the game here at Level 27. They were greatly helped by the Black Belts getting that extra hit and I don't know that it would have been possible to win under the old rules from the base game. I suspect I'd have needed a lot more attempts at the final dungeon at the very least instead of winning out on both of my first two attempts.
Anyway, this was a total blast to play and I'm glad that I was finally able to complete this variant some (checks notes) 18 years after I wrote my initial teaser for the website. The Berserker variant wasn't anywhere near as difficult as I had expected either; it turns out that winning every battle in one or two rounds of combat kind of solves any problems a lack of armor might cause. In a supreme case of irony, I also realized that the Black Mage Nuke never cast his nakesake spell NUKE even one time across the whole game, heh. It was always preferable for him to be healing or casting FAST or doing something else rather than blasting monsters in the final dungeon - I guess life is like that sometimes. Final Fantasy Renaissance was a great excuse to go back and spend some time revisting an old classic, many thanks to Ozmo for putting this project together. I may try my hand at another variant or two for the original Final Fantasy since this is a pretty fast game to complete, we'll see how I'm feeling in the months ahead. Thanks as always for reading along.


