
Tiring of the melee classes after playing through three of them, I wanted to experiment next with one of the casters, and specifically with one of the most unique jobs in the entire game. That was the Blue Mage, a class unique to the Final Fantasy universe. Anyone who has played one of the recent Final Fantasies should be familiar with this character; rather than having any of his own spells, the Blue Mage gains access to various abilities by getting hit with enemy magic, after which he "Learns" their spells and can cast them himself! There are a lot of Blue Magic spells, 30 in total, which is significantly more than that of the other magic classes. (There are 18 each of White/Black for example.) As you can guess, White magic has defensive and healing functions, while Black magic is offensive in nature. The Red Mage has no magic himself, combining together low-level white and black spells, while the Time Mage's Dimensional Magic controls the game's buffs and debuffs, best symbolized by the Haste/Slow family of spells. What then does Blue Magic do?
Uh, a little bit of everything. Blue Magic is literally all over the place, with various odd functions that can't be found anywhere else. You have healing magic (White Wind), direct attack magic (Aero), status inflicting magic (Frog Sony/Tiny Song), brutal buffs (Mighty Guard) and debuffs (Dark Shock/Guard Off), and finally some spells that are just difficult to put in any particular category (Goblin Punch). The Blue Mage dabbles his hand in every field of magic, and scheming up various ways to put his abilities to best use was going to be a ton of fun!
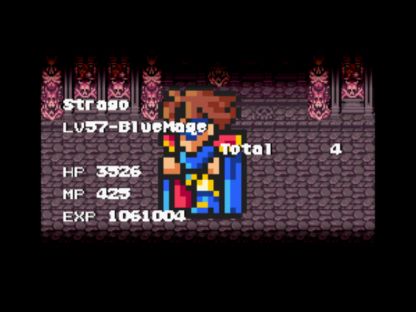
Since "Blue Mage" is a class unique to the Final Fantasy universe, there aren't as many places to draw inspiration when chooing a character name. The only one that I could think up that was any good at all was Strago, after the fiesty old man from Final Fantasy 3/6 - almost certainly the best known Blue Mage in existence. As usual for my solo runs, everything up to the Wind Shrine and Wing Raptor was uneventful. And since Blue Mage is one of the starting six jobs, there was no need to use the emulator to do an unnatural job swap. Here were Strago's initial statistics:
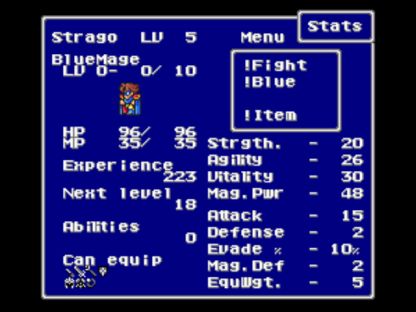
One thing that was different was the fact that I held Strago at level 5 by running from a number of battles, for reasons I'll get into in a minute. More importantly, take a look at Strago's Magic Power stat. The high number there indicates clearly that the Blue Mage is a casting job, despite the fact that he/she can equip swords and shields. If you look at the "Can Equip" tab, you'll see more info on that. This is one of the great advantages of the Blue Mage, the ability to equip swords, rods, and shields (Aegis Shield!) in addition to the default knives. As far as the other numbers go, the Blue Mage has average Agility and Vitality, and rather paltry Strength. Only 20 in that category! Because the Blue Mage is so poor in this area, he/she can never really serve as a primary melee character, even though they get access to some pretty good weapons. The attack multiplier (which relies on Strength and Level) simply remains too low.
Anyway, the first thing to do with Strago was to get out there and learn some Blue spells! As I mentioned above, the way to do this is to get hit with the enemy's magic, then survive and win the battle involved. There were two early spells that would be critical to Strago's overall success:

I'll start with Vampire, which Strago picked up from the bats in the starting Pirate Cave. This spell functions almost identically to the Black Mage's Drain spell, in that it sucks life out of the target and restores it to the caster. However, instead of doing normal damage, Vampire will always do damage equal to (Max Life - Current Life) / 2 on the part of the caster. Say that Strago had 50 life left, out of a max of 100. Then Vampire would do (100 - 50) / 2 = 25 damage, and would restore his life to 75. This is extremely handy for restoring hit points in all sorts of situations!
Goblin Punch is a special spell. It has a casting cost of 0 magic points, and functions like a normal attack, using the Blue Mage's current weapon as its Damage number. But there are two things that make Goblin Punch unique; first, it is ultimately a spell and the damage is thus completely independent of row positioning - you can use it from the back row at no penalty! Secondly, if the Blue Mage is the same level as the monster, Goblin Punch gets a massive damage multiplier, and does EIGHT TIMES normal damage! 
Now you know why I wanted to cap Strago at level 5 - because that's the same level as Karlabos!

So rather than doing 30 damage per attack, Strago instead did 240 to the ugly red lobster. As a result, he only needed three successful attacks to achieve victory, which came pretty quickly. The first use of Blue Magic was a success!
At level 5, Strago was drastically underleveled for a solo character entering the Ship Graveyard, and he needed to rest after each fight in the free inn until reaching about level 9. The one real pain here was the fact that all the enemies were undead, making Vampire useless. Goblin Punch, used freely from the safety of the back row, was the meal ticket for the moment.
I ended up facing Siren at level 12, after leveling up for a little while. This particular fight was all about using Vampire, as Goblin Punch wasn't particularly impressive in terms of damage. I had Strago concentrate on defending while Siren was in her undead, physically attacking form. Then, when she swapped back to the human form, Strago would drain her health using Vampire. He could get off two castings of Vampire if I timed it correctly, which would provide enough of a safety cushion to survive the attacks from the undead form. This was therefore a very exciting battle, with a lot of tension as Strago continued to seesaw back and forth from near-death to full health. One of the best fights I can recall in quite a while! The only way Strago was going to lose was if Vampire started to miss its target, and that didn't happen, so Strago walked away the victor.
In Carwen, Strago picked up a better weapon (Regal Cutlass) and some improved armor, although he remained greatly inferior to Arthur in both areas. Fewer points in Strength and Vitality will do that! North Mountain yielded up Blue magic spell #3:

And a highly useful one it was! Flash is a spell that inflicts the Darkness status ailment on the target, which causes the to-hit number to drop by 3/4. If the to-hit percentage was 100%, it falls to a mere 25%, and that makes a big difference! The best thing about Flash is that it hits all targets at once, as indicated in the picture above. The Blocks enemies, which look like the little tombstones, try to cast Flash in battle but start with 0 magic points, so their spells always fail. I used Strago's one Ether on the Blocks enemies (!) to give them the ability to hit him with the spell and learn it. Pretty sneaky, eh?
Magisa and Forza got hit with the Flash treatment, which rendered Forza almost completely impotent. With the shield factored in, he was missing about 80% of the time. A combination of Goblin Punch and Vampire did the two of them in, and I made sure to leave Magisa alive until she cast Aero, adding a weakish direct damage spell to Strago's arsenal.
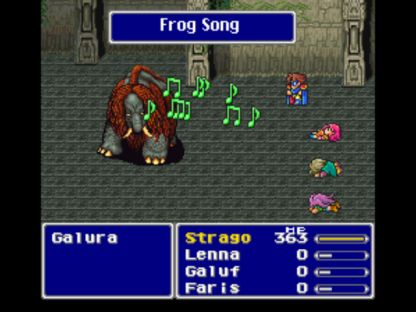
Ironically, the random enemies in Waltz Tower were more dangerous than the Galura boss at the end. I got wiped out by the mage enemies inside a couple times (who can cast Sleep and Drain), while Galura was just a big weenie. Unlike most bosses, he was vulnerable to Toad Song (picked up from one of the Ice Toad foes in the Tower). Although Galura did cast Toad on himself and change back to normal, Flash + Aero with a little healing from Vampire as necessary made short work of him. Have I mentioned how much fun it is to play as a Blue Mage? 
The woods outside Karnak contained another important Blue spell that I was keen to pick up for Strago. The Wild Nacks (wolves) near there use a spell called ????, which does damage equal to (Max HP - Current HP). This spell is a lot like Vampire, in other words, only it doesn't drain life back to the caster. The Wild Nacks are common and use this ability frequently, so ???? was an easy pickup. I quickly found that Strago's best offense was to let him drop to a low hit point total, and then use ???? over and over again on the random enemies. While this was very effective, it was also a bit hair-raising to be so low on health! Because of the way Vampire, ????, and White Wind (which we'll get to later) all synergize with having a lot of hit points, the Blue Mage is a great job to combine with the Monk, who has the highest Vitality and best HP growth in the game. Keep that in mind should you go trying a non-variant playthrough.
Strago got use out of Goblin Punch, Vampire, Flash, and ???? at various points in time in the Steamship. I also had him pick up Exploder, a self-destruct Blue spell, from the Motor Trap enemies. Obviously useless for a solo character like Strago, but my goal was to have him learn every Blue spell by the end of the game! I knew ahead of time that Liquid Flame was level 19, and made sure that Strago was the same level to get the mega bonus from Goblin Punch:
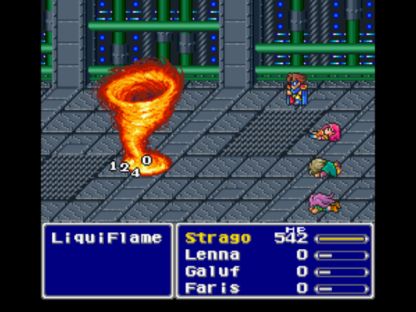
Yep, that got her attention! Three attacks and that was it. I have to say, I was liking this 8x bonus damage thing!
Karnak Castle was surprisingly difficult to do. One of the big problems of the Blue Mage is that he tends not to be a very fast killer; inflicting status ailments and wearing enemies down with spells like Goblin Punch take a while. Similarly, you can't exactly run around on minimum hit points in dangerous areas either, at least not if you don't want to get killed. After some false starts, I realized that I wouldn't have time to grab all the Elixirs inside like most of my solo characters do. Strago focused on getting the Elf Cape and Guardian Knife; I think I had time to get two Elixirs as well. The one other good thing was that Strago picked up Aero 2 from the Gigas enemies, adding another spell to his arsenal. Too bad there was no "Wind Rod" to increase damage from Air element...
There was yet another very important Blue spell to be found in the wilderness between Karnak and the Ancient Library. In the small desert located between the two, the game triggers an encounter with the Dragon Chimera, a mini-boss of sorts with powerful attack and defense. This enemy uses a strong spell called Aqua Rake:

You'd think that this spell would be classified as Water element, but it isn't; Aqua Rake is actually non-elemental. (This is probably a mistake in the code.) The spell is very powerful early in the game, hitting all targets at a strength significantly greater than Fire/Ice/Bolt 2. The only drawback is its extremely expensive cost in magic points, at 38 per casting - more than Flare! Anyway, first Strago had to defeat the boss. I wore down the Chimera with a combination of Vampire and ????, turning his own powerful blows against him. After a number of tense rounds of combat, he went down and Strago walked away with another impressive spell for his collection.
For the bosses in the Ancient Library, Strago had level targets already in mind, to take them out via Goblin Punch as he did with Liquid Flame. Ifrit was level 22, so Strago faced him at the same time. I knew I was in good shape when the first Goblin Punch hit and did 1440 damage - Ifrit only has 3000 total! Needless to say, that wasn't a very tough fight. Byblos was pretty much the same deal, only at level 24 instead. Strago lost on the first couple of tries when Byblos used Sonic Wave, which changed his level and made Goblin Punch ordinary again. Then I managed to get lucky and dodge the attack, which meant that Goblin Punch dished out 1800 damage instead. Bye bye Byblos!
I should mention that Strago picked up the Blue spell Magic Hammer from Byblos during their brief fight. This spell cuts enemy magic points by half; useless for random fights, but highly useful in one or two boss encounters, which we'll get to later on. Now there was only one thing remaining to do in the Ancient Library...
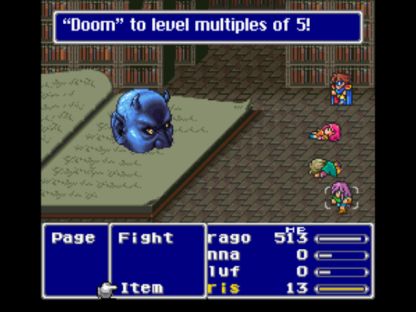
Pick up Level 5 Doom from the Page 64 enemies! This powerful Blue spell instantly kills any party member or monster whose level is a multiple of five - bosses included. Now, it is obviously grossly unfair to keep a second character alive in order to learn Level 5 Doom for a solo run, which is what I did here. However, I had no intention of using Level 5 Doom in any normal battles, until later in the game when I could get hit by it again (wearing the Bone Mail) and survive. I learned the spell here for one reason alone: because it can be used to kill Atmos in the second world. And I HATE the Atmos battle. I don't want anyone to get the impression I'm abusing the rules of the solo playthrough, and just wanted to explain what was going on for clarity's sake.
With the Steamship now sailing again, I sent Strago over to the small islands just north of Crescent, where a Black Flame taught him the spell Dark Shock. This is one of the nastiest tools in the Blue Mage arsenal; when Dark Shock hits successfully, it reduces the enemy level by half! Lower levels mean a lower chance for many of the enemy spells to hit, plus it can make normally immune bosses susceptible to the "level" spells like Level 5 Doom and Level 3 Flare. A must-have for the Blue Mage.
Did you know that Aqua Rake has a hidden property that causes it to do 8x normal damage to desert opponents? And did you know that the Sandworm is classified as a desert enemy?

Well, now you know!  Gotta love the one-hit kills against bosses.
Strago first blinded Crayclaw using Flash, then turned his own Tailscrew attack against him by using ????. Crayclaw couldn't deliver the final blow, since he had something like 1/10 odds to hit between Darkness status, Mythril Shield, Elf Cape, and Guardian Dagger. This one was over pretty quickly.
The next boss, the Adamantium Turtle, was significantly tougher. He has high Defense and Magic Defense, plus starts the fight in Armor and Shell status, cutting damage even further. Strago's best offensive action was to use Aqua Rake, which still only did about 300 damage per casting. The one good news was that most of Adamantium's attacks missed Strago, thanks to the same defensive combo I used against Crayclaw. Anyway, I had Strago cast Aqua Rake about four times, at which point his magic points were starting to run out. Rather than use an Elixir, I turned the damage Strago had already received against the boss, finishing him off with ????.
These Blue spells are all really awesome to use - when they work. Adamantium had a property that would start to pop up more and more as the game went along: high Magic Evade stat. This works exactly like the Aegis Shield (which grants a 1/3 chance to dodge any spell); a dice roll check is conducted, and any spell that rolls lower than the percentage fails automatically. For Adamantium, that percentage was 50%, which meant a lot of Strago's spells were failing. Some of the later Exdeath fights see boss Magic Evade go as high as 85%! You're just wasting your spells when trying to cast into those odds. Thankfully, direct damage spells like Fire/Ice/Bolt always hit their target, or the magic users would really be disadvantaged. Good luck trying to hit Exdeath with something like Dark Shock though!
Strago made it through these stages of the game faster than a lot of my other solo characters; he was only level 28 upon reaching the Sol Cannon battle. One side effect of this was that he had less money than my other characters too, and still possessed only 40k gold. I needed another 10k for a Flame Ring, then another 50k beyond that for an Angel Ring. That meant - ugh - I was going to have to do some leveling. No way around it, Strago needed that gear and raising money was the only way to get it. A great place to fight was the small islands north of Crescent, which always trigger a battle against five Black Flames (870g and 1350XP). They would die instantly to one casting of Aqua Rake too! The only problem was needing to go to an inn frequently, to combat Aqua Rake's beastly magic point cost. Strago gained seven whole levels in the process, up to 35! I guess that was a lot of experience, heh.
I picked up two more Blue spells from the smaller minibosses that precede Sol Cannon: Emission (a direct fire attack spell) from the Flameguns, and Missile (essentially the spell Quarter, reduces enemy health by 3/4) from the Rockets. Both had their uses, especially Emission; the Blue Mage lacks a lot of direct attack spells, and with a Fire Rod equipped Emission did as much damage to a single target as Aqua Rake for a lot less magic points.
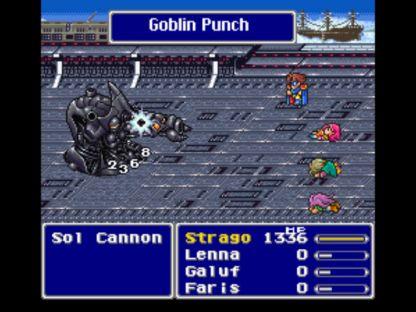
Against Sol Cannon, I was stressing out over how to win. Sol Cannons is immune to pretty much every status ailment, and it was going to take forever to kill him with Emission or Aqua Rake. On a final pass through the code, I hit on the solution: Sol Cannon is listed as level 36, and Strago was right below that at level 35! All I needed to do was add one more level to get the 8x damage bonus from Goblin Punch. I definitely did not plan that, but it worked perfectly. Two castings of Aqua Rake to kill the Launchers, then a whole bunch of Goblin Punches to kill Sol Cannon. Strago only had to use one High Potion and one Elixir in this battle, which is the best any character other than my Samurai Kambei had done.
Inside the Lonka Ruins, the Whirl Demons had a really helpful Blue spell called White Wind that I wanted to pick up. But - it's a healing spell that never targeted Strago, so there was no way to learn it! While I couldn't do anything at this point, there was a way around this problem, which I'll explain later on. One spell that I could pick up was Level 4 Quarter, which is cast by the very rare Hydra enemies on the bottom floor of the ruins. I found one and had Strago get hit by it, which he could since he was still level 36. That way, when Strago faced ArchaeoAvis...
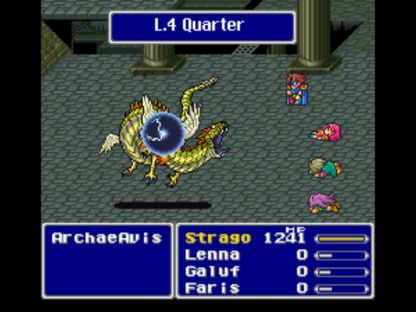
I could turn the spell against him! The fourth form of ArchaeoAvis was level 20, and as such easy meant for Strago's new ability. The one weakness of Level 4 Quarter is that it doesn't work against "Heavy" opponents, meaning most bosses, but for whatever reason only the final, undead form of ArchaeoAvis is classified as such. For the rest of this fight, Strago used a combination of Aqua Rake, Emission, Flash, ????, and Vampire to get the job done. I did win on the first try, and again only had to use one Elixir. Strago has done much better in that regard than a lot of my other characters.
On to the second world. After getting all four characters back in Exdeath's Castle, Strago had the second encounter with Gilgamesh on the Big Bridge to contend with next. This is the fight where Gilgamesh casts Haste, Armor, and Shell when he gets low on hit points. I had a plan in mind to stop him from doing that:

By draining him of magic points with the Magic Hammer spell Strago had picked up from Byblos. Every casting dropped his magic points in half, starting here from 1000 down to 500. Because of the way multiplicative math works, it only took about nine castings to drain his magic completely. Then, when Gilgamesh got low on health, he was unable to Haste himself! Meanwhile, Strago went into the battle with the Flame Ring equipped, and simply healed himself with Emission (powered by a Fire Rod) when his hit points dropped. While the battle took a long time, it was a lot of fun.
I found Strago using the Emission/Fire Rod combination a lot in the second world. It was the best way to do direct damage, since Aqua Rake still required a massive cost and couldn't be used regularly. Having the Flame Ring on as well meant that damage was minimal. Here's the spell in action against the Tyrasaurus:

One of the cooler-looking spells, IMO. A jet of flame shoots out and incinerates the target. Looked pretty weird though when Strago cast Emission on himself to heal! 
The Hiryuu Valley was a welcome place to be, bringing the Bone Mail and a wealth of experience. The Dragon Zombies in particular gave lots of experience points, and their undead-ness left them easy prey to Emission's fiery damage. I thought that the Hiryuu Plant boss at the end would be easy, but it wasn't. The Hiryuu Plant and its Flowers all have really high Magic Defense - Aero 2 didn't even scratch them! Strago had to start the battle with Aqua Rake, to kill the paralyzing flower. Second round, he used Missile to eliminate 3/4 of the boss' health, doing 8000+ damage! Missile doesn't work against "Heavy" targets, but the Hiryuu Flower isn't one of them for some reason. Then the strategy consisted of casting Aqua Rake over and over again to do the final damage necessary for the kill. Unfortunately Aqua Rake didn't do much damage to the Plant, only about 400 per casting. Strago won the battle on his last casting before running out of magic points. Whew!
Gilgamesh battle #3 on the ship followed the same strategy as before, draining away his 888 magic points so that he couldn't cast Missile or Death Claw. It was rather amusing how impotent he was at the end of the battle, prevented from doing anything but trifling melee attacks.
Up to this point, Strago hadn't been able to get any more new spells in the second world. The Barrier Tower changed that; he learned a Blue move called Time Slip that inflicted Sleep and Aging status effects on the enemy. You'd think that doing two statuses at once would be good, except being immune to either Sleep or Aging makes the target immune to Time Slip, so this wasn't a spell that Strago broke out often. He also learned Guard Off, a useful spell that cuts enemy Defense and Magic Defense in half! The one drawback is that the bosses with really high Defense usually have high Magic Evade as well, which makes hitting them with this spell difficult. Another great one to have, however.
I learned Level 5 Doom with Strago earlier for one reason: the Atmos fight. Now it was time to break that out:
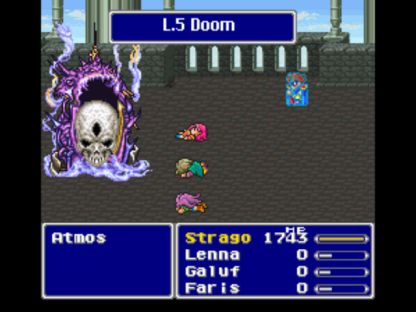
Atmos is level 41. He can be killed instantly by successfully casting Dark Shock (which drops his level to 41/2 = 20) and then following that up with Level 5 Doom. Thus Strago achieved a true victory over my most hated boss in the game - aside from the caveat that he needed help from another character to learn Level 5 Doom in the first place. With the Bone Mail, Strago could now survive a casting of Level 5 Doom for real, so I kept an eye out for a chance to pick it up again and bring the spell into regular use.
Nothing worth mentioning in Guido's Cave, as Strago ran from just about all of the Metamorpha fights. The battles in the Forest of Mua took quite a while to do, with the most effective strategy consisting of casting Emission against each opponent. Emission is single-target only, so many of the encounters dragged out over a half-dozen or more rounds of combat. It still beat anything else in Strago's arsenal though - the Blue Mage's one weakness is doing direct damage in large quantities. Strago picked up another Blue spell here, Tiny Song, which was fairly useless. This late in the game, most everything is immune to Size status.
There was one upside to the Forest: there's a chest with the Aegis Shield near the end. Yes! 
The Crystals/Seal Guardians were the same as usual. Injure the Fire Crystal down into the critical range, then let it heal you with via the Flame Ring while killing off the other three. Strago cast Aero 2 against the Fire Crystal, and used Emission against everything else. The Wind Crystal used Aero 3 when it neared death, teaching Strago another important Blue spell! With an Air Lancet (dagger) equipped, Strago got the "magic up" attribute for Air element, just like equipping a Fire Rod. Excellent.
The powered-up Aero 3 was Strago's main offense in Exdeath's Castle. A casting would do something like 1500 damage to all opponents, and two such spells were enough to defeat most foes. Compared to Strago's usual slow pace, this felt almost godly! He picked up two more Blue spells in here: Level 2 Old, from the Magic Dragons, and White Wind from the Arages (little rabit-like creatures). Getting White Wind was quite a hassle, as it is actually a healing spell. Strago had to confuse an Arage with the Dancing Dirk, at 1/8 odds of happening, then have the Arage cast White Wind on him, at 1/4 odds. White Wind is a really useful spell though; it restores health equal to the current HP of the caster to the entire party. This healing will work through Wall Rings, Bone Mail, whatever - helpful in all kinds of situations! Since White Wind doesn't depend on Magic Power in any way, and works well with high Vitality, this is another Blue spell that synergizes well with the Monk job. Try messing around with a Blue Monk some time, they're quite effective!

Against Exdeath, Blue took advantage of his level (66) to start the fight with Level 2 Old. Even though Exdeath is protected against Aging status, he was still hit by the spell regardless. There's nothing you can do against the Level spells; if you're the wrong level, you're toast. This cut his speed down drastically, and was extremely noticeable. Then Strago got to work casting Aero 3, his best offensive move. Each spell did roughly 2500 damage, and with a Wall Ring reflecting back many of Exdeath's spells onto himself, the boss went down fairly quickly (see insert). I still had to do the fight many times, however, because Exdeath opened the fight with Condemn eleven times in a row at one point! Sheesh.
After passing the Antlion roadbump, Strago went to Mua to get his Chicken Knife. I thought it would be cool to do all that damage from the safety of the back row, without ever having to worry about the Flee effect via Goblin Punch. Well, I was totally wrong on this one! Every item has a separate "Goblin Punch" attack value, which in almost every case is equal to its attack power. For the Chicken Knife, that value starts at 1 and never goes up, no matter how much you run. It was useless with Goblin Punch, sadly. Still a better choice than the Brave Blade, which Strago couldn't equip at all, but not quite what I had been hoping for...
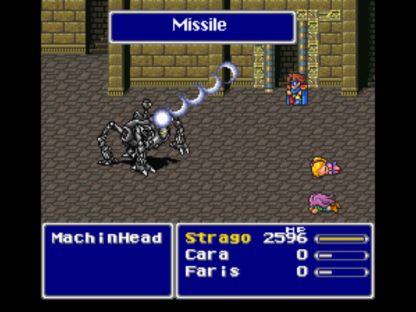
Aero 3 was mostly the spell of choice in the Pyramid, as it did the most direct damage. There was usually room for some other Blue magic too; the best way to take out the robots, for example, was to cast Missile (as pictured) and then follow that up with Aero 3 for the killing blow. Since the Machine Heads can also cast Missile, there were some serious rocket exchanges taking place! Strago picked up two additional new spells here. First he learned Blowfish, a spell which always does exactly 1000 damage when cast. Not particularly useful this late in the game, but I suppose good to know. Secondly, he learned Level 3 Flare in a truly unusual fashion. The Zephyr Zone enemy calls in additional monsters to fight for her, and one of those was something called a Lunenta. This new foe cast Sonic Wave on Strago, dropping his level from 49 to 24, and then followed that up with Level 3 Flare! Curious way to learn a spell, to be sure.
Merugene/Mellusion has four different forms, each with exactly 500 magic points. I decided to have Strago drain away her ability to cast spells with Magic Hammer; a mere four castings (500 to 250 to 125 to 62 to 31) dropped her down to the point where she could only cast a single Fire/Ice/Bolt 3. Once I had done that for all four forms, she was completely helpless. With a Flame Ring to cancel out Fire/Ice 3, and White Wind for healing when needed, Strago could wear the Bone Mail with no side effects. Piece of cake boss.
With the airship in tow again, Strago went on a quick search of the remaining Blue magic spells he lacked. I sent him into the Cleft of Dimension (final dungeon) just to pick up Level 5 Doom (which he could now survive, wearing the Bone Mail) and the spell Roulette. The latter magic has a cursor that randomly bounces around all enemies and party members, and whoever it stops on dies instantly. Not too useful, except that it only costs 1 MP, and if it hits someone wearing the Bone Mail, it restores them to full health! I had Strago use this to take out all sorts of nasty opponents, or heal himself completely in tight spots. One time, an enemy hit Strago with Hurricane and dropped him to 5 hit points, and he couldn't heal himself with an Elixir due to the Bone Mail. I had him cast Roulette, and stopped the cursor on Strago perfectly to heal back to full health! That was my favorite little trick of this whole variant run.

Most importantly, Strago picked up the spell Big Guard (also known as Mighty Guard in other translations) from the rare Stingray enemy. To get this one, Strago had to confuse the Stingray with the Dancing Dirk's "Tempting Tango" move, then wait for him to cast the spell. Big Guard is insanely expensive at 72 MP cost, but it casts Armor, Shell, and Float on the entire party! Practically uber for a normal game, it was still really good for Strago. Any tough boss could be made a lot easier this way.
In going through the last three dungeons in the third world, Strago found it somewhat surprising how many enemies were susceptible to one of the Level spells at his command. Hardly anything had a level divisible by five, and thus avoided the instant kill from Level 5 Doom, but all sorts of enemies could be hit by Level 3 Flare or Level 4 Quarter. I had never given Level 3 Flare in particular much credit before, thinking "why not just cast Flare instead, which will work on all enemies?" but in cases where it was applicable, the opporunity to do a full strength Flare to all enemies at once was extremely powerful. These spells are definitely underrated. In places where the Level spells didn't work, Aero 3 did the bulk of the damage, with occasional help from Roulette. Strago still continued to mix in old spells like ????, Vampire, Emission, and White Wind as needed too. One thing about Blue magic, you won't simply spam one spell over and over again, which is pretty cool.
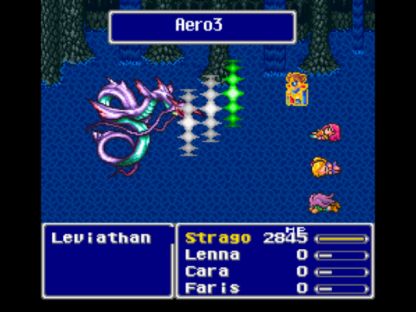
The bosses required somewhat different strategies to defeat. Stalker/Stoker was level 7, so he was hit with Dark Shock and dropped to level 3, then attacked with Level 3 Flare. This targeted all four of the images at once, for an easy win. The Minotaur was killed with the Chicken Knife and an Elixir or two, pretty standard stuff. Omniscient has a weakness to Air element, thus he was demolished with ease by Aero 3. Possibly the easiest time I've ever had against him with any of my solo characters. The piggy trio in the Great Trench were worn down by a series of Aero 3 spells, and I even failed to kill them all at the same time, but that didn't matter because Strago's Aegis Shield blocked their Delta Attack petrification move. Ha! Leviathan was a case study in pelting him with Aero 3 while protected by Big Guard and a Coral Ring.
In a surprisingly short amount of time, Strago was ready to go back into the Cleft of Dimension and prepare for the endgame boss gauntlet. The only other Blue spell he had picked up was Condemn, from the skeleton Unknowns in the Great Trench. While Condemn was fairly useless because it didn't work on bosses, I did play around with it a little bit and mess around with normal enemies. It was fun to be the one dishing out the ticking death clock for a change!
Wood Sprite can be killed with ease by any character wearing the Bone Mail, as it blocks her Drain and Aging spells. Strago cut her down with the Chicken Knife and had no problems. Apanda was vunerable to the same tricks as Byblos, and Strago went ahead and hit him with Flash to inflict Darkness status. Unable to attack, and his spells getting locked out by Big Guard's Shell status, Apanda went down quickly to a hail of Aero 3.
Then it was time for the Blue Mage against Blue Mage showdown:
Apocalypse is a Blue Mage himself, and can cast every Blue spell in the game. He is also level 57, making him a target for Level 3 Flare, as seen above. One of the interesting things about the battle is that Apocalypse has an AI that reacts to the Blue spells you cast. For example, once Strago started casting Level 3 Flare, Apocalypse responded by casting Level 3 Flare back at him. The only problem was the fact that Strago was level 55, and this immune to its effects. Whoops!  That made this a REALLY easy battle; I probably could have even skipped casting Big Guard to start.
From Apocalypse's save point, Strago took on the remaining bosses in the Dimensional Castle. Catastrophe did a whole lot of nothing, and died quickly to Aero 3. Halicarnassus did most of the damage to herself via the Holy/Wall Ring combo. Strago just healed with White Wind and used a mixture of Aero 3/physical attack with the Chicken Knife. Twin Tania was vulnerable to Level 3 Flare, the two forms being level 39 and level 30. Rather than go with a Wall Ring, I stuck with the Running Shoes here, and pelted the boss with Flare spells until he croaked. Maintaining Fast/Armor/Shell status on Strago made him extremely difficult for bosses to defeat!
With the addition of Death Claw from one of the Death Claw enemies in the Dimensional Castle, Strago had now maxed out his spell roster:

Well... almost. The missing spell was "Fusion", an attack where the caster sacrifices himself to restore full health to an ally. I could have gotten this spell in the second world by confusing a Dilure enemy with the Dancing Dirk, but forgot about it until the third world, at which point in time it became all but impossible to get. I wasn't going to spend hours hunting down a 100% useless spell, so Strago's spellbook will always remain incomplete. That was a little bit of a disappointment. Still, you can see here the huge variety of spells a Blue Mage gets access to. Puts the 18 spells of a Black Mage to shame!
Necrophobia was easier than usual. Big Guard pulled the teeth out of the Barriers' magical attacks, then a combination of Golem and Aero 3 combined to do in the boss himself. Necrophobia has insanely high Magic Defense, but this doesn't matter so long as you use an elemental spell (he is weak to all elements), and Aero 3 was doing something crazy like 7000+ damage per casting. Easy. I was somewhat disgusted to see Strago successfully steal the Genji Armor from Gilgamesh in his final appearance (using the Thief Knife), as it was an armor he couldn't even equip! Kambei or Arthur would have liked that...
After walking back out of the final dungeon to recharge the Magic Lamp and restock potions, it was time for the final battle:
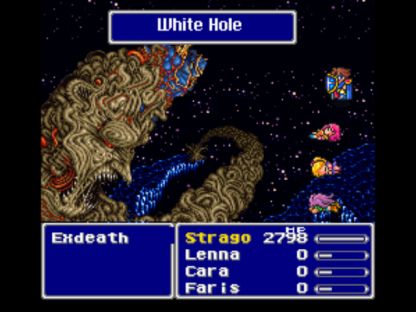
Exdeath's tree form was quite easy to beat, as the marvelous Aegis Shield always blocked his White Hole insta-kill move. That's really the only trick this boss has; if you can defend against Stoning, he isn't really all that tough. Having Big Guard in play also made this so much easier - Strago effectively doubled his life from 3500 to 7000 health! He could even survive a casting of Meteo, unless Exdeath rolled really high on the damage. That brought Strago to the second, Neo Exdeath form:
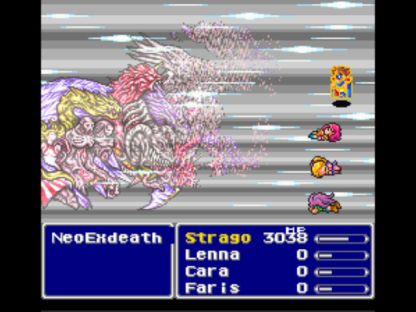
I left the Magic Lamp completely charged for this fight, and started out with Bahamut/Leviathan/Odin summons in order, to deal extra damage to the parts. You may recall that this backfired with Black, but there was one key difference: Black didn't have an Aegis Shield to protect him from Part #4's Delta Attack! After those initial summons were out of the way, Strago kept casting Aero 3 against Part #1, to eliminate the Grand Cross-ing area of the boss as soon as humanely possible. Even so, doing nothing but trying to kill Part #1 ASAP, Strago was still killed on three different occasions by Grand Cross (death status, zombie status, Countdown). There's no strategy to it; every Grand Cross is a huge dice roll that has the chance to kill your solo character. Strago had to survive three Grand Crosses to win the battle, and I didn't get lucky the first few tries.
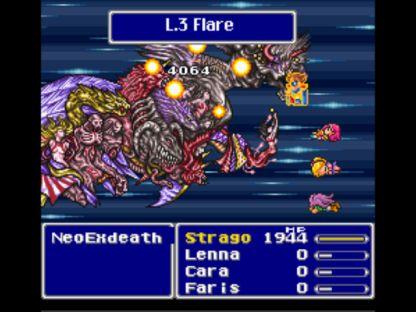
As soon as Part #1 was killed, the battle was essentially over, so long as I didn't do something incredibly stupid. I used Level 3 Flare against Part #3, and good ol' Aero 3 for Part #2. Strago kept healing with Elixirs whenver health dropped under 2000, and refreshed Big Guard whenever it was Dispelled. Like I said, Grand Cross was the whole threat in the final battle. I would have had to screw up badly to lose once it was out of the picture. And I didn't screw up:
I wish that Strago could have won on the first try, but he just didn't get lucky. Kambei and Arthur had to catch some breaks to win out perfectly, and Strago didn't. Plain and simple. It took less than an hour overall to defeat Neo Exdeath, which I consider to be pretty fast. The last boss isn't easy for any solo class - well, maybe not including the Samurai!
Strago finished at level 57, the same as Kambei, and tied for the lowest among any of my solo characters. He certainly could have done it at an earlier level, but I don't treat this as a competition or anything like that. Wherever my guys happen to finish is where they finish. On the whole, the Blue Mage was one of the most engaging characters I've yet tried. The diversity of the spell selection was incredible, and Strago never relied on any one spell to get him through all situations. I had to think about the best course of action in just about every fight; I was using something like a dozen different spells situationally at the end of the game! You won't get that with the Black Mage, heh. If you can stand the slow pace (because the Blue Mage doesn't kill things quickly), this is a really fun character to try. Check it out. 


