
Here we are again with another Final Fantasy 5 solo challenge. On this occasion I wanted to explore one of the game's true oddball job classes, the one embodied by the Dancer. This is an entertaining and fun character build - if painfully dependent on pure chance much of the time! The Dancer has two key advantages compared to the other jobs in this game. The first of these is the Dance ability, which randomly picks one of four different actions, a straight 25% chance for each one. Since the Dance command is so central to this job, let's go through these four options that can come up.
Jitterbug Duet: This dance functions identically to the Black magic spell Drain. (In the code, it is literally the exact same thing.) Jitterbug Duet steals life away from the target and adds it to the Dancer, healing him or her in the process. Because it functions identical to the spell Drain, Jitterbug Duet is not dependent on row position, doing full damage from the back row, and damage is based on the Magic Power stat, not Strength. This one is usually pretty helpful to get, as it heals the Dancer while dealing decent damage at the same time.
Mystery Waltz: This dance is almost identical to Jitterbug Duet, only it steals magic points instead of hit points (it mimics the Black magic spell Psych). It also is independent of row position and steals more MP as the Magic Power stat goes up. Generally speaking this is the least useful Dance to get, since the Dancer has no spells and doesn't use magic points.
Tempting Tango: This dance mimics the White magic spell Charm. It confuses the target automatically so long as they don't have an immunity to Charm/Confuse status. This is highly useful against random monsters, not so much against bosses, almost all of whom can't be confused. Late in the game, the Dancer can get some special gear that replaces Tempting Tango with the fourth and final Dance...
Sword Dance: This is the big one, overwhelmingly the most desired Dance to get. Sword Dance deals a melee attack with a 100% chance to hit that does four times normal damage (double the Attack AND double the multiplier M) plus stacks with all other damage modifiers. You can get some truly insane numbers by combining Sword Dance with other job abilities like Magic Sword and Two-Hands! The only real limitation is the random nature of Sword Dance; it often has a habit of failing to show up when you most want/need it. There are some Dancer-only items in the third world that replace Tempting Tango with Sword Dance, giving a 50% chance to land this highly desired Dance.
The other advantage that the Dancer class has is the ability to equip Ribbons. They are the only class (other than the default Bare job) that can equip them. This wouldn't seem like a big deal, except that the Ribbon is the best piece of armor in the entire game: it has high Defense value, grants +5 to all four stats, and protects against virtually every status ailment. Even better, you can get a Ribbon as early as Karnak Castle, proving enormously useful for a solo run such as this. No need to worry about getting killed by petrification or instant death attacks!
Now for the drawbacks. As already mentioned, Dance is a painfully unpredictable method of attack, and long strings of Tempting Tangoes and Mystery Waltzes can lead to defeat in a hurry. Secondly, the different Dances contradict each other in terms of how they work; Sword Dance is a physical attack and demands placement in the front row to get full damage, while the other three are magical attacks and rely on the Magic Power stat to do damage. The Dancer is thus sort of stuck in a weird hybrid position, not quite a melee class but certainly not a casting job either. Finally, the Dancer has the lowest Vitality stat of any class, and that means the lowest hit points in the entire game! Not quite what you want in a solo character, to say the least...

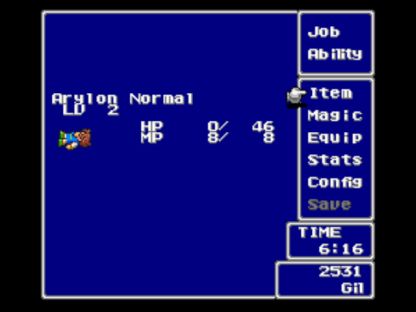
The name for this character was a breeze. All veterans of the original Final Fantasy should be familiar with Arylon the Dancer! Because the Butz/Bartz character sprite for the Dancer class looks really retarded, I decided I would play through the game this time with Faris as the solo character of choice. (Besides, who ever heard of a male Dancer? Yeah, I know they exist and all, but c'mon.) You cannot actually rename any of the other characters, so I gave Butz the name "Arylon" and just pretended that it applied to Faris. Use your imagination. I played up through the Wind Shrine as usual, only using Faris as my key girl this time, and swapped jobs immediately thereafter:
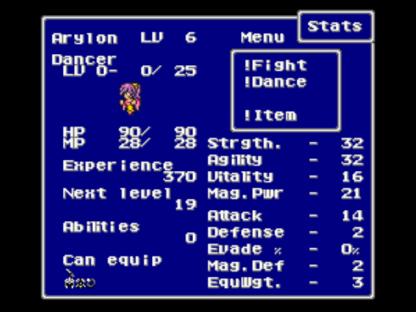
The "Arylon" in that shot has actually been pasted into the screenshot, hehe. Take a look at those stats. Excellent Agility, decent Strength, rather subpar Magic Power, and absolutely atrocious Vitality. Ugh. Only 90 hit points at level 6?! For comparison, the Knight job has 148 HP at the same level, more than half again as much! Well, this was gonna be interesting for a solo challenge, I could tell that already...
I leveled Arylon up to 12 before going to take on Karlabos, since that was where she would pick up a third attack multiplier. Karlabos himself was a matter of fighting the lobster a bunch of times until Arylon managed to hit on Sword Dance. (Get used to reading that line - you're going to hear it a lot!) I had an unusually bad streak of luck before finally managing to hit the desired combo, with Arylon going Sword Dance, Jitterbug Duet, and Sword Dance in succession to get the kill. Each Sword Dance was already doing 350-400 damage on the occasions when it popped up, wow! This with just a piddly old Dagger too.
The Ship Graveyard proved to be no trouble for Arylon, but Siren was a little bit harder. I found that once again the best tactic was to Dance and hope for the best, with a very wide variety of potential outcomes. Tempting Tango was able to confuse Siren, when it showed up:
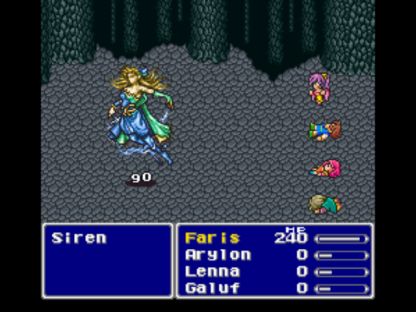
She smacked herself around pretty good, heh. Jitterbug Duet and Sword Dance were of course useful, so only Mystery Waltz was a total dud. I concentrated on Dancing against the Human form and just defended as best I could when Siren swapped over to her undead form. The real problem came when Siren started casting Haste, Slow, and Sleep; I was wiped out a number of times as a result of these bufffs. Arylon had to use a couple of Elixirs, but I had found two in the Ship Graveyard, so it balanced out. Sword Dance got it done.
Once outside of the Ship Graveyard, Arylon could start relying on Dancing against random enemies as her main attack. I could not use it against the undead opponents in the Graveyard, as Jitterbug Duet would actually drain life out of Arylon when it popped up! Now the forest critters near Carwen and on North Mountain, they were a different story. Arylon sat in the back row and Danced away, with everything except Mystery Waltz producing a good result of some kind. (I have used this same tactic with many characters along with the Dancing Dirk, and it works especially well for magely characters with high Magic Power stats.) At the moment Jitterbug Duet was draining about 200 health every time it appeared, and that killed all the random enemies in one hit plus healed Arylon almost to full! A nice combo for this early point in the game.
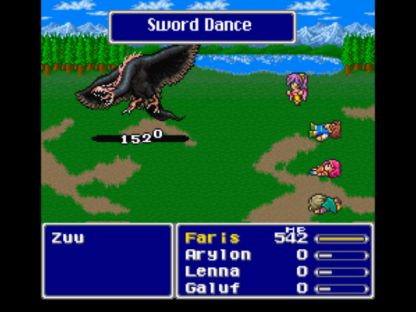
The Magisa boss at the end of North Mountain was the first battle where Arylon got truly "lucky" with her Dancing. I pulled Jitterbug Duet on the first Dance, doing 200 damage, followed by a useless Mystery Waltz, followed by a Sword Dance that did 450 damage. Magisa flopped over instantly and died, never even getting a chance to bring in Forza. Ha! 
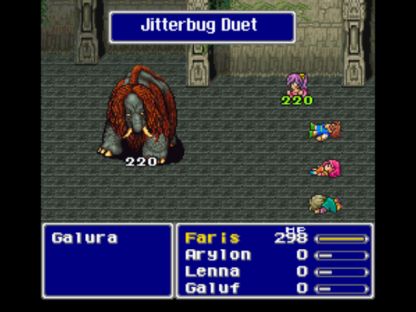
Arylon upgraded to the Training Suit armor in Worus, and then headed off to Worus Tower. I continued to sit in the back row and rely mostly on Jitterbug Duet to do damage. That wouldn't work for much longer, but it was OK for now. Just needed to survive a little longer until Arylon could upgrade from her Dagger to something better. I tried facing Galura in the front row at first, only to see Arylon take way too much damage and get killed. The back row worked better again, as a combination of Sword Dance, Jitterbug Duet, and a whole lot of Potions (using the same tactics that I employed here with Spoony the Bard) saw Arylon through this battle. No need for any Elixirs, fortunately.
Karnak brought the first upgrade to a better weapon, in the form of the Mythril Dagger. I found that Arylon's damage output was more than capable enough to defeat monsters in the Steamship, but her low hit point total made every battle an adventure. Starting out here at level 17, Arylon had barely over 350 HP, forcing me to keep her in the back row to survive. With such a low hit point max, even a normally innocuous move like HP Leak status could become dire peril. More often than not, I found myself Dancing and hoping that Jitterbug Duet would come up for healing purposes, often one step ahead of disaster. Never a dull moment with this particular solo run!
Arylon had no issues with Liquid Flame, using the normal strategy of healing up during the Tornado form and attacking during the others. I stayed in the front row, as Liquid Flame pulls you there anyway with "Magnet" and a full-force Sword Dance did almost 800 damage. The escape from Karnak Castle was noteworthy, as one of the treasure chests there contained Arylon's ultimate armor:
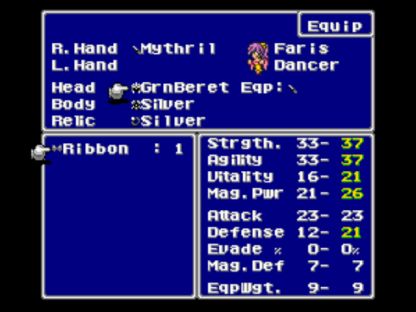
As mentioned at the outset, the Ribbon boosts every stat and provides outstanding Defense, particularly so at this stage of the game. Going from 12 to 21 Defense was simply enormous, and many of the random monsters actually attacked and 0 damage! What you can't see here is the further protection the Ribbon provides against virtually all status ailments: Dead, Stone, Toad, Poison, Darkness, Aging, Berserk, Mute. This makes it the best armor in the game, even better than my much-beloved Aegis Shield. Since Dancing isn't a fast way to kill enemies, Arylon had just enough time to grab the Elf Cape and Guardian dagger before escaping the burning castle.
With the Ribbon providing strong defensive protection, Arylon was able to move up to the front row on what I hoped would be a permanent basis. That, combined with the upgrade to the much stronger Guardian weapon, had Sword Dance banging out some incredible damage:
For so early in the game these 1500+ damage attacks were just insane, killing all non-boss opponents in a single hit. Remember, this was not exploiting an elemental weakness or getting a critical hit; Arylon was banging out that kind of performance against all opponents any time Sword Dance popped up. I was impressed with the performance of my girl here - everyone would learn to fear the Dancer with the purple ponytail! 
The strategy for both Ifrit and Byblos was the same: start Dancing and hope for the best. Arylon defeated them both with virtually no use of healing items, and at low levels to boot: Ifrit at level 24 and Byblos at level 26. It was all about getting multiple Sword Dances to line up in a row, and avoiding those useless Mystery Waltzes and Tempting Tangoes! You might think that I would find this boring, playing a character who was so dependent on luck for success, but for whatever reason I was amused instead. I think it was mostly due to the sheer silliness of defeating these evil-looking monsters by DANCING, of all things. Heh. Byblos did highlight one thing of note: his Charm spell was not stopped by the Ribbon. This was the first status ailment that Arylon was not protected against, and I vowed to keep that in mind for the future.
I went back to pick up the Steamship, and since Arylon had about 35k gold, I fought some random battles for a little bit until she had the full 50k to buy a Flame Ring. I didn't see any need for an Angel Ring, however: the Ribbon already protected against Aging status! In the story sequence at Crescent Island, there's one very brief part where Butz/Bartz has to catch a black chocobo that's running around in the forest. Well, I decided to open up the status inventory to see what that would look like for my solo playthrough:
Only one character, and he's dead! Huh? Something's not right here!  Anyway, it was pretty funny to see this. All my other solo runs have been with the Butz character, so this was my first time running into this particular little quirk.
The Sandworm was defeated without any real problems, Arylon landing enough Jitterbug Duets to keep herself healed from the Quicksand attacks that came her way. The rest of the desert was a breeze too - it's actually a very short dungeon if you know the proper path through ahead of time. Crayclaw was one boss where Tempting Tango was *NOT* useless, as he is vulnerable to the Charm status:

I still would have rather had Sword Dances pop up, however, as they would each do over 1000 damage and Crayclaw only has 2000 health. It took a couple of tries to do this battle (Arylon wound up with a lot of useless Mystery Waltzes), and then I landed two Sword Dances in three tries, and that was that. Obvious I could have won the battle on the first try if I resorted to Elixir usage, but I wanted to save them for more serious encounters.
The Adamantium Turtle was best fought in the back row, where his attacks would be cut in half while Jitterbug Duet would still function at full strength. This did cut down Sword Dance's power, of course. Between Arylon's Jitterbugging and 50% physical evade with the Guardian/Elf Cape combo, this battle wasn't too bad, although I did go ahead and use one Elixir when Arylon caught a long dry streak between Jitterbugs. Certainly many of my other characters have faced far worse.

Prior to facing Sol Cannon, there are four battles against a pair of either Flameguns or Rockets. I always prefer to have my solo characters face the Flameguns, as their Emission attack can be entirely shut down with nothing more than equipping a Flame Ring, however inevitably at least one of the four encounters will see the Rockets pop up instead. These guys cannot kill you themselves, as they never do any direct damage. They will use either Missile (which takes away 3/4 of your health) or Rocket Punch, which takes away 1/2 of current health and inflicts Confuse/Charm status. Therefore the two Rockets themselves will never kill you, but they'll Charm your characters and get them to kill themselves!
The easy solution - which I've finally hit on in my tenth playthrough, silly me - is to equip your characters with really weak weapons that don't do enough damage to punch through their current armor; the Knife (Attack 7) from the start of the game is usually the best choice. I've tried de-equipping all weapons, but your fists have an 8% chance to do a critical hit, and that's not what you want! Here in this battle, you see Arylon all the way down to a single hit point, and yet she won't kill herself because that Knife can never do enough damage to punch through her armor. Most weapons in this game don't have a chance to critical hit, FYI. So with a combination of Jitterbugs and some very weak Sword Dances, Arylon got through this battle unscathed. The Flameguns were cake by comparison.
Sol Cannon involved hoping to get Sword Dances quickly against the two Launchers in order to take them out of the battle, then Dancing and hoping for the best against the big gun. I was pretty fortunate in removing the Launchers, and managed to defeat the Cannon itself when Arylon hit on a lucky streak of Sword Dances and Jitterbugs. Only needed to use 3 Elixirs here, which is about average for my solo characters.
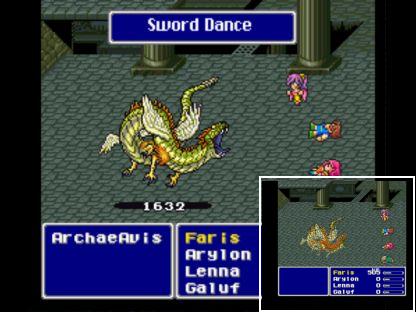
Arylon did well against the random foes in the Lonka Ruins, aside from the "Lamia" enemies who could Confuse her. They gave me so many problems that eventually I started running from the random encounters with Lamias in them, and fighting only the rest of the battles. ArchaeoAvis was another boss fight where Arylon's best move was to Dance and hope for some good luck from the dice gods. The first four forms could practically be killed with a single Sword Dance (each one has 1600 health), so they went down surprisingly fast whenever Arylon didn't draw long dry spells of Tempting Tangoes or Mystery Waltzes. The last "undead" form (which is actually not flagged as undead in the code, interestingly) required two Sword Dances to kick the bucket. It only took a couple of tries to get past this boss, and Arylon finished the dungeon at level 32.
On to the second world! Or... not quite yet. Arylon still had to get past the three "meteor" minibosses that guarded the entrance to the next world. Well, the Chimera Brain and Titan were easy meat, and went down under a hail of Sword Dances. Then Arylon came to the Puroboros, and... oh crap.

There are six of the Puroboros bombs. Each of them has 1500 hit points to start. Every time that they take an action, they have a 2/3 chance to attack, and a 1/3 chance to use "Exploder", which deals Sacrifice damage equal to their remaining health. At full health, they would do 1500 damage and kill Arylon instantly. Furthermore, if you kill them the Puroboros will cast "Life 2" and bring any of their companions that have been already killed back to life. Arylon had to find some way to wear down these six opponents without them blowing themselves up and instantly destroying her, while at the same time preventing them from reviving their friends that had already been defeated. Got any ideas on how to do that? 
This was, quite frankly, a puzzle without an easy answer. The only real upside was that I had known Arylon would run into this roadblock for a long time, and been thinking about how I was going to go about getting around it. The key would be the same tactics that I had employed with Arjuna, a mixture of planning and many, many repetitions to swing luck in Arylon's favor. If any Puroboros exploded with full health, Arylon would die, and there was nothing I could do about that. I would simply have to fight the battle over and over again until that didn't happen. What I needed to focus on was maximizing Arylon's damage output, controlling the one thing that I could control in this heavily chance-dependent battle.
Arylon needed to start out by Dancing and hitting on a Sword Dance right away, which would wipe out one of the six Puroboros instantly. It would cast Life 2, but this would be irrelevant because none of its fellows would be dead yet. Next, Arylon would attack normally and hit one of the other Purorobos twice, doing about 500 damage each time. This would drop its health down to ~500 HP, meaning that Arylon could take an Explosion from it without dying. Now I had to hope that the other four Puroboros would NOT use Exploder (which would still kill her instantly) and that the injured Puroboros WOULD use Exploder, removing it from the battle entirely without casting Life 2. Rinse and repeat for the other four Puroboros until the battle was won, using Elixirs as necessary. All told, Arylon would need the back row Puroboros to skip using Exploder about 10 times in a row, at 2/3 odds each time. 2/3 raised to the 10th power has odds of about 1.7%, so I could in fact pull this off with enough repetitions and good fortune coming my way. When I would get bored of this, I would go gain another level or two to help out - mostly to increase Arylon's max HP total, which remained freakishly low due to her tiny Vitality. Eventually, after gaining seven levels (from 32 to 39) and fighting the Puroboros about a hundred times, I pulled it off:

There's the last one exploding, which would do only ~500 damage to Arylon. Victory at last! Keep in mind, I do not save-state my way through these battles - when I say I fought the boss encounter around a hundred times, I mean exactly that. It was with enormous relief, therefore, that I could proceed on to the second world with Arylon. The good news was that this was the biggest roadblock in the entire variant run, and things would open up considerably from here.
I had to use three Elixirs to get Arylon past Gilgamesh on the Bridge, which was about what I expected. Arylon actually died a couple times to the random enemies on the Bridge, when they used the "Mustard Bomb" spell which would auto-hit for 300 damage. Then I wised up and realized I could kill these opponents with one normal attack, and that Arylon would be better served doing that than trying to Dance every time. It was easy after that.
The one noteworthy part of the Rugor/Moogle diversion was picking up the Dancing Dirk, which for once was no different than any other weapon because Arylon was already well familiar with the Dance command! It was another upgrade in damage, which helped out a bit. When Arylon reached the Hiryuu Valley dungeon, I discovered anew the perils of Dancing against undead opponents:

Jitterbug Duet or Mystery Waltz when used against undead foes drains HP/MP out of you and into your enemy! Of course I have taken advantage of this myself on many occasions, most notably when equipping the Bone Mail. It was a real pain here though, as it effectively ruled out using the Dance command, and since the Dancing Dirk uses Dance 50% of the time randomly, Arylon had to fall back on the less powerful Orihalcon dagger. Normally this is one of the better places to raise experience for characters, but it was pretty troublesome for Arylon. I was able to pick up the Bone Mail though, yay!
The next boss on the list was the Hiryuu Flower, which is somewhat of a puzzle to figure out. I was pretty disgusted to find that the Ribbon did not protect against either Charm or Paralyze statuses, which left Arylon no better off than my normal characters! At least the Bone Mail would stop the Charm attack from Hiryuu Plant #5, however Arylon would still have to kill the paralyzing Plant #4 (my nemesis!) manually, just like so many other solo characters. Now keep in mind that the fatal weakness of the Bone Mail is that you cannot heal yourself with items, no Hi Potions or Elixirs or anything like that. Arylon had to use the Bone Mail to defend against the status ailments in this fight, and therefore had to win before her hit points ran out. And with her low Vitality, her max HP total was extremely low. This all added up to a serious problem!
Reaching this point at level 41, Arylon simply didn't have enough health to stay in the fight for very long. Doing damage wasn't the problem - successful Sword Dances were doing over 3000 damage, and I would only need four of them to win - staying alive long enough to attack was the issue! I did some more fighting in the Hiryuu Valley (again, dealing with the undead troubles mentioned above) and finally had success at level 45:

Arylon's max HP at this level had increased to 1650 health, which was just enough to get the battle done. She had landed successful Sword Dances on 4 out of 8 Dances; now that might seem highly improbable, with the odds of Sword Dance being 1 in 4, but in fact the percentage of pulling 4 out of 8 Sword Dances is 11.4%. Definitely unlikely, and yet not totally out of the question. A half-dozen attempts at the new level saw Arylon through.
From there it was on to the Gilgamesh/Enkidou battle on the ship. While I'd like to tell you that there was a complicated plan for these opponents, once again it pretty much came down to Dancing and waiting for a cluster of Sword Dances to appear in succession. One Sword Dance and two regular attacks sufficed to eliminate Enkidou, and then it was a matter of waiting for more Sword Dances to appear against Gilgamesh, while hoping and praying that he wouldn't use Death Claw. I kept the Bone Mail on Arylon, even though it ruled out healing items, because it essentially eliminated physical damage and she could drain back some health when Jitterbug popped up.
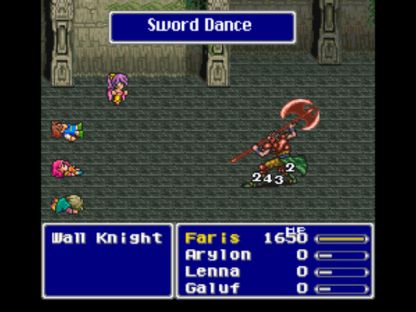
Arylon was able to find a Wall Ring pretty quickly in random encounters inside the Barrier Tower. I figured I should probably show a picture of what the Wall Knights look like, after mentioning them so many times! The rest of the enemies in the Barrier Tower were pretty easy, except the Red Dragon inside one of the treasure chests. Arylon had real trouble Dancing against an undead opponent whereby she drained her own life away whenever Jitterbug appeared! Atmos was dealt with in the usual way, killing off the other three characters throughout the course of the battle rather than all at once. Arylon actually won quite easily, taking the boss down long before the dead bodies of her companions were anywhere close to its mouth.
I had Arylon do a mixture of Dancing and normal attack in the Forest of Mua, depending on the situation. She was now using the slightly-stronger Air Lancet dagger, purchased in Mua, and there were some foes against which it was easier simply to attack and kill them normally rather than gamble on landing a Sword Dance. Jitterbugging and use of Hi Potions sufficed to keep up health without any real trouble. On the two occasions where Arylon's hit points dropped into the critical range, I simply ran away from battle. The meek shall inherit the earth, it seems.
Initially, I thought that I would have Arylon fight the Crystals with normal armor so that I could use healing items. That didn't go too well, however, so I swapped over to the Bone Mail. The result:
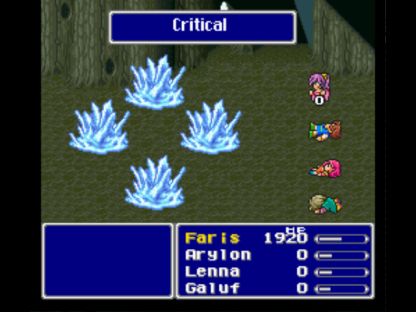
Their physical attacks were completely nullified. That gave me all the time in the world to have Arylon damage the Fire Crystal and set up the Fire 3/Flame Ring synergy that makes this battle such a cinch with the right equipment setup. I tried my best to set it up so that the other Crystals could be killed with a Sword Dance in such a way that they would never cast their elemental spells at all, which worked against the Earth Crystal but failed against the Air one. On the whole, this was pretty simply once I had the proper gear and tactics in place.
The random foes on the first few floors of Exdeath's Castle posed no problems. The Dragons on the upper floors, however, were essentially instant death for Arylon, especially the dreaded double yellow dragon pair that I hate so much. Here, I needed some luck not just to beat the bosses, but just to reach them! Almost a little like the original Final Fantasy, where avoiding nasty random encounters was most of the challenge.
Then Arylon reached the top floor, and that's where the fun began:

I've talked about the "Condemn" spell many times, so here's finally a picture of it operating. Black flames appear around your character, and then a ticking "death clock" begins counting down to zero. There is only one item in the entire game that protects against Condemn (a Chemist mix that can't be obtained by other classes), and so this move is inevitably fatal for solo runs.
Arylon had an extraordinarily difficult time facing off against Exdeath at the end of the second world. This is always a challenging fight for my other solo characters, as they have to dodge the assorted nastiness of attacks like Condemn, Hurricane, Vaccuum Wave, and so on. Just staying alive is hard enough, while the solo character bangs out their best damaging attack or spell repeatedly. For Arylon, however, this was made even tougher. She had to stay in the front row to do any kind of real damage, and that left her vulnerable to absolutely punishing blows against Arylon's pitiful max HP total. Each Vacuum Wave did roughly 1500 damage, and when I first tried this battle Arylon only had 2100 health! And yet I could not drop back into the rear row, as that would drag the battle out further and make it all but a certainly that she would be hit by Condemn at some point. Between a rock and a hard place here.
To make matters worse, Arylon's damage output wasn't even consistent. At least with a normal solo character, you can see how much damage each attack/spell is doing, and make logical estimates based around them. With Arylon though, her Dancing was so totally unpredictable, I never had any clue what I was going to get. Because of Exdeath's high Magic Defense, everything other than Sword Dance was totally worthless, so Arylon was once again Dancing and feverishly hoping to pound out repeated Sword moves at 1/4 odds before Exdeath could go through his AI routine and kill her with Condemn (which itself had 2/3 odds of appearing in the move list!) The best way I can think to describe this is through an analogy: imagine playing two different games of chance at the same time. You need to throw Snake Eyes with a pair of dice while at the same time hitting a straight draw in a game of poker. How many iterations of each game do you think you would need to run to land both at once? Yeah, that's what I thought. It would drive you crazy!
So I fought the Exdeath battle over and over and over again, without success. After a while, I would go add some more levels and try it again. On three different occasions I sat down and spent an hour doing nothing but running Exdeath iterations endlessly, without winning. (Remember, as mentioned before I do not cheat by using emulated save states - I really ran through hundreds of boss attempts here.) Most battles ended with Exdeath casting Condemn right at the start, and that was that. Some times Arylon would dodge Condemn, but no Sword Dances would appear, and eventually Exdeath would work through his AI routine and get back around to Condemn, leading to death. Other times I would get the Sword Dances, only to see Exdeath use Condemn and doom it all to naught. Finally - finally! - when Arylon was level 59, all of the cards lined up perfectly on one attempt, and she made it through the battle unscathed:

It was all over! Raise a toast to the dice gods.  Arylon had landed four Sword Dances successfully (at 3500 damage each) and dodged three Condemns (at 1/3 odds each) to get to the second, easier half of the Exdeath AI routine, and it was all cake from there. But seriously, level 59?! Good grief. I have multiple characters who had already finished the whole game by that point! Ah well, it's not a competition after all. At last the worst was over, and I could move on to the easiest part of the run.
Or maybe not! You lose Faris very briefly in the third world for the first battle, against the Antlion boss, and have to use Butz and Cara by themselves. I figured I would turn them both into samurai and use GilToss to get past this roadblock, only to find that the Antlion's Defense rating is too high - GilToss was doing zero damage! Urp, not good. And the worst part of all is that there are no random monsters in the third world until after you defeat this boss, so no place to gain levels or add additional experience points. (Kinda bad game design there, IMO.) What in the world was I going to do?
Well, all I could do was work with the tools that I already had. I turned Butz into a Knight (Icebrand sword) and Cara into a Samurai (Dancing Dagger) and loaded them both up with the maximum defensive equipment: shields, Elf Capes, and so on. The idea was to have both characters dodge most attacks, and there was no need to worry about hit points because any successful blow would kill the recipient instantly. Fortunately I had a huge stack of Phoenix Downs in inventory from opening chests and monster drops, and so long as one of the two characters stayed alive, they could keep reviving each other endlessly, because the Antlion has no multi-target spells. Sonic Wave was also totally useless here, because Butz and Cara were levels 2 and 1! It took ages of whittling away at the Antlion's 8000 HP, doing ~100 per attack, but they got it done eventually. Whew. Next time, I'll make sure to plan better to avoid having to scramble like this!
OK, now the fun stuff could truly begin. Because Arylon began loading up on a series of awesomely good Dancer equipment, beginning with the star of so many solo runs, the Chicken Knife:

Yes, that would be 9000+ damage getting knocked out on Sword Dances, thank you. Oh, and one other detail: Arylon was doing that damage from the BACK ROW. Any Sword Dance from the front row resulted in instant 9999 damage, but that was so much overkill asskicking that it made more sense to drop Arylon to the safer back row. It's almost a shame that this game truncates all the damage down to four digits - I'd love to see Arylon doing 18,000 damage attacks! (That's a major reason why those who max out this game love the Hunter's X-Fight so much, as it gets around this restriction.) Needless to say, there were no encounters anywhere in the Pyramid that were challenging in the least. Arylon's biggest issue was running away by accident when I attacked with the Chicken Knife.
After trashing Mellusion with a series of Sword Dances, Arylon gained access to the airship and most of the third world destinations. I bought her the Running Shoes (yay!) in Mirage village, picked up the black chocobo in there, and headed off to the Phoenix Tower. There was no need to go to the top for the Phoenix summon spell, but I could use the Thief Knife to pick up another piece of Dancer equipment:

The Rainbow Suit completed the set of Arylon's gear. It can only be equipped by Dancers, and has several unusual properties. First of all, it provides an excellent Defense of 18, which is only slightly lower than that provided by the Crystal Armor (20), the default end-of-game equipment for melee classes like the Knight and Samurai. Secondly, it protects against Charm/Confuse spells, which is nice because the Ribbon doesn't for some reason. Finally and most importantly, the Rainbow Suit makes the Dancer more likely to get Sword Dance! Essentially it replaces Tempting Tango with Sword Dance in the code, thus changing the Dance command so that one has a 1/2 chance to get Sword Dance, along with the usual 1/4 chance for both Jitterbug Duet and Mystery Waltz. This enormously reduces the luck factor in battle, although as anyone who has flipped coins knows, you can still get streaky results even when the odds are 50/50.
The Rainbow Suit allowed Arylon to sit in the back row and Dance nonstop, dishing out huge damage with the Chicken Knife while taking little damage in turn. Finally her low Vitality was less of an issue! The one drawback was that I could not equip both the Rainbow Suit and Bone Mail at the same time; in a couple of places where I knew that the enemies would break out Doom/death spells, I swapped back to the Bone Mail for safety's sake. The default ending equipment combo for the Dancer is thus Chicken Knife, Ribbon, Rainbow Suit, Running Shoes. There are two other items that have the same "Sword Dance Up" property as the Rainbow Suit (Maneater dagger and Red Shoes), but these are both inferior to the Chicken Knife/Running Shoes. The Rainbow Suit is the way to go, especially for a solo character.
After that, the rest of the third world was kind of a big joke. Arylon Sword Danced her way through pretty much everything - I mean, what's going to stand up to a series of 9000+ attacks?

Nothing, that's what!  This cut-and-paste job shows the unequal fight against the Minotaur in Fork Tower. Arylon did 9600 damage to him, he responded with 320 to her. Three successful Sword Dances and it was all over. Ditto for Stalker - it's not too hard to play "find the real one" when you only have to guess correctly two times to win out! The only tricky place was the Great Trench dungeon, simply because everything down there was undead and Arylon's Jitterbug Duets drained her own life away when it came up! I got it done OK; however, between Jitterbugging and the lava floors Arylon drank a metric ton of Hi Potions. Istory was a study in contrast, as Arylon only needed nine Hi Potions to get through the whole place. All of the bosses in these areas were handled in the same fashion as I've detailed in previous solo reports: Magic Lamp to get the final hit on the trio in the Great Trench, Coral Ring for Leviathan, etc. After more than three hours on Exdeath alone, Arylon took all of ninety minutes to fly through the four main dungeons in the third world.
With no desire to go out and complete the optional sub-quests (I mean, the strategy for Bahamut was just going to be another parade of Sword Dances!), Arylon stocked up on Elixirs and entered the Cleft of Dimension. I employed the Bone Mail again in the "Lonka Ruins" section of the dungeon, defending against the Doom/Roulette spells that some of the enemies toss around in there. Everywhere else, Arylon's default equipment had her Sword Dancing a path of destruction through the midst of the monster ranks. Wood Sprite and Apanda died in three hits each. Apocalypse uses nothing but magical attacks, so Arylon could move up to the front row for maximum carnage:

I don't care how many times I've seen it, 9999 damage is always very cool. (In situations like these, I feel like the screen should print out something like "Goto overflow! You broke the game!")
Arylon managed to kill Halicarnassus before she could even cast Holy, and that was without the Running Shoes equipped. Arylon hit on a streak of 4/5 Sword Dances, and that was that! Twin Tania's Giga Flare did 3000 damage, and I was glad at this point that Arylon was somewhat over-leveled, because she had 3100 max HP and survived by a whisker! Had to face Necrophobia three times, as he killed Arylon twice with the Maelstrom/Vaccuum Wave el cheapo combo, but that was kind of par for the course. I opted not to use Golem from the Magic Lamp here, as I knew Arylon could do this fight without too much trouble, and that would save me the effort of walking all the way out of the Void to go charge up the Lamp again.
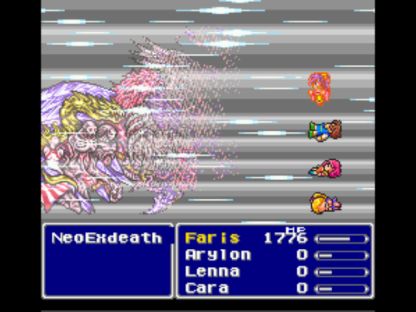
So we came to the final showdown, Dancer vs. pandimensional incarnation of evil:

The Ribbon blocked White Hole's petrification move, Arylon minimized damage in the back row, and Sword Dance put up the predictable godly numbers. Not exactly the hardest time I've encountered with the "Tree" form, in other words. Arylon made it to the Neo-Exdeath form on my first attempt, and I managed to eliminate the first two parts (Part #4 and Part #1) without too much trouble. Everything was on track to get another perfect run on the first try, which only two of my other solo characters have managed to do. Then I screwed up the Elixir timing and was hit with Almagest and Vacuum Wave in rapid succession, which proved fatal for Arylon and her low health. Argh! The fatal weakness of this character struck again at the worst possible moment. Anyway, I went back and continued plugging away at the final boss, although I hit a streak of freakishly bad luck at one point when the Tree form pulled out Meteo four times in a row (at 1/3 odds each time!), destroying four successive attempts. My second try at Neo-Exdeath also failed, as Arylon was hit by Almagest/Vacuum Wave SIMULTANEOUSLY as I sat with the cursor on the Elixir key waiting to use it. That was some total BS right there! 
OK, perhaps I was going about the final battle in the wrong manner. Usually, I want to eliminate the Grand Crossing part (Part #1) as quickly as possible, as it represents a huge dice roll over which you have no control. However, Arylon's Ribbon and Rainbow Suit protected her against virtually all status ailments - she was safe against 16 of the 18 possibilities, 89% odds! And with her low health total, it was the physical attacks from Part #3 that were inducing the most headaches. I decided to swich tactics and go after Part #3 first, which would also allow Arylon to move into the front row thereafter and start banging out the 9999 hits again.
In short, this worked on the first attempt. Arylon successfully dodged 5 Grand Crosses without issue:
With that, Arylon declared victory and put her dancing shoes away for good. 

So after finishing the second world at level 59, Arylon finished the game at level 62. There was no need to do any grinding whatsoever in the third world, and although I fought pretty much all of the encounters, the last few dungeons just flew by! Even though this was on the high end for my solo characters, Arylon barely cleared 3000 HP. Compare that to my knight Arthur, who finished four levels lower at 59, and had 4789 HP at the end of the game. You better believe that made a difference!
Overall, the Dancer solo run proved to be a little bit tougher than I expected her to be. This was mostly due to the low Vitality stat, which had Arylon seemingly on the edge of disaster at all times. I also expected the Ribbon to stop more of the deadly status ailments used by so many bosses in this game, however it failed to protect against three of the threats I feared the most: no protection against Charm/Confuse, Paralyzation, or Condemn moves. Thank goodness the Ribbon does stop petrification attacks like White Hole. As someone who usually hates random elements you might think I found this character frustrating, but no, I actually didn't mind the Dancing wheel of fortune. I think the extreme silliness of the whole concept amused me on many levels.
Fun parting fact: Faris wears her Dancer costume when appearing as "Sarisa" at the beginning of the third world. What a little cutie! 


