
Jesse James was already Level 42 when he started the second world, which is quite frankly absurd. A non-variant playthrough would have finished the entire game by this point! Then again, we are talking about a solo Thief, after all...
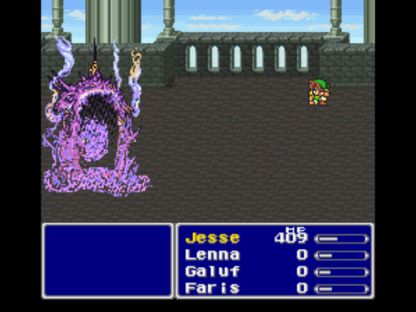
I used my normal tactic of turning solo Galuf into a Samurai to get past the initial Gilgamesh battle in the Exdeath Castle basement. When it came to the subsequent encounters on the Big Bridge, Jesse had one advantage over all of my other solo characters: he had the full 99 Hi Potions in stock.
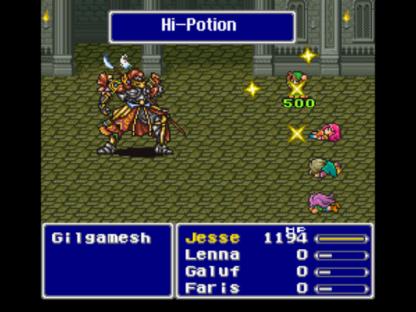
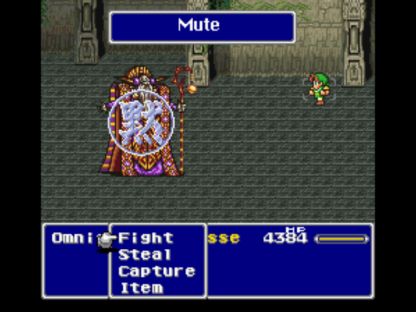
That was a slim advantage to be sure, but it was all that Jesse had going for him! By sitting in the back row and using the Full Moon, Jesse could get past the initial battles on the bridge without using anything other than normal Potions. That meant that I could save all of his Hi Potions and Elixirs for the Gilgamesh fight, as seen in the picture above. While Jesse only did about 250 damage per attack, he could alternate Fight/Hi Potion, Fight/Hi Potion and slowly wear down the boss that way. At least, I could do that until Gilgamesh initiated his AI change when he dropped under 2500 HP remaining, at which point he would cast Haste and Armor on himself, making victory all but impossible. I had to stop him from Hasting up somehow!
There were two solutions to this problem. The first would be waiting out the battle until Gilgamesh used up all of his magic points, i.e. the "Byblos" plan. This would take forever and was not appealing. The second and better option was to hit Gilgamesh with the Mage Masher dagger right as he dropped below the AI changeover point, inflicting Mute status and blocking him from casting his buffing spells. This was another big dice roll - the Mage Mash has a 33% chance to cast Mute - but with a little repetition it was bound to work, and without Haste status in place Gilgamesh was a total non-threat. Problem solved!
Very little of note took place in Rugor and the Moogle Village. Usually this is where you can buy Hi Potions for the first time, but of course Jesse had been stealing them for quite some time. (At least now I didn't have to pilfer Hi Potions one at a time any more!) Jesse killed the Tyrannosaur with a Phoenix Down and acquired the Dancing Dirk, just like all my other solo characters. However, Jesse's real target was Bal Castle, or more specifically the basement of the castle. Down there are very strong opponents known as Statues (this is the area where you can get Odin later in the third world) who have a critical Rare Steal:

The Double Lance! One of the best weapons in the game, and an absolutely essential item for finishing the quest with a solo Thief. The Double Lance has a much stronger Attack value (61) than any other weapon at this stage of the game - Jesse had previously been using the Full Moon (Attack 35) and the Guardian dagger (Attack 36). Even better, it strikes TWICE with each attack! It's the only weapon in the game that has that property. Jesse therefore saw his offense virtually quadruple in one stroke; now he could move up to the front row and kick some major behind. It's a shame that this weapon can only be equipped by the Thief and the Ninja, since it's so good at this stage in the game.
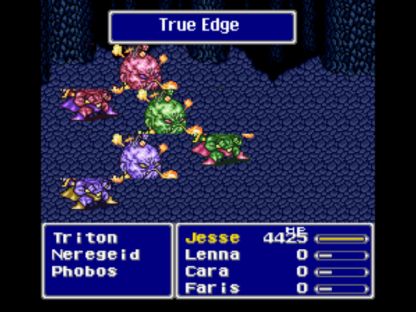
With his new Double Lance and the Bone Mail from the Hiryuu Valley, Jesse James had no trouble dispatching the Hiryuu Plant:
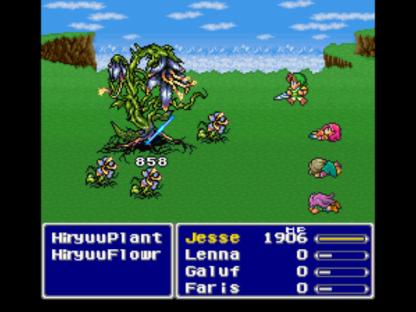
At 850 damage per swing of the Double Lance, or some 1700 damage per attack, Jesse was able to kill the boss before it got around to reviving its Flowers. The Bone Mail protected against most of the nasty status effects from the Flowers, and Jesse killed the one Flower he was vulnerable to (#4) before it could get off its paralyzing move. Gilgamesh and Enkidou were surprisingly easy to defeat in the Ship battle; Enkidou went down in a mere three attacks. Wow! This wasn't the old pathetic Jesse, the Double Lance gave him some real fighting power. This boss fight also demonstrated the irony of playing a solo Thief: Jesse had the ability to steal the awesome Genji Glove accessory from Gilgamesh, however he couldn't equip it because it's classified as a heavy armor! D'oh! 
Despite what you might think, it's actually not possible to steal a Wall Ring in the Barrier Tower. Jesse simply imitated every other solo character and fought until he won the accessory in a drop from the Wall Knight enemies. Now at this point Jesse was Level 46, and he had absolutely no chance of defeating Atmos by himself. Because this was one of the toughest solo variants, I was determined to do the battle in completely legitimate fashion, having all three other characters start the fight already dead. Atmos would suck them up in a few rounds, and then Jesse would have to survive a deadly barrage of Comet spells!
Jesse needed a combination of two things to get past this roadblock encounter. The first was more offensive ouput for more damage; the second was more total hit points, to survive multiple castings of Comet. The only way to achieve both of them was through adding additional levels:
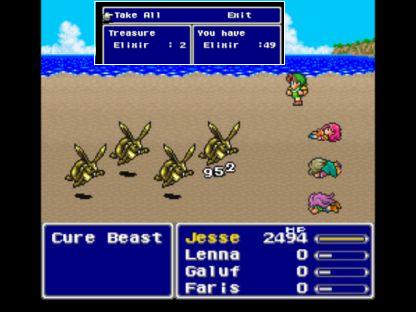
The best place to gain experience was against these Cure Beast enemies, which can be found with Land Turtles in a small area to the north of Surgate Castle. These random encounters are very easy and give out about 2000 experience with each battle. Best of all, the Cure Beasts have a chance to drop Elixirs, so by building up his levels here Jesse could also stockpile lots of Elixirs for future battles. He started at 32 Elixirs and the overall tally slowly increased; first 40, then 50, then 60... My target level for Jesse was 58, where he would get an extra attack multiplier. To give you an idea of how long this would take, Jesse had accumulated just over 450,000 total experience points to this point in the game. Reaching Level 58 would require 1.14 million experience, well over double the entire game's worth thus far! That would take a while at some 2000 XP per battle...
A long while later, Jesse had piled up 70+ Elixirs and was ready to face Atmos. It was time to get the battle started!
Ummm... that could have gone better...  Poor Jesse had 3583 max health, and as I quickly found out, that simply wasn't enough to stand much of a chance at winning. Atmos would start the battle by sucking up the other three characters, during which time Jesse could get off three attacks (at about 2000 damage per attack, or 1000 per swing of the Double Lance). Since Atmos has 20,000 overall health, Jesse needed to get in another seven attacks in order to win out. However, it was extremely difficult just surviving each round of combat, much less having a chance to get in a round of attacking! Here is Atmos' AI script if no characters are dead for him to suck up:
{Comet,Comet,Nothing}+{Comet,Comet,Nothing}
This means that Atmos has a 2/3 chance to cast Comet, then another 2/3 chance to cast Comet again. Or, to put it another way, Atmos had 4/9 (44%) odds to cast Comet twice, 4/9 odds to cast Comet once, and 1/9 odds to do nothing at all. Furthmore, Comet itself is a highly variable spell, rolling a random number between 50 and 200 and then multiplying the result by 8, for overall damage anywhere between 400 and 1600. So on any Atmos combat round, Jesse might get hit by two Comets and take 3000+ damage, or he might be left completely untouched. It was the random nature of this battle that made it so maddeningly frustrating - how could I plan ahead if I had no idea how much damage Jesse was going to be taking?
Worst of all, Atmos starts the battle in Haste status, meaning that Atmos attacked twice for each action Jesse took. He would still get killed much of the time doing nothing but using Elixirs on every round of combat! The only real solution to this problem was to gain more max HP... which meant leveling up further. Argh. What I wouldn't have given for the Monk's "HP +30%" ability here!
Jesse gained another attack multiplier at Level 61, but still no luck at fighting Atmos. I tried once more at Level 64, and by this point in time Jesse had piled up a complete stock of 99 Elixirs as well as 1.6 million experience. It was getting ridiculous - I was so tired of fighting those darned Cure Beasts and Land Turtles! Jesse was up to 4200 max HP now, and I started to have some more success against Atmos. I found that if Jesse had more than 3000 health left, he could usually slip in an attack and survive the succeeding Comet barrage without being killed, although a particularly bad roll of the dice could still wipe him out.
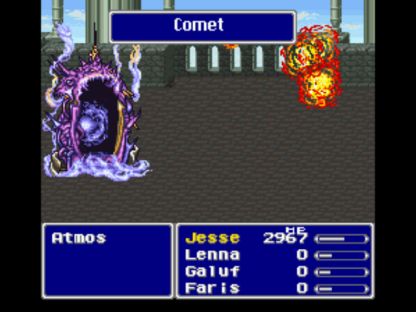
On my best run I worked Atmos down to his final 3000 health, meaning just two more attacks needed to win. Jesse had 2600 health remaining himself, which I guessed would leave him with about 50/50 odds to survive another round of combat. I decided to gamble and attack, knowing that if Jesse could live to act again he could attack a second time and win the battle instantly. But that meant he had to survive two rounds of action from Atmos... The first Atmos attack came up, and was very bad news for Jesse: two Comets, one for 800 damage and a second for 1400 damage. Jesse had only ~400 life left, meaning any use of Comet in the second Atmos round would kill him. I started cursing to myself, knowing I had lost... and then Atmos skipped BOTH uses of Comet at 1/9 odds to save Jesse's life and seal his doom! 
Unbelievable! What a lucky break; missing out on both Comets had only 11% odds. Guess I can't say that this game never did anything for me. You can see in the picture how Jesse is on death's door, but I knew that one more attack would finish off Atmos and won out successfully. Thank God that was all over.
Now the price of winning this victory: in order to beat Atmos, Jesse James became ridiculously over-leveled for the rest of the game.

Jesse was all the way up at Level 64, way higher than anything one would reach in a non-variant game, and even beyond where most of my other solo characters finished the game. He was still midway through the second world, with about a third of the game still to go...
While we're here, let me mention briefly how important it is for a solo Thief to increase his or her Strength stat. The base Strength for a Thief is only 26; fortunately, Butz/Bartz gets a permanent +3 addition to this number, to increase it to 29. That's further modified in this screenshot by the Bandana helmet, which adds another +3 to Strength. For the Atmos battle, Jesse further equipped the Strength Suit (+3 Strength) and the Power Ring (+3 Strength) for a grand total of 38. With all of those bonuses, Jesse had an attack multiplier (M) of 21; if he had been stuck with the base Strength of 26, the attack multiplier would only have been 15, for a damage reduction of a full 50%! The Thief is possibly the class where Strength boosts matter the most, since it gets no abilities that increase damage and the starting number is so very low for a melee class.
Since Jesse's level was so high, he rolled through the next couple areas of the game without even breaking a sweat. Each of the Double Lance's two strikes was doing about 1200 damage, which was enough to kill the enemies in places like Guido's Cave and the Forest of Mua in one hit. With Jesse having 4000+ HP, there were no dangers here. Flame Ring for the Crystals/Seal Guardians, yadda yadda.
Exdeath's Castle was quite easy as well, due to Jesse's very high level. This is why I usually kill off the other three characters one at a time in the Atmos battle, because going up to Level 60+ renders too much of the rest of the game boring. Jesse's Escape ability came in handy here, allowing him to get out of battles that I wasn't interested in facing. This is one of the understated advantages of a Thief: if you equip the Escape ability, you have a guaranteed, 100% safe run from any random encounter, due to the fact that the Thief's innate Caution ability means that they will never get a back attack. Food for thought if your party is on the verge of death and needs to get the heck out of somewhere!
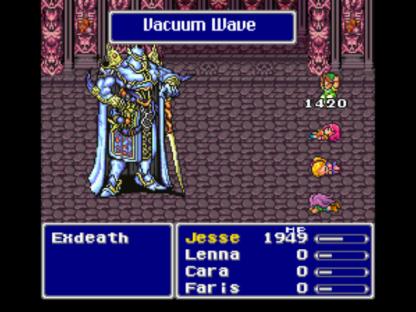
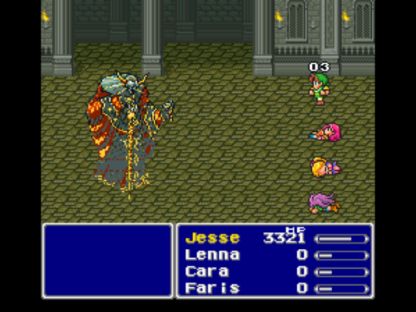
Exdeath is always a tough battle for a solo character, thanks to that Condemn ability of his. 2/3 of all battles will end instantly as he uses Condemn on the first turn. (And Condemn is an auto-hit ability, so it will never miss, unfortunately.) Exdeath's physical attack's packs quite a wallop too! Poor Jesse was getting a taste of that above. I had to stay in the front row though, in order to do the maximum amount of physical damage.
Jesse had the advantage of possessing tons of health due to his high level, letting him take more hits before I had to stop and use an Elixir. He was doing right around 1500 damage per attack between the two swings of the Double Lance, meaning that Jesse had to get off about a dozen attacks in order to trigger Exdeath's AI change, after which victory would be assured. In other words, Jesse would have to dodge two Condemns to get that far - but I had a lot of problems getting to that point. Jesse also had trouble dealing with Exdeath's combination of Vacuum Wave followed by Hurricane; the first would inflict a HP Leak affect, causing health to slowly decrease, while the second would drop Jesse to the critical range. HP Leak would still be in effect, meaning Jesse's health would drop to something like 5 HP and then drop to zero almost instantly! Very little that I could do about that, and it was reminiscent of the earlier Crayclaw battle. But eventually, Jesse managed to dodge the bad stuff, do the 16,768 damage needed to trigger Exdeath's AI changeover, and victory was a cinch after that. On to the third world.
Exdeath was the last real challenge for Jesse James before the final boss encounters. That was due to the marvelous Chicken Knife, which solved Jesse's offensive problems for good:
The Chicken Knife not only has an extremely high Attack value of 127 (when fully powered up), it also gets a bonus multiplier that causes it to deal tons of extra damage. Most weapons get their multiplier based on the Strength stat: Strength * Level / 128 is the basic formula. But the Chicken Knife gets the normal multiplier, plus an extra one based on Agility: Agility * Level / 128. These two are added together to get the final attack multiplier (M). Now the Thief doesn't have much Strength, but he does have a ton of Agility. And when using the Capture ability, the Chicken Knife's Flee effect will never kick in. Thief + Chicken Knife was a match made in heaven! 
There's really very little to say about the rest of the third world, aside from some odd observations made along the way. Jesse's extreme speed (augmented further by +5 Agility from equipping the Chicken Knife) allowed him to kill the two Gargoyles with ease before they could revive one another. Nothing in the Pyramid provided a challenge; Jesse could shut down the Machine Head robots in two fast attacks before they could get off their Missile/Surge Beam combo. Merugene/Mellusion wasn't even worth mentioning. After Hasting up with the Running Shoes in Mirage, things became even more of a cakewalk.
Jesse amused himself by Stealing some weird and interesting gear:
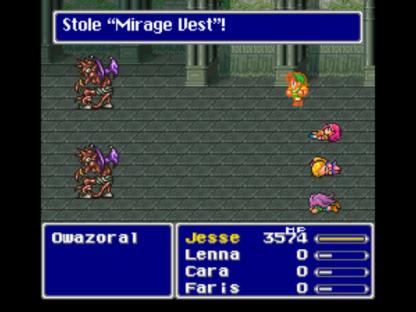
You find some crazy stuff by using Capture on every single opponent! These Owazorals in the Solitary Island Temple were carrying Mirage Vests, for example. Jesse looted all of the treasures inside and then took out Stalker without much issue.
In Fork Tower, Jesse beat the Minotaur without even using a healing item. Then I hit the reset button and flipped over to the other tower, to take on Omniscient:
Rather than simply sit around and wait for Omniscient to waste all his magic points, I decided to be a little more proactive with Jesse. The Bone Mail + Wall Ring combination made Jesse immune to all of the enemy spells, and then I settled in to wait for the right moment to strike. Whenever Omniscient cast Mute or Stop, it would be reflected off of Jesse's Wall Ring and hit Omniscient himself, allowing Jesse to attack with the Chicken Knife. It took a long time to wear down the boss this way, due to his constant life Regen, but eventually Jesse was able to get the job done. Definitely more fun than sitting around and waiting for Omni to run out of 20,000 magic points!
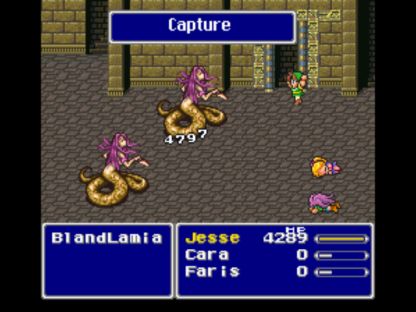
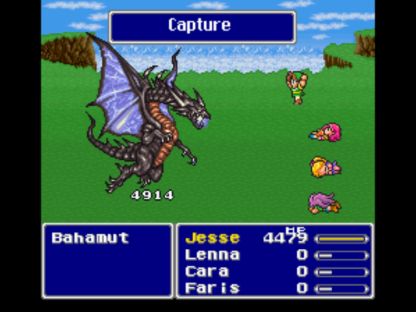
Capture got Jesse past the Unknown enemies in the Great Trench, who have a Possess counter-attack that is keyed to the "Fight" command. By using Capture instead, Jesse avoided this instant death attack. I walked all the way down to the bottom floor, then realized that I had forgotten the Magic Lamp needed to defeat the bosses. OK, that was pretty dumb; sadly, it's not even the first time I've done that!  Go back, get the Magic Lamp, and come back again... Jesse attacked each of the three enemies with the Chicken Knife twice, doing about 10k damage to each one. Then I started using the Magic Lamp to hit all three, first Bahamut, then Leviathan, then Odin:
Whoops, Odin killed them all instantly! I wasn't even trying to do that, it happened by accident. I did know about this ahead of time, however I normally try to avoid it because it's a cheeze solution to beat this boss group. Ah well, they were all almost dead anyway! (Just remember that you can get any variant past these three by using the Magic Lamp's Odin summon.)
After breezing through Istory with little to mention, I decided to go explore some of the other bonus challenges in the third world. I kind of liked Jesse James, and wanted to see some places I hadn't visited in a while. First up, facing off against Bahamut:
He was pretty easy, with Jesse using a Wall Ring to reflect Mega Flare back against its own user. I honestly thought this battle would be a little tougher. A whole bunch of Captures with the Chicken Knife worked really well. After clearing out North Mountain, I sent Jesse over to the Phoenix Tower to see what was inside:
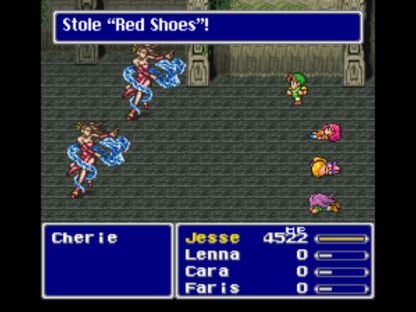
I'd actually never been through this place before, if you can believe it. My original non-variant team simply forgot about the area, while my summoner didn't want to go to the top because the Phoenix summon could then randomly appear when using Conjure (and would revive the other three dead characters, bad for a solo run!) So this was my first time going all the way to the top and facing the unique enemies inside. Jesse stole some really impressive gear here: Wall Rings from Chamcumbia (who also have Ribbons as a Rare Steal!), Rainbow Suits from Bella Donnas, and Red Shoes from Cheries. The enemies here aren't all that tough, and these items that you can steal sell for tons of money. The one downside is that you can't run from any of the battles, so Jesse amassed 11 Red Shoes by the time he walked all the way to the 30th floor... and then back down again. No Exit spell, remember. As far as picking the right path through the hidden doors, Left-Left-Right works almost all of the time. Good enough for me; you can look up the exact path online if you want to be certain how to get through.
By the time he was ready to enter the Cleft of Dimention, Jesse had piled up a tremendous amount of junk gear:
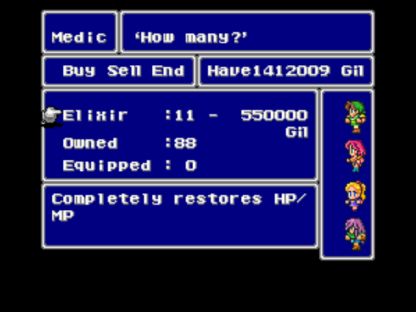
After it was all sold off, Jesse had a total of just over 1.4 million gold. I wasn't even sure if the game would go beyond six digits in gold count, and apparently yes, it does. This picture shows Jesse trying to purchase Elixirs in Mirage village, and maxing out after just 11 more. That still left an unused 800,000 gold in stock! Due to all his steals (and lots of leveling up), Jesse was the richest of my solo characters by far. No one else has ever gotten beyond about 600k gold, much less double that. He's also the only one to reach 99 Elixirs, which tells you something about how much grinding a solo Thief has to do...
Jesse entered that final dungeon at Level 68, with a completely maxed inventory of recovery items. I used the Escape ability in the starting desert area to skip out on battles against the Land Crawls; unfortunately Jesse couldn't have both Escape and Capture equipped at the same time. Both Wood Sprite and Apanda were extremely easy opponents, and I didn't even bother to de-equip the Bone Mail for healing item purposes. Apocalypse defeated Jesse on my first try by casting ????, then Jesse got him on the second go, managing to win the battle just barely before the Condemn timer could run out!
That's always fun when it happens. Catastrophe was no issue, not with essentially unlimited Elixirs in stock. Halicarnassus killed herself with a reflected Holy. Twin Tania's signature Giga Flare move only did ~3000 damage, and since Jesse had 4500 max health, that pretty much removed the danger from that battle.
Escape once again come to the fore against the enemies in the Void:
These encounters give no experience and no gold, so there was no point in fighting. With Escape plus the innate Caution ability, Jesse never took so much as a single point of damage. And that was a good thing, because Jesse had to go through this area quite a few times when battling against Necrophobia. The four Barriers posed no problem, however unfortunately Jesse was killed several times by Necro's Hurricane/Vacuum Wave combination. Nothing I could do about that! Every time Jesse died, I had to walk all the way back from the save point in the Dimensional Castle - what a pain. There wasn't any great strategy to this battle, just keep attacking and healing as necessary while hoping that the deadly Necrophobia combination wouldn't pop up. I was ultimately successful on the fifth try against Necrophobia. Jesse nicked the Genji Armor as a parting gift:
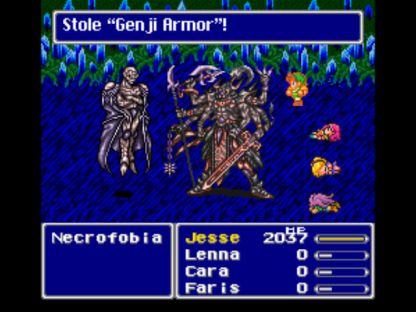
But of course he couldn't equip the Genji Armor. The pathos of a solo Thief...
Thus Jesse James came to the final battle against Exdeath and Neo Exdeath. I wasn't too worried about this one, because Jesse had good damage output, a lot of hit points, and virtually unlimited healing (90+ Elixirs). What I hadn't counted on was the terrible havoc wrecked by White Hole:
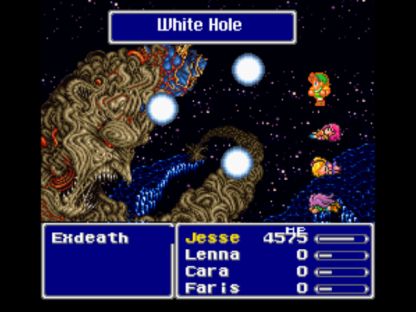
For whatever reason, Jesse had the absolute worst luck with White Hole. Exdeath broke it out again and again, every single time petrifying Jesse and resulting in instant death. Now any solo character that can't equip the Aegis Shield runs a serious risk when facing this particular move, but Jesse seemed to get nailed more than anyone else I can remember. We're talking literally dozens and dozens of boss fights ending with White Hole popping up. I couldn't even make it to the second half of the battle against Neo Exdeath, thanks to that one stupid attack. Exdeath shouldn't have been that hard... but thanks to White Hole, Jesse had an enormous amount of trouble here!
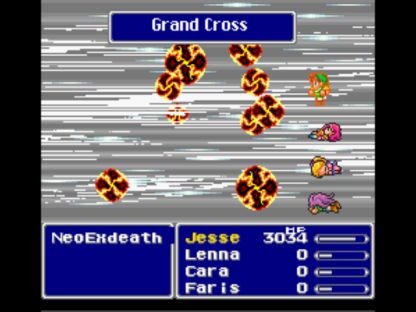
Eventually, I managed to dodge White Hole appearing and reach the second, Neo Exdeath half of the last battle. Jesse used the Odin summons from the Magic Lamp to remove Part #4 (standard procedure for solo characters), then went to work against Part #1 and its Grand Crosses. As I've said a number of times before, Grand Cross is the only true danger in this fight. If you know what you're doing, and are careful with Elixir usage, the physical parts from Part #3 and the Almagests from Part #2 should never kill you. Jesse had innumerable Elixirs in his stash, so I wasn't going to run out there. That meant that the whole showdown came down to three Grand Cross dice rolls. The first one did nothing, the second one caused Mini status, and the third one did nothing.
Game, set, and match:
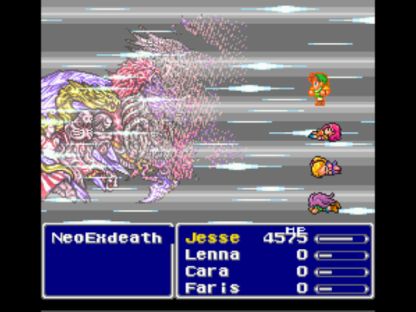
Yeah, Jesse used about 30 Elixirs finishing off those last two parts, but they were NEVER going to kill him! Even if an Almagest and Vacuum Wave hit at the same time, it wouldn't be enough to wipe out all 4500 health - which was a good thing, because two of them did in fact hit at the same time during the fight. Just need to be careful about using those healing items at the right time and keep attacking.
So in very odd fashion, Jesse James had tons of trouble getting past the Exdeath Tree form, yet defeated Neo Exdeath on the very first try! Normally it's the other way around. Because I was keeping a tally for curiosity's sake, I can state that Jesse died 49 times against Exdeath: twice to Meteo, once to my own error in using healing items, and the remaining FORTY-SIX times to White Hole!  Good grief... The fiftieth try at the final battle was the successful one. Lucky #50!
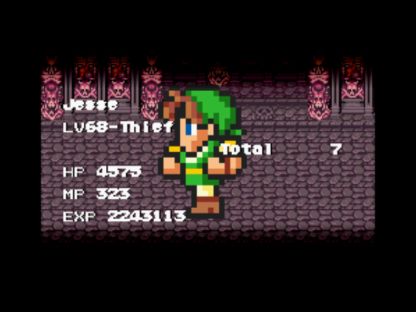
Jesse ended the game at level 68, which is pretty funny since he defeated Atmos halfway through the second world at Level 64! Everything else kinda flew by after that point. That's a very high level even for a solo character, but as I've said on a number of occasions, Jesse was a solo Thief, after all. The only comparison I have is to the solo runs done by notDave of Gamefaqs, who finished his solo Thief at Level 71. Looks like we were pretty much on the same page there.
Overall, the solo Thief was difficult, yet ultimately not as hard as I thought it would be, or as reputation made it out to be. The key was preparing for battles ahead of time by grinding out oodles of Hi Potions and/or Elixirs, thereby overcoming the natural weaknesses of the class. The dreaded Byblos encounter wasn't really tough at all, simply long and tedious. Atmos was the real challenge, and that could only be overcome by gaining levels. Solo Bard was a little tougher for me, although that may be due to the fact that I was still learning a lot of this stuff back then. The solo challenges undoubtedly get easier with more practice and experience at running different characters.
I'd like to do something easier next; Chemist seems like it would be a lot of fun, with that broken Mix ability...


