
Sample Livestream Game, Part One
Sample Livestream Game, Part Two
For The King (FTK) is a turn-based roguelike adventure game created by developer Iron Oak Games and released in April 2018 after a long period in early access. This was another Kickstarter game in the mold of FTL: Faster Than Light, and it shares a number of features in common with its sci-fi themed predecessor. As in other roguelike games, each playthrough is a one-time adventure done with only a single savegame file. If your party is defeated, that's it, game over. Start over from the beginning once again and try to do better the next time. For The King retains the common roguelike trait of possessing a punishing difficulty level, and due to the different starting party combinations and randomly-generated maps, the game has a high amount of replayability. I also found myself loving the polygon art style used in this game, reminiscent of the early 3D games of the 1990s. After watching a few videos of this game in action, I knew that I had to give it a try and play it for myself. FTK was retailing at the time of my purchase for $20, and there's a good chance that it can be found in a Steam sale for even less than that. This is an inexpensive game to download and take out for a test spin.
One of the biggest faults of FTK is a lack of good documentation online. There's an official Wiki page that's somewhat helpful, but I couldn't find anything that went into much depth about serious strategy for this brutally difficult game. The forums for the game were mostly people complaining about how hard it was to play and the fact that there's level-based scaling involved, while the Livestreams that I watched were invariably other newcomers who had no idea what they were doing. It became clear that if I wanted to have a real strategy resource for FTK, I was going to have to create it myself, and that's exactly what this page is designed to do. I'm going to walk through a full Tutorial game on the medium difficulty level and let this serve as a searchable resource for anyone else who might be interested in getting into this game. I think the Realms Beyond crew will like this game a lot, and since it's a coop game, maybe I'll even get some playing partners for myself down the road out of this.
EDIT: Since writing this Tutorial section initially, I found one useful guide written by SirImperialMike for Master difficulty. While I don't agree with every specific detail, there's a lot of good advice in the guide for someone who might be starting out with For The King. It's worth a read if you're interested in one of the few other online resources available for this game.

Main Game Mode
Herbalist, Hunter, Minstrel
Journeyman Difficulty
This is the starting party select screen in FTK. There's an option to pick one of three game modes (the main For The King mode, Dungeon Crawl, or Frost Adventure), set the difficulty level, and choose whether to play an online coop game or an offline Single Player game. This was an offline game of course, which is almost certainly easier than coordinating with two other players online (if not as much fun). The first major decision when starting out in For The King is the party composition. You have three total characters in your group, and a choice of ten different classes to pick between. Eight of the ten classes can be split into pairs based around their primary stat: Strength (Blacksmith and Woodcutter), Awareness (Hunter and Trapper), Intelligence (Scholar and Herbalist), and Talent (Minstrel and Busker). The last two classes (Hobo and Monk) are essentially secret classes that don't lean towards any one stat in particular, with the Hobo being a gimped challenge class. Each of the classes tends to emphasize one or two of the game's stats and comes with their own unique abilities. The chance to replay the game with different classes is one of the biggest selling points of FTK, much like trying out the different ship designs in FTL.
For this game, I decided to pick a starting group of Herbalist (Intelligence), Hunter (Awareness), and Minstrel (Talent). This was not a variant group and represented what I consider to be a rather strong party for FTK. The Herbalist has fairly mediocre stats in everything other than Intelligence, compensating for this by having two useful innate abilities. "Gather Herbs" gives you a chance to find herbs each turn out in the field, and "Party Heal" is an indispensible ability that lets the game's healing herbs benefit everyone in the group at once instead of only the character consuming them. Regardless of your party setup, someone needs to acquire an item with Party Heal on it as soon as possible, and the Herbalist can ignore that due to starting with this skill as an innate ability. It's quite nice and the online FTK community seems to love this class. The Hunter is the game's fastest class, with the highest starting stats in both Speed and Awareness. This is essentially a ranged DPS class, focusing on being fast enough to dodge attacks and get lots of shots off with a bow. Hunters have several useful innate abilities: "Elite Sneak" and "Elite Trap Evasion", which do what the names suggest, along with "Energy Boost" (a chance to get an extra movement point each turn) and "Called Shot" (a higher critical chance when using a bow). I've come to believe that the Hunter is the game's strongest class, for reasons that I'll get into later. Last but not least, I picked a Minstrel for my third character. This is a support class that trades raw stats for one of the game's best abilities: "Encourage" has a 35% chance to change any missed dice roll of your allies in combat into a successful roll. (They also have a less useful ability called "Inspire" that randomly gives a small amount of experience to allies standing next to them.) Encourage is an amazing ability and pretty much serves as the calling card for the Minstrel class.
There's a fair amount of customization in terms of picking names for your characters, their color scheme, male/female status, skin and hair color, their hats and backpacks, and so on. I don't mind taking a few minutes to fiddle with this because these characters will (hopefully) be around for some time on a long run. For this particular game, I named my characters Smoky, Bowstring, and BraveSirRobin. I'm sure that I'll run out of names eventually, but I'm having fun with this for the moment. 

This is the main screen of the game while playing, and I'll take a minute to explain what it all means. Starting at the top of the screen, you can see on the left side what character's turn it is. They will go in order from left to right over and over again throughout the game, and there's no way to change that order while playing. The bar at the top also serves as the game's "Chaos Meter". Those little skull symbols represent the next time that the chaos meter will increase, and here on Journeyman difficulty, the meter ticks up after five full rotations of each character's turn (so fifteen total party turns). If the chaos ticks up too high, enemies will get additional health and the landscape will take more and more damage. If the meter hits three chaos marks, it usually means a game over situation. This is FTK's version of the rebel fleet from FTL; you must keep fulfilling quest objectives to keep the chaos meter low and stop the game from getting out of control. The meter prevents the player from grinding out levels endlessly and puts the gameplay on a constant clock. Many of the players on the online forum hate the chaos meter, but it's the driving factor behind the whole game setup. FTK needs the chaos meter to keep the quest moving along, again for the same reason that FTL needs the rebel fleet. Playing this game requires balancing the building up of your characters against the ticking clock of the chaos meter in the background. The higher the difficulty level, the faster the meter fills up and the less time that the player has available.
At the bottom of the screen are the three character portraits, and this is where most of the other key information is displayed while playing. The big number next to the character's portrait is their current HP, and the usable items in their inventory are listed with small icons just to the right. Each character's gold total and their equipment pouch are further to the right side of the inventory. Note that everyone starts with almost nothing at the beginning of the game, just one or two items and a handful of gold pieces. (You get more starting stuff on Apprentice, the lowest difficulty level.) Getting started can be quite challenging in this game, with few resources at the player's disposal. Below that are bars for health and experience, and the blue "0" represents everyone starting at a beginning level of zero. Why Level 0 and not Level 1, I have no idea. To the left of the character portraits, the numbers from top to bottom display armor (in blue), resistance (in purple), evade percentage (in green), and current attack damage (in purple or white, purple for magic damage and white for physical damage). As you would expect, armor blocks physical damage while resistance blocks magical damage, and evade is the change to dodge incoming attacks entirely. There's also a "pipe level" that starts at zero which I'll discuss later on.
The very bottom of the screen contains each character's scores in the game's seven attribute stats. This can be toggled on or off and starts turned off by default, but you'll want to have it on because the stats sit at the core of FTK's gameplay. From left to right, these stats are Strength, Vitality, Intelligence, Awareness, Talent, Speed, and Luck. While there are seven stats in total, in practice the game really only has four stats. The first is what I'll call primary stat, the main stat attuned to each class. This is either Strength, Intelligence, Awareness, or Talent depending on the class involved. For example, Awareness is the primary stat for the Hunter class; Bowstring starts with 78 in Awareness. She'll want as much of this as possible, up to the cap of 95. The other three primary stats don't really matter very much on Bowstring and she can safely ignore them for the most part. The second stat is Vitality, which determines how much health each character has. Obviously more of this is always better, although Vitality in practice isn't as important as you might think because it doesn't have much scaling (i.e. 50 Vitality and 80 Vitality aren't all that far apart). The third stat is Speed, which determines combat order (higher Speed goes first), how often characters attack in combat, and a character's evade percentage. Speed is absolutely awesome and you want as much of it as possible on everyone. The fact that the Hunter is the game's fastest class is a major reason why I believe it's also the strongest class. Finally, Luck is a rarely used stat and starts at 50 for every class. It doesn't seem to matter very much and can also generally be ignored while playing.
The active gameplay takes place on the hexagonal map in the middle. Each character rolls the dice each turn to see how many movement points they have for that turn (this is a Speed check and higher Speed gives a better chance for more movement points), then they move around on the field independently until running into events or enemies. When they do run into an opponent, this screen pops up:

Smoky is playing the first turn of the game and ran into my first enemy, a single Level 0 Beastman. You can almost always see the level of the opposing enemies on the map, and it's a good idea not to go fighting anything above your current level. The way that this works when encountering an opponent is that any of your allies located in the red tiles will also be pulled into the battle. If they're outside that range, they don't take part in the combat. The trick is therefore to have your three characters close enough to one another to help in the fights, but also split up enough that they can be efficient in exploring the map and pushing back the fog of unrevealed tiles. It can get very complicated at times trying to balance the need to stay close against the desire to cover more ground. In this particular situation, Bowstring and BraveSirRobin are both outside the red tiles, however they can still join in the battle because they have items equipped with the "support combat range" property, which lets them join fights from one extra tile away. The lineups on either side of the monster portrait will always show who gets pulled into the combat and who doesn't, and mousing over an enemy will also display the battle range for planning purposes.
However, players also must remember that these rules don't apply only to the party - they apply to monsters as well! If there's more than one enemy within that span of red tiles, they will ALSO be pulled into combat, up to a maximum of three foes on each side. (FTK's combat engine can only handle 3 vs 3 battles.) Smart players can use this creatively to pull enemies off in the distance into combat instead of moving all the way over to their tiles, handy when opponents are on the other side of walls or impassable terrain. There's also an option to attempt an Ambush of the enemies, which grant a extra surprise round of combat... at the cost of giving the enemies a surprise round if the dice roll fails. The Herbalist is a poor class for attempting an Ambush, and I didn't go for one here. Finally, you can also choose not to fight by Retreating back a tile if desired. Sometimes monsters will pop out and surprise you though, and at that point combat is unavoidable.

This is what the combat screen looks like in FTK, the other place where the player will be spending most of their time. The portraits and the status bars at the bottom remain exactly the same in and out of combat, which is handy for keeping things consistent. Combat order goes according to each character's Speed according to the list up at the top. You can see when each individual will get their turn, and characters with high enough Speed will start getting extra rounds of combat, part of the reason why Speed is such an amazing stat. Bowstring gets to go first here because she has the highest Speed at 78; obviously there's a huge difference between your party going before the enemies in each fight as opposed to after them.
Attacks are made using a simple dice roll system. The starting Hunter bow has a physical damage rating of 6 points and keys off of the Awareness stat. That's the little "eyeball" symbol shown in the middle of the screen. When making an attack, roll the 100-sided dice three times and compare against the character's Awareness stat. Since Bowstring has a score of 78 in her Awareness stat, she has 78% odds to hit on each of those three dice rolls. On three successful rolls (0.78 * 0.78 * 0.78 = 47% odds), she will do 6 damage to her opponent. If she succeeds on two out of three of those dice rolls, she will do 4 damage to the enemy, and so on. Armor blocks incoming physical damage and resistance blocks incoming magical damage, although of course this lowly Beastman has none of either category. Every weapon of the game tests one of these stats, and the vast majority of them test one of the four primary stats (Strength, Intelligence, Awareness, Talent) in some form. Lots of attacks have special properties or status attacks, usually trading these abilities for decreased accuracy. For example, this bow has a second attack option (the arrow piercing the shield icon) that ignores enemy armor in exchange for -10% accuracy on each dice roll, 68% instead of 78%. With different weapons holding different properties, there's a ton of room to experiment with different options, and of course, this being a rougelike game, players have to work with whatever stuff randomly drops. It's all highly intuitive and a lot of fun.
One other thing: FEWER stat icons are better than more stat icons. Each one of them represents an additional dice roll, and you'd rather get max damage by succeeding on two dice rolls than needing to succeed on four or five dice rolls. There are some extremely powerful weapons that are also highly inaccurate, and they aren't nearly as good as they might sound.

The initial Beastman was dispatched easily. This picture is from another battle shortly thereafter with the maximum of three opponents at once. Here you can see the Minstrel's Encourage ability kicking in for the first time: 35% odds to succeed on an ally's failed dice roll in combat. Instead of Smoky failing one of his three Intelligence checks, he succeeded on it instead. Encourage is an amazing ability and I love having it via a Mistrel character. It's even better than it might seem because most of the game's weapons require a perfect dice roll to get their "special" property: armor or resistance piercing, a status effect like slow or burn or shock, a buffing ability like speed up or armor up, and so on. If you don't get a perfect roll, you don't get the special aspect of the attack. Furthermore, there's another extremely important aspect of a perfect dice roll: enemies will NEVER evade a perfectly rolled attack. The game actually cheats a bit in this regard because the player characters can dodge perfect monster attacks but they can never avoid your perfect rolls. (For understandable reasons, as players would be very angry if they rolled perfectly and the monsters took no damage.) Failed dice rolls are therefore disproportionately costly, and turning a failed dice roll into a successful dice roll is a powerful ability indeed.
There's another way to ensure that dice rolls succeed in FTK: Focus. This is indicated by the three glowing hexagons above each character's status bar, showing that each character has three Focus points available. Characters can spend a point of Focus to ensure a guaranteed successful dice roll, and this is one way to take the randomness out of the game's combat system. If you need an enemy dead right now, you can spend Focus points to make that happen... at the cost of using up some of your small pool of available Focus. This is therefore a resource to be managed, much like mana or spell slots in other RPGs. I see way too many people on Livestream burning through their Focus like crazy instead of being more judicious in its use. A character will zero Focus points is a character leaving themselves with no safety net for a bad dice roll to pop up. Be very careful about spending your Focus points too liberally and leaving your fate purely in the hands of Fortune.

At the same time, you don't want to be so stingy that you never make use of Focus either. Here's an important little trick to learn: characters can spend a Focus point to get an addition movement point on the map screen. In this situation, Smoky has come up one point short of being able to move into the town of Woodsmoke. If he ends his turn outside the town, he'll have to wait for the turn to cycle back around to him again to go to the inn and heal, and then that will use up another turn because the inexpensive healing option costs a character the rest of their turn. This would be extremely wasteful, sacrificing two full rotations of my characters before Smoky was back and ready for field duty again. Instead, I spent a point of Focus to let him reach the town and heal back to full on this turn, then be ready to move out into the wilderness again next turn. Healing at the inn also restores two points of Focus so it didn't actually cost him anything. Efficient movement around the map is critically important in FTK, and knowing when to spend Focus to get extra movement points is part of that decision-making process.
This picture also does a good job of demonstrating what the overworld map looks like. FTK has a colorful fantasy-themed world that uses the same stylized "early 3D graphics" look as the rest of the game's artwork. Unrevealed tiles have little yellow borders with question marks around them, while revealed tiles are unbordered. Destinations further off in the distance are covered by white clouds that get pushed back as your characters approach. There's no fog of war in this game, and once something has been explored it stays revealed for the rest of the game. The difference between explored and unexplored tiles is a bit too subtle for my tastes, and it's easy to miss the distinction while playing. I wish that the designers would do a little bit more to distinguish the two types of tiles on the overworld screen. In a similar vein, the game does a terrible job of indicating when a character leaves one area and heads into another. The tile graphics change a little bit and the banner at the top of the screen (where it says "The Guardian Forest") swaps over to the new area description, but both of these are very easy to miss. Monsters are much stronger in the other areas and I've realized in retrospect that several of my initial game overs came from wandering into another part of the map without realizing it. In this particular game, the Golden Plains spawned only three tiles away from the starting town of Oarton, and the Poisonous Bog was similarly only three tiles away to the south. If I hadn't known that it was important to avoid these areas and stay in the easier Guardian Forest for the first few levels, I would have suffered an immediate party death and been wiped out completely. The game does a poor job of explaining what's going on here to new players, and I suspect many of them quit in frustration before they figure out what's going on. It's something that the designers should try to fix, perhaps with a popup warning screen when entering a new area for the first time.

Getting started on the higher difficulties can be pretty brutal in FTK. Your characters have no equipment beyond their starting weapons, and with no armor or resistance, they can easily take 5-10 damage per enemy attack. Gold is similarly very tight, with only about 5 gold dropped per monster killed. The most important thing to do for the first few turns is fight Level 0 enemies close to either Oarton or Woodsmoke, pausing frequently to heal injured characters at the inn. Use the modest gold income to keep your characters topped off on health and try to upgrade their weapons as soon as possible. In the picture above, Bowstring has already upgraded to a more powerful weapon with 9 physical attack damage instead of the starting 6 damage. I actually had a ton of Awareness-based weapons dropping early on this run without getting much in the way of Intelligence or Talent-based weapons for the other two characters. Do not spend gold on defensive equipment unless it's really necessary, as the different types of armor can be picked up in drops from enemies. Outside of healing your characters, I strongly suggest saving gold for weapon upgrades and buying more Godsbeard herbs. These are the game's healing herbs and it's almost impossible to have too many of them. They scale up in cost as the game continues, which means that getting them cheaply in the early game will only end up saving gold in the long run.
Of course you also want to explore the map as well since there are often lots of useful bonuses to be found there. To the northwest I ran into that stone obelisk item with the red markings, which is called a Sanctum in this game. Sanctums provide a powerful bonus to the character that tributes them, and they will shield that character from a single deathblow. BraveSirRobin grabbed this first Sanctum mostly because tributing it provided a full restore on health; it also gave him +10% critical strike chance. Then I found this Cult Device, an enemy object that can be destroyed for a bonus. There's one Cult Device in every area of the map, and smashing them is always helpful. You can choose to remove a point of chaos, gain an extra life, or remove a scourge, which I'll explain a bit later. I chose to reduce chaos by a point, which removed the impending chaos skull from the timeline at the top of the screen. Most of the time, the player will either want to remove chaos or to gain an extra life from the Cult Devices, although sometimes a remote scourge could be good to eliminate as well. Destroying Cult Devices always helps your group in some way.
As far as scourges go, I had also found the lair of one of them in this same immediate area, the cave with the glowing purple rock inside:

Scourges are essentialy minibosses that will appear in game after game. There are about a dozen of them in total, and one will spawn in each map area throughout the game; if you play FTK a lot, you'll get to know each of them. The scourges will eventually appear on the top of the screen as part of the chaos meter, and if they aren't destroyed by the time that they reach the left side of the meter, they will cause some kind of detrimental effect to take place. The Ancient Quarry here contained the scourge named Deimos, and his unique ability is to cause all enemies on the overworld to be replaced by white clouds, making it impossible to know what type of enemy is standing on each tile. It's not too bad as scourge abilities go, although still better to ward off if possible. I had seen that Deimos appeared at Level 2, and yes, the scourges will show up with different levels of strength depending on when and where in the game they appear. I waited to face him until my characters were Level 1 and all of them had upgraded their starting weapon, as well as picking up at least a little defensive equipment from random drops to provide a bit of armor and resistance. I would have preferred to do this battle at Level 2, and it may have been a better idea to wait for more experience and items before taking on this opponent. At the same time, I had completely explored this area of the map and wanted to clear out the scourge now to avoid the need for backtracking later. I decided that I was strong enough to win and initiated the combat.
Unlike most scourges who have two accompanying minions, Deimos is only a single opponent. His gimmick is that he has high armor and resistance, making it highly important to use piercing weapons if possible. I fought through the enemy's defenses and was taking significant damage, but I almost had the boss defeated at the same time. I just needed to avoid a truly bad dice roll... and then I had two of them in a row, leaving Deimos on a single hit point remaining. He took full advantage of this oversight on my part:

Yeouch! That hurt a lot.  With that perfect roll from Deimos, he killed poor Smoky and would have killed BraveSirRobin as well if it wasn't for the Sanctum, which now crumbled into dust. The "Still Alive" message means that a Sanctum has been destroyed to preserve that character's life. Fortunately Bowstring was able to finish off the boss on the next attack, but wow, what a setback this had been. It was my own fault too; while I did have some pretty awful dice luck that left Deimos alive with a single point of health, I really should have been more aggressive about using my Focus in this fight. Bowstring didn't use a single point of Focus, and even one more shot getting through would have made the difference. Since I was going to have to stop and rest at an inn regardless after this battle, there was no reason not to use a bit more of my Focus resources.
I paused afterwards to assess the damage. Losing that Sanctum for BraveSirRobin wasn't too bad; mostly it meant that he would be vulnerable again to a potential killing blow. Reviving Smoky represented a bigger setback since it cost me one of my three starting lives. See those little heart symbols below the chaos meter? Those are how many lives you get. Reviving a character is easy, simply walk onto the tile where they died with another party member. However, it uses up one of those lives and you don't get very many of them to play around with. Obviously if the whole party dies in a single battle, that's it regardless of how many lives might be left over. No one remaining to bring the others back to life. Anyway, reviving Smoky dropped this group down to only two lives remaining and cut into my margin for error. I'd have to be more careful in the future.

There are rewards for defeating the scourges, however, in the form of some pretty choice gear. Each of them will always drop a unique artifact with special stats in addition to the random loot that always appears after a victory. Deimos yields this piece of his skull in somewhat morbid fashion, with major bonuses to armor and health and three useful status immunities. At this early stage of the game the Deimos Skull was practically an uberdrop; just compare it to the stats on the feeble Kettle Helm that Smoky had been wearing up to that point. I opted to have my Herbalist wear this piece of gear to keep him from falling again in combat. It's no use having a healer if he's the first once to be killed in battle! This screenshot also demonstrates the equipment setup in FTK, with seven total equipment slots available on each character. This feels like roughly the right amount of gear slots to me, enough for some flexibility and customization without being overwhelming. You can also use the tabs under the character portrait to sort their inventory by weapons, armor, scrolls, consumable items, and so on. It's a reasonably well designed interface and there's no limit to how much each character can hold, although later on the inventory management can get a bit tedious once the items start to pile up.

After exploring the area to the north of Oarton and Woodsmoke, I circled around further to the west with my party to check out the remaining parts of the Guardian Forest. This area wound up being a dead end that didn't lead to any other regions of the map, and I didn't find too much of interest in the area. Note that it did turn to night outside, as FTK operates on a day/night cycle that's also visible on the chaos meter at the top of the screen. When the meter drops into the dark purple parts of the bar, it will turn into night outside for a few turns as special night markets open up and there are more dangerous monsters prowling around.
The only true place of interest off here in the west was this Dark Cave. This was a mini-dungeon to explore and there are usually a few of these in each area of the overworld map. They're great places to venture inside because they usually have two or three battles followed by a guaranteed treasure chest at the end. While the danger level is a bit higher than out in the field because there's no chance to retreat from combat, the rewards of getting more gold and useful item drops are also much higher as well. I should also mention one very useful property of all dungeons: entering with a single party member will move your whole party inside so long as they're all present in the same map area. This is a great way to regroup your party together on the overworld map when they get spread out. Since this was a Level 1 dungeon, my party of Level 1 heroes at maximum health looked to be in plenty good enough shape to complete it. I headed on inside.

This is the tail end of one of the battles inside the cave. In between combats, the action sequence bar at the top of the screen is replaced by a small map showing the rooms of the dungeon. Your location is the torch symbol, completed rooms have a check mark, empty rooms have guaranteed battles, and rooms with a question mark could have a number of different results, everything from traps to healing fountains to an underground store. This was a small minidungeon with two enemy encounters, a random instance (which I think was a healing well this time), and then the treasure chest at the end. I'll also draw attention to one other thing from this picture: see the little purple version of the Speed symbol next to Smoky's character portrait? That indicates that he's been Cursed for the Speed stat. Cursed is a nasty status ailment that drops the score of one stat by 25 points (in this case from 67 to 42). While this doesn't matter too much if it hits a non-primary stat or Luck, having your primary stat go down by 25 points can be devastating as it turns your 80 percent dice rolls into 55 percent dice rolls, and that means a lot of misses. Having Speed or Vitality get tagged with a curse is also quite bad, slower movement in combat or fewer health respectively. Curses are especially annoying because they never go away on their own; the player must clear them in town or get an item with curse immunity to remove the status ailment. The curse removal items (Hag's Bane) tend to be rare and expensive to purchase, so be prepared to work around your characters being cursed. I went back to town to heal afterwards and purged this curse from Smoky.
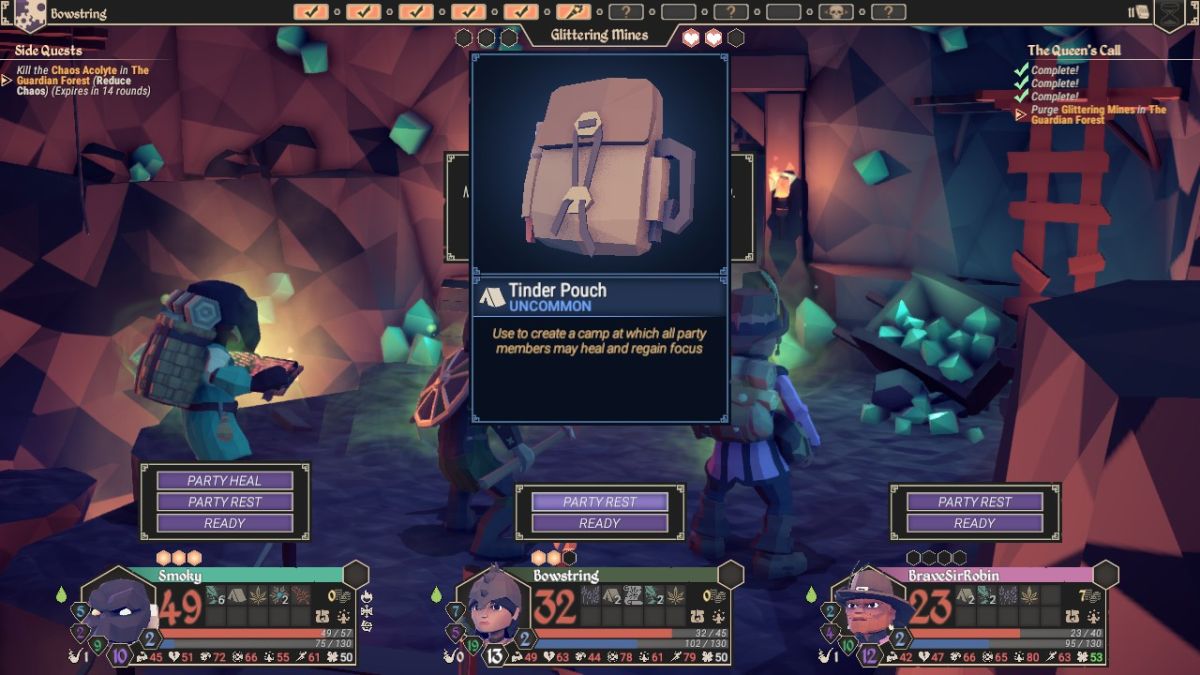
Other dungeons are much longer than the randomly-generated little cave that I had initially explored. The Glittering Mines is the major dungeon that closes out Act One of FTK, and as the map above indicates it's about triple the size. There's always a place to rest by using a Tinder Pouch halfway through the Glittering Mines, which duplicates the effects of staying at an inn. I assumed on my first playthrough that since the first major dungeon had a place to use a Tinder Pouch inside, future dungeons would also follow suit. Heh, not so much in this game. There are some places to use them in the final dungeon at the end of the game but that's about it. Note that I've stocked up heavily on Godsbeard herbs, with ten in total split across my three characters. Smokey had six of them because he had the indispensible Party Heal ability in case I needed to heal everyone at once. I'd also upgraded his pipe level to increase the healing effect to the rest of the group. I don't want to imply anything about the designers of this game, but they sure do seem to like references to herbs and pipes... 
I should point out as well that my party members were all poisoned at the time of this screenshot. That's the green teardrop next to their character portraits, and poison deals minor damage over time as one would expect. It also has a penalty to stats: -5 to all attributes per level of poison, and your characters can be double poisoned or even triple poisoned in this game. This is really obnoxious since it will hinder all of your dice rolls in combat, make your characters slower, decrease their health totals, etc. Unlike cursed status, poison will dissipate on its own eventually, so thank goodness for that. It was also cleared by the use of this Tinder Pouch which had my group back to full fighting health again.
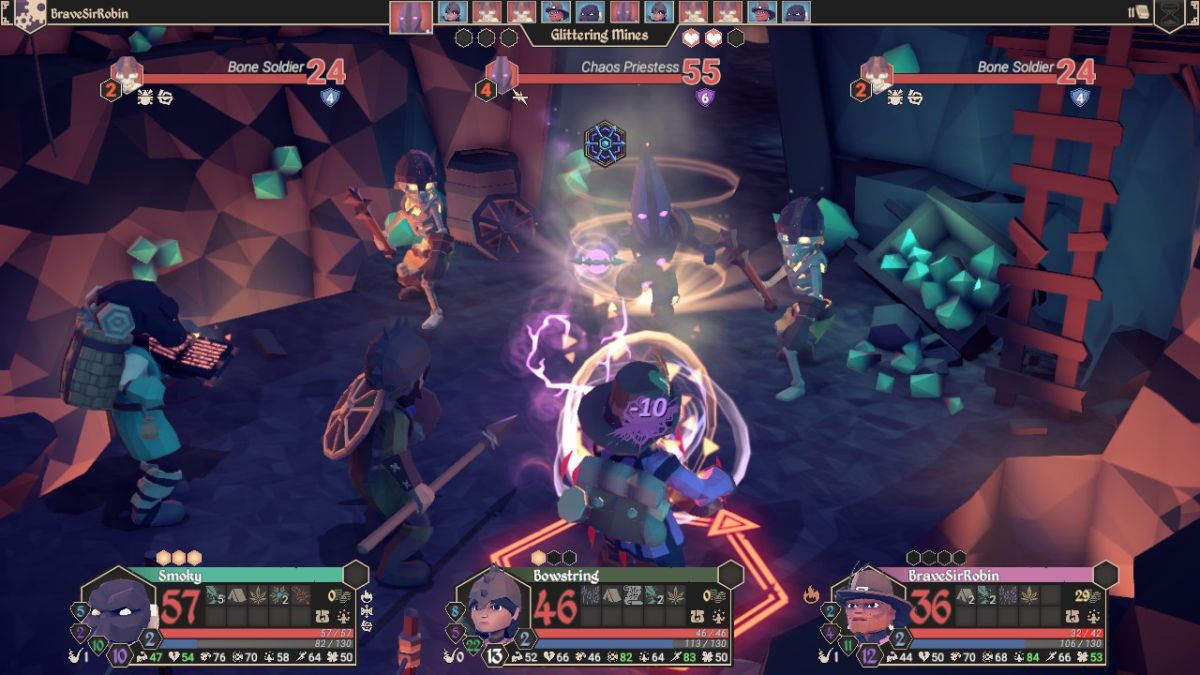
The boss at the end of the Glittering Mines is always the same, a battle against this Chaos Priestess and two accompanying skeletons. I believe that her level increases as the difficulty goes up although I'm not sure of that. She's quite fast and was able to move before Bowstring's 83 speed, dealing mostly magic damage and possessing some hefty resistance for this stage of the game. Poor BraveSirRobin took 10 damage and was hit with the Enflame debuff, causing him to take additional fire damage over time. I concentrated on having my characters take down the Bone Soldiers first to remove enemy attacks from the battlefield as quickly as possible. The bosses themselves tend to have too much health to make them a good initial target. After smashing both of them, BraveSirRobin was approaching death's door and this time with no Sanctum to keep him alive. I turned to Smoky to break out his Party Heal ability:
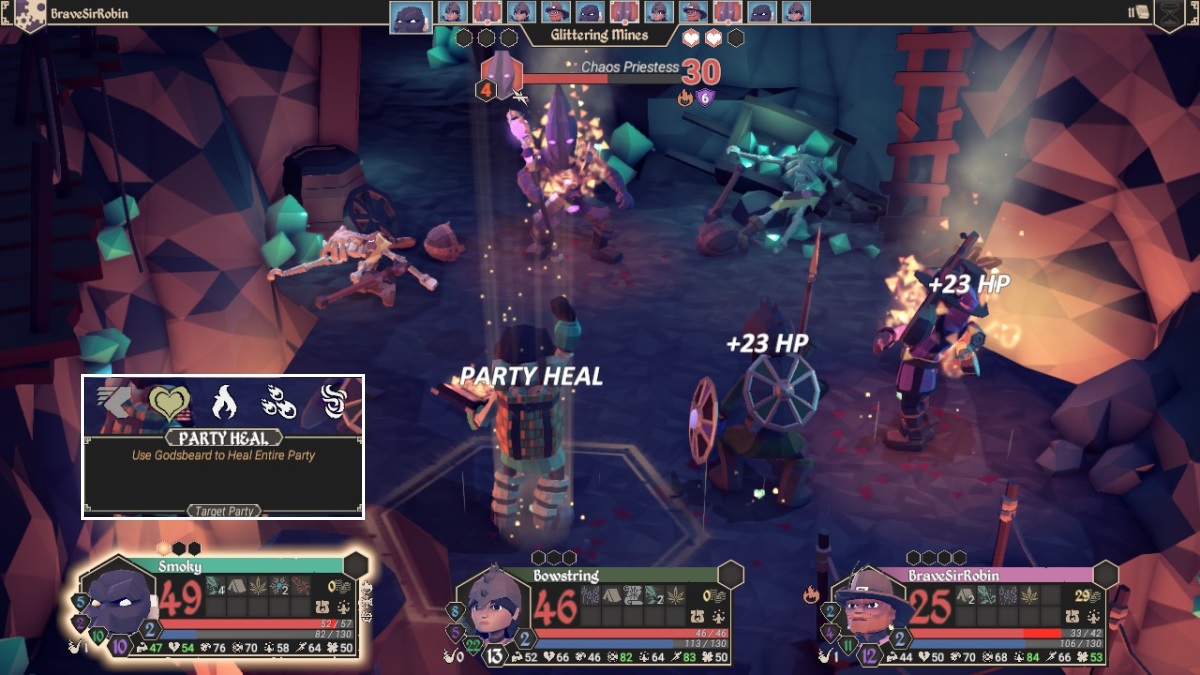
Party Heal can be used in any of the underground dungeons, either in combat or between battles. It consumes a Godsbeard herb to heal the whole party at once for 75% of the healing value of the herb. The default healing from a Godsbeard is 15 HP, and then it goes up with each pipe level: 30 HP, then 45 HP, and then finally 60 HP at the maximum pipe level of 3. This is why it's important to upgrade the pipe level of your characters as the game progresses, to keep the scaling of the healing herbs in sync with your growing HP totals. It's especially important to upgrade the pipe level of whoever is bringing Party Heal as an ability since the game only checks the pipe level of the ability user, not the individual pipe level of each character. Party Heal is also a fantastic deal in terms of item effectiveness; Smoky would get 30 HP back for eating the Godsbeard herb himself, but instead he was able to restore 23 * 3 = 69 HP via Party Heal, more than double the base rate. The one downside is that using Party Heal in combat does eat up a character's turn, which is why it's preferable to use it between fights if possible. You often don't have that luxury though, and this timely use of Party Heal took BraveSirRobin from 10 HP up to 33 HP, removing the danger from the rest of the boss fight. The Chaos Priestess did target the Minstrel again, and it was only this healing that kept him alive.
In the wake of victory, it was time to check out the loot that dropped. This was the best item that I'd seen yet:

Very nice indeed! This was a significant upgrade from what Smoky had been using to date. More armor, more Intelligence, a lot more resistance, and an extra point of Focus to play around with. These are the bonuses that the Intelligence-based armor set has at its disposal, with more advanced versions of the armor providing the same stat types in larger quantities. The Awareness set of armor that Bowstring would be searching for is the best of the group: it contains armor, resistance, Awareness, and evasion. In fact all of the stuff that a Hunter will wear tends to have lots of Awareness, Speed, and evasion on them. This is why the Hunter is the best class in the game; Hunters start out faster than anyone else and keep getting more of their primary stat, more speed, and more evasion. The Strength-based classes (Blacksmith and Woodcutter) get screwed over in this regard because the Strength-based gear mostly comes with Speed penalties. Ouch! The slowest classes have to get even slower to stack more of their primary stat, and while they do have more Vitality to compensate somewhat, it doesn't make up for the speedster classes getting half again or more chances to act in combat. The Intelligence-based armor set used by the Herbalist and the Talent-based armor set used by the Minstrel fall somewhere in between, good for their classes but lacking the self-reinforcing synergy of the Awareness gear.
With victory achieved over the Glittering Mines, my party was ready to leave the starting area and head on to Act Two. This would be where the map opened up for the first time and I had the chance to explore the world more fully. There was still a long, long way to go before reaching the end of the quest.


