
Livestream Link (for those who would rather watch first before reading)
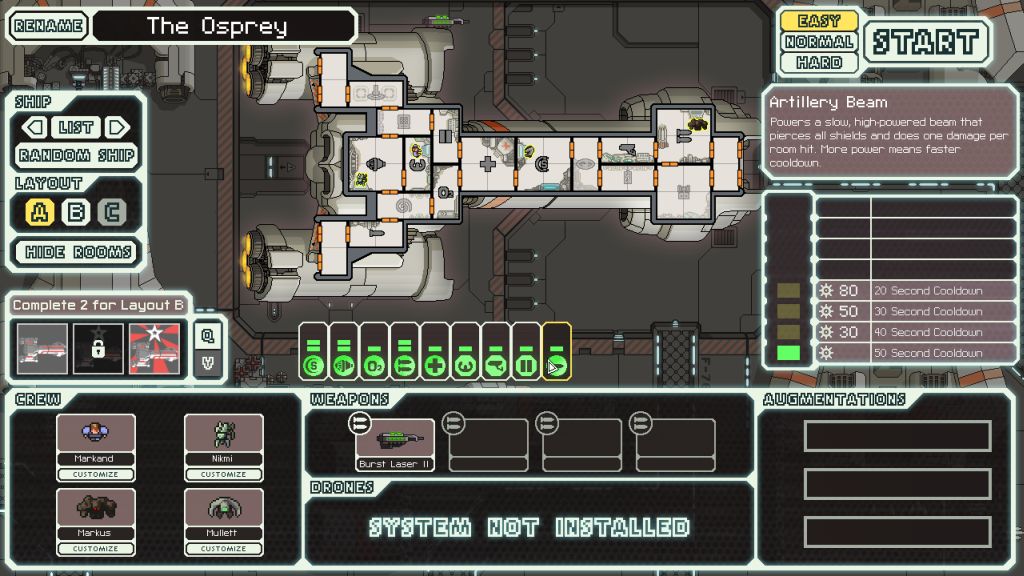
Here's a completely different ship for a change, not the Kestrel in any of its three layouts. The Federation Cruiser represents a combination of the best efforts of the various races that are fighting together against the rebels, and this is demonstrated in the multiracial crew that appears on board. The Federation A layout in particular has the excellent starting crew of 1 Human, 1 Mantis, 1 Rockman, and 1 Engi. That's a group well suited to any desired strategy, from boarding other ships with a Teleporter system to sitting back and playing defense with an engi around to make repairs. The starting weapon on this ship is also very strong, with our old reliable friend the Burst Laser II returning from the Kestrel A setup. Three shots for two weapon power, almost impossible to beat that in this game. With this starting toy, the Federation A is well suited to go in just about any direction for weapons setup.
The most unique feature of the Federation cruiser is something known as the Artillery Beam, an additional weapon not present on any other ship. As described in the picture above, the artillery beam is a slow-charging beam weapon that completely ignores shields and deals one damage per enemy room hit. You do not control the beam weapon at all, and one of its few weaknesses is an inability to aim the thing. Upgrading the artillery beam to higher levels lowers the cooldown from a starting 50 seconds down to an eventual 20 seconds. This extra weapon is very nice to have, and it offers an additional means of getting through some difficult situations. Even if your default weapons can't break through enemy shields, the artillery beam will always be able to hit and deal damage. Eventually, anyway! How much scrap to spend upgrading the artillery beam is one of the interesting strategic decisions surrounding this weapon. Note that it does take up one of your system slots, however, meaning that there are only two of them remaining. You can't have Cloaking, Drone Control, and a Teleporter, for example. Only two of the three. This is one of the few drawbacks of the Federation A layout.
Taken as a whole, the Federation A is one of the game's best ships. I would rank it as slightly better than the Kestrel A, and roughly equivalent to the Kestrel B. This is not a challenge ship by any means. If you can't win with this thing, you're doing something wrong. Only a couple of the truly broken ship designs end up exceeding this one. I also think it's one of the more entertaining ships to use, between the multiracial crew and the artillery beam. Let's get started.
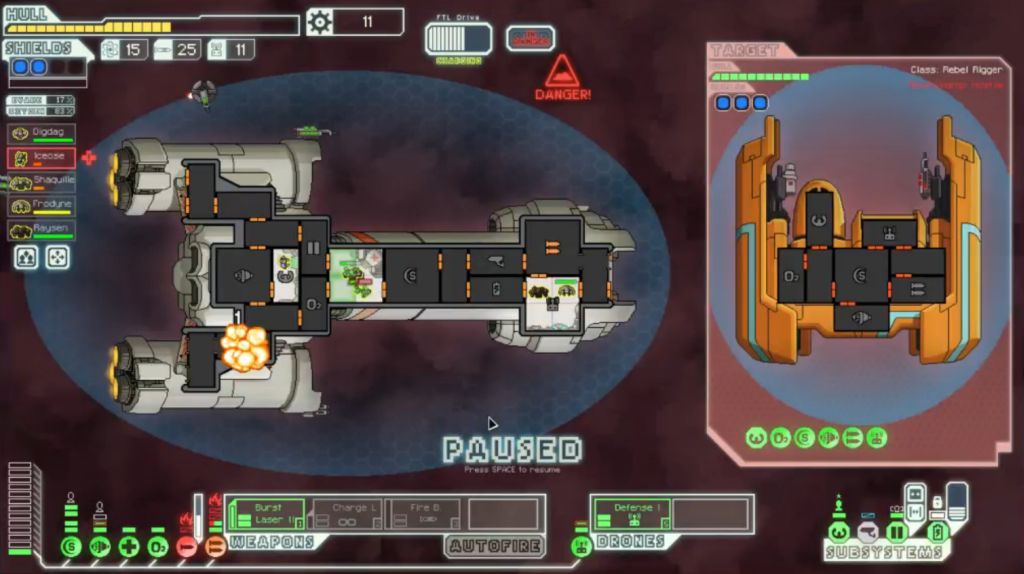
My first attempt with the Federation A lasted all of about four minutes. I ran into a very strange battle in Sector One where boarding drones kept punching holes in the ship's hull. I didn't manage the oxygen drain from the hole in the hull correctly, and then my Oxygen system was ionized at a critical moment. When a missile punched yet another gap in the hull, there was no way to restore the air circulation fast enough to save my crew. Here's what that looked like:

What a comedy of errors. I should have kept the doors closed while there was a hole in the engine room, opening them just caused all of the oxygen to drain out of the entire ship. I did this backwards; you want to open all the doors in the ship AFTER the hole has been fixed, not while you're repairing the breach. Ooops. Well I did learn another little tidbit here, even if it meant costing a poor crew their lives. I was not going to continue when the second jump cost me half of the personnel on board. Restart!
The second attempt didn't exactly get off to a good start, as a rebel ship knocked out my weapons with a lucky first volley and then ran away before I could get them back online. Fortunately the next battle gave me a double scrap reward, 37 scrap from the combination. That's a massive amount in Sector One on Hard difficulty, and it helped a ton. 15 scrap from the subsequent fight and I had level 4 shields (two layers) ready to go. I also had the good fortune to obtain a full scan of the starting sector from an autoscout near the beginning of the area, and that allowed me to jump from encounter to encounter, piling up additional scrap all the way. That's one of the understated luck factors on these runs, getting a full scan of a sector on the first or second FTL jump can make a huge difference as far as getting ahead of The Curve. It's so much easier when you can plot out your course, as opposed to hopping around blindly like most of the time.
I also picked up this freebie, still in Sector One, when I gave a rock ship the extra fuel that they requested:

Another Laser Charger, a nice addition. This was the same Burst Laser II + Charge Laser combination that I had used to good success back on my Kestrel A run, and I seem to remember that the second weapon had been picked up for free in that game too. This gave me another immediate target for my scrap spending, adding more levels in weapons so that I could deploy the pair of lasers together. With five shots on a relatively short 12 second cooldown, I would be in great shape for the first half of the run. Hopefully I'd be able to find something down the road for the lategame when enemy shielding began to ramp up.
I spent the rest of Sector One hitting fight after fight, and came out of there in truly great shape. The most damage that I took came from an event that smacked the hull, enemy ships had achieved little. I had enough scrap to take weapons to level 4 at the beginning of the second sector. Now I just needed enough power in the reactor to fire both of them! The rest of Sector Two was pretty straightforward, I was able to find quite a few fights and win with minimal damage. The Burst Laser and Charge Laser pairing were shredding the enemy ships, which mostly had a single shield bubble (or even none!) Unfortunately the scrap rewards were consistently low, I think I was rolling at the bottom end of what can appear. The biggest pickup was a Defensive Drone II found in the wreckage of an enemy ship. I didn't have a Drone Control system yet, but that was excellent sell bait (35 scrap) if nothing else.
By the beginning of Sector Three, I was starting to need a store visit due to low fuel and accumulated hull damage. When I finally spotted one, I made haste to jump over to it, even though it meant backtracking and wasting an FTL jump later. This store had some very nice stuff for sale, and I picked up a Drone Control + Defensive Drone combo along with the Backup Battery. I funded these purchases by selling the Defensive Drone II and a random Fire Bomb that had appeared in a storage cache along the way. There was just enough scrap left over to add some fuel and patch the hull up into the green. While I was a bit disappointed that I hadn't been able to get any weapons here, adding a defensive drone would be hugely important in stopping those random missiles from whittling away at the hull. Here's a rule of thumb that I've discovered while playing FTL: cloaking is much better than defensive drones in the final flagship battle, but defensive drones are better at getting you to that fight to begin with. Obviously having both is ideal if at all possible!
I thought that I was in a very strong position entering Sector Four, only to run into a nasty sequence of bad luck. First an event dealt five damage to the ship's hull. That wasn't a lot of fun. Then I ran into this nasty ship design: three shield layers, a Burst Laser II and an Artemis Missile for weapons, and then a Combat Drone plus Boarding Drones on top of that. Holy cow, that was vastly more difficult than anything I'd seen thus far. Making matters far worse, the very first missile got past my defensive drone and hit the Drone Control system, knocking it out. Now I had no way to shoot down the incoming enemy missiles. Great, just great. Meanwhile, the enemy ship was also firing their Burst II Laser (three shots) every 12 seconds, and they had a Combat Drone hovering about pouring in more laser shots. Remember, this was the beginning of Sector Four, I did not have level 6 shields yet for the third bubble. Make matters worse, their second missile hit my weapons system, setting it on fire and knocking out the Charge Laser. Now I couldn't even get through their heavy shielding with anything other than the artillery beam.
The third enemy missile, of course, hit the artillery beam system. 
The freaking defensive drone had been completely worthless! It missed every missile and failed to shoot down any of the boarding drones. With all of my offensive tools disabled, it was high time to beat a retreat from this disaster of an encounter. Although I managed to escape, the damage had been done, with more than ten points of the lifebar drained away. Then on the very next jump, an event cost me one of my crewmembers: Raysen the Rockman was gone. Argh, what a horrible streak of misfortune hitting all at once! Just when I felt that I'd been riding high and mighty it all fell apart at once. Now I needed to win some more battles in a hurry or risk falling behind the dreaded Curve. My shields needed to hit level 6 ASAP, and my two laser weapons were beginning to become outdated. I needed a lot of things upgraded, and I needed them upgraded yesterday.
Fortunately the rest of the ships in Sector Four were much weaker than that monster from before. Sometimes the game will throw out these true aberrations where the AI lucks into something incredibly deadly. It appears to be random. (I once ran into an auto scout in Sector Four with this setup: *TWO* Burst Laser IIs, three shield layers, a Cloaking unit, and the encounter fought in an ion field where there's only limited power available. I couldn't even power up engines to escape before the thing sliced my ship to ribbons and ended a very promising run!) I had much more success against the other enemy ships, even pulling a couple of double rewards and getting a new rockman to replace the one who died. Raysen Junior! The biggest concern was now weapons. I was entering Sector Five, and nearly every enemy ship had level 6 shields. That made it very difficult to deal much damage with just the Burst Laser and Charge Laser. I needed to find or buy something else immediately.

This was the weapon that I ultimately purchased at a shop halfway through Sector Five. The Ion Stunner is far from my favorite weapon, but there were simply no other options available. The ion weapon would be able to knock out a single layer of shields, and that would make the task of the lasers much easier. It was remarkable in practice what a difference this tiny little 35 scrap weapon could make. The enemy ships with three shield bubbles were knocked down to two bubbles by the Ion Stunner, and this swung the math in favor of my lasers. They only needed to hit with 3/5 shots to deal damage instead of 4/5 shots, and that was a major difference. Then I was able to add a Pike Beam in a store at the end of the sector, and I was basically set on weapons for the rest of the game. Burst Laser, Charge Laser, Ion Stunner, and Pike Beam. Not the greatest combination, but it should be enough to get the job done.
Sector Six started with a bang, pulling a full map from an auto scout's databanks on the first jump. Here's what that looked like:

It was a bit unfortunate that so many of the encounters were located down in the southwest corner, rather than being spaced out across the sector. I spent as much time as I could down there, and managed to land quite a few fights in the process. Because the store was situated in such an awkward spot, I opted to skip it completely and rely on finding another store in the next sector. It was not worth it to backtrack multiple times up there in the north. Scrap rewards from winning fights went into upgrading the weapons to level 7 and then adding some reactor upgrades to power everything. Once the Pike Beam was online, the enemy ships went down in a hurry. The one setback was losing a crewmember in an event - and it was Raysen Junior! Not again!  That rockman was apparently cursed. It left me a bit shorthanded at fighting off boarders, too many engi and not enough muscle. I purchased a Mantis from a store to make up for this, naming him Raysen III, naturally. May you fare better than your predecessors.
My hope was to purchase Cloaking from the store in Sector Seven. Sadly it was not on sale, and so I had to fall back on Hacking for the final system slot instead. I also had the chance to pick up another Burst Laser II for a pricey 80 scrap, and had a tough decision on my hands. Ultimately I decided to hold onto my existing weapon setup, spending scrap instead on another Mantis to handle teleporting invaders in the flagship battle. I still needed to upgrade shields to level 8 and add another level to engines, plus get additional levels in systems like Doors and the Medbay. I didn't think I'd have enough scrap if I purchased that extra weapon. In retrospect, I think this was a mistake. I probably would have had enough scrap to make it work, and swapping out the Ion Stunner for another Burst Laser II would have increased my damage output enormously, especially with Hacking to guarantee hits (knocking out enemy piloting for 0% evade). A good offense can be an effective defense as well, since you take out the enemies before they can have time to damage you. I think this would have made for a less difficult flagship battle down the road. Easy to say in retrospect, of course.
There was nothing more of note until the flagship battle was about to begin. I managed to farm up a good amount of scrap from encounters in Sector Eight leading up to the rebel base, and managed to preserve a repair station right next to the base. I figured that I could hop over there after the first or second phase of the flagship and get a health restoration back to full. The one drawback was this meant moving through a beacon where the rebels were about to take control, and that led to a very dangerous fight indeed. This monster ship had Flak, a Burst Laser II, a Burst Laser III, and the rebel ships in the background firing their undodgeable ASBs at me. Their shots disabled the artillery beam, knoced out piloting temporarily, and dealt five hull damage. I had barely scratched their ship. Get out of there, man! As such, I entered the flagship battle in far from ideal shape:

Rebels on board, crew injured, hull damaged, no artillery beam online. This was a bit ugly. The rebel flagship started the battle by hacking my Hacking unit. That was pretty meta right there, fortunately not very dangerous though. The very first missile swarm hit my Drone Control system, setting it on fire and taking it out of commission despite the best efforts of my crew. I did manage to get it repaired before the second enemy trio of missiles. That group managed to hit shields and weapons with the two rockets that the defensive drone didn't shoot down. RNG strikes again, it seems. I realized while watching this footage again that I had made a major error. I had the Pike Beam on weapon slot #4, which meant that any damage to the weapon system would depower the thing. It should have been in slot #3, with the Ion Stunner (the least important weapon) in the last slot. The Pike Beam would get knocked offline several times throughout the flagship battle, and that would limit my damage output significantly. It was a dumb micro mistake on my part.
Anyway, the crew did a good job of fixing the damage to the shield and weapon systems. I just wasn't able to strike back very hard without the Pike Beam. The artillery beam had also been offline at the start of the fight, and it too played almost no role in this first phase. The damage from that thing definitely would have helped a lot. In the end, I took nine total damage from this first phase, leaving my hull at 16/30 HP overall. Thankfully I could pop over to the repair station nextdoor, which took the Federation ship back up to full again. I did not like my chances at winning without that "trip to the inn", so to speak. Wish I could have saved my game here in case of disaster!
Phase two is the drone phase of the battle, and for once my defensive drone shot down the first boarding drone from the flagship. I've been having bad luck with that on other runs recently. I used the trick/cheat to get my hacking drone past the enemy defensive drone and hit their engines once again. I needed to fire my lasers with 0% evade to make sure the first volley did its job. I was actually getting some excellent damage on the flagship this time, shredding their shields and taking out over half the lifebar with my initial two volleys of shots. However, despite 40% evade and the full four layers of shields, the enemy drone surge completely trashed the Federation ship. The drones dealt eight damage in a matter of seconds and took out weapons (no more Pike Beam!), artillery beam, piloting, sensors, and the backup battery:

That was hard to believe, since I had an excellent defensive setup. It looked like a run of bad RNG on the replay, with every single shot from the combat drones hitting at once and then the beam droids slicing apart the hull. Too bad I didn't have a cloaking unit here. Making matters worse, the defensive drone had failed to shoot down one of the subsequent boarding drones, and I was forced to fight hand to hand against the thing while also trying to patch up the damage from the drone surge. What a mess. I managed to get off one final volley mere seconds before the second drone surge hit, and that fortunately finished off the flagship. Thank goodness on that timing, I didn't want to imagine that the second drone surge would have done. I had taken eleven damage here, and so the Federation ship would go into the final phase at 19/30 HP. I hoped that would be enough.
The last phase began with another stroke of ill fortune, as one of my Mantis crewmembers was hit with the Mind Control. That was better than the pilot being the target, although it was still quite bad. Mantises become unbelievable deathbringers when buffed up with the extra health and damage from mind control. I simply threw other crewmembers at the mantis and kept swapping them out to the level 2 medbay every few seconds. No one could go toe to toe with that guy for more than a very brief period. I was very fortunate that the initial two rebel marines teleported into my medbay, making them much easier to kill. While I was microing the combat, the first missile swarm popped out of the flagship. My defensive drone shot down one missile, but the other two hit... weapons and the artillery beam. Great, just great.  This depowered the Pike Beam before it could fire even one time, and also set the weapons room on fire. I had to vent the room of oxygen to put that out, and it would be a long time before I could spare crew to go over to the system and repair it. Thus most of the third phase of the flagship fight was done with just the Burst Laser, Charge Laser, and Ion Stunner for weapons, and this was a major reason why the battle lasted so long. A lengthy duel with the flagship is not desirable, to say the least.
The level 2 medbay was probably the MVP of this fight. I kept that thing powered for a very long time, and it allowed me to rotate crew into and out of the hand to hand combat. The second pairing of rebel marines had teleported into the right side of the ship, into the area that was already devoid of oxygen from venting the weapons room. I kept the doors locked and let them suffocate for lack of air. Amazingly the second volley of flagship missiles had all missed the Federation cruiser, giving me a brief reprieve while I was fighting the rebels. The third pair of boarders also teleported over by my weapons system, and they too were victims of lack of oxygen. The mind control had worn off on my mantis, and this also helped turn the tide. The enemy boarders were finally cleared out, and the only remaining danger in that regard was further mind controlling of my crew (which would indeed happen, and hit a mantis crewmember again - twice!)
My offense was still strictly limited without the Pike Beam, and it took far too long just to get through the Zoltan Shield. The artillery beam played little role in the fight again, as it was hit repeatedly and set on fire several times. There were too many things going on, I couldn't spare crew to fix it until very late in the battle. Meanwhile, my ship was slowly seeing its hull drained away through laser shots that made it past shielding or missile shots that the defensive drone was unable to target. It was turning into a race to see which ship would be destroyed first in the long, grinding war of attrition. I had six health remaining when the Pike Beam was finally repaired, while the flagship had fourteen. Miraculously, the defensive drone shot down two missiles in the next swarm, and the third one missed. Thank goodness. My first full volley of shots in the entire fight went off and dealt eight damage, leaving the flagship with no shields up and a mere 6 HP left. We're going to win! Then the Zoltan Shield returned to the flagship. Oh you have got to be kidding me! Fortunately the flagship was pretty crippled with no normal shields left and no evade, allowing the lasers to cut through the Zoltan Shield in rapid order. I just had to survive one more power surge + missile volley combo. My ship was tagged with one missile and two laser shots, leaving it with a mere three health left. But that was still two more hull points than I needed, because my own return volley finished off the flagship for the narrowest of victories:

It was a very close run thing indeed, arguably the tightest victory that I've achieved so far. The biggest problem in the extended boss sequence was my inability to get much of anything out of the Pike Beam or the artillery beam. I did nearly all of the damage through the weak lasers and ion pairing, which dragged the whole thing out for way too long. This allowed the hull to be picked apart by the flagship's nasty attacks, missile by missile. Lack of offense was the real killer here. It's too bad that I didn't have a cloaking unit, which would have made the battle about a thousand times safer.

This victory scored just below another Hard difficulty victory with the Federation A ship, one that I had done earlier and not shown on Livestream. I ended up setting a new record for beacons explored on this trip with 109, which seems to be about the most you can get in FTL under normal circumstances. Most of my games wind up right around 100. Scrap was right where most of the Hard games seem to wind up, sitting just shy of 1700. When you realize that one of my Easy games accumulated 2871 scrap, and the enemy ship designs are also significantly less difficult on the lower settings, it helps to give an idea of just how much more challenging the game gets on Hard mode. You'd better know what you're doing, that or get incredibly lucky RNG stuff.
This was a voyage that was generally on the easy side, with two major hiccups along the way. The first was the sequence of misfortune that took place at the start of Sector Four, where I took 15 damage and lost a crewmember in the course of a few FTL jumps. The one random rebel ship that I fought there set me back significantly, and delayed upgrades to the Federation ship that nearly cost me the run. The other life and death moment came in the battle against the final boss, which I already detailed at length above. I really would have benefitted from more offense there, or a cloaking system, or both. On the positive side, I now know that I can kill the rebel flagship with little more than two lasers and an Ion Stunner. I got almost nothing out of the Pike Beam and Artillery Beam, while somehow still winning. Heh.
I will probably try some of the other Federation layouts next to experiment more with its unique properties. Thanks for reading.


