
Livestream Link (for those who would rather watch first before reading)
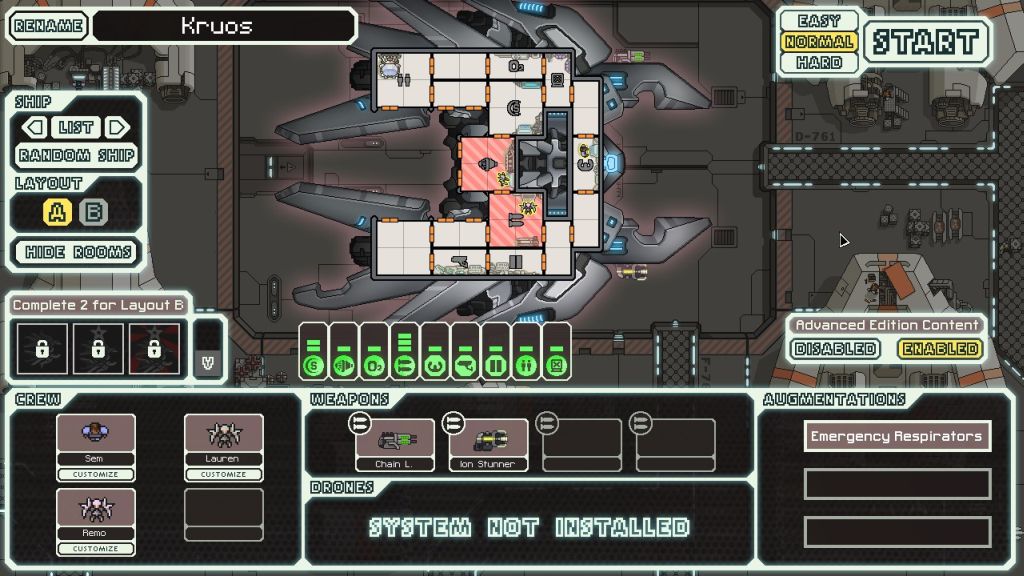
The two Lanius ships were added in the Advanced Edition (the free expansion) of FTL, and both of them are strong designs. The default "A" version is actually the weaker of the two, but it has a number of powerful tools at its disposal, even if the ship is not quite as amazing as its overpowered Lanius B cousin. This layout has the Chain Laser and the Ion Stunner for weapons, both of them new things that were added in the expansion. The Chain Laser is the more useful of the pair, a two-shot laser that starts with a long chargeup time and gets faster after each firing. The starting cooldown is 16 seconds, and it goes down to 7 seconds after three shots (the cooldown dropping by 3 seconds upon each use). Although I would prefer a simple Burst Laser over this thing in nearly any situation, all laser weapons are pretty good in FTL. The Chain Laser is a serviceable weapon. It's matched here with the Ion Stunner, a weapon that does one point of ion damage and stuns any enemy crew in the room fired upon (10 second cooldown). The main advantage of the Ion Stunner is its power usage, only requiring one reactor bar to operate. You can fire it while the Chain Laser is still charging, knock out one shield layer, and effectively trade one enemy shield bubble for one weapons power. Good for the early game, something that will probably get replaced later.
More significant is the presence of Hacking, the shining star of the expansion content. Hacking is good at just about everything, and arguably an overpowered addition to the game. Hack piloting or engines to remove the ability to dodge, Hack shields to drain them away, Hack weapons to delay enemy shots from firing, Hack medbays and cloning bays to stop them from functioning, and so on. On the Lanius A, it's particularly useful to target hacking on enemy weapons while the Chain Laser is slowly charging up. Done correctly, you can stop those pesky missiles from ever getting off a shot. Beginning the game with a Hacking system is enough to raise this ship above average all on its own. (I would rate this around the 60-70th percentile roughly, above average while still quite a bit short of top tier.)
The other defining feature of this ship is the Lanius crewmembers. This new race added in the Advanced Edition doesn't breathe oxygen, and in fact actively drains it from rooms. The Lanius A starts with two of them along with a Human pilot. These two guys are great at suffocating enemy boarders. They're also handy at putting out fires (because they suck the air out of whatever room they're standing inside) and they can patch hull breaches without taking any damage from oxygen loss. The downside is that they can't share rooms with non-Lanius crewmembers without actively damaging them, and they can't be intentionally killed off by opening up the hatches (which you might want to do with a cloning bay). The Lanius A also starts with fairly minimal upgrades to the ship overall, with level 3 weapons and level 2 shields, but everything else at the default level 1. This balances things out a bit, although the early levels in stuff like engines are pretty cheap. At least you can sell the mostly useless Emergency Respirators for 25 scrap at the first store to help out!
On this particular run, I had a nasty little battle at the second beacon. It was one of those ion storm events with limited reactor power, and I had all of four bars to use against the enemy auto scout. It had a beam drone flying around (making a shield bubble mandatory) but also a missile launcher, and I could only power shields + Chain Laser, leaving nothing for engines or oxygen or hacking! The first missile even hit my shield unit and knocked it offline, so I responded by Hacking the enemy Drone Control, killing their beam drone and buying me some time. I eventually won after several long and tense minutes, taking 5 hull damage in return for 12 scrap. A terrible exchange, unfortunately. This was actually one of the hardest encounters of the entire run!
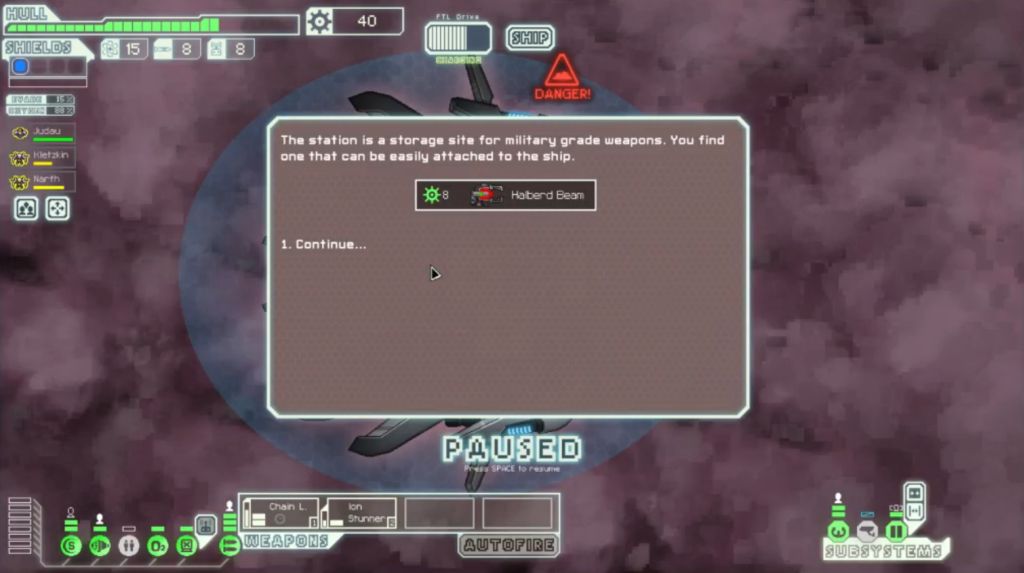
The biggest turning point of the run came two beacons later, when I found this Halberd Beam inside a military storage facility.  This was an absolute game changer, as the Halberd Beam paired extremely well with my default starting weapons. There would be no need to search out stores and save scrap for a weapon purchase. All I had to do was upgrade weapons to level 5, and then I'd be able to make use of the Chain Laser + Halberd Beam combo, which I could ride for a very long time. With Hacking in the mix as well, I could honestly defeat the rebel flagship with just this trio of weapons. Obviously I hoped to do better than that, but this setup could carry the Lanius A for a very long time indeed.
First things first, however. I didn't need more overkill offense just yet. The Chain Laser + Ion Stunner was plenty for the moment, and I could even swap them out for the Halberd Beam if that looked like a better option for an individual battle. More important was upgrading my defenses, and I used the remainder of Sector One taking shields to level 4 (for the second shield bubble) and engines to level 4. I strongly recommend doing this on most ships, as the improved shields and higher dodge chance will greatly reduce the amount of damage taken. Even leaving aside that these upgrades will often prevent an outright defeat, you save a lot of scrap by not having to heal at every store. That still left me with enough time to upgrade weapons to level 5 by the end of Sector Two, which put the Chain Laser + Halberd combination in play for the third sector. The only battle worth mentioning here came against a Slug ship with two shield layers, an extreme rarity prior to Sector Three. The battle took place at an ion pulsar, which wiped out their shields quickly. Otherwise I probably would have used Hacking on the enemy shields, and then fired the Halberd Beam against the shieldless target.
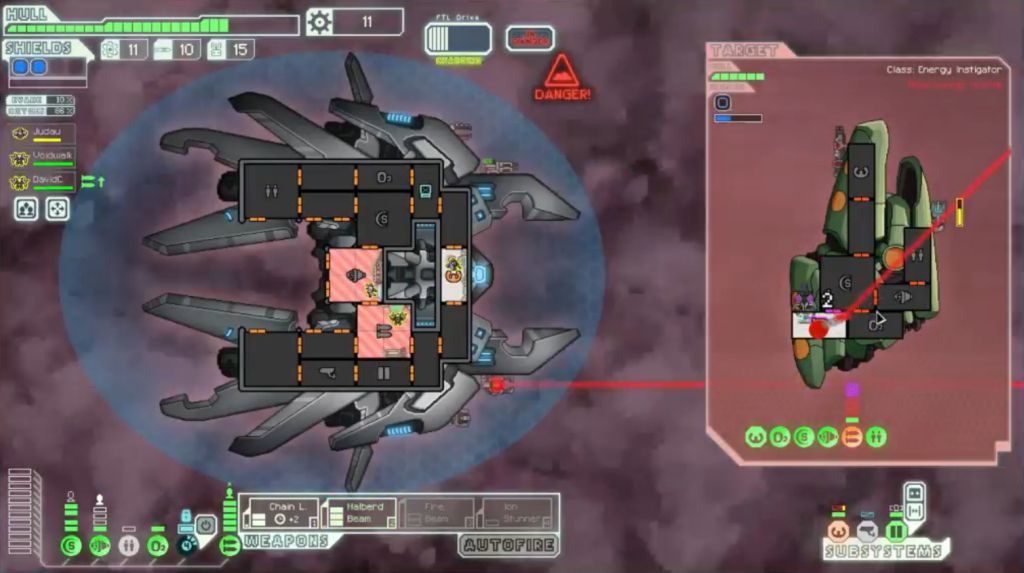
The Chain Laser + Halberd Beam combo was pretty overpowered for the moment, and it tore apart the ships in Sectors Three and Four without much trouble. Zoltan ships caused the most problems, since I was unable to use Hacking while their supershield was up. I decided that I would upgrade weapons to level 6 next, in part to get the Ion Stunner back in play again, but more importantly to provide a damage buffer for the Chain Laser and Halberd Beam. I didn't want to have either one of them knocked offline during combat, the former because of its faster chargeup time after each shot, and the latter because it takes so long to fire (17 seconds). Getting weapons to level 6 meant that a random missile hit would avoid disaster, and of course add a third weapon to the offensive output as well. It seemed to work out well, even if I was delaying the third shield layer a bit.
A store in Sector Four posed an interesting choice:

I had the chance to purchase a second Halberd Beam if desired. Normally, it's pointless to load up on an all beam weapon setup, since you can't get through enemy shields and sit there doing nothing. However, since the Lanius A starts the game with a Hacking system, it opens up the possibility to go whole hog on the beams. A fully upgraded level 3 Hacking system can drain away all four shield bubbles, leaving the target ship completely helpless to stop multiple beams of fiery death. But did I want to go that route here? Such a strategy is inherently risky, as it relies on a Hacking drone to take down the shields. If you would run out of drone parts, or get shut down by defensive drones or antidrones, you can find yourself in very serious danger. Nevertheless, with the stream viewers egging me on, I opted into this strategy, selling an Ion Bomb and Pegasus Missile found along the way in random drops, then using that scrap to pick up the Halberd Beam. It would sit unused in storage for the moment, waiting to be broken out in the lategame. Then my crew found a Hull Beam randomly floating in space at the end of Sector Four - whoa!  That was literally the perfect weapon to compliment this setup. Halberd + Halberd + Hull Beam would wreck the flagship if I could use Hacking to remove the shields. We're talking one shot kill territory. Now the question was whether I could make it to Sector Eight in one piece to put this diabolic plan into practice.
I still had two major weaknesses despite all of the good luck taking place. First of all, I was still sitting on the starting three crew, and every time that rebel boarders teleported over to the Lanius A's deck, I would have to pull my two Lanius guys out of their rooms to go deal with the threat. It was a good thing I had those oxygen-draining monsters on board, or the invaders would have posed a much more serious threat. I fought off three mantises at one point despite having only the default level 1 doors. That was another system that needed to be upgraded pronto. The other big weakness was a lack of Cloaking or a Drone Control system. With no defensive drone, I was a sitting duck for missiles of all kinds, reliant on hitting stores for repairs. This problem reared its ugly head in Sector Five, a rebel sector where the only store was located right next to the entrance. I had to travel the whole sector without a chance to repair, and a series of missiles slowly whittled away at my hull. First the Lanius A dropped down to 10 HP... then it was down to 5 HP. Sheesh, don't tell me that I'm going to lose the run in this cheap fashion! To add insult to injury, one of the rebel ships managed to flee with one health remaining while the Halberd Beam was in mid-firing animation. You've got to be kidding me! 
Salvation came in the form of a shop at the first beacon of Sector Six:
Thank goodness. I used the accumulated scrap to heal back up into the green, and at this point I was confident that this run would be able to reach the flagship. I added the Backup Battery here and continued upgrading weapons until they maxed out at level 8. I found a Laser Charger in another storage facility, the weapon that can fire up to four shots if it charges completely, and made use of the Chain Laser + Laser Charger + Halberd Beam combination. This gave me five total shots to remove shields, which was nearly always enough to let the Halberd Beam cut the enemy hull apart at full damage. I was trying to save drones as much as possible, even though I had close to 20 of them in inventory and was unlikely to run out. Better safe than sorry though. Towards the end of the sector, I realized that I would be in serious danger against the flagship with only three crewmembers, and so I payed out 45 scrap for a Human with shield expertise, exactly the skill that I needed. Then the exit beacon offered the chance to purchase an Engi for only 33 scrap, which was a major deal in this situation. While I generally suggest that you avoid purchasing extra crew, sometimes you simply don't get any from random events and have little choice. I did not find a single one over the course of this entire run, so I had to shell out some extra cash for more warm bodies. As sweet as my weapons luck was on this run, my crew luck was the opposite.
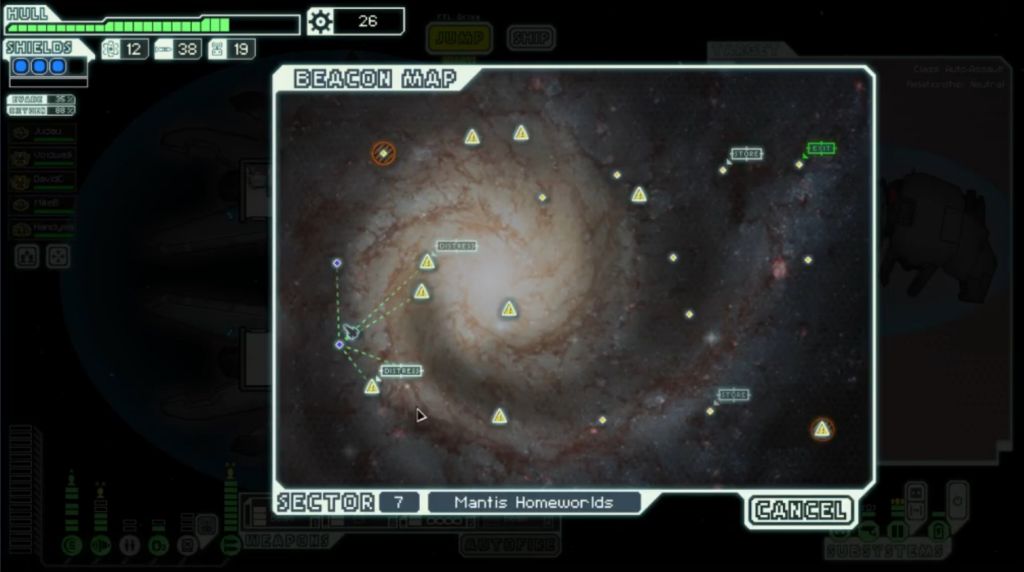
I caught a major break of fortune when the first beacon in Sector Seven gave me a complete map reveal. This allowed me to hit most of the encounters throughout the sector, and even reach a conveniently placed store right before jumping out. Perfect, absolutely perfect. I would turn these battles into roughly 250 scrap, maxing out Hacking and purchasing Cloaking (plus a Rockman) at that final store. No defensive drone for this entire run, but I was fine with that. Cloaking would be more useful against the flagship anyway. With the remaining battles in Sector Eight, I farmed enough scrap to finish off upgrading shields to level 8, and picked up a few more reactor bars to power everything. I managed to hit two repair stations along the way, leaving my hull at max health and giving me more drones than I would ever need. Everything was in place to smash the flagship, it was time to rumble.
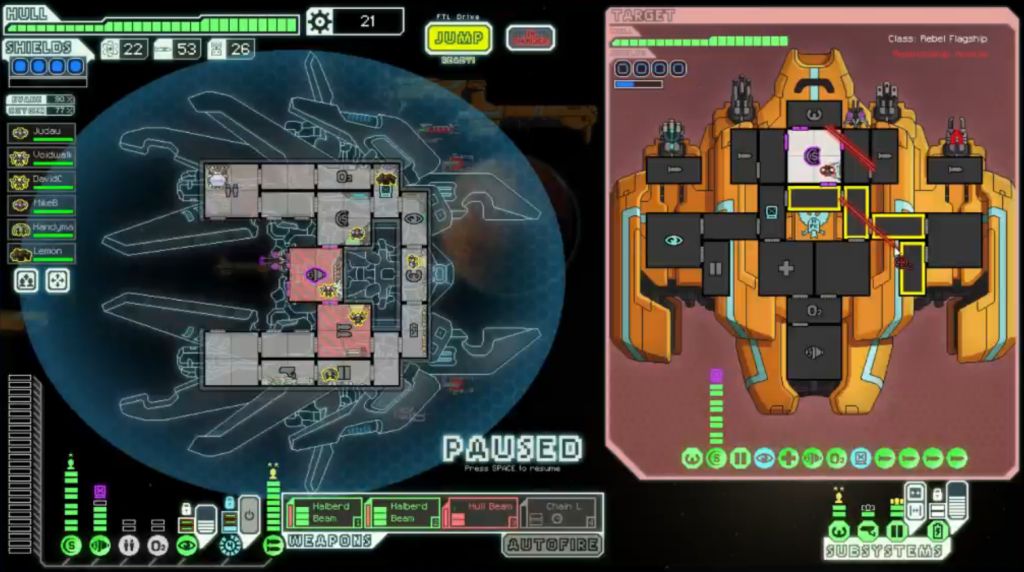
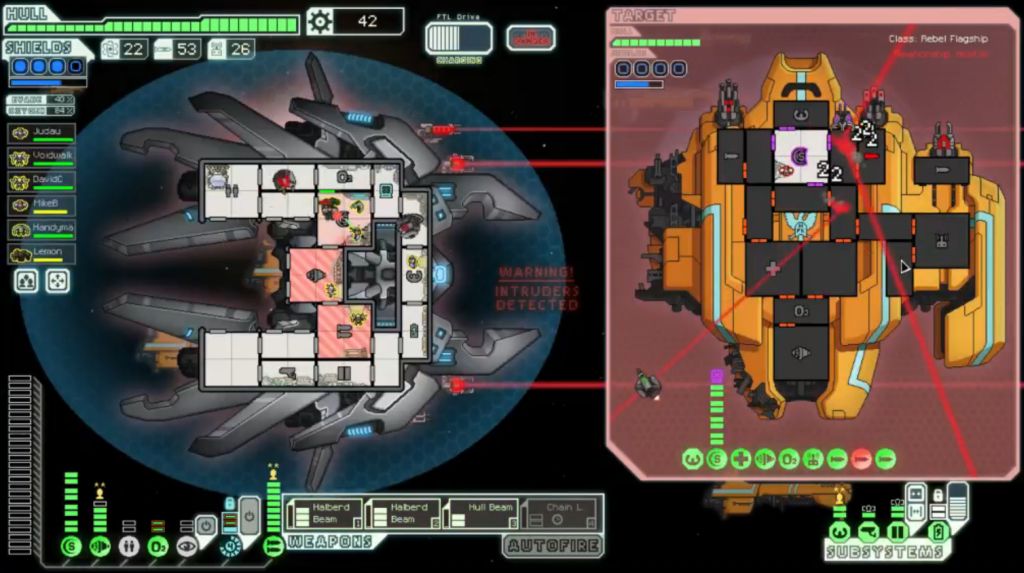
I had been using level 3 Hacking against enemy shields throughout Sectors Seven and Eight any time that a ship appeared with the maximum four layers. Drain away the shields with the hacking drone (which actually takes about ten seconds, so make sure to initiate the hacking while your weapons are still charging) and then fire the beam weapons. Halberd + Halberd alone was enough to torch just about anything, the pair often doing 16-20 hull damage between the two of them. Add in the Hull Beam and it became disgusting. This simple math did not change against the flagship. The rebel supership has 19 HP in the first phase, and I could get eight damage from each of my three beam weapons. They chose to use their Hacking against my engine room, then I used Cloaking against their first missile volley. By that time the beams were all done charging, the shields were down, I fired away, and the flagship simply disintegrated:

I don't know how else to put it, one second the flagship was there, and the next second it was exploding into pieces. The flagship has 21 HP in the second phase of the battle, and it fared absolutely no better. Even worse, actually, since there was no rebel cloaking to deal with this time. Hack their shields, wait for them to drain away to nothingness, and then fire the beams again. Once more it was a one-shot kill.
That's not a repost of the same screenshot. The Livestream chat was full of "WTF DUDE" and "wow" and "this isn't even fair" messages.  I appreciated the "stop playing on easy man" line (with kappa face, of course). This setup is indeed pretty crazy when everything comes together. There was some hope from the chat that this could be a completely flawless no damage final battle, but I knew that the final phase would be a bit tougher. The Zoltan Shield that the rebels get in the third phase would rule out a fast kill, and I still lacked any defensive drones to block their missile attacks. They were definitely going to get some shots through (barring simply insane dodging at low odds). When the battle started, the rebel Mind Control hit one of my two Lanius crew, the one who manned the engine room. That was a bit unfortunate, as I lost the 10% evasion bonus, plus I had to sacrifice the other Lanius guy (the one who ran the weapons) by throwing him into borg vs borg combat, as no one else could fight the mind controlled Lanius in a room with no oxygen. When the rebels began teleporting over, they all ran into the room with the mind controlled Lanius, which was pretty funny because they were racing into a room with no air. (They are programmed to go aid whoever gets mind controlled.) Those rebels all began dying in a hurry from that, heh. I saved Cloaking for the power surge lasers, and therefore suffered some damage from random missiles. Nothing critical was hit though, and the weapons were still firing away unabated. It took two shots from the Hull Beam plus one shot apiece from the Halberd Beams to break the Zoltan Shield. I sent the Hacking drone over to the rebel shield unit, and once again began sucking away their shields. For the third time, I landed the one-shot kill with a massive beam volley:

It looks a lot worse in this screenshot than the situation actually was. The flagship got off one final missile volley + power surge just as it was exploding, and that caused some completely irrelevant damage. If I'd been able to use my weapons Lanius for the 20% faster charge, my ship would have taken only a few scratches, as the flagship never would have gotten around to that last volley. Obviously a defensive drone would have been pretty nice as well.
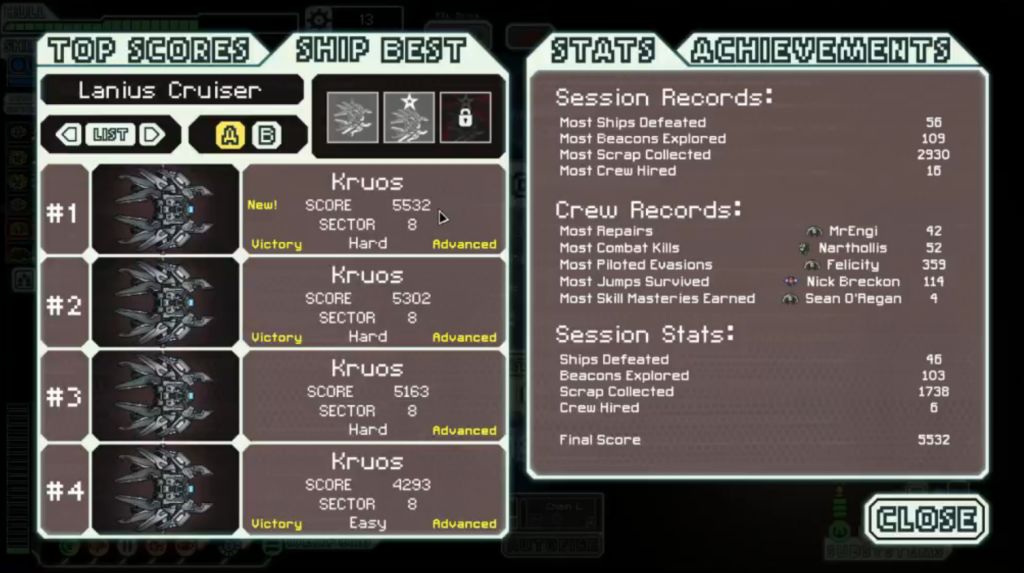
Numbers for the run were fairly standard across the board, and the score was average for Hard difficulty. This voyage stood out for the unusual beam weapon setup, which was only made possible due to the Hacking system. It's kind of amusing that this run was characterized by the multiple Halberd Beams, a weapon that normally has no association with the Lanius A at all. FTL can be like that sometimes. I did get a ton of use out of the Chain Laser and Ion Stunner, which I was still using as late as Sector Seven before the enemy ships began showing up with the full four shield bubbles and rendered them impractical. This is a fun ship to use, not too overpowered and not too weak. Hacking gives you a lot of options and allows for some interesting plays. I'd recommend this ship as a good one to learn about some of the new expansion mechanics, if anyone is still making the transition from the non-Advanced version. As always, thanks for reading and/or watching.


