
Livestream Link (for those who would rather watch first before reading)

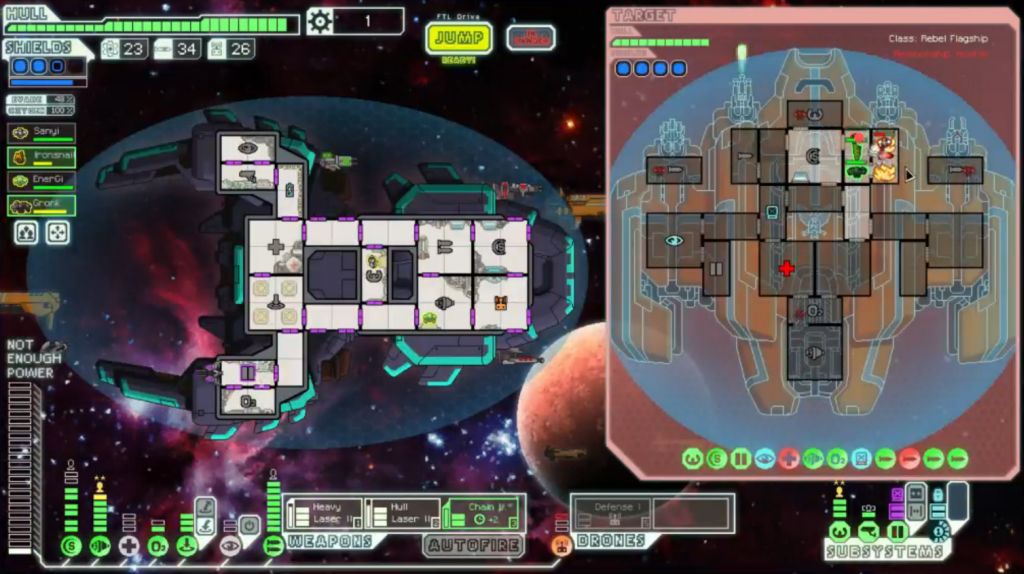
Alright, time for another FTL mission, this time with the Mantis B Cruiser. This ship is widely viewed as one of the best in the game, always near the top of the tier lists whenever someone draws them up online, and it's easy to see why. The first and biggest advantage is the presence of a four-tile Teleporter system. When combined with the Mantis race's fearsome combat abilities, this turns much of the game into a cakewalk. A boarding party of four Mantises is almost unstoppable, at least against anything other than auto scouts. To make things even more hilarious, if you accumulate a full crew of eight, you can even teleport four attackers over to the enemy ship, followed by sending over ANOTHER four crew as quickly as ten seconds later. Ever wanted to do what the flagship does in its final phase? Now you can! That's a bit impractical for normal use, but it is possible as a desperation strategy. There are only three ships in the game with a four-tile Teleporter, and this is one of them. It's not a coincidence that Mantis B and Crystal B are both considered top tier, and Mantis C is still well above average.
The second big advantage of this ship lies in its defenses. Mantis B is the only ship in the game to start out with level 4 shields, two shield layers right from the start of the game. That makes the initial setup all but invulnerable to starting lasers and beam weapons. As if that wasn't enough, the ship also begins the game with a Drone Control system + Defensive Drone combo. This provides an excellent defense against missiles as well. So - what exactly hurts your ship? Not much. The comparison to frail setups like the Stealth ships are almost comical. The nearly impregnable defenses of the Mantis B will give your boarders plenty of time to chew through the enemy shipmates, and of course you start the game with Mantises anyway, who win 1 vs 1 against almost anything. Starting to see why this ship is so powerful?
It doesn't end there either. There's another hidden advantage built into the Mantis B in the form of its power setup. This ship begins the game with a full ELEVEN reactor power!  You get enough to run the two shield bubbles (4 power), one level of engines (1 power), plus one level each of oxygen, medbay, and teleporter (3 power). But that's still only 8 power, and the game gives you three more on top of that, enough to run a Boarding Drone (3 power) as well. This is much more than the ship needs and definitely serves as overkill for an experienced player. Go read or watch the Zoltan C run to see how painful a limited power setup can be. This ship even gets the Mantis Pheromones augment for faster movement speed, and unlike the Mantis A starts the game with Sensors installed. Why does Mantis B get Sensors while Mantis A doesn't? Who knows! This ship seems to get just about everything.
There are a few drawbacks to the Mantis B Cruiser, of course. The biggest one is that the ship starts out with no weapons at all, which probably threw players for a loop when FTL first released. The designers arguably overcompensated for the lack of weapons with all of these other goodies thrown in. Since then, the Advanced Edition has released other ships that also start out with no weapons and are much weaker in every other respect (namely Federation C). The lack of starting weapons obviously isn't a huge setback given the overpowed status of Mantis B and Crystal B. Secondly, this ship lacks for crew at the start of the game. You only begin with two Mantises, and they both kind of have to teleport over to the enemy ship to attack. That leaves no one behind to run the ship itself! Fortunately you are more likely to find crewmembers when invading other ships without destroying them, and a normal Mantis B run will find plenty of new friends along the way. This is one of the most crew-dependent ships in the game; it may well be worth the cost to purchase some hired hands if you haven't been finding them. Mantis B snowballs very hard as you pick up enough people (cyborgs? bugs? sentient rocks?) to both run the ship and use the four-tile Teleporter at once. It also bears mentioning that this ship only has 3 total slots for weapons (like the Mantis A) which limits the kind of setups that you can run. That's a pretty big restriction that forces players further into using the Teleporter for offense. Finally, this ship does start with minimal levels in Engines and Weapons. These are very easily upgraded but do bear mentioning at the outset of a run.
Overall, this ship was widely considered the best non-secret ship in the game (excluding the rare Crystal B) prior to the release of the expansion. Today it's widely seen as being the third best ship, with the Lanius B slotting into second place. However you set up the tier list though, this one is powerful indeed. Let's hope I can avoid screwing up too badly.

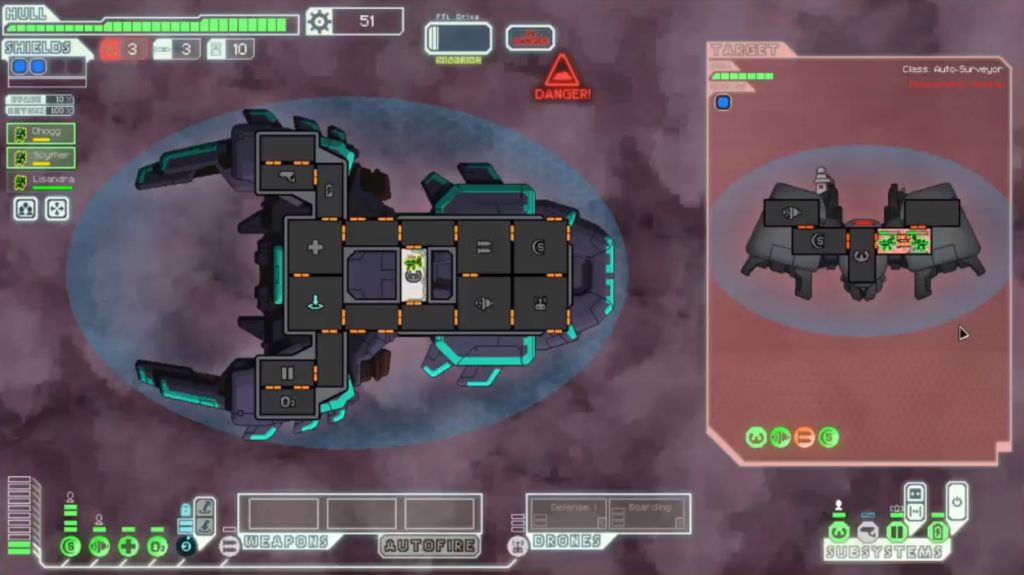
Here's an example of a typical battle when just starting out in Sector One. I began the fight by teleporting both Mantises over to the enemy ship, leaving no one behind to pilot the Mantis B itself. However, this didn't matter at all because the pirate's dual Heavy Laser setup was easily blocked by my two shield bubbles. There was no chance whatsoever for this ship to deal damage. (By the way, note all of the unused power in the reactor here. I told you the starting setup was overkill on power!) On the offensive side of things, the pirate ship had a Human and an Engi on board, who died easily in melee combat to the two bugs. With no Medbay or Cloning Bay for support, that was all she wrote. Encounters like this are completely trivial to complete, while also providing the increased scrap bonus from getting a victory without destroying the enemy ship, and they are commonplace in the first two sectors. The Mantis B normally can get out ahead of The Curve with some big early rewards and never look back again.
My first upgrade upon reaching 30 scrap was to take the Teleporter to level 2. This allows your boarders to beam over to auto scouts and beam back again without suffocating from lack of air. It's also an extra safety measure as well, letting you bring your guys back after 15 seconds if something goes terribly wrong as opposed to waiting 20 seconds. And there's one other benefit: it damage buffers the Teleporter unit so that taking a single point of system damage won't knock the thing completely offline. (That can be extremely bad!) I've had better success by prioritizing the Teleporter upgrades when using these boarding ships, and I did so again here. Next I picked up a dream reward from a subsequent fight, finding a Mantis prisoner on board a slave ship as well as an Antipersonnel drone! The drone didn't matter very much, but a third Mantis was exactly what I needed. Now my invading party was three strong and easily able to overwhelm most early ships. (Of course, then I hit an enemy Zoltan ship and had to run away with my tail between my legs because I had no weapons to break the Zoltan Shield. Heh. Even the Mantis B setup has its weaknesses.)
Despite that one amazing reward, the rest of Sector One was pretty sparse. I found relatively few battles, and two of them were against Zoltan ships that couldn't be touched behind their impregnable super shields. Sector Two had a massive nebula in a Civilan Sector, and it proved to be fairly slim pickings again despite hitting lots and lots of beacons. Way too many of the encounters that I did get were against auto scouts:
These ships are real pains for anyone using a Teleporter gameplan: no enemy crew to kill and no air to breathe. Only the Lanius do well against them. For the specific case of the Mantis B, it's necessary to weaken them using the Mantis crew, and then send in a Boarding Drone to get the last hit and destroy the ship. Make sure not to destroy the enemy auto scouts with your own crew on board! They don't come back to life without a Cloning Bay. Not only are these battles more difficult than the ones against standard ships, they also deny the bonus scrap reward from capturing ships intact. Auto scouts always must be destroyed due to the lack of crew. So these things are thoroughly obnoxious for Mantis ships to deal with, and I was less than pleased to hit them repeatedly.
With the strange start to this run and the lack of non-auto scout encounters, I went down as low as zero fuel at one point, although fortunately I never ran out completely. When I did hit a normal ship, it had a Medbay and I had to work very hard to kill the enemy crew, only managing to pull it off due to having three Mantises to play around with. (The rebel ship I was fighting used up all its missiles over the course of the long fight.) The back half of Sector Two was much nicer, with consistent scrapes against one foe or another. Everything that didn't have a Medbay was easy pickings, and I piled up 200 scrap hoping to hit a store and find some weapons to buy. With the Defensive Drone and the two shield layers, I was doing just fine on defense. I even came across two different events where I could trade useless missiles for reactor upgrades, winding up with 13 reactor power, plus the Backup Battery. I swear you guys, I did not mean to end up with the Reactor Bar of Shame - it just happened that way! 
Sector Three was another Civilian Sector, with two stores immediately visible along with another giant nebula on the north side of the map. With zero weapons for sale at the first store, I went for the strongest option available:
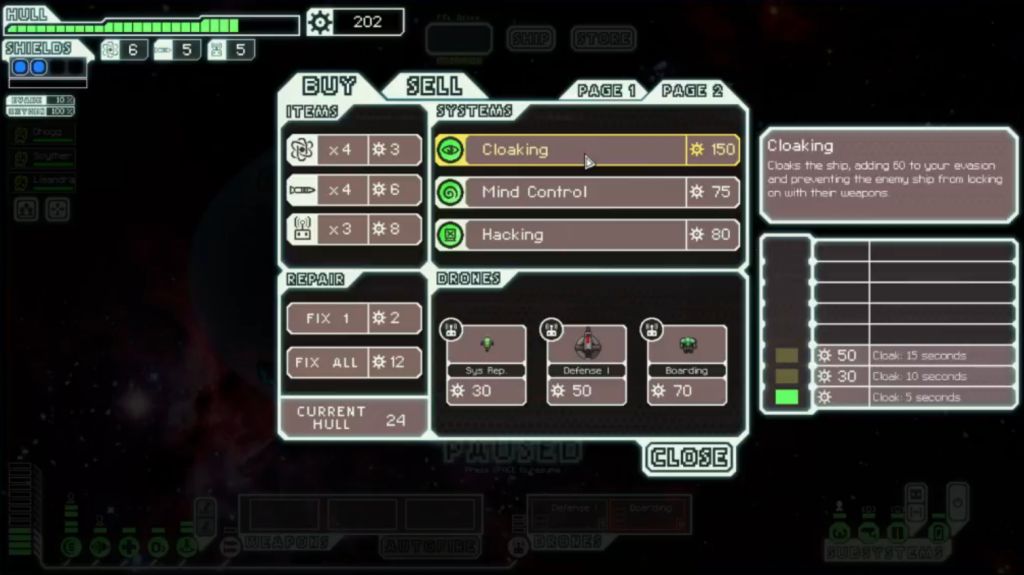
A very early Cloaking system, much sooner than I typically have the scrap to purchase it. Still, this was an excellent addition to my overall setup. Three Mantises and a Teleporter were plenty to carry my offense against most opponents, and the Cloaking system plus the Defensive Drone was enough to nullify most damage. Keep in mind too that you can find weapons in events and as post-battle rewards, but you'll never pick up a Cloaking system in a goody bag. It seemed like a strong use of the scrap that I'd hoarded to date, although I was going to need weapons and better shields / engines and more crew ASAP. Amazing defenses and melee combat for this setup paired along with a lot of other holes.
The other store had a two-shot Charge Laser for sale, and I snapped that up in a heartbeat. Had to sell the Boarding Drone to do it, but I could simply use the Mantises to take out auto scout shields, and then fire the laser for the last hit. I'm not much on the Boarding drones, or any of the drones beyond the Defensive ones. Anything that you can't control on offense adds too much randomness for my liking. The first non-store beacon in the sector gave me a full map reveal, and I used that knowledge to plot my way through six full encounters to the exit. One of them had a tremendous reward floating in space before combat even began:

The Heavy Laser II was a perfect weapon for my slot-limited setup on the Mantis B. Three power for only two shots isn't as bad when you can only carry three weapons total. This was a huge find, and I would use this weapon for the rest of the run. (The fuel was quite nice too.) Piloting from one encounter to another, I would find a Chain Laser later in the sector. This allowed me to start combining my boarders with conventional weapons, shooting out Medbays and Cloning Bays to help the invaders in their mission to eliminate enemy crews. The last fight of the sector against a slave ship even gave me the choice of a new crewmember: Mantis, Rockman, or Engi. Obviously I went for the bug: four Mantis teleporter party! Now we were really in great shape. A few more upgrades to defenses, a few more warm bodies to run the ship after beaming over the Mantises, and this run would be all but cinched.
Sector Four was a Rock sector, where I did not fear to tread thanks to having both a Defensive Drone and Cloaking in hand. Somehow I'd made it all the way here with level 4 shields and level one engines (!!!), but there was a method to my madness. There was no point in upgrading the engines so long as I had no one to pilot the ship. Zero percent evade was zero percent evade regardless. I would need to remedy that now, however, before the enemy ships got any more dangerous. The toughest encounter here wasn't against any of the rebel ships at all - it was against a Solar Flare environmental hazard! Mantises are terrible at repairing or putting out fires, and the stupid thing knocked out my Door controls to prevent me from venting the ship of oxygen. Then more fires took out Oxygen as well. I was comically trying to put them all out as the star in the background kept lighting even more fires. Finally I got the situation under control, but only after long minutes of fighting the flames. What a strange predicament.
The highlight of this sector was an auto scout battle. I sent three Mantises over to the enemy ship, only to realize that the hull layout of the auto scout would prevent me from teleporting them all back. One of the Mantises was doomed!  Or were they? Through some slick unit micromanagement, I was able to bring them all home by the slimmest of margins:
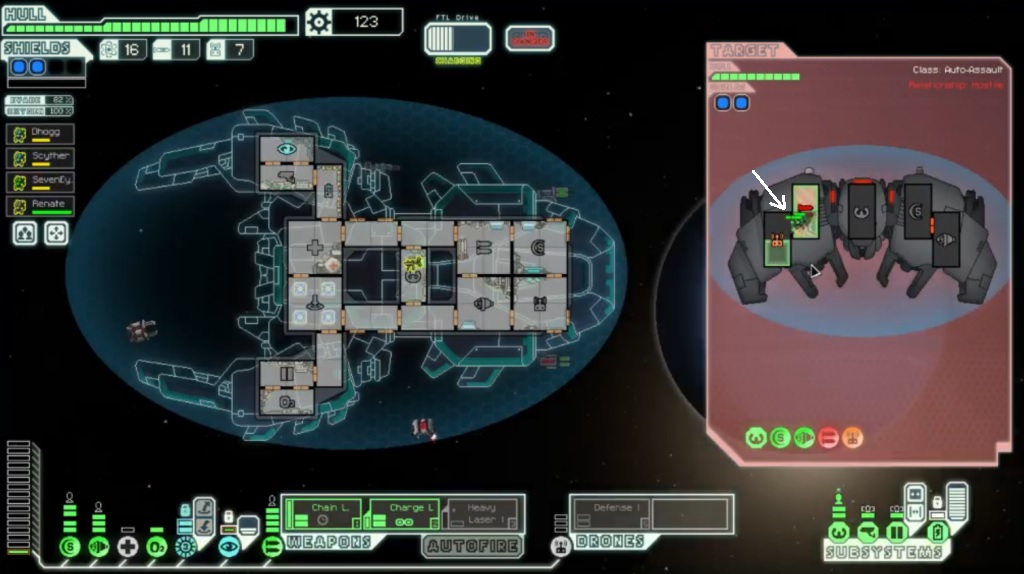
The trick is that you can have more than three crew inside a two-tile room if you've ordered them to move to a different room. I had two Mantises in the right room and one Mantis in the left room here. First, I sent one of the Mantises on the right over to the left, sending the TOP one and not the bottom one, thus opening up space for the Mantis on the left to move to the other room. As the two moving Mantises passed one another, there was just enough time to teleport all three of them out of the right room simultaneously. Whew. This is one of those things that is easier to understand visually than describe in text, so check out the recording at about 1:08:30 to see this in action. I was pretty happy - disaster avoided.
Everything else in this area was routine. I picked up a Human to pilot the ship in an event, finally having someone to remain on the Mantis B when everyone else went gallavanting through the Teleporter. With the Cloaking unit, I had no fear of diving past the exit to get more encounters. (This didn't work perfectly, as I cloaked through the rebel ASB but took a big volley from a Flak II on the rebel ship, bah!) Scrap continued to pile up at a healthy rate, and I used it to increase shields to level 6 and engines to level 4. More post-battle luck went my way as the Hull Laser II dropped from another combat at the end of Sector Five. This would allow me to run the Chain Laser + Hull Laser II + Heavy Laser II setup to get seven total shots, and two of them of the Heavy variety. Just needed to upgrade weapons up to level 8 and get all of the toys in play. With outstanding defenses + solid weapons + the four Mantis raiding party, this game felt like it was all but wrapped up now.

I purchased a Slug crewmember in Sector Six, adding one with weapons experience to fill out the ship. Then I came across a Zoltan with maxed engine skill at a later store and picked him up as well. That Zoltan was more than worth it, giving me +10% evade and a free reactor bar of power to boot. This was a case where I had plenty of scrap to burn and a real need for more hired hands on deck. As much as I've advised against spending money on crew, sometimes it is indeed the best purchase available. I'd already maxed out weapons level by the halfway point of this sector, going with the final layout outlined above. This burst of lasers absolutely shredded the enemy ships that I came across; most of them had three shield layers, and some of them only had two. I almost didn't even need the quadruple Mantis raiders... but of course I used them too.  There's not too much to say about these last couple of sectors. The Mantis B was riding the top of the power curve, and my guys steamrolled all comers. I maxed out defenses, damage buffered all of the key system, and was even able to take Engines up to level 6, one past the point of diminishing returns. With the addition of one final Rock crewmember from an event, I was as prepared as I would ever be for the final duel.
With the four-tile Teleporter unit on hand, I planned to use a different strategy for the flagship. Normally I don't try to beam over and attempt to kill the rebel crew, since the flagship has the altered layout on Hard difficulty without the isolated missile pod, plus the nasty combination of Cloaking + upgraded Doors + an upgraded four-tile Medbay for healing. It's just not worth the danger for most ships. Mantis B is an exception, however. All I needed to do was shoot out the Medbay with my excellent laser setup, then teleport all four Mantises into the damaged room to prevent repair. The bugs would kill all of the rebels one by one, then could walk around smashing the key systems (missiles, shields, engines, etc.) at their leisure. Easy stuff.
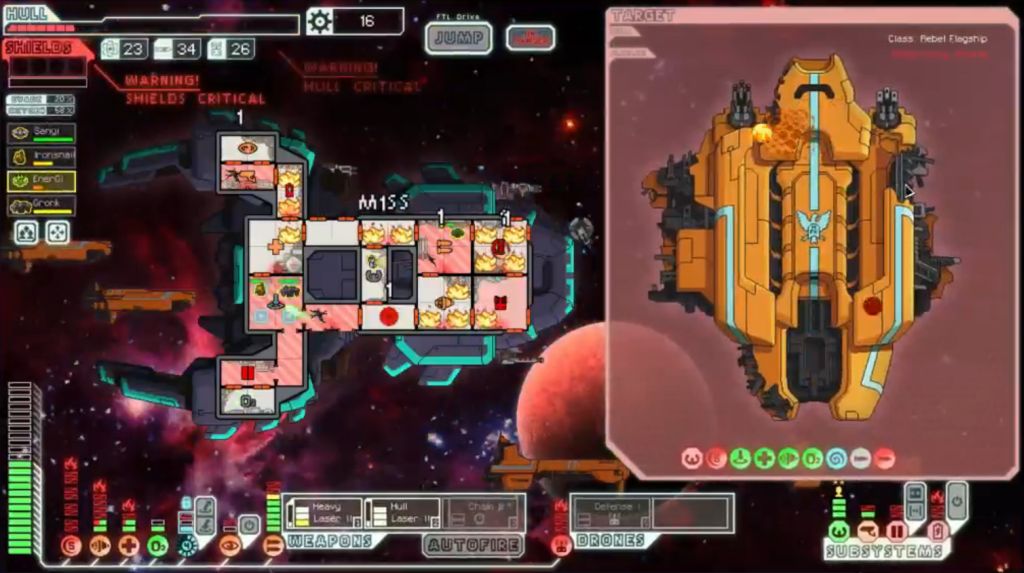
The battle started and the rebel Hacking hit my Door unit. OK, no problems there. My guns went off and I had a great first volley, smashing right through the rebel shields and blasting apart their Medbay. Get in there, Mantises! They immediately set about killing the rebels with reckless abandon. Unfortunately, my lasers had done a little TOO good of a job of firing at the enemy Medbay. The Heavy shots had managed to set the room on fire... uh oh. Well, I'll just pull the Mantises out of there as soon as the Teleporter comes off cooldown; that's why I used the level 3 version of the thing for the shortest possible cooldown. Then the flagship activaed its Cloaking unit:
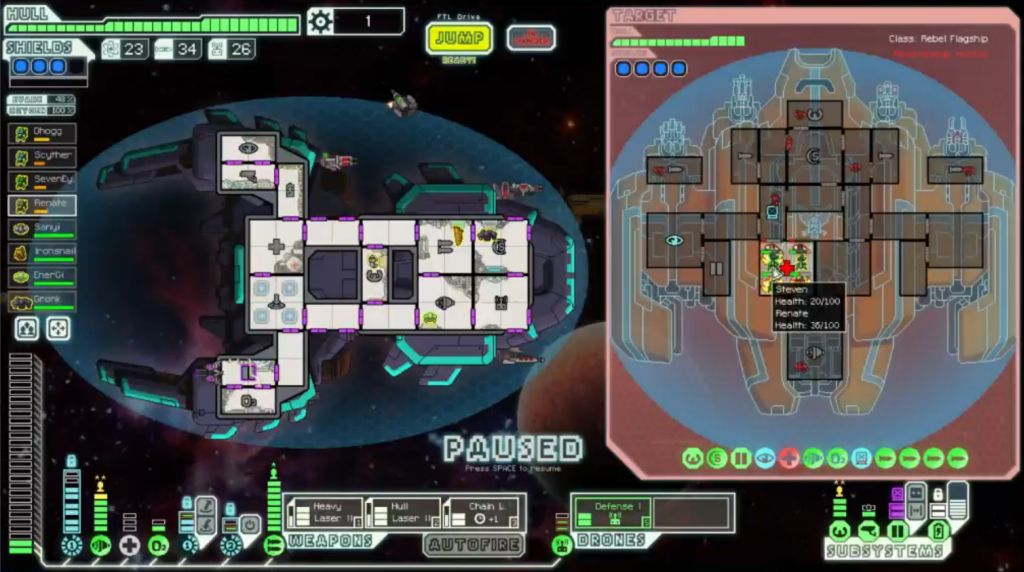
Oh no. That's.... that's really, really bad. I could not pull my guys out of there, and all four Mantises - the pride of my ship - ended up burning to death seconds later.  Now what in the world was I going to do?!
There were five separate mistakes that I made here, all minor things which could have saved this disaster from taking place. First and easiest would have been upgrading the Sensors unit to level 2, which would have granted vision onto the rebel ship. I had tons of excess scrap on hand and there was no excuse for not doing this. I badmouth the Sensors unit all the time, and this one little upgrade would have saved my bacon. Sigh. Secondly, I could have watched the rebel graphics more closely. A sharp eye would have noticed the "putting out the fires" animation on the crew and avoided teleporting into the Medbay, directly into the fire's path. Third, I could have teleported into a different room altogether; the Cloaking room is a pretty good choice because the Door controls are nearby, and that's a useful target to take out when boarding. Still, this was really just a subset of the first problem of not having vision, because if the Medbay wasn't on fire then it would have been the best place to beam into. Fourth, I should have waited until just AFTER the flagship cloaked to use my Teleporter, so that I could pull my guys out in an emergency situation. That's a good rule of thumb to use against any ship that has a Cloaking unit aboard. Finally, I should have told all four Mantises to attack the Medbay's doors the second they popped into that burning room. I'm pretty sure that they could have gotten through the doors and escaped into the adjacent room before dying to the flames. That was me having a brainfreeze at the worst possible moment, standing in the fire and not doing anything while they all burned to death. What a cascade of failures!
So now I had four crewmembers left and a nearly-intact flagship still to fight. What to do now? The most obvious strategy was to fall back into standard gunship style, relying on the lasers to shoot our way to victory. I didn't think that would work, however, not once the Mind Control unit came into play in the third phase and I had to fight whatever rebels were still alive. Hmmm. You know, there were only six rebels still alive in the central hull of the flagship, and their Medbay was still burning and preventing anyone from repairing it. Could I use the Teleporter again and try to finish off the ones still alive? It seemed like it was worth a shot, since I could heal my guys and they couldn't. Time to send in the B Squad: Ironsnail the Slug and Gronk the Rockman!
I beamed them into the missile pod... which I'd also managed to set on fire mere seconds earlier with another volley of Heavy Laser shots. Heh. But this time I'd learned my lessons, and I had them attack the doors and escape out to safety in the next room. My two dudes camped out in that room, and kept attacking the rebels every time that they moved over to fight the fires next door (which they kept trying to do repeatedly). The rebels had no ability to heal, and they kept taking more damage from my Slug + Rockman pair along with the flames themselves. Amazingly, this sufficed to kill everyone on the flagship! With the missile controls disabled and burning, there were no missiles to worry about, meaning that the Mantis B ship itself was in zero danger. My boarders took out the rebel shields and then the lasers finished things off. Total damage taken in the first phase: 1 HP. Backup strats for the win!
The second phase was extremely easy. With no crew to worry about (only the one poor guy in the pod off to the right side), I could beam directly into the missile pod, just like this was non-Hard difficulty. The B Squad teleported over to the flagship again, and their melee attacks plus the first laser salvo took out the weapons pod. I would never see a single missile in this phase. They took out the shields next, and there was no one over there to repair the damage that I'd inflicted. The whole thing took mere seconds, and the flagship was quickly laid low. Zero damage taken in this phase.
Now if only the third and final phase would be that easy! The flagship would have three separate threats in this last battle. First of all, I'd have to get through the Zoltan Shield before being able to use the Teleporter at all. Secondly, the Mind Control would wreck havoc, setting one of my four crew against me and causing all sorts of problems. Finally, with all crew now dead, the flagship's AI would kick in, automatically repairing systems as they took damage, exactly like an auto scout. There would be no easy cakewalk across the finish line here.

Mind Control hit my Human pilot first, which was a bad result if not the end of the world with level 3 Piloting. Once it wore off, the B Squad of the Slug and Rockman went over to the flagship again via the Teleporter. I had an unlucky break early in the battle: one of the flagship missiles hit my Door room and set it on fire. There was no way to vent this fire before it burned out the Door controls completely, and with only a Human and Zoltan still on board, I didn't have the resources to spare to go fix that room. My inability to control the doors would make the rest of this fight far more difficult. The second Mind Control hit the Rockman while he was over on the flagship, forcing my Slug to run around in circles dodging the angry stoneman until it wore off. My laser volleys weren't getting through the flagship's shields either, partly due to bad luck and partly due to the increased evade (33%) of the final phase. Four volleys in a row failed to get even one point of damage through. The only thing keeping me alive in this long fight was my Cloaking unit - without it, I would have been dead meat.
Finally the Slug + Rockman boarding squad managed to take out the enemy missiles, even as system after system on my ship continued to fail. I could not repair the damage, not with disabled Doors and only two crew on board, one of them Mind Controlled half the time. Eventually I got a strong volley of shots through, which disabled the Mind Control and breached the hull. Like an auto scout, the rebel flagship AI will never repair a system if the hull is breached in that room, so I wouldn't have to deal with that threat again. Sadly the missiles were back online again, and the boarding team would have to disable them yet again. I probably should have told them to go after Piloting first, as once that was disabled all of my lasers would have had 100% to-hit odds. I'll keep this in mind for the future. The boarders were now working on the piloting room, and I'd gotten a shot through onto the rebel shields as well, but my own Defensive Drone had been knocked out, and the Engine room and Shield room were burning. If only I had my Mantises alive, this would have been so easy! Instead it was coming down to the wire. Both ships were in absolutely dreadful shape by now; systems knocked out everywhere, rooms burning, hull breaches leaking oxygen out into space. We both started with full crews, and nearly all of them were dead. What a battle! It just came down to which hull was going to hold out longer, and I had barely enough of an edge to reach the finish line first:
Whoops, I probably should have cloaked that last superweapon volley that hit just as the flagship was exploding. I think every single shot hit, and the poor Zoltan was stunned in a room with zero Oxygen, causing him to die seconds later from lack of air. I don't know if I could have salvaged this situation if the game had continued. Maybe, if everyone rushed the Door room and fixed it before the fires burned apart the rest of the ship. It would have been close. In any case, that's about as wrecked of a ship as I've ever had at the end of a successful victory. Quite a wild ride!
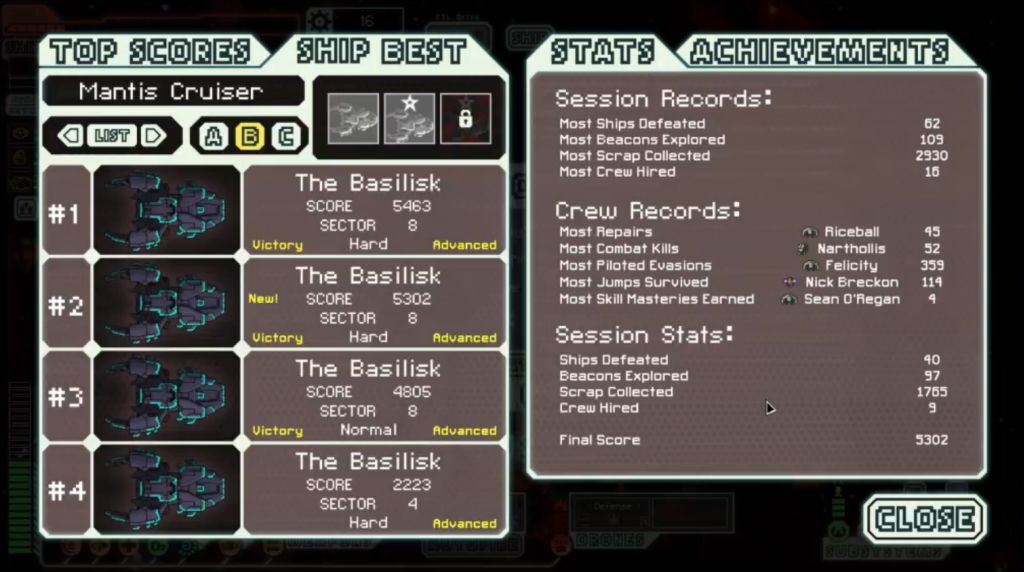
My silly mistake with the four Mantises had therefore turned a very easy flagship fight into an epic duel. I'm weirdly kind of happy with that, as it forced me to dig deeper into the bag of tricks and come up with this alternate path to a win. The B Squad did their jobs well, very well indeed, and they even managed to survive it all. With the four Mantises, that would have been a total stomp; I doubt I would have taken even five damage. For the run overall, it was a standard scoring game, with an average scrap total. I simply didn't find that many enemy ships, only 40 combats despite hitting 97 beacons. In any case, this one was all about the flagship battle. The rest of the run was relatively straightforward. That ending though... definitely worth watching on stream. Hope you enjoyed hearing about it, the whole thing was a blast to play.


