

YouTube Link Part One
YouTube Link Part Two
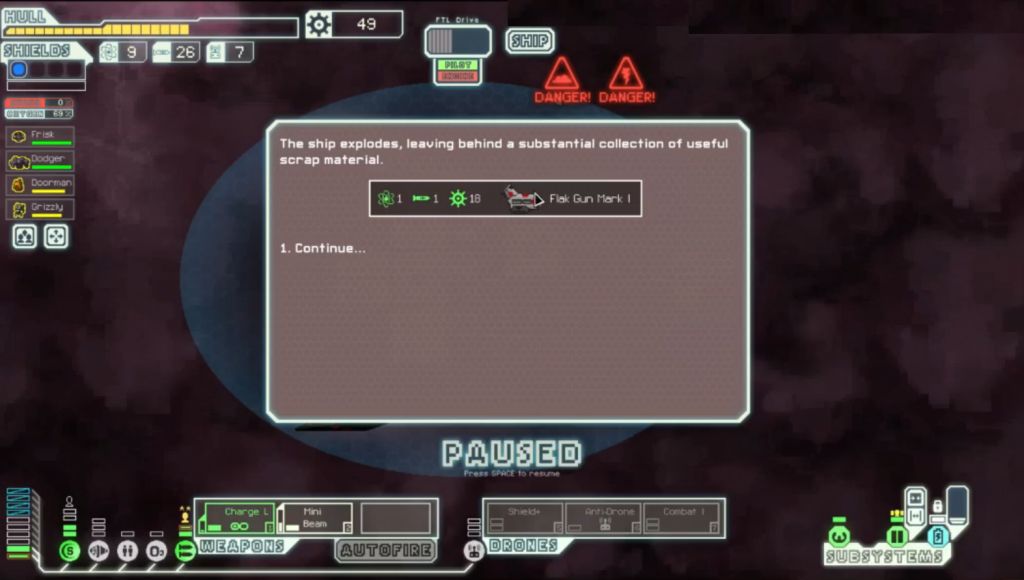
Many people consider the Stealth C Cruiser to be the worst ship in FTL. I don't agree with that point of view - I find the Zoltan C to be the weakest - but this was the single most-requested ship for me to play on Livestream, and Stealth C certainly isn't a very good ship. The disadvantages of this ship practically leap off of the computer screen: Stealth C starts the game with no Shields and no Cloaking!!!  At least the other Stealth ships get Cloaking units to compensate for their lack of Shields. Not the Stealth C. You'll have to purchase them from a store for 125 scrap if you want to have them available. (Protip: you do want to have shields available. Purchase them ASAP.) This combination appears to be completely and utterly suicidal at first glance, and forms the rationale for Stealth C appearing at the bottom of so many tier lists online.
In order to have some kind of defenses, the Stealth C starts the game with a Shield+ drone, identical to the normal Shield drone except that it costs 2 power to run instead of 3 power. This thing will create a single point of supershielding (identical to a Zoltan Shield) every 8 seconds, up to a maximum of five supershielding points. In practice, it's very rare to get that high. Most of the time, you'll have a single point of supershielding and no more. The supershield will block all damage from getting through, stop boarders from using a Teleporter or sending a Hacking drone, prevent Mind Control, etc. It's exactly the same thing as a Zoltan Shield. The Shield+ drone is actually quite useful against early game missiles that normally crash through shielding to inflict damage. Of course, a single laser or ion shot can break through the thing too, so there's no a lot of safety! Since Zoltan Shields aren't very good against Combat or Beam drones, the Stealth C also has an Antidrone on hand to shut them down, and it's crucial to remember this when enemy drones pop up. The Antidrone generally does a pretty good job of keeping them offline, although sometimes it misses its shots and leaves the Stealth C in a real pickle. Unlike every other ship in the game, the Stealth C wants to take Drone Controls to level 3 as the first ship upgrade; this allows the ship to run the Shield+ drone and Antidrone together at the same time if needed, and also damage buffers the system such that a single hit won't knock out the Shield+ drone. Trust me, the Shield+ drone needs to be running pretty much all the time on this ship to prevent damage. If the player only has the default level 2 system, and it would take stray damage, then all manner of chaos can ensue.
The Stealth C also has the advantange of very good early game weaponry, albeit gear that doesn't scale well into the lategame. The starting weapons are a Charge+ Laser and a Minibeam. The first weapon is unique to the Stealth C, a gun identical to the normal two-shot Charge Laser except that it takes 5.5 seconds per charge instead of 6 seconds, and only requires 1 weapon power instead of 2 weapon power. The Charge+ Laser is a very solid weapon that can be incorporated into a lot of different weapon builds, especially with that very nice 1 power requirement. The Minibeam on this ship is the same one incorporated into the Stealth A design, a very shot beam weapon with a fast chargeup time (12 seconds) that costs 1 weapon power to run. Don't be fooled by the size of the Minibeam; it can routinely hit 3 rooms and it also has the possibility to set fires, unlike virtually all other beam weapons. Paired together, these are formidable early weapons - which are badly needed, as the Stealth C can't stick in extended battles for very long. It's unfortunate that the Stealth ships only have three weapon slots and not four, as these would both make great 1 power additions to a lot of weapon setups. Because they are slot-inefficient tools, they will likely both be replaced over time. Add in the amazing Long Range Scanners augment, plus the starting Drone Control system, and the Stealth C starts to look a lot more viable as a ship.
But let's not get ahead of ourselves either. This ship still has no Shield unit, and the 125 scrap investment into that system is costly indeed. The weapons do not scale well into the lategame and will have to be replaced at some point. Even with excellent management, this ship is still one string of poor RNG luck away from running into complete disaster. Stealth C doesn't even come with Scanners, for heaven's sake! This is definitely a challenge ship, and it will take real skill to pull off a victory on the hardest difficulty.

This run began with an inauspicious start, with the first opponent dealing 4 damage to me and then managing to run away with a single point of hull remaining. Inconclusive battles like this one are particularly bad for the Stealth C, as the ship has a limited number of drone part available for use. It's somewhat like the Rock A's missile conundrums in that regard. I did manage to catch a break with an early map reveal in Sector One, allowing me to pilot my way from encounter to encounter for maximum scrap gain. I also forgot to upgrade the Drone Control system to level 3 at the first opportunity, something that could have gotten me into a lot of trouble. Well, I did remember eventually...  It was also important for me to put up a Shield+ drone immediately at the start of each fight, as I ran into a lot of enemy Heavy Lasers in this first sector, and their chargeup time (9 seconds) was only barely slower than the Shield+ drone's chargeup time (8 seconds). If I forgot to activate the drone right away, those Heavy Laser shots would slam home against my poor shieldless hull for 2 damage apiece. Stealth C is definitely a ship where small micromanagement actions make a difference.
I found a Mantis in a surrender option halfway through the first sector, giving me a nice crew of four. Human, Slug, Rockman, and Mantis - not bad. The Livestream audience requested that I name the Rockman pilot "Dodger" in memory of the last failed attempt with the Stealth C, and Dodger obliged with some truly impressive piloting, lots of evades at 20% odds in the early portions of the run. I would finish the first sector with 125 scrap in inventory. Now it was time to go looking for a store and pick up a Shield unit. Total damage taken in the first sector was 12, not all that different from a lot of other ships.

I found a store early in Sector Two which kindly obliged on the Shield unit. Fortunately, all stores are guaranteed to have shields for sale if your ship doesn't already have them, a rare gesture of mercy on the part of FTL's designers. There were no other weapons worth getting here, so I repaired the hull and continued onwards. (Sorry, not enough money to get the Scrap Recovery Arm! Shields were more important.) Moving forward, I would try to save the Shield+ drone for use against enemy missiles, while relying on normal shields for lasers and ions. With perfect timing you can line it up so the supershield goes up just in time to block the missile and not get wasted on something else. That's very difficult to do, however, and I would fail in my attempts to pull this off most of the time. By the end of Sector Two, I'd managed to upgrade shields to level 4 and my run was starting to look a lot like so many other ships.
(Side note: This is one of the few weaknesses in FTL's gameplay: the tendency of every nonvariant playthrough to converge together over time. When playing optimally, every run tends to gravitate towards some mixture of lasers and beam weapons, supplemented by Drones / Hacking / Cloaking. Even if the ships start out from different beginnings, they converge together into the same path over time. While I think there's enough randomness in FTL to keep playing it for a very long time, the fact remains that this convergence definitely does take place and can create a feeling of sameness. Some of the weapons and systems are just better than others, and expert players will gravitate towards them again and again.)

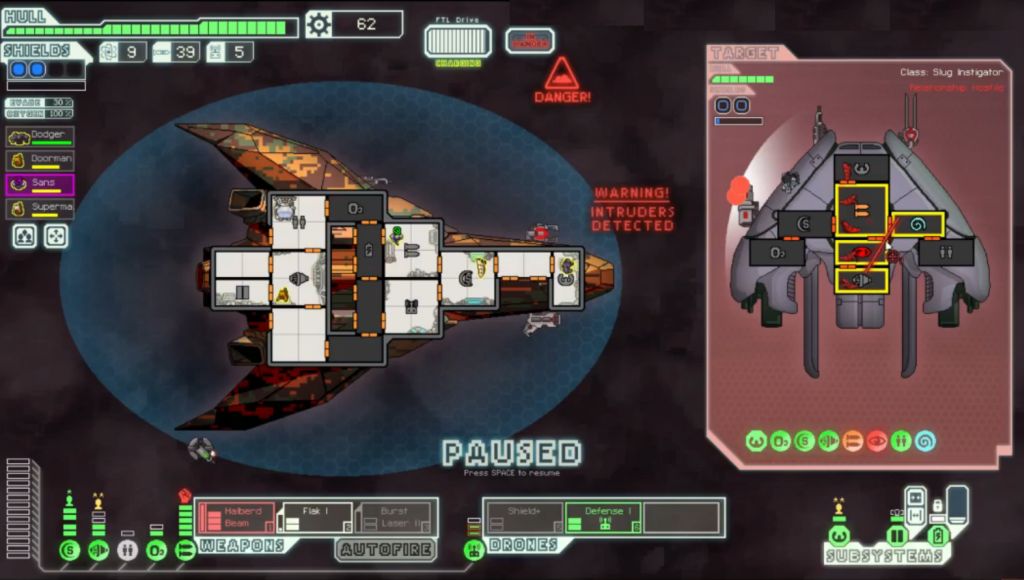
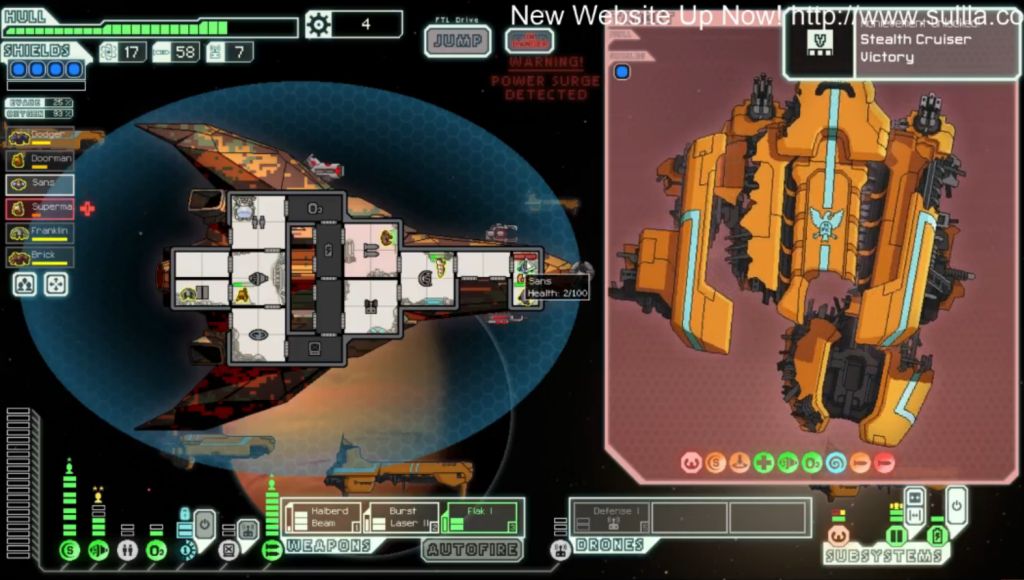
I was on the lookout for a weapon upgrade in Sector Three, with the enemy ships now typically sporting two shield layers. That made it significantly harder to deal damage, as both Charge Laser shots had to hit the target, followed by the Minibeam doing its thing. I was still able to make good use of the Shield+ drone however, such as the above picture, snapped just as a rebel missile slammed into the supershielding. Still, it was only a matter of time until the rebels began popping up with the third shield bubble (which can happen as early as Sector Four), and then I'd be completely out of luck. I needed another weapon ASAP.
As it turned out, Fortuna was smiling on me in this run. Just a few beacons into Sector Three, I discovered this postbattle victory prize:
A free Flak I weapon!  That was exactly what I needed. Now instead of saving scrap and desperately hoping to purchase something useful at a store, I could simply upgrade weapons to level 5 and be set for the next few sectors. Finding a strong weapon for free is probably the single biggest break of good luck that the player can get in FTL. In this case, it took a run that was teetering on the verge of falling behind The Curve and placed it back into a very comfortable position. Then the next store had a Halberd Beam for sale, and I snapped that up in an instant. Sorry Minibeam, good as you may be, you're not in the same class as the Halberd Beam! I sold the Minibeam and some extra junk that dropped in previous battles, holding onto the Flak, Charge Laser, and Halberd for the moment.
Sector Four was a rebel sector with three battles visible immediately. Some of these opponents were honestly quite nasty, such as a rebel fighter with a missile launcher, Heavy Laser, Halberd Beam, and three shield bubbles. Even with my upgraded weapons, these were no cakewalk encounters. (I would have been hopelessly screwed with nothing but the old Charge+ Laser and Minibeam.) I also found a Defensive drone floating in space during this sector, making me less reliant on the Shield+ drone. Things were looking very good; the only potential problem was accumulated damage, as these tough fights left wear and tear on the hull.
Then I ran into a particularly nasty encounter. This was against an autoscout fought in an asteroid field. The thing only had one shield bubble, but it was packing Cloaking along with a Chain Laser, a Minibeam, an Ion Blast I, and an Ion Bomb. I wasn't too worried at first because I figured that I could kill the machine quickly. My Halberd Beam could nearly one-shot the thing once its single shield layer was down. However, what I hadn't counted on was the presence of that Ion Bomb. The first bomb hit my Weapons room, knocking both of my weapons offline for the next 20 seconds. Not good. Their Minibeam then took out my Doors and set a fire in my Engine room; the second Minibeam took out my Cloning Bay and Oxygen. I had two crewmembers that were nearly dead, making this even more of an ugly situation. Then the fire burned out my engines, making it impossible to dodge incoming projectiles or run away. I had the Human and Mantis frantically trying to repair systems, when another Ion Bomb took out my Shield unit. Holy crap!  And then a random asteroid slammed right into my two low health crew trying to repair the Cloning Bay, killing both of them:

With the Cloning Bay offline, they would not be coming back to life again. RIP Frisk and Grizzly.  As if that wasn't bad enough, the hull of the Stealth C was deep in the red and the whole ship was about to explode. I managed to get off a Halberd Beam shot and finish off the autoscout, but the damage had been done. Two crew dead and only 2 health remaining on the Stealth C! What a total disaster. A run that had looked like a certain victory was now hanging by a thread.
I had to pass up an "aid the civilian ship" event at the next beacon, with the Stealth C being in no position to fight. That was painful to do, as those encounters have a chance for a double scrap reward and are always worth the attached fight if your ship isn't about to die. Fortunately, the very next beacon had a store and I was able to repair up into the green:

At the cost of about 75 scrap, of course. Ouch.  Painful as that may have been, it was better than dying, so I paid the shopkeeper and assessed the situation. Losing the two crewmembers had been a very harsh blow, as the later sectors always have a lot of ships that will board you using a Teleporter, and of course the flagship at the end does that on steroids. Two crew is not enough to handle those endgame scenarios. I would need to find more people somewhere along the way. The good news was that I had managed to save the two most valuable members of my crew, Dodger the Rockman with maxed Piloting skill, and Doorman the Slug with maxed Engines skill. Those are the best skills to train, and I could build a new crew from this leftover pair. The cost of the repairs had also been defrayed partially by selling a Flak II weapon which had recently dropped after a battle. In theory, the weapons setup that I had right now could work against the flagship, even if it wasn't the strongest. I added a little bit more reactor power and headed onwards.
The last store in Sector Four trolled me a bit. It had all manner of nice weapons for sale (plus the Weapon Pre-igniter!) but lacked the thing I most wanted to purchase: extra crew. There was a Burst Laser II on sale, which would allow me to complete the holy weapon trio of FTL if I purchased it. However, spending this scrap would also delay my upgrade to level 6 shields and the third bubble, which could potentially be very dangerous. And I wouldn't actually be able to use the Burst Laser II for some time, seeing as how I needed to upgrade weapons twice more (from level 5 to level 7) to get the full trinity in play. The purchase would be somewhat of a reckless play. Nonetheless, I opted into it and purchased the Burst Laser II. Now I was set on weapons for the rest of the game, but I would need to amass scrap quickly to stack up the 100 needed for the next tier of shields plus the 165 needed to get all my weapons in use. Better get to work.
Sector Five was the Slug Home Nebula. My weapons seemed to take forever to charge with no one manning them, and I worried greatly about any systems getting damaged, as I couldn't spare crew to repair them. I caught a lucky break when I had a blue event dialog for having a Rockman on board, in an encounter with a Slug captain (the one that normally has the "Drink / Refuse" options). This caused the other ship to heal up part of my hull and open up a store, where there were finally crew for sale! I purchased a Human, jumped away and fought another battle to accure more scrap, then jumped back and purchased another Slug. This gave me a crew of four again, which was a workable amount for this point in the game. The next couple of battles were relatively easy, allowing me to start saving for all those upgrades I'd been delaying:
Yes, halfway through Sector Five and still with only level 4 shields! Heh.  Not exactly what I recommend, but it had been more important to pick up those two extra crew while I had the chance. Two more battles gave me the needed scrap for the third shield layer, and then I began saving for weapon upgrades. The exit to the sector was in a nebula, so I happily dove past it for more fights with no ASB to worry about. There was one tricky little fight where the Cloning Bay was disabled by a prebattle event, and a pair of boarders Teleported into the Door room, removing my ability to control their movement. That one was handled with some very careful venting of different rooms. I was also horribly trolled by Fire Bombs in another fight, losing system after system before the enemy ship finally ran out of ammunition - and then they even managed to run away, leaving me with no reward for all my troubles! That was a very annoying five minutes of gameplay that I wouldn't wish on anyone else. Nonetheless, Sector Five had been a hugely successful place in recovering from the disaster in the previous area. This was the sector where I managed to get things back on track once more.
Sector Six was an Engi Sector. I made it through the first few battles without too much trouble, then faced another decision at a store. I had the option to pick up Cloaking, or a Hull Repair drone for my Drone Control system, or upgrade my weapons to level 7. I also really needed to fix some hull damage and purchase more fuel, as I was down to only 3 fuel remaining. Tough choices here. I decided that I would purchase Cloaking, selling the venerage Shield+ drone to do it, and passed up on the Hull Repair drone. The weapons upgrade to bring all three of the holy weapons trio into play would have to wait a little bit longer.
A blue event option from having Long Range Scanners allowed me to gain a fifth crewmember shortly thereafter, an Engi. Very nice! By the end of the sector, I'd managed to save up enough scrap for those weapons upgrades, bringing the Burst Laser II online. I used Sector Seven for farming more scrap, finding a Rockman along the way who joined as the sixth crewmember. Now I was confident I'd have enough people on board to take on the flagship. Hacking appeared in a store, allowing me to complete the holy trio of systems (Drone Control, Cloaking, Hacking) to go along with my holy trio of weapons. By the time the sector was over, I had all of the systems that I needed, but I was still in the process of upgrading to the fourth and final shield bubble, and I hadn't been able to damage buffer any of my key systems either. I hoped to have the chance to farm a little bit more scrap in Sector Eight before hitting the last boss.
I managed to get four battles and hit a repair station in Sector Eight. That was a pretty good result, and I had just enough scrap to upgrade shields to the maximum level of eight. I damage buffered Cloaking and Hacking on the very last beacon before hitting the flagship, and I was still a bit too low on reactor power. The run had given me just barely enough resources to make it all work, typical for one of the weaker ships on Hard difficulty. I swear that this game is calibrated to near perfection in providing the player with exactly enough to achieve victory, and no more than that.
The rebel Hacking drone landed in my Piloting room to start the flagship's first phase, one of the targets I would have preferred to avoid. Not as bad as hitting Weapons or Shields, not as good as most of the other options. With Hacking and the holy trio of weapons, I had the guaranteed ability to remove the flagship's missile room from the battle. Four shots to break their shields, two shots to hit the missile room itself, and then the Halberd Beam to deal 2 damage on top of that. Obviously you need Hacking to remove the flagship's evade to ensure that every shot will strike the target; the same tactic can be used without it, but randomness can and will play a factor. I cloaked through the first volley of rebel missiles, and so long as I kept firing on the missile room, I could keep them permanently offline after that. The rest of the weapons simply are not a threat to a well-upgraded ship being run by an expert player. No damage taken in the first phase.
The second phase was largely a runback of the first phase all over again. I succefully shot down the first Boarding drone with my Defensive drone, and slipped my Hacking drone past the flagship's own defenses. Hacking + Flak + Burst Laser + Halberd combined together to remove the flagship's missiles and keep them offline throughout the rest of the fight. I cloaked through the drone surge and that was that. It feels like I've really got this setup down by now, and it's only when I'm missing a crucial system like Cloaking or Hacking that I get into trouble these days.
I had not dealt with the flagship's crew, however. I deliberately set up a scenario to run away from the flagship's third phase, pulling six rebels onto the Stealth C and then jumping away back to the Federation base. I did this to good effect in my Engi B victory game as well, if anyone remembers that desperate fight. This run was in a much better position, but I still didn't see any reason to take chances. I eliminated those initial six rebel boarders, and when the battle was rejoined, there were only three of them on the flagship. Two more of them came over to the Stealth C, while Dodger the Rockman pilot was Mind Controlled. Hmmm, not great. My crew killed off the two attackers while the weapons worked their way through the flagship's Zoltan Shield. It went down about the same time that they did, followed by the pilot coming out of his Mind Controlled state. With only one rebel still alive on their ship, he had no real way to repair the damage that I was doing, while my crew patched up the systems hit during the earlier melee fight. The duel didn't last much longer from there: just two more volleys from the full holy trio of weapons saw the flagship exploding into hot gas:
There's the victory printout achievement; Stealth C was one of the few ship that I hadn't achieved a victory with previously. Seven damage taken in all against the flagship, which I consider to be a pretty clean sequence. Note as well the message displaying the new location of the website at www.sullla.com - I was cropping it out of the other pictures, but decided to leave it for this one. I'm hoping that I'll be able to remain at this hosting permanently from now on.
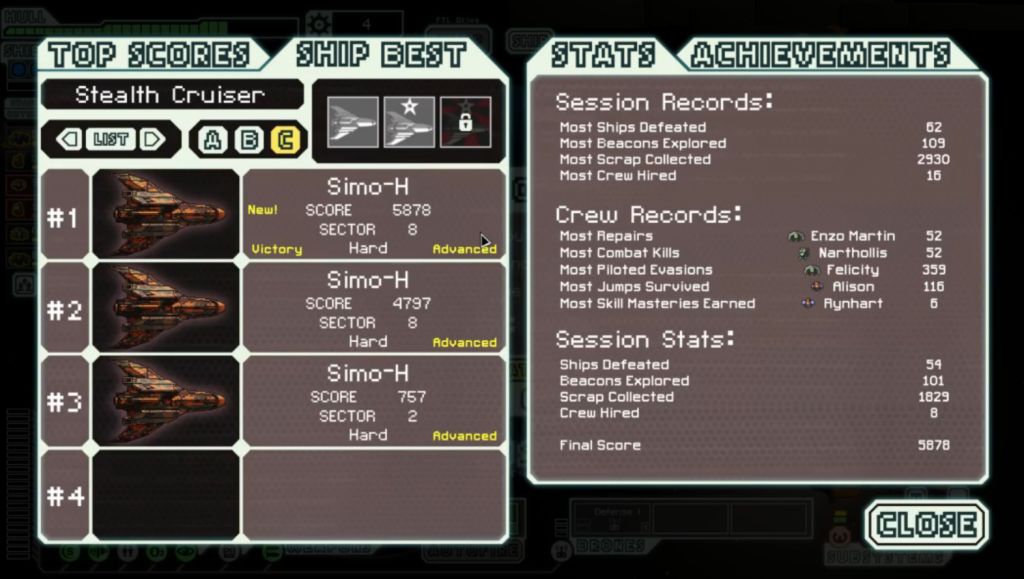
The score for this run graded out as good without being exceptional, a little below 5900. For a stronger ship the 1800 scrap that I collected would be bordering on overkill, but with the Stealth C's various missing needs (not starting with Shields and all that), it ended up being relatively tight, just barely enough to collect everything that I needed. This run was particularly noteworthy for the recovery job following that disastrous autoscout encounter in Sector Four. I'm honestly surprised that I was able to pull things back from the brink and get back to a position where the final flagship duel was relatively routine. Thank goodness I managed to find a store for healing right away when the Stealth C was down to 2 HP, and that I was able to rebuild my crew from that low point of having only two of them left. I hope this will serve as an inspiration for anyone reading this tale - you can recover from near death situations in FTL. All it takes is a little good luck from the random number generator, and you can be back in business again. Don't give up!
Thanks again for reading and / or watching. I truly appreciate how supportive all my fans have been over the years. 


