
Runelord Tressa had largely skated through the first two chapters of Octopath Traveler without difficulty, and I didn't anticipate her having much more in the way of troubles as she continued her journey. The Runelord continued to be an extremely powerful class with answers for essentially any opponent. It was so convenient having access to all six elements and inevitably being able to hit some kind of weak point for each monster, I'm really going to miss it the next time that I play a different class. Anyway, finishing up with the Chapter 2 stories meant that it was time to step back from the main plot and do some additional exploring in optional side areas. Tressa started out by clearing the Derelict Mine and its concluding boss, Manymaws. The weird plant creature hit her with a bunch of status ailments but died in two hits to Fiery Pursuit. I'm glad that Manymaws is pretty easy for most characters to kill since the dungeon annoyingly lacks a save point next to the boss fight.
I decided to make a run to Grandport next as the first town to visit out in the third ring. Grandport is almost always the first of these towns to visit since it has so many useful items available for Purchase along with the critical NPC who can be Challenged for endless Refreshing Jams. Runelord Tressa wouldn't need to go through that kind of grinding but there was still some great equipment for her to pick up. The walk out to Grandport can be deadly for underleveled characters, however, and Tressa was nearly defeated here:

She made it through the previous round of combat with exactly 10 HP remaining. This the reason why I make sure to grab all of those Nourishing Nuts that boost maximum HP, you never know when having a bit more health on hand will make the difference. These Greater Kingfisher monsters had gotten in a first strike round and Tressa was nearly dead by the time that she could get her Wind Rune in place. With 6300 HP apiece they also didn't die in a single hit from Gusty Pursuit, and that was a true rarity for Tressa. She had been able to one-shot her opponents for the entire game thus far. I was able to have Tressa alternate attacking with consuming Medium Healing Grapes for the next few rounds until one of the two birds was dead, and at that point the danger level dropped precipitously and the battle because a formality. Tressa was able to fight her way to the city gates without having another close call like this one. It was another sign of the strength of her class, battling to a third ring town instead of running away from every encounter.
Grandport held all of the usual goodies that should be familiar from my past solo report, the Forbidden Shield for a massive increase to physical/elemental defense along with the Protective Necklace for a similar +80 defense in both categories. Tressa would wear both of these items for the forseeable future as nearly all of my other characters have done. I'll spare the pictures of these items since I've shown them a number of times previously. Something that was genuinely new was this item that Tressa picked up in the hills outside Orewell:

The "Mysterious Knight" is named Cervantes and seems to be living out a Don Quixote fantasy of wanting to be a great warrior. There's a quest associated with this NPC whereby defeating him with Challenge/Provoke produces a Large Critical Nut. Cervantes is extremely easy to defeat - the guy is completely delusional - and finishing the quest is basically a formality. Before attacking the poor guy this time, however, I made sure to Purchase the Rune Hatchet that he was carrying for Tressa. This item has the highest elemental attack on any axe in the game, representing a "best in slot" opportunity for Tressa. There's a later axe that boosts two types of elemental damage and can come out higher overall in damage output, but for now this was definitely the best option for the Runelord class. I continued to use swords on the rare occasions where Tressa needed physical damage and otherwise relied on attacking with her axe. The difference between the two weapons was enormous, generally double the damage or better from using the Rune Hatchet with +278 elemental attack as opposed to the Forbidden Sword with +0 in the same category.
Purchasing all of those items had cleaned out Tressa's pocketbook and that meant she needed to return to more dungeon exploring. With higher offensive and defensive stats now in effect, Tressa was able to clear out the Tomb of the Imperator with no issues. I had gone in there earlier and she was actually wiped out due to taking too much damage. This was one of the very rare game overs that I ran into with this class, something that had barely occurred at all thus far. After visiting Grandport and upgrading Tressa's defenses she had no further issues. For the Behemoth optional boss at the end, I shifted gear around to get some more evade in place, thinking that this would be great for dodging the powerful attacks from the creature.

But then Tressa killed the thing in two hits with her Bright Pursuit and that was that. LOL?  I also realized that I had forgotten about the Hollow Throne and somewhat belatedly took a spin through there. It's an optional dungeon with a significantly lower challenge level and Tressa bulldozed her way through it without breaking a sweat. The Throne Guardian at the finish was taking 7000+ damage from each swing with Icy Pursuit; it wasn't much of a battle. With some additional cash in her wallet from fighting these monsters, I had Tressa pick up one last item:

The Enlightening Necklace provided the highest boost to evade available in the accessory slot, with +80 to the stat. (Side note: there are way too many different necklaces and bracelets with similar names in this game! It's hard to keep them all straight.) This was an important item when I swapped Tressa over to her alternate "evade" setup as pictured above. I already had the best-in-slot Ethereal Dancer Garb with its bonus of +166 to evade and I was using Gustav's Shield as the best current option in the shield slot. My mistake was not picking up the Silent Bandana, the best choice for the helmet slot, which was readily available in Saintsbridge and which would provide another +111 to evasion. This was one of the lessons that I'd learned from the Cyrus solo game: the importance of evade gear for dealing with some of the most dangerous physical-based bosses. Enemies like Werner and Simeon hit so hard that they'll inevitably kill most solo characters, making the only solution to avoid getting hit at all. I typically found myself using this evasion setup only for boss fights, as random enemies hit a lot less hard and could be handled through stacking physical defense normally. I definitely wanted the evasion-based gear though, breaking it out as an optional setup when faced with physical opponents who didn't inflict elemental damage.

The Venomtooth Tiger was a perfect such chance to demonstrate the effectiveness of this evade-based gear. As I've written before, this is the easiest of the Chapter 3 bosses due to the ability to shut down its poison-based gimmick through equipping an Antidote Stone. All of the big cat's damage is physical in nature and can therefore be dodged with enough evasion. I found that Tressa was able to sidestep roughly half of the attacks from the boss, and that made it worthwhile to use the evasion gear as opposed to stacking higher physical defense and giving up any chance to avoid attacks. It did get a little bit dicey when two or three of the tiger claws would hit in succession, forcing a sequence of Healing Grape usage until the RNG would go back to being kind and deliver up a string of misses once again. Anyway, the defensive side of the battle was the only concern here. Tressa's rune-boosted attacks were dealing about 7000 damage when the Venomtooth Tiger was unbroken and of course the maximum 9999 when shields were down. I think it was six or seven attacks in total to defeat the boss. It was too bad that the Venomtooth Tiger wasn't weak against either swords or axes to punch through those shields faster and finish things off more quickly.
Tressa's own Chapter 3 story was only the first of the group. With all of the various side quests knocked out ahead of time, I had her continue onwards with the rest of them in sequence, starting with Olberic's Chapter 3 story in Wellspring:

The biggest threat from the random encounters for the two Chapter 3 stories based in this area (Olberic and Therion) comes from the widespread use of poison. I don't know why an arid desert would be full of monsters that poison your characters but that seems to be the reality in this world. I typically have my solo characters equip an Antidote Stone for safety and the accessory came in handy here once again as Tressa made her way through the Lizardman's Den. For the boss at the end, I tried going with the evade setup once again because the Lizardman Chief uses all physical attacks. This didn't seem to work that great though and I think Tressa might have done better by using her standard defensive setup along with an accessory that boosted max HP. That's not to say that the battle was difficult, however, largely because Tressa was able to one-shot the two minions with her Icy Pursuit. For some reason those poor lizards only have 3100 HP apiece and Tressa was doing quite a bit more damage than that. Their elimination reduced the fight to just Tressa and the Lizardman Chief itself, and while the big guy could hit for more than 1100 damage at a time, the boss never increased beyond one action per round. That just wasn't much of a threat and Tressa pounded him into submission using her Bright Pursuit.
Alfyn's Chapter 3 story was up next and this was a place where the alternate evade setup defensively was not a good idea. Miguel has low base damage while hitting with lots of attacks and debuffing your character's physical defenses. As I've written before, the answer is to stack as much physical defense as possible which essentially neutralizes the threat from the boss. He'll hit seven times in a row with his spears and do less than 100 damage with each one - not dangerous. Tressa continued to hit for 7000+ damage at a time and had no issues. Then I continued onwards to H'aanit's Chapter 3 story and the Dragon boss at its conclusion:

Tressa brought her evade gear again along with an Inferno Amulet to neutralize the fire element damage from the Dragon's breath attack. While the Inferno Amulet performed as well as ever, I found the evade gear to be a major disappointment. Tressa only dodged about a third of the incoming blows and when they did hit, the damage was pretty terrifying. (On the positive side, her SP Recovery passive was restoring a lot of spirit points, heh.) Those Rending Strikes were hitting for just shy of 1500 damage at a time and Tressa's max HP total was only sitting at 3500 HP. Again and again I found her dropping into dangerous territory on the lifebar, forced to spend many rounds in succession healing with Medium Healing Grapes to avoid dying. Only when a string of misses happened to pop up in a row could Tressa go on the attack, and of course she would have to waste one round buffing up with her elemental rune (Light in this case) periodically to keep her offense going. Tressa ended up falling below 100 HP at one point in this battle, but she was never completely wiped out and I was able to avoid using any Refreshing Jams while still winning on the first try. Too stubborn to dip into that stash, I suppose, even know that I'd almost certainly have a bunch of them left over at the end of the Runelord character run. Anyway, I regarded this battle as somewhat of a failure even though Tressa emerged victorious. I resolved that I needed to upgrade her setup a bit more, particularly in terms of pumping up her life total above that 3500 HP mark.

There were two items in particular that I wanted, both of them located in the frigid northern expanses of the Frostlands. The first item was the Adamantine Hat, by far the best helmet in the game for any spellcasting class. I've highlighted this item before with previous characters, but as a quick refresher, it has very good physical defense along with the best elemental defense of any helmet in the game, then further adds a massive +88 elemental attack for good measure. That's almost like getting an Elemental Augmentor completely for free! Tressa snuck into the Maw of the Ice Dragon optional dungeon and had Therion open the purple chest holding this item. I immediately noticed a differece in terms of damage dealt, with her typical attacks jumping up from the 7500 damage range to the 9000 damage range. Excellent news, Tressa was getting closer to my goal of hitting the 9999 damage cap on every single elemental pursuit auto-attack. She cleaned out the rest of the optional dungeon of its treasures, although had to avoid the Dreadwolf boss for the moment since it had too much damage for her to survive.
The other item was an accessory available for Purchase in the town of Northreach: the Empowering Necklace and its +1000 HP ability. The hard part of claiming this accessory comes from making it to Northreach itself, one of the most remote towns far out in the third ring. While Tressa didn't have the Evasive Maneuvers passive skill or some other kind of trickery to skate past the random battles, she was able to power up with her Fire Rune and incinerate the ice-heavy monsters in this region. They hit quite hard but she hit harder.  That opened up the Purchase seen above and I happily swapped over to the new accessory for the health boost. Along with a Large Nourishing Nut picked up from Sir Miles in the town of Northreach, Tressa was now up to roughly 5000 max HP and that was a much safer place to be.

With that side diversion out of the way, Tressa returned to the main narrative of the remaining Chapter 3 stories. She dealt with Primrose's Chapter 3 story first, making her way through the Obsidian Manse to face Albus. This is the one-trick pony boss based around the use of the blindness status condition, which can fortunately be blocked through the use of a Bright Stone accessory. Even a class like the Runelord which doesn't particularly care about hitting the target needs to use this accessory to block an instant death attack from the boss. Tressa had no trouble with Albus initially, largely because he started out taking just one action per round, only to stumble a bit when he summoned his two Obsidian Officer minions halfway through the fight. They added to the damage that Tressa was taking and tipped the math of the encounter, threatening to overwhelm her healing capacity. This was a situation where I was able to rely on the physical damage component of the Runelord class for once: Tressa invested all of her boost points into auto-attacking with her axe. Since the minions were weak to axes and had exactly four shields, those four axe swings punched through their defenses and let the elemental pursuit hit for a max damage 9999 value and a one-shot kill. Then I healed for a few rounds with Tressa, let her boost meter refill, and did the same thing with the second minion. Once Albus was alone once more, this battle was a piece of cake.
Cyrus' Chapter 3 story was next on my list. I included a screenshot from one of the random encounters in the associated dungeon, Yvon's Birthplace, simply due to the rare situation that popped up: this "Researcher III" opponent did *NOT* die in one hit to Tressa's elemental pursuit! That basically never happened against a generic enemy and it was so unusual that I had to capture it with a screenshot. There were a couple of different factors limiting Tressa's damage here, such as using the wrong element (wind instead of lightning - the other Researchers in this encounter group were all weak to wind) and the target having the elemental defense up buff in place. Still, this was the vanishingly rare case where something didn't die instantly against Tressa and that was worth noting.

Yvon ended up being a relative pushover, easier than a bunch of the other Chapter 3 bosses had been. His Research Fellow minions had enough health to avoid dying in one hit despite a weakness to axes. Tressa found that she could try out this novel strategy called "hitting something twice" and it still worked out OK. It helped that the damage from the minions was elemental in nature and Tressa was permanently in the "elemental defense up" state. As for Yvon himself, he was pretty easy to break with light element damage and never increased beyond a single action each round. The tricky thing about this boss is supposed to be his high HP total at 63k and that just didn't pose any problems for Tressa. Her elemental attacks were getting close to hitting the damage cap even against unbroken targets, and of course anything against a broken target was an automatic 9999 result. It didn't take long to put the evil headmaster away.
The two remaining bosses among the Chapter 3 group were the ones that tend to require the most creative solutions. I wanted to start with the Mystery Man and the Shady Figure, the duo who wait at the end of Ophilia's tale outside of Goldshore. These two can be tough for a solo character since they both have a sizable health total (roughly 30k apiece), they work together with healing and buffing spells, and eliminating one of the two only makes the surviving member more dangerous. In particular, low offensive variants can struggle against the 800 HP healing tossed out by the Shady Figure at the end of every round. Fortunately the Runelord was a class that didn't have to worry much about that since Tressa's damage output was simply enormous. She was further aided here by her perma-buffed elemental defense; I loaded up Tressa with strong elemental defense gear and then her Elemental Edge passive took care of the rest:

Their spells hit Tressa's resistances and had no effect. The Shady Figure later used an ability called Arcane Enhancement and gave both of them the elemental attack up buff, but even that only caused the incoming spells to deal 100-200 damage apiece. Tressa had nearly maxed out her elemental defense at 999 and then applied the further 33% damage reduction from her passive - they simply couldn't do much of anything. This allowed Tressa to turn and focus on her offense using various different elemental pursuits. The two bosses lock out their elemental weaknesses during the first half of the battle, and as a result Tressa couldn't get the 30% damage bonus from hitting an elemental weakess. Still, she seemed to manage OK:
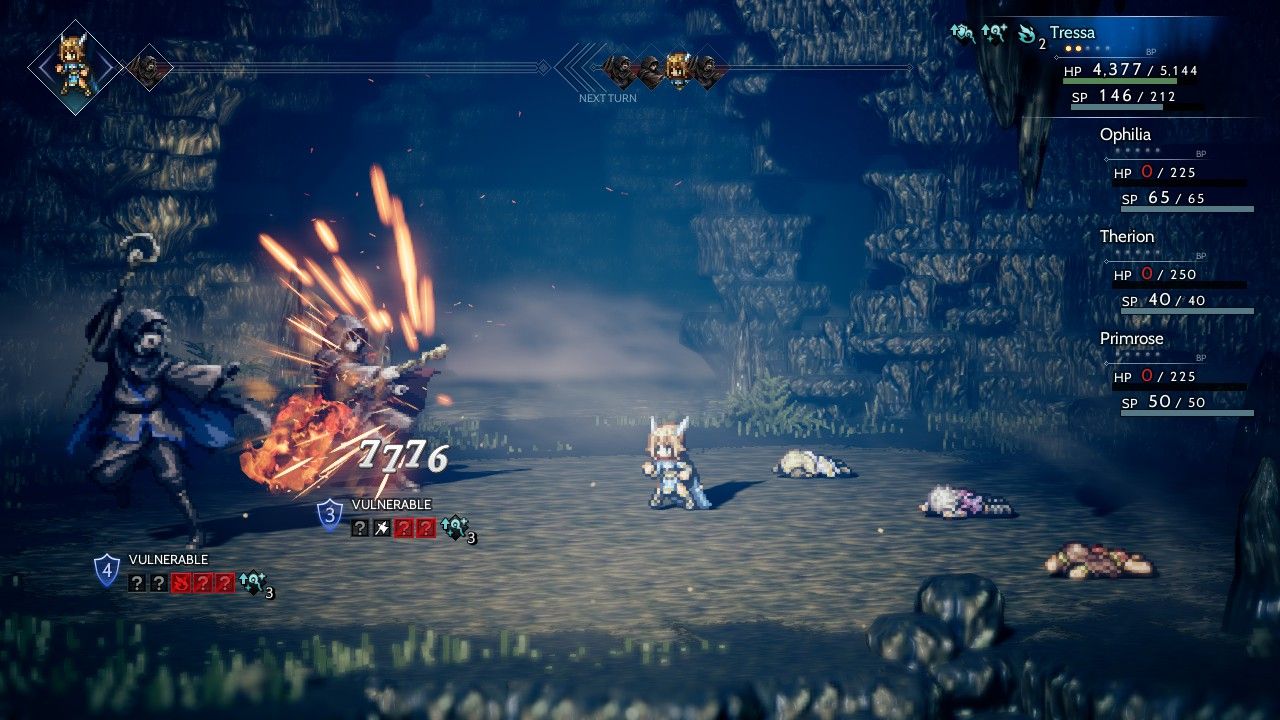
Dealing 7700 damage per attack instead of 9500 damage, oh no! Needless to say, Cyrus would have killed for this kind of setup. My plan for the battle was to alternate attacks against the Shady Figure and the Mystery Man so that whichever one was still alive at the end would go down in a single hit. This was readily possible since Tressa was dealing about 10x as much damage per swing as the bosses were regenerating each round. The math was fundamentally in her favor even keeping in mind that she needed to spend some rounds healing and recasting her elemental runes. I also had to be careful not to break the Mystery Man, who was weak against axes, since I didn't want to defeat that boss too quickly. The sequence ended up playing out the way that I envisioned, with the Mystery Man dying while the Shady Figure had health displaying in red text (i.e. under 25% remaining). One last attack against the isolated target was enough to finish things off, though the Shady Figure did get off a pair of Arcane Blade attacks for 1200 damage apiece in that one last round. Whew! (Despite the name, Arcane Blade is a physical attack. All of Tressa's elemental protection was useless there.)
One other point worth noting. The Shady Figure used an ability called Break Spirit which inflicted the elemental defense down debuff on Tressa. How would this interact with her permanent elemental defense up passive support skill from Elemental Edge? I thought that the debuff would simply get ignored but no, it turned out that both conditions applied simultaneously and canceled one another out. They were both showing up on Tressa's character screen at the same time, with one arrow pointing up and one pointing down. This means that Elemental Edge guarantees your character will never be in a situation worse than neutral state for elemental attack/defense. However, enemies can cancel out the buff with the corresponding debuff, at least temporarily. That could be important information to know for the future.

With the additional levels that Tressa had picked up from the last few dungeons, I found that she could now hit the 9999 damage cap against the monsters in the deserts outside Wellspring. This required targeting the appropriate elemental weakness for the 30% damage bonus but it was pretty consistent from this point forward. Given the ease of looking up each foe's weaknesses in my reference guides, this meant that Tressa was pretty much maxing out the damage cap against everything she faced. How much longer until she could max out damage even while *NOT* hitting an elemental weakness? Yep, the Runelord is a pretty good class!

Finally the last boss of Chapter 3, the thief Gareth at the end of Therion's story. I've written before about how this guy is really nasty for solo characters, between his item-stealing ways and his SP thefts and his minions who will revive him out of being broken. The biggest weakness of Gareth is his low overall health at only 38k in total, something that can allow his opponents to punch through to a victory even if things are otherwise falling apart in the battle. I wasn't too worried about Tressa because Gareth was fortunately weak against both swords and axes, making it easy to use auto-attacks to break through his shields and restore lost items. Her Runelord abilities would also ensure that as little as four or five attacks would be sufficient to defeat the dodgy thief. The first order of business was removing one of the two minions to eliminate their attacks, but not both minions since that adds an extra action to Gareth's AI scripting. The minion died instantly to an Icy Pursuit despite not having an ice element weakness; so far, so good.
I had Tressa attack Gareth twice afterwards and knock him down to one shield, just in time to capture the scene above where her items were stolen at the perfect moment. She had more boost points available if there had been a need to punch through additional shields with her axe, which fortunately there wasn't. The next attack broke the boss to restore items and then a final attack afterwards finished off Gareth. I did have to break out a Refreshing Jam to restore HP and SP after Gareth stole all of Tressa's spirit points, the first time that she'd needed to use one of those items. This was still pretty routine overall and ended in a victory on the first attempt.
So those were the Chapter 3 bosses, handled in much the same fashion as the Chapter 1 and Chapter 2 bosses. Tressa's damage output kept smoothly ramping up in accordance with the greater health totals of the bosses and made the whole thing pretty straightforward. Tressa was continuing to kick some serious behind while still fighting with one hand tied behind her back. I was finally going to let her use the Runelord's Divine Skill for the first time against the Chapter 4 bosses, which was where I finally expected her to face serious opposition. That story remains to be told in the final part of her solo journey.


