

549 monsters slain, 72978 gold, 7790 ore, 5213 aether, 200 souls
I continued the Barbarian Legacy series in the aftermath of having finished Normal difficulty. I had 300 souls to spend and put 200 of them into the third rank of Master Smith since I knew that I had some major equipment purchases to make. I wanted to get the Crescent Helm, Ammonite Chest, and Ammonite Trinket which together required six more equipment weight upgrades. It also boosted Armor up to 68 which was now worth adding the Reinforced Rune for the 8% increase, which of course needed three more rune weight upgrades as well. The Master Smith category at the Soul Shop was really coming in handy here. I only had 38k gold remaining after those purchases and I decided that I'd hold off on any Gold Gain upgrades until the next character run. Instead, I dropped 5000 ore/aether on the second Strange Transaction to take the third rank of Absolute Strength. I wanted to hit 51 Strength for the next point of lifesteal and just barely had enough money to get there, with a few tidbits left over for more Vitality.
Defeating the game on Normal difficulty opens up the "Threads of Fate" and the chance to reach New Game Plus difficulty for the first time. I followed the same pattern as I did with my initial Knight Legacy challenge, turning on the burden transforming normal Lamech into the more dangerous Lamech Prime boss refight and then adding two points in Burden of Evolution (monsters have 20% chance to transform into the next tier up) and Burden of Adaptation (monsters have 6% chance to gain a commander buff) along with one point in Burden of Scale to make the dungeon 10% larger. This was significantly more burdens than needed, as the player only needs to pick two of them and I'd selected six, with my goal being to recreate the feeling of increasing the difficulty level from the original Rogue Legacy. From my previous playthrough, I knew that these additional burders made the random monsters across the dungeon significantly tougher opponents.

Barbarian #5: 59 Vitality, 51 Strength, 73 Armor, 6 Dexterity, 20 Intelligence
This Barbarian had the Synesthesia trait: everything leaves behind color trails in exchange for 25% additional gold. He also had the Super IBS trait which replaced the Barbarian shout with a "super fart" that bounced the character up in the air slightly, not a great trade. I found the New Game Plus dungeon to be a major step up in difficulty with even the monsters in the Citadel requiring two hits to kill and capable of dealing close to 100 damage. The Synesthesia trait was also somewhat annoying in practice, particularly when there were a lot of enemies with ranged projectiles operating on screen at once. I headed into the Study as soon as I found the entrance and essentially treaded water on health for some time, losing HP at about the same rate as I was able to gain it back via lifesteal and meat/flask recovery drops. This was the first time that I'd taken a character with the Synesthesia trait through Murmur's miniboss chamber and the graphical result was pretty wild, huge horizontal streaks of color all over the place. Eventually I was able to clear everything out while picking up several Blessings of Life along the way.
The same pattern from the Study continued through the rest of the Citadel and Axis Mundi: I could not seem to restore HP back into the safe zone for any length of time. This was mostly due to the fact that I kept taking more Blessings of Life which were absolutely everywhere on this pass through the dungeon. I think I found eight of them just in the first three biomes, pretty crazy stuff. At one point I fell as low as double digit HP on the big bridge but managed to recover and slowly start filling up the lifebar again. All of that extra health functionally turned into a form of healing when I reached the end of Axis Mundi and opted to fight the two Void Beasts, with the doors of the boss room recovering 40% of max HP for about 450 total health. This wasn't my best fight against the two Void Beasts as my Barbarian once again hacked them down without much in the way of subtlety. I would have liked to use the shout here but remember that it was unavailable for this character, replaced by that stupid farting - argh!
I tried to go up into the Sun Tower next and unfortunately that didn't work out for me. Remember how I benefited from a crash to desktop back in Normal difficulty as I was able to get a second chance at the Irad boss fight? This time the exact opposite happened: I was able to get through a very difficult entry room with double commanders without taking a hit, only to see Rogue Legacy 2 crash and then did much worse when I redid the same room afterwards. Steam was acting really flaky all throughout this session and I'm not sure what was going on. In any case, I took about 300 damage and quickly had to leave the Sun Tower for the less dangerous Kerguelen Plateau. Earlier I had grabbed Hyperion's Ring when I was unable to find a relic that provided additional sustain while traversing the dungeon. This effectively gave me an additional 500 HP when my Barbarian died in the Plateau and was forced to use the revive. I continued clearing the tundra wastelands and decided that I would focus on trying to defeat estuary Naamah with this character, if only to avoid having to collect the Lilly of the Valleys a second time.
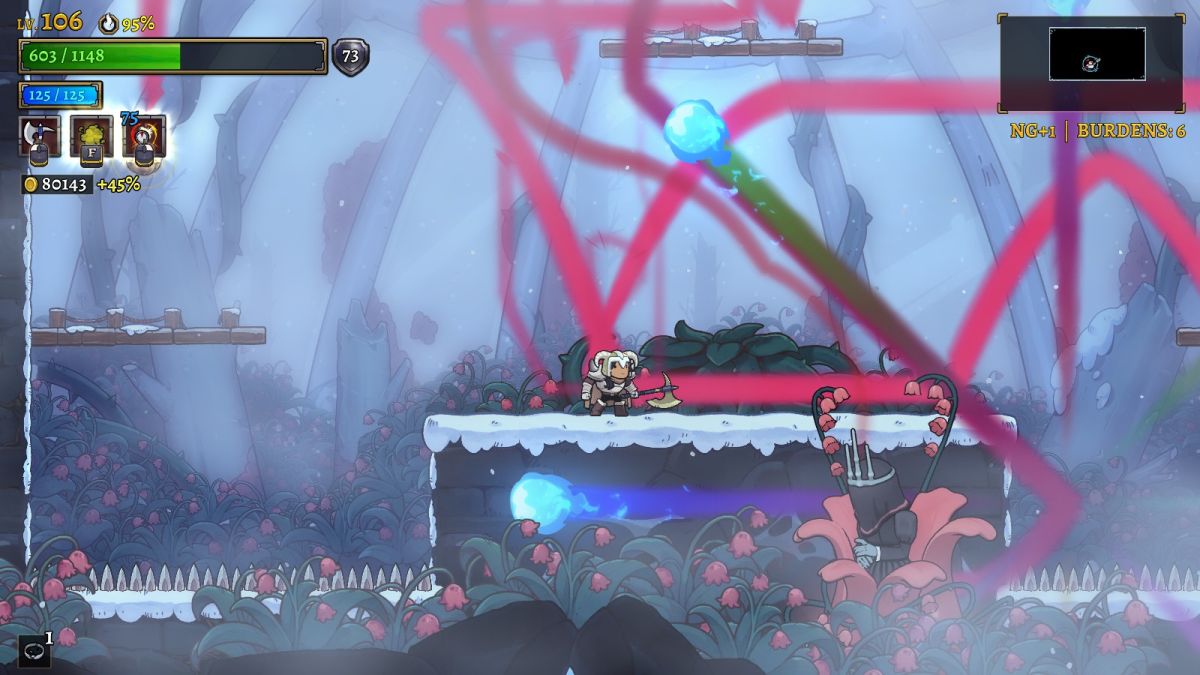
I noted back in Normal difficulty that Naamah was a tougher opponent than normal for the Barbarian class. That held true again here in NG+1 difficulty since she never stays in place long enough for the Barbarian to get off very many of the big ground swings. I wasn't helped either by the Synesthesia trait filling up the boss chamber with colorful streaks that made it harder to see what was going on or an inexplicably choppy framerate from Steam that I'm not used to experiencing with Rogue Legacy 2. This was a long fight that lasted for minutes on end and my Barbarian inevitably took hits as he whittled down Naamah's healthbar with lots of airborne spinning slashes. While I did defeat Naamah in the end, I wound up losing back pretty much all the health that was gained from entering the boss room. After that, my Barbarian was slowly chipped down by taking damage across the rest of the Plateau. It was a frustrating sequence as I kept gradually losing health, my sustain lower than the incoming damage, until eventually a stupid arrow trap dealt the last blow. This was still a very solid first character for NG+1 difficulty although I think that I could have done better. At least I had cleaned out a whole bunch of useless equipment from chests - the gold total was lower than it otherwise would have been because I found so many "Warden +1" and such items along the way.
335 monsters slain, 87368 gold, 6888 ore, 3649 aether, 200 souls

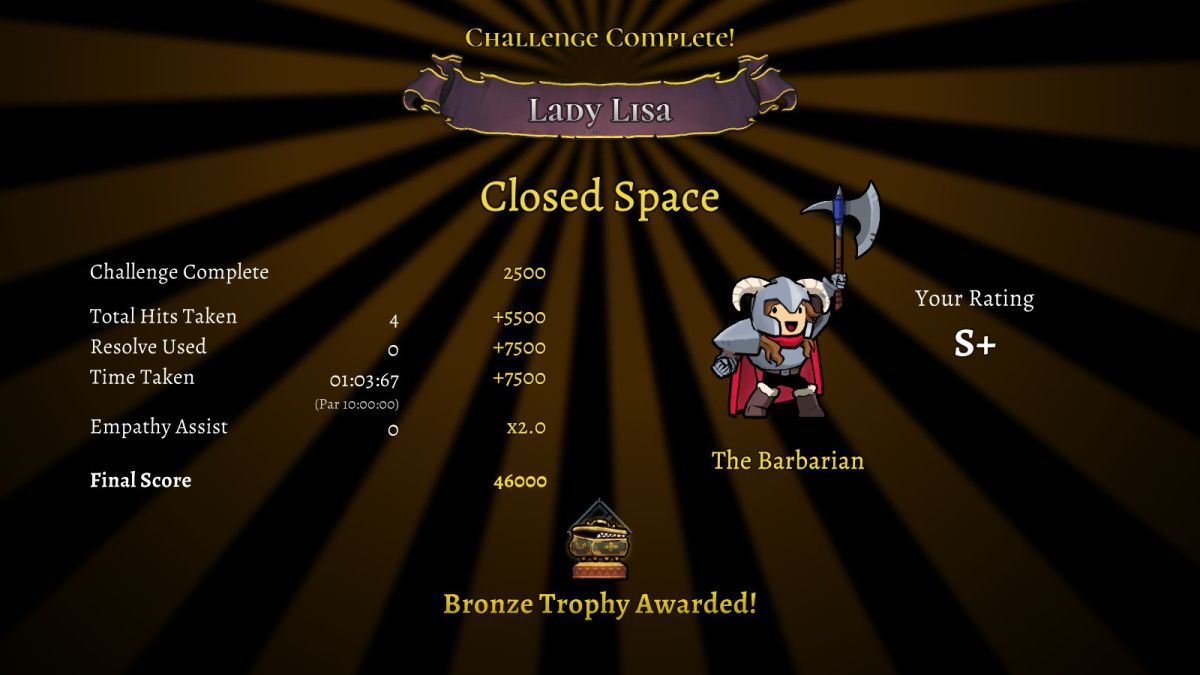
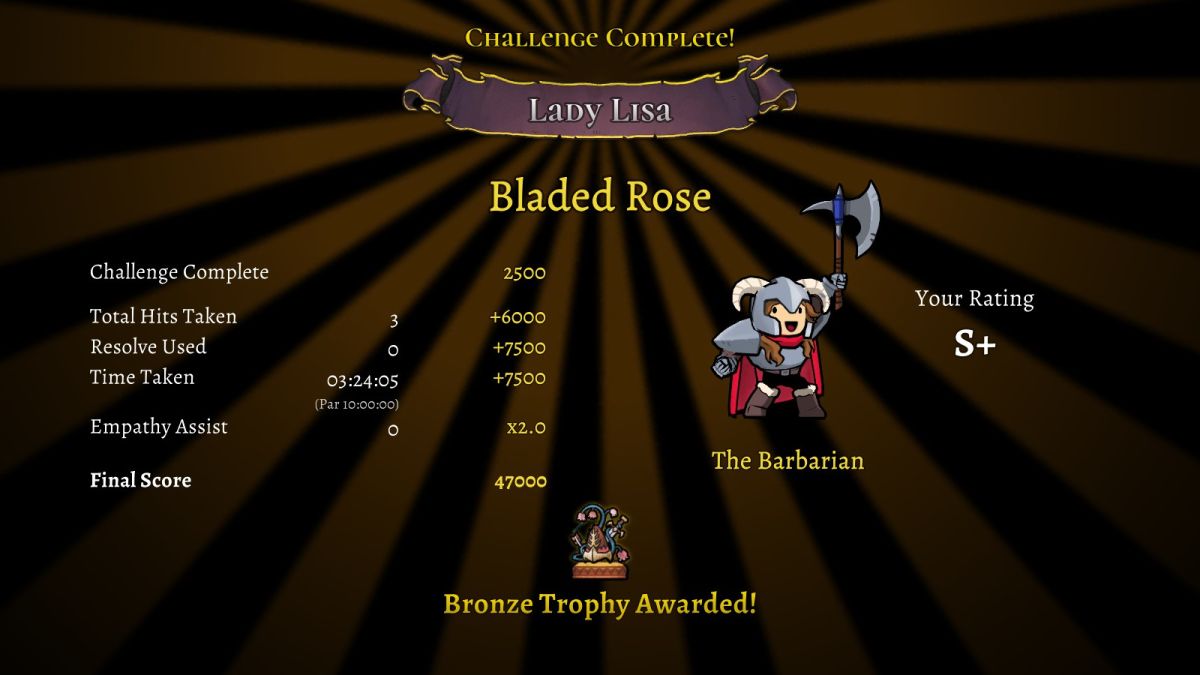
Back in town, I was able to access the scar challenges again at the Drift House. (I still don't know why the scars are unavailable immediately after finishing a difficulty level.) I started out by trying my hand at the mimic chest version of estuary Enoch and fortunately was able to win with an S+ score on the very first attempt. It honestly wasn't a particularly great performance from me but this is one of the easiest scars to complete and there was no reason to try again since I already had the Bronze Trophy in hand. I had also unlocked the "Bladed Rose" scar where the player faces off against both Lamech and Naamah simultaneously, and that challenge was certainly one that I did not complete on the first attempt. Bladed Rose always causes me problems since Lamech and Naamah do a good job of running interference for one another. Whenever one of them is vulnerable it always feels like the other one is forcing you to dodge their attacks. There are four meats hidden in the scar room and with their help defeating the two bosses wasn't a problem. No, the issue was winning this scar while taking five or fewer hits over the course of the fight in order to unlock the S+ rating. I tried this scar about 20 to 25 times over the course of an hour before I was finally able to piece together a clean result with only three hits taken for the Bronze Trophy. I wasn't sorry to have this scar out of the way after that effort.
My reward for completing these two scars was a massive payout of 700 additional souls to give me a total of 950 souls to spend. This worked out to one additional rank of Absolute Strength and Master Smith along with two ranks in Unbreakable Will; my Barbarians now had four total levels in each of these categories. As for the town merchants, the last run had been strangely devoid of runes and therefore I had nothing to pick up at the Enchantress. It wasn't that I had failed at the fairy chests, they simply hadn't shown up in the dungeon at all. I had found a bunch of equipment but only one item that was worth purchasing: the Drowned Sword for +5 Strength over the previous Crescent Sword. This left 79k gold to spend at the "castle" upgrade tree but the next two Gold Gain upgrades sucked away 53k of that total. I was still hurting in terms of income due to a lack of any Bounty Runes appearing thus far. With the remaining funds, I took the unorthdox step of buying six Intelligence upgrades to boost the stat to 26 points for another point of Soulsteal value. This cost about 12k gold which felt worthwhile for Barbarians which badly needed more sustain. The rest went into random Vitality and Strength upgrades to continue ticking up the core stats for the class.

Barbarian #6: 64 Vitality, 58 Strength, 73 Armor, 7 Dexterity, 26 Intelligence
This Barbarian had the IBS trait which meant that she farted a lot but without replacing the shout as the class talent, whew. She also started with Freon's Reward relic which granted back HP on opening treasure chests, something that I was quite happy to have. This Barbarian had ticked over to 7 HP per monster kill (5 HP from the double Lifesteal Runes and 2 HP from the Soulsteal Rune) which was a nice confirmation that I was doing the math on the lifesteal correctly. Anyway, it was remarkable what a difference having a little more lifesteal and Freon's Reward made in terms of staying healthy. Getting 26 HP back per treasure chest might not sound like a lot but it really adds up over time. The benefit also includes opening fairy chests and quest reward chests as well. Aside from one room with four of the spear-wielding monsters encountered in a sardine can, I had few issues proceeding through the Study and was able to take three Blessings of Life along the way. I also found the Glowing Ember relic (deals 75% more damage on every 6th hit) to make use of the remaining 25 resolve on this Barbarian; when the sixth hit lined up with an axe swing, the damage was absolutely massive.
I cleared out the full Study and took out the Gonghead Twins minibosses along the way since things were going so well. I found the entrance to Axis Mundi quickly and headed for the Sun Tower next with much of the Citadel still unfinished. I cleared out some of the Sun Tower before getting hit with a crash to desktop again, then went through more of the Citadel to regain HP before heading into the basement. This was a character where I bounced around from biome to biome a lot without staying in one place for too long. When I reached a point where my Barbarian was about 40% less than full health, I teleported back to the boss room in the Citadel to take advantage of the free healing before facing Lamech Prime. Usually I don't find the Lamech refight to be that tough, however this time around I struggled badly at dodging his various projectiles. I kept thinking that I had avoided an attack and refrained from using the Barbarian shout only to wind up getting hit anyway. The good news is that Lamech Prime doesn't deal that much damage on each hit taken but my repeated mistakes did add up over time. I wound up losing about 800 HP by the time that I emerged victorious which was a downright lousy result.

I used the remainder of Axis Mundi to restore some health and then headed up to the top of the Study upon hitting 40% less than full once again. I had a mediocre boss fight against estuary Enoch's mage form, once again not using the shout as well as I could have. Although I don't think that it works against the void projectiles, it would have been helpful against the fireball swarm that Enoch likes to shoot out. By way of contrast, I had a fantastic result against the mimic chest second half of the boss as I avoided taking any damage at all. The Barbarian excels against mimic Enoch and this half of the boss should be easy for this class. Afterwards I did some healing in the Plateau followed by going back to the Sun Tower and finishing the climb up to the top. Then back to the Dry Lake again and so on. This was a long, long character run that stretched on for several hours with insane value from the Freon's Reward relic; I must have opened close to a hundred treasure chests across its length.
The other big highlight of this character's journey took place against estuary Irad. I decided to take on this boss once most of the Plateau was cleared and found the eyeball monster to be another tough, challenging boss opponent. I did my best to take my time but still kept getting stuck in the big swing animation occasionally. Once again it was a close boss fight and yet I was clearly going to emerge victorious. My Barbarian was in mid-swing animation to deliver the final blow... and that's where I was hit with another crash to desktop, the exact moment in time captured in the screenshot above. Again, that wasn't me freezing on a particular video frame, that was the exact instant that the game crashed to desktop - argh!  These game crashes were getting bad enough that I checked to see if I needed to update drivers on the laptop. Anyway, I was annoyed enough at this stolen boss victory that I decided to focus on clearing the rest of the dungeon rather than take another stab at Irad. I was able to get through the whole Plateau and about 80% of the Dry Lake before my Barbarian's health finally ran out. It was a great character even with the ridiculous crash against Irad.
620 monsters slain, 166469 gold, 12148 ore, 5967 aether, 200 souls
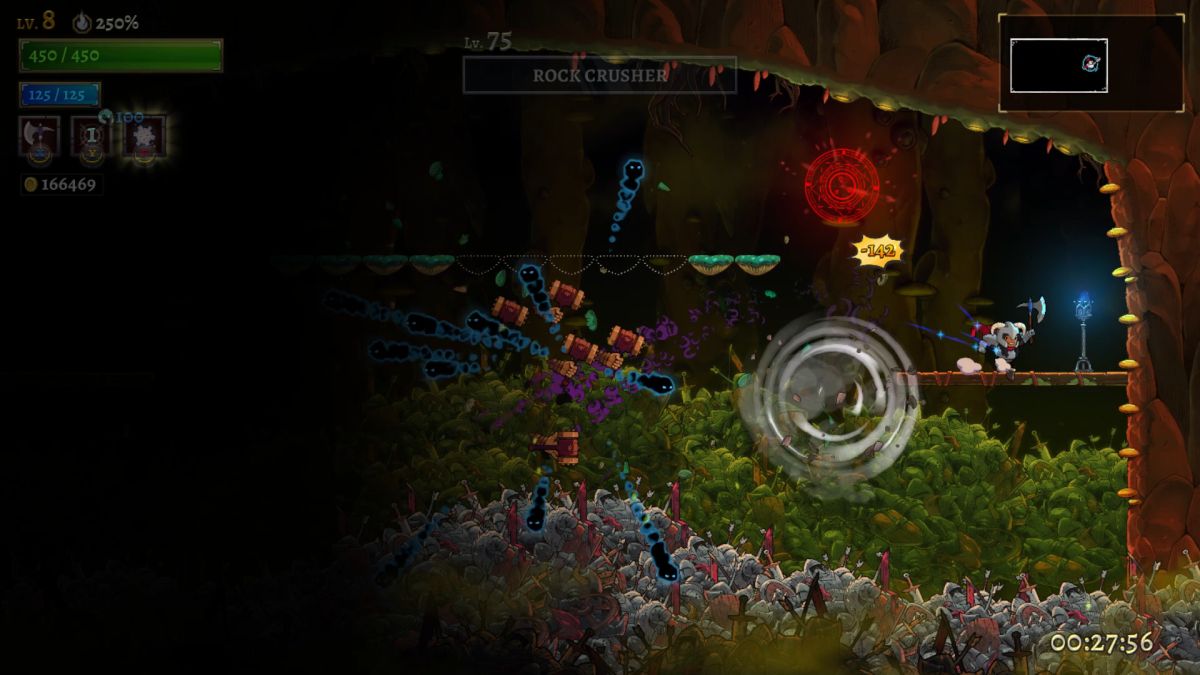
Upon returning back to town, I headed over to the Drift House and started banging my head against the one remaining scar challenge, Automatons. This is an extremely difficult scar where the player has to face waves of the flying dagger/axe/hammer/shield minions, followed by fighting against all four of the gigantic versions of the automotons previously faced as minibosses in the Dry Lake. I didn't have much luck against this scar on a long sequence of failed attempts that were nowhere close to succeeding. About the only good news was the fact that one swing of the axe was sufficient to kill the flying daggers; everything else took two chops though. Normally I took too many hits against the first half of the battle to make the second half worth fighting, and when I did make it there, I wasn't able to burst down and kill the first big automaton (the flying dagger always appears first) before the other three showed up and the room became too filled with enemy projectiles. With enough tries, I was somehow able to complete the scar with exactly five hits taken for the S+ rating, I'm not even sure how I pulled it off. The key to this fight is always eliminating the flying dagger ASAP before the other big automatons spawn as it becomes almost impossible once they're all present.
Now I had 700 souls to spend and I decided to grab another rank apiece of Absolute Strength and Master Smith. I continued to have bizarre rune luck, having found a second Reinforced Rune while still lacking even one Bounty Rune. It wasn't worth purchasing a second Reinforced Rune yet so I held off there, and similarly there was nothing that I wanted at the Blacksmith. I had cleared out basically all of the "Item +1" junk and hopefully the Ammonite +1 stuff would begin appearing next. Thus I had 166k to drop into actual stats; the first 71k went into the next two Gold Gain upgrades which left just shy of 100,000 gold remaining. I finally picked up the Alchemy Lab upgrade so that the Barbarian shout would recharge on finding mana flasks and then picked up more of the usual Vitality, Strength, and Armor upgrades. I made sure to gain enough Strength to hit another point of lifesteal and also dumped some money into the cheaper Dexterity upgrades since they added damage on the big axe swing, if not on the jumping spin.

Barbarian #7: 74 Vitality, 65 Strength, 77 Armor, 14 Dexterity, 26 Intelligence
This character had the Charismatic trait: 15% discount on purchases in shops which I used before his run started. That's a rare trait since I don't recall ever seeing it pop up previously. Amusingly, the math worked out such that this Barbarian did exactly 200 damage per grounded swing, no more and no less. I found that it was noticeably easier to progress through the dungeon with this character thanks to the additional stats picked up on the last trip back to town. I came across the Cornucopia relic early on (meats restore an additional 8% of your max HP) and grabbed it, transforming each meat item from restoring about 50 HP to restoring about 150 HP. That relic along with the aforementioned stronger overall stats seemed to boost this Barbarian to the point of comfortable sustain everywhere outside of the Dry Lake. I cleared out the Study first as usual and then set about to working on the basement biome while taking every Blessing of Life that I came across.
Even as the challenge level of the dungeon was dropping, the loot that I was finding was better than ever. I mentioned before how the previous Barbarian cleaned out a whole bunch of junk equipment to stop it from appearing in future drops. That opened the way for this character to start landing much better stuff: the +1 version of the Ammonite Helm, Chest, and Cape. I also turned up the Obsidian Helm which has a huge bonus to Vitality and had a good chance of being used later. In the rune department, I finally was able to find the first Bounty Rune after clearing out basically every possible tier 1 rune and then later came across the second Quenching Rune. I was having pretty good luck in the rune department overall, especially finding the second Lifesteal Rune so quickly, it was only the lack of Bounty Runes that had been holding me back.
Once the whole Dry Lake was cleared, I grabbed the two keys and opened the miniboss portals. I made sure to enter both of them at full health while clearing out other parts of the dungeon, and it was a good thing that I did because they were tough challenges once again. The dagger/hammer pair in particular was really hard and I took close to 1000 damage in the process of defeating them. I'm convinced at this point that these minibosses are simply bad opponents for the Barbarian due to the arenas in which they're fought: there are few places to stand and make use of the axe swing against these automatons. I was able to get the job done but I was glad that there were lots of places elsewhere in Axis Mundi and the Kerguelen Plateau to recover HP between fights. I was all set up to make a serious run at finishing NG+1 difficulty with this character... and then I let my Barbarian's life get too low after taking another Blessing of Life and accidentally died in Axis Mundi. Whoops.  There was no excuse for this at all of the breakable items were still saved up at the teleporters; I wasn't even running the recording software at the time because I wasn't expecting to be doing anything dangerous. Chalk this up to poor play and inexcusable hubris on my part.
457 monsters slain, 128100 gold, 8215 ore, 2336 aether, 0 souls
For once I had nothing to do at the Drift House but did have lots to purchase at the other town merchants. I had several runes to add: the Bounty Rune (finally) from that last run along with the second Quenching Rune. The pair of them cost five rune weight upgrades and almost 30k gold, sheesh. Over at the Blacksmith, I was able to upgrade to the +1 versions of the Ammonite Chest and Cape followed by picking up the Obsidian Helm at a total cost of seven more equipment weight upgrades. This only left a little over 50k gold for actual stat upgrades which I spread around to Vitality, Strength, and Armor as usual along with a few points in the cheaper Dexterity upgrades. I also dropped one more point into Meditation Studies so that entering boss rooms would restore 60% of max HP to help with the bosses that I hoped to clear with this character.
Barbarian #8: 88 Vitality, 69 Strength, 96 Armor, 15 Dexterity, 29 Intelligence
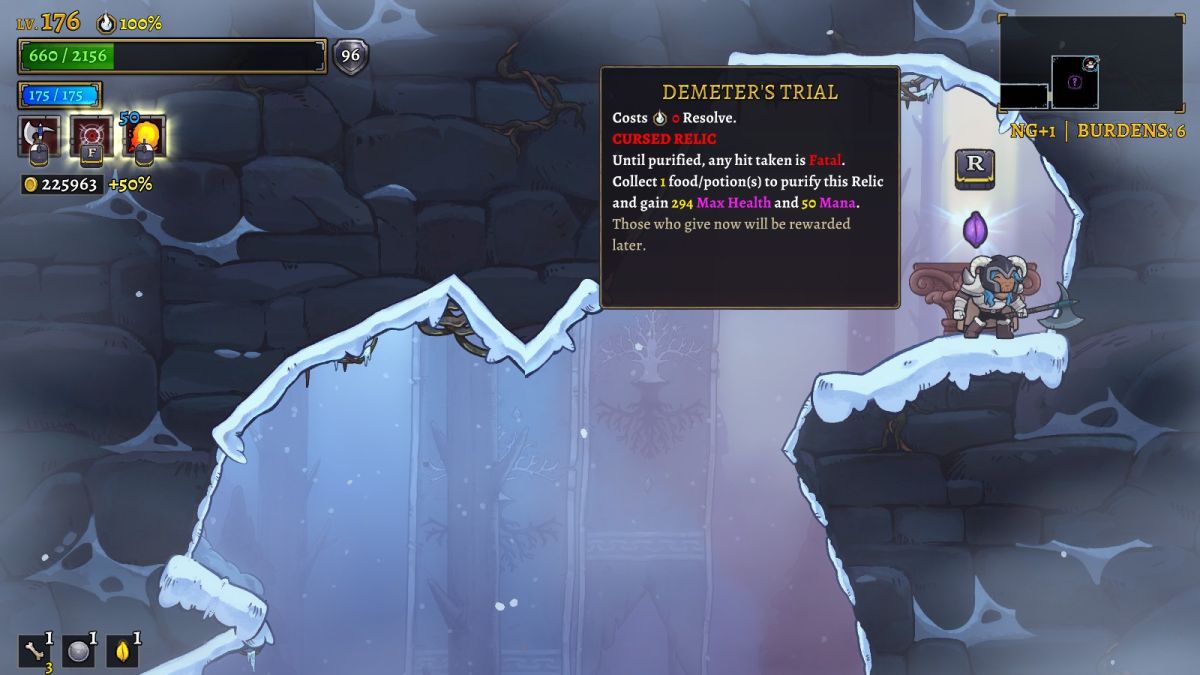
This Barbarian had major increases to Vitality and Armor; his starting health was just under 1000 HP before stacking up additional Blessings of Life. I started out in the Study as usual and had some unexpected trouble in there. It was a combination of finding several additional Blessings of Life along with some room formations which were simply very difficult to complete. Things straightened out after that and I was able to hit my stride down in the Dry Lake, completing the whole basement without ever having to leave for HP recovery and with part of the Citadel still unexplored. I was also able to find the Gnawed Bone relic in the Dry Lake (eating meat while at full health increases max HP by 10%) and surprisingly landed all three stacks before I was finished down there. I was helped here by Tubal's workshop room: there's always a meat drop outside the entrance and the same room dropped a second meat item as well. Finding the third meat afterwards took less effort than I had expected, and along with half a dozen Blessings of Life plus an easily-cleansed Demeter's Trial relic, I was able to boost this Barbarian's max HP above the 2000 mark. I would eventually find a second Demeter's Trial in the very last room of the entire dungeon and thankfully I still had all of the breakables at the teleporters to cleanse it as well.
For the remaining 25 resolve, I found Achilles' Shield (deal 10% more damage when above half health) which was a good fit for a character that had so much life available. Even though 10% additional damage wasn't all that much, it was better than nothing and boosted the axe swing from about 210 damage to 230 damage. I also noticed that I was picking up significantly more gold than in past runs, due to the combination of having a higher gold multiplier (50% total thanks to the new Bounty Rune) along with receiving gold from more treasure chests. I had pretty much already obtained every piece of equipment which could drop on NG+1 difficulty and it makes a visible difference over the course of a run when every chest is yielding gold instead of a sizable number producing equipment. This was another sign that I really needed to finish up here and move on to the next difficulty level.
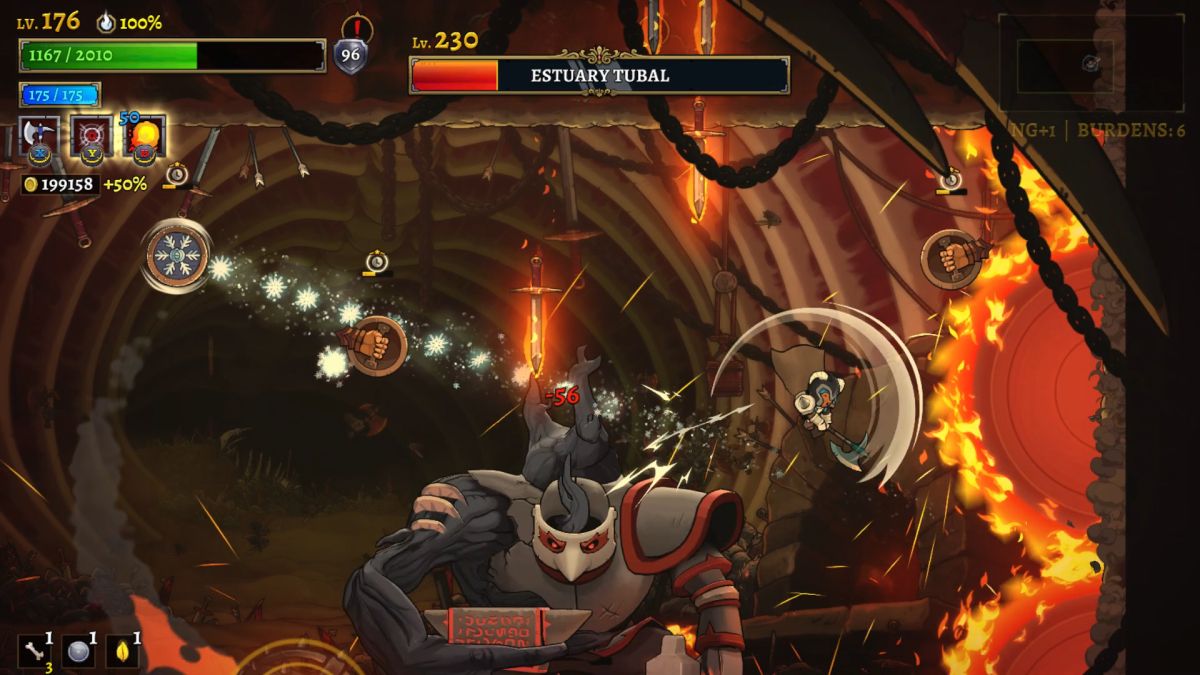
Estuary Irad was the first boss on the list, having escaped death due to a miracle crash during one of the previous Barbarian heirs. I did my best to follow the successful strategy from Normal difficulty, taking the fight slowly and prioritizing dodging over landing more axe swings. I was able to make it through the first half of the battle without taking any hits and then used the shout to clear the screen whenever things looked dicey after the third eye opened up. I basically kicked Irad's butt and won the battle with 1500 HP remaining - not even close. Then I teleported down to estuary Tubal with the Plateau still uncleared since I thought I might need it to recover health afterwards. Tubal was a noticeably harder opponent than Irad, in part because he had more health but mostly because it was tougher dealing with his flying minions. While I was able to use the Barbarian shout to clear them with its tiny area of effect damage, the invincibility period on the minions lasted long enough that they were able to get in several hits. I was also sloppier at this boss fight and took some hits that could have been avoided with a cleaner fight. The overall result was a tight duel that wound up being a bit closer than I would have liked, with Tubal falling when my Barbarian had about 500 HP remaining. Thank goodness for stacking all that health with Blessings of Life and the Gnawed Bone relic.
I was honestly more worried about Tubal as an opponent than either of the final bosses behind the Golden Doors. Jonah proved to be an easy foe once again, with my Barbarian able to get right up in his face and smash him with the big axe attack. Jonah kept doing his dangerous pizza attack but I've gotten much better at dodging it through repeated practice. I came close to having a perfect Jonah fight and knocked him down to about 20% health remaining before finally getting tagged by one of his spoons, ah well. It certainly made no difference in the outcome of the battle as Jonah was easily defeated. As for Cain and the final boss fight:
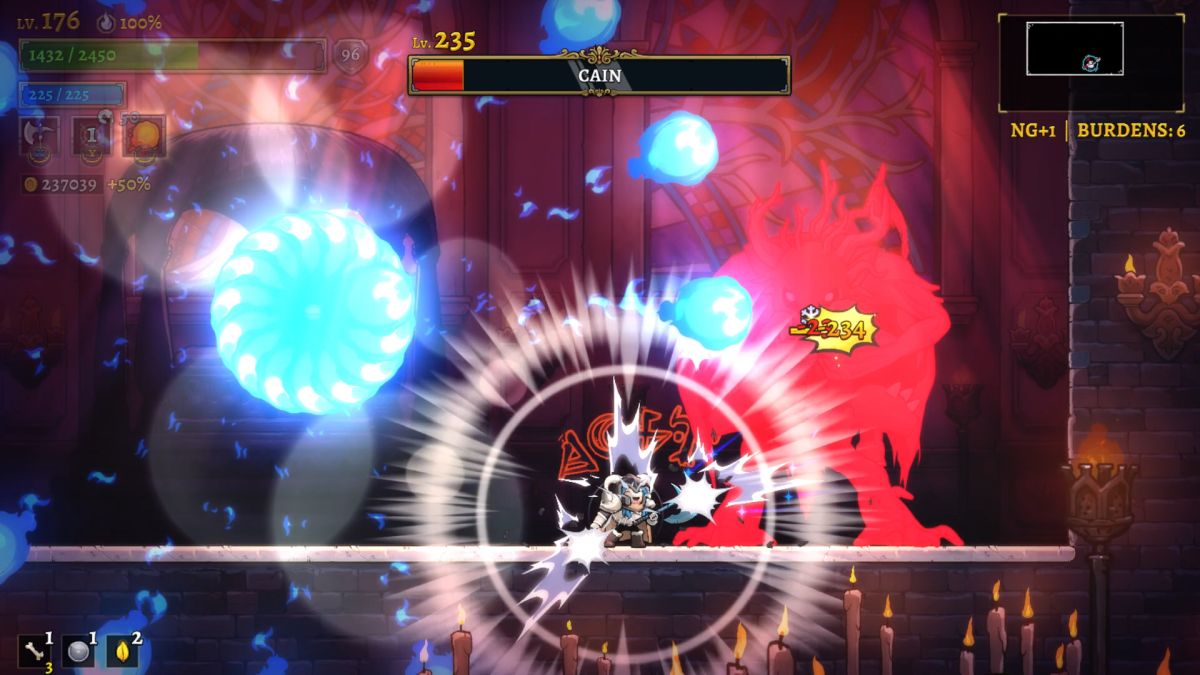
This is another battle that I've gotten much better at fighting with practice. Cain's attacks become significantly less deadly once the player knows how to read them and can start dodging them ahead of time. I found that it was easier to avoid Cain's "dark" attacks as opposed to his "light" attacks for whatever reason although neither set caused any real problems. It takes a long time to work through Cain's massive lifebar and I inevitably took some hits along the way. However, my Barbarian had also accumulated his own gigantic health pool which was sitting at 2450 HP and I had enough life in the tank to avoid having to sweat things out. My Barbarian had well over 1000 health remaining when Cain finally croaked. Anyway, this was the expected result from this character and it would have been monstrously disappointing if I hadn't been able to complete NG+1 difficulty. Time to move on to NG+2 difficulty and the last dungeon to be cleared for this Barbarian Legacy challenge.


