
I had to start my Class Legacy series for Rogue Legacy 2 with the Knight class as the most basic and default option available. With that task completed, I was free to start exploring some of the more unusual options and I particularly wanted to experiment with an Intelligence-based class of some kind. The Mage was the obvious choice in that regard as the purest spellcasting class in the game, reworked since the original Rogue Legacy to be more user-friendly while still being based around the use of its various spells. All classes in Rogue Legacy regain mana upon hitting enemies with their basic attack, making them all function like the old Spellswords in that regard, and therefore Mages want to hit monsters with their weak auto attack to generate mana to cast spells. They can be one of the strongest offensive classes in the game when built around the Intelligence stat with the tradeoff of having low health and no defensive abilities whatsoever. That combination looked to be challenging to say the least. (Incidentally, I keep trying to call this the "Archmage" class since that was the name in the original game. But no, Rogue Legacy 2 only has Mages instead - I guess they need more training!)
Let's take a quick look at the stats for this class:

Health: Vitality * 7 + 100
Mana: 200
Weapon (Wand of Blasting): Strength * 1.25
Class Talent: Utility Spell
Class Passive: Mana Leech (Siphon)
Mastery Bonus: Intelligence
Right away, the biggest difference for the Mage class as compared to the Knight is the lower Vitality scaling, only getting 7 HP per point of the stat as opposed to the full 10 HP. This is still better than the first Rogue Legacy where they only received half of the Knight's health although unfortunately it does affect how much HP gets added from things like Blessings of Life. Low health will always be one of the challenges that this class needs to overcome. To compensate for this, Mages have a base mana of 200 which is excellent and tied with the Astromancer and Chef for the best in the game. Anything that lets this class cast spells more often is a good thing and there are a number of relics that help in that regard.
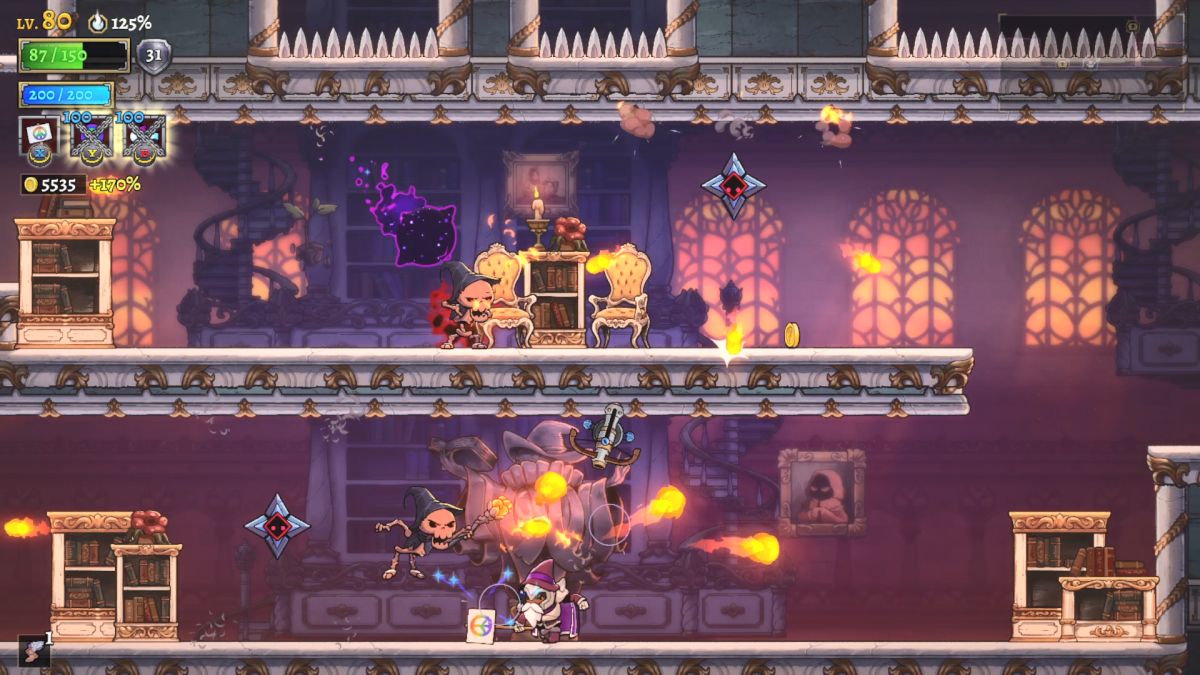
The Mage has one of the more unusual weapons in Rogue Legacy 2 in the form of the Wand of Blasting. The Wand itself can hit targets right next to the Mage with a tiny hitbox for paltry (Strength * 0.5) damage. This is virtually useless and should be avoided if possible. The Wand also shoots a blue fireball that produces a small explosion about a third of the screen's length in front of the Mage's position which has better damage (Strength * 1.25) while still being pretty sad for anything other than the early game. Mages will be upgrading their Intelligence, not their Strength, which rapidly relegates the Wand's basic attacks into a form of mana generation. This is tied to the Mage's class passive of mana leeching, as each explosive projectile will generate 15 mana immediately and then siphon back another 25 mana at 1 mana every 0.1 seconds over 2.5 seconds total. Spin kicks also provide this same mana leech and the explosive projectile will further apply Magic Break status to the target hit which increases magic damage dealt for the next few seconds. Again, Mages output very good damage but are horrible at taking a punch themselves. They are the very definition of a glass cannon as one would expect for a spellcaster.

The class talent for the Mage is the presence of a utility spell: they will always get some kind of defensive spell in the talent spot and then an offensive spell in the normal spellcasting slot. This helps to make the class more versatile in terms of its spellcasting at the cost of lacking anything to prevent damage. I would happily trade away the chance to have two different spells in favor of something that blocked incoming damage in the talent spot. The utility spells are defined as the Flame Barrier, Freeze Strike, Lightning Storm, Magic 8 Ball, Prismatic Spectrum, Shock Wave, and Wind Wall so I expected to be seeing a lot of them throughout this journey. The Wind Wall seemed like the best for actual defense whereas a bunch of those other spells felt like more offensive options by a different name. I would also get the option to start forcing certain spells in the Drift House later on which seemed like it would be highly useful for this class.
One final note: part of this variant involves never paying to unlock the teleporters or make use of the Architect to lock down the dungeon. Every character starts with a completely fresh map and has to make their own path through it. This isn't as bad as it sounds since clearing the dungeon offers up the chance to find relics and Blessings of Life to increase overall max HP for the rest of that character's journey. I will always be trying to full-clear as much of the dungeon as possible throughout this series. I also won't be using the rooms that switch to alternate class weapons and talents since that would invalidate the purpose of testing out each class one at a time. We want to assess the power of each class, not swap everyone over to the best stuff and get past the bosses using only the strongest options. With that introduction out of the way, let's dive into this variant proper with the Mage class:

Mage #1: 16 Vitality, 15 Intelligence, 0 Armor, 5 Focus
The Mage is one of the first classes that unlocks on the "castle" upgrade tree so I had the initial Knight collect about 550 gold and then immediately retired him. This was just barely enough to unlock the Mage class with only a single point invested into Vitality. My initial Mage had the Fungal Spread spell for her offensive option and the Prismatic Spectrum for the utility option; it was going to take some practice to get used to having the gameplay revolve around spellcasting rather than auto attacking as with a Knight. I found the Fungal Spread to be fairly useful as a spell, aimable in every direction and with decent damage though pricey to use at 75 mana per casting. As usual for a starting character, my goal was to unlock the basic heirlooms while bringing back as much gold as possible. The lack of the double jump and air dash threw me off repeatedly as I took several needless hits when I instinctively thought that I had them. There was a second entrance into the Study that didn't require having a double jump and I ventured in there briefly until the Fungal Spread spell accidentally woke up a painting commander - whoops! I fell as low as 13 HP before finding the air dash heirloom for a fortuitous health refill. The Wand's hit box conveniently goes through walls which made killing monsters in the heirloom challenge trivial. The place where it suffers is when monsters get right on top of the Mage which should be avoided at all costs.
There was a Blessing of Life in the Citadel which yielded an increase of 32 max HP. Thanks, I guess. I found the Leather Chest and Scholar Helm elsewhere in the Citadel which would be nice to equip afterwards, then almost died in a red portal when I rolled one of the hardest rooms. It was the one with the star thing (a Blightborn Furcas) in the middle of a room with other monsters spawning and I was fortunate to limp out of there with 18 HP. I went to the heirloom room at the entrance to Axis Mundi to refill health a second time. Then I spent some time in the Study afterwards, hunting for a big item drop in a treasure chest, and cleared out a decent number of rooms before taking a few hits and having to retreat. I went through the remainder of the Citadel next and found another Blessing of Life, knocking my Mage down to 30 HP again and then refilling health a third time at the Aesop's Tome heirloom. I headed into Axis Mundi next and played it pretty well while stilling taking chip damage here and there. There was a third Blessing of Life that I took which turned out to be a mistake when I failed to see any health recovery items appear. I made it to the halfway point and raided all the breakables saved up at the teleporters only to find nothing. I had no lifesteal or Armor on this first Mage and the uncommonly low drop rate of meat items was a real blow. I was getting close to the end of the bridge when a gunbox commander hit my character and dealt the final blow. This was a decent if not spectacular first heir.
144 monsters slain, 6156 gold, 793 ore, 268 aether
I started out by purchasing the standard two starting runes, in the Lifesteal and Magnesis categories. The only rune that I'd found on that first run was in the Eldar category and higher magic crit damage was a very low priority. At the Blacksmith, I bought the Scholar Helmet and Leather Chest brought back by the previous heir. The Scholar Trinket was another thing that she had obtained but it wasn't worth buying, not when it didn't unlock a unity bonus and only provided 3 Focus. It was too bad that I hadn't found any capes since they're they key equipment category for Intelligence-based classes. The remaining leftover money went into Vitality and Intelligence as the primary stats for this character. I did make sure to unlock the Mastery bonuses so that these Mages could start earning experience towards additional Intelligence.

Mage #2: 25 Vitality, 21 Intelligence, 7 Armor, 5 Focus
This Mage rolled the Poison Bomb and Freeze Strike spells. The Poison Bomb could be thrown in any direction in a looping arc that tended to travel a bit like the axe from the original Rogue Legacy. The Freezing Strike could only hit targets immediately to the left or right of the Mage's position and cost an expensive 100 mana per use. I wasn't much of a fan of these spells since the initial damage from the Poison Bomb was quite low and needed to be stacked up over time to be effective; good for bosses and not so great for random monsters. I had a big hit immediately in the Citadel when I found a Bounty Rune, excellent!  Unlocking that rune so quickly would make a big difference in bringing back more gold over time. I continued to be struck by how different the Mage playstyle was from the Knight; I tried to keep monsters at arm's length distance constantly, launching poison shots and then backing away and trying to auto attack only when it was safe. This worked great as long as there was space to maneuver which wasn't always possible.
There was a Blessing of Life in the Citadel and this was when another of the perks of playing an Intelligence-based build appeared: meat items restore 2x Intelligence in Rogue Legacy 2. This makes the frail spellcasters much better at recovering health from meat drops since they keep stacking up Intelligence over the course of their journey. It's one thing that helps to balance out their lower health totals from poor Vitality scaling. This Mage was already up to 42 HP restored per meat which is about where my Knight had been on finishing NG+2 difficulty. Similarly, I found Freon's Resolve relic (treasure chests restore HP equal to Intelligence) which was better for this class than a Strength-based build. For the most part I kept heading due east, not trying to full clear the Citadel and instead pushing straight across Axis Mundi. That led me into the Plateau where I continued going east until eventually reaching the Far Shores and the location of the Double Jump heirloom. I had the chance to show off some fancy Poison Bomb spells in one of the little enclosed rooms that made up the heirloom challenge and even refilled health back to full after grabbing another Blessing of Life outside.

I headed into the Study next in search of the void dash heirloom. I didn't have much luck finding it initially though I did make it to the central room with the guaranteed Blessing of Life and take the additional max HP. That damage along with some hits from monsters eventually sent me back into the unfinished Citadel for health recovery where I came across lots of meat drops. They were able to refill this Mage's healthbar to full which allowed me to face Lamech in my first boss fight with this class. It went swimmingly well as I kept tagging Lamech with poison whenever he stood still and used the alternate Freeze Strike spell to block his homing fireball projectiles released when the boss drops to half health. This turned into a perfect fight with no damage taken - not a shocking development given the ease of Lamech but still welcome. The Mage was proving to be more viable than I had initially thought and I was pleasantly surprised by the strength of these early characters.
I found the void dash heirloom room but saved it for the full health refill since I was close to max HP. This proved to be a mistake when I went into a red portal and was killed fighting the monsters inside - whoops. Getting trapped in an enclosed space with aggressive flying hammers turned out poorly for this character. I could have made it a lot further if I hadn't messed up inside that red portal.
225 monsters slain, 12684 gold, 1339 ore, 1338 aether, 100 souls

Polishing off Lamech opened up the Drift House for the first time along with the initial scar challenges. I went ahead and tried my hand at this Simple Start challenge and found it to be unexpectedly difficult to complete. I think that this was due to have a weaker spell selection, with this Mage rolling the Tesla Spike and Flame Barrier spells. The Tesla Spike does virtually no damage to monsters when targeting them directly and instead needs to hit a wall or surface of some kind where it explodes with electrical energy. There are open sides to the room where Simple Start takes place and I kept throwing the Tesla Spike right through them where it was completely useless. It took me about half a dozen tries to complete the challenge for the S+ rating and the reward of 100 souls from the Bronze Trophy. Along with the 100 souls from defeating Lamech, I was able to unlock the basic purchases in the Soul Shop: Embroidered Investments, Runic Horizons, and the first rank of Unbreakable Will. I didn't think that I had enough money saved up to reach the Gold Gain upgrades but at the very least I'd be able to pick up some more levels in Vitality and Armor.
Elsewhere on the Docks, the big thing that I wanted was the Bounty Rune brought back by the last character which required one additional rank of rune weight. Over at the Blacksmith, I purchased the Scholar Chest, Cape, and Trinket which unlocked the unity set bonus of 10 additional Focus. This is the stat that adds to critical strike damage on spells and each spell has a different way to trigger its own skill crit. For example, the last tick of electrical damage on the Tesla Spike will always skill crit. While Focus wasn't terribly important as a stat, it felt worthwhile to pick up the Scholar Trinket as opposed to running nothing in that slot and giving up the bonus. Remaining gold went into Vitality and Intelligence as usual as I continued to work my way towards the upper part of the upgrade tree where the Gold Gain levels were located.
Mage #3: 31 Vitality, 28 Intelligence, 11 Armor, 19 Focus
This Mage had the Tesla Spike and Flame Barrier spells as mentioned above along with no traits. My goal once again was to reach the void dash heirloom up in the Study where I had died without claiming it on the last character. To help out with this, I took the Body Buffer relic early on in the Citadel: monsters have 8% odds to drop meat when defeated. This is a bad relic for fighting bosses but excellent for exploring the dungeon which was my goal for the moment. It didn't take long to confirm that the Tesla Spike is a really, really bad spell. It's hard to make use of a spell that can't be targeted directly at monsters and mandates ridicuous shenanigans of throwing indirectly at walls and ceilings to deal any damage. I found the entrance to the Study quickly and headed inside another red portal at full health. This turned into another disaster as I couldn't hit the monsters inside with the Tesla Spike - not great when paintings and mimic chests are charging towards you in a cramped space! I fought as best I could but lacked the tools needed to defeat these enemies and died straight from full HP. Moral of the story: find a better spell and stop going in the darned red portals! 
28 monsters slain, 1122 gold

Mage #4: 31 Vitality, 28 Intelligence, 13 Armor, 19 Focus
I could only purchase a single Armor upgrade with the paltry return from the previous character. This Mage had the Poison Bomb and Freeze Strike spells along with the Catalyst relic: deal 20% bonus damage to enemies with a status effect. That combined really well with the Poison Bomb since enemies would always have a status effect while poisoned. I discovered pretty quickly that the Poison Bomb + Catalyst relic combination did outstanding damage. One cast could kill a beefy tier 2 enemy knight if the monster stood inside the poison cloud for the full duration. However, with no relics to provide addition health sustain and with only 1 HP restored per monster kill, my Mage was heavily dependent on meat items appearing from breakables in the dungeon. When I had a lengthy streak with none of them dropping, I was forced to retreat from the Study to the Citadel where I defeated dozens and dozens of monsters without getting additional health drops. I cleared out almost the whole Citadel before finally having enough HP to return to the Study where I did find the void dash heirloom. I was even able to take the damage from another Blessing of Life before going inside to get some additional max HP for free.
Because this Mage was well equipped to face bosses, I went ahead and fought the Gonghead Twin minibosses. Their healthbars dropped rapidly once I was able to apply the ticking poison and I only took a pair of hits before downing the two of them. Then I hopped over to the other miniboss in the Study and was able to refill that lost health from breakables inside Murmur's huge chamber. The immobile miniboss was extremely easy to defeat with Poison Bombs since it never tried to move out of the way. I was able to clear out the rest of the Study from there, even completing a red portal without managing to kill myself for a change. (Yes, I kept going inside them even after the last two heirs - I always think that I can pull them off even when it's a bad idea.)

I proceeded into Axis Mundi next where things went quite well overall. I was able to collect several more runes (unfortunately nothing useful) and even picked up a Blessing of Life since I had made it back to full HP. I was feeling confident enough to face the two Void Beasts at the tail end of the bridge and absolutely smashed them in the boss fight. They made the mistake of clumping up on top of one another and the poison cloud wrecked them in no time flat. I actually killed the second Void Beast (the one that doesn't show up until the first one loses a third of its health) before the first one! From there I headed into the Plateau where things continued to go smoothly, my Mage able to clear out rooms without finding himself in any real danger. This run had gone on long enough that I was starting to bring back some major gold income as well. Once everything was fully explored in the Plateau, I decided to take on estuary Naamah since I had this boss-killing poison setup. The poison cloud wasn't quite as effective against her because she floats around and never stays in the same place but the spell was still quite useful. I was also able to use the secondary Freeze Strike spell to break Naamah's flying projectiles on several occasions; the main drawback there was the 100 mana cost on the alternate spell. My Mage took a few hits here and there while still emerging from this battle with a straightforward victory.
There was no choice but to head into the Sun Tower next because I lacked the lantern for the Dry Lake. Things continued to go well and there was one room where the Mage performed much better than the Knight would have, a vertical room with two treasure chests at the bottom and tons of monsters on platforms leading down to them. I was able to stay at a distance and toss Poison Bombs down at the enemies to kill them all in safety whereas the Knight would have surely taken a bunch of hits meleeing everything. I also continued to find more runes and wound up with a supreme irony: my first very tier 2 rune rolled as a Lifesteal Rune! I was still missing a bunch of the initial tier 1 runes, including the Soulsteal Rune and all of the Armor-related ones, only to find a second Lifesteal Rune while playing a character that didn't build Strength. Fate has a sense of humor, it seems. I was almost to the very top of the Sun Tower when my health ran out, bringing this excellent run to a close.
460 monsters slain, 37897 gold, 5586 ore, 3273 aether, 200 souls
I started out at the Soul Shop as usual and invested 100 souls into the initial rank of Infinite Knowledge. This is the Intelligence-based version of Absolute Strength and increases the maximum rank of the Intelligence and Focus categories on the main upgrade tree. At the Enchantress I went ahead and purchased that second Lifesteal Rune which was extremely pricey for this stage of the game at 3300 aether. That cleaned out most of what I had stored up and prevented me from using the "Strange Transaction" feature to convert ore/aether into more souls. At least I would be doubling my innate healing from 1 HP to 2 HP per monster kill. I also swapped from the Scholar Helm over to the Ammonite Helm since I could do so while still maintaining the Scholar unity's extra Focus. I still wasn't using anything in the Sword slot at all since everything I had found to date provided Strength and nothing else. I had no Mastery ranks in the Knight or Valkyrie classes, of course, which meant that equipment space was very tight. The designers basically assume that the player will be picking up a good amount of extra equipment weight from those classes which creates a pinch for a variant challenge like this one. Then I paid through the nose to unlock my way to the Gold Gain upgrades and took both of the levels available, leaing only a modest amount of money to invest into stats. This was more of a play for the long run rather than any expectation that I'd be able to complete the dungeon any time soon.

Mage #5: 35 Vitality, 30 Intelligence, 21 Armor, 20 Focus
This Mage had multiple traits: Compulsive Hoarder (all relics are twin relics) and Muscle Weakness: very little knockback on monsters. That last trait was mostly a non-issue for Mages since they don't do much in the way of auto attacking at close range. Muscle Weakness was worth 25% additional gold generation for being a negative trait and the bonus scaled to 45% with my character's Bounty Rune and Gold Gain upgrades. More importantly, this Mage had drawn the Searing Shot spell for the first time which is probably the best option overall. The damage is excellent, it can be thrown in any direction, the projectile travels through walls, and the fireball causes a burn effect that keeps ticking away afterwards. It even costs 50 mana which is less than most of the other spells! The Searing Shot is far more reliable than having to hit with Poison Bombs or Tesla Spikes or whatever and I was quite pleased to have it for this character's journey.
The run took on a unique character when the first relic that I found was a double version of Catalyst: 40% additional damage to monsters with a status condition. This naturally applied to all of the burning damage from Searing Shot and those blue fireballs were absolutely roasting the enemies as a result. There were two Blessings of Life in the Study and then I found another two of them in the Citadel; all of that damage taken had me walking a tightrope on health at a couple points. Fortunately I managed to avoid doing anything too stupid and came out stronger as a result. I cleared out Axis Mundi afterwards and found a fifth Blessing of Life inside one of the storerooms. Otherwise the area was uneventful as I continued stacking up gold and shooting monsters with fireballs.

I judged that I had enough health to face estuary Enoch and teleported back to the Study to confront him. The Searing Shot continued to do fantastic damage and my biggest concern was enough mana generation to keep firing off more spells. This was something that I didn't have to worry about with melee attackers, balanced by the fact that this Mage character could mostly keep his distance from Enoch. The mimic chest second phase should have been very easy since I never needed to get particularly close to Enoch however I misplayed the situation several times and took unneeded damage. All of those Blessings of Life proved to be the difference as they allowed me to limp out of the boss room with about 200 HP remaining instead of suffering defeat.
Afterwards, I headed into the Sun Tower with the Plateau still untouched as a place to retreat if necessary. That didn't end up being needed as I was able to climb to the top of the Tower without issue, picking up a number of useful pieces of equipment along the way. I found several of the Scholar +1 items, including the Cape, along with some Ammonite stuff that could be worth running for the unity set bonus. From there it was over to the Plateau to fill up the healthbar again in preparation for facing estuary Irad. The big find here was a Soulsteal Rune which is the equivalent of the Lifesteal Rune but scaling off Intelligence, not Strength. I'd been hoping to find one of them for some time and it didn't show up until the 15th rune. I also discovered that the Searing Shot was an excellent spell to use against the wolves, taking them down from a distance without needing to get close for melee attacks.

I wrapped up the Plateau at full health and had no choice other than to try my hand against Irad since I lacked the Sun Lantern for the basement. The Searing Shot worked well against the eyeball boss, as the ticking fire damage could be applied in more than one place at a time to eat away at Irad's healthbar. The biggest problem in the battle was finding space to get off the casting animation without taking damage. The Mage is locked in place for about 0.3 seconds when casting and I was having to scramble all over the place to dodge Irad's various projectiles. The second half of the fight in particular turned into a madcap sequence of dodging as I desperately avoided the bullet hell of Irad's boss chamber while tossing off spells whenever there was a clear moment. It was a near-run thing but I was able to emerge victorious by the skin of my teeth, surviving on 50 HP when the next hit would have killed me. This was awesome because now future heirs could proceed directly into the Dry Lake and not have to kill this boss ahead of time. I raided all of the saved up breakables at the teleporters which yielded exactly one meat drop and therefore died shortly thereafter in the Dry Lake. What a successful character though!
451 monsters slain, 50923 gold, 4210 ore, 4031 aether, 200 souls

Back at the Docks, I went ahead and paid 2500 ore/aether for the initial Strange Transaction at the Soul Shop. This gave me enough souls to pick up Preferential Treatment to lock the right-most heir on the character select screen as a Mage and then also purchase Existential Appeasement to select the starting spell as well. I had already seen that some of the spells were vastly better than others and decided to lock the Searing Shot since it had been by far the most effective tool to have available. It doesn't appear that there's a way to lock the utility spell so something random would continue to roll for the Mage's class talent. In the runes category, I wanted that Soulsteal Rune found during the last run and paid for the three rune weight upgrades needed to use it. For the equipment slots, I converted over to the Scholar Cape +1 which allowed me to drop the Scholar Chest in favor of the Ammonite Chest while retaining the Scholar unity bonus. I didn't expect to be using that for much longer but it was still the best option for now. Remaining gold went into basic stats (Vitality, Intelligence, Armor) since I didn't have any additional gold generation levels to take. My souls had needed to go into Preferential Treatment / Existential Appeasement instead of Unbreakable Will.
Mage #6: 39 Vitality, 43 Intelligence, 31 Armor, 20 Focus
This Mage unfortunately rolled the Pacifist trait: you cannot deal damage and have 60% less HP in exchange for 150% additional gold generation. I'm not sure this should even count as an heir since the character was hopelessly crippled though I guess I did get some of these back in the original game as well (Vertigo trait and all that). The "deal no damage" applies to spell as well as auto attacks and my Mage character was locked out of casting anything at all. I discovered that you can still auto attack with Pacifist trait, dealing no damage and knocking back anything hit by a good margin. That's a small mercy I suppose although the 60% health penalty makes it impossible to make any real progress. I ran around opening treasure chests as best I could and even managed to unlock one additional rune in a platforming challenge. However, I was never going to make it very far with this helpless Mage and he died about half a dozen rooms into the Study. I was pleased to bring back as much gold as I did.
0 monsters slain, 6102 gold, 188 ore, 266 aether
Obviously there was little I could purchase after that last run. I bought one level in Armor and Intelligence and that was it.

Mage #7: 39 Vitality, 44 Intelligence, 33 Armor, 20 Focus
This Mage had the Searing Shot spell that I'd forced via purchases at the Soul Shop along with the Shockwave spell in the utility spot. He also appeared with the Masochism trait: gain 50% of your mana when hit but can't gain mana from basic attacks. Fortunately the innate Mana Leech passive on the Mage class still worked to generate mana, if slower than normal since mana from auto attacks was disabled. I was pleased to see that monster kills were restoring 4 HP with the Soulsteal Rune, doubling the rate from my previous Mage characters. While exploring the Citadel, I came across the Soul Tether relic and decided to give it a try. This one has a 5 second cooldown and then causes your next auto attack to deal 150% bonus magic damage to all nearby enemies. I hadn't used this before since my previous characters had all been Strength-based builds and I was impressed at how it performed here on an Intelligence setup. It essentially turned the auto attacks of my Mage into a legitimate source of damage in their own right (after that 5 second cooldown wore off) and hit in a wide area that covered much of the screen. Not bad at all for 45 resolve cost.
This turned into a routine clear of the dungeon. I started out in the Study and made it through the biome without encountering any serious difficulties. I went into the Dry Lake next and surprised myself by clearing the whole thing without ever needing to retreat for a health refill. I think that I was playing well combined together with having additional lifesteal over previous characters and the Soul Tether relic helping out with lots of extra damage. Apparently I was getting closer to the end of Normal difficulty and the dungeon itself was becoming less of an issue. From there I rebuilt health on Axis Mundi and went back into the Dry Lake to defeat both of the miniboss pairs. The combat against them was different with a Mage as compared to a Knight, mostly running away while throwing out Searing Shots at a distance and trying not to get too close. This went better than I had been expecting as I defeated one of the two enemy groups without taking a hit and the other one with only minor damage. The Mage was arguably better than the Knight in this particular case. I finished clearing out the rest of the Sun Tower and the Plateau while knowing that I had zero chance to defeat Tubal. There hadn't been a single Blessing of Life in the whole dungeon outside of the guaranteed one in the Study and I had nowhere near enough life for the last estuary. This Mage died while clearing out a red portal at the top of the Sun Tower that I had previously skipped since I had thought it might cause his demise. The red portals struck again!
589 monsters slain, 67726 gold, 5747 ore, 2191 aether

I had a desperate need for more souls to spend at the Soul Shop and turned to the available scar challenges in the hopes of obtaining more of them. I started out with Bladed Rose, the one that pits the player against both Lamech and Naamah simultaneously, and I was able to win after several attempts. This one is quite difficult without having some kind of defensive ability for protection; this particular Mage had rolled the Wind Wall spell in the utility slot and that did help a good bit. Even though I was able to complete the challenge (with no assistance from empathies or relics), I wasn't quite able to muster up enough points for the Bronze Trophy. See, you're supposed to be able to combine together the scores of many different classes to complete the scars, not require near-perfect performance from a single class to qualify for the soul reward. The fact that I could score an S+ rating for the Bronze Trophy on basically everything with the Knight class was an indication of how powerful the class truly is. I'll probably use a Duelist or Knight to gain the last 2000 points needed on this scar since I already earned an "S" rating with the much-weaker Mage class and I didn't feel the need to punish myself with more repetitions.
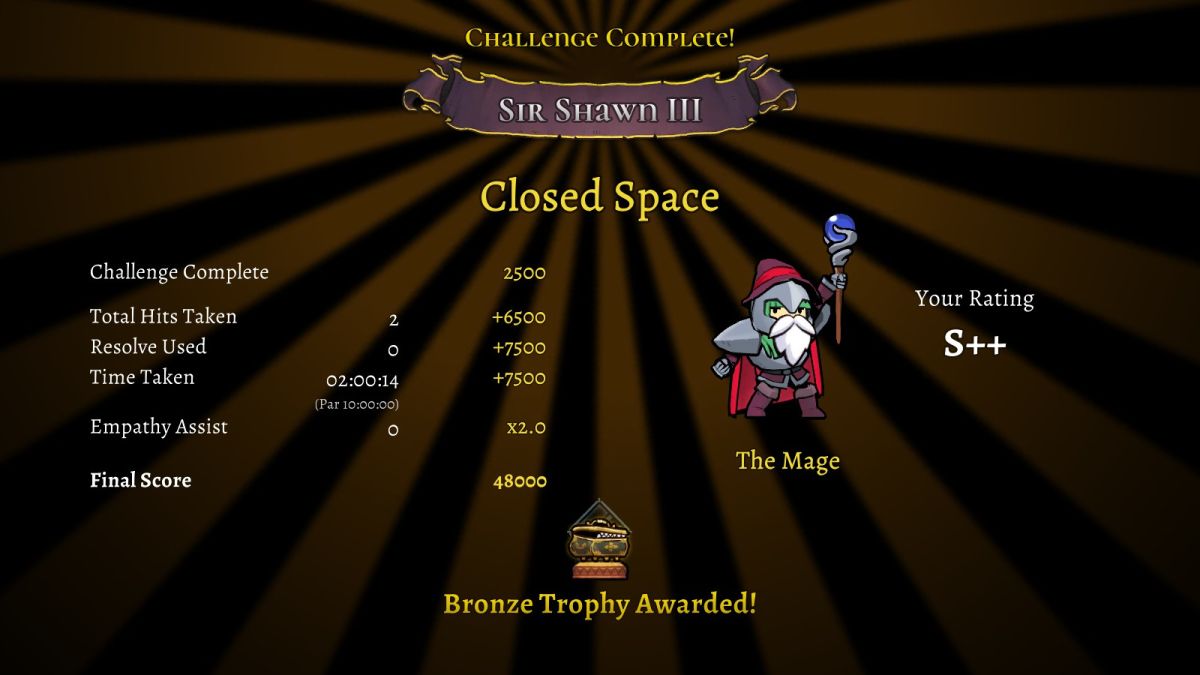
By way of contrast, I was able to land the S+ rating on the Closed Space scar challenge on the second or third try at the boss. This challenge is a duel against the mimic version of estuary Enoch in a small room with pressure plate spikes on the floor. While it does take some practice to figure out the boss patterns, Enoch only has three moves and they can all be avoided with the appropriate counter-measures. This ends up being a much easier scar than Bladed Rose and I was able to claim the 300 soul reward that accompanied the Bronze Trophy. I spent those souls right away on additional ranks of Unbreakable Will, Infinite Knowledge, and Master Smith at the Soul Shop. I needed more levels in all of the basic stats (Vitality, Intelligence, Armor) along with additional Gold Gain and equipment/rune weight.
This is the point where I would normally pick up additional runes and equipment at the docks. However, despite having found 20 runes thus far, I still hadn't turned up any Folded or Quenching Runes and it didn't seem worthwhile to purchase the Reinforced Rune (8% more Armor) until I had more total Armor to boost. On the equipment side, I didn't have anything which would be an improvement over my current gear setup. I couldn't unlock the Ammonite set's unity bonus yet and the only potential upgrade would have been going from 8 Intelligence on the Scholar Cape +1 to 10 Intelligence on the Crescent Cape - not worth it. I still wasn't even using the Sword slot because everything available only provided useless points of Strength! Thus the full 67k worth of money went into stats: two more Gold Gain upgrades, enough Intelligence to hit the 50 mark for additional lifesteal from the Soulsteal Rune, and the rest mostly into Vitality. Hopefully I'd get more Ammonite and Crescent equipment to appear in the dungeon on these next trips.

Mage #8: 45 Vitality, 51 Intelligence, 33 Armor, 20 Focus
This Mage had no traits along with the Searing Shot spell that I continued to force and the Wind Wall spell as mentioned above. The Study went great as I cleared most of it without even taking a hit while finding two Blessings of Life along the way. I went down into the Dry Lake next and finally had a big hit in terms of equipment by finding the Ammonite Sword. This would allow me to run something useful in the Sword slot and hopefully pick up the set bonus as well. I was having no problems whatsoever clearing the basement and entered a red portal on full HP... only to lose all 500 health inside while clearing the monsters.  The cramped spaces of the red portals are just deathtraps for Mages who need to attack from a distance. I continue to have horrible results from entering them even while taking care to face them at full health. I guess I should just stop trying them since they're killing run after run.
208 monsters slain, 23647 gold, 852 ore
The gold from this aborted run was spent unlocking the Ammonite set bonus by purchasing the Ammonite Sword and Cape along with the equipment weight needed to wear them. Now that I was gaining 30 Armor from the set bonus, I also paid to make use of the Reinforced Rune for its 8% bonus to total Armor. This actually dropped my Intelligence slightly below 50 and cost me a point of lifesteal from the Soulsteal Rune which I'd have to fix with more upgrades next time around.

Mage #9: 45 Vitality, 49 Intelligence, 82 Armor, 7 Focus
This Mage had the Bookish trait: 50% additional mana and magic damage at the cost of -25% health. I'm not sure if that was a net positive or a net negative but ho boy did this Mage hit hard with his spells! He also had the Ectomorph trait which causes your character to get knocked way back upon taking a hit. That trait was worth 25% additional gold and it wasn't much of a penalty. I came across Coelus' Shell relic early on and decided that it would be a good fit for this high-damage yet physically frail Mage. Coelus' Shell charges up after killing six enemies and then blocks one incoming source of damage followed by charging up again on another six monster kills. While it's not especially useful for boss fights, it's a great option for exploring the dungeon and preventing lots of incoming damage. It can also block the damage incurred from Blessings of Life which makes a big difference over the course of a long dungeon sequence. I found two Blessings of Life in the Study and another in the Dry Lake which meant that this relic was seeing a lot of use.
With the dungeon itself not proving to be terribly challenging any more, I tried to focus on improving my gameplay with the Mage class itself. I was getting better at using the basic combo for the Mage, an auto attack with the Wand to apply Magic Break status followed by an immediate Searing Shot for big damage. This one-two punch was easy to pull off and I was improving at getting the rhythm of it down. The Bookish trait boosted damage from spells without increasing it from auto attacks which only further exacerbated the discrepancy between the two. The Searing Shots were clearly the focus by this point while the Wand attacks had very much been relegated to mana generation duty. That discrepancy would only increase over time as I kept pumping the Intelligence stat while leaving Strength at its base value. Having 300 mana instead of 200 mana was also very convenient for this run although Capacity Runes (+20 mana apiece) didn't feel useful enough to spend limited rune weight on them.

As far as the dungeon went, I was able to clear the whole Dry Lake without needing to retreat for a health refill, even completing some red portals because apparently I couldn't take the hint from past characters. A number of additional pieces of Crescent gear showed up in the basement which might be useful long term along with a Folded Rune to increase the Armor block cap after the run was over. It was a pretty leisurely pass through the full dungeon until everything was finished and only the estuaries remained. I didn't think that I had a realistic chance to defeat Tubal but I made sure to have one damage block stored up on Coelus' Shell before heading inside the boss doors. I did have one advantage for this boss fight: the ticking burn from Searing Shot was very good against Tubal's minions. They are the real danger in the fight since they deal full damage (getting hit by them functions the same as getting hit by Tubal - note that this is different from Alexander in the original Rogue Legacy) and they fly around the room creating chaos. The damage over time from my Searing Shots knocked off their protection though and I was able to eliminate them quickly when they spawned. Tubal himself isn't really that dangerous if his minions can be eliminated and I surprised myself at how well I was doing. Towards the end of the fight I ignored the flying minions to blitz through the remainder of Tubal's lifebar and managed to get the job done with room to spare.

I was low on health after defeating Tubal and only had enough upgrades to restore 40% of HP when entering through boss doors. However, I had saved up the breakables at the teleports for the whole dungeon and there were enough health recovery items inside to bring this Mage back up to full strength. (I had also left a tiny portion of the dungeon uncleared so that I could recharge Coelus' Shell before going through the Golden Doors.) I wasn't too worried about facing Jonah himself, however I knew that I needed to keep up my health since there would be no more breakables to exploit from this point forward. I was able to dodge the various weapon attacks from Jonah without any serious issues and it simply took a little while to cut through his hefty amount of life. I think that he hit my Mage three times in total with the first damage instance blocked by Coelus' Shell. This allowed me to proceed to the final showdown with Cain where I played extremely well without quite having enough health to finish the job. Cain was down to about 20% HP remaining when I was trapped against the wall by a series of projectiles that I had no defensive ability to avoid and perished. Nonetheless, this was a great run that far exceeded my expectations. Hopefully only one more Mage needed to finish off Normal difficulty.
637 monsters slain, 99598 gold, 8927 ore, 5822 aether, 200 souls
For the between-character shopping spree, I spent the 200 souls that I had gained on another level of Unbreakable Will which allowed me to sink 51k gold into two more ranks of Gold Gain. I now had six levels there and the Bounty Rune equipped for 40% total increased gold generation. No new equipment that I wanted to use had dropped on the previous run so the only other gear upgrade was making use of the Folded Rune to increase the Armor blocking cap from 35% to 39%. This left about 40k worth of money to spend on stats which I concentrated in Vitality and Intelligence. The Armor upgrades are so expensive to purchase that I shied away from them; I was getting a lot of Armor from the Ammonite set's unity bonus anyway.

Mage #10: 52 Vitality, 54 Intelligence, 82 Armor, 7 Focus
This character had the Emotional Dysregularity trait: mana costs and spell damage increased by 100%. This meant that the Searing Shots cost 100 mana instead of their usual 50 mana while doing absolutely massive damage for Normal difficulty. The initial hit was dealing 207 damage and then there would be six more ticks of the burn effect for 70 more damage apiece - yowzers! This felt like it would be excellent for boss fights if somewhat less practical for running the dungeon (as most of that damage would be immense overkill versus random monsters). It was extremely satifying to have "one shot, one kill" power against everything in the dungeon though, even beefy enemy knights and the commanders that popped up from time to time. If there's a weakness to the Searing Shot, it's the narrow hit box of the blue flame projectile and the fact that the spell is single-target damage that normally can only hit one opponent at a time. Missing shots was a bit more painful when each spell cost 100 mana though this was tempered by the fact that my Mages had essentially out-leveled the dungeon by now.
Mostly I was looking for Blessings of Life to increase my overall health total and useful relics for dealing with Cain; the latter concern was solved when I found a double Catalyst relic in the Study. This was a combination that I'd had before and dealing 40% additional damage to enemies with a status condition (i.e. everything) tipped this Mage's damage output into the ludicrous range. It was honestly hard to test it because everything died instantly when touched by a Searing Shot fireball. With this much damage backing up his spells, this Mage had a leisurely trip through the dungeon without facing any serious threats. I came across a moderate number of Blessings of Life, I think four of them in total across all six biomes. The biggest highlights were finding the Ammonite Trinket which would let me shuffle some gear around while maintaining the set bonus along with the final two runes that I'd been missing. The next-to-last rune to appear was a Quenching Rune which I'd felt the lack of having throughout Normal difficulty. I took one hit from a Shredder commander at the tail end of the Plateau and had no way to regain the 8 points of Armor that I lost due to a previous lack of that Quenching Rune.

It was all going to come down to the final confrontation with Cain and I was as well prepared as I could be. The Searing Shots did immense damage to the Immortal King and the biggest issue from an offensive perspective was landing enough auto attacks to generate mana. As far as survivability went, I did a pretty good job at dodging Cain's various attacks if not quite as good as the previous Mage. Fortunately I had significantly more health and better damage output to boot which was enough to carry me over the finish line in a fairly close fight. It wasn't a true nailbiter but I was sweating a bit by the end. Thankfully I wouldn't have to re-run the entire dungeon yet again and could move on to NG+1 difficulty with the next character.
Thus it took me ten Mages in total to complete Normal difficulty, double what it took to do the same thing with the Knight class. That was partially due to the Knight being a stronger class overall, partially due to my inability to avoid red portals that sent several characters to their doom, and partially due to the Pacifist trait which wasted one of the Mage heirs. The Mage class performed better than I had expected and was proving to be lots of fun to play. The class design for the Mage is infinitely better in this game than in the original Rogue Legacy where it never quite worked properly. Here in Rogue Legacy 2, the Mage has its own distinct playstyle between using the Wand for mana generation followed by unleashing hell with its spellcasting. We'll see how well the class deals with the souped-up monsters and bosses of the next two difficulties before rendering a final verdict. Stay tuned!


