
We're returning to the Class Legacy series by taking a look at the Ranger class, the basic ranged physical attacker in this game. Rangers shoot at their foes from a distance using a bow and their ability to attack safely outside of melee range is their greatest advantage. This is a class that deals excellent damage in exchange for struggling against enemies at close range and lacking much in the way of defensive abilities. The Ranger is one of my favorite classes in Rogue Legacy 2 and I was looking forward to this opportunity to dive into them in more detail. Let's start by taking a quick look at the stats for this class:

Health: Vitality * 8.5 + 100
Mana: 125
Weapon (War Bow): Strength * 2.25
Class Talent: Ivy Canopy
Class Passive: Hunter (+10% Strength/Dexterity)
Mastery Bonus: Strength
Rangers have 85% scaling on the Vitality stat which puts them in the middle of the spectrum as far as the various classes go, lower than pure melee fighters like the Knight and Barbarian while also being higher than spellcasters like the Mage and Astromancer. Their weapon is the War Bow which can be fired at any angle in a full 360 degree rotation. The bow never runs out of arrows (thank goodness there no need to manage arrow inventory as in Diablo 2) and has very good range, able to hit enemies about a full screen's distance away if angled properly. However, the arrows from the bow do not travel through terrain obstacles and the attack speed of the bow isn't particularly great. It takes about half a second for the attack animation to play before the next arrow can be fired, significantly slower than the Knight's speedy sword swings, though the attack animation of the bow can be canceled by dashing after firing. That's something that can be very handy and I'll have to get in the habit of attack-dashing to master this class.
The damage scaling on the War Bow is the second-highest of any standard weapon in the game, with each point of Strength translating into 2.25 points of damage. This is even better than the Knight (which has Strength * 2 scaling) though the Knight attacks faster to make up for it. Only the Barbarian's incredible ground attack damage outperforms the bow shots (at the cost of an even slower windup and swing animation). The skill crit for the War Bow can be achieved by drawing back the arrow for about a second before releasing to fire, which adds Dexterity * 2.25 damage along with the Dexterity percentage modifier to the attack. This turns the arrow into a golden color that's easy to observe on screen and the skill crit is fairly easy to pull off. In most cases, however, I've found it better just to attack normally and get more shots off rather than slowing down and waiting to fire the skill crit arrows. They're useful when triggering enemy paintings and mimic chests though which don't activate until landing the first shot.

The class talent for the Ranger is the Ivy Canopy, an unusual ability that puts a temporary platform underneath the Ranger's feet wherever they happen to be standing. This can act as a safe place to stand and fire arrows at monsters down below, or serve as an extra midair jump, or be used to reach parts of the dungeon and solve fairy chest puzzles which would otherwise be unachievable. The Ivy Canopy serves as a semi-defensive ability since it will block small and medium sized enemy projectiles that come in contact with it. Standing on the platform also causes the Ranger's bow attacks to inflict the Spore Burst spell on contact, dealing additional magic damage based on the Intelligence stat. I won't be pumping Intelligence on these characters so the damage will be minor but hey, better than nothing. The Ivy Canopy will also open cracks in walls and secret doors like a spell cast which can by handy at times. The platforms last for 8 seconds and then the talent goes on a 7 second cooldown that can't be shortened before becoming available for use once again. I already know that I probably won't use this talent as much as I should.
Rangers have a basic class passive: +10% additional Strength and Dexterity. It's short and sweet and to the point. One final note: part of this variant involves never paying to unlock the teleporters or make use of the Architect to lock down the dungeon. Every character starts with a completely fresh map and has to make their own path through it. This isn't as bad as it sounds since clearing the dungeon offers up the chance to find relics and Blessings of Life to increase overall max HP for the rest of that character's journey. I will always be trying to full-clear as much of the dungeon as possible throughout this series. I also won't be using the rooms that switch to alternate class weapons and talents since that would invalidate the purpose of testing out each class one at a time. We want to assess the power of each class, not swap everyone over to the best stuff and get past the bosses using only the strongest options. With that introduction out of the way, let's dive into this variant proper with the Ranger class:
Ranger #1: 15 Vitality, 16 Strength, 0 Armor, 6 Dexterity
The Ranger is one of the most basic classes and requires almost no gold to unlock on the main "castle" upgrade tree. I gathered a couple hundred gold with the starting Knight and immediately retired, then unlocked the Ranger class and the mandatory single point of Universal Healthcare to get started for real. This Ranger had the Chronic Fatigue Syndrome trait which added a cooldown for spells and talents, something that didn't matter for a Ranger and happily granted 25% additional gold! She also had the relic Aite's Sword which causes physical attacks to deal 150% more damage but breaks after taking a single hit. I'm afraid that I wasn't able to keep it for very long before it shattered; at least this starting character with no equipment had tons of spare resolve. My goal as usual for the starting character was to unlock as many of the heirlooms as possible. The biggest danger in the Normal difficulty Citadel comes from forgetting that these starting characters lack the double jump and air dash. Despite my best efforts, I took several hits out of sheet habit from thinking that I had these basic tools available when they were still missing.
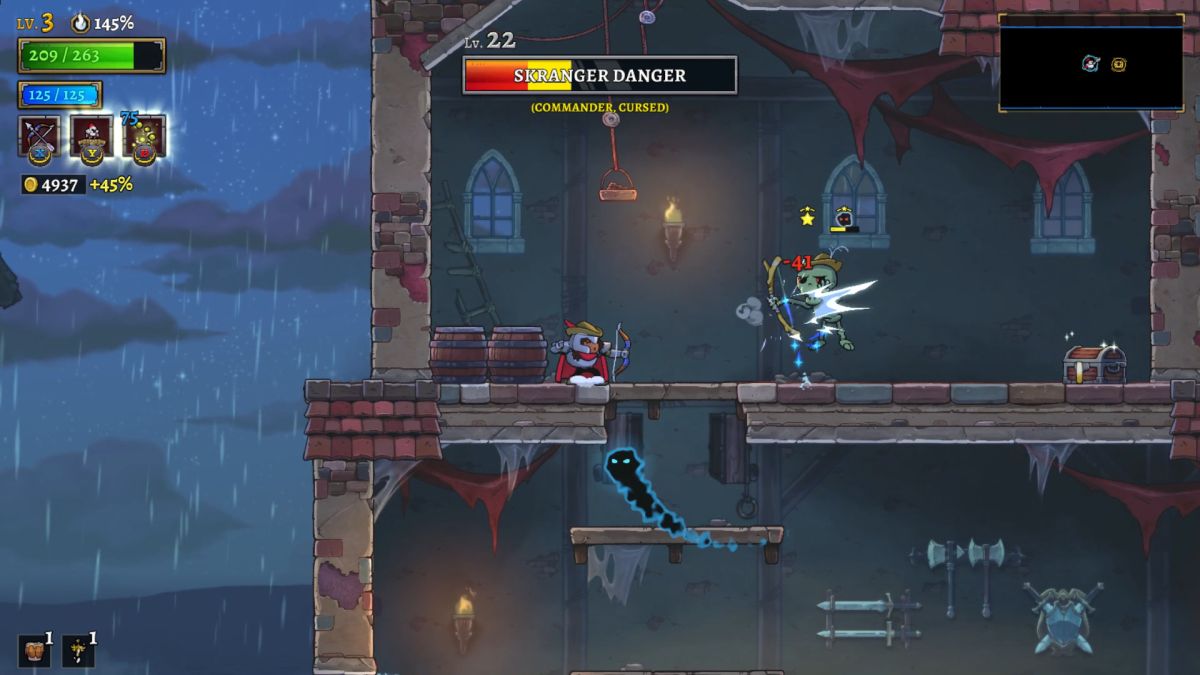
I used the Ivy Canopy to sequence break my way into the Study and poke around in there for a bit. I was able to clear almost a dozen rooms and claim the always-present Blessing of Life before eventually taking enough damage to force a return to the air dash heirloom in the Citadel for the full HP refill. After completing that, I decided to try my hand at Lamech since he's such an easy boss and I thought it would be fun to have 100 souls available for use by the second heir. Lamech was indeed not particularly difficult but I did take a number of hits by virtue of not having the double jump unlocked yet. At least I was able to use the Ivy Canopy to block his homing fireballs shot out when dropping to 50% HP. My health fell low enough that I had to use the Echo's Boots heirloom at the entrance to Axis Mundi to refill health a second time. I would have needed to get that anyway to pass through Axis Mundi, of course, plus it was needed to kill the void slugs and void fireflies elsewhere in the dungeon. There was the pictured Cursed skeleton archer at the beginning of the bridge and this is a commander type that causes problems for the Ranger class. Arrows have a small hit box and can only hit one target at a time with their slow rate of fire; it's often better to spin-kick to clear the Cursed ghosts. I took a couple of hits here followed by damage from an ill-advised Blessing of Life and then died at the end of the bridge with the Aesop's Tome heirloom HP refill from the Citadel still unused. Whoops.
116 monsters slain, 7020 gold, 629 ore, 674 aether, 100 souls

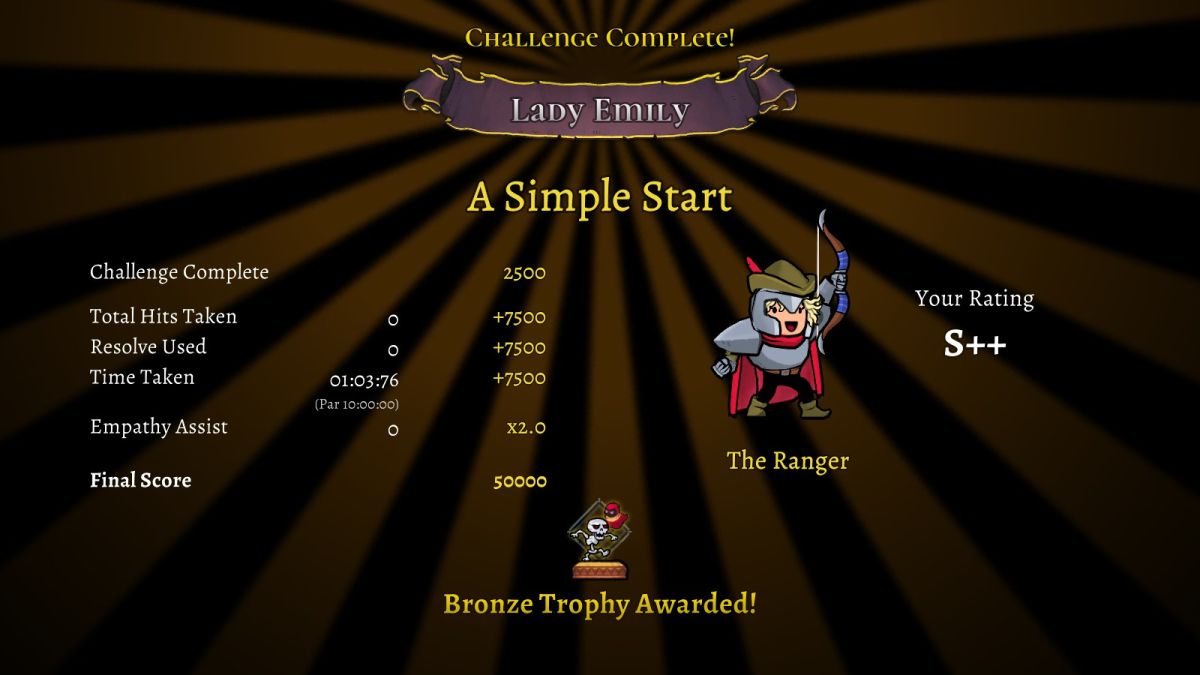
Knocking off Lamech with the first character led to a truly weird situation where the Drift House was the first thing unlocked on the docks, even before the Blacksmith and the Enchanter!  That was certainly something I'd never seen before. I discovered that it's possible to read the memories of the scars without having Aesop's Tome; I guess the developers never imagined that someone would be lacking the basic heirlooms from the Citadel when they began unlocking scars. I tore my way through A Simple Start and landed a perfect 50,000 score in the process which gave me 200 souls to spend in the Soul Shop before I had even unlocked the Blacksmith, heh. I purchased the first rank of Embroidered Investments and Runic Horizons as always, with the former maybe even being useful for a change if it delivered some early Leather and Scholar +1 items. The other 100 souls went into the initial purchase of Unbreakable Will although it would take a little time to work my way up to the Gold Gain levels at the top of the unlock tree.
I finally recruited the Blacksmith and the Enchantress next. In a bit of odd luck, I hadn't turned up a single piece of equipment with the first Ranger so I was left with only the default Leather Helm to purchase for 2 points of Vitality. The only rune that I'd found for the Enchantress was a pointless Eldar Rune but the player always starts with a Lifesteal and Magnesis Rune by default, both of which I immediately purchased. I made sure to unlock the Mastery bonus so that future Rangers could start earning XP and then focused heavily on Strength levels. I saw that there was enough gold to hit 25 Strength and hopefully pick up the second point of Lifesteal value, then dumped the rest of the gold into the cheaper Vitality stat. There wasn't enough remaining money to pick up any Armor, unfortunately, which would have to wait for the next heir.
Ranger #2: 22 Vitality, 25 Strength, 0 Armor, 6 Dexterity
This Ranger had no traits or relics and had happily rolled the Fireball spell at a point early enough in the game where it would be useful with default Intelligence. I unlocked the "Two Masters" scar immediately at the start of the dungeon, something I hadn't been able to do with other classes since they lacked the Ivy Canopy talent. I was pleased to see that this Ranger was indeed getting 2 HP per monster kill with 25.3 Strength rounding all the way up and counting the same as 50 Strength. Once inside the dungeon, I headed towards the Study and used the Ivy Canopy to sequence break into the fourth biome again. The plan was to clear as much of this area as possible and then rely on the remaining heirlooms to refill health after taking damage. I made it through a good portion of the Study and picked up the War Drum relic along the way which would be more useful than normal thanks to having 200% resolve to play around with. Once again, it was hard platforming through this area with no void dash or double jump! Eventually I took enough hits that I was forced into taking the void dash heirloom and finally claimed the extra dash length along with the free HP restoration. Now I just needed to make my way over to the Plateau for the last heirloom.
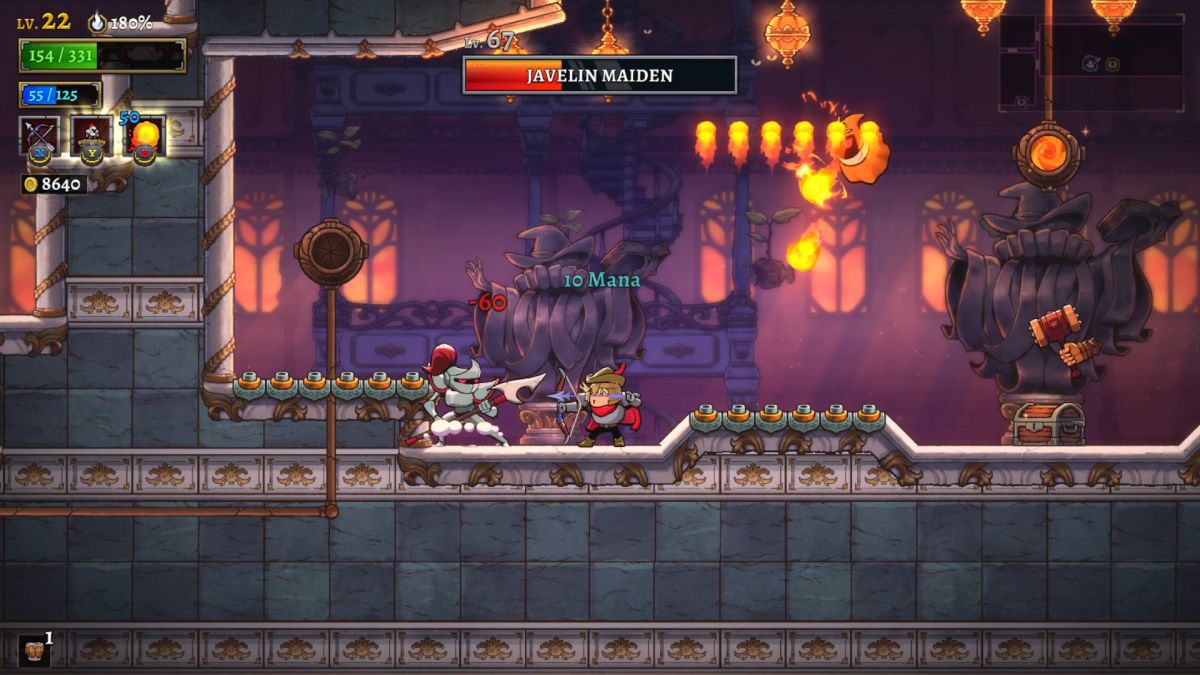
I wasted a good bit of my Ranger's very limited health clearing out the room pictured above, one of the nastier segments where fire rains down from the sky and there are always half a dozen monsters in the central area. The inability of the Ranger's arrows to penetrate through walls was a real disadvantage in situations like this, forcing me into melee combat where the bow isn't a good option. I did kill everything in this room and finished the full clear of the Study but had to take Aesop's Tome heirloom to avoid running out of health. Afterwards I made my way through Axis Mundi where I dropped as low as 7 HP at one point and had to raid the remaining breakables in the teleporter rooms for safety. I took my time and rebuilt my lifebar on the bridge with the assistance of Freon's Reward relic granting 15 HP back for every chest opened. I kept heading further and further east, grabbing the 15% damage bonus via empathy assist for each of the estuaries along the way, eventually reaching the Plateau for the first time. I skipped the Axis Mundi Void Beasts for the moment in the hopes of making it to the double jump heirloom. The Plateau turned out not to be too bad and it wasn't long before I claimed my prize of Aether's Wings along with another full HP refill.

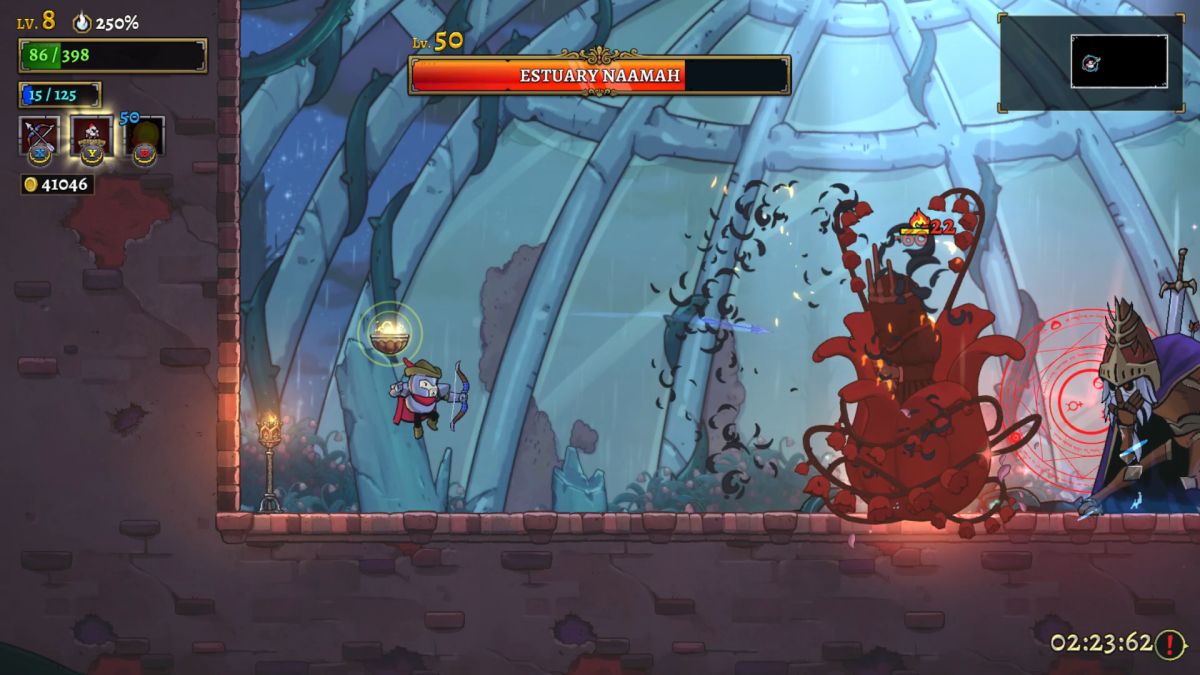
With my main objectives secured, I decided to use the remainder of the run to finish full clearing the rest of the Plateau. I was able to find two Lillies of the Valley to open Naamah's boss door along with Hyperion's Ring relic for the revive at half health after dying. This Ranger didn't exactly have a lot of health due to his starting 22 Vitality but I had the extra resolve so there was no reason to skip the relic. All of those relics also synergized well with the War Drum to provide a bit more damage. Once I had the Citadel, Axis Mundi, Plateau, and the Study all full cleared, I decided that I would try to defeat estuary Naamah due to my past success against her. The battle against Naamah went reasonably well, far from perfect while still being quite solid for only the second character. I accidentally dropped my Ranger into the spiked floor twice and flubbed a couple of dodges against Naamah's blue fireballs. Nevertheless, I was able to pelt the boss with arrows and a series of Fireball spells while doing an excellent job of avoiding all of Naamah's pink-colored unique projectiles. My Ranger won the battle on low health without triggering the Hyperion's Ring relic.
I was starting to run out of places to explore in the dungeon and therefore headed into the Sun Tower to see how much of the climb this character could complete. I was having pretty good luck at finding equipment on this run after drawing a blank with the first Ranger, landing the Leather Chest +1 and Scholar Cape +1 (both of them by far the best items in their respective sets) along with the Leather Trinket and the first Soulsteal Rune. While these Rangers would never have enough Intelligence to get too much use out of that last rune, going up to 3 points of lifesteal would definitely be worthwhile. Anyway, within the Sun Tower I made good progress until running into a tier 3 crossbow commander with the Shredder trait. That ability was pointless since this Ranger had zero Armor but its attacks did 131 damage which was more than a third of this character's total HP. I took two hits and triggered Hyperion's Ring before killing the darn thing. From there, I made it about 75% of the way up the Sun Tower before finally falling to a tier 3 volcano commander. This was a fantastic run for the second character that brought back oodles of goodies for the use of future heirs.
388 monsters slain, 29556 gold, 4548 ore, 2012 aether, 100 souls

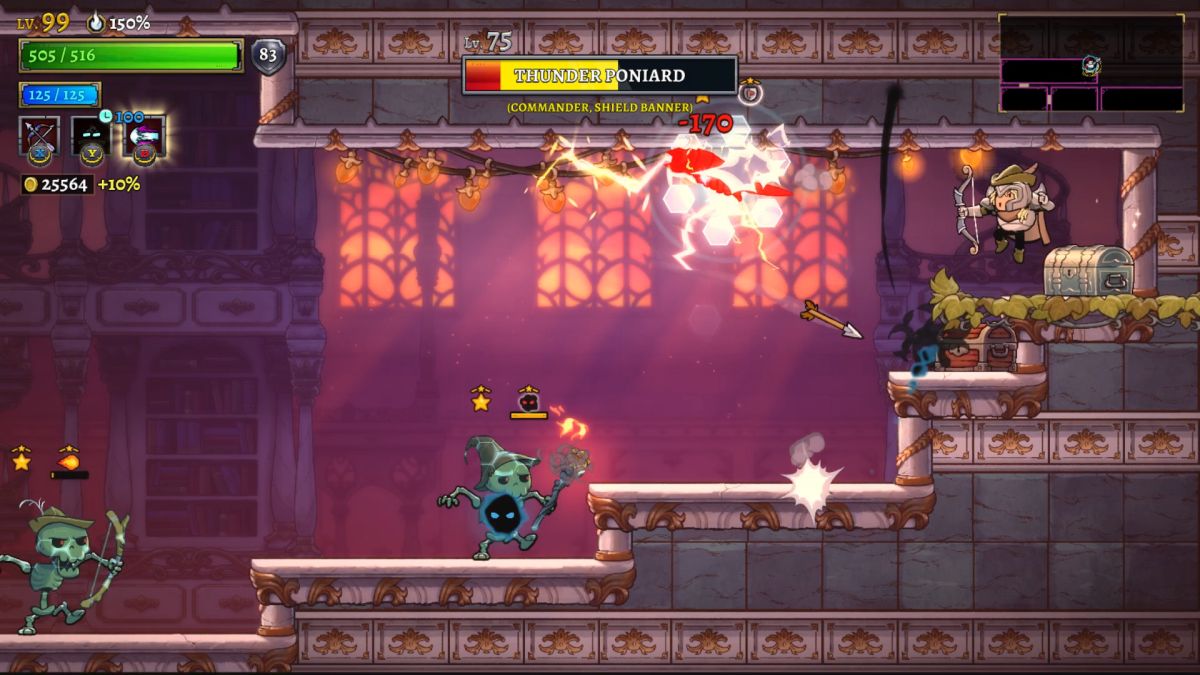
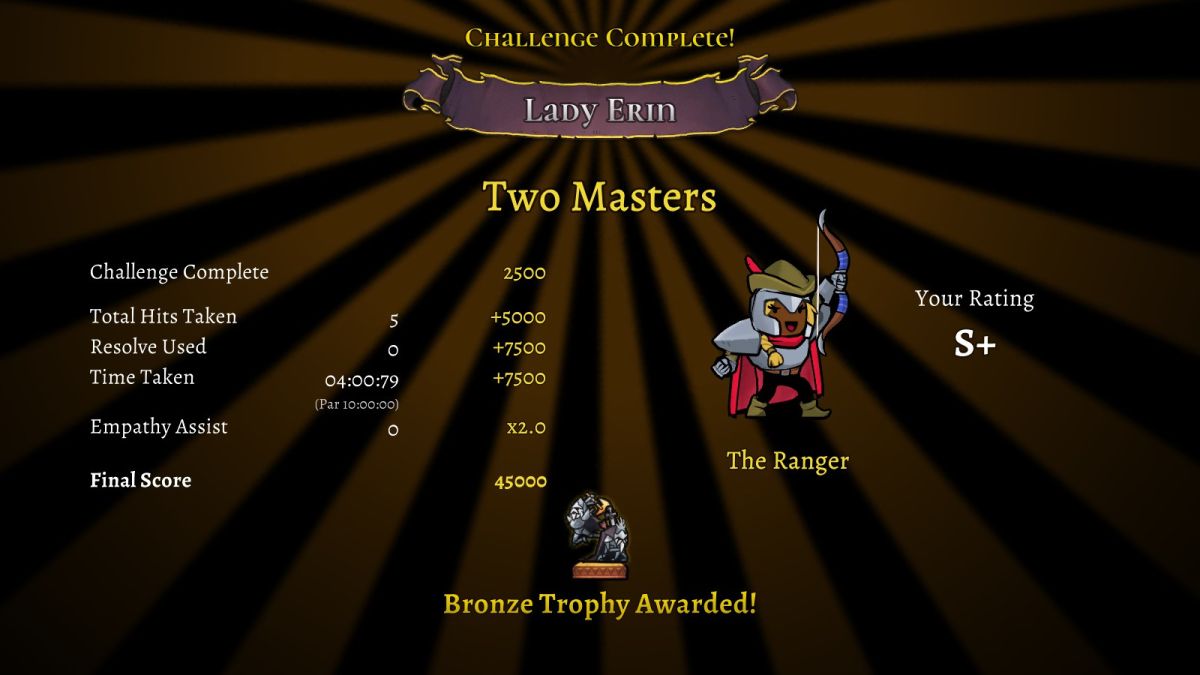
Back at the docks, I started out by trying my hand at the "Two Masters" scar challenge that I had unlocked with the previous character. This is a fight against two Lamechs at once (with some minor variations to the normal Lamech abilities) which dates back to the original Early Access version of Rogue Legacy 2. The Ranger class isn't especially good at dealing with bosses and it became immediately obvious that this was an extremely difficult scar to overcome. Each shot with the bow would lock my character in place for about half a second and the player can't always use the dash to cancel that delay when there are enemy projectiles flying around everywhere. I had to hit each of the two Lamechs with about 50 shots to defeat them and my character could only take a grand total of 5 hits if I were going to land the S+ rating for the Bronze Trophy. Of course I think the Ranger would outright die from 6 or 7 hits taken so pretty much any victory would be enough to get the job done. I had rolled the Flame Barrier spell on this Ranger and used it whenever I could get close enough to one of the Lamechs in safety. I also tried to use the Ivy Canopy to block various enemy projectiles whenever an opportunity presented itself. I can't stress enough that this was exceptionally difficult and it took about half an hour of various failed attempts until I was finally able to get a victory which just barely qualified for the S+ rating. Taking even one more hit would have left me with an "S" rating and then I would have needed to use another class to score the last 1000 points or else run the whole thing over again. This was not a great sign for the upcoming bosses that I would need to fight in the normal game mode!
Now I had 400 souls burning a hole in my pocket available for spending. I dropped 100 of them in the initial rank of Absolute Strength and then a further 200 souls on Prefential Treatment. This would permanently lock a Ranger on the heir select screen in the rightmost spot and ensure that I never had to reroll for lack of my desired class. I held the last 100 souls for the moment for lack of anything truly necessary. As for the other town merchants, the Enchantress had that Soulsteal Rune available and I didn't even need to buy additional rune weight to make use of it. There were no unity bonuses that I cared about from the gear that the Blacksmith had on hand so I simply bought whatever had the best stats in each category. The highest priority went to the Warden Sword (7 Strength) and Leather Chest +1 (13 Armor) since they had the stats that I most cared about. The Leather Trinket was worth another 3 Armor and the initial rank of Leather Unity (20% additional resolve) which also seemed worthwhile. Then I picked up the Warden Helm for another 3 Vitality while holding off on anything in the Cape slot for the moment to save on purchasing more equipment weight. Not having any Mastery bonuses from the Knight or Valkyrie classes definitely hurts in that regard. As usual, I split the remaining funds between Vitality, Strength, and Armor. I couldn't make it to the Gold Gain levels yet (why are they so hard to reach?!) and they would have to wait for the next character.

Ranger #3: 35 Vitality, 38 Strength, 19 Armor, 9 Dexterity
This Ranger rolled the Combative trait: 50% more weapon damage at the cost of 25% less health. That's probably a worthwile tradeoff and with that bonus plus the additional Strength added between runs her damage was roughly double the previous Ranger. Now I just needed to increase her HP via Blessings of Life or relics. It was a lot of fun one-shotting monsters with arrows, including the enemies in the Study to my surprise. A skill crit bow shot would kill even the paintings and mimic chests in a single hit which I had not been expecting. I turned up a Gnawed Bone relic right away in the Citadel (eating meat at full HP increases your max health by 10%, stacks up to three times) and managed to get the full three stacks with some careful maneuvering through the Study. I also found three Blessings of Life while exploring and that trio along with the Gnawed Bone doubled the max HP of this Ranger from where she started - exactly what I'd been hoping for.
I cleared out the Study first and it surprised me at how little resistance the enemies put up. The combination of awesome damage and a steady 3 HP per monster kill helped to keep this Ranger cruising along with no real problems. I blitzed my way across the first half of Axis Mundi, finding a couple more Blessings of Life along with the first Reinforced Rune, and headed up into the Sun Tower at the halfway point. Once again I found that the Tower was unexpectedly doable for this character, not requiring lots of retreats to restore health and quite manageable overall. I guess that the Ranger class was proving to be stronger than I had expected with this being only the third heir. There were some tricky rooms like the one pictured above with double commanders but I never really found myself in serious danger and went straight up to the top. The Ammonite Chest was hiding in one of the treasure chests for a big find along with the first Quenching Rune. The only two runes that I still wanted were in the Bounty and Folded slots which would hopefully turn up sooner or later.

I made use of the second half of Axis Mundi to heal up from some of the damage taken in the Sun Tower. There was yet another Blessing of Life (roughly the sixth or seventh overall) on the second half of the bridge and I was also able to find Demeter's Trial relic. This is a cursed relic that kills your character when taking a single hit unless it's purified by eating a meat or drinking a flask. I had plenty of breakable items saved up at the teleporters for exactly this occasion and happily purified the relic for more increased max HP/MP. From there I entered the Plateau and kept rebuilding health until I was close to full, picking up Coeus' Shell relic to help out in this process. This relic blocks the next source of damage after defeating six enemies and then recharges again after killing another six enemies, rinse and repeat. When the Ranger was almost full on health, I sent her back to the boss doors at the end of Axis Mundi to face the two Void Beasts. They were very easy to defeat by pegging them with arrows at a distance and I only took a single hit with the damage blocked by Coeus' Shell. Having spent a good bit of time with the prime version of this boss from NG+2 difficulty, I can't say that the non-prime Void Beasts put up much of a fight in comparison.
After finishing up with the remainder of the Plateau to claim a full clear of the first five biomes, I set my sights on estuary Irad at the top of the Sun Tower. While I still hadn't defeated Enoch yet back in the Study, it was more important to get past Irad because he unlocks the Sun Lantern which allows your characters to explore the Dry Lake. I was only getting a 20% restore on health and mana when entering boss doors at the moment which meant it had to be one boss or the other, with Irad taking precedence. I was highly nervous about this estuary due to the slow attack animation of the bow and the aerial nature of the combat in Irad's boss chamber. I had fought Irad with Rangers before on other save files and it hadn't gone very well. The first half of the fight indeed proved to be tough as I dodged the projectiles from the eyeballs while carefully picking moments to attack when it was safe. Then by accident I hit on a major breakthrough: the Ivy Canopy was AMAZING for this boss battle!  Placing an Ivy Canopy right in the middle of the room provided a safe place to stand and fire arrows while blocking some of the smaller projectiles in the process. The big blue fireballs all seemed to avoid this location and I was able to shoot arrow after arrow as long as the platform remained active. I won't say that this trivialized the fight but it sure as heck made it a lot easier. I was able to win with just under half health remaining for a pretty comfortable margin of error.
Now I wanted to see how far I could make it through the Dry Lake and things were going quite well as I cleared the first dozen or so rooms. Coeus' Shell was working to block some of the random hits from monsters and I was slowly starting to fill up the HP bar once again. Then I ran into a tier 3 volcano commander with the Massive trait who hit me once and did 225 damage, ouch! I misplaced the Ivy Canopy which would have blocked its falling projectiles and then a second eruption hit my Ranger to deal another 225 damage and end the run. That was a somewhat sad ending to an otherwise magnificent trip through the dungeon.
454 monsters slain, 41046 gold, 5915 ore, 4556 aether, 200 souls
There was a new scar challenge to try out back in the Drift House. This was "Bladed Rose" where the player fights against both Lamech and Naamah at the same time, arguably the most difficult scar that unlocks in Normal difficulty. It plays out similarly to Two Masters with the need to dodge all sorts of enemy attacks from two huge bosses on the screen at the same time. I had the good luck to roll the Fireball spell on this Ranger which is a fantastic tool for landing some additional damage in these scars where the stats are all normalized (and where spells actually do more than pinprick damage). The bow shot + Fireball spell combo worked beautifully and was the main reason why I was able to make any progress at all. For all that the Ranger deals excellent damage in normal gameplay, their bows seem to be rather pathetic in the scars where the class can't take advantage of its various Strength bonuses. It was incredibly difficult trying to hit both Lamech and Naamah about 50 times apiece while dodging everything that they threw at me. Oh I could win the battle just fine, thanks to the four meat drops hidden in the corners of the room, but winning and getting a good score was virtually impossible. Once again I could only take a maximum of five hits for the S+ rating and the Bronze Trophy. This proved to be just out of my reach; I tried the scar over and over again for about an hour and the best that I could do was six hits. I decided that this was good enough and I'd get the final 1000 points with another class in between normal character runs. I want to be clear on this: the "S" rating where I took six hits was an exceptionally good performance while using the clunky Ranger class! I didn't feel bad about getting the final 1000 points elsewhere.
That meant no more souls for the moment beyond what I'd brought back on the last Ranger. With exactly 300 souls to spend, I picked up the second rank of Unbreakable Will and Absolute Strength at 150 souls apiece. More levels of cheap Vitality and Strength, not to mention additional Gold Gain levels, would all be very much needed for this class. I picked up the Quenching Rune at the Enchantress along with three rune weight upgrades while holding off on the pricey Reinforced Rune since 8% additional Armor wouldn't mean much until I could get the Ammonite set unity in play. For all of the equipment that I'd found, there wasn't too much that I wanted from the Blacksmith. The Ammonite Chest barely increased Armor value over the Leather Chest +1 and would lose the Leather set bonus which didn't feel worth it. I contented myself with the Scholar Cape +1 to get something from that slot while paying for three equipment weight levels to put it on. Then I concentrated on unlocking up to the Gold Gain levels and grabbed one of them before spending the rest of my money on the cheap stats from those ranks of Unbreakable Will and Absolute Strength. For all that 41k gold sounds like a lot for Normal difficulty, it gets used up real fast when shopping in between runs.

Ranger #4: 40 Vitality, 42 Strength, 25 Armor, 9 Dexterity
This Ranger didn't have stats that were particularly higher than the last one but he did have the Nostalgic trait which turned everything into sepia-toned colors. This was worth 25% additional gold and I had bought the first Gold Gain level to increase that to an even 30%. If I could achieve a full dungeon clear with this Ranger, it should be worth significantly more money simply due to that extra gold gain. For once I decided to start out in the Dry Lake although I had to use up more of the Citadel than I wanted before finding the entrance down into the basement. I made solid progress in the most difficult biome and cleared out a little more than half of it before needing to leave for easier areas with health dropping low. I turned up another Gnawed Bone relic early on this run and did my best to land all three stacks; it took some time but I did get them all eventually while working through the Study. That was the next area to tackle and it went very well as I even managed to clear a series of red portals without much trouble. Several Blessings of Life were the only thing that cost my Ranger health as he finished up with the biome.
I expected that it would be smooth sailing from here, using Axis Mundi to fill up the lifebar again and then back into the Dry Lake. However, the bridge ended up being a disaster thanks to a tier 3 knight commander who rolled the Shield Blocker trait. The commander was tucked into an inaccessible corner of the bridge architecture and I was forced to run in between four other monsters to kill the thing, taking about 200 damage in the process. This meant that I largely broke even on health in Axis Mundi instead of getting my expected HP refill, argh. Fortunately things went much better in the Sun Tower and I wound up with a net gain of health while climbing up to the top despite the much more dangerous enemies inside. This was partially due to some nice platforming on my part and more importantly due to finding two pizzas along the way that each restored more than 200 health to my Ranger. I grabbed a couple more runes although nothing terribly significant while also finding more Ammonite equipment, ultimately everything except the Ammonite Trinket before this run was finished. This would let me unlock the initial tier 1 set bonus with the next character and leap at once from 25 Armor up to something in the 70-80 range.
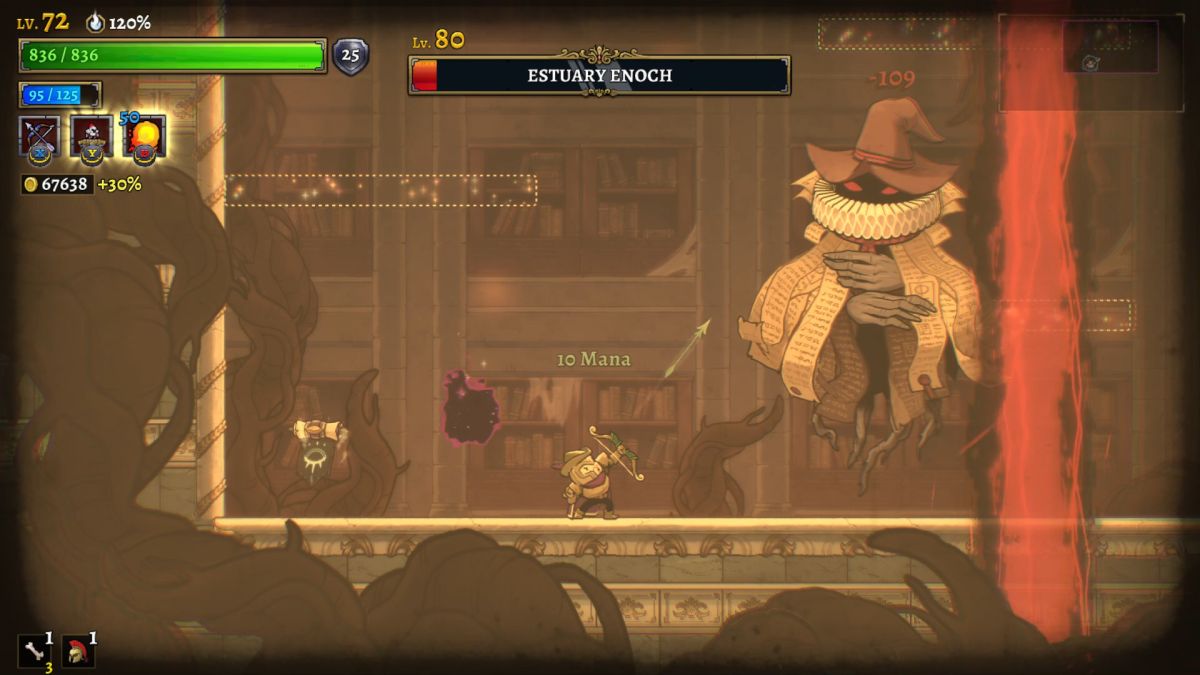
I made sure to clear out the full Plateau to continue stacking up more gold while I was running a character with the 30% bonus. There wasn't anything too tough in the most isolated biome and I was able to claim one last Blessing of Life to take HP over the 800 mark. Now I backtracked to the unfinished portion of the Dry Lake and methodically cleared out everything that remained. Some of the rooms were quite difficult, especially one of the red portals that I almost certainly should have skipped over, and it took real effort to make it through everything. I did get it all done though: a full dungeon clear with my fourth Ranger, excellent. I broke open some of the pots that had been saved at the teleporters for additional HP and headed off to face estuary Enoch at the top of the tower. The first part of the battle was easier than I had expected, with the Ranger able to stay at a safe distance while firing arrows and Fireball spells. I avoided taking any damage and used the Ivy Canopy platform several times to block the enemy projectiles. The mimic chest form of Enoch wasn't bad either as I never had to put myself in melee range of the bouncing creature. It was also easy to stand above Enoch on the Ivy Canopy when he went racing back and forth on the ground. My Ranger was barely scratched in walking away from this boss fight with an easy victory.
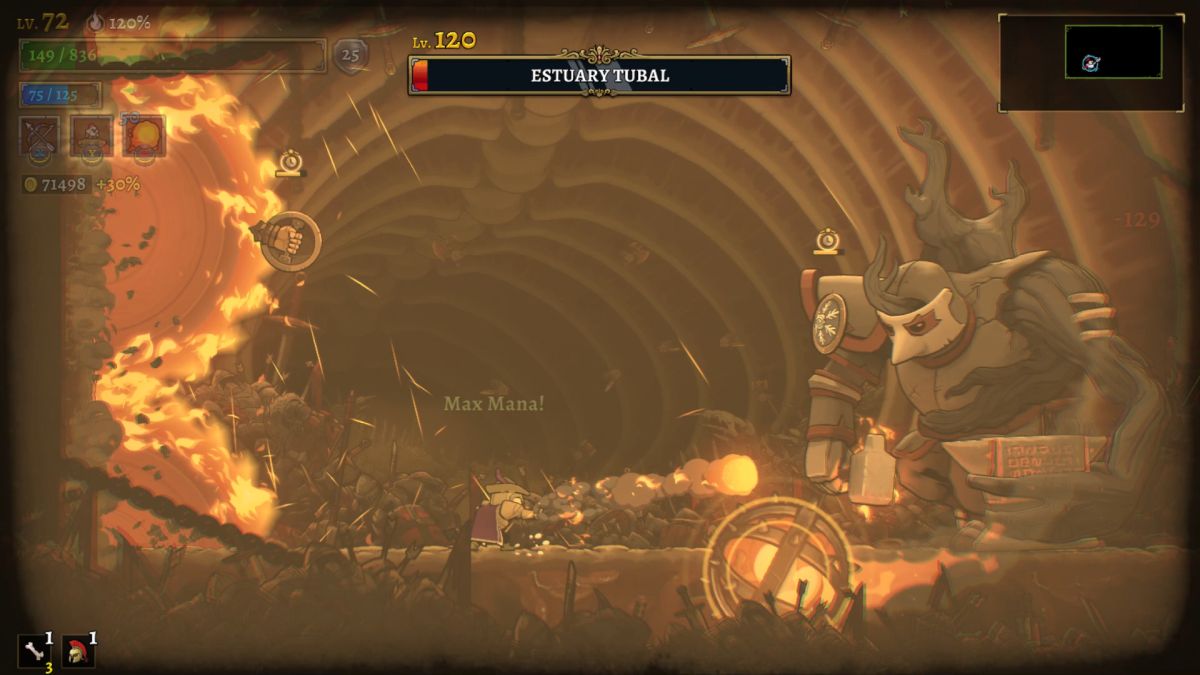
At this point I still had to take out the two miniboss pairs behind the Pearl and Onxy Key doors in the basement. I raided every last breakable at the teleporters but could only get up to about 500 HP before entering the first miniboss room. I played very poorly against the shield/axe combo and took a bunch of hits that knocked me down to a mere 209 HP which left the other miniboss pair looking like a dicey proposition to defeat. Of course I followed that up with a perfect fight against the dagger/hammer combo where I evaded everything while shooting them down from a distance. Go figure, I have no idea how that happened either. There were no foes remaining in the whole dungeon now except for Tubal and with a scanty 383 HP remaining (after the 20% HP refill from entering the boss door) a victory didn't seem likely. I concentrated on avoiding the automaton minions whenever he summoned them while waiting for their invulnerability timers to wear off, only then engaging with the flying minions after they could be damaged. The battle was going surprisingly well as I avoided most of Tubal's attacks, however I was down to only 140 HP at the halfway point and the whole effort felt doomed. Still, I wasn't going to give up until the estuary actually killed me and thus kept firing away with arrows and spells. I managed to get through the third summoning of minions without taking any damage and hey, don't look now, Tubal was starting to get pretty low on his own healthbar. The estuary had only a tenth of his life remaining when he paused to summon more minions for the fourth time and I gambled that I could burst him down before dying myself. There was just barely enough time to get it done, I took one final hit as I fell to 52 HP while using the invulnerability frames to deal the last blow:
What an amazing victory!  I had been very worried about defeating Tubal with the Ranger's slow attacks and then somehow managed to overcome the boss with less than 400 starting HP. I had picked up Hector's Helm relic earlier (deal 20% more damage when under half HP) and that certainly played a role in letting me pull this off. Now for the bad news: there were zero HP recovery items to be found anywhere in the dungeon. My poor Ranger was sitting on 55 HP and going through the Golden Doors only restored that to 223 HP. I hadn't been expecting to take on this many bosses with the fourth heir and therefore hadn't invested in the levels that restored more HP/MP when going through boss doors. Well I gave it my best shot against Jonah and managed to take out 3/4ths of his health but ultimately it simply wasn't enough when starting at such a poor life total. I'd have to come back again for the final two bosses with the next Ranger.
618 monsters slain, 76048 gold, 9060 ore, 5353 aether, 200 souls

There was another new scar challenge available at the Drift House which I hadn't been able to complete with my previous classes in this series. This was the "Narrow Praxis" scar that tasks the player with using the Ranger class to destroy a series of targets, and since this is a Ranger-only challenge it hadn't felt appropriate to let the other classes make use of it. (I had been skipping the Barbarian-only "Heavy Weapons" scar for the same reason.) Narrow Praxis looks to be extremely difficult at first glance due to the many targets that appear and I honestly had no idea how to complete this one when it was first added in Early Access. The trick is that the player must use the Ranger's Ivy Canopy talent since arrows fired from the platform will explode and hit nearby targets via its Spore Burst ability. The optimized path places two Ivy Canopies, one in the upper-left corner and then a second one at the bottom-right corner after the cooldown runs its course. The best way to see this in action is to search on YouTube for "Narrow Praxis" and watch one of the insane individuals who has managed to complete the whole thing in 14 or 15 seconds. Now that I knew the proper path to follow, I was able to hit 35 seconds for the Bronze Trophy without much trouble and then practiced a bit until I dropped under 28 seconds for the Silver Trophy. I'm sure that I could reach 25 seconds for the Gold Trophy with more repetition but the 400 souls from the Silver Trophy were plenty for right now.
I had 600 souls to spend at this point and decided to spend 250 of them on two ranks of Master Smith to lessen the cost of the equipment and rune weight upgrades that I knew I was going to need. I also had lots of extra ore and aether on hand which made it an easy call to convert 2500 of each of them into another 150 souls via the first Strange Transaction. Then I purchased the third rank of Unbreakable Will and Absolute Strength at 200 souls apiece. This was the most souls that I can remember having this early in the game thanks to the Ranger being able to access the Two Masters and Narrow Praxis scars. Over at the Enchantress, I grabbed the Reinforced Rune and the three rune weight upgrades needed to wield it. I actually found the tier 2 version of the same rune on the last run as well but it was a bit too pricey at the moment to purchase. The Blacksmith was the vendor that saw the most use on this return to the docks as I purchased the Ammonite Sword, Helm, Chest, and Cape along with the SEVEN (!) equipment levels needed to use all of them. This lowered a couple of stats by modest amounts while increasing Armor from 25 to 83 - seemed like a good trade.
For actual upgrades, I picked up one rank of Gold Gain to get the even 10% bonus. I could have picked up more in that category but I decided to pump real stats instead in the hopes of maybe clearing Normal difficulty with this Ranger. I grabbed the cheap levels of Vitality and Strength unlocked by the additional ranks of Unbreakable Will and Absolute Strength, then saw that I was close to hitting 50 Strength for the extra point of lifesteal and made sure to hit that mark. The rest mostly went into Vitality although I made sure to put one more level into the Meditation Studies category so that entering boss doors would heal 40% of HP/MP. That would likely be needed if I was going to clear both Jonah and Cain with this character.
Ranger #5: 46 Vitality, 50 Strength, 83 Armor, 9 Dexterity
This Ranger had the Combative trait that I'd already rolled once before: 50% increased weapon damage at the cost of -25% total health. Arrow shots were dealing about double the damage of the previous heir and this Ranger was one-shotting pretty much everything that wasn't a commander. I essentially just needed to stack additional health above the starting 369 HP value so I crossed my fingers for lots of Blessings of Life and useful relics. It didn't take long to realize that this Ranger had reached the point at which the dungeon no longer presented much of a challenge thanks to high damage, tons of Armor, and good sustain via 4 HP per monster kill lifesteal. Everything was so much easier than before thanks to having "one shot, one kill" power against virtually all random enemies. It was a ton of fun having this kind of one-tapping arrows on hand and I knew that I'd miss it when the difficulty level increased.
Anyway, I started out in the Dry Lake again and went through the whole basement without any notable issues, even finding a pair of Blessings of Life along the way. After that, I methodically worked through the Study and Citadel like some vengeful spirit of death, sending one monster after another into the afterlife with precise arrow shots. I wasn't having much luck at finding useful relics or additional Blessings of Life beyond the guaranteed one in the Study. What I did find was another version of Demeter's Trial relic which I was easily able to purify for another 147 max HP. Eventually I grabbed the Red Sand Hourglass while working my way up the Sun Tower, a relic that provides 75% extra damage on the next weapon attack and then goes on a 5 second cooldown before it applies again. The Hourglass-empowered arrows were dealing 255 damage which was absolutely insane for Normal difficulty. Once the Tower was complete, I finished up with the rest of Axis Mundi and concluded with the Plateau where I had the good luck to come across two more Blessings of Life. I never could find a useful relic for the final 25 resolve (I took the Ivy Seed for lack of better options) but 884 HP along with 83 Armor and the Combative trait's damage bonus felt pretty good. I was about as well prepared as I could be for the last two bosses.

This time I was going up against Jonah with full health rather than a sliver of remaining HP and that made things much less stressful. I don't think that the Ranger class has one of the better matchups with Jonah as the arc of the arrow shots doesn't line up especially well with the slightly curved hilltop where this combat takes place. I found myself missing an awful lot of shots that went over Jonah's head and this was a duel where the ranged nature of the bow didn't seem to provide much of an advantage. (Jonah is one of the very few enemies in Rogue Legacy 2 that doesn't damage the player when contacting their sprite.) Nevertheless, I rarely have any problems with this opponent and was able to win the fight with more than 600 HP remaining. I did have to be slightly careful to ensure that my Ranger would still have full health for the following Cain battle and fortunately I was able to minimize damage sufficiently so that the 40% heal from the final boss door was enough to heal up completely.
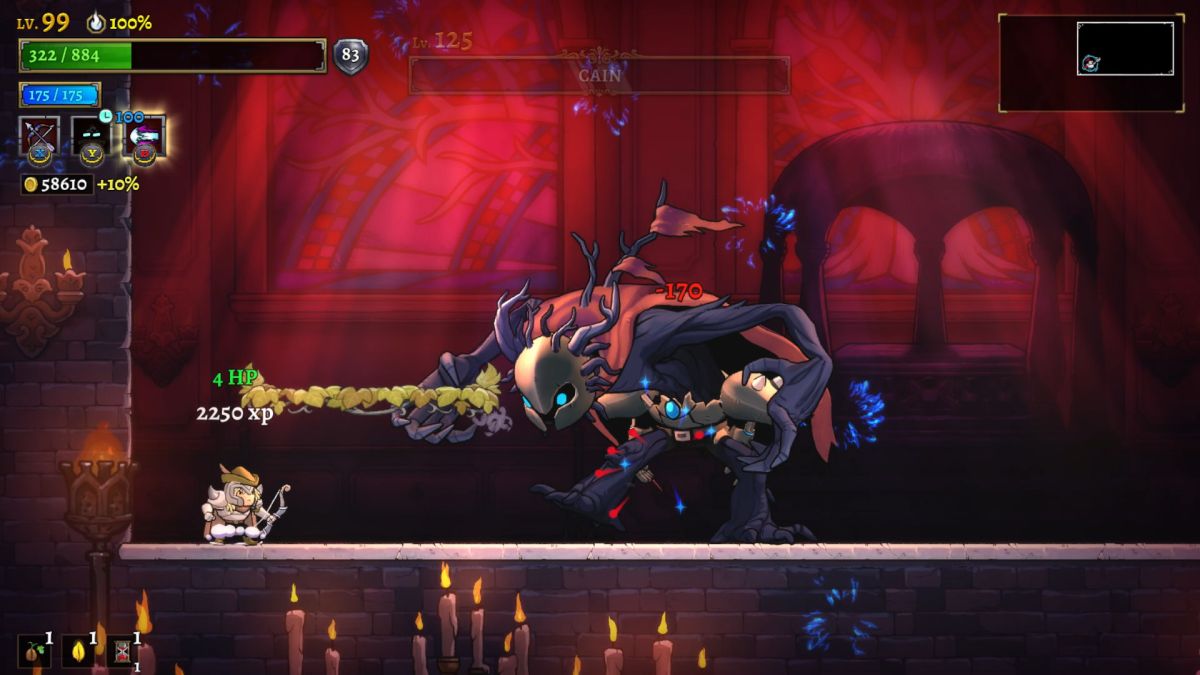
Cain is a much tougher opponent than Jonah and yet this was a place where the Ranger's bow shots worked exceedingly well. Keeping some distance from the final boss helped to provide a measure of safety, adding just a tiny bit of additional time to read the enemy attacks and dodge appropriately. The Ivy Canopy was also surprisingly useful for this fight, especially when Cain dropped to the 3/4 and 1/2 marks on his healthbar and went into the animation where he shoots off lots of homing blue fireballs. I placed the Ivy Canopy just above the Ranger's position and fired away in safety from underneath, knowing that the platform would block all of the shots flying down from above. I've definitely gotten better at reading Cain's various attacks over time which was a good thing before he kept spamming the worst of the bunch, the "dark" ability where he shoots out two Naamah projectiles with a void spiked ball in the middle. He did that attack five or six times, way more often than random chance would suggest, and it was the main thing that made the fight challenging. Otherwise I felt as though I had the situation under control at all times and was able to win a comfortable victory at roughly a third health remaining.
The Cain death animation even looked like he was getting shot in the stomach with an arrow, heh. That brought the tally to five total Rangers needed to clear Normal difficulty, equaling the number from the Knight Legacy playthrough. This was much better than I was expecting since the Ranger class is definitely weaker than the Knight class and I had been anticipating having a lot of problems with the boss fights. Instead, this collection of Rangers had torn right through the estuaries without much trouble. Some of that was luck and a good bit of it was likely due to my own growing familiarity with the various boss abilities, especially Tubal/Jonah/Cain who were the last enemies added in Early Access and who I had the least experience playing against. Whatever the reason, this was an awesome performance and it was time to move on to the next difficulty! The story continues on the next page of this report.


