

597 monsters slain, 214068 gold, 10197 ore, 7332 aether, 100 souls
Having finished the first two difficulties, now I had to complete the trifecta to finish up with the Ranger Legacy variant. I had quite a bit of ore and aether sitting around and therefore spent 7500 of each on the third Strange Transaction which provided enough souls for the fifth rank of Unbreakable Will. There was nothing that I wanted in terms of equipment which made this a good time to purchase the second Reinforced Rune that I'd held off on buying for some time. I was still looking for the second Lifesteal and Folded Rune along with tier 3 runes in all of the important categories. I dropped about 100k gold on the next two Gold Gain levels and then focused on Vitality and Strength as usual along with one additional level in Meditation Studies to reach 60% HP/MP healing when entering boss doors. I held off on Armor purchases since I was close to hitting the second tier of Ammonite set unity if I could just find the +2 version of the Chest, Cape, or Trinket.
Once again I cranked up the burdens for NG+2 difficulty. Following the same pattern as my Knight Legacy earlier, I chose to take 14 burdens (instead of the required 4) to make things harder. I was taking max ranks in Burden of Evolution (50% chance for monsters to upgrade to the next tier) and Burden of Adaptation (15% chance for monsters to gain a commander buff) along with all three points in Burden of Scale to make the dungeon 30% larger. For my last burden, I also took the NG+2 option to face the prime version of the Axis Mundi Void Beasts. I knew from my previous experience that having tier 3 monsters everywhere would made things noticeably harder as far as clearing the dungeon.

Ranger #12: 91 Vitality, 91 Strength, 105 Armor, 7 Dexterity
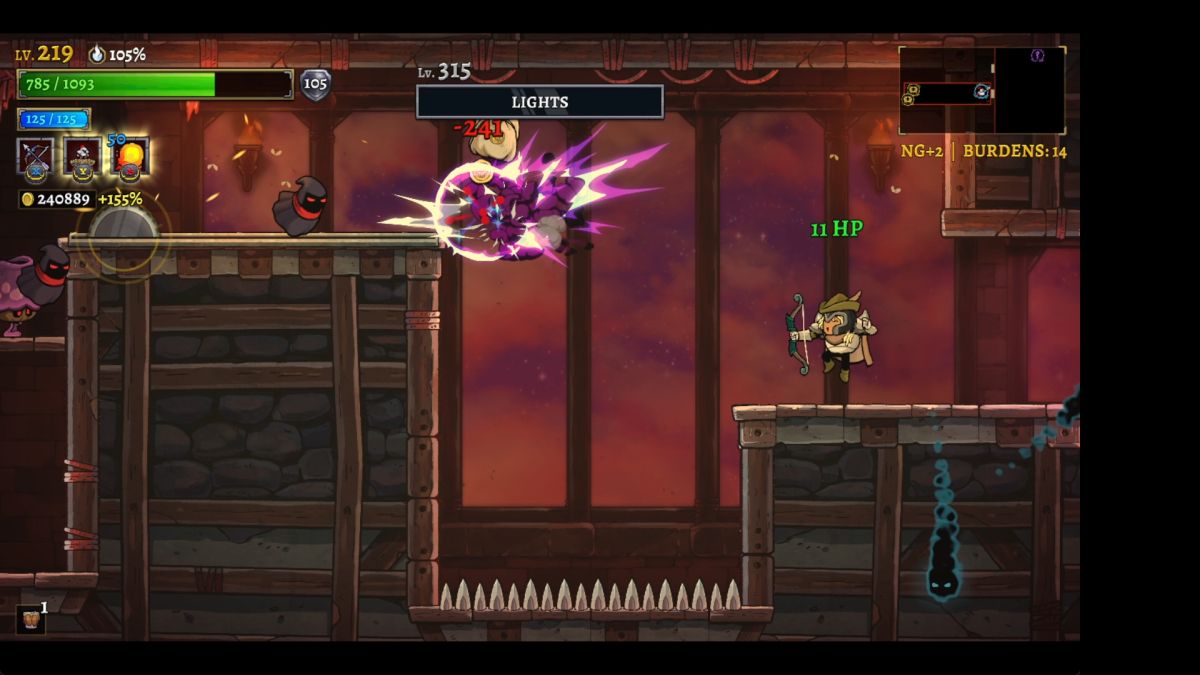
This Ranger had the Nostalgic trait for the colorless background tones and the Corrupting Reagent relic which left a poison trail behind on the ground when dashing. Unfortunately this relic ate up 35 resolve that could have been better used elsewhere and it didn't do much of anything to help since the poison damage was irrelevant. If anything it may have been a slight detriment since the poison cloud kept breaking open pots on the ground that caught me off guard. Anyway, the first character in NG+2 difficulty often struggles with the tougher monsters and this heir was no exception. It took many, many shots with the bow to kill enemies with their scaled up health, usually three arrows for normal monsters and as many as seven or eight shots against the beefy versions of the tier 3 monsters like the Royal Guards. Conversely, my Ranger would take at least 100 damage from the basic critters and could easily face 200 or more damage from commanders. There wasn't much room for error while working with a Ranger that had less than 900 HP at the start.
I worked my way through the Citadel until reaching the Study and progressed as far as I could in the upper biome. I managed to get through maybe a quarter of the Study before falling low on health and retreated back to Lamech's boss room in the Citadel which I entered for the 60% HP healing. This was the non-prime version of Lamech which meant that it was an easy boss fight; he hit my Ranger one time as I pelted him with arrows at a safe distance. Then it was back into the Study again for as long as I could remain there before more accumulated damage forced a retreat into the Citadel. But the Citadel itself is not easy on NG+2 difficulty and it was all I could do to stay alive rather than rebuilding health in there. There was a long stretch of time where I was working on 100-200 HP without being able to get back into a safe zone. I even had to suffer the ultimate indignity: using a Blessing of Life for healing rather than increasing max HP, ouch! I was under 100 HP at the time and would have died if I hadn't taken the health recovery though so it was the correct decision even if it hurt.
The turning point for this run came in Axis Mundi where I fell into some kind of higher consciousness for Rogue Legacy and plowed through everything in my path. After clearing out a particularly nasty Cursed commander at the start of the bridge, I proceeded through the entire rest of Axis Mundi without taking a single hit from the monsters. There were lots of tough obstacles and I managed to overcome everything as if I were in some kind of a trance. This rebuilt my Ranger's lifebar all the way back up to full again and allowed me to go back and finish up with the Study as well. I found a bunch of useless Warden +2 and Sanguine +2 items along the way but the real treasures were the rune finds: finally the second Lifesteal Rune and then the third Bounty Rune! The extra lifesteal would be a massive help as I was still sitting on 6 HP per monster kill which wasn't sufficient any longer. I was feeling great at this point only to make a catastrophic mistake: I hopped over to the boss room at the end of Axis Mundi and completely forgot that it contained the prime version of the boss fight. I wasn't even close to full HP and had been intending to use the easy normal version of the Void Beasts for an HP refill - whoops! I did my best but was cut down by the two giant skeletons and their minions. Argh, what a dumb way to kill a run that was doing great! 
288 monsters slain, 183169 gold, 7057 ore, 3080 aether, 100 souls

I spent some time back in town trying to complete the Automatons scar challenge without ever managing to achieve success. I could make it past the first half of the challenge with the minions, sometimes without even taking a hit when I was lucky, but I couldn't deal with the four big minibosses when they appeared on the screen together. The normalized stats on the Ranger class meant that I simply lacked enough damage capacity - I could not burst down and kill one of the four minibosses fast enough before they filled the screen with their various attacks. As much as I would have liked those extra souls, this didn't appear to be a scar that I was going to complete with this class. (Unless I started making use of the empathy assists which I didn't want to do.)
As far as picking up stuff back at the docks, I was primarily interested in the runes held by the Enchantress. I purchased the third Bounty Rune and the second Lifesteal Rune which I had been sorely lacking on the last few character runs. It would take me up to 10 HP per monster kill if I could hit 100 Strength so I made sure to pick up some more levels in the key damage stat for the Ranger class. There wasn't anything new that I wanted in terms of equipment as I continued to hold out hope for one of the Ammonite +2 items to drop (ideally not the Sword or Helm) which would unlock the tier 2 unity bonus in that category. Hopefully I could avoid anything as dumb as the way that the last character ended their journey.
Ranger #13: 100 Vitality, 101 Strength, 105 Armor, 7 Dexterity
This Ranger had the unfortunate FND trait: the heir becomes disarmed briefly and can't attack after taking a hit. That's a nasty, nasty penalty although it did come with a bonus of 55% to gold generation. She also started with the War Drum unique relic for a small amount of extra damage at the cost of 45 resolve which was high enough to prevent me from grabbing anything else. The extra Strength on this Ranger definitely made a difference as she was dealing 241 damage per shot which dropped a number of monsters down from 3 arrows to 2 arrows needed to secure the kill. I was also pleasantly surprised to realize that I was gaining 11 HP per monster kill, one more than I'd been expecting, but which made sense given my double Lifesteal Runes and 101 Strength. (8 points for having 100 Strength plus 1 point rounding up from 101 Strength plus 2 points of Soulsteal value from 26 Intelligence.) This was badly needed and in retrospect I was surprised at how far I had made it with the last character on only 6 HP worth of lifesteal.
I headed into the Study as soon as I found it and spent a long time up there clearing through the many rooms. I was able to make it through almost all of them before finally having to retreat into the Citadel for a bit to heal up. I went ahead and finished clearing the Citadel before returning to the Study and polishing off the remaining rooms, one of which was truly ugly with a Shield Banner commander in a tiny room protecting a pair of flying tier 3 daggers. Axis Mundi was up next and I nearly died at the outset of the area when there were double Cursed commanders hiding in awkward corners of the docks that had to be dug out with extreme care. The rest of Axis Mundi went well and I was finally able to find some additional Blessings of Life which had been completely absent in the first two biomes aside from the always-present one in the Study.

Upon reaching the halfway point of Axis Mundi, I decided to attempt the climb up to the top of the Sun Tower. This area didn't prove to be as difficult as I had feared or perhaps I simply handled it well in making it all the way up to the top without any serious crisis. The FND trait wasn't hindering me as much as I thought it would, perhaps because Rangers want to keep their distance from enemies all the time anyway and that made it easier to deal with situations where it's not possible to attack. I was also starting to accumulate some serious cash by now between the normal bonuses to gold generation and the additional 55% from having the FND trait. Exploring this much of the dungeon turned up the third Quenching Rune and a bunch of the Kin gear including the Kin Sword. That item would be very expensive in terms of equipment weight but probably worth using over the Drowned Sword, at least until I was able to hit the first tier of Drowned unity.
Once Axis Mundi was finished, I proceeded through the Kerguelen Plateau for the first time on NG+2 difficulty. This is the most inaccessible region of the dungeon if you don't pay to unlock the teleporters ahead of time and I had to find the two Lilly of the Valleys to unlock estuary Naamah's boss door. Once that was out of the way, I went ahead and fought the boss since she doesn't pose too much of a threat in her non-prime form. I made a couple of mistakes here and there while winning the overall battle without any real problems. This eventually gave me a full clear of every biome outside the Dry Lake and I finally headed down to the area that I'd been skipping. I made it through a dozen or so rooms before coming across a chamber with cramped spaces where tier 3 hammers kept hitting me for 250 damage at a time, ouch! With all of my breakable resources at the teleporters used up and my Ranger down to a mere 58 HP remaining, I sacrificed my Ranger's life via the Future Successor's Bargain relic that I'd seen earlier in the Study. This delivered me an additional 130k gold for a character who was dead in the water. RIP brave Ranger!
513 monsters slain, 538840 gold, 7193 ore, 5032 aether, 100 souls

I made a brief attempt at the Spreading Poison scar challenge with the Ranger between runs but it was so difficult that I quickly lost interest. Maybe another time I'd give that a shot, not today. I had 300 souls on hand which was just enough for another rank of Unbreakable Will and two more levels of Gold Gain; I figured that these were probably the last time I'd sink money into those upgrades given that I was approaching the end of this variant. For the moment the only rune that I wanted was the third Quenching Rune, requiring three rune weight upgrades, and then I had some decisions to make in terms of equipment. I thought it over and swapped out the Obsidian Helm for the Ammonite Helm +1, losing 10 Vitality but gaining the second tier of Ammonite unity for an effective 80 additional Armor after running through modifiers. This actually cost less equipment weight which meant that it wasn't costly at all going from the Drowned Sword to the Kin Sword, only one more equipment weight level required. Hopefully I could find some of the Ammonite +2 gear in order to move out of the subpar stats on the Ammonite Helms.
I puchased the two new Gold Gain levels for 112k gold and then still had 371k money in my pocket to spend on real stats - wow! I made sure to get the fourth level of Meditation Studies for 80% HP/MP heal on entering boss doors and then loaded up on Vitality and Strength. Lots and lots of those two stats, close to 40 levels overall. If anything was going to make my next Ranger a stronger character, it would be more Vitality and Strength to go along with the massive Armor boost that I'd obtained from equipment.
Ranger #14: 107 Vitality, 131 Strength, 185 Armor, 7 Dexterity
This was another Ranger with no traits and no starting relics leaving me free to build in any direction. Base damage with the Kin Sword and all those Strength upgrades was now 298, enough to one-shot some of the tier 1 monsters in the Citadel once again. This run began in the Study as usual and nearly died in the first few rooms when I took a bunch of hits against a Cursed commander in an awkward spot. I had to retreat for a little while and rebuild health in the Citadel, helped out enormously by gaining back 13 HP per monster kill thanks to that additional Strength from those upgrades. The early damage that I'd taken was also a motivation in choosing Freon's Reward for my first relic; although it wouldn't do anything against bosses, restoring 26 HP every time that my Ranger opened a treasure chest was very helpful indeed. I was later able to find the Incandescent Telescope to make use of the remaining 25 resolve, and the ranged nature of the bow made it easy to land the additional damage bonus. These were pretty good draws in the relics department.
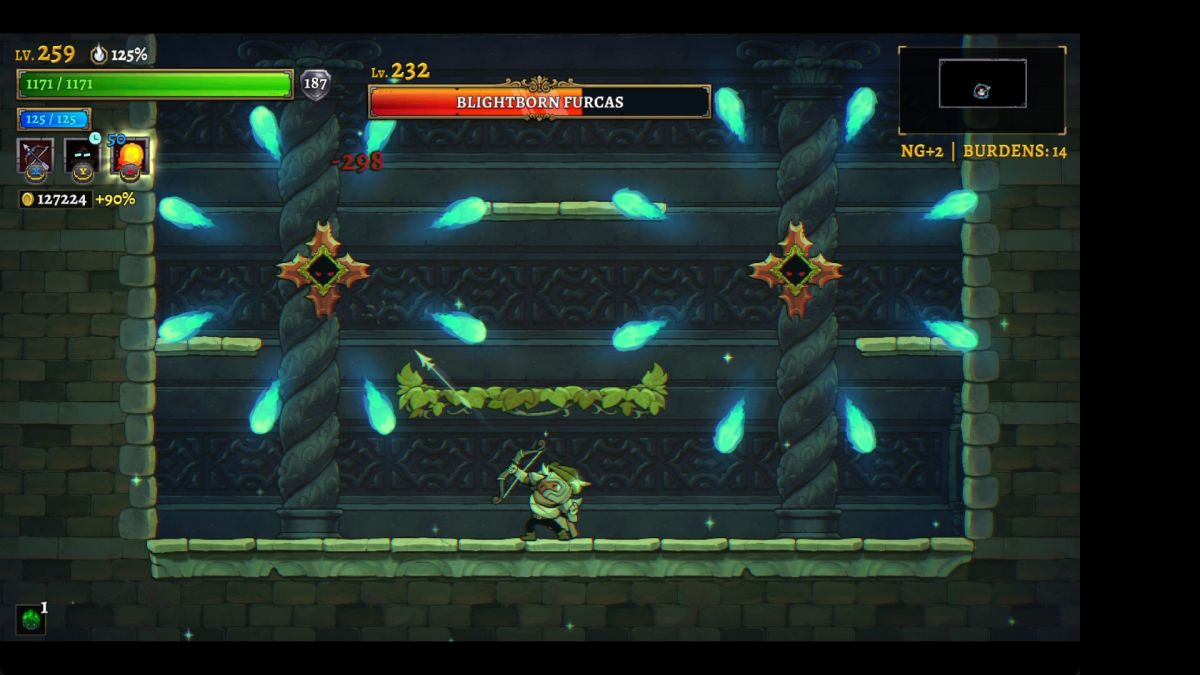
Buoyed by these additional tools, I returned to the Study and cleared the rest of it without further problems. I think that it also helped that I was now "warmed up" for this session which definitely is a thing for Rogue Legacy. One notable aspect of this character was finding lots of red portals, three or four of them in the first few biomes, and I felt confident enough to complete them without dying in the process. A well-placed Ivy Canopy turned the Blightborn Furcases into easy pickings as demonstrated above. I then headed into the Dry Lake with some of the Citadel still unfinished and started clearing my way through the vast basement reaches. It took me a full hour of real-world time but I was able to make it through the whole area without ever needing to leave. The extra Armor on this heir, the hefty lifesteal that he had on hand, and Freon's Reward relic all combined to push me over the tipping point of sustainability. I'm always a little bit sad when I'm able to full clear the whole Dry Lake for the first time since it means that the current difficulty level is coming to an end and the dungeon no longer poses the same threat.
Exploring the entire basement resulted in some additional gear that could be useful later on, several pieces of Drowned +1 equipment which would be excellent if I could find some way to run them while maintaining the Ammonite tier 2 unity bonus. The next big find was the second Folded Rune which turned out to be the very last tier 2 rune that appeared, dropping in the Citadel from a fairy chest where it was obligated to appear (since all of the other tier 2 runes had already been discovered). I was able to complete the rest of the Citadel from there and proceed through Axis Mundi while finding a few more Blessings of Life along the way. The other big takeaway from this run was the appearance of the third Lifesteal Rune in the Sun Tower which would be absolutely amazing once it could be deployed. That should be enough to get my next Ranger up to something like 20 HP per monster kill and turn the dungeon into a triviality.
As for the Sun Tower itself, this time it proved to be a difficult area and gave me significantly more problems than the Dry Lake. Sometimes the game is like that, just lots and lots of cramped rooms that rolled tier 3 monsters with dangerous commander abilities. I fell down to 84 HP at one point and had to retreat to Axis Mundi for a while; I actually fought estuary Enoch as part of that health recovery process since entering the boss doors gave my character about 1200 health back. My fight against Enoch was OK without being great, interspersing periods which I used the Ivy Canopy effectively and dodged incoming projectiles with some bone-headed mistakes that resulted in damage. At least I continued to perform well at the mimic chest portion of the fight which does seem to be a cinch for the Ranger class. Even though this was far from perfect, I still came out way ahead on HP by using the boss encounter as a healing fountain of sorts.

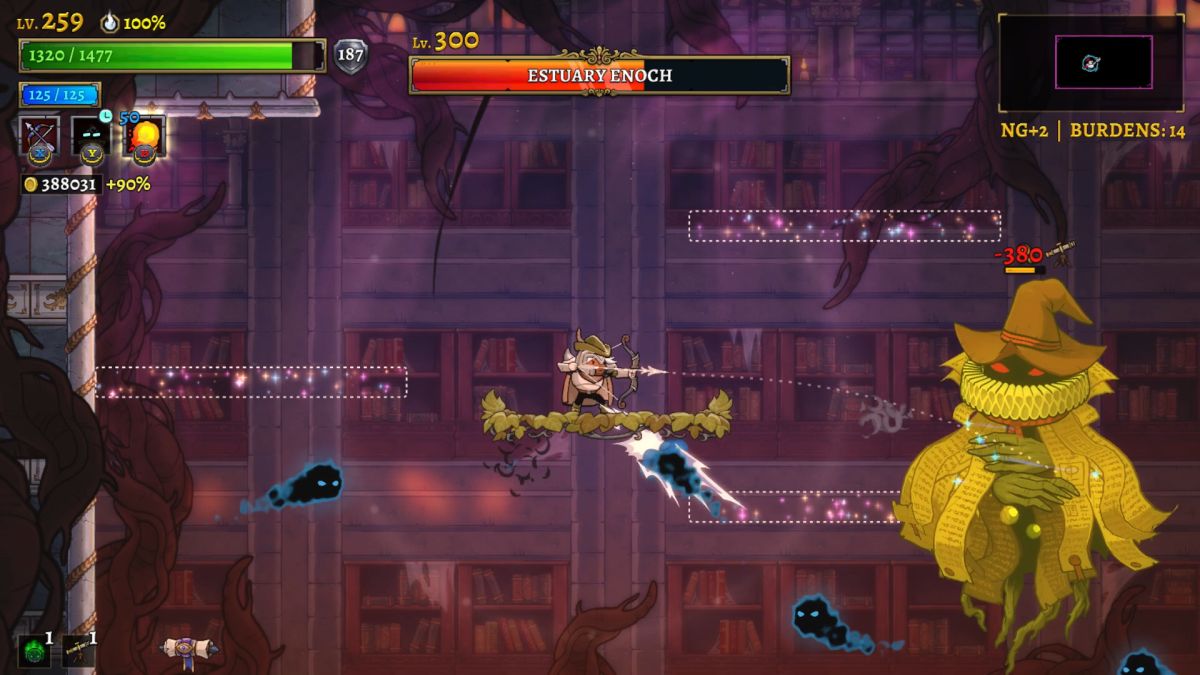
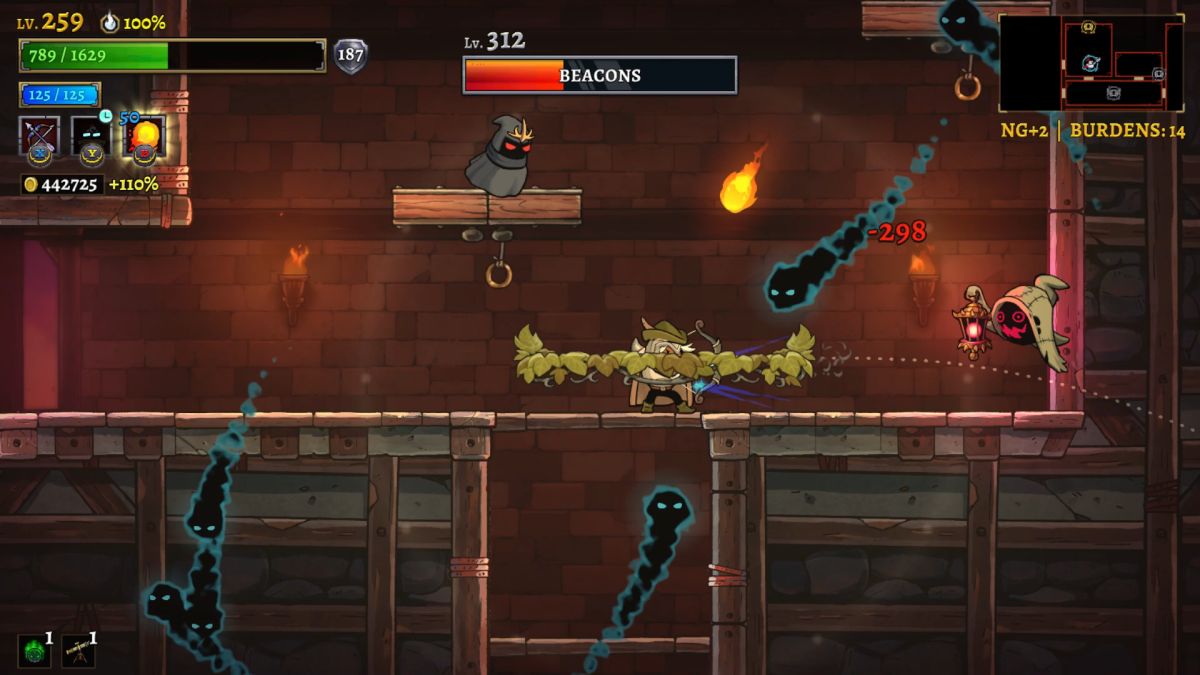
I'd like to say that the rest of the Sun Tower was easy from that point on but no, it actually wasn't. There were more nasty rooms that lacked easy answers and I had to retreat back into Axis Mundi again before I was able to get the whole Tower completed. This was due in part to finding two additional Blessings of Life in the Sun Tower that caused heavy damage to my Ranger when I took the max HP increases. As much as they were appreciated, they made my performance in the vertical biome look worse than it actually was. I also need to speak up in favor of the Ivy Canopy class talent which had gone from something that I treated as an afterthought at the beginning of this variant into an absolutely crucial tool in the Ranger's arsenal. There were innumerable rooms which would have been impossible to clear without the help of the platform and I was deploying it practically the instant it came off cooldown. This is a much, much better talent than I thought due to its ability to block most incoming projectiles from a certain direction. Just look at a screenshot like this one where the platform is blocking or about to block something like six different heat-seeking projectiles to get a sense of how indispensible the canopy truly was in these fights. 
Once the whole Sun Tower was finally complete, I teleported to the end of Axis Mundi to take on the prime version of the Void Beasts (and take the near-full HP restore in the process). The tactics of this battle are relatively simple: focus on eliminating one of the two main Void Beasts before damaging the other one and keep taking out the skeleton minions that spawn throughout the fight. It's extremely important to keep down the number of enemies on screen to prevent having eight or nine different opponents all tossing out their own projectiles. I found that it was easy to deal with a single Void Beast but things became much harder with both of them on the screen at the same time, particularly trying to avoid the cursed ghosts that appeared whenever they did their jump attack. At least the Ivy Canopy was useful for blocking those shots. Things got pretty hairy when the first group of skeleton minions appeared and I took a bunch of hits that dropped my Ranger down to about 400 HP remaining. However, I noticed the same pattern from when I fought these opponents with my Mage character: the battle became much easier as time passed, especially once the first main Void Beast (Byarrrith) dropped. I barely took any damage at all once it was down to just Halpharrr and even gained some HP from lifestealing off the skeleton minions. This was a situation where disaster was narrowly averted and I was fortunate to emerge victorious.
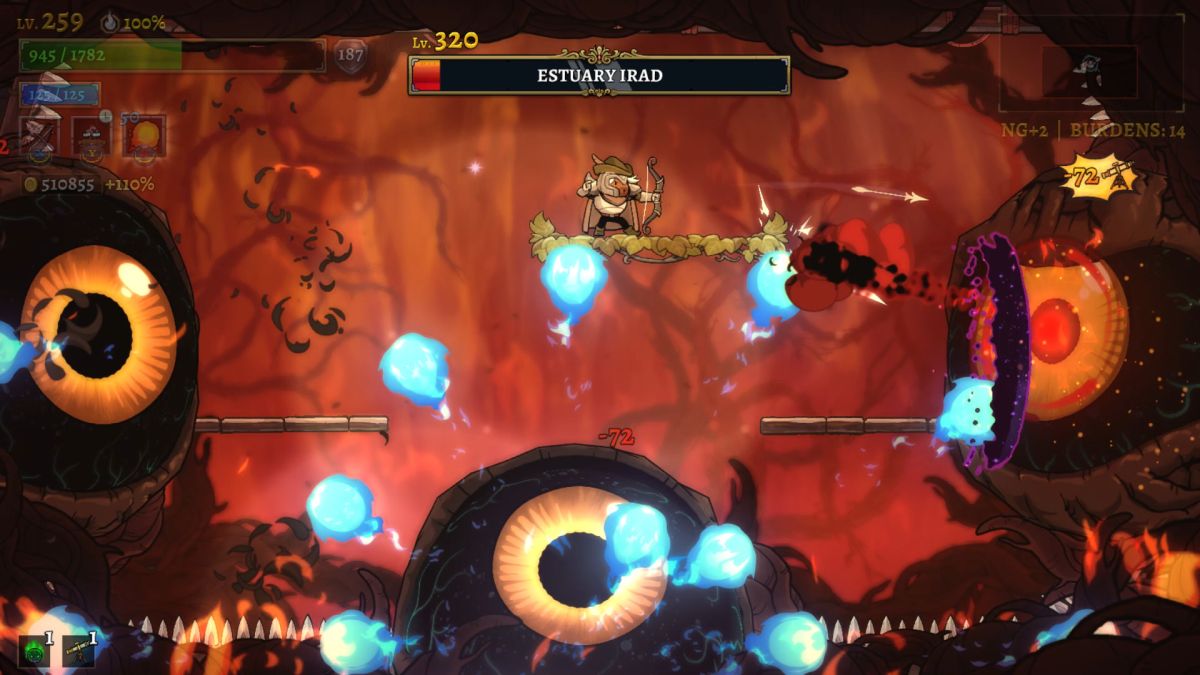
The Plateau was the last remaining biome and obviously didn't pose the same threats as the Dry Lake and the Sun Tower. However, it turned out that there were two more Blessings of Life hidden in the frozen wasteland and therefore the challenge became trying to maintain enough health to take both of them while also being in a safe enough place to fight the remaining bosses. I also still had to face the axe/dagger/shield/hammer minibosses in the Dry Lake before facing Tubal although I had made sure to open the Pearl/Onyx portals earlier. This forced me to keep paying close attention instead of sleepwalking my way through the Plateau's weaker foes. On that note, I used the health refill from Irad's boss doors to good effect, turning another estuary fight into an effective healing fountain as I'd done with Enoch earlier. I had effectively solved the Irad encounter by this point, using the Ivy Canopy placed in the center of the room for attacking while largely dodging Irad's projectiles without firing when it was on cooldown. That one spot is so perfect for this boss that it has to be intentional on the part of the developers to give the Ranger a safe place to attack. The battle went really well outside of one moment where I messed up and took three hits in rapid succession, otherwise this was smooth sailing as another estuary was removed from the board.
I went back and finished clearing the rest of the Plateau afterwards while trying to heal up from the last Blessing of Life's damage. This Ranger started out at roughly 1000 HP and nearly doubled that to 1935 HP over the course of the run, proof enough that trudging through the whole dungeon is highly worthwhile. Then I still had to fight the minibosses in the Dry Lake afterwards so I smashed a bunch of the various pots that I had saved up at the teleporters until finding enough health recovery items to feel safe. The first duel against the shield and axe combo went badly as I failed to avoid the bouncing shield when I missed a couple of key arrow shots. The second encounter with the dagger/hammer pair went much better and turned into a nearly flawless fight; I managed to kill the dagger almost immediately when it stopped to throw knives rather than use its charge attack. The heal from Tubal's boss door took my Ranger back to full HP and I was feeling relatively confident going into the battle. I was able to pull off a flawless first rotation through Tubal's abilities, downing the summoned minions without taking a hit and avoiding Tubal's own attacks until he brought in the bouncing spiked ball to make things more difficult. His second and third summons were more problematic and the last third of the fight turned into a bit of a slugfest due to having too many hostile targets on the screen at once. I was glad that I'd been able to take all those Blessings of Life since this was a narrow victory that my Ranger won with a mere 300 HP remaining.
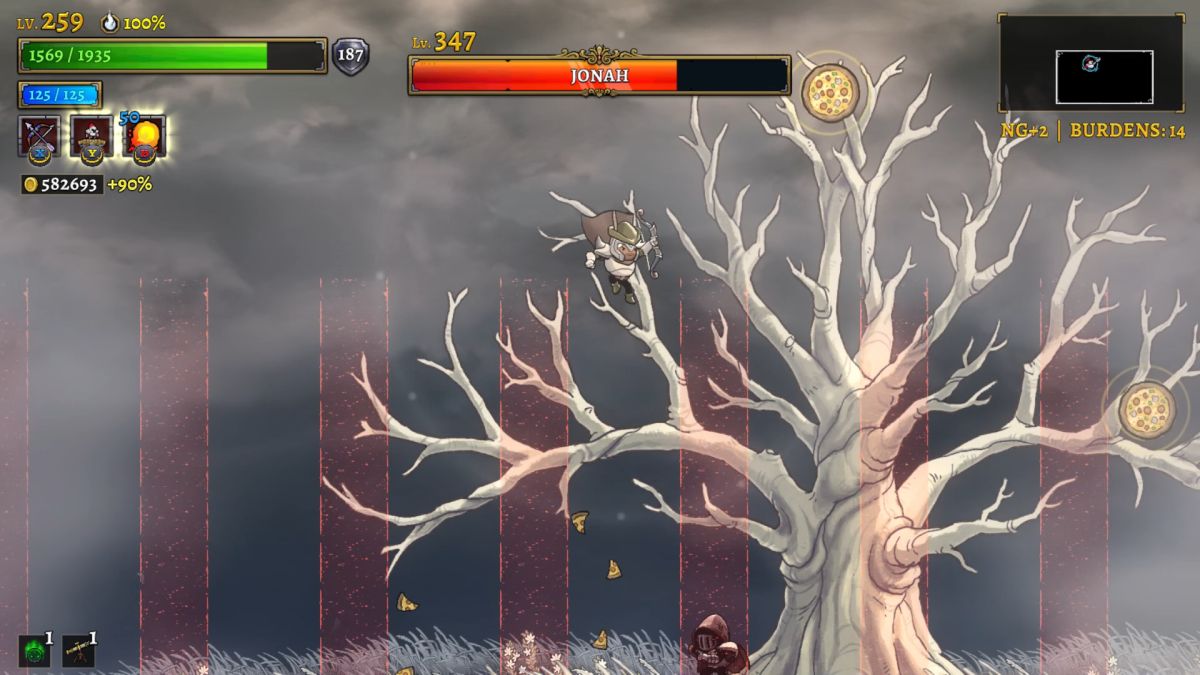
Only two more bosses remained at this point and both were reachable with the Golden Doors now unlocked. I've written many times with various different classes that Jonah doesn't seem to be a particularly difficult boss once the player learns all of the attacks that he can pull off. The one attack that causes me the most problems is his "pizza" ability, and yes, that's a real thing in this game! Although the pizzas can be broken with a spin-kick, their homing ability that chases after the player (and often bleeds over into the next attack from Jonah) makes them a serious threat. This time around Jonah decided that he was going to spam the pizza attack instead of his less dangerous stuff, performing the same move over and over again. I think that I handled it relatively well, using the Ivy Canopy to block some of the projectiles, but I still inevitably took some hits in the process. The net result was a passable if not great Jonah fight, never in doubt while also not being something that would go onto a YouTube highlight reel. I could live with that result..
As for Cain, I hate to keep repeating that I've gotten much better at this fight over time but the final boss really has become much more routine with additional time and repetition. The key thing is recognizing which attack is coming ahead of time and then dodging appropriately; everything is telegraphed and can be avoided but a newcomer player is going to get crushed before they learn the patterns. I used the Ivy Canopy to block the heat-seeking blue projectiles and otherwise stayed at a distance while plugging away with arrows. The one Cain ability that continues to cause problems for me is the Naamah projectile paired together with a void spiked ball. While I can clear those targets given enough time, they usually bleed over into the next Cain attack (much like Jonah's pizzas) and they're responsible for a disproprtionate number of the hits that I take. In any case, this was a fairly clean boss fight and I won with plenty of health remaining, even getting a stylish last arrow shot while jumping over Cain's head:

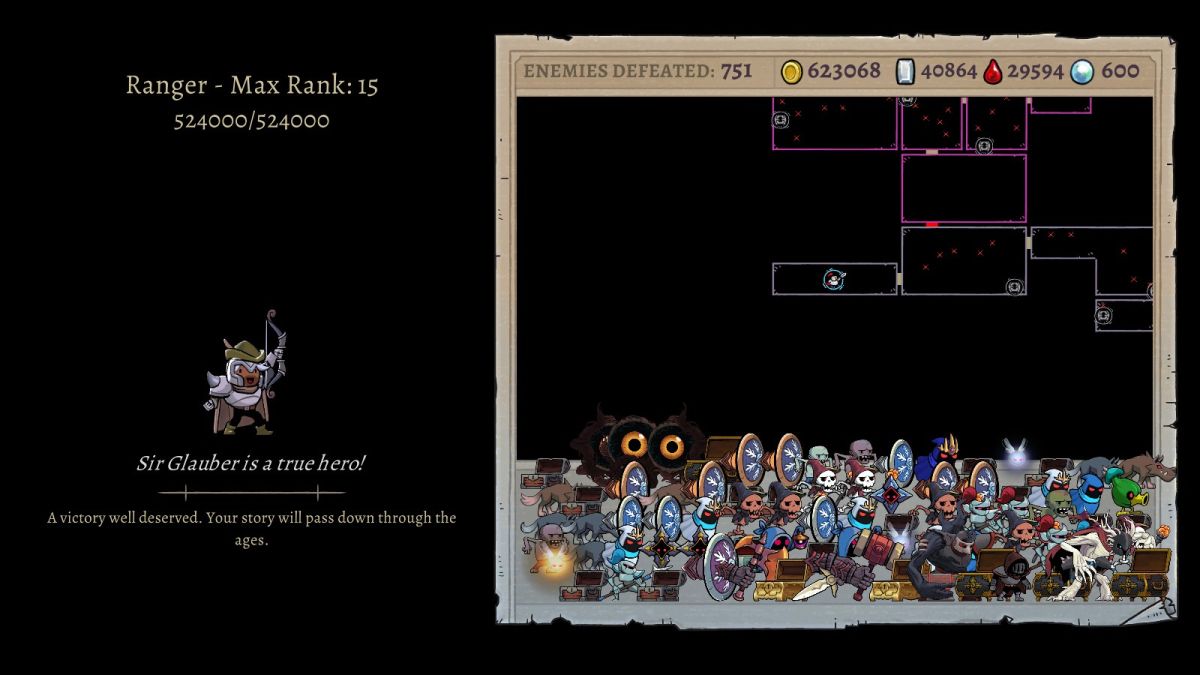
The little "13 HP" lifesteal message popping up while killing the last boss always amuses me.  I was therefore able to complete NG+2 difficulty with this Ranger while bringing back a massive haul of 623k gold which I would never get to spend. The same thing happened with my last Mage character and it's almost annoying that I had these amazing final runs which would never be able to spend their gold or use the items/runes that they brought back! On the other hand, I was also pretty happy with not having to clear the entire dungeon once again given how long it takes. I recorded this entire run across two character sessions and the real-world time for this character came out to more than three hours. I went ahead and compiled the boss footage from the final session into a YouTube video with commentary; you can watch it here to see what it looks like to defeat these bosses in real time with a bunch of arrow shots.
I ended up with 14 total Rangers needed to complete the three difficulty levels and that was despite throwing away the lives of two heirs in utterly wasteful fashion back in NG+1 difficulty. The Ranger as a class feels above average without being at the top of the potential tier list for Rogue Legacy 2, not as strong as the Knight class while grading out a bit better than the Mage. The biggest surprise while playing this class was the strength of the Ivy Canopy which turns out to be an excellent defensive ability. It's really good at creating safe spaces in combat but tricky to use since it's so different from most other talents. This is one of those places where playing the same class over and over again for each heir gives you a real appreciation for their respective abilities. I had become very, very good at placing those platforms by the time that I'd gone through the whole dungeon with more than a baker's dozen of these Rangers. I also have to mention that this is one of the most fun classes to play in the game thanks to their sniping abilities. It feels awesome to line up that perfect shot and weave it past three terrain obstacles to eliminate a monster on the other side of the screen!
Thanks as always for following along, I hope the journey of these Rangers was entertaining.


