
Back when I first started writing about Final Fantasy variants in the mid-2000s, I theorized that the solo White Mage would be the most difficult solo class to play in the original Final Fantasy. With the benefit of hindsight and two additional decades of experience, I'm no longer convinced that this is the case. Sure, a solo White Mage isn't exactly an easy challenge to undertake, and out of the solo classes it would be much easier to complete the game with the Fighter or Black Belt classes, or even the Red Mage as the strongest option amongst the spellcasters. However, the White Mage has healing and defensive magic out the wazoo, and if I learned anything from running my Iron Fists variant team, it was the fact that a proper defensive setup can make it possible to complete the game with virtually no offense whatsoever. In fact, the White Mage should have an easier time than the Black Mage class and certainly does better than the poor Thief who gets virtually nothing outside of lots of Luck (which literally does nothing in the base game since it's bugged). I'm finally going to try my hand at this setup and see if I can manage better than the tortured path of poor Blak from back in the day.
As a quick settings note, I'll be using Ozmo's Final Fantasy Renaissance build since it fixes essentially all of the innumerable bugs present in the original Final Fantasy. Perhaps all that Intelligence that the White Mage class gets will actually do something here for a change. The White Mage class itself has been the subject of considerable debate over the decades as far as whether the character is male or female; the gameplay itself gives no indication whatosever so I've always felt that this is purely subjective on the part of the player. I always thought of the White Mages as female in the original Final Fantasy so that's what we'll go with here but there's really no right or wrong answer. I also decided long ago that if I ever played this variant I would name my character Hope - when taking on a challenge like this, you've got to hold on to hope! With that, let's get started:
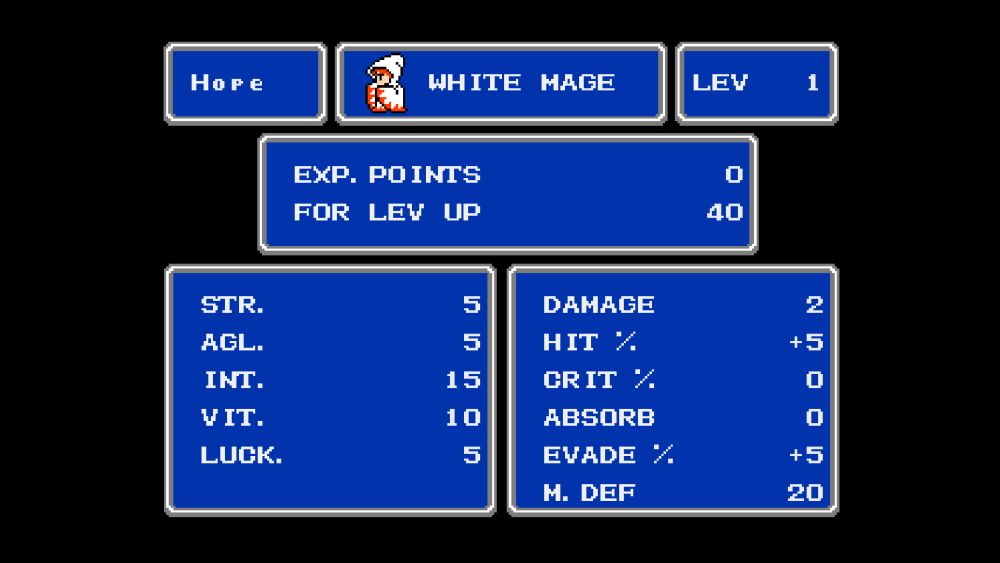
These are the base stats with which all White Mages begin the game. This class heavily emphasizes Intelligence (which again was a bugged stat in the original game that did absolutely nothing) and does surprisingly well when it comes to Vitality. White Mages will never be able to stand on the front lines like Fighters or Black Belts but they wind up with substantially more health than both Red Mages and Black Mages, good news for a solo venture. The biggest issue for the class is always its terrible offensive output, with White magic having no offensive capabilities except when facing undead monsters. Hope would be able to open the game by purchasing an Iron Hammer which has 9 Attack on it, bringing her up to 11 total Attack for 11-22 base damage before factoring in enemy Absorb. That's actually quite good for the start of the game and not much different from what a Fighter or Thief could muster up.
Unfortunately White Mages have horribly bad offensive scaling: they start out OK and simply don't get stronger with the passage of time. Their weapon selection is appallingly bad, with the Iron Hammer only getting replaced by the marginally better Silver Hammer... and then that's it for the rest of the game until the Masmune arrives. Those hammers also have no Accuracy bonus on them, unlike most weapons, and the White Mage class only gets a paltry 1% Accuracy gain per level up. This means that the White Mage won't start getting two hits at 32% Accuracy until sometime around Level 25, ouch! Then in a case of truly bizarre game balance, the White Mage also gets a mere 2 Magic Defense per level up, less than what the melee fighting classes get. This is common across all of the mage classes by the way: for some reason, the lunkheaded muscle classes are better at resisting status effects and preventing enemy spells from doubling their damage than the spellcasting classes. It's another sign that the original developers had absolutely no idea whatsoever how to balance the starting six classes.

Anyway, Hope used the starting gold to purcase the aforementioned Iron Hammer, a Cloth armor for its minimal 1 Absorb, and the CURE spell to have some healing available with her initial spell charges. The first task once she had her starting equipment was to kill off the other three characters which can be a bit tricky since you can't target your own party members in this game. I had to do this three separate times before I managed to pull it off correctly, with the failed attempts seeing Hope herself die to Imp attacks even as I tried to remove the three Fighters. Eventually it came together correctly and Hope even managed to hit Level 2 in the process as pictured above; at least solo characters level very quickly in Final Fantasy since they effectively get four times normal experience. A quick word here about leveling up: each class always gets predetermined stat increases for each level, such as a White Mage getting Strength, Agility, Intelligence, and Luck upon reaching Level 2. There's also 1 in 4 (25%) odds for characters to gain the missing stats that they aren't guaranteed to get on level up, and yes, this can be save-scummed to force the stat increases that the player might want. I intended to force Strength increases on Hope because she would need the extra damage so badly though fortunately that wouldn't be needed until Level 5 since the first few levels for White Mages always contain Strength gains. There's also a distinction between "strong" levels where characters gain 20 plus Vitality / 4 HP as opposed to "weak" levels where they only gain Vitality / 4 health instead, though those are completely predetermined and can't be adjusted in any way.
Level 2 is a "strong" level up for all six classes and it greatly helped out Hope by taking her from 28 HP up to 55 HP where there was much more grace room to survive a random encounter. She would almost always kill an Imp in one hit if it landed (unless she rolled her minimum possible 7 damage) but had much more trouble tanking through the incoming hits. Imps deal 4-8 base damage which was lowered to 3-7 damage against her 1 Absorb, and that added up fast when it was four or five of the critters against one White Mage. I hung around outside Coneria until reaching Level 3 which unfortunately didn't offer very much in terms of gains for Hope, just a couple of additional health from a "weak" level and some second-level spell charges that she couldn't use yet. I did purchase a Tent and make a run to grab the Cap in the Temple of Fiends which succeeded on about the third attempt, bringing Hope up to a whopping 2 Absorb. That actually made a difference against Imps by dropping them down to 2-6 possible damage, sad as it might be.

Level 4 was another strong level up worth 25 additional max HP and Hope even gained another point of Attack thanks to hitting 8 Strength (every two points of Strength equals another point of Attack). I had accumulated enough gold to fill out her other first-level spell slots with HARM and RUSE which I was confident would give her everything she needed to tackle the first boss. Garland has 106 HP and base 15 Attack which was enough to do 13-28 damage against Hope's paper-thin armor; under normal circumstances, he would tear her to pieces without blinking. Fortunately Hope had the RUSE spell at her disposal which is a truly fantastic tool for a solo character. It increases evade by 80 points and can be stacked across multiple casts; this is added to the player's innate evade and compared against the Accuracy of the attacker to see if an attack hits. Garland has an innate 27 Accuracy and the base to-hit number is 168 so he would normally have 168 + 27 - 5 = 190 / 200 = 95% odds to hit. However, after stacking RUSE three times, that math flipped over to 168 + 27 - 245 = 0 / 200 = 0.5% odds to hit (since there's always 1 in 200 odds to land a successful attack). Garland is an all-physical attacker and therefore he was completely helpless once Hope had her RUSE shield up and running. It didn't matter that Hope was plinking away at 5-10 damage per round, Garland was never going to do anything. He missed his first attack which meant that Hope won the fight without ever taking a single point of damage - White magic for the win!
With the bridge to the north unlocked, my next goal was making it over to Pravoka and obtaining the ship. This took a couple of tries as Hope wasn't particularly good at running away from battles and she was clobbered by various groups of MadPonies and Wolves and such before she could make it to the next town. Eventually she landed a couple of Close Calls and slipped through to Pravoka on about the fifth or sixth time that I made the attempt. The eastern town had a pair of Gloves on sale to bring Absorb up to a mighty value of 3 points along with the Pirates lying in wait in their scripted battle:

This was a really tough fight for my solo Black Mage who needed to gain a ton of levels to have enough health on hand to survive all of those Pirate blows. Hope didn't need to worry about anything like that and was readily able to challenge the miniboss encounter at a mere Level 4 thanks to the power of the RUSE spell. She took about five attacks before getting off the first RUSE spell and then I think a single additional attack managed to hit before the second and third RUSE arrived on subsequent combat rounds. That was all she wrote for the fight as the Pirates were completely unable to touch Hope afterwards who slowly bashed in their brains with that big hammer. Hand over one ship, signed sealed and delivered courtsey of sea captain Bikke. So far the White Mage was handling the boss fights better than the random encounters, heh.
It took a couple of tries to get the ship back over to Coneria since the monsters in the sea pummeled Hope unless I could get off a successful escape. Once I was back outside the cheap 30 gold inn at the starting town, Hope could get down to the business of farming up some additional gold and experience:

The open ocean was the best place to fight for the moment, not least because Hope could operate just off the coast of Coneria with a full recovery at the inn nearby. I realized that the best way to handle this situation was simply to treat every encounter as if it were a boss fight: RUSE up and then go to town with the hammer once the evasion protection was in place. This allowed Hope to defeat monster setups like the pictured Shark + Red Sahag that she otherwise would have had no chance of defeating. It cost Hope all of her first-level spell charges to pull this off but what did that matter with an inn right next door? The experience and gold payout for winning with a solo character was absolutely massive at this stage of the gameplay and Hope was able to level very quickly, far faster than I had dreamed possible for a poor White Mage swinging a hammer. The only downside was that enemies in the sea tend to have fairly high evade themselves and Hope didn't exactly have much in the way of Accuracy on her setup. I would often see long sequences where both sides kept attacking and missing with no damage dealt to either side, very much a comedy of errors. Sooner or later Hope would get the job done though.
I made certain to keep forcing Strength increases on the level ups where Hope didn't naturally gain a point in the stat, repetitive as it may have been. She needed every bit of additional Attack available to make this variant work. Eventually I had saved up 1500 gold and could make a run down to Elftown to pick up the CUR2 spell for some extra healing ability. I still hadn't purchased any of the second-level spells thus far since they were all useless for the moment and would only burn through much-needed funds. Around Level 6, I purchased a single Tent for Hope and made the trip over to the Dwarf Cave to loot the pair of treasure chests inside, killing an Ogre/Creep pair along the way with more RUSE usage. That provided enough money to purchase HRM2 and then I could start saving for enough recovery items to make a serious attempt at the Marsh Cave. I figured that I would need several dozen Heal potions along with a bunch of Pure potions and some spare Tents to lock in my progress with save states. During this process, I actually found myself getting excited to pick up a fifth 1st level spell slot for Hope at Level 7 - that was enough castings of RUSE to fight two whole battles, one with double RUSE and another with triple RUSE, before going back to the inn! Solo White Mage is a bit of a weird beast sometimes.

By the time that Hope reached Level 10, I thought that she had a realistic chance of being able to complete the Marsh Cave. She had reached 175 HP and had 6 first-rank spell charges plus 3 third-rank spell charges along with 40 Heal potions and 10 Pure potions for recovery. By carefully manipulating each level up, I'd been able to ensure that Hope gained a point of Strength with each level, taking her to a total Attack of 16 for 16-32 base damage. This was still far insufficient to let her slug things out against anything but Imps and Wolves, however it did mean that Hope would at least be able to damage the Wizards and not have to sit around plinking for 1 damage per round. I was confident that she could defeat the Wizards if she could make it to them and get her RUSE protection in place, it was getting into and out of the Marsh Cave which was going to cause the most problems.
Once I had set up a Tent save point outside the cavern's entrance and got down to the business of running attempt after attempt to bring back the CROWN, I quickly discovered an unexpected problem. The random encounters inside the Marsh Cave weren't actually so random after all: Hope was fighting the exact same battles in the exact same sequence over and over again. I don't remember this being the case in the original game and I think it's likely a mistake in terms of how Ozmo recreated the coding for Final Fantasy Renaissance. It didn't take long before I had the pattern of encounters memorized: first an easy battle against Scums which could poison Hope but never deal more than 1 damage per attack, followed by a battle against Zombies/Ghouls if Hope was still on the initial floor and Gargoyles if she had made it to the second basement. These were some tricky fights between the paralyzation of the Ghouls and the raw damage of the Gargoyles which would drop Hope in a round or two if she wasn't able to run successfully. The third encounter was the one that caused the most problems though:

Hope would always hit this group of Bones and Crawls which were extremely bad news. The Bones could be eradicated with a HARM spell but the Crawls were not undead and were basically guaranteed to inflict paralysis. They would get 6-8 attacks per round which left no hope for the status effect failing to kick in, followed by the Bones pounding Hope's unprotected form to death. I tried several different strategies to make it past this fight: casting HARM to remove the Bones didn't end up doing much because the Crawls would just keep her paralysis-locked for the rest of the fight. RUSE worked at dodging the attacks from the skeletons but failed to stop the Crawls; since they had so many attacks, some of them were bound to get through. I suffered enough defeats here that I went back and raised Hope to Level 12, using the accumulated money in the process to purchase the fourth-rank FEAR spell at a pricey 4000 gold to see if that would do anything. FEAR drops the morale rating of each monster and greatly increases the chance that they will run away; the formula for an enemy retreating is Morale - 2 * [character level] + (0...50) < 80, with FEAR lowering enemy morale by 40 points. Crawls have a morale of 106 which meant that they would drop to 106 - (24 + 40) = 42 if the spell hit and then they'd be practically guaranteed to run away barring a really good dice roll on the (0...50) part of the formula. But then I tested this in practice and FEAR apparently never worked on Crawls in a bunch of tries so I guess they have status protection against it. Oh well, it was worth the attempt.
That left running away from the really bad encounters and hoping to get lucky, the old-fashioned method for making it through the Marsh Cave. This was a bit of a different experience for me because running was famously bugged in the original Final Fantasy and has now been fixed in Final Fantasy Renaissance. Running is supposed to be based on the Luck stat but actually looked at the status byte of characters in alternate party slots, in practice making it so characters in the first two slots had practically guaranteed successful runs. With this bug fixed, the correct formula is now applied which is that a successful run comes from rolling Luck > 0...[Level + 15]. Using Hope's current stats as an example, she had 11 Luck and needed to roll below 11 on a dice toss of 0-25 for effective odds of 11/26 = 42%. She gained a point in the Luck stat on her next two levels so this was marginally better at 13/28 = 46% when I came back at Level 12. I found that it was noticeably harder for a solo character to escape with this bug having been fixed compared to the base game, and long streaks of poor retreat rolls kept dooming many of these attempts at the Marsh Cave.
If Hope could make it past that Bone/Crawl encounter in some fashion (a successful retreat, a chance to strike first battle, the rare case where it was only Bones and no Crawls present, etc.) then Hope had good odds to make it to the Wizards on the third floor:

This miniboss fight went exactly the way that I knew it would, casting RUSE and praying that Hope would act quickly in the turn order before the enemies could get off their own attacks. The Wizards would tear her to pieces without the evasion protection in place though the combat could turn comically easy once three casts of RUSE were complete. The number of Wizards in this battle is random and can roll two, three, or four opponents. Obviously facing two Wizards was the best case though it was still better to fight three or even four Wizards if Hope went first in the combat as opposed to two Wizards where she acted last. I was able to defeat even the four Wizard encounter several different times where Hope was lucky in terms of turn order, though it took ages to kill all of the monsters with hammer blows that mostly did single-digit damage. Then again, there was also the one battle I remember against two Wizards that opened up with 2 hits / 105 damage followed by 2 hits / 107 damage and Hope collapsing instantly. So yeah, there was a fair amount of RNG to this combat and I'd say that Hope was able to defeat the Wizards a little better than half the time. Getting the CROWN wasn't really that bad, it was making it back out again afterwards.
To make her escape from the Marsh Cave, Hope would have to survive another half dozen or so random encounters. The third basement floor liked to give her multiple encounters with Mucks, enemies that I discovered hit hard but had a low Accuracy rating. I would cast one RUSE in these battles and then start trying to run away which was usually sufficient to make it out safely. (Side note: Hope's first-level spell charges were much more valuable than her third-level spell charges since RUSE was so critical to her survivability. I found myself casting HRM2 against Bones because I didn't want to expend a potential RUSE charge with the HARM spell!) Then after the Mucks she would always get a battle against Scorpions where I had to pray for a successful run as there was no trickery which would be useful. She would typically get two chances to escape and if those failed it was certain death. Then a battle against Mucks, Scums, and different types of spiders followed by more Scums on the initial basement and then one last Bone/Crawl encounter. That final encounter killed Hope two different times when she was nearly out of the cave, including once when she was a mere three steps from the exit - I was about to throw the controller across the room.  The fact that all of these battles were so deterministic definitely made things much harder as opposed to actual random encounters which sooner or later would have rolled an easy path through the cavern for Hope. But no, she had to face those blasted Crawls every single time no matter what she did because the encounter seeds were apparently frozen in place on every reload of the save file. I hope this is something that can be fixed in future builds as it's not desirable for players attempting various different challenge runs.
I knew that Hope could make it through the dungeon because she had come so close on several different occasions. Finally she managed to make all the way down to the Wizards, kill the three of them guarding the CROWN, RUSE her way past the Mucks, land a successful run on the second round against Scorpions which would have killed her on the next attack, and make it back to the initial floor once more. This time the step counter was working in her favor as she made it nearly to the end before the Scum encounter, then walked out the door before ever having to see that final Bone/Crawl group - success!!! I'd estimate it took between 50 and 100 total attempts to clear the Marsh Cave and I was extremely glad to have this challenge disappearing behind me in the rear view mirror.

The gameplay always feels like it opens up after completing the Marsh Cave now that Hope could pick up the thread of the main plot once again. I sailed back to Pravoka and finally purchased a pair of second-rank spells (MUTE and ALIT) which I had skipped over before since there were more important things to purchase. MUTE was absolutely necessary for use against Astos as the one method for shutting down his spellcasting. After restocking some of the expended Heal and Pure potions, I sent Hope up to Astos' Castle and launched right into combat against this boss. The key to winning was to land the MUTE spell which would prevent all of the various nasty stuff that Astos can cast. The formula for these status-affecting spells to hit is 148 + the spell's accuracy rating - the target's magic defense and then divided by 200. In this case, that was 148 + 64 - 170 = 42 / 200 = 21%. Not great odds but something that could be forced with enough repetition.
Well Hope was able to do better than that because she actually landed the MUTE spell successfully on the very first try!  I followed this up with the standard triple RUSE spells and that was it, battle completely over. Unlike in more modern RPGs, MUTE never wears off or times out and the only way to remove it is through the very rare AMUT spell which Astos doesn't have. His spellcasting was locked for all time which immediately wasted 3/4 of his combat rounds, then the evasion shield from RUSE took care of the 1/4 of all rounds where the boss used his physical attack. It didn't matter at all that Astos has 40 Absorb and Hope could never deal more than 1 point of damage per attack, she was guaranteed to win eventually. It certainly did take a while to chew through the 168 HP on Astos, close to 10 minutes even with the gameplay running on 3x normal speed thanks to Hope missing about a third of all attacks. She did get one critical hit that I saw which did 17 damage to slightly speed things up. Eventually it was over though and the CRYSTAL was Hope's prize with a victory on the very first attempt.
I did the standard fetch quests afterwards that resulted in the KEY, then ran around opening up all of the locked doors. The only prize that Hope could use was the Silver Hammer which had 3 more Attack and 5% more Accuracy than the venerable Iron Hammer. That might not sound like much but going from 17 Attack to 20 Attack with the new weapon was a noticeable damage increase. Technically Hope could also equip the Power Staff of 6172 gold sell value, however it had the same Attack value as the Silver Hammer without the 5% Accuracy bonus making it inferior in every situation. (The Power Staff has a higher index number and thus a higher crit rate in the base game but it actually shares the same crit rate of 1% with the Silver Hammer now that crits are fixed.) All of the money raised from looting those treasures were enough to fill out the remaining third-rank and fourth-rank spell slots with AFIR and AICE. More importantly, access to Melmond meant upgrading to the Silver Bracelet which was a huge increase in defensive value over the Copper Bracelet, from 4 Absorb up to 15 Absorb! Now early game small-fry opponents like Wolves and Sahags couldn't deal more than a single point of damage to Hope and she was less reliant on casting RUSE in every battle for safety.

One of the biggest challenges with playing a White Mage is dealing any kind of offensive damage, making it hard to power-level your character in an efficient manner. The great exception comes against undead monsters who can be hit with the HARM spells for heavy damage, turning the White Mage into a pretend Black Mage in this one circumstance. Astos' Castle turns out to have one of the best locations in the whole game for leveling a White Mage as his treasure room contains several trapped tiles which always lead to a fight with undead opponents. The potential options are a battle against 3-5 Images or a battle against 2-5 Mummies; between these two, the Mummies are a far better option as they provide more experience while also having the less dangerous Sleep status effect. (Images can inflict paralysis which usually means certain death.) By contrast, any hit against a sleeping target wakes them up and there were combats where Hope would get put to sleep, then wake up, then go to sleep, then wake up again followed by still getting her HRM2 cast off to wipe the enemies. Each Mummy was worth 300 gold and 300 experience making it commonplace to get as much as 1500 XP from a single fight. I brought a bunch of Tents and saved after every forced battle since Hope would still get wiped out every now and then, repeating this process until she had saved up enough money to purchase CUR3 and HRM3 over in Melmond plus gain four total levels up to Level 16. With more total max HP and more powerful spells at her disposal, Hope was now well-positioned to begin venturing into the Earth Cave for the first time.
I genuinely enjoyed the challenge posed by this dungeon, something that was tricky for Hope to complete without veering into the nearly-impossible territory of the Marsh Cave. I started out by making a few trips into the cave to clear out the treasure chests on the first two floors, partially for the loot contained within and partially as a way of getting a better sense for how to approach the dungeon. Most of the random encounters were noticeably easier than the ones in the Marsh Cave, with fewer opportunities for Hope to be stunlocked plus her having MUCH better defensive protection thanks to that Silver Bracelet. There were plenty of battles here against easy opponents like Asps and Arachnids which couldn't do more than a single point of damage against her new Absorb. WrWolf / GrWolf encounters were also common which could be chased off via castings of the FEAR spell. (It was pretty hilarious hitting them with FEAR and then watching the various wolves turn tail and flee!) Bulls, Trolls, and Giants all hit hard but lacked any kind of crowd control so weren't too tough to run away from. The Earths guarding the treasure chests on trapped tiles were the most dangerous monsters, however they could readily be handled through the old triple-RUSE castings to lock out their all-physical attacks. I also traveled to Crescent Lake at some point in this process and bought the FOG2 spell which added 12 Absorb to Hope on casting, taking her from 17 to 29 Absorb which was quite handy in some situations. I had a lot of fun coming up with different tactics for the various random encounters that popped up along the way.

The third floor of the Earth Cave changed up the encounter list and added new opponents which were significantly more dangerous. Wizards started showing up and, since they were a boss encounter in the Marsh Cave, they couldn't be escaped from with the Run command. I had to burn 2-3 RUSE charges when they appeared so that Hope could bash in their brains with her hammer. Even scarier were masses of undead with paralyzation attacks, the same Images from the trapped tile in Astos' Castle but also Geists and Spectres who always appeared in large groups. Hope had the HARM spells to wipe them out but that wouldn't matter if she was stunlocked and killed before she could get the casting off. I was actually more concerned about defeating the Vampire than dealing with Lich because Hope would have to walk all the way back out of the dungeon again with the RUBY and that would mean more time where she could hit these nasty random encounters. The Vampire himself died in two castings of HRM3 and then the race was on to make it out safely. Hope got very lucky here: she hit a Geist/Spectre encounter and went first in turn order to deliver the killing HRM3, then had another fight against Images and went second in turn order after dodging the initial paralyzing attack. It only took three attempts to succeed in defeating the Vampire and getting out of the cave, as Hope escaped with nearly all of her spell charges expended. She had just enough resources on hand to get the job done.
Next up was the short process of swapping the RUBY for the ROD and then returning back to the Earth Cave again to tackle Lich. The third basement continued to be dangerous enough that I skipped most of the treasure chests in favor of heading directly for the stairs down. Hope was wiped out one time here by a Geist/Spectre encounter which was annoying but not unexpected. Down on the fourth basement, she kept running into a new group of monsters consisting of 1-2 Giants along with GrImps and WrWolves. I found that it was handy to use a charge of FOG2 here which knocked the attacks from everything other than the Giants down to 1 damage, then concentrate on running afterwards. Hope could tank as many as five or six failed rounds of running and still survive to escape. There were more Wizards here along with Mummies which could be cut down by HRM2. Fortunately Hope never saw any of the Cockatrices that can appear and eventually she found herself confronting Lich on the bottom floor:

Lich is an undead mage who will use one of his spells 75% of the time and attack the other 25% of the time (the scripting in the original Final Fantasy is very simple). He always casts spells in the same order (ICE2-SLP2-FAST-LIT2-HOLD-FIR2-SLOW-SLEP) and can do so endlessly since the monsters don't actually have spell charges or magic points in this game. I opened the battle by having Hope cast AICE to block the damage from that ICE2 spell only to fail in the turn order roulette as Lich went first and blasted her for 160 damage - ouch! I knew that the FAST spell was coming soon and therefore spent the next few rounds casting the standard triple RUSE, with Lich helping out Hope by wasting a few rounds using his physical attack. Then I made sure to get ALIT in place to prevent 3/4ths of the damage from the upcoming LIT2 and tried to get AFIR in place for FIR2. That second spell didn't work though since Lich's HOLD spell inflicted a successful paralysis before Hope could cast AFIR. Fortunately FIR2 didn't double its damage and only hit for about 40 damage which was pretty survivable. I had Hope cast CUR3 for the big heal pictured above and then finally, with triple RUSE and triple elemental resistances in place, she could switch over to the offensive with HARM spells. Three castings of HRM3 were sufficient to deal 400 damage and eliminate the first fiend. I probably could have had Hope just blitz down the boss with triple HRM3s right out of the gate but I thought it was safer to play things this way and get her defenses established first. This was a ton of fun - it felt like a real boss fight in the way that the original Final Fantasy rarely achieves.
At this point I had my choice of which of the midgame troika dungeons to tackle next. As usual, I opted to send Hope into the Castle of Ordeals first since there were multiple items hidden inside which would prove to be vastly useful in Gurgu Volcano and the Ice Cave. Specifically there was one offensive and one defensive item that I wanted to obtain:

The Zeus Gauntlet was the more important treasure of the two, an item that Hope couldn't equip but which could cast LIT2 when used in battle. This was an enormous offensive upgrade against anything that wasn't undead, with LIT2 guaranteed to deal at least 30-60 damage against all monsters who didn't resist lightning element, plus good odds to double that damage and deal another 30-60 damage if Hope succeeded on her spell attack roll. Enemies weak against lightning, such as everything encountered in the sea and on rivers, were of course particularly vulnerable to the power of Zeus. As for the Golden Bracelet, this was another defensive upgrade which increased Hope's Absorb from 17 to 26 (after adding in the minimal benefit from her Cap and Gloves). The additional defensive power was particularly useful against monsters that attacked multiple times such as Gargoyles and Scorpions. Hope could also cast FOG2 to stack up even more Absorb if needed though in general the triple RUSE setup worked better against purely physical threats. Finally, the Heal Staff was also hidden in the Castle of Ordeals and well worth picking up though it was somewhat less useful for a solo character who had lots of healing power on hand and little chance of running out of Heal potions.
As for the Castle of Ordeals itself, the dungeon turned out to be surprisingly difficult for such a short area. Hope found herself running into the same issue as the Marsh Cave: the random encounters weren't actually random at all as she kept facing the same enemies in the same order over and over again. When starting from her Tent save point outside the castle, Hope would face the same monster sequence repeatedly: first Red Gargoyles, then Medusas, then Red Gargoyles again. These were pretty nasty foes since the Red Gargoyles could blast Hope with FIR2 spells and then cycle over to the HOLD spell which would inflict paralysis. A couple of the gargoyles weren't dangerous but they would show up in packs of 6-7 at a time which posed a dire threat. The Medusas had 50% odds to use GLANCE on every turn which was an instant death petrification attack; no other party members were present here to use SOFT potions on Hope. Between these two encounters Hope kept getting wiped out, then she found that there was another encounter with Sorcerers and their insta-kill melee attacks waiting for her on the second floor - argh!
I tried fighting some random encounters outside the castle before heading inside which would change up the order of what monsters Hope would face. This seemed to help to some extent as she could replace one of those Red Gargoyle fights with Mancats which were somewhat less dangerous. Still, the fact that it was impossible to avoid facing the same encounters in the same order over and over again really made this dungeon much harder than it needed to be since I never saw some of the easier battles against Zombulls and Mummies at all. Eventually I was able to get enough fortunate running RNG to get Hope to the second floor where there was a different sequence of random encounters. She used RUSE followed by the Zeus Gauntlet to get past the Nightmares on the trapped tile, faced a random encounter with Mummies that HRM3 cleared out, then one more fights against 3 Red Gargoyles where she managed to escape before getting hit by HOLD, and then the final battle against the Zombie Dragons which was simple for a character packing RUSE and HRM3. I think it took about two dozen attempts in total to complete the Castle of Ordeals, again the whole place being harder than it needed to be due to the non-random nature of the battles inside.

By way of contrast, Gurgu Volcano proved to be very easy for Hope thanks at least in part to the valuable prizes she had just secured. Switching over from melee attacks with the Silver Hammer to constant use of the Zeus Gauntlet was probably the biggest game-changer here. None of the monsters inside the volcano were particularly weak to lightning element... but then again nothing resisted lightning either, and the base damage of 30-60 against all monsters was downright amazing in comparison to the old hammer bonks. Hope had about 50% odds to get the doubled damage from LIT2 and it was always nice when the damage jumped up to the 100 range. She was also much better protected than before thanks to the addition of that Gold Bracelet which had some of the weaker enemies like Iguanas and Ogres unable to deal more than a single point of damage with their attacks. I could spend much of the dungeon walking on the lava floors which are highly annoying for a full party but easy stuff for a solo characters. There are no random encounters on the lava tiles and taking 1 damage per step was a trivial penalty with only one character to heal.
I took the time to clear out the treasure chests in the volcano even though there was basically nothing here that Hope could use. Exploring the full dungeon is simply fun to do and this was an effective way to gain some additional gold and experience for my solo White Mage. Hope was actually fighting and killing most of the monsters for a change instead of simply running away, and this had her leveling very quickly with 1000-2000 experience gained per victory. I believe that she gained three levels here in the process, up to Level 23 overall. It also helped that Gurgu Volcano doesn't seem to have much in the way of enemies with paralyzing or instant death attacks which kept wiping out Hope in other dungeons. In this case, she had smooth sailing pretty much the whole way through. Once the treasure chests had all been opened, I headed for the bottom basement floor and the second fiend:
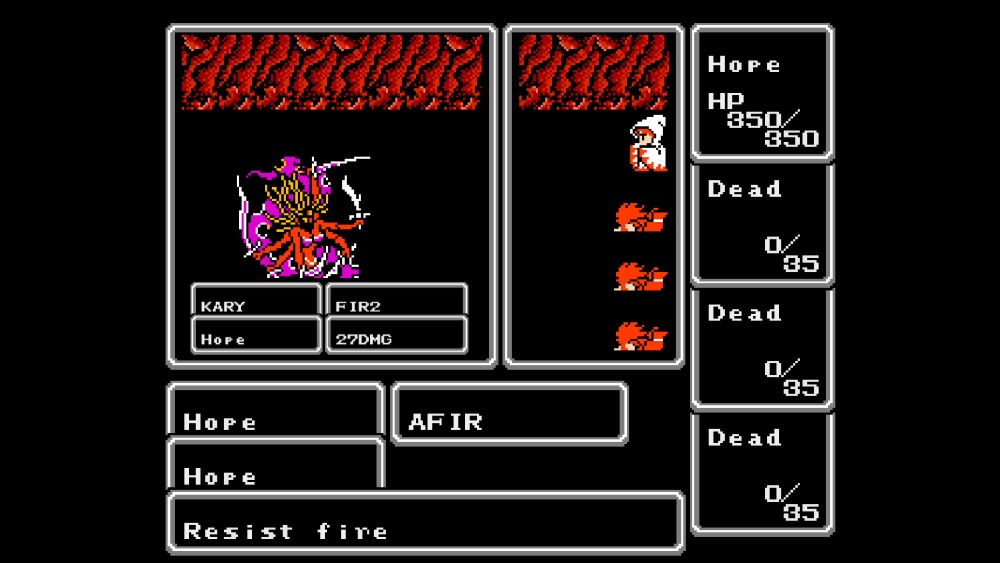
Kary rarely causes too many problems and is generally seen as one of the weakest of the major bosses. She will use her strong melee attack 62% of the time which can land up to six hits, then cast a spell from her predetermined list the other 38% of the time. Kary's physical attacks are generally seen as being more dangerous than her spellcasting so I determined that I would have Hope open the battle by casting RUSE the standard three times. Kary landed six hits for about 180 damage before the RUSE protection was in place so yeah, that seemed like a wise decision. Kary always casts her spells in the same order (like all enemies in Final Fantasy) which goes FIR2-DARK-FIR2-DARK-FIR2-HOLD-FIR2-HOLD. Those repeated uses of FIR2 made AFIR a necessity to gain protection against fire element, making it so FIR2 would never double its damage and cutting the base damage in half. Hope could easily tank 15-30 damage hits from FIR2 and she even had CUR3 charges in her back pocket if she needed to heal away some of the chip damage taken in the fight.
So I managed to get the triple RUSE and AFIR defenses in place and then began the slow process of wearing down Kary's 600 HP lifebar. Kary has 50 Absorb to rule out melee attacks and she resists all three major elements which had the Zeus Gauntlet limited to its own 15-30 damage per round. This would still be perfectly fine to wear down the boss over time except that she started casting HOLD towards the end of her spell progression. A successful hit from that spell inflicts paralysis and it turns out that a stunned character loses all of their evade. The next Kary attack dealt 300 damage and Hope found herself thoroughly splatted on the floor - whoops.  Final Fantasy is an old game where there are no save points in dungeons and any lost fight against Kary means starting the whole volcano over again from scratch. Now what was I going to do?

Fortunately there was an easy solution here: Kary turns out to be weak against status-inflicting spells. This increases the odds of these spells hitting their target by about 20% and I knew that a successful MUTE spell would block any of those HOLD spells from landing, not to mention prevent all of the annoying FIR2 castings as well. The odds of MUTE working on Kary were 148 + 40 + 64 - 183 = 69 / 200 = about 35% which wasn't bad at all given that Hope had 6 second-level spell charges available for repeated tries. On the return trip to face the boss, I made sure to get the RUSE evasion in place once again followed by AFIR for safety, then started casting MUTE. To my delight, it landed successfully on the very first try and that was all she wrote for the battle. Kary would never be able to remove the silencing effect and she remained unable to hit Hope with her melee attacks. Many rounds of Zeus Gauntlet usage later, the boss dropped dead and Hope had successfully restored the light to another orb.
This page has gone on long enough that I'm going to split the report into two parts. Hope's journey continues on the next page.


