
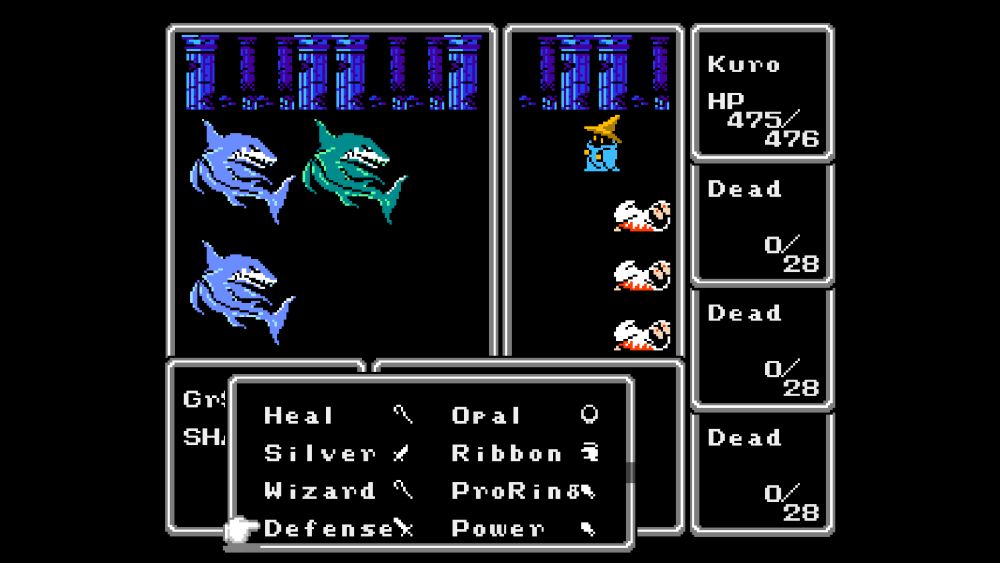
Kuro had finally managed to make it past the Wizards at the bottom of the Marsh Cave, followed by an easy victory over Astos to bring the early stages of the gameplay to a close. Access to the Mystic KEY opened up a whole bunch of new doors for Kuro, both figuratively and literally, as he was able to access the next few towns for the first time. For starters, Kuro was able to purchase an upgrade both to his offensive and defensive equipment. His new weapon of choice was the Silver Knife, which at 10 Attack / 15 Accuracy was an improvement in both categories over his former Large Knife (7 Attack / 10 Accuracy). While 10 Attack wasn't much to write home about, it was still better than what Kuro had before and this was the last weapon he would ever get before the Masmune, heh. In terms of armor, Melmond sold the Silver Bracelet with an Absorb rating of 15 that took Kuro up to a grand total of 17 Absorb after adding in his Cap and Gloves. If this sound familiar, it was exactly the same defensive gear that my solo White Mage and Thief had both been wearing at the same time. It's a little weird how seemingly 70% of the game's equipment can only be used by the Fighter/Knight and Ninja classes.

More interesting was Kuro's spell selection as he could now purchase Tier 5 spells at Melmond and Tier 6 spells at Crescent Lake. There weren't a ton of options here as Kuro was unable to use the direct damaging spells and instant kill spells by variant rule, plus the WARP spell was limited to the use of Black Wizards. The only other spell waiting at the higher tiers of Black magic was BLND (ICE3 was obviously not usable here) so outside of that one, this was the full list of every spell Kuro would ever know. As far as the spells I haven't discussed yet, LOCK and LOK2 decrease the evasion of enemy units, making it easier to hit them. They only decrease evasion by 20 points though which translates into 10% better odds to hit on the 1 to 200 dice rolls used by Final Fantasy; this is almost never worthwhile. Similarly, the DARK spell inflicts the blindness status ailment which is a bit better at double the effect, 40 points = 20% less odds to be hit from a blinded target and 20% better odds to hit them. The problem once again is that this requires successfully hitting a status-inflicting spell, and if you can hit the enemy with DARK, why wouldn't you rather hit them with the far superior HOLD or CONF instead? SLOW and SLO2 had a very niche use of shutting down monsters with multiple attacks, not something that was common but great if it ever did come up. This would be awesome against Kraken if the RUSE spell wasn't a much more reliable way of solving the same problem.
The biggest new prize was the STUN spell which finally allowed Kuro to make use of his Tier 6 spell charges. STUN is theoretically supposed to be an even better version of the HOLD spell, automatically inflicting a successful paralysis against any opponent with less than 300 max HP. As one of the Final Fantasy mechanics guides states, "300HP Threshold Spells (STUN, BLND, and XXXX) always hit if the target is not resistant and its current HP is equal to or less than 300, and always miss otherwise." Unfortunately this is something that Ozmo doesn't appear to have programmed correctly in Final Fantasy Renaissance as the spell failed to land numerous times when I tested it against targets with less than 300 HP. It was pretty disappointing to launch this at Giants (240 HP) and get the "Ineffective" message back some of the time. I came to think of STUN as just another version of HOLD; at least Kuro had more overall spell charges to burn when trying to inflict paralysis.

The Earth Cave was the next dungeon on the list and therefore the logical place to head once Kuro had finished acquiring his new items. The main discovery that Kuro made inside was that the bulk of the monsters continued to run away from him! Asps, Cobras, Arachnids, Ogres and GrOgres, GrWolves and WrWolves, even stronger enemies like Minotaurs all turned tail and ran away from the melee Black Mage. I could understand why this was happening due to how the Morale formula works, not to mention Kuro was Level 26 at a time when a non-variant party would be something like Level 10, but it was still pretty hilarious to watch. The pictured Gargoyles above were one of the few opponents willing to stand and fight with any regularity, and Kuro had an answer for them in the form of the SLOW spell. The Gargoyles had a low base Attack of 12 (which translated into 1-7 damage against Kuro's armor) and could attack with as many as 4 hits at a time. SLOW knocked them all down to a single hit where they were a complete joke offensively. Along with the use of CONF and HOLD/STUN against anything that didn't run away, Kuro didn't find himself in much danger going through the first few floors of the dungeon.
All that running away meant that the Earth Cave wasn't a good place to gain more experience, however. I thought that the Earth monsters on the trapped tiles might be a good target to grind for XP except that they had immunity to status spells like the Wizards. That ruled them out and in fact they were pretty good at killing Kuro with their massive 66 Attack so he steered clear of them entirely. I ended up returning to the Peninsula of Power to pick up four more levels, up to Level 30 which was the next "strong" level for the Black Mage class. This brought Kuro up to 379 HP where I felt he would be safer against the enemies he was now seeing. Of course, four more levels meant even more running away from the monsters inside the Earth Cave which was frankly fine with me.

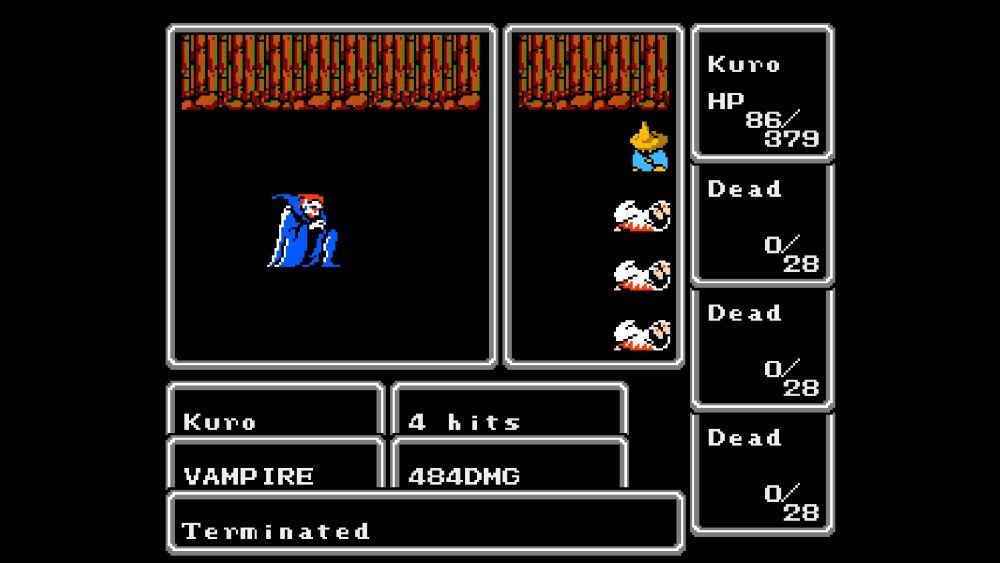
Floors 3-5 of the Earth Cave have a much more dangerous monster mix than the initial two levels and I hurried Kuro down to the Vampire as fast as possible. He continued to see a lot of easy WrWolf encounters and when the more dangerous Images or Cockatrices appeared, Kuro had enough Magic Defense from his absurd overleveling to avoid their stunning/petrification effects. The one unrunnable encounter was against more Wizards, now appearing as random monsters, at which time Kuro brought out his trusty knife and went to town with TMPR and FAST. He relied on the same stab-happy tactics against the Vampire who also had status immunity and therefore ruled out Kuro's bag of tricks. Nothing to do but buff up and rely on melee attacking. The first time that Kuro made it to the miniboss, the Vampire landed a very low-odds stun from his melee attack and subsequently killed Kuro as pictured above. Yes, the Vampire can do that - his attacks have the same stunning property as Ghouls and Geists and the like, it just rarely ever comes into play. That had been a poor bit of RNG cruelty and the second time that Kuro went through the cave he was able to return the favor with extreme prejudice. There wasn't anything too scary on the way out and Kuro found himself one RUBY richer for his efforts.
Two trips through the Titan's Tunnel later, Kuro was back with a shiny new ROD in tow. He had to dodge one random encounter against Images this time around and a less-scary fight against several Mummies while making his way through the lower basement floors. There was an amusing fight against two Wizards where Kuro buffed himself up and then landed a "5 Hits! 258 Damage!" blow against one Wizard followed by the other one instantly retreating at warp speed that almost felt choreographed. Lich was waiting down at the bottom as always:
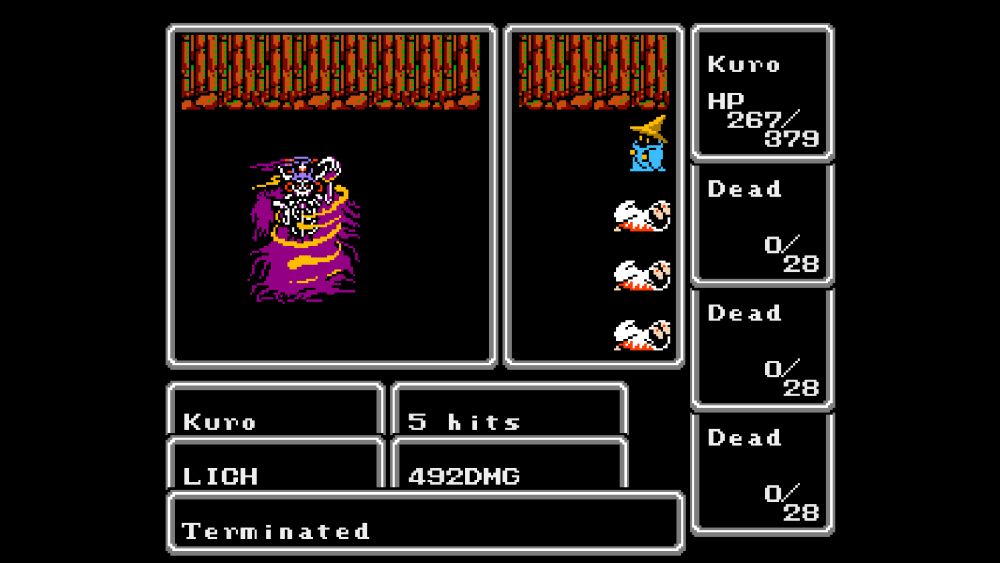
Lich also has status immunity so it was the same battle plan again: buff up and charge in swinging that knife. Lich completely ignored attacking and went straight through his spell progression as he often does: an ICE2 that avoided doubling its damage but hit at the maximum non-doubled value for 79 damage, a successful SLP2 that Kuro instantly shook off the next round, FAST on himself for all those melee attacks Lich was't making, and then a weak LIT2 that hit for 33 damage. Meanwhile Kuro was preparing for a surgical knife strike: 26 base Attack plus 14 Attack from TMPR and then increased to 5 hits with the FAST spell in place. That was 1-40 x 5 damage against Lich's hefty defenses and I expected this to take a few more rounds... only for Kuro to have his knife slashes go critical and one-shot the Earth Fiend immediately. Sheesh Kuro, did he insult your family or something?!  Well I certainly wasn't complaining. One ORB down, three more to relight.
Access to the CANOE meant a trip up to the Castle of Ordeals as usual:
Unlike your standard group heading to the isolated northern castle, however, there wasn't too much inside that made a real difference for Kuro's setup. He could never class change with the TAIL nor could he employ the Zeus Gauntlet for infinite castings of LIT2. That's the main prize in terms of equipment for most parties aside from potentially the Ice Sword for Fighters. In fact, the biggest treasures here for Kuro were a Gold Bracelet to increase his Absorb rating another 9 points and then the Heal Staff which wouldn't do much of anything until paired with RUSE out of the Defense. At least Kuro could skip the MudGol-defended treasure chest with the Zeus Gauntlet inside (though the same item can also be picked up in a different chest on the top floor - I usually prefer the trapped chest just to get Zeus in hand one floor sooner).
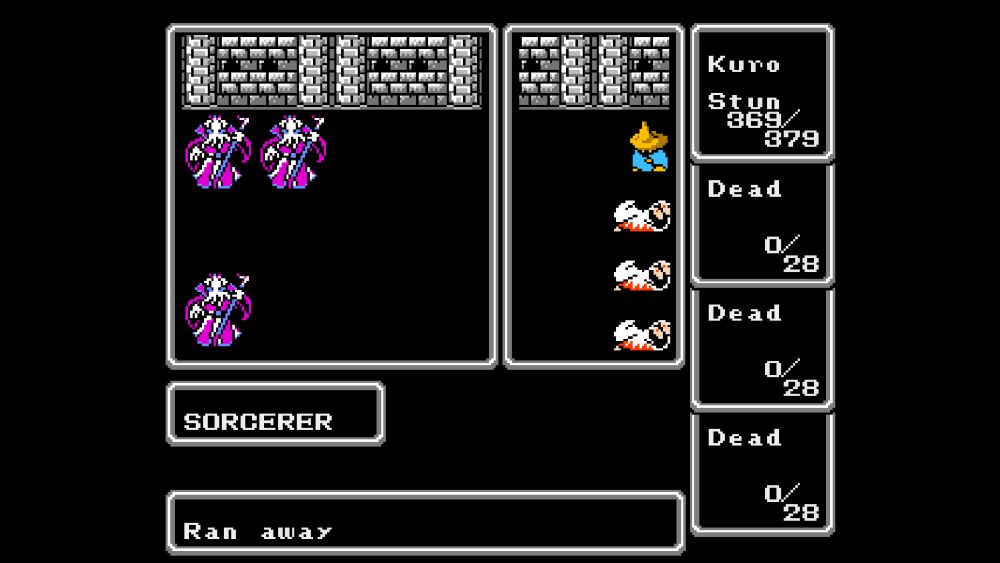
As far as running the castle itself, this is one of the shortest dungeons in the game and can be traversed in as little as five or six random encounters. Kuro basically ran from everything since there wasn't much point in trying to collect XP when he might get wiped out later in the same area. The monsters in the castle were fairly dangerous as a group with a diverse mixture of threats that could wipe out Kuro. Large groups of Red Goyles killed him once by mass-spamming FIR2 with no AFIR or Ribbon yet for fire element protection, Medusas turned Kuro to stone once with their GLANCE ability, another time he had terrible running luck and was wiped out by accumulated damage against a Mummy/WzMummy group, and of course the pictured Sorcerers landed a one-hit kill on another occasion. Nothing here was a serious roadblock though and Kuro could keep trying until he was able to dodge the bad RNG elements and make it out of the dungeon with his desired prizes. This screenshot was taken on the fifth or sixth attempt at the Castle of Ordeals when Kuro avoided any one-hit KOs (with the Sorcerers amusingly running away from him) and then managed to TMPR/FAST to death the Zombie Dragon at the end. Honestly this was pretty easy.

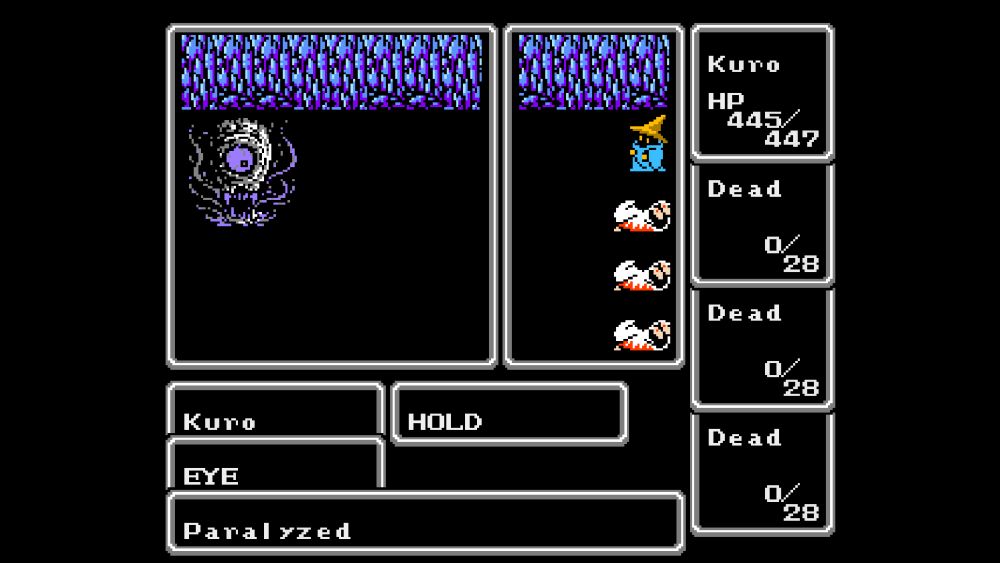
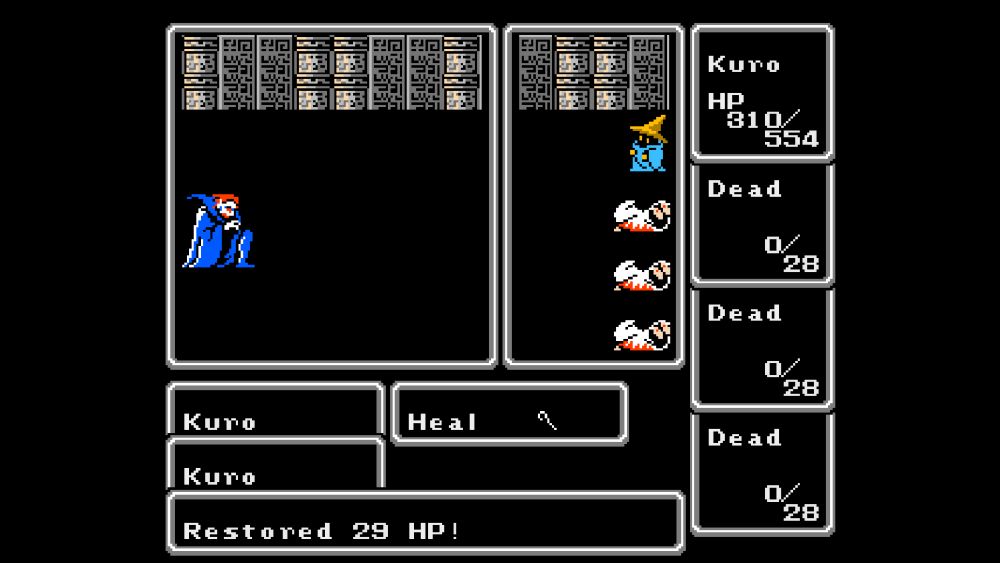
My goal was to gain a few more levels before heading into the Ice Cave, with the logical destination being the next "strong" level up for the Black Mage class at Level 35. I spent some time searching around to see if there were any new areas which would be good places to gain additional XP since Kuro needed another five levels costing about 160,000 more experience points. The first area that I tried was the wilderness surrounding Crescent Lake, and the monsters there were pretty easy to defeat. Unfortunately they didn't pay out as much experience as I would have liked, somewhere in the 500-1000 XP per victory, and far too many of them kept running away from Kuro's massively overleveled self. He was having to tie them up with confusion status just to stop them from retreating! The aquatic monsters on the rivers were another possibility but it took too long to kill them without the normal addition of the Zeus Gauntlet for LIT2 spam. I also kept running into STUN failing to work properly against Ochos and Hydras where it would have been extremely useful; the screenshot above is proof that this spell is bugged in the version of Final Fantasy Renaissance that I was playing.
Then I tried heading into Gurgu Volcano where it was more or less the same story: Kuro could kill everything inside but the XP rewards weren't that great and way too many enemies fled in terror from each combat. I took the time to clear out the treasures from the big room on the second floor, mostly for fun, where the only monsters who proved able to wipe out Kuro were Fires when they popped up as a double encounter. He could kill one Fire perfectly well enough while failling barely short of enough health to get them both (and of course Fires had status immunity like their Earth cousins). That left... going back to the Peninsula of Power again, heh. Kuro had been practically living there for ages on end and he was now finally strong enough to be able to win against almost everything that he ran into. That included the ZomBull encounter by simply meleeing them to death despite their status immunity. I particularly liked fighting the Frost Wolves since they had high morale and never ran away; even the Giants now spent a lot of time retreating from combat and denying Kuro XP. I also never saw even one Wyvern encounter despite all the time spent on the Peninsula which looks like another mistake on Ozmo's end, forgetting to include the 1 in 64 encounter from this area. Not a big deal but something I figured I'd mention.
Kuro was gaining about 12k-15k experience on each outing before having to return to town to recharge his spells. He powered through those five levels in about 90 minutes and then paddled over to the Ice Cave for the first time:
This place is infamous for being one of the worst dungeons in the original Final Fantasy, packed full of monsters with paralyzing effects or one-hit kill potential. It's kind of a cheap way to make a dungeon difficult if we're being honest but the Ice Cave certainly does cause a lot of problems for both normal and variant groups. I hoped to work around these issues by taking Kuro all the way up to Level 35 (a non-variant group would be here around Level 15!) which did two main things: increase his max HP total and increase his Magic Defense. Max health should be easy for anyone to understand, Black Mages have abysmal health growth and he was still only sitting at 447 HP after all those extra levels. The other property of leveling was to gain two points of Magic Defense on each level up, the most important stat for staying safe in this area. Magic Defense wasn't even a visible stat in the base game (though it did work properly under the hood), and the updated interface in Final Fantasy Renaissance clarified that Kuro was sporting 88 Magic Defense at this point. This was crucial because the odds to be stunned or petrified in Final Fantasy are (100 - Magic Defense) / 2 which translated into a mere 6% for Kuro. It would be very difficult for the undead in the Ice Cave to stun him, and in a worse case scenario I could gain three more levels to minimize this down to the 1 in 200 odds that everything always has to succeed. I also needed a higher level on Kuro so that the 3-7 Wizard encounter would see the mindflayers run away en masse; Kuro could never cut them all down with his melee attack before they killed him otherwise.
In terms of actually running the dungeon, Kuro made it through with minimal effort just as I'd been planning. He was stunlocked into death twice by the undead packing the Ice Cave and then everything went smoothly on the third trip through. Kuro was running from almost every battle (where his odds were 28 / 50 = 56% per attempt) and he was highly impervious to the paralyzing strikes from the Images and Wraiths and Geists inside. There was one big group of Wizards that ran away in droves and another unrunnable combat against a Frost Giant / Frost Wolf pair which had to be meleed to death. Kuro wasn't bothered by that group - he'd been slaying Frost Wolf packs on the Peninsula of Power for months now. He successfuly ran from combat both times he hit the trapped tile with the undead on the bottom basement floor, and the one time that Mages popped up, Kuro landed an instant "Close Call" before they could launch any RUBs. The Eye boss guarding the FLOATER does not have status immunity so Kuro was able to tag it with HOLD (after casting STUN and having it fail on the first round which should never happen!) then TMPR/FAST up for the knife kill. Kuro's overprepared nature allowed him to clear the dungeon in mere minutes of real-world time after hours spent grinding levels.
As an aside, Kuro's quest was highlighting some of the deep flaws in the gameplay of this old title. Most of the danger in Final Fantasy comes from the random encounters, not the bosses, and that danger is heavily tied to various status and instant-kill effects. It's pretty rare for the monsters to wipe out the party due to actual accumulated damage instead of hitting them with RUB or undead stunlock or whatever. However, it's possible to prevent nearly all of those effects through leveling high enough or simply equipping Ribbons in the lategame, and then the spells-as-items take over and allow virtually any setup imaginable to complete the game from there. For all of the wacky setups that I might start out with, by the time that my characters are entering the Temple of Fiends Revisited, they tend to be using the same gear and doing the same things. Thus the early game is often much, much harder than the lategame for these variants no matter what I do to try and cripple them. Certainly things were about to get a lot simpler for Kuro as the airship now opened up the rest of the game's treasures to him for the first time.
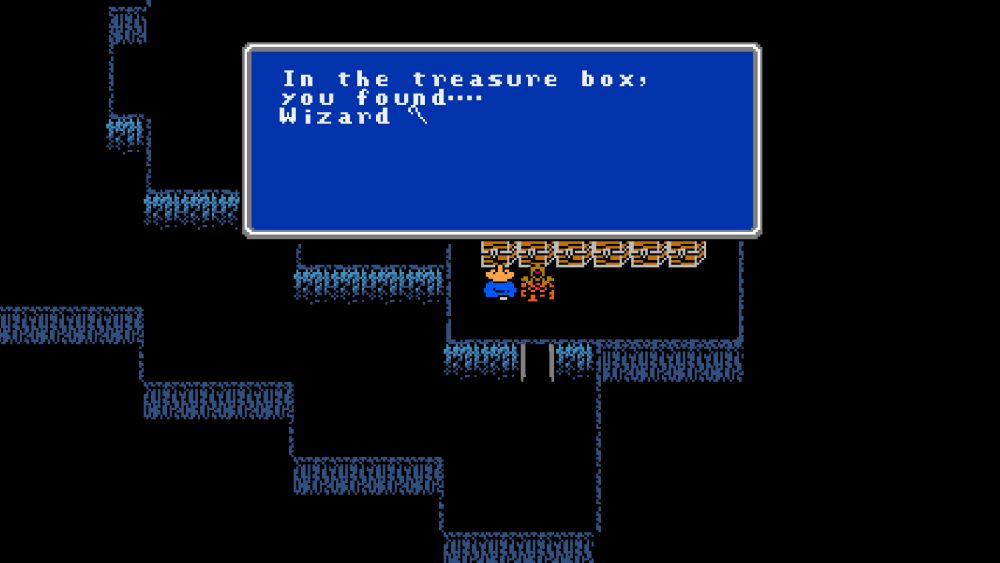
The first destination for Kuro had to be the short Waterfall dungeon, at least after stopping to pick up the BOTTLE from the nearby Caravan. The Waterfall only contains a single treasure room with six chests but it held multiple priceless items for my Black Mage. Pictured above was the Wizard Staff which tends to be ignored in most non-variant parties. Here it was practically an uber item: infinite castings of the CONF spell with each use! Kuro had been relying on confusion status for practically the whole game and now he could wield it endlessly on demand without having to worry about running out of spell charges. There had been a lot of tension between CONF and FAST up to this point in time since they both occupied the same Tier 4 Black Magic spell ranks and Kuro could only use one at the expense of the other. Now those spell charges could all be reserved for FAST usage and the Wizard Staff could be spammed against even the weakest opponents without fear.
Despite capturing the Wizard Staff in the screenshot above, the other two items contained in this room were actually more important for the success of Kuro's quest. The first of these was the Defense, a sword that Kuro couldn't equip but which cast the RUSE spell on demand in battle. Anyone reading this probably knows that repeated castings of RUSE stack up 80 points of evasion per use and quickly make the caster (nearly) impossible to hit. This was the vital tool necessary for surviving against bosses like Kraken who would otherwise crush Kuro into a fine powder. The other new item was a Ribbon, one of three that can be found across the world map. The Ribbon grants resistance to all eight elements in Final Fantasy which includes protection against every form of instant death and all status ailments. I'd been envious of those Wizards and then Lich earlier for their status immunity, now finally Kuro had the same protection as well.
The Sea Shrine held the remaining treasures that Kuro needed and therefore that's where he headed next after making a quick pitstop for some OXYALE and a ProRing in Gaia. The undersea denizens of the Sea Shrine are pretty weak customers on the whole while also paying out massive amounts of experience; now Kuro finally had a replacement area for leveling better than the Peninsula of Power. Normal parties can shred the enemies in here with the power of the Zeus Gauntlet and Thor's Hammer for repeated LIT2 castings, and even without that form of direct damage, Kuro didn't experience much in the way of problems. The only annoying encounters were the WzSahag / Red Sahag spam since there was no LIT2 to wipe out the weak Red Sahags and the always-deadly Ghost encounter with their incredible melee blows. Both of those encounters are unrunnable (the Waters on the bottom basement floor are the one other unrunnable fight) and forced Kuro to kill everything if he wanted to proceed. I sent him up to the top floor first where he could upgrade to the Opal Bracelet for another 10 points of Absorb, then down the lower treasure level where the Power Gauntlet was waiting in another chest.
That produced the overall equipment setup captured in the screenshot above. Every single item listed here was crucially important for Kuro's journey and couldn't be swapped out for something else. I had the Heal Staff in the first weapon slot since Kuro had to spend a lot of time pausing to recover HP followed by his equipped Silver Knife. Unlike a lot of other mages, Kuro couldn't drop his weapon and rely on spells/items at this stage of the gameplay, he still needed that knife for melee combat! Then the Wizard Staff was in the third slot for the free CONF castings followed by the Defense in the final slot. I was frequently using the Defense for RUSE spam at the start of random battle to prevent Kuro from taking too much damage, then healing back to full at the end with repeated Heal Staff usage. Over on the defensive side, the Opal Bracelet and ProRing were needed for Absorb while the Ribbon was of course the Ribbon and inherently awesome to have. The last armor slot held the vitally important Power Gauntlet which casts SABR when used in combat: 16 more points of Attack and Accuracy for the rest of the fight. It's the souped up version of TMPR and actually works here in Final Fantasy Renaissance. Kuro used this item any time that he wanted to use his physical attack, which was basically also every battle from this point forward.

This was essentially Kuro's complete setup for the rest of the game. He didn't need to open any more treasure chests or buy anything else, there was no way to upgrade further until reaching the Masmune in the final minutes of the game. I still went around opening most of the treasure chests in the various dungeons anyway though, mostly to have something to do while grinding out those remaining levels. The next target on the list was a belated return to Gurgu Volcano to deal with the Fire Fiend and light the second ORB. Unsurprisingly the enemies in the volcano were no match for Kuro now that he had gained all of these endgame toys and ballooned his experience close to Level 40. RUSE from the Defense took care of any physical attacks and the Ribbon's elemental protection took care of everything that wasn't physical. I had a lot of fun tearing through Red Giants and Agamas and Grey Worms once Kuro had beefed up with SABR from the Power Gauntlet. It was a leisurely romp down to the bottom floor where Kary was lurking.
Kary was one of the easiest bosses possible for Kuro to handle: she is actually WEAK against status attacks, not immune to them! This meant that status-inflicting spells had 40 points (i.e. 20%) better odds to hit successfully against the boss. Kary does have very high Magic Defense (183) so the odds still weren't guaranteed even with this weakess, about 35% chance for spells like CONF and HOLD to hit the fiend. That was more than enough for Kuro though who started out the combat by getting triple RUSEs in place for physical protection, then began trying to inflict confusion via repeated uses of the Wizard Staff. The status landed successfully on about the third try followed by the amusing spectacle of Kary stabbing herself with her six attacks. She was dealing about 30-40 damage on a normal round since Kary also has a high Absorb rating, then she would occasionally crit for mass damage like the screenshot above. Kary broke out of confusion status once, Kuro reinflicted it again, and Kary eventually committed seppuku with her next big crit. This was a lot of fun. 

With the Sea Shrine also looted of its contents, it was time to head down to the lowest depths and eliminate its own boss. Kuro had a blast fighting his way through this dungeon, making extensive use of the Defense, the Power Gauntlet, the Wizard Staff, and the Heal Staff. I'm not sure I've ever gotten this much use out of the spells-as-items without ever dealing direct damage from any of them! Lobsters in particular were great targets for confusion status because they hit the other monsters so hard, often dealing close to 100 damage across their multiple hits. They could also inflict poison status on the other enemies, which deals a paltry 2 damage per round, and I actually saw a Sea Snake die to poison at one point - I wish I'd been fast enough to grab that screenshot. I made sure not to accumulate too many experience points on Kuro and gain a level by accident while fighting through waves of watery foes.
For Kraken himself, the most important round of combat was the very first one since there was a slim potential for the boss to one-shot Kuro if he landed some crits. I hoped Kuro would go first in the turn order only to see the big octopus attack first: 7 hits for 266 damage, ouch! Exactly half of Kuro's lifebar, interestingly enough. Kuro then cast RUSE out of the Defense, followed by going first on the second turn with another RUSE, and that was all she wrote - Kraken never touched Kuro again once the evasion shield was in place. Now there was plenty of time to start the buffing train: TMPR into SABR from the Power Gauntlet into FAST. Kuro had a base Attack of 30 which swelled to 30 + 16 + 14 = 60 Attack multiplied across a new total of 6 hits, or 60-120 x 6 total damage per swing. That was reduced significantly by Kraken's 60 Absorb and in practice Kuro was hitting for somewhere between 100 and 200 damage per attack. He hacked away at Kraken for four rounds and then on the fifth round some crits finally popped up for the massive 536 damage printout and the win. I don't think Kuro even needed that overkill damage since he would have won with a normal attack but he's always been a bit of a showboat.
Now the only area remaining before the final dungeon was the Mirage Tower leading up into the Sky Castle. I took the time to open all of the various treasure chests along the way even though there was nothing that Kuro wanted outside of the ProCape on the third floor of the Sky Castle. This was effectively a way to pass the time while grinding out the final ten levels before hitting the level cap of 50, with Kuro needing to exit the dungeon every time before leveling so that he could save-scum his stat point gains. These final ten levels for the Black Mage class are probably the worst set of stat gains in the whole game for any class: zero "strong" level ups afte Level 41, zero points of guaranteed Strength, zero points of guaranteed Agility, two points of guaranteed Vitality, three points of guaranteed Luck - and of course the continued Intelligence point on every level. That's an absolutely brutal set of stat gains and I had to invest a substantial amount of time continuing to force dual Strength/Vitality increases across these various levels. Sometimes it could take longer to force these stat increases than it did to accumulate the 32,000 XP for each level!
There was only one benefit to all of these Intelligence points that Kuro was accumulating: better HP restoration from the Heal Staff. While Intelligence as a stat did absolutely nothing in the original version of Final Fantasy, Ozmo has added Intelligence scaling equal to (Intelligence / 2) percent for any damage or healing calculations. With Kuro closing in on 70 points of Intelligence, that meant roughly 30-35% higher values whenever he used the Heal Staff. The item is supposed to restore 12-24 HP per use which was amplified up to 16-32 HP for Kuro, a noticeably faster process when he was refilling his healthbar. Normally this would also apply to attack magic spells but of course they were off limits for this variant. Intelligence as a stat was finally doing something and Kuro largely couldn't take advantage of it, heh.

As far as the Mirage Tower/Sky Palace dungeon itself, Kuro had smooth sailing in here and I can't recall him getting wiped out even one time. Many of the weaker denizens like Catmen would run in terror due to Kuro's inflated level while most everything else could be handled by using the Defense for evasion followed by the Power Gauntlet's SABR into melee attacking. Kuro really didn't need to use his spells too often anymore as the Defense + Power Gauntlet combo took care of most everything. The Blue Dragon guarding the teleporter to the Sky Palace would always deal several hundred damage to Kuro but equally always fell to a FASTed Kuro's knife strikes. In the upper half of the dungeon, the biggest issue was often making sure to avoid getting too many experience points before leaving to do the latest stat manipulation on level up. Some of the random encounters paid out gigantic amounts of experience, like four RockGols yielding about 9500 XP, plus there were a handful of battles like the Eye which couldn't be escaped from and had to be killed for XP. I never had to reset due to gaining too much experience but Kuro cut it close a few times.
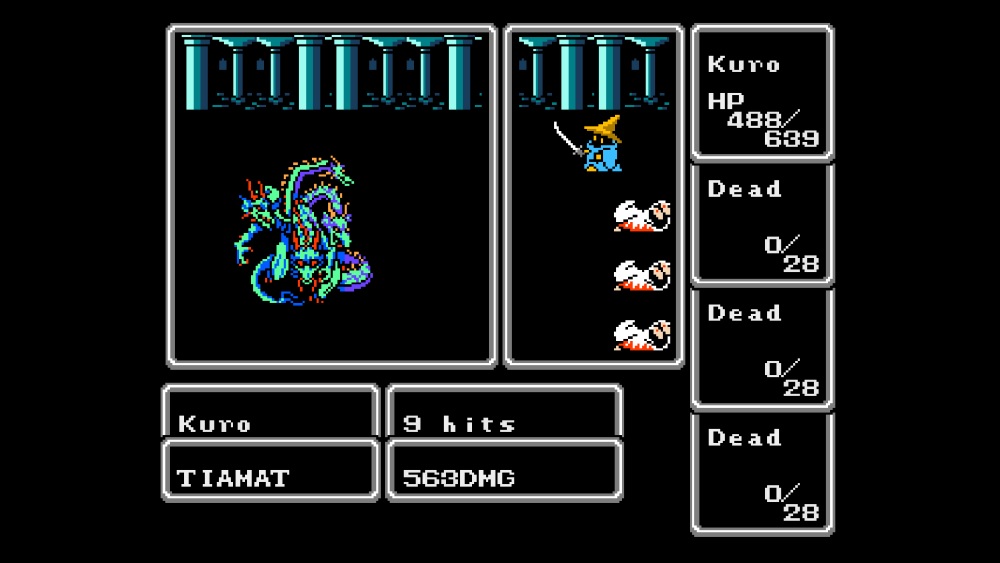
Tiamat was waiting on the top floor of the Sky Palace as always and there would be no Bane Sword cheese resolution to the fiend this time around. Kuro would have to get in there and take down the dragon with nothing more than his knife and a bunch of buffing spells. He was getting about 22-23 points of Attack from Strength and then another 10 from the Silver Knife's base Attack, plus TMPR and SABR would effectively double that with another 30 combined Attack. That came out to 63 Attack or 1-46 damage per hit against Tiamat's huge 80 Absorb rating, thankfully multiplied across 6 hits due to the FAST spell. In practice, I found that Kuro was hitting for somewhere in the 80-150 damage range on average, with the pictured 203 damage representing the high end of what was possible. Tiamat couldn't hit Kuro thanks to his RUSE shield of course, but she was doing a fair job of chipping down his health with her THUNDER-POISON-BLIZZARD-BLAZE abilities. This is why it's so important to stack all that health on stat gains; I was confident that Kuro's HP would hold out long enough to win and he finished things off with a 500 damage crit a few turns later for the victory.
After taking another hour to grind out the last three or four levels, Kuro reached the cap of Level 50:
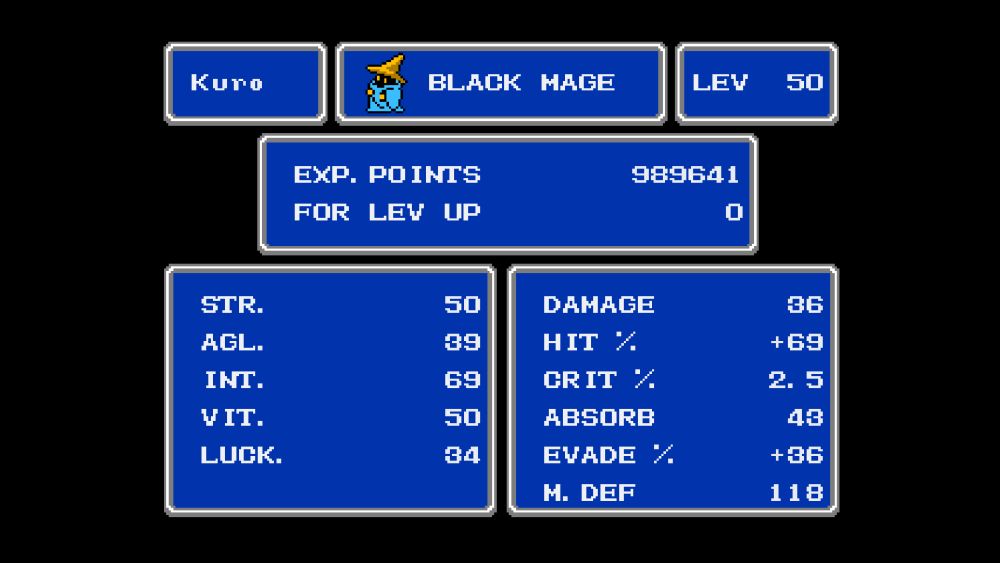
These stats were the obvious result of the manipulation I was doing, with Strength and Vitality increasing on every single level across the whole game. (The final two points of Vitality weren't needed but Kuro gained one anyway on Level 49 and then I figured I might as well force the last point on Level 50 for the perfect round number.) Note that I did not do stat manupulation with my previous solo Black Mage character, click here to compare to Blak's Level 50 stats as an example of a control group. Kuro wound up with about 20 more points of Strength and Vitality as compared to Blak, and even Blak was well above your typical Black Mage in terms of stats since the expected values for these stats are only 23 points apiece! I didn't have as much success at hitting Agility when leveling, with 32 as the expected stat there, and I didn't place a priority on Luck at all which came out barely above its average value of 32. Perhaps the biggest difference was in the realm of HP growth, with your average Black Mage having a mere 470 max HP at Level 50 compared to 518 HP for Blak and a whopping 639 HP for Kuro. This would give my solo character a much bigger margin for error over the course of the final dungeon even if Kuro was far, far short of what your typical Fighter or Black Belt would be sporting.

OK, time to get serious now: the final dungeon of the game, the Temple of Fiends Revisited. This is the longest dungeon in Final Fantasy by a good margin, packing a whopping six different bosses across its course, and with absolutely no save points anywhere to be found. Even two decades later, I well remembered the struggles that Blak had here and the dozens of attempts that I needed to make it through to Chaos at the end. My approach with Kuro was to take a conservative strategy for the random encounters. He had 52% odds for a successful run which was too chancy for my liking; if Kuro were to get four or five unsuccessful retreats in a row, he could easily die to the monsters inside from accumulated damage. Instead, I had Kuro use the Defense two or three times in every fight to get his evasion protection in place, then start cutting his foes down with melee attacks. When there was one opponent remaining, it was time to break out the Heal Staff and recover HP back up to full. Rinse and repeat again for the next random encounter without leaving anything to chance. Only when Kuro had a "Chance to Strike First" for the guaranteed run or when he knew he could survive a whole bunch of failed retreats in a row did he try to escape from combat.
The first few floors of the temple are some of the most dangerous spots for random encounters. Kuro dodged the nasty Gas Dragon encounter, instead hitting Worms (an unrunnable fight), Mages who had their RUB spells blocked by the Ribbon, and an easy battle against Chimeras. A four-spot of Frost Dragons appeared at one point, fortunately still not using their Blizzard ability in this version of Final Fantasy Renaissance, and then four Zombie Dragons which were less scary thanks to having only melee attacks. The Phantom failed to lay a scratch on Kuro with the Ribbon stopping all of its various instant-death spells. The following Earth floor was full of Earths and MudGols who could be neutered via RUSE from the Defense, and then it was time for the first really scary obstacle of the dungeon in the form of Lich:

Lich is dangerous for exactly one reason: he has the NUKE spell and he's not afraid to use it. He casts a spell 75% of the time and always goes in the same rotation of NUKE-STOP-ZAP!-XXXX before starting over with NUKE again. There was no time here to waste getting RUSE from the Defense since Lich so rarely attacks, my plan was to use the Power Gauntlet followed by FAST and then swing away until the fiend was dead. Unfortunately Lich opened up the fight with the pictured NUKE hitting for 362 damage, yeouch!  That was nearly the maximum possible that he could roll for damage, with the spell doubling its damage and rolling at the upper end both times. This left Kuro with a mere 277 HP remaining and he was potentially vulnerable to dying to a second NUKE. Lich didn't waste any rounds attacking, instead cycling through his spells as fast as possible, meaning that this was going to come down to that second NUKE's damage roll. The spell went off... and failed to double its damage, hitting for about 150 damage, whew! Kuro's Magic Defense saved the day there as he narrowly escaped from this combat with his hide intact. Can you see why it was so important to stack up the maximum possible amount of Vitality over the course of this character's quest? Victory with barely over 100 HP remaining - Blak would have perished here with his smaller health total.
The following Fire floor provided a respite for Kuro without anything particularly threatening to be found there. I used the Heal Staff to keep him at max HP as Kuro cut his way through Agamas and Grey Worms. Kary was a much easier battle with triple RUSEs blocking her melee attack and then the TMPR/SABR/FAST combination working to cut the fiend down to size. Kary has enough Absorb that this took half a dozen rounds but Kuro was under no threat, taking minimal damage from her occasional FIR3s. The Water floor was a bit more tricky, as the most common encounter has 3-6 Waters which hit hard and can't be run away from. When they popped up, Kuro leaned on the Defense as usual and took his time cutting them down individually. Kraken was lurking by the downwards staircase and he represented the second great threat in the last dungeon. Kraken has a base Attack of 70 and can hit up to 8 times; with good damage rolls, he could easily one-shot Kuro before my Black Mage even had a chance to act. I decided that I would give up the Power Gauntlet and SABR for this fight to equip the ProCape instead, maximizing Absorb at 51 points to cut down on as much incoming damage as possible. If Kuro could survive long enough to get the RUSE protection in place then he'd win the fight regardless, even if it took longer without the advantage of SABR.
It all came down to what Kraken did on the first round...
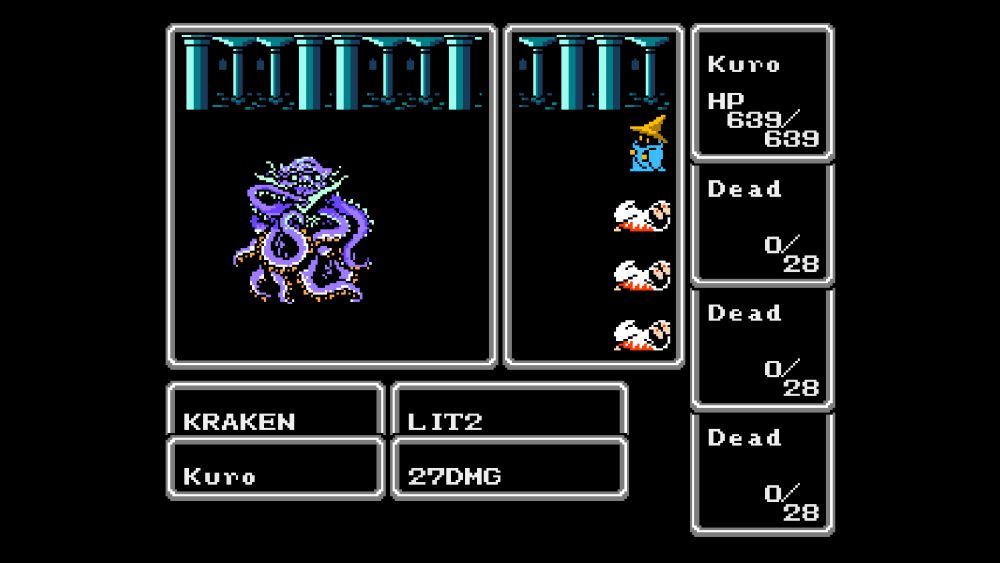
Bingo! He cast a weak LIT2 instead of attacking for a paltry 27 damage. Then Kuro went first on the second turn of combat with another RUSE - and Kraken still landed 3 hits for 180 damage through the double RUSE, sheesh! He never managed another successful attack but that was bad enough. Without SABR to add 16 Attack and Accuracy, Kuro wasn't doing that much damage to Kraken either. In fact, he was averaging about 30-60 damage per round which was less than I'd been hoping. Kraken has 900 HP in this refight which meant that a new problem was starting to emerge: Kraken was slowly chipping away at Kuro's health with repeated LIT2s. Even though each one only did 20-30 damage, they did stack up over time and Kuro didn't have a ton of life to spare. I was starting to get really worried as Kuro dropped down towards 200 remaining health, only for him to finally pull out a critical hit for 300 damage and slay the big octopus. Whew, that was another nailbiter of a boss fight, much tougher than I'd been expecting. I still think it was the right call to drop the Power Gauntlet for this one battle even if it made the melee combat slower.
The Air floor is much less dangerous, with Sorcerers typically the scariest opponents. They never appeared for Kuro though and would have run away from Kuro's high level if they did show up. Instead my Black Mage faced Airs, RockGols, and Vampires which were all handled via the standard Defense into Power Gauntlet into melee attack pattern that had become so familiar by now. The path was clear to claim the ultimate prize of the run:
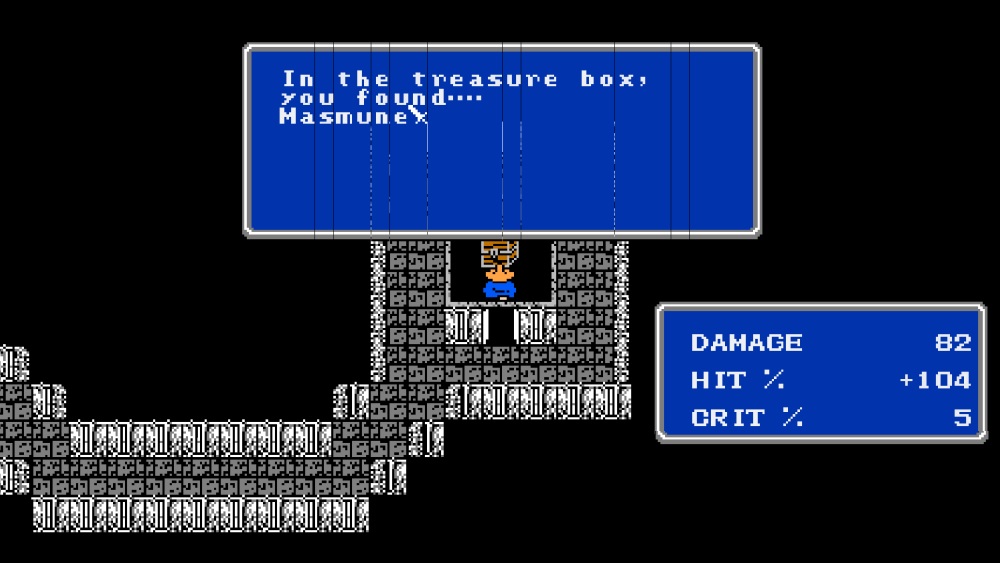
The coveted Masmune was finally in Kuro's possession! I'm not sure that I've done a good enough job of explaining how ridiculously weak Kuro's weapon had been up to this point. He was still using the Silver Knife of all things, with 10 Attack / 15 Accuracy for its stats. The Masmune was just a wee bit better with stats of 56 Attack / 50 Accuracy and double the crit chance (5% instead of 2.5%) as well. It was too bad that this weapon would see use for all of five minutes before the game ended. Tiamat provided an opportunity to field test the weapon:
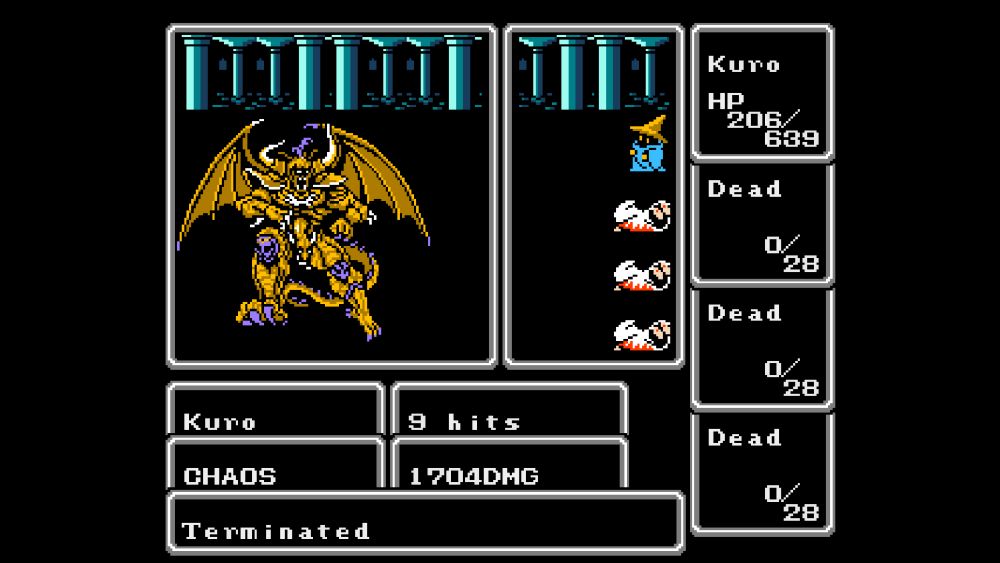
Yeah, that would do nicely. Let's take a quick look at the math of the new Masmune-wielding Kuro with his full buffs in place. He was starting from a base Attack of 82 now, increased by 30 more points to 112 Attack with TMPR and SABR, and then this was multiplied across 9 hits (!) with FAST in place. Even with Tiamat having a full 90 Absorb, Kuro was dealing 22-134 x 9 damage on each attack which very quickly got out of hand. The first strike landed for the pictured 563 damage and then the second attack went critical and did something like 1400 damage. Down went the evil dragon, just like that. That Masmune is a rather good weapon, no?

Chaos was the last foe remaining and I really hoped that Kuro could get the battle right on the first try to avoid having to do this whole dungeon again. The strategy was simple: 2-3 uses of the Defense to lock out Chaos' physical attacks and then the standard three buffing spells before swapping over to the offensive. Kuro had no way to heal himself aside from the weak Heal Staff which meant that this was more or less a YOLO situation, time to charge in and hope for the best. As far as Chaos goes, the thing to watch is his spell progression. Like all enemies in Final Fantasy, he always moves through the same spells in the same order which is ICE3-LIT3-SLO2-CUR4-FIR3-ICE2-FAST-NUKE. CUR4 is really nasty as it heals him back to full health and then NUKE at the tail end has the same damage capacity that Kuro had seen earlier with Lich. At least Kuro had FAST on hand to counter SLO2 if it landed; some of my other solo characters had to replay this battle until the SLO2 missed at roughly 50/50 odds.
This time around, Chaos chose to emphasize his abilities instead of his spells. These are CRACK-INFERNO-SWIRL-TORNADO which then also repeat endlessly in the same order; CRACK is an instant death attack that could never hit Kuro, however the others dealt fairly heavy elemental damage even when resisted with the Ribbon. SWIRL in particular doubled its damage against Kuro and hit for about 160 damage, argh! Meanwhile, Kuro was getting ready to swap over to the offensive but it just took so long for him to get fully buffed, three rounds of RUSE usage followed by SABR into TMPR into FAST. Six whole rounds needed in preparation while Chaos was moving through his various ability lists. He launched ICE3 and then LIT3 which meant that the CUR4 wasn't far off now. Kuro himself was taking a lot of damage and I wasn't sure if his healthbar could hold out long enough to win; it was going to be dicey if Chaos got the CUR4 off to reset his health total. The first attack with the Masmune hit for about 700 damage, not bad at all, and then the second one...
...did that. GG everyone, thanks for coming, drive home safely.  Chaos never reached SLO2 or the following CUR4 in his spell order, like I said he was really spamming his abilities instead this time around. It turns out that even a Black Mage can reach godly offensive power if you manipulate max Strength gains, equip the Masmune, and then stack up all of the various attack-buffing spells together (now that they actually function correctly). Imagine this setup working off a Fighter or Black Belt instead and it's easy to see how TMPR, SABR, and FAST can completely break the game. I limited myself to one casting of each on Kuro, in theory these spells are supposed to be able to stack together with multiple castings which would get into the realm of the truly silly. Too much multiplicative math is a bad thing.
This was the end of the road for Kuro, the successful conclusion to his quest. I'm incredibly pleased at how this played out, taking all of the knowledge that I gained over the course of two decades and using it to improve upon the performance of my original solo Black Mage. In addition to that, because TMPR and SABR were bugged in the original game, I'm almost certainly the first person who's ever completed this particular challenge. It was not possible to play a melee-only solo Black Mage in the base game and now I'm the first one to prove that TMPR/SABR/FAST can more or less complete the whole game on their own. Throw in the way that Kuro had to lean so heavily on forgotten spells like SLEP and HOLD and CONF and this whole journey was a total blast from start to finish. I successfully completed the whole Temple of Fiends Revisited on the very first attempt thanks to diligent planning and a good bit of fortunate combat RNG - I couldn't be happier with these results.
I view Kuro's playthrough as my magnum opus for the original Final Fantasy. There's really no way to improve further from here, no way that I can make things tougher than playing a solo Black Mage who isn't allowed to cast attack magic. I hope that you enjoyed reading through this report as well as so many others over the years, and that Kuro's story will stick with you for a long time - thanks!


