
Black had the three remaining mini-bosses left to finish up the first world. I went easiest to hardest, same as before with Solo. The Chimera Brain was no threat whatsoever, especially with the Flame Ring pulling the teeth from its Blaze (ice element) attack. This boss does use Aqua Rake, a water-element attack which is supposed to do extra damage against the Flame Ring's fire element, but this part of the game is actually bugged. The Flame Ring doesn't take extra damage from water attacks. Black had no problems, winning with ease. Titan was a similar joke; four castings of Fire 2 put him away with no danger at all. Black still had almost half his life remaining after the final Earth Shaker spell.
The Puroboros were a little trickier, but this was one of the places where the Black Mage's mass-damage abilities really shined:
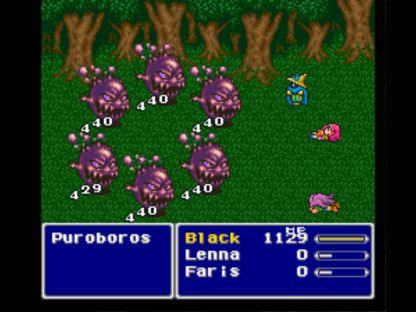
Each one of those things has 1500 health, and when they act, they either attack normally or cast the self-destruct "Exploder" spell. Exploder does damage equal to (max HP - current HP), so in theory one casting could kill Black! Fortunately, the Puroboros go through three rounds of "Nothing" in their AI script before acting. Black didn't have quite enough magic damage to kill them outright, but three castings of Fire 2 dropped each of the Puroboros to under 300 hit points. Thus Black was able to survive a couple of self-destruct moves. When the Puroboros die, they cast Life 2 and revive all of their dead comrades at full health! What Black did was cast Fire 2 three straight times, until the Puroboros acted for the first time. Four of them chose to attack, and the other two blew themselves up with Exploder. Black then killed the remaining four, who revived their two dead comrades. Instead of killing the final two, Black simply damaged them to near death, then waited for them to blow themselves up with Exploder. This worked perfectly, and he avoided any more hijinks with Life 2. I felt like I was starting to get a handle on this fight, and how to do it with more consistent success. It's definitely an unusual encounter!
Over in the second world, I discovered an even easier way to do the Galuf solo battle against Gilgamesh. Rather than turning him into a Summoner and relying on casting Titan, I simply made him into a Samurai and used "Giltoss". Even at level 1, that did something like 2000 damage, more than enough to win. As long as you don't mind spending the cash, it's an easy victory. Definitely improving and refining my tactics with each additional playthrough.

The Gilgamesh battle on the bridge was significantly tougher. Recall that in this fight, Gilgamesh has 6500 hit points and casts "Haste", "Armor", and "Shell" on himself when he drops under 2500 health remaining. He also changes his AI routine from unimpressive physical attacks to one that includes lots of "Jump" attacks, just like the Dragoon ability. Jump does damage independent of row - very bad for Black! - so Gilgamesh was doing 400 damage per Jump and acting twice as fast as Black. Meanwhile, Shell cut down magic damage by half, from 750 to 375 per casting. Ugh. Another battle that seemed to be all but impossible. 
Solo had done this battle by relying on BuildUp and Counter to get around Gilgamesh's AI behavior change. Black would have to find a different path... Now I could do the battle fairly easily by breaking a rod for Fire 3 damage, right before hitting the 2500 health changeover, but I'd already promised myself that I wouldn't rely on that unless absolutely necessary. And I hadn't exhausted all possible options here as yet. I soon worked out that by equipping a Flame Ring and casting Fire 2 on himself over and over again, Black could heal back enough damage to survive Gilgamesh's Jumping ability. Then, when two rounds went by without Gilgamesh choosing to Jump, Black could get in an offensive Fire 2 of his own. It took a VERY long time to get in the final eight castings of Fire 2, enough so that Black used up all 270 of his starting MP and another 200 MP after using an Elixir, but he did do the fight successfully without having to break any rods. Whew! Although this wasn't as bad as ArcheoAvis, it wasn't exactly easy either.
Out in the wilds of Rugor, Black was able to buy the fourth-level black magic spells: Drain, Break, and Bio. While the first two might see situational use, Bio was the real spell of note. With a spell attack of 105, it was twice as strong as the Fire/Ice/Bolt 2 group, and could further be powered up with a Venom Rod another 50%, for a total spell attack of 157. Bio now became Black's primary attack against foes with no particular elemental weakness. It also helped to have a fourth poison element on hand for the rare foes that were weak to poison.
Everything in the dungeon leading up to the Moogle Village was weak against fire or lightning. The Tyrasaur at the end was weak against fire. Three Fire 2s = victory. Easy stuff.
I was a little surprised to find out in the Hiryuu Valley that Black was not able to equip the Bone Mail. Only four classes in the game cannot use it, and Black Mage is one of them. (Everyone other than the mages can use it, apparently.) That was a disappointment, as I'd been hoping to use its high defensive value and poison absorbing abilities in a number of places. Black would just have to make due with a back row position to help reduce physical damge.
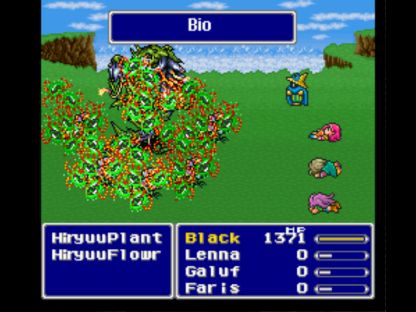
The Hiryuu Plant and its flowers are dangerous for any class that can't hit all opponents at once. Fortunately, the Black Mage is not one of those jobs. Bio (powered by the Venom Rod) did about 900 damage to all targets, easily enough to kill the plants each round. They only have 100 health each, after all. A dozen rounds of casting and the boss went down. Never had a chance to attack Black. Just as it was for Solo, this was an easy encounter.
The ship battle against Gilgamesh and Enkidou was the next one I had to worry about. The other enemies on the ship died in one casting of Bio, no sweat on Black's part. Two castings of Bio (each doing roughly 1900 damage) would get Gilgamesh to call in Enkidou, who always leads off the battle with "White Wind" and heals them both back to full. Black targeted Enkidou first, as he had fewer hit points (only 4000) and could cast that nasty "Vampire" draining spell. Three Bios would do it. Then Black needed about five rounds to wear down Gilgamesh. I had Black equipped with the Flame Ring so that he could heal himself with Fire 2 as needed, and that seemed to work pretty well. Ended up having to do the battle three times, because Gilgamesh used that horrible "Death Claw" spell the first two times. Just a matter of running the battle until he avoided it in his AI routine.
The first couple of battles in the Barrier Tower gave Black enough ability points to master his job:

Unlike Solo, Black only had two abilities to play around with - and one of them was entirely useless! The "!Black" ability allows other jobs to cast black magic, which is extremely useful in a normal game and completely pointless for this variant. The "MP +30%" ability functioned exactly the same as the HP one that Solo had employed. I probably wouldn't have picked it had their been other options, but there weren't. Overall, not much that Black could do in this area. I found it reassuring that Black maxed out his job at the same point in the game as Solo had done so. Looks like I was on track for this variant as well.
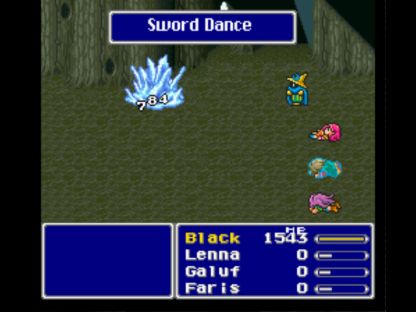
Once again, I needed to pick up a Wall Ring drop from the Wall Knight enemies in the Barrier Tower. However, these foes are permanently in Wall mode, and thus spells cast at them will simply reflect back on the caster. I was going to have to get creative here to kill these opponents:
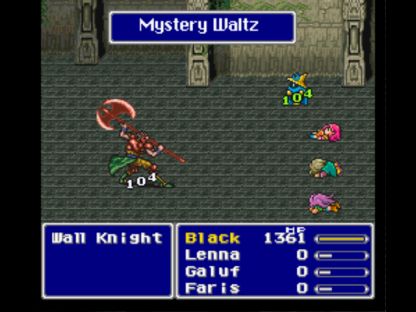
The answer was the Dancing Dirk, which randomly uses the four Dance commands when attacking. Sword Dance would do great damage (even from the back row), Tempting Tango confused the Wall Knights so that they would attack themselves, Jitterbug Duet functioned as a Drain spell and did solid damge, while Mystery Waltz stole magic points to cast more spells. Black could also cast the spell Drain itself, which ignores Walls, although this required multiple castings to deal enough damage to kill the Wall Knights. Eventually, a Wall Ring dropped and then Black could reflect spells off of himself to take them out. The Dancing Dirk is useful in all sorts of situations - don't sell it!
That brought Black to the Atmos (also known as Atomos) fight. I make no bones about it: I hate this boss above all others. Every other boss in the game can be planned around, and neutralized with the right equipment setup. With Atmos, there's nothing that a solo character can do. Once he drags the three dead chracters to the left side of the screen, he WILL open up with repeated castings of Comet, and your character WILL die unless they're at some ungodly high level. Otherwise, you have exactly four rounds of combat to deal 20,000 damage to Atmos and finish him off before he goes into Comet mode. This is the Duriel fight of FF5, a pure variant buster that breaks nearly all solo builds. I hate it. 
I tried my best with Black, but obviously it was far short of what was needed. Each casting of Bio did a little over 2000 damage, and four times 2000 was nowhere near 20k damage. Breaking rods only did marginally more damage, not significant enough to make a difference. Argh. The answer to this battle is to go level up until your character can inflict enough damage to kill Atmos in four or five rounds. No planning or strategy involved, just grind grind grind until damage magically increases to the amount needed. As I said with Solo, phooey on that! I'm not going to ruin the rest of my variant just because this one battle is broken for a solo character. I know I can do this battle; it just involves grinding out 25 additional levels in a meaningless bout of tedium. No thank thee.
I did the same thing with Black as with Solo, starting with one character dead instead of all three and killing the others off throughout the fight. The extra two characters did nothing but defend, of course. This gave Black the additional time he needed to win the fight:

I really don't like doing this battle this way. It always feels like cheating. If anyone knows a better way to do this fight, or something that I'm overlooking, please let me know. It's one of the few battles in the game that I don't have an answer for.
With the Barrier Tower out of the way, Black could finally go to Mua where all sorts of goodies awaited. There were two different pieces of equipment (Magus Hat and Lumina Robe) on sale that boosted Defense, Magic Defense, and Magic Power! Win-win-win all around. Combined they took Black's Magic Power from 57 to 60, which increased his overall multiplier and thus spell damage. More importantly, Mua had the fifth-level black magic spells on sale: Fire 3, Ice 3, and Bolt 3. Each had a base spell attack value of 185, and that could be boosted to 277 with the appropriate rod! More damage than Flare (254), in fact, although Flare is non-elemental and pierces Magic Defense. All of a sudden Black could annihilate foes again, doing 2000+ damage to all opponents with a single casting. Unlike Solo's steady rise in strength, Black tended to gain power in big jumps when he gained access to better spells, and this was possibly the biggest such jump in the whole game. None could stand before the mighty magics of the Black Mage!
Guido's Cave was easy, and it's a short dungeon anyway. The Forest of Mua gave great experience, and the enemies here were mostly vulnerable to fire. There was one opponent called the GajriGajra, who absorbed all of Black's elemental spells. That meant breaking out the Dancing Dirk once more, which worked extremely well. Black continued to get "Mystery Waltz" with some regularity, allowing him to steal magic points and continue casting his destructive spells. Black ended up gaining four whole levels in this region, going from 41 to 45 before finishing. That was nearly identical to where Solo had been, I think.
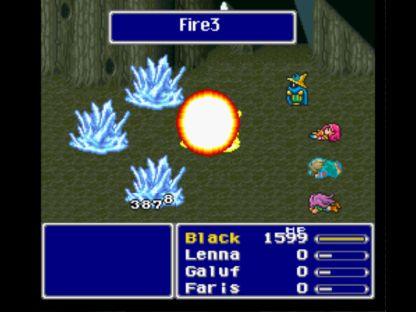
The four Crystals mostly absorb elemental attacks, but it turns out that fire works against all but the Fire Crystal (the one at the top). I spliced together two screenshots to demonstrate how much damage a single casting of Fire 3 would do; the Crystals each have 7700 health, and one spell would do about half that! Because the Crystals begin casting strong elemental attacks when they get down into the critical area on health, I found the safest approach to be casting Fire 2, then two Fire 3s, which would be guaranteed to kill the target. Two Fire 3s ran the possibility of leaving the target alive with a small amount of hit points, opening up their nasty elemental attacks. This sufficed to take out the first three Crystals with ease.
The Fire Crystal is immune to fire, ice, lightning, and poison. It has to be taken out with physical attacks instead. (For some reason, EVERY Black Mage guide mentions this, although none of them talk about the same deal with ArcheoAvis, which is a much more dangerous fight.) That's not to say this battle is in any way difficult; the Crystal has a weak physical attack, and equipping a Flame Ring can negate its fire damage when it opens up with Fire 3. Black slowly wore it down over about twenty rounds of combat using the Dancing Dirk. Very little danger. Unless my experience with Solo and Black has been deceiving, I think this boss just isn't that tough overall. Make sure you have a Flame Ring on hand, and most of your problems are solved.
Notice how dead Galuf already has a Wall Ring equipped for the Exdeath cinematic sequence? He he. 
I thought that Black would have a little more trouble in Exdeath's Castle, but that wasn't the case. Fire 3 continued to annihilate all comers, even those who didn't have any specific elemental weakness. Fire 3 + Flame Ring healed Black whenever he got into real danger, and the Wall Mages who couldn't be targeted directly with spells fell prey to (what else?) the Dancing Dirk. Love that dagger. Black has to use a lot more Tents/Cabins than Solo (to refill magic points), but he takes a lot less physical damage and needs fewer Hi Potions. It's an interesting contrast.
Gilgamesh battle #4 proved to be a little troublesome, with Black getting hit by lots of status ailments that screwed him up. Black won the fight on about the fourth try, when he managed to avoid the worst stuff. I actually continued casting even after being hit by "Mini", since it doesn't do anything to stop magic. Nothing too difficult here.
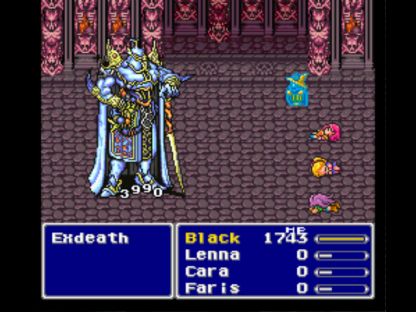
Black had a MUCH easier time against Exdeath than Solo did. It was all about the amount of damage that each could do; Solo could only do about 2000 per attack unless he used BuildUp, while Black's powered-up castings of Fire 3 were doing roughly twice that. Black thus moved quickly through Exdeath's first 16,000 health and reached his second, less dangerous AI routine where the Wall Ring reflected back the boss' own spells at him. The only real issue was the fact that Black had significantly fewer hit points than Solo, forcing me to use Elixirs a little more aggressively at times. With 11 in inventory however, Black could down 3 or 4 without breaking a sweat. My first attempt at the battle saw Black get hit with Condemn, and thus lose automatically when the timer ran out. On the second try, Exdeath didn't use Condemn and Black actually ended up winning:
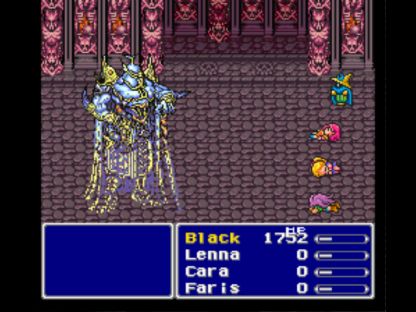
Wow, only two tries needed!  I actually had more difficulty with Gilgamesh, if you can believe it. Black was also only level 47 here, rather than the level 52 Solo needed to win. No bones about it, this is simply an easier encounter for the Black Mage. Very nice.


