
In the third world, the Antlion fight occasioned no difficulty whatsoever. Fire 3, Fire 3 and it's dead. That was simple. Another battle where Black had it noticeably easier than Solo. Rather than head directly for the Pyramid, I sent Black on a quick detour to Mua. He picked up another important item there:
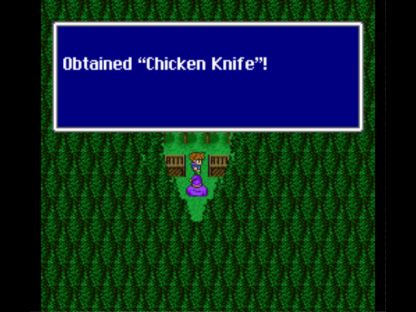
The Chicken Knife! A fabulous weapon, the Chicken Knife starts out with an attack of 1 and increases every time that you run away from battle, throughout the entire game. It's the opposite of the Brave Blade, which begins at attack 150 and decreases with each retreat. For a Knight or Bare job, the Brave Blade is likely the better choice. For every other class, the Chicken Knife is the way to go. It can be powered all the way up to an attack of 127 with enough running - that's more damage than Excalibur! The Chicken Knife actually does even more damage than expected, because there is a bonus addition to the multiplier that incorporates Agility as well as Strength. It can end up doing even more damage than the Brave Blade in many cases, and with no need to preserve the perfect record of fighting all battles. The one down side is that the Chicken Knife has a 25% chance to run from battles when selecting "Fight". Still, there are a number of semi-abusive ways to get around this restriction, like using the Hunter's X-Fight or the Ninja's 2-Hands abilities... 
For Black, this was his ultimate physical weapon. It started out with an attack of about 35, and I went ahead and spent some time running away from dozens of battles to power it up to full. Thanks to the emulator's fast-forward feature, I was able to get an hour's worth of running done in about 10 minutes. Sweet! Black would still be casting spells in the vast majority of situations, but it was nice to have some physical backup on hand in case he was Muted (or something like that).
Black mixed up Fire, Ice, and Lightning spells as appropriate when running the Pyramid. Most foes here were weak to something, and those that weren't were felled with ease by juiced-up castings of Fire 3. Black took significantly less damage here than Solo did, which was good considering he had a lot fewer hit points. The dreaded Machine Head robots had their teeth pulled:
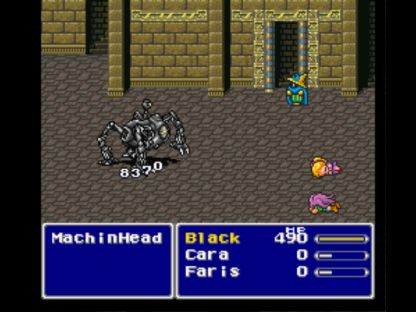
A single Bolt 3 and they were terminated. Wow! Watch out for the Black Mage once he gets his full assortment of spells. If it's got an elemental weakness, it's going down in a hurry.
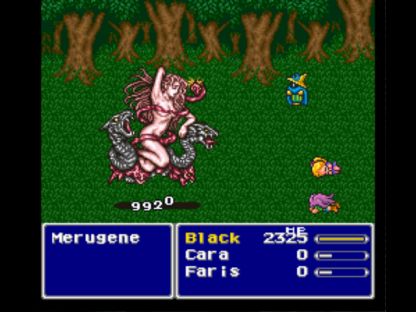
Mellusion/Merugene is the boss who changes up her weak point throughout the battle swapping between Fire, Ice, and Lightning. I peeked at the code and saw that she begins the fight casting Ice and Lightning spells, thus beginning with weakness to Fire. Black therefore went into the battle with a Fire Rod equipped, which put out insanely good damage (see above). I expected Mellusion to change her elemental barrier after one such casting, but nope, she just attacked normally. There's a graphical display when that happens, and I didn't see anything special happen. So Black cast Fire 3 a second time and banged out another 9000+ damage. Mellusion attacked again in response, and Black finished her off with a third Fire 3. The whole thing lasted about ten seconds. 
This was almost a little too easy. Ever since getting access to Fire/Ice/Bolt 3, Black had pretty much been on cruise control. He didn't even have Flare yet! The Black Mage was probably a little tougher than the Monk in the first world, but vastly easier so far in world three. Multi-targeting and the ability to stay in the back row just make everything so much simpler.
The Solitary Island Temple gave good experience and was relatively straightforward. Black gained three levels, from 49 to 52, in here. The one problem he encountered was Ixecrators casting Level 5 Doom when he was level 50, and wiping him out instantly. No Bone Mail to deflect those Doom spells, unfortunately. Gaining another level eventually solved the problem. Stalker didn't pose any special difficulties, since Black could target the whole group of four and avoid having to guess. Had to do the fight about four times, until Stalker's various Charm and Hurricane attacks didn't hit at the wrong time and cause a death.
That brought Black to Fork Tower, where I fully intended to fight both bosses with my solo character this time around. The Minotaur presented the more serious challenge for a Black Mage. How to take on a purely physical boss with a wimpy casting character?
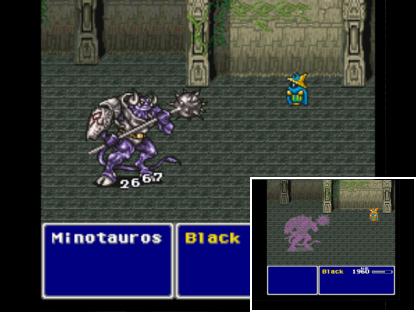
Answer: move Black to the front row, equip the Chicken Knife and the Running Shoes (Haste), and hack away! Even a weak mage with pathetic 19 Strength like Black could do some serious damage with a fully-powered Chicken Knife. Although Black lost a couple rounds to the Knife's flee effect ("Can't Run!"), it didn't cause any real problems. The Minotaur did about 700 damage when attacking, so Black healed using Elixirs as needed. I could go ahead and down them without consequence, since this fight wasn't going to be saved (i.e. my real run would have Black go up the magic side of the tower). Black ended up winning on the first try without any serious problems (see inset picture above).
Now I had no doubt that Black could take on Omniscient at the top of the left tower. The bigger issue was how to take on the Minotaur at the top of the physical tower with three barely-used, low-level spare parts! I'd been thinking about this for a while, and reasoned the easiest solution was the same one I used with solo Galuf against Gilgamesh: turn them all into Samurai and use GilToss for big damage. I spent some serious cash to purchase two additional RunningShoes accessories, enough to give all three characters Haste status. Then they each went into battle hurling cash left and right. The Minotaur would kill any of the three in one hit, but they could keep reviving each other with constant Phoenix Downs faster than he could kill them. Pretty soon the boss went down. The total cost for this little sidebar was about 125,000 gold - pricey, but successful!
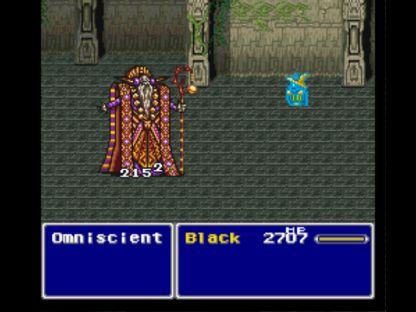
Black totally humiliated Omniscient, more so than any other boss in the whole game. Fire 3 did great damage (Omniscient is always in permanent "Shell" mode, so takes half magic damage) and all of the boss' spells simply reflected off Black's Wall Ring back onto the caster. Black didn't take so much as a single point of damage. I don't think any other class can own him so completely, with the possible exception of White and Time Mages.
I made sure to get the Magic Lamp before heading into the Great Trench dungeon, so that I could save myself a trip on powering it up. With all the enemies in here being undead, you'd think they would be weak to Fire spells. No such luck - they're all weak to Holy element, but not Fire. The undersea trench is therefore like some bizarro version of the normal game, where White Mage (Holy) and Bard (Requiem) are the two strongest classes. Very, very strange. 
Black made use of the Magic Lamp against the boss trio at the end of the dungeon. For Solo and his pathetically low Magic Power stat, the damage of the summons had been less than his normal attack, and thus not worth much. Black, however, had a very high Magic Power number, which meant that Bahamut did a ton of damage to all foes. I tried to spread out the rest of the damage evenly by casting Bolt 3, since none of the three bosses were strong or weak against lightning. Unfortunately, the damage must not have been spread evenly enough, because the first time I tried this Black accidentally killed two of the three and left one alive, and he was taken out when they retaliated with Delta Attack. Slight change of tactics: start with castings of Bolt 3, and then FINISH with a Bahamut summon, which meant less room for error in taking them all out at the same time. This worked out successfully without a hitch.
Black recharged the Magic Lamp on the way out, then proceeded to Istory Falls. Most of the enemies there were weak against lightning, and even the ones that weren't fell to repeated castings of Bolt 3. I kept waiting for the challenge to increase, and it wasn't getting any tougher. Two castings of Fire/Ice/Bolt 3 were still taking out any group of enemies. Leviathan was the same story:

Coral Ring to absorb his Tidal Waves, then a whole lot of Bolt 3s on offense. Look at that crazy damage! Black had even less trouble here than Solo did, and Solo didn't exactly have a lot of trouble.
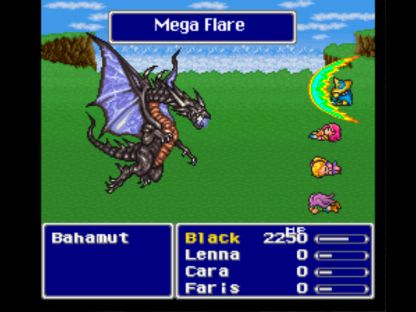
I went back and grabbed the Odin summon after completing the fourth primary dungeon, just for purposes of completion. (And I know that I missed Shoat and Carbunkle earlier, so there's no reason to point out the holes in my logic!) I actually forgot to equip a RunningShoes accessory for the Odin fight, and yet Black was doing so much damage with his spells that he still won with time to spare. Against Bahamut, I got a little more creative:
You would think that I'm using the Wall Ring here to reflect Bahamut's Mega Flare back on him, but that's actually not the case. Black was using the RunningShoes again for Haste status, and I was having him break out use of an item I haven't mentioned yet. That was the Wonder Rod, an item turned up in Fork Tower that can cast any White or Black magic spell in the game. Much like the Magic Lamp, the Wonder Rod starts with the first-level White magic spells, and proceeds in order through every spell until casting Holy. After that, it goes through the Black magic spells, then cycles back to the White ones and begins again. Unlike the Magic Lamp, it never has to be recharged either - a definite plus. Black could already cast all of the Black magic spells, but this gave him limited access to all of the White ones as well! I prepped the Wonder Rod ahead of time, and had it cast Shell, then passed through Heal and Cure 3 to Wall. Black was therefore getting the benefits of Haste, Shell, and Wall at the same time!
Naturally this begs the question, why didn't I use the Wonder Rod with Solo in my previous game? The answer is the one limiting factor of the weapon: it can only be used by jobs that equip rods. Obviously the Monk is not one of them, and there actually are relatively few jobs that can use rods. Still, for the jobs that do employ rods, this is an amazingly versatile weapon that can and should factor into your plans when playing a variant. You'd better believe that Black planned to use Shell in the final battle against Neo Exdeath! 
A few more quick words about Black's equipment. His mainstay weapon was the Wizard Rod, one of the Twelve Legendary Weapons, which functions much like the elemental rods in granting the Magic Up boost. It's better than the others though, since it provides a boost to fire, ice, lightning, poison, air, and earth elements! No more carrying around four different rods and switching as the situation demanded. Black used the Circlet and Black Robe (appropriately named!) for armor, as they provided substantial boosts to Magic Power and also above average Defense. Finally, I generally gave him the Guard Ring for his accessory; the addition to Defense was helpful, and the Regen status kicked in enough to be noticeable. Obviously many other accessories were used as the situation demanded against bosses. Most of the gear that Black turned up was sold to buy additional Elixirs. I tried to sell the excess Legendary Weapons, only to find that they were worth a measly 5 gold each. Bah!
Into the Cleft of Dimension (or "N-Zone", if you're using that horrible Playstation translation). Black found a good solution for the Land Crawl enemies in the first sandy area: one casting of Doom would drop them instantly. What wasn't so fun was the following Lonka Ruins part, where one of the enemies could cast Roulette and put Black's life in the hands of a dice roll. Solo hadn't had a problem here, because the Bone Mail protected against Roulette and Level 5 Doom. (Both spells actually healed him to full health!) No Bone Mail meant a problem. Got wiped out here a few times and had to start over, argh.
Calotisteri/Wood Sprite did nothing but cast Old and Stop. I had equipped an Angel Ring to guard against Old, and Black simply pounded away with Fire 3 until she croaked. Never saw a Drain spell, her trademark attack, so the lack of Bone Mail wasn't a problem.
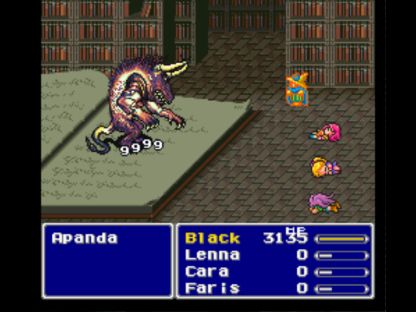
Apanda - Byblos 2.0 - was weak against Fire, so you pretty much know how that turned out.  Three castings at max damage finished him off quickly.
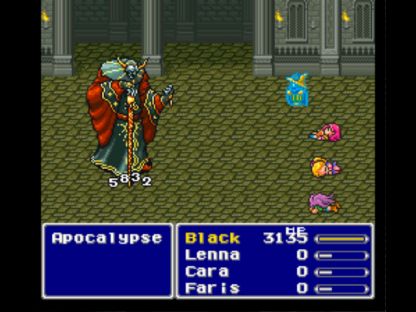
Apocalypse and his Blue Magic spells always present an unusual challenge. I looked at the Algorithm Guide and saw that he had a weakness to Poison, of all things. That was good, because Apocalypse has an extremely high Magic Defense of 70, which would have drastically cut down normal spell damage. Yes, I could have used Flare because it penetrates Magic Defense (it cuts it by 3/4), but Bio still ended up being the best choice. Wasn't expecting that. Black needed two attempts for this battle. The first time, I went with the Wall Ring and ended up getting hit with Condemn, and Black couldn't quite do enough damage to win before the timer ran out. The second try, I decided to ignore the Wall Ring, and gamble that Black would avoid the really bad stuff, going with the Running Shoes instead. This actually worked better, taking out Apocalypse faster and thus giving him less time to go through his dangerous spells. Won on the second attempt.
Physical jobs can do this fight without too much trouble. Casting jobs that don't have access to Poison element could find themselves in real trouble, against that high Magic Defense. The White Mage (Holy) and Time Mage (Meteo) would probably be OK. Red Mage would really have some trouble though. I can see at least one way to do it, but it would involve some serious planning ahead of time. Maybe I'll explore that at some point...
Catastrophe didn't have enough health to pose a problem. 20k hit points meant little with Black doing 5000+ damage per casting. With RunningShoes equipped, he only got to attack twice before Black finished him off. Probably the easiest boss in the Cleft of Dimension, even more so than Wood Sprite and Apanda.
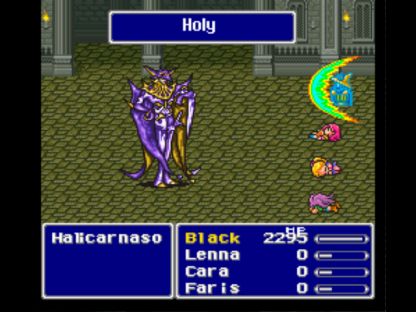
I wised up against Halicarnassus and gave Black the Wall Ring for this fight. When she eventually got around to casting Holy, it was reflected back and did 9999 damage to her (see above). Her other attacks were not worth worrying about. The Frog status from Kurururu was easily cured with the Toad spell, or even a Maiden's Kiss item.
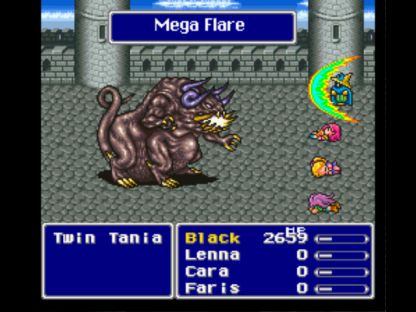
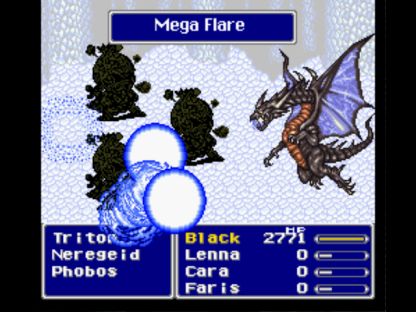
Twin Tania responds to physical attacks with Leviathan's Tidal Wave, so Solo had equipped a Coral Ring for this fight to absorb them. Twin Tania responds to magical attacks with Bahamut's Mega Flare, however, so Black instead equipped a Wall Ring. While reflecting those attacks back wasn't quite as good as absorbing them for free healing, it still wasn't too shabby. The fight was actually humorous at some points: Twin Tania cast Atomic Ray, which was reflected back on him. Then he responded to THAT attack with Mega Flare, which was ALSO reflected back for more damage!  The sole dangerous part of the fight was when Twin Tania charged up "Giga Flare", an even more powerful version of Mega Flare which can't be reflected. I had Black use an Elixir right before it hit; the attack did 3000 damage, and Black had 3100 hit points at max. Whew! Gulped another Elixir and came through the situation OK. Twin Tania died before getting the chance to use it again. The low Vitality of the Black Mage almost cost me here.
Black did the whole Cleft of Dimension up to Twin Tania in one go. He probably could have gone further, except for the fact that I needed to make preparations for the next battle against Necrophobia, and it would be vastly easier to do that against the easier foes outside the final dungeon. For this penultimate fight, Black needed to do two things ahead of time: cycle through the Wonder Rod back to Shell again, and prep the Magic Lamp for Golem. I went back to Mirage, restocked on Hi Potions, and prepared these two items against the non-threatening foes in Istory Falls. After a long trek back, it was time to face Necrophobia:

He's a tough opponent for a Black Mage. All of the Barriers start out in permanent Wall mode, so casting spells at them won't work. Summoner (Bahamut) and Time Mage (Meteo) wouldn't have this issue, but the Black Mage does. Now I could have equipped a Wall Ring and bounced spells off of Black at the enemies; however, that would have meant giving up the RunningShoes and Haste status, which I wasn't willing to do. Instead, I put Black in the front row and had him hack away with the Chicken Knife! There was no added danger from the front row, as the Barriers do nothing but cast magic. Meanwhile, Black's Shell status - enacted on the first turn of the battle with the Wonder Rod - cut the damage he was taking in half. He would have died from the initial barrage of Flare/Holy spells if I hadn't done this! Four castings at ~500 damage was no problem. Four castings at ~1000 damage would have meant instant death.
Fighting with the Chicken Knife was a rather tedious process. Black Mages just aren't meant to be melee fighters. Each attack did 2000 damage, but far too many rounds were wasted when the Knife's Flee effect kicked in (and did nothing, since you can't run from Necrophobia). The Barriers ran out of magic points long before Black killed them; they actually only have 300 MP each, and drain that pretty quickly with all their Flare spells. Black therefore had plenty of time to whittle down each Barrier, cast Golem with the Magic Lamp, and move into the back row when the last Barrier was on the verge of death. Why the focus on Golem? To prevent Necrophobia's Maelstrom/Attack deadly combo. I got a picture of the Golem summon in action:

As it turned out, Necrophobia never actually used Maelstrom, so my precautions were unnecessary. But my strategy would indeed have worked, if it had been needed. Thanks to the lessons I learned with Solo, this fight was a lot easier than it could have been. The unshielded Necrophobia is weak to just about every element under the sun, and all of Blacks spells did 9999 damage to him. He went down fast. Got it right on the first attempt, yay!
Only Exdeath remained now. Ugh. I wasn't looking forward to the final battle, to say the least. First things first: Black had to leave the Cleft of Dimension and walk all the way back out again (no Exit spell! He's no Time Mage!) to go recharge the Magic Lamp in the Great Trench. Then I had Black cycle through all the spells in the Wonder Rod to get back to Shell again. Oh yeah, gonna be using that one in the final battle too! I would have liked to use Armor as well, to cut down on physical damage, but there were just too many spells between Armor and Shell in the Rod's cycle. I couldn't exactly waste a half-dozen rounds of combat cycling through useless spells in the exceedingly dangerous final battle! Shell it was then.
Back to the final save point, make sure everything is prepared, and then get started with the first attempt:
The Exdeath "Tree" form is a darned tough battle in its own right. It's probably harder than 80% of game-ending bosses all by itself, to say nothing of the second form! Rather than try to explain everything in words, let me give you the AI routine for this boss:
{Fight,White Hole,Nothing}
{Fight,White Hole,Fight}
Condition:HP < 30000{
{Flare,Holy,Fight}
{Fight,Fight,White Hole}
{Fight,White Hole,Nothing}
{Fight,Condemn,White Hole}
}
Condition:HP < 10000{
{Meteo,Fight,Nothing}
}
As mentioned before, the AI randomly picks one of these three actions from each row, then goes to the next row and continues cycling through them repeatedly. The two conditions should be fairly self-explanatory; Exdeath's actions changed when he dropped below 30k and 10k health. The starting routine wasn't too bad, as Exdeath's Fight only did about 750 damage to Black. Flare and Holy (in the second routine) were more dangerous, at a little over 1000 damage each, and Condemn was of course a ticking death clock if it came up. However, the main danger was OVERWHELMINGLY Exdeath's White Hole spell. The move caused instant death if it hit, and it usually hit about 75% of the time. Look at the routine: Exdeath had a 1/3 chance to cast it almost every damned round! White Hole killed Black so many times it wasn't even funny. The programmers of this game were just evil when they came up with that move. Defeating Exdeath's Tree form inevitably meant running an inordinate amount of attempts until luck saw Black manage to avoid his one-hit kill cheesiness. Oy. 
Assuming Black could dodge all that, he still had to avoid Exdeath's Meteo spell when the boss dropped under 10k hit points. Now remember that I had set Shell status on Black at the beginning of the battle, or any casting of Meteo would have meant instant death. With Shell, he could usually survive a casting, if at max health, although a few unlucky rolls on the Meteo damage could still mean defeat. Sometimes Black would get lucky here, and get the "Nothing" AI action. Other times he would get slammed with Meteo. Once, Exdeath used Meteo three times in a row, at 1/27 odds! Probability can do crazy stuff - that's not really that unlikely an outcome. With luck, determination, and a lot of tries, Black was able to get past this form and move on to the second half of the battle.
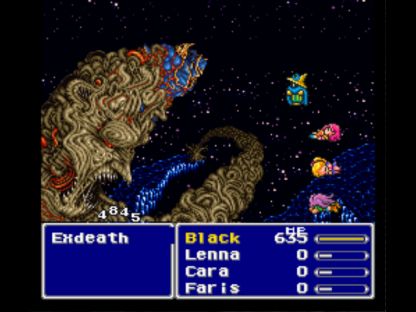
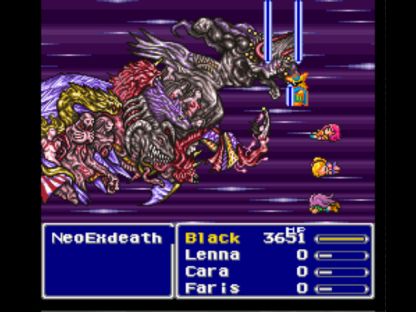
Because the final form has four different parts, the Magic Lamp was useful for summoning espers that would damage all of them at once. This wasn't an option for Solo; remember, his Magic Power was so low that even Bahamut did less than 1000 damage! For a caster like Black, Bahamut dished out real damage:
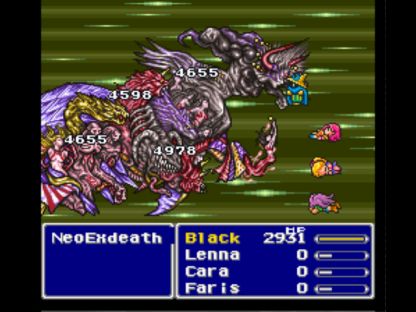
Almost 20,000 total damage issued there! Going into the last showdown with a fully charged Lamp therefore seemed like a good idea, rather than starting the fight with Odin prepped. There was a drawback though: Part #4 (the one that gets taken out by Odin) had a 1/3 chance to use "Delta Attack", another insta-kill move. I reasoned that I could probably avoid this once, and Black would start the battle anyway with Bahamut/Leviathan/Odin, so Part #4 would be going down quickly anyway. At least, that was the plan...
Attempt #1 hit by Delta Attack
Attempt #2 gets taken down by Grand Cross (death status)
Attempt #3 made it a long, long way. Black successfully eliminated Part #4 with Odin, and wore down Part #3 (the physical one) with a sequence of Fire 3 spells. He was halfway through the other two parts when Grand Cross inflicted Aging Status. Nuts. Aging/Old status slowly drops all stats to 1, rendering the target character effectively useless. There wasn't anything I could do as I watched Black's damage from his spells fall from 5000 to 4000... or was there? The next spell after Shell in the Wonder Rod's cycle was Heal - which cures status ailments! Would that work on Aging?
Yes! Now it doesn't reverse the stat loss that's already taken place, but it prevents further deterioration. Although Black was stuck doing 3000 damage instead of 5000, he was still alive and in business! At least, until he was taken out by a final Grand Cross a mere instant before winning. Part #1 had 1451 hit points left, and Part #2 had 1271 left. Black was 98.7% of the way there. Yeargh! 
Attempt #4 defeated by Grand Cross (stone status)
Attempt #5 hit by Delta Attack
Attempt #6 hit by Delta Attack (good grief! it's showing up 50% of the time!)
On the seventh attempt, Black again made it amazingly far, down to the final two parts, only to be taken out by a last-second Grand Cross again. The two parts combined had less than 5k health remaining, out of their initial 220,000 hit points. Sigh. Just gonna be one of those days, it seemed.
Because I'm talking about Grand Cross so much, let me explain more about what it does. The spell can inflict any status ailment in the game; essentially, there are 18 different outcomes determined by a roll of 0-17:
If N1 = 0, inflict Dead status (instant game over)
If N1 = 1, inflict Stone status (same result - death for a solo character)
If N1 = 2, inflict Toad status (easily cured)
If N1 = 3, inflict Mini status (easily cured)
If N1 = 4, inflict Poison status (easily cured)
If N1 = 5, inflict Zombie status (another game over)
If N1 = 6, inflict Darkness status (laughable non-threat)
If N1 = 7, inflict Aging status (curable with the Wonder Rod, as explained above)
If N1 = 8, inflict Sleep status (irritating, not serious)
If N1 = 9, inflict Paralyze status (useless - blocked by Haste status)
If N1 = 10, inflict Charm status (potentially dangerous, usually knocked out of this though by physical attack)
If N1 = 11, inflict Berserk status (deadly, although it could actually be cured by the boss' Dispel move!)
If N1 = 12, inflict Mute status (irritating, not serious - Mute wears off quickly)
If N1 = 13 or N1 = 14, inflict Stop status (useless - blocked by Haste status)
If N1 = 15, inflict Countdown status (death clock)
If N1 = 16, inflict HP Leak status (laughable non-threat)
If N1 = 17, inflict Weak status (curable with Elixir)
So four of these 18 (death, stone, zombie, countdown) were practically guaranteed death, and another three (Aging, Charm, Berserk) could cause problems. Others were laughable, or couldn't even affect Black. Just what I always wanted, a big stinking dice roll determining my fate in the final battle! From a variant standpoint, this was depressing.  No matter how good your planning, much of the ending encounter boils down to avoiding bad outcomes from random number generators. So much of FF5 is well done, but this really... isn't. At least not for solo characters.
Attempt #8 hit by Delta Attack
Attempt #9 defeated by a Grand Cross Berserk at an inopportune moment
Attempt #10 hit by Delta Attack
Attempt #11 hit by Delta Attack (oh come on!)
Attempt #12 hit by Delta Attack (WTF!?!)
At this point, I gave up on the whole "have Bahamut do extra damage with the Lamp" idea. Even though Delta Attack was supposed to show up only 1/3 of the time, I'd gotten it on 7/12 runs so far. Enough of that - clearly my luck wasn't holding on that one. I fought a random battle and prepped the Lamp for Odin instead. I'd take my chances with Grand Cross and see what happened.
Attempt #13 defeated by Grand Cross (death status)
But on Attempt #14, Black dodged five different Grand Crosses: Charm, Toad, Mini, (nothing - Stop/Slow?), and Weak. I made no screw-ups, and he emerged victorious! 
Wow, what an ordeal that was. Black needed 14 tries to defeat Neo Exdeath, and since I lost to the first form about 80% of the time, the overall number of attempts was likely well over 50. Yikes. The sole redeeming factor is that these battles have kickass music playing in the background. I don't think the battle was any harder for Black than it was with Solo, just that Black tended to have the worst possible outcome show up at the wrong moment. Barring a disastrously bad Grand Cross roll, Black would have won on Attempt #3, and saved me at least an hour of tedium.
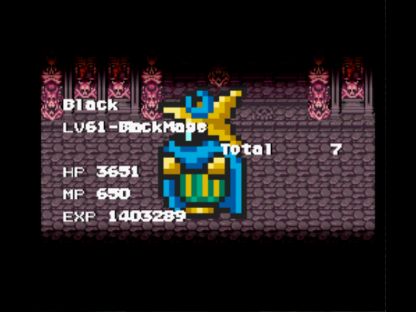
I was pleased to be able to finish the game at a significantly lower level with Black, at lvl 61 compared to 75 for Solo. That's not a fair comparison, of course; the Monk needs to increase in level to increase damage, while Black wasn't gaining much in terms of damage after he gained access to Fire/Ice/Bolt 3 and Flare. It was certainly different playing a character who had 3600 health instead of 9200 though! One of the big surprises was the fact that Fire 3 was superior to Flare in almost every situation. Using a Flame or Wizard Rod, Fire 3 had a spell attack of 185 x 1.5 = 277 compared to 255 for Flare. It also cost fewer magic points too (25 compared to 37). Black barely cast Flare at all throughout the whole game. A good sign of the usefulness of those Magic Up items!
This was a lot of fun, but I'll probably need to take a break for a little while. That final boss battle really wore me out. If you decide to do a solo run in FF5, make sure to bring an ample supply of patience with you. 


