
I mentioned in my last Final Fantasy report that I was going to take a look at the forgotten SNES game next, the overlooked Final Fantasy 5. The key feature of this game is its intricate Job System, whereby your four characters can switch back and forth between 22 different jobs (or classes) and learn abilities from each of them. By mixing and matching the abilities of different jobs, you can put together extremely powerful combinations. For example, if you level up a character as a knight and a white mage, you can combine them to create a knight that can also cast white magic. And the combinations only get more exotic from there - how about a dancing ninja? A summoning berserker? A samurai chemist? Yeah, it can get pretty crazy!  Certain combos are definitely stronger than others, but there's nearly infinite replayability by doing things a different way, and finding alternate paths to victory. As T-Hawk predicted at Realms Beyond, Final Fantasy 5 is a game made for variants.
The one knock on this game is that it has a poor "story", and that the characters aren't well-developed or interesting. That's certainly true: the plot is as generic and cliched as you'll ever see, and there's not much personality amongst the four characters. Still, my response to this criticism would be the simple statement, "if you're looking for a good story, why are you playing a video game?" The whole point of having complex storylines and interesting characters in RPGs is to provide some relief from an otherwise tedious grind-fest. But in FF5, there is no slumber-inducing grinding: your "story" *IS* the gameplay! That is, you create the plot yourself by defining which jobs you assign to each character. This game simply doesn't deserve the maligning it often takes online, because it actually requires you to use some imagination and flesh out the personalities yourself. Heaven forbid gamers do that...
I played through the game once on a non-variant run to familiarize myself with the gameplay engine, and learn about what individual weapons/spells did and where to find everything. FF5 is a pretty big game, certainly much bigger than the original Final Fantasy, and there was a lot to pick up! I know the first game practically by heart after all these years, and it's a very big difference between knowing instinctively where the boss weaknesses are and having to flip back and forth to online guides for that same info. Fortunately, there's a fabulous FAQ written by J.L. Tseng detailing every single calculation that takes place in the game. (You could call it the Jarulf's Guide of FF5, and I don't use that term lightly.) By the time I completed that run, and annihilated the final boss with my awesome team of super-powered deathbringers, I was ready to start a variant run of some kind.
For my first such game, I decided I would return to my original Final Fantasy variant and reprise the solo Black Belt. Of course, the Black Belt class itself is gone, but the Monk job is nearly identical. The Monk fights bare-handed, equips only light armor, has a high rate of critical hits, and see damage increase based on adding more levels rather than finding better weapons. The game mechanics are literally almost identical! In other words, this variant means swapping immediately to the monk job and never switching to any other class, playing the game out in true black belt fashion. Time for Solo to embark on a new quest to conquer the world with the power of bare fists.
Two quick notes on the game itself. I am playing an emulated version of the Super Famicom game, using the excellent translation provided by RPGe. As such, I'll be using their translation for all of the character/monster/item names. Even "Butz", which is kinda silly, although I vastly prefer "Cara" to the name "Krile" that they used in the Playstation translation. Secondly, while you could technically use any character for a solo challenge, both Lenna and Galuf drop out of your party for non-trivial lengths of time. Between Butz and Faris, I went with the former since he looked closer to the original black belt character design. Butz is also the only character in the game you have the option of renaming, so I went ahead and rebranded him "Solo".
And off we go!
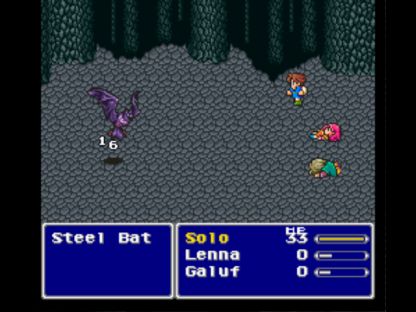
First things first: kill off the other three characters and get to work fighting alone. This picture was taken in the first cave, before you even meet up with Faris and her crew. Solo hasn't gotten the Monk job yet either; you pick up the first six jobs VERY early on, but not immediately. For the moment he was using the default "Bare" class, which can equip all weapons and armor but has no abilities whatsoever. I'll skip over the early uninteresting plot details; Solo met up with the other three characters, made his way to the Wind Shrine, and fought the first boss, the WindRaptor. The big bird, this game's version of Garland, took a while to take down when fighting with only one character. I had plenty of potions though, which made it easy. I also realized towards the end of the battle that I should move up to the front row, since all of the boss' wind damage was magical, and that vastly increased Solo's attack.
At the top of the Wind Shrine, Solo gained access to the first six jobs and began channeling the power of the monk!

Let me explain a little more about this class, since it's the only one we're going to be dealing with in this report. The monk has the highest base strength and vitality stats in the game, meaning a lot of physical damage and the best hit point growth of any job. (It also has the lowest magic power stat of any class, and thus the least magic point growth. Totally irrelevant for this variant though, since Solo will never learn or cast magic!) The monk will always get two hits, one for each fist, and damage increases as level goes up. More on that in a little bit. There are two other aspects of the monk job worth mentioning. The first is the option to use a "Kick" attack, which works exactly the same as Yang's move from Final Fantasy 2/4. The Kick deals weakish damage to all enemies - occasionally useful in some situations. The monk also has an innate ability called "Counter", which you could add to characters in FF3/6 and FF7 with relics/materia. The Counter ability gives the monk a 50% chance to counter-attack automatically whenever he takes physical damage. In some situations, the best strategy is to do nothing but defend and rely on Counter to defeat the enemies! The monk also has two other situational skills (BuildUp and Mantra) which I'll discuss later as they become useful.
Anyway, after the tiny Wind Shrine dungeon, Solo returned to the nearest town of Tule. I sold off all the starting weapons (useless now!) and spent all the gold saved up so far on potions. Ended up with about two dozen for the next area. That would be the Torna Canal, a very short dungeon that you actually sail through on a boat, ending with a boss fight against a crab-like creature called Karlabos. This was the first fight where Solo got wiped out, as Karlabos had a melee attack that could stun him into helplessness:

Nasty stuff! This was the beginning of Solo's lengthy travails against bosses who could inflict deadly status ailments. The first time I tried the fight, Solo never even got to issue a command, just got stunned over and over again while being slowly beaten to death. Karlabos also had an attack called "Tailscrew" that it rarely used, which functioned like a "Weak" spell: dropping hit points below 10 no matter where they started. The only healing option available to Solo was potions, which cured 50 hit points. That wasn't enough! I decided I needed to concentrate on offense, and getting in enough damage to kill Karlabos (650hp) before he had time to whittle down Solo. Moved him to the front row, and had much better results, the attacks increasing in damage from about 20 with each fist to 60 or so - 120 per attack total! On the third try, Solo got in a bunch of Counter attacks and avoided getting stunned, leading to victory. He was level 9 at the time.
Solo gained more excellent experience in the next area, the ship graveyard. He picked up a huge increase in damage at level 10, for reasons I'll explain in a minute. Gained a couple more levels against the relatively-easy undead opponents, leading up to another boss battle with the Siren.

I had forgotten where this boss fight gets triggered, and entered it the first time with Solo not at full hit points, in the wrong row, and without any clear idea of what my strategy was going to be. You can guess how that turned out! Siren swaps back and forth between two forms: a human form that casts magic, and an undead form that attacks. She has quite a few spells in the human form, which cause serious variation in how the fight plays out. For example, the first battle I tried saw me get hit with Sleep, which is really bad for a solo character! Once again, the superior strategy seemed to be starting in the front row, then swapping to the back row when Siren went over to her undead form, to cut down on the physical damage. (Magical damage is independent of row, so better to be in the front when she was casting spells.)
My second try, Siren led off with Mute - totally useless! That's where I snapped the above picture. Next round, she cast Cure, similarly pointless since Siren healed back 60 damage and Solo inflicted 200+. She used Bolt the third round, while Solo banged out more damage. At this point, I gave up on the notion of switching rows, and kept on beating away while she changed forms. It was all over in five total rounds of combat. (Siren only has 800 hit points.)
Less than 5% of the way into this game, and I've already killed three different bosses. If there's one thing FF5 is lacking, it isn't bosses! They're everywhere. Compare to the original game, which has about a dozen on the whole (Garland, Wizards, Astos, four Fiends x2, Chaos) and you see how many more potential road blocks there are in this game.
Why do the front and back rows make such a difference in damage? Time to pull out some formulas and explain how damage is calculated. If this doesn't interest you, just skip ahead a few paragraphs. According to J.L. Tseng's guide, the formula is as follows for Fist damage:
ATTACK TYPE (HEX: 30) (Fists)
1) Hit% = 100, Evade% = Target Evade%
2) Follow Hit Determination for Physical Attacks steps (6.2.1).
3) Use Fists Damage Parameters (6.4.6):
Attack = 3 + (0..(Level/4))
M = 2
Defense = Defense
If the Attacker has Brawl:
Attack = 3 + Level*2 + (0..(Level*2/8))
M = (Level*Strength)/256 + 2
Defense = Defense
If the Attacker Kaiser Knuckles (and Brawl):
Attack = Attack + 50
4) Apply Row modifiers to M (6.5.2).
5) Apply Command modifiers to Attack, Defense and M (6.5.3).
6) Apply Target Status Effect modifiers to Defense and M (physical) (6.5.11).
7) Apply Attacker Status Effect modifiers to Attack (physical) (6.5.12).
8) Apply Critical Hit modifiers to Attack and Defense (6.5.17).
9) Damage = (Attack - Defense) * M. Max Damage = 9999.
Let's break this down into smaller steps, because it's actually not very complicated at all. We'll start by assuming the attack hits (and skip the hit/miss calculation performed in steps 1 and 2). For the base damage number, we use the middle section, as Monks by definition always have the Brawl ability. The attack value is equal to 3 + Level * 2 + a random number between 0 and (level * 2) / 8. In practical terms, Attack is pretty much 3 + Level * 2; at level 12, most of Solo's attacks do a base damage of 3 + (12 * 2) = 27 damage. Defense is also simple to calculate, as it's simply the Defense stat for each monster. You can pull this right out of online FAQs. So far, so good.
The interesting part is calculating the multiplier number, which Tseng conveniently labels as "M". If you look again at the middle section, the base calculation for M is (Level*Strength)/256 + 2. Where the FF5 guys came up with this formula, I have no idea, but in practice it works really well. Let me give you a current example. Solo was level 12 at this point in time, with the default Monk strength value of 54. His multiplier was therefore (12*54)/256 + 2 = 2.53 + 2 = 4.53. An important note: FF5 uses integer math, and always rounds down (truncates) in calculations. So in our above calculation, the multiplier would round down to 4.
The final calculation is then extremely simple, as seen in step 9 above. (Attack - Defense) * M. Against an enemy with 0 Defense, Solo would do (27-0) * 4 = 108 damage, which was indeed what I was seeing. The other steps (4 through 8) deal with modifiers for unusual commands, status effects, and critical hits, which we can ignore for normal play. I do want to mention the row modifier (step 4) however, because of the huge effect that it had on Solo. Any character in the back row has their damage cut by half, a straight M/2 on the multiplier. Why is this such a big deal? Remember again that FF5 uses integer math. Let's say that Solo had a multiplier of 3 under normal conditions. In the back row, that would become 3/2 = 1.5 which becomes 1 after rounding down! Solo would be doing not double, but triple the damage in the front row under those circumstances. Now you might be inclined to just stay in the front row all the time given that math... but you'd be overlooking something critical. The math works BOTH WAYS, and the same limitations apply to the monster values of M. Thus, you do slightly more than double damage in the front row most of the time, and take slightly less than half of the damage in the back row. The best place to be therefore depends heavily on the situation. Both have their uses at times!
Anyway, getting back on subject. Solo picked up a slightly improved armor in the next town of Carwen, nothing worth writing home about though. The main thing I did there was load up on potions; I did a little extra fighting outside the town until Solo had enough gold to buy 99 of them. (Marsh Cave all over again, he he.) Took Solo up another level in the process, to 13. The following enemy area was North Mountain, which presented another boss battle about 3/4 of the way through. The fight starts against a magic-using woman named Magica, who calls in her husband Forza once she's near death. Knowing I would be facing magic attacks again, I had Solo in the front row to start the battle. He pummeled Magica pretty good, but she got in a nasty Drain spell that did almost 200 damage before biting it. Solo only had 450 hit points total - ouch!
Once the woman was gone, I shifted Solo into the back row against the melee-exclusive Forza. Solo was near death, forcing me to use a potion each round of combat. Forza would attack and do 40-60 damage, then Solo would respond by healing exactly 50 hit points back. And thanks to Counter, Solo would strike back 50% of the time when hit! Love that innate ability. We repeated this dance for over a dozen rounds until the brute finally dropped dead. Victory! Won on the first try this time by having the right strategy ahead of time. Should have grabbed a picture though, to break up the wordy text of this report.
The next town was called Worus, where the Water Crystal tower resided. There was another improved armor there for Solo, the Training Suit, which boosted Defense and also increased Strength by one point. Remember, Strength and Level are the two things that get factored into the multiplier calculation, so even a single extra point there was noteworthy. (Stats never increase by leveling in this game, by the way. Just hit points and magic points.) After another very short dungeon, Solo was facing off against yet another boss:
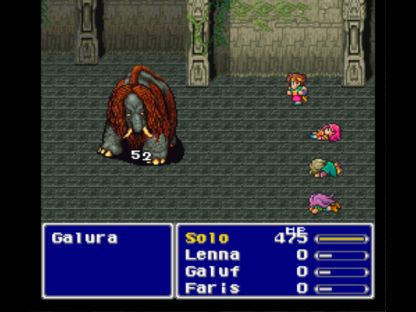
The... thing called Galura uses nothing but physical attacks, so this was a total slugfest. I put Solo in the back row to minimize damage, which cut his own attack down to a little over 100 damage per two-fisted round. That might not have been the best decision, because Solo was getting 5x multiplier in the front row, and only 2x in the back row. It ended up working regardless, thanks to a lot of successful Counters and several critical hits. Solo squeeked past with less than 100 hit points left, another tight victory.
Another village, another dungeon to follow. This is the pattern for basically every RPG, it's just a little more noticeable here because the early areas are so short in FF5. Karnak houses the Fire Crystal, and so understandably a lot of the terrain here had lots of little fires burning on them. Solo gained enough ability points to open up the Mantra command, which heals back some damage when used in combat:
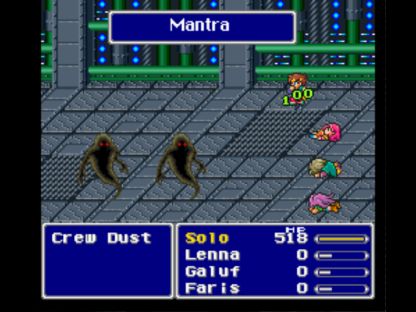
Even better, it uses no magic points! Too bad that it's only useful in the early parts of the game, due to its weak curative properties. (The problem here is actually not Mantra itself, but the disastrously low Magic Power stat possessed by the Monk. Mantra's healing power is halfway between Cure 1 and Cure 2.) For the moment, however, it was nearly an uber-ability. Solo could only heal back 50 hit points with potions, and Mantra would cure twice that, at no cost! The best strategy for random battles was therefore to sit in the back row, making no attempt to attack and using Mantra constantly. When the enemies did damage to Solo, he would use Counter and strike back at them without me doing a thing. This was a real-life saver on potions, and made this dungeon (the Steamship) a breeze.
New noteworthy item: Solo turned up the Green Beret in one of the chests, which increased all his defensive stats and also added one point to Strength and Agility. That was a major find, given how the multiplier number (M) works with Strength.
By the time Solo finished this area, he was up to level 19, where he reached the 6x multiplier in the front row (and 3x multiplier in the back row). Interestingly, just like the Black Belt, the Monk version of Solo is also getting "jumps" in damage increase, although definitely to a lesser degree. This brought Solo to the first truly interesting boss in the game, Liquid Flame:
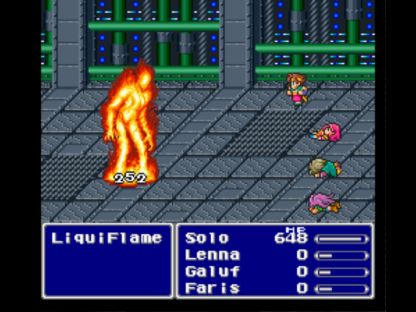
She (yes, it's actually a woman under there) uses almost entirely fire-based attacks, so I placed Solo in the front row again. Liquid Flame switches back and forth between three different forms, each with different attack patterns: a human form (pictured above), a flame tornado, and a fiery hand. The human form would either attack (good!) or cast Flame (bad!) The tornado form would cast Fire 2 on itself endlessly, which would be absorbed and heal damage. The hand form simply attacked Solo over and over again. Liquid Flame would change back and forth between these forms in response to Solo's attacks on her. Now - what was the best way to do this battle?
I was unsuccessful in my first attempt at the boss, trying to figure out the attack patterns. I was doing little more than attacking with Solo, and she responded by roasting him with fire attacks that were too damaging to heal. I probably could have won the battle by using some of my Elixirs, but couldn't get one off in time and died. Hmmm. That still seemed suboptimal. On the second try, I made the discovery that Liquid Flame wouldn't change forms unless Solo attacked her. After more experimentation, I found the solution. The best way to do the fight was to get her into the hand form, and then simply defend, using Mantra every round to keep hit points up and rely on Counter to deal damage. Remember, all of the attacks in that form were physical, which is what I wanted. Solo did still have to deal with an annoying "Fingertip" attack (which caused instant-paralysis for two rounds) and a long sequence of Fingertip attacks forced me to use a Hi Potion (500 hit points recovered) that I had found earlier. In the end though, it was no contest. Another victory won not through brute strength, but by having a plan.
After taking out Liquid Flame, the game serves up an interesting challenge: you have 10 minutes to get out of Karnak Castle before it explodes. The timed events were also present in FF 3/6 and FF7, for those who have played them. There are lots of treasures to grab before leaving, including a bunch of Elixirs and a nice accessory called the Elf Cape (which grants a 1/3 chance to dodge physical attacks). At the exit of the castle is a boss called Iron Claw. Well, the first time I did this, Solo grabbed all the treasure and made it out perfectly, only to have Iron Claw use his special attack "Death Claw", which paralyzed Solo and left him with 1 hit point remaining. Uhh... talk about cheap!  I swear, this game is ridiculously punishing if you don't know what you're doing. Fortunately, there was an easy solution to this situation: kill Iron Claw first (rather than last) in the boss fight, and he won't use the super-attack. Then finish off his accompanying goons afterwards. FF5 is so old-school, it's almost painful at times. There's nearly always a solution to every problem, but you're going to get your ass kicked until you discover what it is.
OK, on to the next spot of interest, which in FF5 is... a library. Gotta give them credit for trying something a little different! You can get the Ifrit summoning spell here by defeating the esper in battle, but I planned to skip that optional fight since it would be useless for Solo. I start moving through the dungeon... hmmm, can't seem to get past this bookshelf that blocks my path. I don't remember running into this roadblock on my first playthrough, why can't I get past it now? Unless - unless that Ifrit fight isn't so optional after all. Darn it.
Now Solo had to deal with a boss that can torch him with fire attacks. Again. I calculated using the damage formula that it would take about 8 rounds of combat to fight through Ifrit's 3000 hit points. The problem was that Ifrit's flame spells did roughly 250 damage on average, and Solo only had 850 hit points. Umm - that wasn't going to be enough, and I didn't want to go through my stash of Elixirs unless absolutely necessary. After several failed attempts, I decided to grind out three additional levels, from 21 to 24, where Solo would pick up an additional attack multiplier (7x in the front row). Each level also added to base damage too, and piled on more total hit points. After reaching the new milestone, I moved Solo up to the front row and started banging away. I had to use one Hi Potion and one Elixir, but got it done on the second try. Another roadblock out of the way; would have liked to do it without using the Elixir (Solo had 10 more in stash saved), but that had been too much grinding already.
The final boss in the Library was Byblos, the second really interesting fight (Liquid Flame being the first):
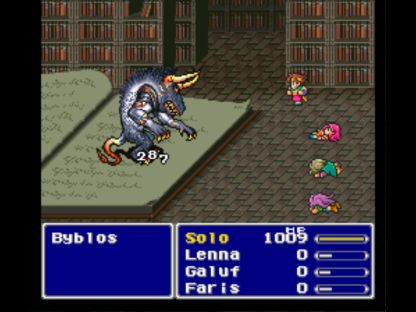
Why is this guy hard? He has all sorts of nasty buffs and de-buffs to wreck havoc on a solo character. If attacked with physical damage, Byblos responds by casting Armor, which cuts physical damage in half. (Actually, the spell cuts the modifier M by half, M/2, so it actually reduces damage by more than 50% in many situations.) If hit by magic, he responds by casting Frog. When Byblos gets low on hit points, he begins casting Drain over and over again, healing himself while hurting the party. That's a brick wall for all sorts of low-damage variants right there. Byblos also has a very strong physical attack (30 base damage and a multiplier of 15x!) and even more nasty status-affecting spells: Slow, Charm, and "Sonic Wave", which cuts level by half. There are all sorts of bad things that can happen in a fight against this guy!
Needless to say, Solo got absolutely trashed in my first attempt against this boss. I started thinking about some possible boss-busting strategies, and decided to break out the Monk's BuildUp ability. This causes the Monk to wait a round, then attack in the next round at double strength. (Literally, M is set to M * 2). Ordinarily, this is not particularly useful, but here it would allow me to get in a double-power strike against Byblos before he cast Armor and buffed up his physical defenses. Afterwards, it would allow Solo to counteract Byblos' Armor spell (M*2/2) and avoid any rounding errors from integer math. Now I was still almost certainly going to need to grind some more levels, but it was worth a try regardless.
On my first stab at this new strategy, Byblos immediately Charmed Solo and got in a nasty hit. "Oh, this is going just GREAT!" I'm thinking. Once I finally get a chance to act, I give Solo the BuildUp command. While waiting for that, Byblos levels another physical attack, causing Solo to respond with Counter and deal two 300 damage hits. Before Byblos can cast Armor, Solo responds with his BuildUp attack... and BOTH attacks went critical, dealing two 1500+ damage hits to kill the boss instantly!!! 
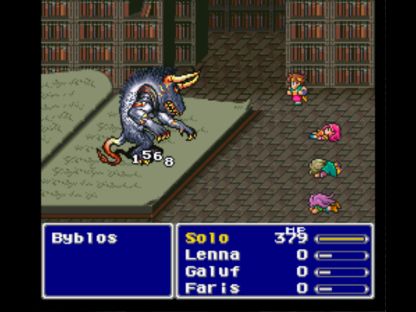
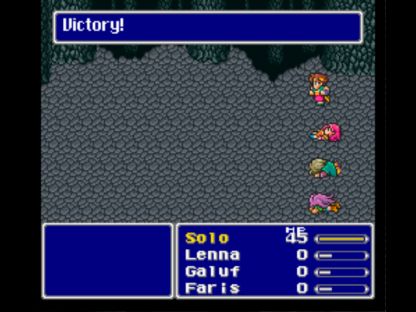
I was so stunned I barely got the screenshot. Amazing! Byblos has 3600 hit points, and Solo dealt that number in two attacks literally seconds apart. Full health to dead just like that. I wouldn't believe it if I hadn't seen it myself. One thing's for sure: the BuildUp skill was going to get rotated into more boss fights as a new tactic!
After the Ancient Library, the next task in FF5 is to journey across a desert region, where (of course) another boss awaits. The Sandworm is also somewhat interesting, because it pops back and forth between three different "holes" and any attack directed at one of the holes misses. I made sure to pause and wait for the Sandworm to move before attacking with Solo, and he never attacked the wrong target. The Sandworm's attack was rather weak, consisting of a "Quicksand" spell that did exactly 60 damage each time. Solo had plenty of hit points to cover that. He kept attacking, and after enough rounds the boss went down. Easy fight on the whole.
Finally, Solo now got access to an airship - following another boss fight, of course. This new opponent, Crayclaw, had a "Tailscrew" attack that dropped hit points to critical. Ugh. Solo died before I could heal him the first time I fought Crayclaw. The second attempt, the boss concentrated on physical attacks instead, allowing Solo to Counter and deal easy damage. Crayclaw had weak defense and few hit points (2000), so Solo won in a mere four rounds of punching.
The airship opens up a few extra locations in FF5, although nothing on the order of the original Final Fantasy. The one village that offers something noteworthy is Istory, where three powerful accessories are on sale: the Flame, Coral, and Angel Rings. The Flame Ring absorbs fire attacks, negates ice attacks, and is weak against water attacks. (This is good, because there are very few water attacks in the game!) The Coral Ring is the opposite, absorbing water and weak against lightning. Great if you choose to fight Leviathan at the end of the game. The Angel Ring grants very high magic defense (a must in some battles) and protects against a bunch of status ailments. I wanted all three for Solo!
The only catch: they are each a cool 50,000 gold and thus phenomenially expensive. Solo had had few expenses, saved his money all game, and still was only sitting at 45k gold. This is another aspect of FF5 that I really like: gold MEANS something in this game, and you have to prioritize funds carefully. On a normal playthrough, just keeping your party equipped with current weapons and armor can be a challenge. It's a far cry from most modern RPGs, where you'll always have vastly more money than needed and never have to make tough choices. Since I could only buy Solo one of the three accessiories at the moment, I took the Flame Ring, as I would be needing it the soonest to defend against upcoming fire and ice attacks from bosses. It's a shame you can't get to Istory before fighting Ifrit!
I went back and fought Shiva now, even though Solo could never summon her. It's fun when bosses can't hurt you.  I also fought Ramuh as well, who COULD hurt Solo with lightning. Although there was no point to doing this (since bosses don't give experience in FF5, only Ability points) it was fun, and that's all that mattered.
Back on the quest track, Solo next had to go retrieve Adamantium from a meteor (don't ask...) There was another mini-boss here, the giant turtle known as AdamanTimi. Against a purely physical boss with high attack power, Solo found himself in another giant slug-fest. Put him in the front row, bang away, and hope the other guy goes down first. I swapped out the useless Flame Ring accessory for this fight and equipped the Elf Cape instead, which grants a 1/3 chance to dodge physical attacks. The cape proved its worth here, as Solo dodged about six or seven attacks during the course of the fight. That was hugely important, since he won with a mere 45 hit points remaining!
I didn't quite react fast enough to catch the monster burning away into fog. This was a boss that could have been a roadblock, but a little luck in dodging attacks carried Solo through at the first opportunity.
In a reprise of the original Final Fantasy, the final area in the first part of the game sent Solo up to a floating castle in the sky. Just to get in, however, he had to fight off a bunch of cannons. This was where the Flame Ring proved its weight in gold:
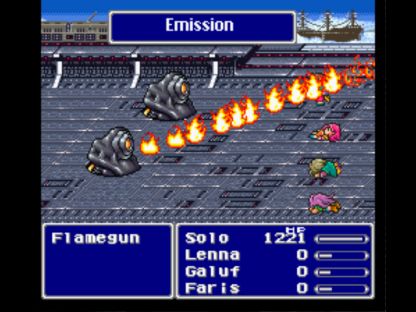
These Flamegun mini-bosses did nothing but shoot off a fiery "Emission" attack over and over again, which did slightly over 200 damage each time. Rather than burning Solo to a crisp, of course, the attack actually healed him! Thus a series of deadly battles that would have required multiple Elixir uses became snooze-fests where I did nothing but hold down the attack button. As I said before, there's almost always a solution to any situation in FF5. You just have to find it, and make sure to have the right equipment on hand.
The real boss in this area, however, was Sol Cannon. This is a nasty, nasty fight; Sol Cannon has over 20,000 hit points and charges up a destructive "Surge Beam" that deals damage equal to 50% of max hit points. Worse, the boss is accompanied by two Launchers, who fire off a stream of Missile attacks that simultaneously count as "Demi" spells (lose 50% of current hit points) and inflict the "Old" status ailment. Now Solo could deal with the damage by using a few Elixirs right before the Surge Beam was fired. What he couldn't cope with was the Old status effect, which slowly drops all stats down to 1. After just a few rounds of combat, his stats would fall so low that it was impossible to do any damage against Sol Cannon!
There was a solution: equip an Angel Ring accessory, which protects against the Old status condition. One problem - they cost 50,000 gold, remember, and Solo just spent that sum on a Flame Ring, which he also needed. The only solution was to fight for a while and raise enough cash to buy the new ring. Sigh. No one ever said this variant would be easy, right?

50k gold can't be raised in day, unfortunately. I experimented with a couple different places to fight, and found the best pickings in the regions just outside Jacole and Crescent. Battles went fastest by putting Solo in the front row and having him Kick monsters, which was enough to take out the weaker ones in a single blow. (Until snapping the picture, I never realized how goofy the Kick animation actually was!) So I fought, and fought, and fought, and eventually raised the money needed. Solo gained six levels in the process, from 28 to 34.
Angel Ring in hand, Solo was immune from the Aging effect of the Launchers. That just meant that the fight was now possible, not that it would be easy. I tried the fight a couple times, and failed - badly. The combination of the Sol Cannon's Surge Beam and the missile attacks of the Launchers was decimating Solo over and over again, even with Elixir use. Remember, the Surge Beam would always do 50% of Solo's max hit point total. The missile attacks from the Launchers would do 50% of his CURRENT hit point total. Use an Elixir too soon, and a missile hit would cut Solo's hp by half, followed by instant death from the Surge Beam. Use it too late, and the Surge Beam would kill immediately. I had to figure out the exact way to fight the battle - when to attack and when to use items - one round at a time through trial and error.
I found it useful to go with the BuildUp ability again here, since it reduced the total number of attacks and made it easier to plan out a strategy. Getting a critical hit on a BuildUp attack was also like getting two crits in one, which was pretty cool when it happened! Eventually, I worked out a plan that got me through about seven rounds of combat successfully. While exploring further ahead on another "scouting" attempt at the boss, Sol Cannon suddenly died!

I was so surprised that I couldn't get a picture again, nuts. My guide stated that Sol Cannon had 22,500 hit points, but it actually died after 15k damage. Perhaps a difference between the SNES and later versions? I certainly wasn't complaining! Although Solo had to use another three Elixirs (leaving six remaining in stock), he was able to pass another serious roadblock and continue moving forward.
Into the Floating Ruins at last. Although most of the treasure inside was garbage, Solo was able to pick up another Elixir inside. There was also an accessory that could possibly be useful: the Power Ring, which added 3 points to Strength. That might be able to get Solo an extra attack multiplier slightly earlier, potentially helpful. Of course, like the rest of this game, the random encounters in the ruins were mere roadkill leading up to another boss battle, against a monster called ArchaeoAvis.
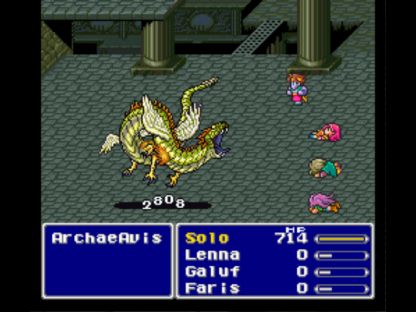
This is another interesting fight - the FF5 design team really did a fantastic job. ArchaeoAvis goes through no less than five different forms! The first four are attuned to different elements (wind, ice, fire, and lightning) while the fifth and final form is an undead one that combines the attributes of all four. I gave Solo the Mantra ability and the Flame Ring accessory for this fight, with the following plan: attack quickly and get through the first two forms, then pause and heal up during the fire form. I hoped that would leave Solo strong enough to finish off the boss without needing to dip into his stash of Elixirs.
The initial stages of this plan worked as expected. Solo took a few hits, but ArchaeoAvis' ice attack was completely nullified by the Flame Ring. Even better, the Flame attacks that the boss used in the third form were absorbed completely, and healed Solo back up to max health! Nice to see things work out the way I wanted. Solo powered through the lightning form, then unfortunately got paralyzed and took a lot of damage against the final undead one. I was one attack away from victory, but Solo was under 100 life and was going to die from the next attack. ArchaeoAvis initiates an attack... and the boss picks "Flame", healing back 400+ life to Solo!  Wow, got darned lucky there, boss picking a fire attack from a long list of possible moves. As a result, Solo won this fight on the first try and without using any Elixirs:

Actually got a picture of this one, heh. That essentially brought the first part of the game to a close - well, almost. There remained three more mini-bosses to take on before moving on to the second world. These are individual encounters; no dungeons to go through, and it's possible to heal up and save before each one. Therefore, generally not too tough. I sent Solo after the easiest one first, against the Chimera Brain. This enemy uses a bunch of ice and water attacks (Blaze/Aqua Rake), however Solo had enough life that he could just pound the opponent with no danger. The same basic plan worked against the next boss, the Titan:
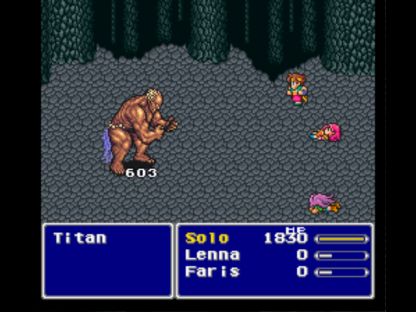
I gave Solo the "HP +20%" ability for these two battles, as there was no point in using Mantra or BuildUp. Having more total hit points was more useful. The final battle was against the Puroboros, a nasty group of six little bomb-like creatures. Each of these opponents could cast "Exploder", which would deal 1500 damage and pretty much finish off Solo. Even worse, when killed they would cast Life 2 and revive any of the Puroboros that had already been defeated! Ugh.
After several false starts, I decided the best path was to have Solo try Kicking his way to victory. Three Kicks took out the three monsters in the front row, leaving the three in the back (who had been taking half damage). Solo took some hits, and managed to kill them off in two more Kicks - only to see them revive the first three again. More Kicks followed, and the front three went down... reviving the back three in the process. Kick some more, kill the back three, and they revive the front three a second time! Finally, more kicks downed the front row for a third time, and now the Puroboros were out of magic points to cast Life 2, mercifully bringing this battle to a conclusion. Whew! It was times like this when I wished for some black magic to down all the enemies at once.


