
That brought an end to the first world, and a shift into the second. After a series of plot events, you end up in control of Galuf alone, and have to go through a very short dungeon to free the rest of the team. I realized at this point that I had no weapons or armor for him to use, as I was only carrying stuff that was useful to Solo. (Note to self: do not make this mistake in future variants!) As a result, I fell back on the cheap man's solution - turn Galuf into a Summoner and have him summon Titan over and over again.

This little area ends with the first of about a billion fights against Gilgamesh. Three Titan summons were enough to win the battle, although it took a couple attempts because my low-level, no-armor Galuf was just *SO* weak. Two hits would kill him. I had to equip the Elf Cape and get lucky with dodging attacks.
Once that was over, it was back to the usual grind: kill off the other three characters and let Solo punch his way through the monsters. In the Bridge escape scene, Solo dealt with the random encounters very easily; I put him in the front row and downed the enemies with a single Kick. There is a second fight with Gilgamesh as part of this area, however, and he was significantly tougher this time around. Gilgamesh has 6500 hit points, and when he drops under 2500 he casts a whole bunch of defensive spells on himself (Haste, Shell, Armor) and starts using the Dragoon "Jump" ability. Doing that last 2500 damage was real tough!
The solution, as you may have guessed, was to use the BuildUp ability. Solo inflicted just over 4000 damage normally, then used BuildUp to do as much of the final 2500 as possible before Gilgamesh buffed himself up. I got this to work correctly on about the third try. There was a good amount of luck involved, with Solo not messing things up by Countering at the wrong time. Eventually the actions lined up at the right time and Solo walked away the victor.
The next few areas were uneventful, and I'll skip over the details of Solo's routine travels through Ruzor and the trip to the Moogle village. After returning to Bal Castle, things started to pick up again. Solo added two new pieces of equipment in Kelb: the Bandana, which increased strength and defense, and the Strength Suit, which more or less did the same. I sold the old Training Suit, but kept the Green Beret for potential situational use. More importantly, Solo came across the Bone Mail in the Hiryuu Valley:

This is probably the most unique armor in the whole game. It has the highest defense of any armor, and literally turns the wearer into an undead creature! The Bone Mail absorbs Poison damage, protects against (some) instant death attacks and a whole bunch of status ailments, and cuts down physical damage immensely with its high defensive value. However, this comes at a cost: since the wearer literally becomes undead, it also makes them vulnerable to Fire and Holy elements. (This can be overcome by equipping a Flame Ring, and hardly any monsters use Holy attacks in this game.) More seriously, curative spells and items actually hurt the wearer! Yes, using a Hi Potion will deal 500 damage instead of healing it for someone wearing the Bone Mail. I tested an Elixir, and it had the same effect as a "Weak" spell, dropping Solo down to less than ten hit points. Therefore, for any boss battle that requires healing, the Bone Mail is sadly not an option.
It was phenominally useful for RANDOM battles though, as I found that most normal enemies had difficulty getting past Solo's new beefy defenses. His new setup gave him 41 Defense - that's a lot! Keep in mind that monster Attack values are actually pretty low; it's the multiplier (M) that does most of the damage. A typical monster might have an Attack of 25, and a multiplier of M = 10. Against normal armor, that would do good damage, but against Solo's Bone Mail, it rendered the attack totally useless. I could now stick Solo in the front row and fight most random battles with impunity. Boss battles now absorbed even more of my attention, as the normal fights could be breezed through with ease.
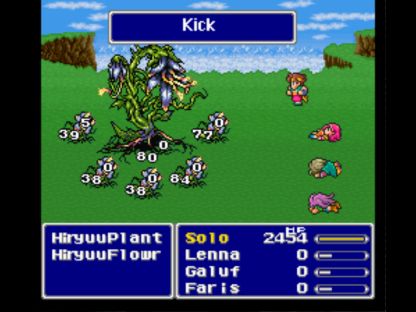
The Hiryuu Plant boss of the valley was not a roadblock foe. The Plant never actually attacks at all, merely raising Hiryuu Flowers that do the attacking for it. However, these Flowers could be killed easily with Solo's Kick, and thus the whole fight became one endless Kick after another. It may have taken a dozen rounds to wear down the boss, but Solo never took so much as a point of damage. Easy stuff - one place where the Monk job really shined! 
The following part of the game is one of the better parts of the story, as the party attempts to break into Exdeath's Castle and destroy the barrier protecting it. During the fights on the ship that preceded this, Solo was amused to find that the ordinary monsters couldn't get through his armor at all! A whole bunch of 0 damage attacks were a good source of amusement. Those are followed by yet another Gilgamesh fight, where (in true Sumerian fashion) he's joined by another boss named Enkidou. Neither one of the two could do much of anything physically against the Bone Mail, and Solo was cruising through this fight with ease.
Then Gilgamesh used one of his special abilities, "Death Claw", which dropped Solo's health down to nil and also paralyzed him. I assumed the fight was over (after all, I couldn't even heal Solo since he was wearing the Bone Mail!) and got ready for a second attempt. But Enkidou immediately followed up the attack with a "Vampire" spell... which backfired against the Bone Mail! I nearly fell out of my chair laughing when the spell drained 1500 life out of Enkidou, killing him and healing Solo almost to full health!  Folks, you can't make this stuff up. From there, it was an easy victory. What an unusual way to win a boss fight!
In the actual Barrier Tower, I had a special goal for Solo to achieve. There was an enemy there called the "Wall Knight" that had a small chance to drop a rare accessory known as the Wall Ring. I was going to need that item in some boss fights later on, which meant grinding through a number of random battles until Solo got the drop he needed. (You can steal the Wall Ring from some other enemies, using the Thief Knife with most classes, but Solo can't equip any weapons at all and thus didn't have that option.) Many random battles on the fifth floor of the tower followed, which I had determined was the most likely place to encounter the Wall Knights. Finally, Solo got what he wanted:

He gained two levels in the process, from 39 to 41. (An enemy called the Trickster tortured Solo with the Blue Magic spell Level 4 Quarter while he was level 40!) Now I could move to the top of the tower and get on with the fight against another of the game's creative bosses: Atmos.

Atmos has a very unusual way of fighting. He casts a very strong spell called Comet until one of the party members is killed. Then he slowly drags their body to the left side of the screen, eventually sucking them into that... mouth, I guess you'd call it. Then the process starts all over again. For Solo, all three party members started out dead, and were quickly sucked into the void. Then Atmos opened up with Comet - which went right through Solo's new Wall Ring! Argh. Looks like it's one of those spells that can't be reflected back at the caster. Dang it, there goes my strategy for this battle...
Solo could get in a total of four attacks before Atmos finished off the rest of the party and opened up with Comet. With each attack doing about 1700 damage on average, I was nowhere close to defeating Atmos and his 20,000 hit points. Trying a number of different combinations of abilities and equipment failed to produce any result. That Comet spell was simply too strong, doing about 1000 damage on average per casting - and Atmos could use it three times per round! Wow. (It's because he starts the battle Hasted.)
I ran the numbers, and Solo would have to reach a level in the mid 60s to stand a good chance at beating Atmos. Phooey on that! The problem is that you're supposed to have someone dead while fighting Atmos. The game is not designed to have one character face his spell barrage of endless Comets. Now I *COULD* go through the tedious process of grinding out 20 additional levels, but then that would remove all challenge from every other boss in the game who was not Atmos. And that was emphatically not what I wanted. Therefore, I decided that I would start the battle with one character dead, and then as each one was sucked up by Atmos, I would kill off another one. Solo would still fight the battle entirely alone, it's just that Atmos would suck up the other three one at a time, instead of all at once. That would provide more time, which is all that Solo needed.
Naturally this succeeded right away:

Solo still took a pounding from a bunch of Demi and Slow spells, but survived to the finish with no problems. Galuf and Faris have already been sucked up, and now Lenna is about a third of the way across the screen. While I can't say I was entirely happy about the way this turned out, it was the best way I could see to do the fight. I think it was within the spirit of the variant, like Ember's use of a Blaze staff against Duriel.
During the runup to the Atmos fight, Solo gained enough ability points to master the Monk job completely. Let me show you what that looks like:

These are the seven different abilities Solo can pick from to fill in his extra command slot. "Kick" is always active, since it's an innate part of the Monk job. "Fight" and "Item" are also always present commands, as they are for all jobs except the Mimic. Abilities with the exclamation mark in front of them mean they are commands that can be used in battle (e.g. "BuildUp") as opposed to innate abilities (like Counter or HP +30%). Now for a normal playthrough, you have your characters swap back and forth between different jobs and combine the abilities they learn for souped-up powers. For instance, you could take the Monk's "Brawl" ability (which lets anyone fight barehanded) and combine it with the Hunter's "X-Fight" command to have a character attack 8 times with their bare fists. Solo can never change jobs, so he's missing out on an extraordinary array of possible combinations. It's also totally pointless for him to equip the Brawl or Counter abilities, since they're innate parts of the Monk job. Nevertheless, I found plenty of potential uses from the three options he did have (Mantra, BuildUp, and HP +10/20/30%) as this report testifies. For general use situations, HP +30% was the default ability Solo picked.
After a brief stop in Guido's Cave, the next area consisted of the town and forest of Mua. Solo upgraded his armor slightly here, with a marginally better helmet (Tiger Mask) and body suit (Diamond Pelt) for situations where the Bone Mail wouldn't cut it. I was carrying several alternate items by now, depending on whether Solo needed to emphasize Strength, Defense, or Magic Defense.
The Forest of Mua was an extremely easy area, and gave tremendous experience. Solo's Bone Mail nullified most physical attacks, even in the front row, and the main magical threats in this area were "Psych" (MP stealer) and "Charm". Psych was pointless for a character who didn't use magic, while Charm was blocked by the Bone Mail's undead properties. Since the Forest also has an extremely high encounter rate, Solo gained four full levels while clearing out the treasure chests (up to lvl 45). He was now doing almost 100 base damage, with a multiplier (M) of 12!

The boss at the end of this area consists of four crystals, also known as seal guardians in some translations. The crystals are each attuned to a different element - fire, water, earth, wind - and they will use spells corresponding to those elements when they are close to dying. Prior to that, they simply attack with fairly weak physical damage. What I planned to do was damage the Fire Crystal first (the one at the top) close to death, then have its Fire 3 spell heal Solo (via the Flame Ring) while he took down the other three at leisure. Instead, the Fire Crystal hit Solo with an attack right after I attacked it, causing Counter to kick in and destroy it first! Oops. You can see it already missing in the above picture. Fortunately this didn't matter, because Solo had no problem killing off the other three anyway, even without getting healed. All of the other elemental attacks did about 500 damage, and Solo could survive plenty of those hits without dying. Not a tough fight.
Then the game's longest cinematic sequence followed, featuring an Galuf/Exdeath confrontation suspiciously similar to the one between Tellah and Golbez:

Even the enemy graphics look similar! Not the most original decision by Square. Anyway, this fight is usually a formality; Galuf does some damage to Exdeath, then gets killed off and the next cinematic sequence follows. (Yes, Galuf dies in this game - sorry if that spoiled things for you.) According to the code, Galuf needs to do 7000 damage to trigger the next event. Normally, that's not a problem. For my pathetically underleveled Galuf - it was. Rather than spend hours watching him punch Exdeath at 12 damage per hit, I had to reset and do the whole crystal battle again with Solo. This time, I gave Galuf the Wall Ring, and watched Exdeath reflect magic off the Wall until he did 7000 damage to himself. Note to self: remember this for future play-throughs with solo characters!
That minor conundrum out of the way, the only remaining obstacle in the second world was Exdeath's castle. This area looks rather satanical for a Nintendo game, I have to say - probably would have scared little kids. Anyway, usually the random monsters in any area were a mere afterthought, but in this place there were rare battles against pairs of Yellow Dragons. These enemies had tons of hit points (8500 each) and could perform a devastating Thunder attack that did 1000+ damage! I tried to have Solo run away, only to find that it was impossible in many of these fights. Argh. Got wiped out in more of these encounters than I would have liked. At least there were two different save points in the castle, including one right before the bosses. (Thank god.)
Once again, there were two boss fights at the end of the castle. The first was the fourth encounter with Gilgamesh, in a battle that's usually more comical than dangerous. Gilgamesh is programmed to change into a second form with incredibly weak attack after taking 12,000 damage - in an ordinary situation, that's cake. However, a solo character faces additional challenges... Gilgamesh could use an attack called "Sonic Wave" that cut Solo's level by half, a devastating blow for someone whose damage was directly dependent on level! Any use of that attack meant an instant reset. Gilgamesh could also use "Hurricane" to reduce Solo's health down to the critical level, and he had decent attack in his first form. I needed to do this fight several times before getting a favorable run of random attacks and seeing it through to completion.
Then the real difficult fight began...

The final battle in world two is against Exdeath, who has all manner of nasty things to throw at a solo character. Rather than try to describe them, I'll cut-and-paste his list of AI commands:
{Fight,Condemn,Condemn}
{Dynamo,Dynamo,Specialty}
{Gravity 100,Demi,Fight}
{Fight,Fight,Specialty}
{Earth Shaker,Earth Shaker,Fight}
{Flame,Fight,Specialty}
{Hurricane,Hurricane,Fight}
{Zombie Breath,Zombie Breath,Specialty}
{Fight,Bio,Fight}
{L3 Flare,L3 Flare,Specialty}
The way this works is that Exdeath would randomly choose one of the three commands in the first row for his first action; in other words, 2/3 chance that he would start with "Condemn" and a 1/3 chance he would start with "Fight". Then he moved to the second row and randomly picked one of the three commands, then the third row, and so on. "Condemn" was particularly bad because it set a ticking death clock over Solo's head that killed him when it reached zero - an impossible death to avoid, in other words. "Dynamo" shifted rows from front to back and vice versa. Exdeath's "Speciality" was called Vaccuum Wave, a physical attack that did about 1500 damage! "Hurricane" reduced Solo to under 10 hit points, while "Zombie Breath" turned him into a zombie and caused instant death.
Clearly, this was a mine field that required considerable luck to have any chance of victory. Most fights simply ended immediately, with Exdeath using "Condemn" and setting off the ticking death clock. To deal with "Dynamo", I stuck Solo in the back row, and thus NEEDED it to succeed and move him back to the front row for full damage. The odds of getting that exact combo to work were 2/9, or 22%. Not good odds. And that merely gave me a CHANCE to win, to say nothing of actual victory. I furthermore needed Solo to inflict considerable damage on Exdeath in a hurry, because after inflicting 16,000 points of damage, he would swap to a new and less dangerous AI routine (based around casting lots of Fire/Ice/Bolt 3s). Solo *HAD* to dish out tons of damage to force the new AI routine before Exdeath got around to using Hurricane (which would almost certainly kill him) or Zombie Breath (which WOULD kill him).
I was having so much trouble that I went back to the Forest of Mua and gained five more levels, taking Solo from 47 to 52. With equipment that boosted Strength, this added two more multipliers as well (from M=12 to M=14). That made a very noticeable difference overall. Once again, I found Solo relying on the BuildUp ability for help. Getting a critical hit on a BuildUp attack was like getting two criticals in one, and that was the kind of luck I needed. The screenshot above came from one such critical, doing 6000+ damage. Meanwhile, the bluish glow came from the Wall Ring, which was desperately needed for this battle. Once Solo managed to get lucky with Condemn/Dynamo and inflict the 16k damage needed to change Exdeath's attack routine, Exdeath began casting Fire/Ice/Bolt 3 over and over again. This would have killed Solo almost immediately, except that the Wall Ring reflected those spells back onto the caster. While Exdeath was doing that, Solo healed up with an Elixir, then used BuildUp twice. On the second BuildUp, Solo got another 6000+ damage critical hit!!!

 What a tough, tough fight. I can't even tell you how many times I had to attempt this fight to get everything to line up correctly. I practically had to memorize Exdeath's entire AI programming script to win out. Going for critical hits with BuildUp is like Dancing and hoping for Sword Dance to appear. The odds are low, but if you try it enough times, you WILL get lucky and win out sooner or later. Now I don't like to put my fate in the hands of the dice... but sometimes, you don't have a choice! Enormously glad this was in Solo's rearview mirror.


