

Dungeon Crawl Mode
Monk, Hunter, Busker
Master Difficulty
The second game mode in For The King is known as Dungeon Crawl mode, and after more time spent playing this game, I think it's become my favorite of the different options. Dungeon Crawl mode shares nearly all of the same basic features with the default game mode: your characters share the same starting items, the map has the same normal areas, the chaos meter is still present, and so on. The overall gameplay is strikingly similar to the default For The King mode. The difference in Dungeon Crawl mode is that there's a lot more randomness; whereas the main game mode follows the same story progression every time, Dungeon Crawl mode tends to be more open-ended. The goal in this mode is not to defeat the evil wizard Vexor, but rather to successfully fight through five major dungeons. Those five dungeons can be hidden anywhere on the map, and the player has to do a lot of exploring to find their locations, then clear them all out. Over repeated playthroughs, I've found this to be more fun than the highly scripted path in the main For The King game mode. Once you've effectively "solved" the main game mode, you can keep following the same steps in each game since you know what dangers are coming. Dungeon Crawl mode plays out more like Faster Than Light (FTL) and lends itself to greater replayability.
I would be playing this game on Master difficulty, the highest option in FTK. Master difficulty represents a brutal test of the player's skill, leaving little to no room for error. Your characters start with almost nothing in terms of gold and items while the monsters have been buffed up with 10% additional health. Over the course of a whole game, that extra health makes a major difference. The chaos meter also ticks faster on Master difficulty: every 8 rounds as compared to every 9 rounds on Journeyman difficulty and every 10 rounds on Apprentice difficulty. Worst of all is the starting life pool: zero spare lives.  If a character dies at the start of the game, that's it, you don't get them back again. The player has to seek out and discover additional "lives" along the way, and unlike Frost Adventure mode, there isn't infinite time available to do that. Dungeon Crawl mode forces the player to balance the development of their characters (both in terms of experience and itemization) while also exploring the map before the chaos meter counts down. Oh, and one bad round of combat can leave a character permanently dead if you can't find some more lives along the way. This is a hard, hard quest to undertake.

For this particular game, I had chosen a party comprised of a Monk, a Hunter, and a Busker. I wrote about the Hunter at length in my Tutorial game of FTK, so I won't add much more here. I still believe that the Hunter is the game's overall best class, with outstanding speed, high damage, and several useful abilities. Paired with Ballgown the Hunter was Charlie the Monk, sporting one of the hidden classes that has to be unlocked by playing on Frost Adventure mode. Monks are a hybrid class that can choose to specialize in either Strength or Intelligence as their primary stat. They are most notable for bringing the indispensible Party Heal ability as an innate trait, and this class is probably a better choice than the Herbalist for anyone who wants to start with Party Heal. Monks have a second rarely-used skill known as Discipline, which causes them to restore a point of Focus to their party members who are completely out of Focus when the Monk scores a kill. It's nice when it kicks in, but running on zero Focus points is exceptionally dangerous so I'm almost never in a position to take advantage of this. (Seriously folks, you do not want to spend much time in this game out of Focus; you do not want to leave your fate in the hands of the dice.) The biggest disadvantage of the Monk is poor Speed at only 60 base stat, down with the Blacksmith and the Woodcutter among the game's slowest. Unlike those classes, the Monk doesn't have particularly good Vitality to compensate either.
My third and find character for this game was MrWhiskers, sporting the unlockable cat skin, devil wings, and foam dome helmet. All of those were purely cosmetic features, of course, with no in-game abilities attached. MrWhiskers was trained in the Busker class, a support class based around the use of the Talent stat. The most famous ability of the Busker is "Distract", which has about 5-10% odds to force a miss on any enemy dice roll attack. This is the reverse of the Minstrel's "Encourage" ability (which has a small chance turn a missed dice roll from a party member into a successful one) and it comes in extremely handy for screwing up some of the nasty enemy attacks. Unfortunately, Distract is a random skill and uncontrollable when it pops up which means that it can't be relied up. Buskers also have "Entertain" as an innate skill which causes them to gain a small amount of gold by ending their turn next to a town. More money is naturally always good to have in a game where resources are tight. The tradeoff for the Busker is having poor Speed as well, with a starting stat of only 58. At least this class does have good Vitality (68), and enough Strength to fall back on those weapons if Talent-based weapons are slow to appear.

This game opened up with my party in the city of Parid, located in the Golden Plains. That's one of the other big differences in Dungeon Crawl mode: you don't always have to begin in the Guardian Forest. Similarly, the various areas are all jumbled together on the map, with the Parched Waste nearby to the north instead of always being across the ocean as in the main FTK game mode. The randomness in terms of the start positions helps add replayability to Dungeon Crawl mode. Anyway, drawing the Golden Plains as the starting area was a nice break of luck. Characters get extra movement points in the Golden Plains, and the ability to cover more ground is always a good thing. This is a nice open area where it's usually possible to explore and uncover various map features quickly. It's the opposite of the Poisonous Bog, the worst area in the game, where movement is strictly limited and the pathways tend to consist of narrow corridors. I try to stay out of that region whenever possible.
The first thing to do at the start of a new game is to upgrade the weapons of your characters. Most of the starting weapons only have 6 or 7 base damage, and that's not very good considering that even Level 0 monsters will have about 10 health on Master difficulty. You also want to keep leveling your characters as much as possible, although that usually tends to take care of itself. I find gold to be in shorter supply in the early game than experience. I had caught a break with the starting town of Parid offering a reduce chaos quest, something that isn't always available (unlike the main game mode, which always has it as an option in each town). I grabbed that opportunity, fought a few battles, and then had the chance to snag my first weapon upgrade:

This Shortbow boosted the damage output of Ballgown by a good bit, and that was especially important since she was the fastest person on my team. It wasn't just a matter of increasing from 6 base damage up to 8 base damage; this new weapon also only had two slots on the main attack instead of three slots. Obviously landing a perfect attack was a lot easier when I only had to roll successfully twice (0.78 * 0.78 = 61%) as opposed to needing to roll it three times (0.78 * 0.78 * 0.78 = 47%).
I had another break of good luck in finding the Cult Device hidden in the Golden Plains almost immediately:

There's one Cult Device in every map area, and tracking them down is one of the most helpful things your party can do. Destroying the devices isn't always the easiest task, however; this particular one was attuned to the Talent stat, and therefore I asked MrWhiskers to smash the thing. I went ahead and used all three points of Focus to take the odds up to 96%, which fortunately did succeed as planned. Nothing's worse than investing a point or two of Focus and then failing an 80 percent dice roll. Since no one else in this group had much in the way of Talent, I did what I could to minimize risks. Destroying a Cult Device gives the player an option to reduce chaos, eliminate a scourge, or gain one life. Since I had zero lives at the moment and had a reduce chaos quest already underway, I went with the option to pick up an additional life. Now I had at least a little breathing room to ward off against disaster, with the chance to bring one fallen party member back to life. Playing the game with zero lives in reserve is a nerve-wracking affair.
I fought in the Golden Plains long enough to raise my characters to Level 1 and then took on a camp of Chaos Acolytes, the subject of my reduce chaos quest:

These enemies can be pretty tough opponents, and I wanted to level up at least once to match them on an even footing. Note that Ballgown had already upgraded her weapon a second time and had reached 11 damage output, eclipsing the other characters who were still stuck on their default starting items. The picture above is highlighting the Distract ability of the Busker, with that skull symbol indicated a failed dice roll on the part of the enemies. MrWhiskers ended up getting pretty low in this battle and there wasn't much I could do about it since I still didn't have any Godsbeard herbs as yet for healing. Fortunately he managed to survive the fight and even leveled in its aftermath. One of the monsters dropped the Decent Lute item, which had 8 damage and three slots on its basic attack, as opposed to 7 damage and four slots on the starting Broken Lute. That was an upgrade for MrWhiskers and I happily made the swap.

Halfway through the first day, I had scouted out the southern half of the Golden Plains and was looping around to cover the northern portion as well. Parid's central location was very helpful here in providing a place to retreat back for healing. I had also found the location of the first scourge, with the Time Cave directly below the stone statue in the left-central portion of that screenshot. I was planning to head there and defeat the Old One after finishing up with the rest of the Golden Plains. I had also picked up a second highly useful quest from the town of Cazeli's Watch: one additional party life if I could find the Sanctum of Blood. It had to be located somewhere in the Golden Plains, which meant that I would get another party life for finding something that I wanted to find anyway, my first sanctum. Sure enough, it turned up in the northeast corner of the plains:

Excellent news. With two lives in the bank, I could use future Cult Devices for reducing chaos and still have a measure of safety if a battle went disastrously wrong. As for the sanctum itself, I gave it to Ballgown since the Hunter class has an innate chance to critically strike, and I figured that she could get the best use out of more crit chance. The Sanctum of Blood is one of the weakest sanctums, but all sanctums are always worth having regardless. They will absorb a death blow to your character and crumble instead of the character falling in battle. As a result, it's always best to grab the sanctums whenever they appear even if they aren't the best fit for a particular character. There's one sanctum in each map area to discover, much like the Cult Devices.
By this point, enough time had passed that the daylight was fading and night was about to arrive. Once darkness fell, I was faced with a new set of dangers:

Check out the level on those vampire bats: Level 3. This is one of the biggest jerk moves that For The King pulls on the player, with the enemies suddenly becoming much stronger when day turns into night. All of the monsters out of the map switch from Level 1 to Level 3 during this first night cycle, and if you're not paying attention to this changeover, your party can quickly get crushed. Several of my earlier game overs came from exactly this point in time, the initial night transition, before I figured out what was happening. The fact that there's no warning whatsoever from the game about what is happening is truly obnoxious. It's like the designers were deliberately trying to screw over the players. If you're not watching the little numbers next to the enemies, watch out.
As a result, I mostly avoided the monsters that had newly spawned as my party made their way south to the Time Cave. Ballgown was cornered by an enemy that popped up out of the ground and actually had to use a Teleport scroll to leap past and join up with the rest of the party once again. I did manage to reach the Time Cave on the turn before the scourge was set to trigger. The Old One has a chance for your characters to lose a turn when active - nasty stuff and nothing that I wanted to see appear. I went ahead and fought the scourge to stop this from happening:
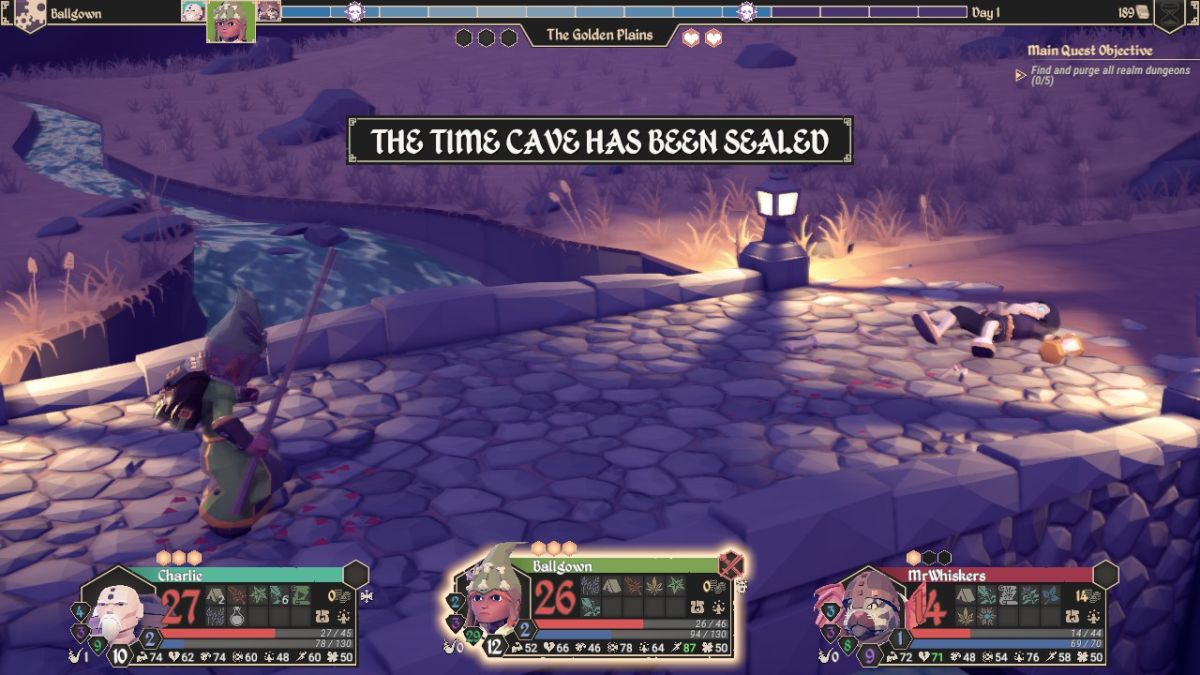
The Old One is always fought alone, and he uses a mixture of magic damage and confusion attacks against your party. This battle ended up playing out in highly unusual fashion; first MrWhiskers was hit with a confusion attack and he immediately retreated, then Charlie was also hit with a confusion attack... and he also retreated. Sheesh! That was unlucky, as confused characters can use any of their abilities and don't often run away. Fortunately, Ballgown had continued to attack the whole time and she was able to land the kill without further incident. I always like seeing the Old One as the first scourge because he drops one of my favorite items in the game upon defeat. The Golden Hourglass is a ring that provides +1 movement and +10 Speed, and it always drops whenever the Old One is defeated. With a little gear shuffling, I was able to get Ballgown up to 92 Speed, plus increase Charlie to 65 Speed thanks to picking up items that Ballgown no longer needed. Now if I could just find a better weapon for Charlie to replace his starting Bokken staff.
I had earlier spotted the first of the five hidden realm dungeons at the southern tip of the Golden Plains. This was the King's Maze, and with an upgraded pipe for Charlie and 6 Godsbeard herbs in hand, I was convinced that I was strong enough at this point to clear the first dungeon. Besides, the Chaos Meter was about to reach its first tick and the dungeon would only be that much more difficult if I waited any longer to storm the interior. The King's Maze consisted of two floors with a resting spot for a Tinder Pouch at the halfway point. I did not have to use one of these tents inside the dungeon though, as I had already set one up outside the entrance, allowing me to heal both before and after entering the King's Maze. I didn't have too much trouble with the battles inside, using a Godsbeard herb occasionally to heal away the damage taken along the way. There were six fights inside, three on each of the two floors, before I reached the boss at the end of the maze:

A Chaos Priestess and her two skeleton attendants were the final obstacle before concluding this dungeon. I went after the Bone Soldiers first, largely because they had significantly less health, but also because the Chaos Priestess had started out the battle by removing Charlie's armor and it seemed like a good idea to finish off the physical damage dealers. First one, then the other skeleton fell, and my party began chipping away at the boss herself. She kept targeting Charlie at the tail end of this battle, and I was forced to eat a Godsbeard herb for the full 30 HP restore (not using the Party Heal function) to keep the Monk from falling. Eventually it was finished though, and the party emerged victorious with their first dungeon cleared.
It turned out that there was a dock only two tiles away from the exit of the King's Maze. The party cleared the dungeon with about 180 gold in hand, and I was pleased to find that purchasing the ship only cost 100 gold. (At some point the cost goes up to 300 gold, and I apparently hadn't triggered that threshhold yet.) This allowed my party to sail over to the tinder pouch campsite for healing, which was still sitting there next to the dungeon's exit, and then begin exploring some of the offshore islands. There was a sanctum hiding there to be claimed:

I think that the Sanctum of Purity is the weakest out of the eight sanctums in the game, merely providing immunity to poison and curses. However, like all sanctums this gave Charlie protection against a deathblow and I was therefore happy to have it. From this point it was a short hop over to the offshore town of Devil's Wharf, where I was able to pick up another reduce chaos quest. That was good news as the Chaos Meter was starting to tick down again, even after I had used my reward from finishing the King's Maze to reduce chaos a short time earlier. You don't get a lot of time on Master difficulty before the chaos level is set to rise once again. Fortunately the enemy camp that I needed to clear for this quest was right next to Devil's Wharf instead of being in some faroff locale. There was also an improved item on sale for Charlie at the store in town:

The Old Shortsword is a fantastic Strength-based weapon, with decent midgame damage (12 base) along with 5% crit chance and the all-important +5 Speed. Even better, this weapon only uses two slots and one of the alternate attacks has the armor piercing property. I'm a humongous fan of the weapons that pierce armor or magic resistance, and that property along with the speed bonus on the Old Shortsword makes it one of my favorite choices. Charlie was now up to 15 damage and 75 Speed (!) with the equipping of this new weapon. I was able to put it to use immediately against the Chaos Henchmen camp, the subject of my new quest:

Note the "Pierced" text on the chaos henchman as he collapsed under the latest blow. This attack hadn't come from Charlie, however, but rather from MrWhiskers who also had a lute with the resistance piercing property. I try to get these weapons wherever possible simply because they make the battles so much more manageable and less subject to randomness. You can have these great weapons only to roll a battle where all of the monsters have 25 armor or something like that, and suddenly your weapons are useless and things rapidly spiral out of control. By contrast, if your characters have piercing weapons, you'll always be able to do consistent damage so long as there's enough Focus to ensure perfect attack rolls.
Anyway, this particular fight was no easy task. I knew it would be difficult because the Chaos enemies were all a level above my party; if this camp hadn't been right next to a town, I would have been hesitant to try my luck. Charlie was confused in the battle, but fortunately he did end up attacking the chaos opponents rather than fleeing or doing something useless. We limped out of this duel with a tight victory and then healed up at the inn in Devil's Wharf. There were several Sea Caves in the area, and I took the time to clear out two of them for additional gold and experience. Sea Caves always yield a Precious Pearl item at the end, one of the most valuable items in the game and something that would come in handy later on.

As the party continued touring the isles, I stumbled across a truly lucky find: the Golden Hero statue. This is something that isn't part of the base game in FTK, and unlocks in the Lore Store after tributing 50 normal stone hero statues. I had played enough previous games to have unlocked the Golden Hero, and it was about to pay off in a big way. The Golden Hero statue provides +1 max Focus to the whole party for the rest of the game, as well as granting global experience to the party and restoring all Focus of the tributing character. This was simply enormous: an extra point of Focus for every character, awesome!  As I grow more experienced at this game, I continue to realize that Focus is an immensely precious resource. Running out of Focus leaves characters extremely vulnerable to some sort of bad dice roll, while characters with lots of Focus can brute-force their way past virtually anything. Getting an additional point of Focus on everyone was incredibly helpful, and unlocking the Bronze, Silver, and Gold Hero statues is one of the few ways that For The King becomes a bit easier on repeated playthroughs. A little, little bit easier.

This was a chance to put some of those Focus points to use. I found another Cult Device on an island to the north of the Gold Hero statue, and since it was again Talent-based, I had MrWhiskers try to clear the thing. Despite sinking three Focus points into the device, he failed a 90 percent dice roll and took a big chunk of damage in return. Ouch! That was a bit unlucky. With his turn finished and MrWhiskers out of Focus, Charlie went ahead and tried his hand next, sinking all three Focus points into the device for 65 percent odds of destroying the thing. Fortunately this time I did succeed on the dice roll, whew. If this had failed as well, I likely would have needed to burn through a Tinder Pouch and heal up the party, then try again. The good news is that there was a town in the Dropstone Badlands near the shoreline, and I was able to sail up there to heal the party. I did not run into the Kraken along the way, which would have almost certainly ended this game.

There was a weapon upgrade for Ballgown in Wendero, with this War Spear having almost everything that I wanted on it. The weapon was a major increase in damage at 15 base attack, and then it also came with +3 armor and the ability to use a shield. Best of all, this was another weapon with the armor piercing property on it, thus putting me into my desired situation where all three characters had a piercing attack of some kind. Ballgown would end up using this weapon for a long time because I wasn't able to find any others that had the same armor piercing property for her. She was able to put this new weapon to use immediately, as the group had found Lucky's Vault and the home of another scourge nearby:

Fergus the Mad is annoying because he will often try to steal some of your gold and then run away. He's also extremely fast and will dodge any non-perfect attack that your characters roll. By way of compensation, he's always fought along without accompanying minions, and he has a low health total that makes the evil leprechaun easy to kill when blows do land. With the use of some Focus points, the party was able to down Fergus and claim his hat, which provides steal immunity and a boost to gold gain. MrWhiskers happily wore the thing, which made him look even more ridiculous. He wasn't done with the bonuses to gold generation either, as there was another sanctum nearby too:

The Sanctum of Wealth was a perfect fit for MrWhiskers. He already had a +15% gold multiplier from his lute and another +7% gold multiplier via Lucky's Hat. This provided another +20% gold multiplier and further theft immunity, making it impossible for enemy thieves or bandits to make off with the party's funds. It's pretty much always a good idea to stack up these gold multipliers on one of the party members, as income is always tight in FTK and getting more gold to spend makes everything much easier. I've found that it's almost impossible to keep up with the scaling prices in the stores without some kind of extra gold multiplier, almost as if the designers expected players to be using these items and balanced the game around that assumption. Either that or FTK is simply a very difficult game, which might be the more accurate explanation.
This corner of the map was packed full of interesting locations. Aside from the Golden Hero statue, the Cult Device, and the hiding place of Fergus the Mad, it also held the town of Wendero and two realm dungeons. Yes, the Obsidian Keep was the volcano dungeon off to the right side of the image while the Water Tower was the towering structure on the islands nearby to the west. I had explored maybe ten percent of the Dropstone Badlands and already came across the major dungeon hidden inside. That was highly lucky since much of the Badlands was inaccesible by ship, and I could have wasted a great deal of time wandering around in there. Furthermore, not every map area even contains one of the realm dungeons. I believe that Dungeon Crawl mode generates seven total areas and only five of them have the realm dungeons. Two of them spawning so close to one another was a major break of good fortune. With my party in good shape, I went ahead and entered the Obsidian Keep before any other disasters could befall me.

This dungeon proved to be a bit on the easy side, perhaps because my party was already Level 5 and the dungeon was listed as only being Level 4. Regardless, I needed to use just a single Godsbeard herb en route to reaching the boss at the end. The most interesting development was this Princess Hat dropping, which I equipped on MrWhiskers. It had an even larger gold multiplier as well as an XP multiplier, which would help him catch up to Ballgown as this game progressed. While MrWhiskers lost his Steal immunity from Lucky's Hat, he already had Steal immunity thanks to his Sanctum of Wealth, and picking up Inspire (an ability that occasionally grants XP to the party) was another helpful addition, as was immunity to being cursed. MrWhiskers would end up wearing this pink frilly hat for the remainder of the party's quest.
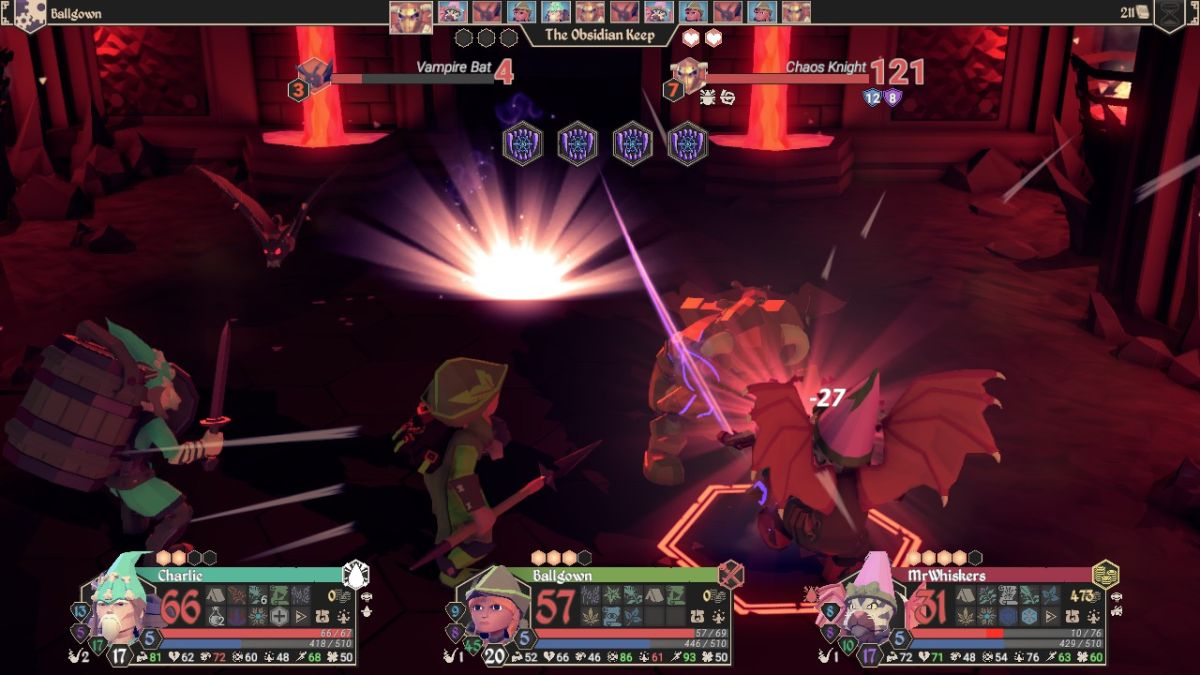
The boss at the end of the Obsidian Keep was this Chaos Knight, who showed up at Level 7 despite the dungeon nominally being only Level 4. Three levels higher than the stated level of the dungeon, sheesh. Fortunately the Vampire Bats that he appeared with were easy pickings, but the Chaos Knight himself was a tough opponent. A perfect attack roll like the one pictured above hit MrWhiskers for 27 damage through his armor (so 35 damage base) and also inflicted a nasty Bleed status effect. I had to use two Godsbeard herbs for their Party Heal property via Charlie, plus another solo Godsbeard herb on MrWhiskers just before the Bleed effect triggered. I could see that he was going to die when it went off if I didn't use the herb, and I didn't want to lose that Sanctum of Wealth. (Note: always make sure each character is carrying at least one Godsbeard herb for emergencies such as this.) Eventually the boss fell without anyone dying; none of my characters were in the danger zone on health but they were all completely out of Focus. I would not have wanted to try doing this fight without piercing weapons either, as that 12 armor on the boss would have made Charlie and Ballgown virtually useless otherwise.
Two major dungeons down, three more to go. Continued on the next page.


