

I had played through all of the various stories that make up the main gameplay of Octopath Traveler, and that experience had convinced me that the Starseer class was capable of facing off against some of the endgame optional superbosses. Going into this variant I thought that the Starseer would be pretty strong, but I had still been surprised at its ability to nullify nearly all of the damage dealt by most opponents. Again and again, Starseer Primrose simply did not take damage from the various Chapter 4 bosses. I had to know whether that would continue against Octopath Traveler's remaining challenges. Just how far would she be able to push things despite having a rather paltry offensive output? We were about to find out how far the game's best defensive and support skills could take her.
Completing all of the Chapter 4 stories unlocks a series of additional side quests, and while most of these are only situationally useful for characters, there was one quest reward that I had accidentally neglected for Primrose. That was the Captain's Badge accessory which grants +50% XP to the party so long as anyone has it equipped, requiring only that Ophilia and Olberic's stories have been completed. While Primrose was late enough in Octopath Traveler's gameplay that the boosted experience gain wouldn't make much of a difference, it was still better than anything else that she might choose to wear while clearing her way through random encounters. Those random fights had long since ceased to pose any challenge and therefore every non-boss encounter for the rest of the game would take place while wearing this thing. The Captain's Badge was enough to take a bunch of monster encounters up close to the 1000 XP threshold and led to fun screenshots like the one above.
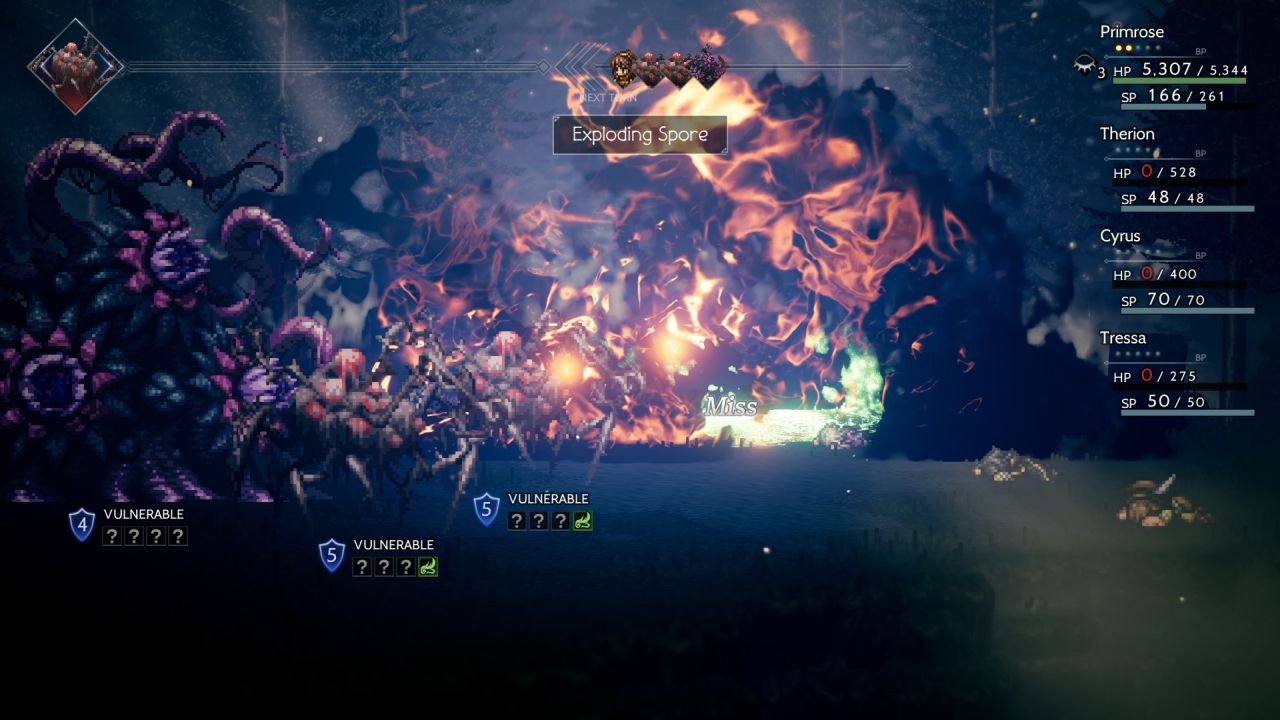
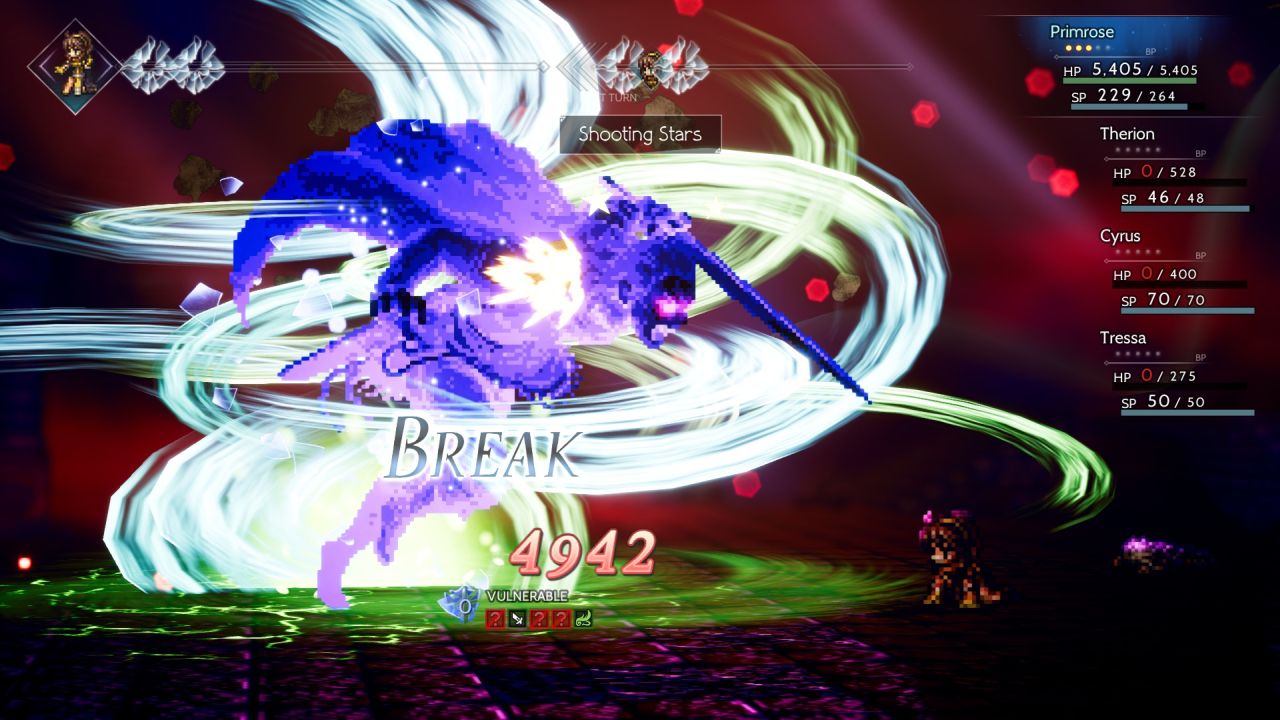
With that out of the way, it was time to get down to the business of facing the remaining optional superbosses. The easiest of these was the Devourer of Men plant creature that appears at the end of the "Into This Air" sidequest. The Devourer has a whopping 224k health and a chargeup Devour ability that results in instant death for the unfortunate party member targeted. This was a geuinely tough battle the first few times that I tried it with a solo character, requiring precision breaks of the Devourer's shields in order to work around that instakill Devour move. And then I later learned that a Vivifying Stone accessory completely blocks the Devour ability which removed most of the danger from the fight. I also made sure to bring along a Void Amulet to block the dark element damage from this boss and, well, that was pretty much all she wrote. The Devourer and its two Deadly Spore minions had great difficulty hitting Primrose with their physical attacks (I continued to observe the roughly 80-85% dodge rate that I've written about before), the elemental damage from the boss was blocked by the Void Amulet, and the Devour cheese kill move was stopped by the Vivifying Stone. It took Primrose a long time to kill this boss since she was only hitting for about 10-12k damage per casting of Shooting Stars, however she was never going to die in the process. The danger level was low enough that I relied on Healing Grapes and Inspiriting Plums for HP/SP recovery and even cast BP Boost a bunch of times to fill up her boost meter faster. This was a surprisingly easy challenge to overcome.
Next up were the four guardians of the secret endgame jobs. All of these opponents have massive life totals and a series of dangerous abilities; I chose to begin with Balogar in the Shrine of the Runelord as he seems to be the easiest for a solo game. Balogar uses a series of "rune" attacks that correspond to the six elements in Octopath Traveler and match the various elemental pursuits tied to the Runelord class. Most of them also have some kind of status ailment tied to them as well, such as the Rune of Thunder dealing lightning element damage and also inflicting unconsciousness status. I had to bring a Conscious Stone accessory to block that and otherwise equipped Primrose with an Empowering Necklace for an extra 1000 HP.
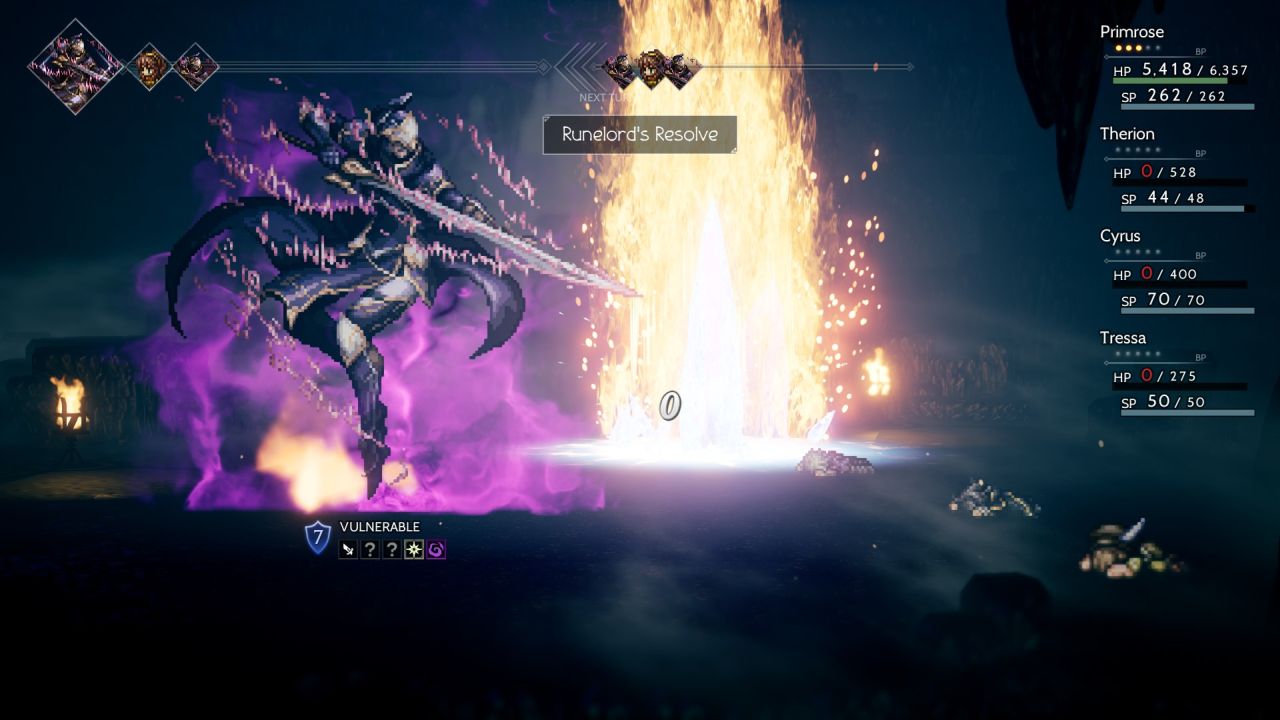
Now here was the good news: unlike the elemental pursuits from the actual Runelord class, which always hit their target and can never be dodged, Primrose was absolutely able to dodge the various rune attacks employed by Balogar. They must be classified as melee attacks that deal elemental damage, and that was perfect for Primrose here as she merrily avoided the vast majority of these strikes. Primrose chipped away with repeated Shooting Stars casts hitting for 13-14k damage at a time and had enough time to rely on easily replenishable Healing Grapes/Inspiriting Plums again. When Balogar started to drop low on health, he used the Runestorm ability which caused his rune attacks to hit the whole party (irrelevant for a solo game) and then broke out the pictured Runelord's resolve. This ability hits six times with all six elements in an explosive cascade of pyrotechnics... and did basically nothing to Primrose. She dodged or blocked more than half of the strikes and the ones that did hit dealt a mere 200-300 damage. So much for the Runelord's ultimate ability! This proved to be another easy opponent.

The other defenders of the secret job shrines would prove to be made of sterner stuff, however. I decided to tackle Dreisang in the Shrine of the Archmage next and brought along double Empowering Necklaces for +2000 HP as this boss didn't have any status conditions to worry about. Dreisang is a straightforward opponent as he pelts the party with one elemental spell after another, ignoring anything too complicated and focusing instead of raw damage output. He likes to stack an elemental attack buff on himself while simultaneously debuffing the elemental defense of the party, a combination which causes his spells to deal a little over double their base damage. This made it more important than ever to use the Starsong buff for protection since one of its four abilities increases elemental defense. However, Dreisang also has a really annoying ability named Divine Majesty: prevents the party from using status enhancements and buffs for 5 turns. This is literally the Starseer's Celestial Intervention ability and Dreisang always starts out the battle by casting it immediately. Once Divine Majesty was in place, Primrose could not use Starsong as all of her own buffs were blocked. That was incredibly irritating - he wasn't supposed to be able to do that!
Well, two could play at that game:

The solution was to have Primrose cast Celestial Intervention on herself before Dreisang could put Divine Majesty in place. With Celestial Intervention protection enabled, Divine Majesty simply was not applied and that allowed Primrose to apply her Starsong buff on subsequent turns which then provided the elemental defense needed to survive this fight. I quickly realized that Dreisang was highly predictable in this regard: he would cast Divine Majesty as his first action at the start of every fifth turn, without fail. By keeping track of which turn it was, I could ensure that Celestial Intervention was in place to block Divine Majesty whenever it popped up. While I couldn't avoid the initial Divine Majesty on the first turn of the boss fight, I managed to keep it from being applied over and over again thereafter. I slipped up once and let Divine Majesty through but only that single time which wasn't bad at all.
That's not to say that the rest of the battle was easy. I had to juggle keeping Celestial Intervention in place at the key moments along with maintaining Starsong protection while also dealing damage with Shooting Stars and healing Primrose as she took damage. Dreisang dealt a lot of damage even with Starsong's elemental defense protection in place, especially when he dropped low on health and broke out his "Extreme Elemental Augmentation". Dreisang was hitting for as much as 500 x 3 = 1500 damage and doing that multiple times per turn. The danger level was high enough that I had to rely on Refreshing Jams for this boss fight and having 7300 HP in Primrose's back pocket was a real help. I maintained my cool and kept all of Primrose's various defensive protections in place, attacking with Shooting Stars only when it was safe to do so, wearing down the boss over an extended duel. This one cost me half a dozen Refreshing Jams but I did emerge victorious on the first attempt.
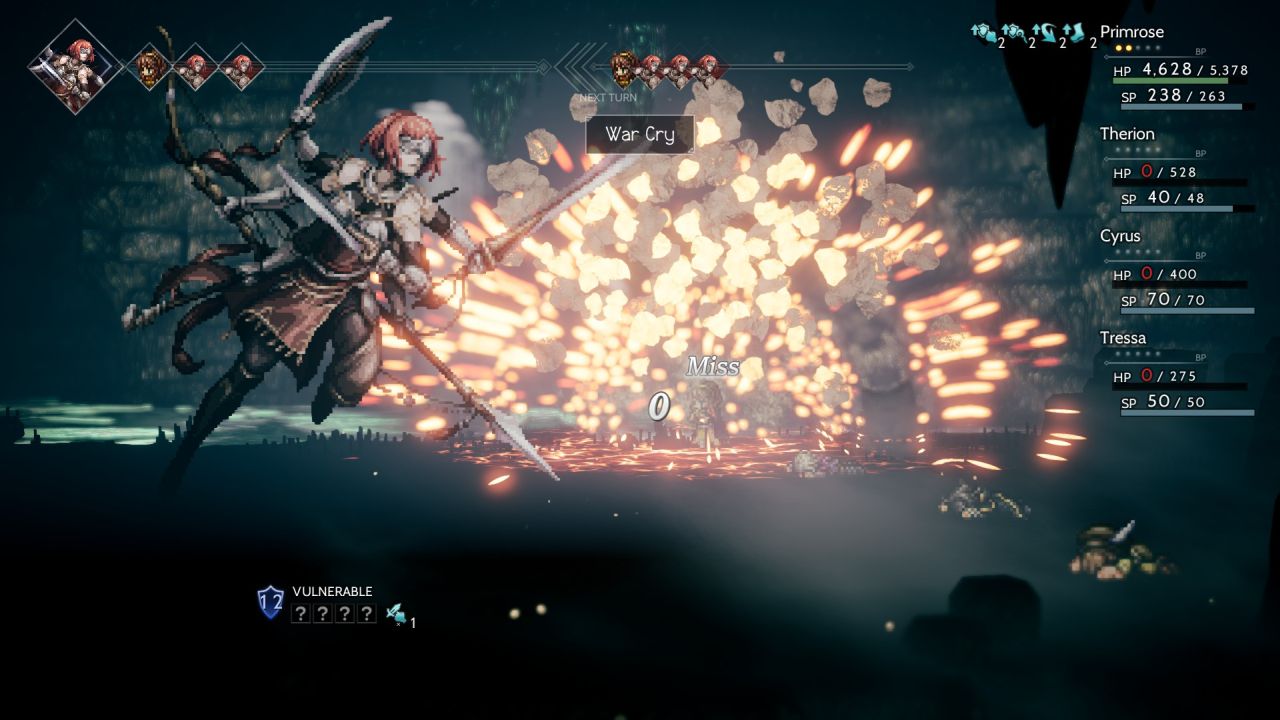
Two secret jobs down, two to go. I judged that Winnehild was likely to be the easier of the two opponents and therefore headed into the Shrine of the Warmaster next. This battle required bringing Antidote and Conscious Stones to block poison and stunning statuses respectively, though I very much wished that I could have brought along an Empowering Necklace for another 1000 HP. Winnehild is a fearsome boss who starts out the battle by using dagger, bow, and axe attacks, then later goes up to three actions per round and adds sword, spear, and staff attacks as well. When she drops low on health, Winnehild will utter her War Cry and unleash six consecutive attacks on the following round which is usually enough to spell instant death for most solo characters. I haven't even attempted to face Winnehild with most of the jobs in Octopath Traveler because they would have stood no chance at all.
And yet Starseer Primrose was a character that I thought could make it past this battle despite her mediocre offensive abilities. This was due to the fact that, for all of Winnehild's awesome strengths, she still relied on physical attacks to deal damage in this boss fight. I had seen over and over again that Primrose could negate most physical damage through her evasion and use of the Starsong buff, the only question was whether that would continue to be the case against this opponent. Much to my delight, I found that Primrose was once again dodging nearly all of Winnehild's physical attacks so long as I was careful enough to maintain Starsong protection at all times. Winnehild would strike again and again and again, only to miss on the usual 80% of those attacks. I couldn't believe that Primrose was having the same kind of luck against these endgame superbosses, but her long-running tactics really were proving to be effective once again.
That didn't mean that there was no danger in this battle, as Winnehild could inflict a true pounding if Primrose happened to get a sequence of bad RNG luck at the wrong moment. There was one time where Winnehild used her War Cry and landed several blows in succession, then I had to watch in horror as Primrose dodged four attacks in a row on sub-1000 health remaining. War Cry was also super dangerous because the action bar at the top of the screen wouldn't show Winnehild getting those extra attacks ahead of time; they would simply appear out of nowhere and suddenly the boss was issuing seven attacks in a row where I was only expecting her to have two attacks. However, the defensive protection of Starsong along with 1 out of every 4 attacks getting nullified by Divine Aura meant that Primrose was quite difficult to kill. She slowly worked her way through Winnehild's 204k healthbar with repeated castings of Shooting Stars, managing to survive several different War Cries before eventually dropping the boss. I actually did beat Winnehild on my first attempt at this boss fight, requiring half a dozen Refreshing Jams but otherwise coming through with flying colors. I hadn't been sure if this would be possible and was delighted to be proven wrong.
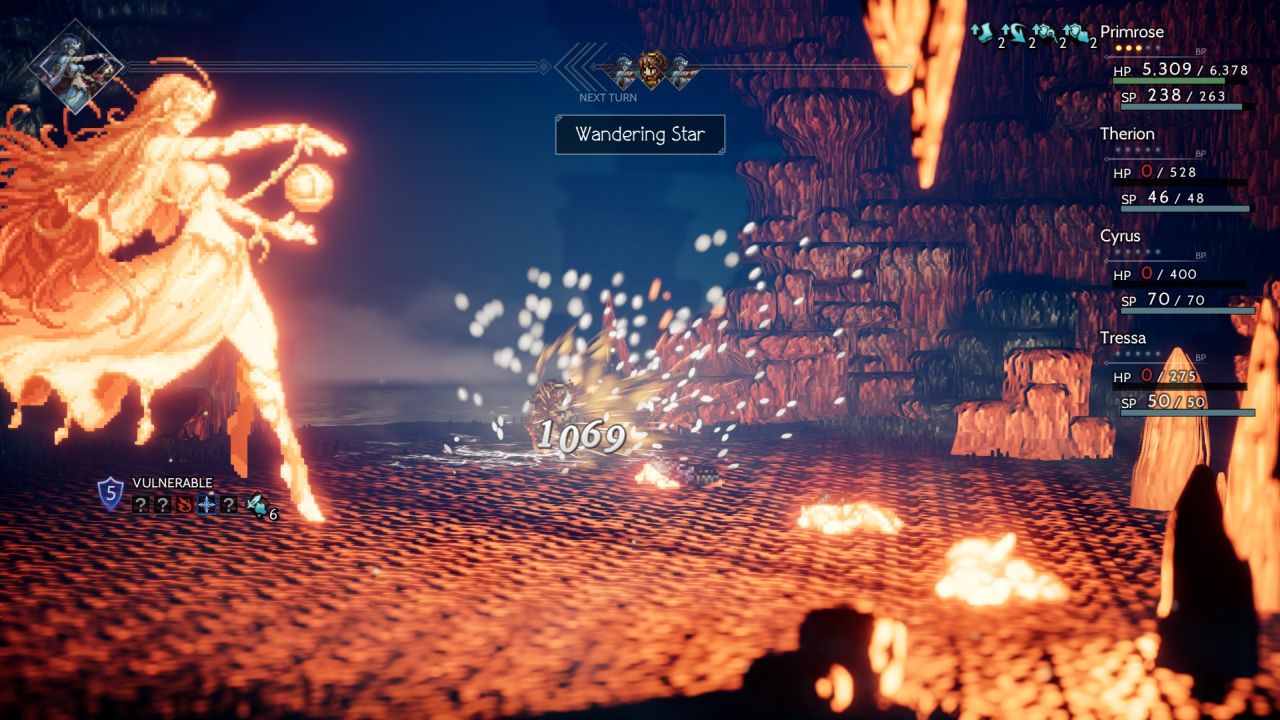
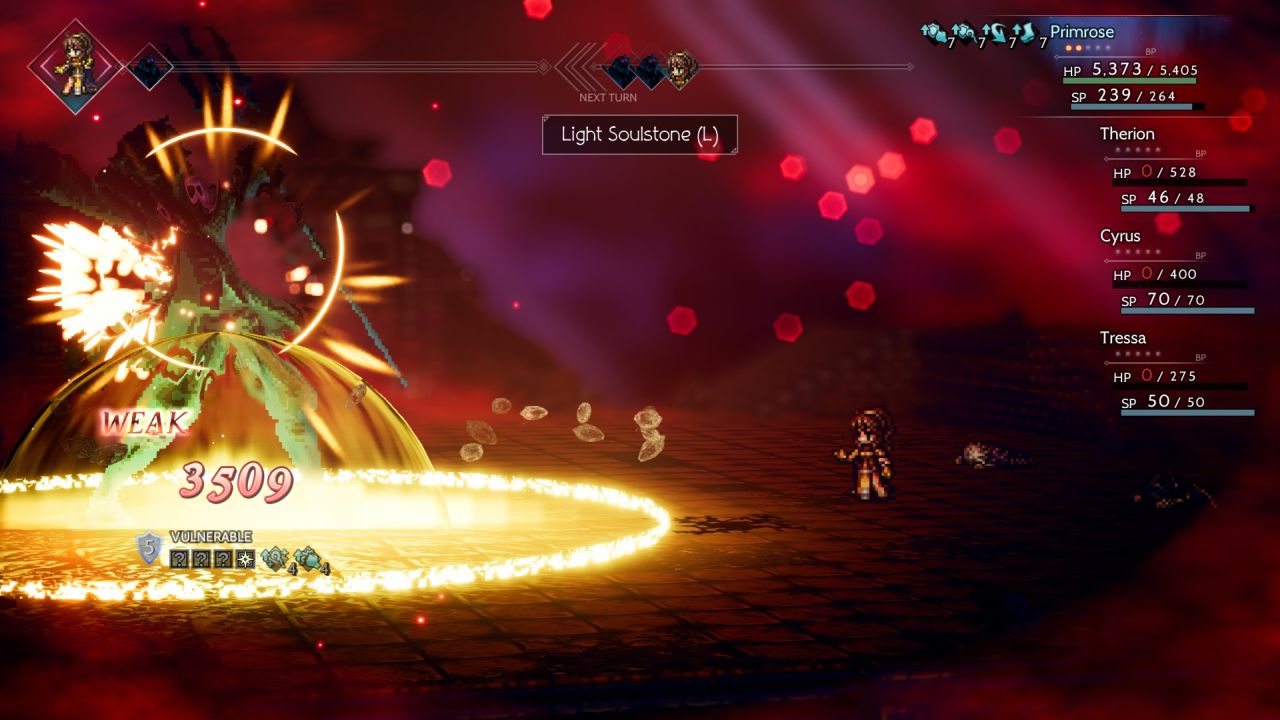
Now there was the question of dealing with Steorra in the Shrine of the Starseer who I had always known would be the toughest of the four shrine guardians. Steorra had all of the same abilities as Starseer Primrose, only better versions of them along with 178,000 HP that had to be chewed through. Unfortunately Steorra deals almost entirely magical damage which meant that Primrose's evasion would be of limited usefulness here. I swapped her equipment over to a setup with more elemental defense and brought a Clarity Stone to prevent confusion status from landing (I tried to do the battle with an extra 1000 HP but the confusion was a death sentence whenever it inevitably landed). Steorra has a series of different "star" attacks that all deal elemental damage: Primrose's own familiar Shooting Stars along with Wandering Star, Lost Star, and Baleful Star. My Octopath Traveler resources claimed that several of these abilities dealt light element damage, and I tried equipping a Gleaming Amulet to block their damage. However, my guide materials were incorrect and all of Steorra's abilities in fact deal non-elemental damage which can't be resisted with items, argh. That was one potential solution to the battle removed.
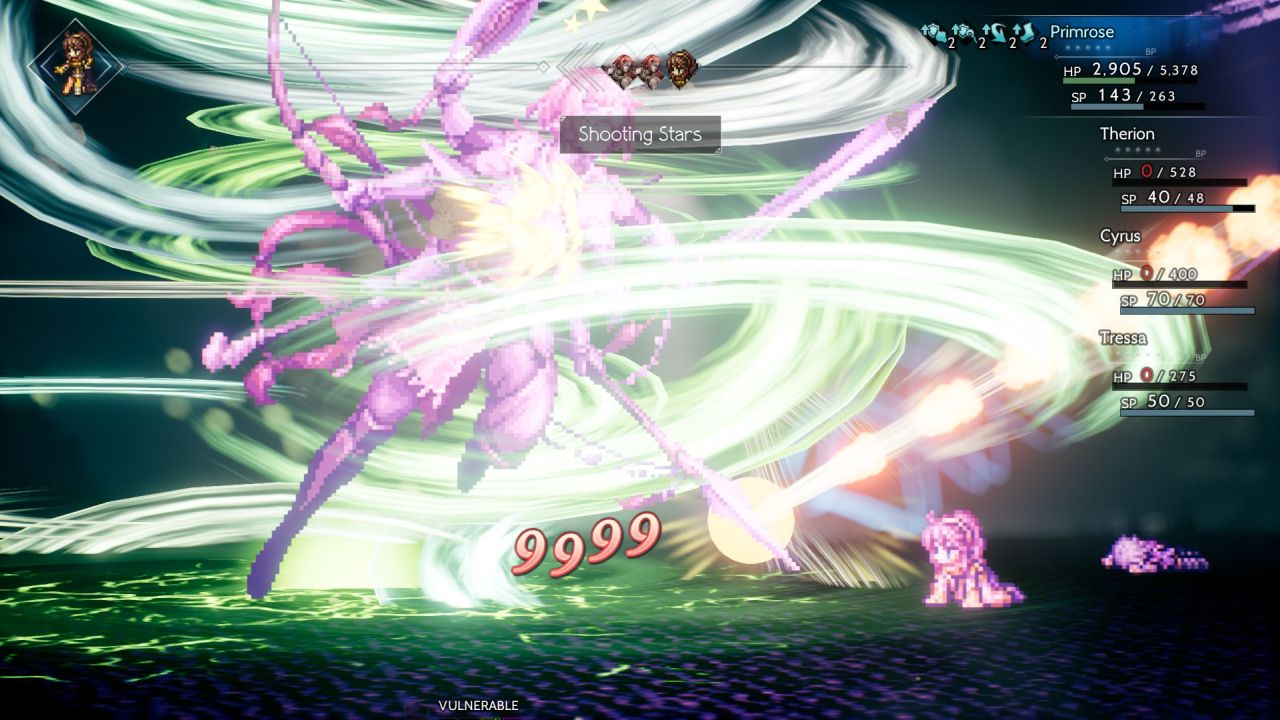
What was worse than Steorra's direct attacks were her various buffs, however. Much like Starseer Primrose herself, Steorra liked to cast Song of the Starseer which mimicked the Starsong ability and increased Steorra's physical defense, elemental defense, evasion, and speed for 4 turns. This further reduced the damage from Primrose's Shooting Stars casts, with the spell hitting for roughly 15k damage if Steorra didn't have this buff in place and about 10k damage if she did. Steorra also counters all physical attacks directed at her though fortunately that wasn't much of an issue here. Bad as this was, I could have survived Steorra's damage by relying on Primrose's Starsong buff and counter-attacking whenever it was safe to do so, in the same fashion that Primrose had done in so many previous battles. Unfortunately Steorra also liked to do this:
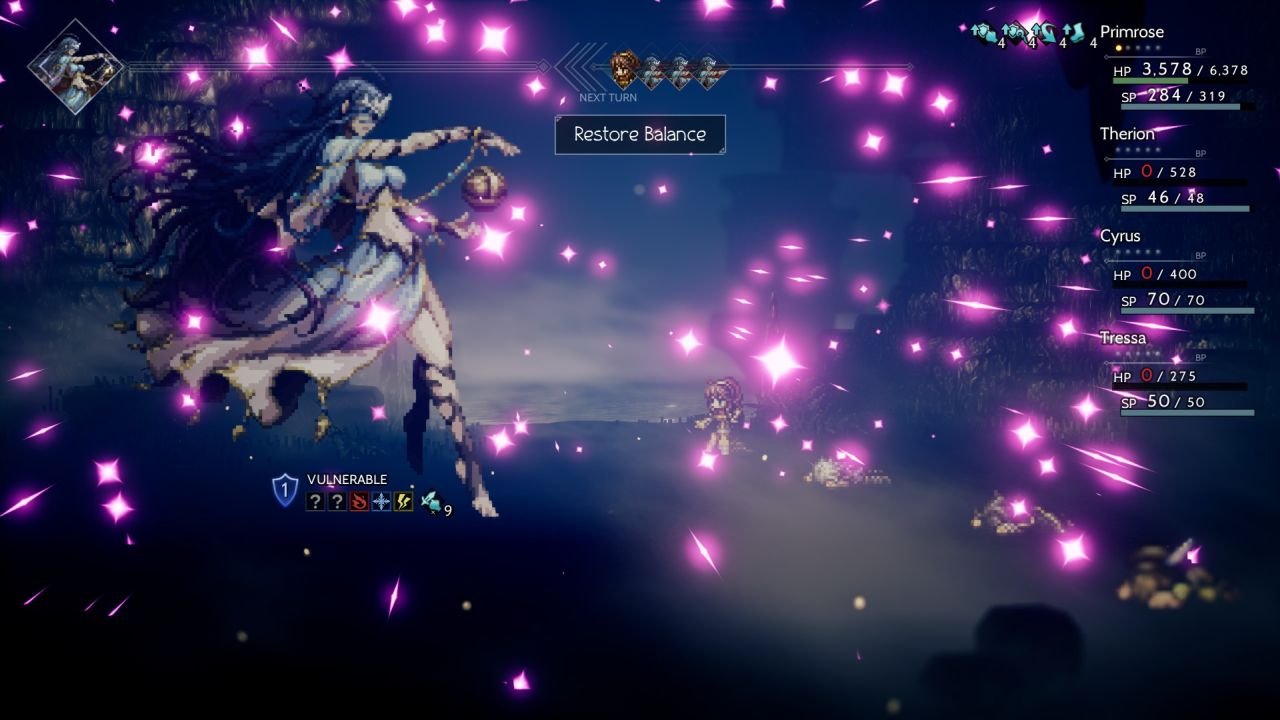
Her Restore Balance ability removed all buffs from Primrose, neatly dispelling the Starsong protection that I tried to put in place. This made Steorra's various spells much, much deadlier since I couldn't rely on Starsong to reduce the incoming damage. Of course, I had seen this trick before with Dreisang and I figured that I could use Celestial Intervention to block Steorra's Restore Balance effect from taking hold, all I would have to do was get the timing down correctly. That's when this boss fight played another cruel trick on me: Restore Balance IGNORED the presence of Celestial Intervention altogether!  Yes, I would specifically cast the "protect your character from being hit by debuffs" ability, only to have Restore Balance wipe out Celestial Intervention anyway. That was... really unfair, what the heck! Thus Primrose effectively had to face this battle with no Starsong defenses at all, since any attempt to put her protective buff in place would get wiped out without me being able to do anything about it.
Despite all of that, Primrose was still a tough customer to defeat as her Divine Aura passive would kick in frequently and I could guzzle down Refreshing Jams for healing throughout this battle. Even with Steorra getting three actions per round, I could still make progress and chip away at her lifebar which would result in an eventual victory. And yet, Steorra still had one final nasty ability to contend with:
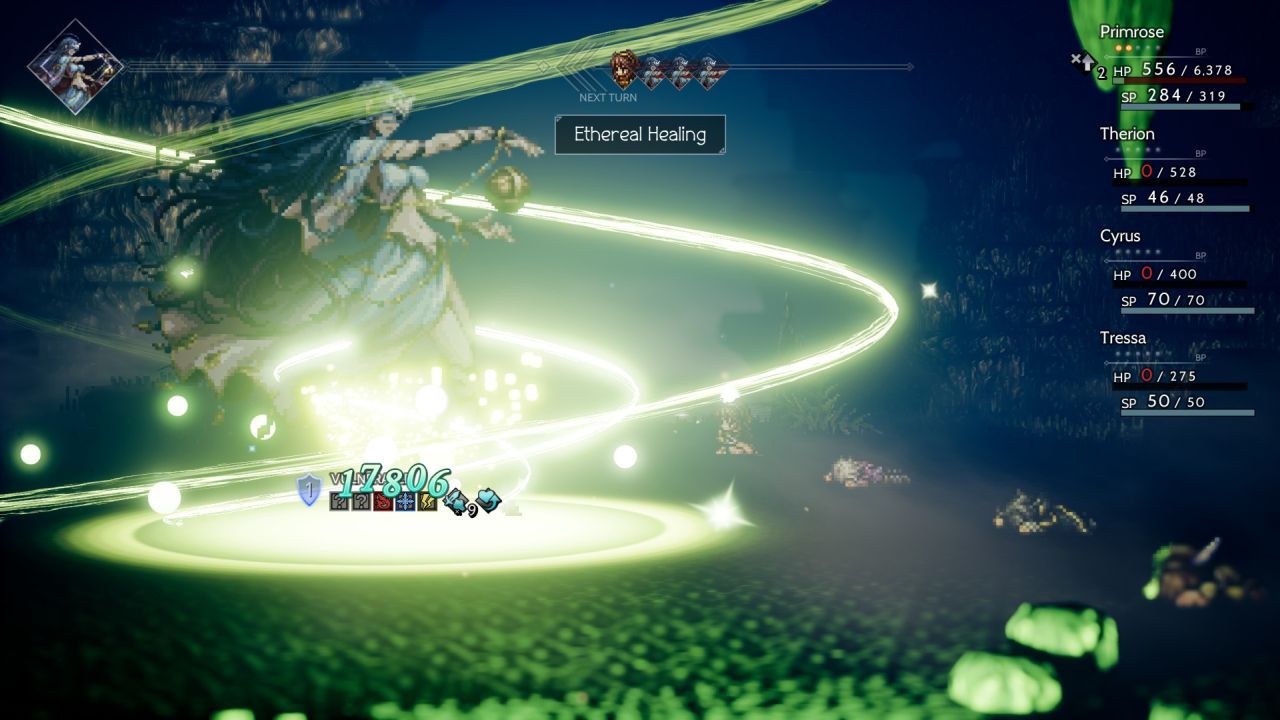
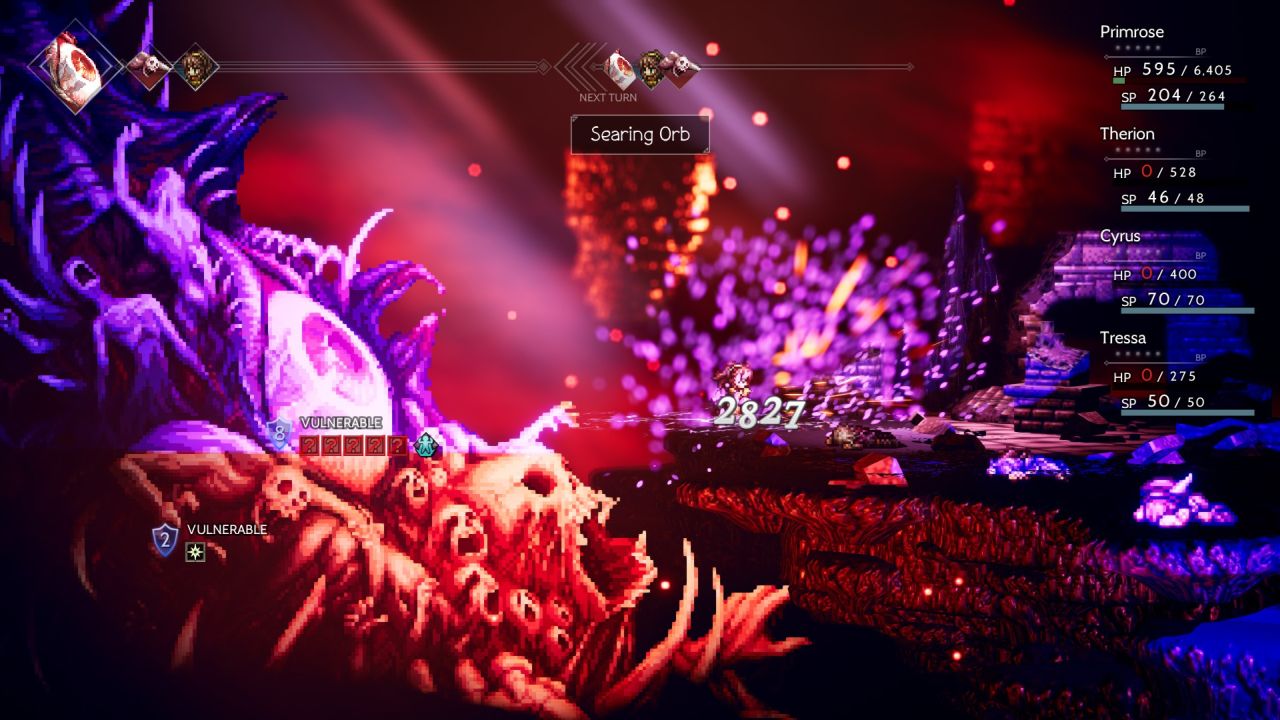
Upon reaching 25% health remaining, Steorra would break out this Ethereal Healing ability which immediately healed her for 17,806 HP (10% of her total) along with a further 3500 HP (2% of her max HP) on every subsequent turn. This was truly disastrous for Starseer Primrose who had limited offensive output and typically won long, drawn-out battles through her defensive prowess. Ethereal Healing required Primrose to burst down Steorra's final 50,000 or so health quickly before that ticking health restoration could do its work. And if that wasn't bad enough, Steorra *ALSO* gained an additional Heavenly Protection ability at low health that functioned the same way as Primrose's own Divine Aura: 25% odds to nullify any incoming damage. There were a bunch of occasions where I lined up a max boosted version of Shooting Stars only to have one or two of the hits deal zero damage thanks to Heavenly Protection. How could I race through that regenerative ability when a good chunk of Primrose's damage was being neutralized?
I tried my best by replaying this boss fight over and over again even though the odds seemed overwhelming. Eventually I figured out that Steorra's initial few shield weakness patterns weren't particularly favorable for Primrose. It was Steorra's fourth and final set of weaknesses that looked the most promising, with both dagger and wind elements to target. Therefore I tried to set up the final and most dangerous portion of this battle to correspond with this set of weaknesses. I would slowly break Steorra's initial 7 shields with Thunder Soulstones, then break 11 out of the next 12 shields with Fire and Ice Soulstones, leaving Steorra with one shield remaining. At this point, I would start casting Shooting Stars and knock Steorra down into the red health zone where she would use Ethereal Healing. Then I would break the final shield, hit her with a max boosted Shooting Stars, and continue frantically casting Shooting Stars as much as possible into that wind element weakness while using Refreshing/Revitalizing Jams whenever Primrose wasn't attacking.
It was the best plan that I could come up with, and it almost worked. I was able to get Steorra low on health on two different occasions, with her down to about 15-20k health remaining by my best estimate. But then she flattened Primrose with more spellcasts to put an end to those attempts, and most of my attempts didn't get anywhere near that far. Steorra had so much damage and so many different buffs to contend with that I was really pushing my RNG luck with Divine Aura just to make it to the ending stages of the fight. It also didn't help that I needed to use 18 soulstones one at a time in succession for setup purposes, which took a long time and really stretched out my attempts at the boss. I would have been much more willing to keep trying this fight if I didn't have to spend 5-10 minutes of setup on every attempt before the real fight even started. Long story short, I tried this for well over an hour without achieving success and decided to call it quits. I do believe that this boss is possible for the solo Starseer to defeat, and if I were willing to spend 10 hours here running endless attempts, I think I could eventually find the right RNG sequence for a win. I just didn't have the desire to go through that for what was already an optional endgame superboss; you can read about my Final Fantasy 5 solo Berserker if you want to see me get tortured in that fashion.
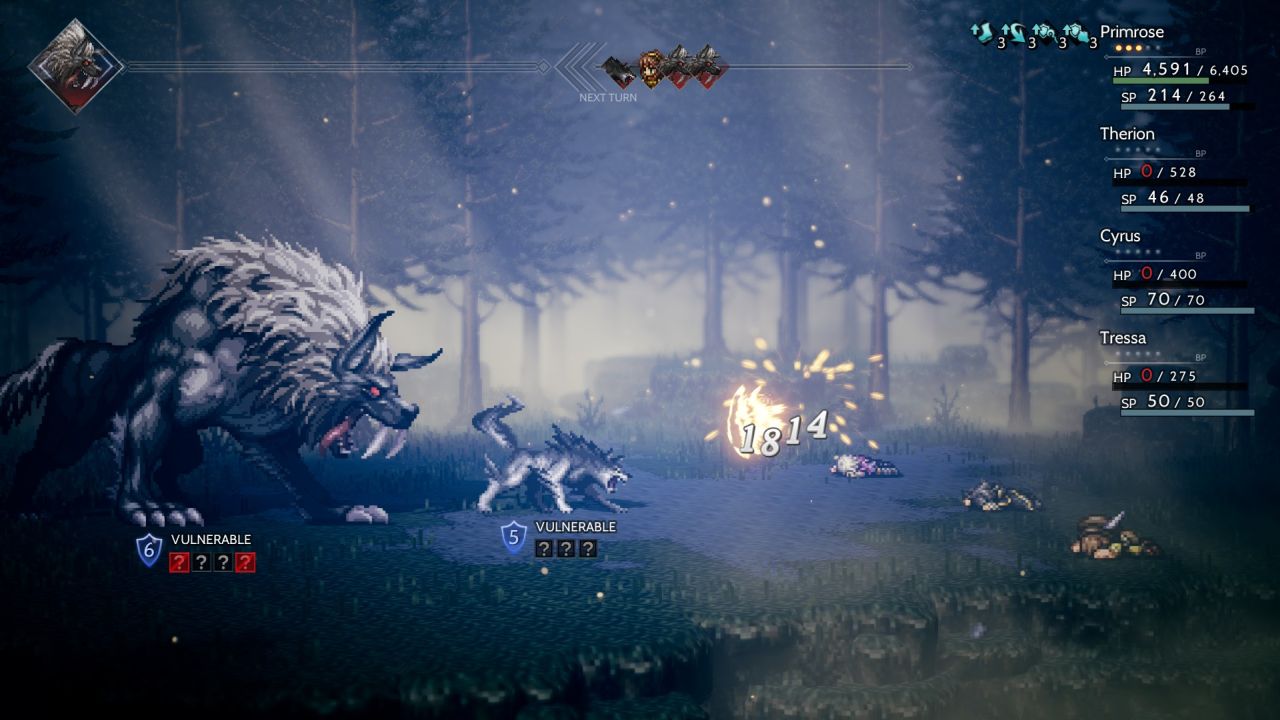
Alright, Steorra had been a close loss but what about the dreaded wolf Mánagarmr? The only one of my solo characters who had ever defeated this opponent was Warmaster Olberic, however Mánagarmr does deal entirely physical damage so I thought Starseer Primrose might have a shot. I equipped a Calming Stone to block its terror status and then set up the Starsong protection field. This did in fact work: while Mánagarmr dealt massive damage on a successful attack, 1800 damage even with Starsong's physical defensive buff in place, most of the wolf's bites failed to hit Primrose. I could safely rely on that same roughly 80% of enemy attacks missing their mark which gave Primrose space to cast Shooting Stars and knock out the Direwolf minions of the boss. This was actually working again!
At least, it was until Mánagarmr did this:
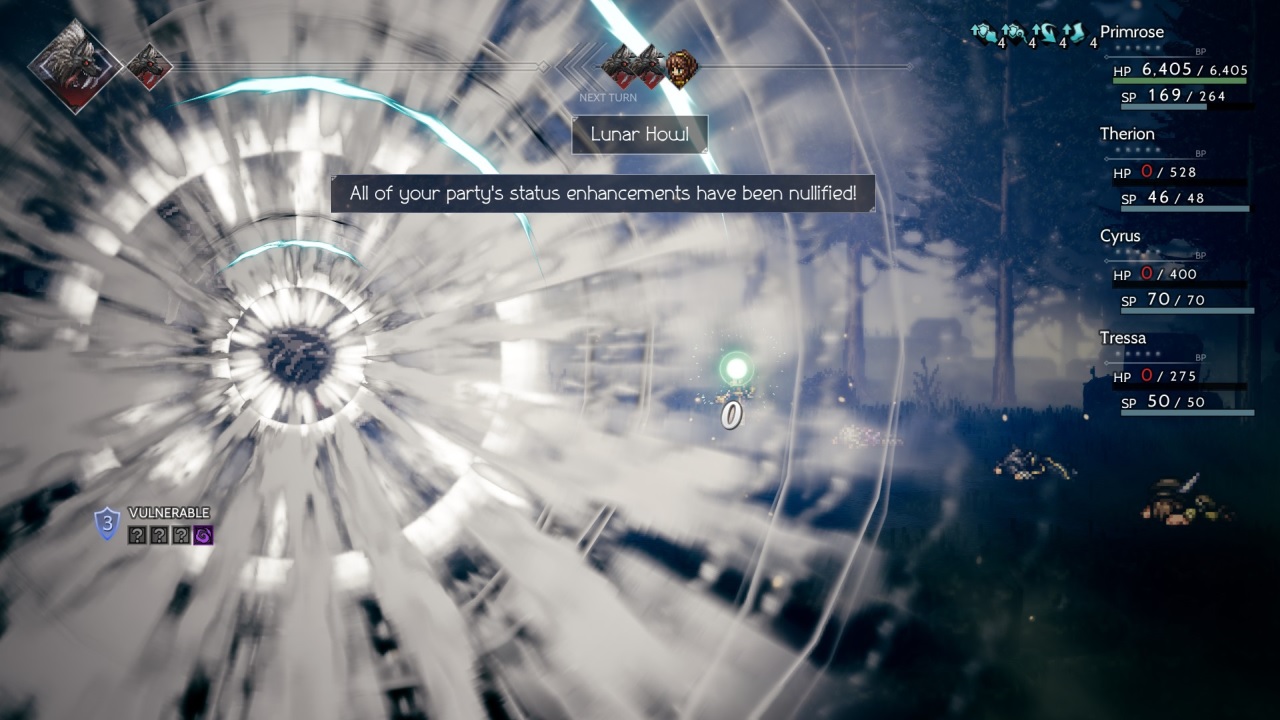
Oh, OK, I guess it's going to be like that then.  In another cheap move on the part of Octopath Traveler's gameplay, Mánagarmr had its own version of Steorra's Restore Balance which instantly removed Starsong protection from Primrose. And for anyone wondering, Celestial Intervention again failed to block Lunar Howl from taking effect, what the ever loving heck?! Lunar Howl wasn't quite as bad as Restore Balance because it didn't stop Starsong from being reapplied afterwards, however the very fact that Starsong could be unavoidably removed at any point in time effectively doomed this encounter. Sooner or later, Mánagarmr would Lunar Howl away Primrose's Starsong buffs and she would be ripped apart by the wolves before it could be reapplied. This was a really dumb way to lose the battle, and I actually did get Mánagarmr down below half health on one occasion, but clearly I wasn't going to be able to make it past this latest jerk move on the part of the game's developers. Mánagarmr was another superboss that I wasn't going to be able to defeat with this solo class.
That left only the boss refights beyond the Gate of Finis. I don't find these opponents to be terribly interesting because they don't do anything different from the initial versions of the Chapter 3 and 4 bosses, only having more health and higher stats in every category. The real danger comes from having to face eight of these boss refights in a row with no opportunity to save the game: make one mistake at any point and the player has to begin all over again. As such, I always start the boss rush with the most dangerous opponents, specially Darius since his Call Comrade cheese move remains the most likely place to get a game over situation. I followed the same pattern as before, using Starsong protection to counter Darius' Nighthawk debuff while keeping him at 1 shield remaining for instant item retrieval whenever he stole away Primrose's supplies. The one tricky part was getting the setup correct to block his Call Comrade move from appearing, namely damaging Darius below 25% HP remaining when Primrose was due to act first on the next round. I managed to pull this off on the very first attempt, after which Darius was complete dead meat. He had no chance to beat Starseer Primrose legitimately and I finished him off shortly thereafter.
Now I really didn't want to mess up the remaining seven bosses; I wanted to get this right the first time so I could avoid ever seeing Darius again. I fought Werner next and once again found him to be quite easy. Repeatedly casting Starsong over and over again kept Primrose's evasion boosted and blocked Werner from being able to apply his Oppression debuff. With that protection in place, Werner really couldn't do much of anything even when he was getting three actions per round. It was a similar story against Simeon, where I took the time to use soulstones to unlock all of his shield weaknesses before knocking Simeon into his more dangerous AI routine. Starsong countered Simeon's Shredded Fortunes debuff and Primrose's evasion was too high for his Act of Impulse attacks to hit more than once in a blue moon. I wore down Simeon and defeated him without difficulty.
The Mattias refight was probably the hardest one after Darius because his Infernal Flame ability blocked Primrose from being able to use Shooting Stars. When it appeared, I had to use the Starseer Divine skill Steorra's Prophecy which was only dealing 5000-6000 damage per casting and had to be used at max boost points. I slowly defeated all three sets of Mattias' summoned minions, each one requiring 2-3 casts of Steorra's Prophecy before they dropped, and then used Light Soulstones to finally break his shields and remove the Infernal Flame effect. He was basically on death's door at that point and a few castings of the reclaimed Shooting Stars finished him off. The remaining bosses weren't as interesting and if anything became pretty tedious to defeat. I equipped a Tempest Amulet to block the wind element damage from Yvon's minions, an Antidote Stone sufficed to deal with the poison on the Venomtooth Tiger, H'aanit's Dragon required bringing an Inferno Amulet to stop its flame breath, etc. These were easy enemies but they all had close to 200,000 health and Shooting Stars was barely exceeding 10k damage per casting. It took a long time to defeat each boss even with the Octopath Traveler emulation running at triple speed, plus I had to deal with the stress of knowing that I'd have to redo everything if I made one mistake along the way - not fun stuff.
That was the main reason why I was a bit worried about Miguel who I faced at the very end of this process. If the damage from his spears was high enough, it could overwhelm Primrose and then I'd have wasted all of the time going through these other boss refights. Fortunately her Starsong evasion allowed her to dodge most of the falling spears, and repeated Starsong casts helped cancel out the Twin Spears defensive debuff that Miguel liked to use. This enemy doesn't inflict any status ailments so I had brought double Empowering Necklaces for 7400 max HP on Primrose which also gave me a nice buffer on health. There weren't any particularly close calls in this battle but I made sure to use Refreshing Jams aggressively just to prevent any mistakes from taking place. My reward for winning these battles was getting to read the secret endgame reports that tie the whole story of Octopath Traveler together, then face off against the true final boss:
Primrose had absolutely no chance against Galdera, of course, and I didn't bother making any kind of serious attempt to contend with this foe. The very fact that she was able to defeat all eight of the boss refights on the first try was victory enough for me. I was proud of what Starseer Primrose was able to achieve as this was one of the best performances of any solo class despite having such weak offensive tools. The Starseer has basically nothing other than Shooting Stars which is a wonky and bizarre spell, and yet that alone was enough to complete pretty much the whole game. While the Starseer falls a bit short of the Warmaster and Runelord in terms of raw power, this remains one of the game's best classes. It's even better when it can function in its intended role as a support class instead of needing to carry the whole damage output on its own shoulders!
The Starseer was the final solo class challenge that I undertook in Octopath Traveler, a project that lasted for a full six years before reaching completion. I have one or two other ideas that I may try at some point for this game, we'll have to see what happens. I don't know if I'll attempt the same kind of solo challenges for Octopath Traveler 2 or any of the other games in the series; I liked Octopath Traveler 2, this kind of thing just requires a big time commitment and I have less time for gaming these days. Regardless of what the future may hold, I enjoyed testing out the twelve classes in this game and Octopath Traveler was certainly a game where I got my money's worth from the purchase. Thanks as always for reading and following along with this journey!


