
I continued with Tressa's journey by making a purchase that I'd been saving up towards for some time:

The Robe of the Flame was a pricey item unlocked by Tressa's Purchase action, but it was well worth it thanks to the massive upgrade in her corresponding stats. Physical defense went up by almost 100 points along with a bonus addition of +56 maximum SP that Tressa didn't really need. Her use of the Rest skill and thrifty spending thanks to the SP Saver support skill meant that this was one stat that didn't need anything in the way of itemization. But the real benefit from this armor came in terms of elemental defense, which went up by a staggering 268 points (!) and nearly doubled overall. If you remember back to the first page of this report, you might recall that healing skills in Octopath Traveler scale off of the elemental defense stat. What would it mean in terms of her Rest ability to have such a massive increase in that stat?

Bingo, Tressa was now up to 500 HP restored per use of Rest, completely for free and with extra SP restoration and negative status removal thrown in as part of the bargain. This was why I had chosen to Purchase the Robe of the Flame instead of other armors that had slightly higher physical defense but lacked the big increase to elemental defense. With Rest increasing from 250 HP restored to 500 HP restored, and with the potential to heal 1000 HP in a single turn if Rest were boosted to the maximum, this flipped the math of random encounters considerably. Tressa could now outheal the damage output of a much wider selection of foes, with the net result of opening up many of the paths in the second ring for practical use. No more running for dear life and praying not to be killed - Tressa was increasingly in a position to fight her way to the next group of towns. This was real progress here, and Tressa still hadn't made use of Hired Help or her Divine Skill as yet.
With the introductory elements of the gameplay now out of the way, this is a good time to look at the mechanics of the damage formula in more detail. I'm going to post this as a screenshot for the report, but feel free to download the whole mechanics guide (in PDF form) from my website right here:

Credit for working out the mechanics goes to reddit user Tables61 who has been appropriately recognized in the linked guide. The damage formula itself is a bit on the lengthy side, but each individual attack breaks down fairly easily into three basic components: the actual attack calculation itself, the attack modifier, and the boost calculation. All of the other parts of the damage formula are standard and don't change from attack to attack, like the crit multiplier always increasing damage by 25% or the weakness modifier always doubling damage against a broken opponent. I find it easier to understand this kind of formula by way of an example, so let's look at the damage calculation using Tressa's starting Tradewinds skill. Broken down into components, this would be:
Attack Calculation = Attack Value - (Defense Value * Defense Modifier). The attack value for Tradewinds (or any elemental skill) is equal to your character's elemental attack with their best weapon equipped. Similarly, the attack value for a physical damage skill would be equal to the physical attack of the weapon making the attack. The defense value is equal to the enemy's physical defense or elemental defense, depending on the skill in question being used. The defense modifier varies by the skill being used, with a value of 1.0 for a normal attack and different values for different skills (lower is better here). Tradewinds has a defense modifier of 0.80, which means that it cuts the enemy's elemental defense by 20% when calculating damage. If Tressa had an elemental attack of 100 and the enemy in question had an elemental defense of 50, the calculation here would be Attack Value - (Defense Value * Defense Modifier) = 100 - (50 * 0.8) = 100 - 40 = 60 base damage.
Attack Modifier. This also differs depending on the skill used, with basic attacks having a value of 1. Unlike the defense modifier, a higher number is better here since it adds to damage. Sticking with our Tradewinds example, this skill has an attack modifier of 1.64 which is pretty good for a normal skill.
Boost Calculation = 1 + (Boost Modifier * Boost Level). This is also pretty straightforward, take the number of boost points invested in the skill (anywhere from 0 to 3) and multiply this by the boost multiplier, then add 1 to the result. If there are no boost points invested in the skill being used, this whole portion of the calculation has no effect. The boost modifier is the third factor that differs depending on the skill in use, with a higher number again being better here. Tradewinds makes for an easy example here because the boost modifier = 1.0 for the skill; therefore, each point of boost effectively functions as another attack at the same strength. With zero boost points, the calculation is 1 + (0 * 1) = 1, whereas with three boost points the calculation is 1 + (3 * 1) = 4. Many other skills have diminishing returns when it comes to boosting them, like Rest which has a boost multiplier of 0.30. These are skills where investing more boost points doesn't have much of an effect.
With those three components in mind, we can finish the core portion of the damage calculation. Using our Tradewinds example at max boost, we get Damage = [Attack Value - (Defense Value * Defense Modifier)] * [Attack Modifier] * [1 + (Boost Modifier * Boost Level)] = [100 - (50 * 0.80)] * [1.64] * [1 + (3 * 1)] = [60] * [1.64] * [4] = 394 damage. If this attack were to critically strike, it would deal 25% more damage and become 492 damage. If it were directed against a broken enemy, it would deal double damage and come out at 787 damage. Crit plus broken would include both modifiers for 984 damage, and similarly we could add on the modifiers for support skills and effects and so on. I'm skipping the level modifier because it can't be controlled in any way, only going up as the character's level increases, and the small random effect that the programmers tagged on at the end to create a 2% variation in the final results. The main factors are the physical/elemental attack value of the character, the physical/elemental defense value of the enemy, and then the three things that actually change from skill to skill: attack modifier, defense modifier, and boost modifier. These three aspects of the damage formula tell us which skills are stronger/weaker than other skills.

Now we can look at the Merchant skill list and decipher what these numbers mean. This is where I pulled the numbers for the Tradewinds skill, of course, and it turns out that the numbers for Tradewinds are kind of a baseline for all of the other elemental damage skills. Pretty much all of the other single-target elemental damage spells use the identical numbers for their calculations: Holy Light (light) and Moonlight Waltz (dark) and Icicle (ice) and Wildfire (fire) and Thunderbird (lightning) all use the identical damage formula. Note that Trade Tempest is weaker in every respect as compared to Tradewinds, with a lower attack modifier, a higher defense modifier (bad!), and a lower boost multipler. In fact, using the same numbers from our previous example, Trade Tempest would only deal [100 - (50 * 1.00)] * [1.33] * [1 + (3 * 0.90)] = [50] * [1.33] * [3.70] = 246 damage, much lower than the 394 damage that we just saw from Tradewinds. Obviously hitting all enemies on the screen at once mitigates this difference in raw power. We can also see the low attack multiplier and terrible boost modifier for Rest, which indicates how it doesn't scale very well with additional boost points. You get 4x damage from Tradewinds for boosting it to the max while you only get slightly more than double the healing power from Rest. Finally note the insane attack modifier from Tressa's Divine Skill of 9.80; there's no boost modifier for any of the divine skills because they can only be used at max boost. Even without that, Bifelgan’s Bounty would deal [100 - (50 * 0.80)] * [9.80] * [1] = [60] * [9.80] * [1] = 588 damage using our same sample numbers, much higher than anything that could be achieved with Tradewinds. I was looking forward to unlocking that with Tressa in the near future.
I could not find a mechanics breakdown of Hired Help despite my best searching on the Internet. I'd have to test and see how it functioned on my own. "Several options available" was an intriguing phrase that practically demanded more in the way of investigations.

Rather than press on into the Chapter 2 stories, I had Tressa experiment with some of the optional side dungeons located in the first ring of towns. I started out with The Whistlewood in the Flatlands, an area that Tressa hadn't been strong enough to complete before picking up her armor upgrade, then continued onward to the Carrion Caves in search of more money and treasure. The Carrion Caves were guarded by this bird creature named Heavenwing, which turned out to be one of the more vulnerable opponents for Tressa given that it was weak to both spears and bows. Her Victor's Spear did significantly more damage than her bow and that's what I used here, with non-broken attacks dealing a little over 200 damage and broken attacks dealing about 330 damage. The increased healing power of Rest was very helpful here, as I mostly had Tressa keep using the Rest command until she was at maximum boost, then land four physical attacks in a row. At one point I accidentally used the "Collect" skill and saw it rake in 11,760 money - not intended but pretty sweet! When the boss started to get low on health it began breaking out some heavier blows, with that savage 1000+ damage attack pictured above far too dangerous for my liking. Tressa was able to finish off Heavenwing in time thanks to the help of some medium Healing Grape items (1700 HP restored per use).

With the money accumulated from running through some of these optional side areas, I returned to Victors Hollow and purchased the Tomahawk Bow to replace the hopelessly outdated Wolf's Bow from earlier. This was a continuation of the pattern that I'd been using with Tressa for some time, having a weapon with the highest possible physical attack in the spear slot and a weapon with lower physical attack but much better elemental attack in the bow slot. The Tomahawk Bow increased elemental attack by a full 50 points, and a followup trip to Stonegard (the Highlands city in the second ring) saw Tressa using her Purchase ability to acquire an Elemental Augmentor accessory for a massive +100 to the same stat. With these two new items in play, Tressa's elemental attack now outstripped her physical attack in terms of damage capacity, making Tradewinds the skill of choice for downing bosses:

A maximum boosted Tradewinds was now up to 1700 damage when used against a broken opponent. Pictured above was the Monarch, a giant butterfly who guards the end of the Twin Falls optional dungeon. This was another boss who was weak to spears and therefore fairly simple for Tressa to defeat. She cleaned out the treasures chests inside Twin Falls and continued amassing more job points. Tressa was about to reach the 5000 JP mark and unlock her eighth and final Divine skill; when that took place a short time later, it was time to test it out against some unlucky random critters:

The Divine skill for the Merchant class is named Bifelgan's Bounty, and like all Divine skills it can only be used at maximum boost (the skill is grayed out and unusable until the player spends 3 BP). Bifelgan's Bounty has a hefty cost of 30 SP, which was cut in half for Tressa thanks to her handy SP Saver passive skill, and even that cost was easy to ignore thanks to Rest granting back 25 SP with each use. So Tressa could pretty much use Bifelgan's Bounty as much as she wanted without ever needing to worry about SP consumption, something that won't be nearly as easy for other solo classes. As I mentioned in the damage calculation above, Bifelgan's Bounty was significantly more powerful than any of Tressa's other default skills. A max boosted Tradewinds would have an attack modifier of 6.56 as compared to 9.80 on Bifelgan's Bounty, making this skill almost exactly 50% stronger in terms of damage. Bifelgan's Bounty shared the same trait of being single-target along with Tradewinds, making it better at taking down bosses than killing large mobs of weaker opponents.
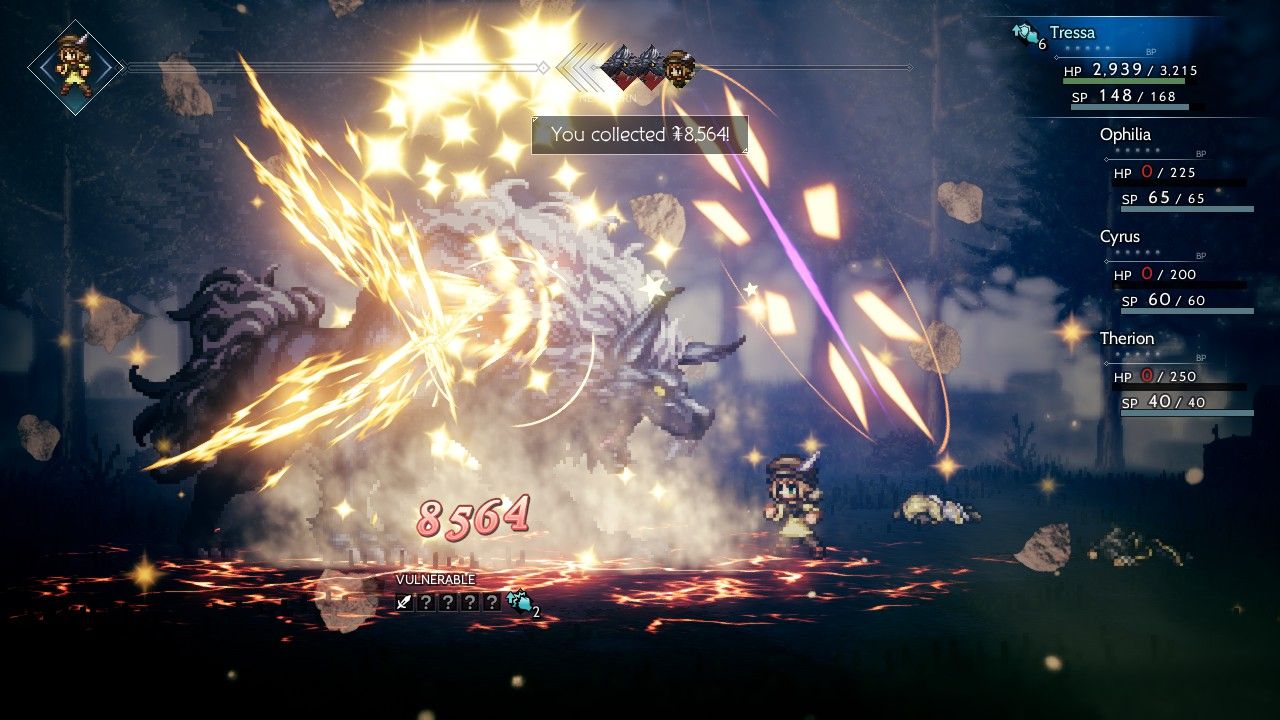
Bifelgan's Bounty has two different unique properties not shared with other skills. The first is that this is an elemental skill that doesn't correspond to any of the six elemental damage types, thus the confusing "non elemental" text in the skill's description. In other words, Bifelgan's Bounty does use the elemental attack stat for its damage calculation, but it's not a form of fire or ice or lightning or wind or holy or dark damage, and therefore can never break an enemy's shields in any way. It's best to use this Divine skill after an opponent has already been broken and will therefore take double damage. The second unique property synergizes with the general Merchant theme for the class: receive money equal to the damage dealt. The one limitation here was that Tressa couldn't receive money in excess of the remaining HP on the target, thus the picture above of Bifelgan's Bounty dealing 1836 damage but only pulling in 1077 in terms of cash. Otherwise though, yeah, she really could pull in thousands and thousands of money from each battle. With Rest there were no SP concerns to worry about, and it was often best to use Bifelgan's Bounty repeatedly to eliminate one target at a time from the playing board. This was a really big deal because Tressa's ultimate non-Divine skill was Hired Help, Octopath Traveler's version of GilToss, which would require tons of money to use at maximum effectiveness. Bifelgan's Bounty would essentially provide Tressa with infinite income to power her use of Hired Help and open up a path forward through the game's most difficult challenges.

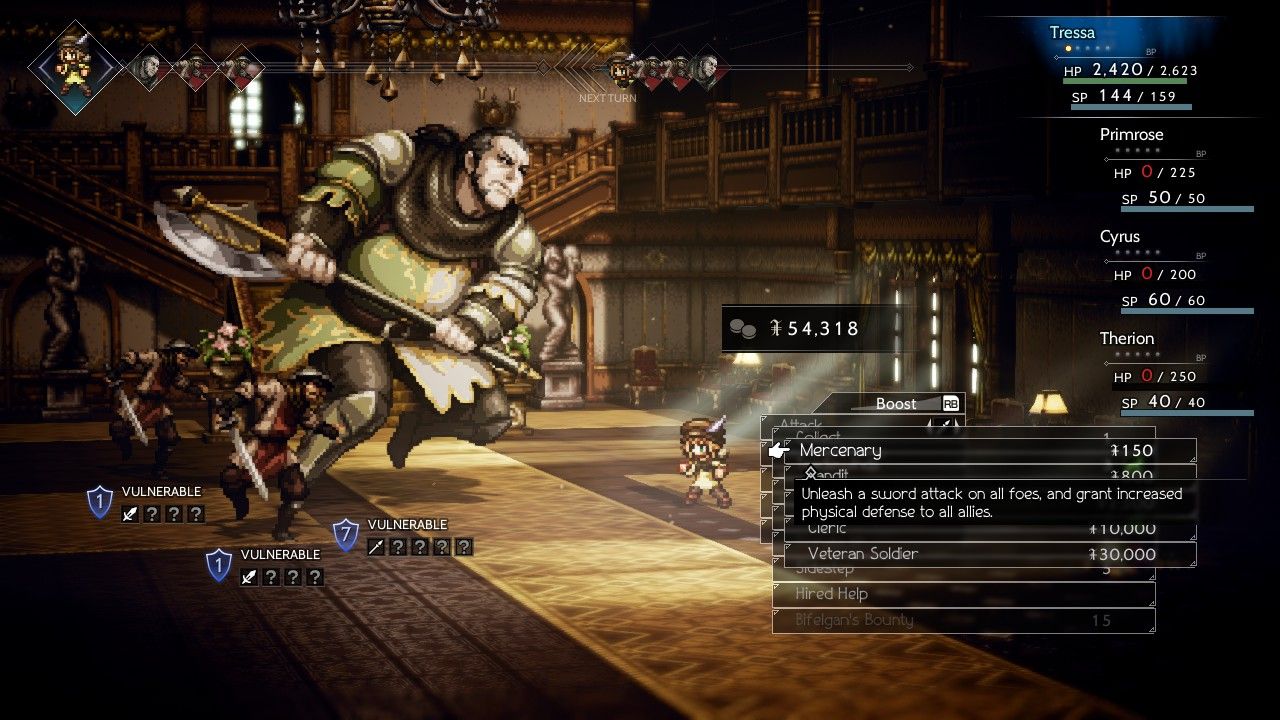
I had a chance to make use of Hired Help immediately afterwards. I wanted to make a dash to Grandport, the Coastlands town out in the third ring where a massive haul of lategame equipment would be available for purchase. Making it all the way to the outer ring town wasn't going to be an easy task though, not against monsters who were well above what Tressa could handle on her own. The solution was to cash in some of her saved up money for use with Hired Help. This is the first time that I've shown the use of this skill, and note there were actually five different options to pick between. I was going for the big spender option at the very bottom of the table, Veteran Soldiers at a hefty cost of 30,000 money. The veteran mercenaries used swords for their attack (a damage type that Tressa otherwise lacked) and delivered a number of strikes equal to the amount of boost points used plus one, anywhere from 1-4 swings. This was an exceedingly powerful attack that hit four times at max boost, dealing 2100 x 4 = 8400 damage in all... and that was against unbroken targets, so double that result if Tressa had been able to break these enemies first. Yeah, Hired Help is pretty disgusting if you can afford the most expensive mercenary options. 
Tressa had no prayer of defeating any of the monsters on the route to Grandport, and running from enemies with speed ratings that much higher than hers was going to be nearly impossible. I had her break out the Veteran Soldiers pictured above to win one battle, which bought enough time for Tressa to reach the save point at the halfway mark to Grandport. Now what? There wasn't enough money left over for another use of Hired Help, not at the Veteran Soldier level anyway, and Tressa was still short of the town gates. She could make it all the way to the bridge outside the town, mere steps away from safety, only to get cut down time and time again by the brutal monsters that guarded the path.

She must have died on that bridge pictured above two dozen times in a row. But I had faith that she could make it; Tressa only needed slightly better luck at avoiding random encounters to make it all the way, or she needed to get lucky and land a single successful escape from combat. I have no idea what the odds were in terms of running from battles but there had to be some slim chance of succeeding, the equivalent of rolling the natural 20 in D&D or whatever. And... eventually that's what happened. After failing over and over again, Tressa finally managed to escape successfully and that was that, she made it across the bridge and into Grandport. This is where Tressa's storyline concludes with her Chapter 4 tale and there's a merchant fair taking place in the town, thus explaining why there are so many options available for purchase. Tressa had just spent all her money on that Hired Help and would need to stockpile funds for a bit, but now I had the option to warp back here whenever I wanted for free via the game's fast travel mechanic. Time to start completing some of the Chapter 2 stories and begin saving up some cash.
I decided to start with Tressa's Chapter 2 storyline, both because it was thematically appropriate for the character and because it was tied for the lowest-suggested character level. With this being my first pass through the game on a solo run, I was still figuring out which chapters were easier and harder to complete. Tressa's Chapter 2 story takes her to the town of Quarrycrest, where she meets up with one of those cliched anime "rival" characters named Ali and then has to save her new frenemy from a predatory local mine owner. Tressa's story is a stock JRPG plotline where the genre-savvy can see every new beat coming from a mile away, pleasant enough but nothing particularly groundbreaking. The dungeon attached to her storyline involves entering a mansion, another place where the designers had a chance to use one of their most creative tilesets. I wanted to call attention to a recurring status attack that the monsters inside kept using:

Horrific Claw was used constantly by these enemy dogs; you may recall that other opponents kept using it in Ophilia's Chapter 1 story. It inflicted the terrify status condition, which prevents your character from using boost points or accumulating more boost points at the start of each turn. This is a real problem because boosted attacks are the bread and butter of the Octopath combat system, and a character who can only use basic attacks and skills with zero boost points invested is a crippled character. Most of my tactics for Tressa involved using Rest repeatedly until she had a full boost meter, then unleashing some kind of skill (either Bifelgan's Bounty for a single target or Trade Tempest for multiple targets) at max boost. Horrific Claw short circuited this and even prevented Tressa from gaining any more boost points at the start of her turns. Fortunately it was curable with Rest but many battles went on for long turns on end in cycles of Horrific Claw / Rest, Horrific Claw / Rest endlessly. Not a fun status condition at all. I would need to find a Calming Stone for Tressa, the accessory that blocked this status condition.
The boss at the end of the dungeon was named Omar, and he was not an easy opponent for Tressa at all. Omar appeared with two minions (each having the creative name "Omar's Footman") and each of them used physical attacks that could hit quite hard, as much as 300 damage apiece in a worst case scenario. Omar would boost the physical attack of his minions and the simple fact of them being able to combine their attacks 3 vs 1 against Tressa was bad news. I countered by having Tressa use the cheapest Hired Help option: Mercenaries only cost 150 money and would launch a sword attack against all foes. The sword attack did negligible damage but it would break the shields of the footmen and more importantly grant Tressa +50% physical defense for the next 2 turns. That boosted physical defense was a lifesaver against the all-physical attacks of these opponents. You might think that Tressa could just kill the footmen, but no, that didn't work because Omar would just summon them back again once they were gone (albeit at 50% HP). With each footman having 6,000 HP to start the battle, they were a major obstacle to achieving victory.
So the basic idea was Mercenaries or healing on most rounds, followed by Tressa attacking four times with her spear at max boost to break through Omar's shields. When he was broken she could land a casting of Bifelgan's Bounty for a very nice 4200 damage, taking a good chip out of Omar's 34k health. Unfortunately Omar's shields kept going up each time he recovered from being broken, starting at 5 shields and then increasing to 7 shields and then finally 9 shields. I also discovered that Omar could use an attack named Overhead Swing, which had a chance to inflict unconscious status on Tressa. That was a recipe for an instant game over once she was paralyzed into submission, and prompted a rethinking of my strategy.

OK, first things first, equip the Conscious Stone that Tressa had conveniently found earlier in the same dungeon, an accessory that blocks the unconscious status effect. It was simply too difficult for Tressa to win this fight through repeated uses of Bifelgan's Bounty, which she would need to land something like nine times to get through Omar's health total. I needed to fall back on her ace in the hole, the Veteran Soldier option from Hired Help, which splashed 30,000 money in exchange for massive damage output. It would instantly kill the two footmen when used and dealt about 18k damage against Omar if used when he was broken. This would be an easy win with two uses of Veteran Soldiers, except, uh, Tressa only had 50k money in her back pocket. Rather than farm up more cash with Bifelgan's Bounty from random critters, I opted to fight the rest of the battle the hard way, using Tressa's Divine Skill when Omar was broken and trying to deal the final ~16k damage needed for a win that way. Unfortunately I came up short here, with Tressa taking too much punishment, and I was forced to have her break out the Cleric option from Hired Help: 10,000 money to bring in Clerics who used a light-based elemental attack. Each hit from their Sacred Prayer did about 1600 damage, or 6400 damage in total when applied across the four of them, along with more importantly wiping out the footmen again for a few turns of reprieve from their attacks. This was enough to win out after numerous retries at the battle. Whew, not the easiest stuff here, and would have been nearly impossible with Hired Help to fall back on. Omar was a tough opponent for a solo character.
Remember how Tressa used the Veteran Soldiers option to help make her way to Grandport out in the third ring of towns? I managed to save up some more money by repeatedly using Bifelgan's Bounty and then made this critical purchase:

The Rune Glaive was the big prize and the reason why I'd taken the time to find a path to this outer town. It actually had a lower physical attack as compared to the Victor's Spear but compensated with an absolutely massive boost to elemental attack, 363 points in total. This would take elemental attack up to the pictured value of 637, and by way of comparison Tressa had previously been operating with an elemental attack of 358 via her Tomahawk Bow. So she had nearly doubled her elemental attack here at a stroke, and this was enormous in terms of shifting the tactical landscape of her battles. The key factor here was the elemental nature of her Divine Skill: Bifelgan's Bounty dealt elemental damage, not physical damage, and therefore this huge increase in elemental attack boosted its damage by about 70%. I found that Tressa could now use Bifelgan's Bounty against target that were still unbroken and deal about 3700 damage, enough to one-shot virtually every monster she was facing at the moment. (If she broke them ahead of time, damage would shoot up into the 7000+ range which was overkill against anything that wasn't a boss.) As a secondary effect, Tradewinds and Trade Tempest also benefitted significantly from the boost to elemental damage. By contrast, I did not see any change to the Hired Help damage, at least for the big Veteran Soldier option, which must have used some other type of damage formula. For individual battles, I would typically either try to kill everything at once with a boosted Trade Tempest or eliminate one target at a time with Bifelgan's Bounty. The one thing that I largely stopped doing was physically attacking with Tressa. Her spear and bow now existed for breaking opponents, not dealing damage. The elemental damage from her skills was simply too much higher to make physical attacks cost-effective. This was a major change from earlier in the solo run and it would influence my strategy moving forward.

The next Chapter 2 storyline with a low suggested character level was Primrose's tale, which I think had a suggested level of 24. (Tressa was consistently about 10-15 levels higher than the recommended number due to her obvious solo status.) I always enjoy contrasting the plotlines of Tressa and Primrose since the latter is so much darker than the former. Primrose's Chapter 2 story involves infiltrating a prostitution ring where sexual favors are traded for political influence, and it ends with the violent death of the perpetrator. That's not to say that "darker" necessarily means "better" in terms of quality writing, however, and I found the end to Primrose's story to be a nonsensical and poorly written mess. Also, why does she keep wearing a skimpy little dancer bikini outfit in the middle of the snowy wilderness?! Anyway, at least we get to see some neat set pieces like the one pictured above. I'm enthusiastically in favor of my party members murdering evildoers who deserve their fates.

In gameplay terms, the boss of this area was Rufus who felt strikingly similar to Omar in terms of his AI setup. Rufus also had attacks that could inflict unconsciousness (I had to redo the battle in order to equip the same Conscious Stone accessory), used nothing but physical attacks, and relied on two "Obsidian Associate" minions to provide additional damage. Unlike Omar though, Rufus never buffed the physical attack of himself and his associates, and that meant that their damage was largely negligible, only about 100 per swing. I ignored the minions with Tressa and focused on Rufus himself, using Hired Help just for the ultra-cheap Mercenaries option to provide extra physical defense while letting boost points accumulate, then boosted for 4x spear attacks to break through the shields on the boss, followed by Bifelgan's Bounty once the shields were down. With the damage coming out around 7000 from Tressa's Divine Skill, she only needed to use it four times to finish off the boss (and then belatedly deal with his minions). No need for the Veteran Soldiers here, which I was trying to avoid so that Tressa could keep saving up for more purchases. Quite the opposite in fact: she actually gained about 30,000 money by using Bifelgan's Bounty to deal nearly all of the damage to Rufus! Long story short, this was a similar but easier version of the Omar battle, and I don't think it was simply due to being a higher level with the Rune Glaive equipped. Unfortunately future solo runs probably still need to tackle Omar first because the Conscious Stone is located in his dungeon and it's mandatory for either battle, but otherwise this was a notably easier encounter.

With all of that cash accumulated from Bifelgan-ing Rufus to death, Tressa returned to Grandport for another spending spree. The big pickup here was the expensive Forbidden Shield, the shield with the highest total increase to physical and elemental defense in the whole game. The various "Forbidden" items all have giant stats at the cost of some kind of penalty, and the tradeoff for the Forbidden Shield specifically was a huge penalty to evade. Tressa's evade at the time was only 137 so that stat dropped to zero: she would never dodge a single attack. But Tressa wasn't dodging much of anything regardless, and it was better to remove the RNG element of maybe 5% odds to sidestep an attack in exchange for adding close to 100 more points in both physical and elemental defense. The boost to the latter stat had Rest restoring about 700 HP per use now, a truly fantastic amount. The Protective Necklace was more of a situational accessory, not something that Tressa used very often but handy to have in case she needed better defensive stats. My general accessory setup for the moment was the pairing of the Empowering Bracelet for +500 HP and the Elemental Augmentor for +100 elemental attack.

I had Tressa explore some more of the optional side dungeons next, starting with the Tomb of Kings (which had no boss inside) and then followed by the Hollow Throne. The monsters in here were pretty tough and it was only through repeated use of Bifelgan's Bounty interspersed with Rest that Tressa was able to avoid death. The boss at the end of the Hollow Throne was this fellow, the Throne Guardian, who packed a hefty lifebar with 30k HP. Fortunately the Throne Guardian was a solo opponent with no minions to worry about, and he also proved to have a weakness to swords. This allowed Tressa to continuously call on the Mercenaries option via Hired Help, the cheapest option that cost only 150 money per usage and simultaneously would deal sword-based damage and grant the physical defense up property. While the Mercenaries did laughably trivial damage, they were fantastic at breaking through the shields of the boss and keeping Tressa's defense permanently boosted. Once the Throne Guardian was broken, Bifelgan's Bounty could be called upon for 8000+ damage blows that pulled in an equal amount of income. This ended up being a much easier opponent than Omar or Rufus, and Tressa found it to be highly profitable for her bottom line.
With the side dungeons cleared, Tressa returned back to the Chapter 2 storylines for some of the other characters. I picked Therion's story next as it also had a low suggested character level, which took Tressa back to the town of Noblecourt, the very first town in the second ring that she'd been able to reach. Here I found myself running into one of the unfortunate obstacles for a solo game:

Therion's unique Path Action is stealing, which grants him access to the same items as Tressa's purchasing ability. However, instead of spending money to buy the item, Therion has a percentage-based chance to steal the same thing; failing too many steals will damage your reputation in town and force the player to spend money to fix it. Therion's Chapter 2 storyline requires him to steal three different items in town, and the designers obviously didn't expect players to be running a solo venture here because the odds to succeed on these steals were each sitting at 3%, the minimum possible number for a theft. (Odds to steal are based on Therion's level, and naturally he was Level 1 since he'd been dead the whole game.) Of course there was a way to get past this obstacle, if a distasteful one: savescum the stealing results by repeatedly loading savefiles until hitting on a success. I actually managed to get two of the three items quickly, only having to reload the second item over and over again after failing about 20 steals in a row. This was obnoxious enough that I might have Therion win a few random battles for future solo games, just to get his theft odds up to something reasonable and avoid the need to waste this much time. You can skip over the cutscenes in each character's storyline but unfortunately it's not possible to skip the required use of their Path Actions.

Anyway, Therion's Chapter 2 story involved sneaking into another mansion (Therion seems to visit a lot of them) to steal another precious Dragonball Dragonstone. The opponents inside were pretty straightforward without anything overly dangerous, certainly much less threatening than what Tressa had seen in the Hollow Throne. The boss at the end was named Orlick, who had the gimmick of being unbreakable until his two bodyguards were defeated. Note how all of his various weaknesses were crossed out in red, something that would become more common with some of the later bosses. Orlick had a weak physical attack and mostly used elemental damage, which was fine with Tressa given how I'd been stacking elemental defense on her to buff up the recovery power of Rest. The two minions were weak to swords and that meant falling back on what had become the usual strategy, Mercenaries for shield breaking and extra physical defense, then into Bifelgan's Bounty once they were broken. Pictured above was the first bodyguard flashing into smoke after taking an 8400 damage attack, and the second one followed suit shortly thereafter.

Once it was down to only Orlick remaining, Tressa could go to work on his own weaknesses. Orlick was vulnerable to spears but it was more fun to break out the Dancers option: 2500 money spent to bring them in for a flurry of dagger attacks that also had a chance to poison and blind the opponent. Then Tressa would call on more Bifelgan's Bounty when Orlick's shields were broken. Pretty easy stuff, even considering that Orlick summoned a golem minion when he fell under 50% HP remaining. I was having a lot of fun calling on these different options from Hired Help, and the versatility of that skill was helping Tressa as much as its raw damage output. It turned out that Tressa didn't just have spear, bow, and wind element damage options; she also had sword, axe, dagger, and light element damage options as well!  With seven different damage types at her disposal, Tressa could break pretty much any opponent imaginable while also falling back on the massive damage output of the Veteran Soldiers. Like I said at the start of this report, Tressa is probably the strongest character for a solo game.

I picked Cyrus for the next Chapter 2 storyline which required returning back to the town of Quarrycrest. The plot of this story turns significantly darker in nature, with Cyrus discovering a sorcerer named Gideon who has been sacrificing townspeople for his research involving blood crystals. It has a real Full Metal Alchemist feel to it, right down to discovering a bloody circle transcribed into the floor of a subterranean basement. Gideon himself appeared with a pair of Dancing Bones minions who once again locked out the various weaknesses of the boss. The skeletons therefore needed to be defeated first, and I had Tressa call upon the Cleric option once again because they had a weakness to the light element. Sacred Prayer blasted everyone on screen with heavenly light, with two uses of the Clerics enough to remove the minions from the playing field. Gideon would call them back later, but they would come back with only 50% of their max health and could be blasted away by more Clerics with ease. And while the cost of those Clerics at 10,000 money per use could have been a concern, Tressa was making that right back again with 8k damage attacks from Bifelgan's Bounty. This was a tricky battle because the Dancing Bones could inflict the terrify status while Gideon himself could debuff Tressa's physical and elemental attack. Tressa called for her Mercenaries on numerous occasions even though none of these foes were weak to swords, purely to get the physical defense up buff in play. I had to repeat this fight a couple of times until I figured out the right pattern.
Next up was Ophilia's Chapter 2 storyline, and I found the random encounters in the associated dungeon (the Murkwood) to be highly annoying. Many of the plant-based opponents here employed an attack that silenced Tressa, preventing her from using any abilities whatsoever. That meant no Hired Help, no Bifelgan's Bounty, not even the chance to use Rest. Silence was a crippling status since I had configured Tressa for elemental-based damage, with her physical attacks being somewhat of an afterthought. The monsters here were easy enough that Tressa wasn't ever killed off but it did make for some long and tedious battles.
The boss at the end of the Murkwood was a wolf-like creature with the Scandinavian name Hróðvitnir. This enemy was another physical attacker with the chance to buff his own physical attack and debuff Tressa's physical defense, a dangerous combination that would result in double damage when applied together. Fortunately Hróðvitnir had a weakness to swords and that allowed Tressa to spam the Mercenaries out of Hired Help for breaking its shields, another usage of what was fast becoming her favorite combo. The Mercenaries cost virtually nothing to use at only 150 money and kept buffing Tressa's own physical defense, while setting up for more Bifelgan's Bounty after the enemy shields were down. Hróðvitnir had an ability called Night Howl that inflicted terrify status on Tressa, which fortunately she could wipe clean with Rest. It would have been more dangerous if the boss used it more often. After Hróðvitnir fell under half health, it started getting 3 actions per turn as opposed to 2 actions, and this truly did make things tough for a solo game. When the enemy is moving at triple your own speed it can be hard to stick in the fight. While I think that this could be a tough encounter for future solos, Tressa had the right tools for the job and made it through without any real issues.
With two remaining Chapter 2 stories left to go, I thought I'd take a quick break from the main plot and try to make a run for another one of the towns in the outermost ring. I wanted to follow the trail to Northreach, the isolated town at the extreme edge of the Frostlands, as there were more useful items to Purchase there with Tressa's ability. This was going to be a harder destination to reach than Grandport though, as the path there was much longer in between places to save the game.

Any thoughts in my head that Tressa was strong enough to fight her way past these opponents were quickly dispelled. The various ice creatures were averaging about 500 damage per attack and quickly pounded Tressa's lifebar into the dust, while also having too much HP themselves to be downed easily. I'd have to rely on various tricks to make my way through this area. The ice lizards pictured above turned out to have only one weakness, axes, which fortunately Tressa did have on hand via her Bandit option as part of Hired Help. I used them to break the two lizards, killed one with Bifelgan's Bounty, then slowly repeated the process with the second. The next battle had four ice wolves and Tressa barely survived long enough against their attacks to pull out the Veteran Soldiers for her strongest attack and blow them all away, at a cost of 30k money. She would have died though so it was far from a waste.

Almost everything up here also had a weakness to fire element damage, and Tressa was happy to pull out a medium Fire Soulstone against this particular group. This item was far from a waste as the extra damage allowed Tressa to finish off one of the monsters with Bifelgan's Bounty (which otherwise would have fallen short on damage), followed by repeating the Bandit usage against the ice lizard and using another Bifelgan's Bounty to secure the kill. This was a narrow victory and I still had to blow away the last ice elemental with the Clerics option from Hired Help for additional damage. Very dangerous stuff, Tressa was barely surviving by the slimmest of margins. She had to make it through four battles in total in order to reach the gates of Northreach, and she never would have made it at a lower level. This town was far harder to find than Grandport had been.

The prize was an upgrade on Tressa's primary accessory, going from the +500 HP on the Empowering Bracelet to +1000 HP on the Empowering Necklace. This took Tressa up close to the 4000 HP mark and added some additional cushioning to her health total. From there it was on to Alfyn's Chapter 2 storyline in the Coastlands town of Goldshore, a region of the map where fortunately most of the enemies had a weakness to wind element. Rather than attack foes one at a time with Bifelgan's Bounty, this was a place where it was better to down whole groups at once with Trade Tempest, taking advantage of the 30% boost to damage dealt against foes who have a weakness to that damage type. A max boosted Trade Tempest was worth about 2000 damage against these enemies and that was enough to clear the field in one go. Very nice stuff and certainly much easier than the deadly trek up to Northreach.
Vanessa is the boss of this story chapter, another opponent who relies on her minions to do most of the work. Vanessa's two sellswords use physical attacks and she will buff them with a physical attack up property via one of her concoctions. Her attacks otherwise have a chance to put your character to sleep and to poison them, with poison again being a rather dangerous status ailment in Octopath Traveler. Future characters might want to equip an Antidote Stone for this battle to take the poison element out of play, since they won't have Tressa's ability to Rest it away instantly. Sleep sounds like a bad status condition as well, but in practice I found that it wasn't much of a threat because taking any damage instantly ends the status, and Tressa was constantly taking hits since she was the only character present. Anyway, the key to this battle was to take out the sellsword minions, and then eliminate them a second time after Vanessa calls them back. After that she won't summon them again and she can be taken down rather easily. This was the easiest boss of the Chapter 2 group to date, although that was likely due to Tressa's own growing strength.

With the money that Tressa had accumulated by using Bifelgan's Bounty so many times against the last few bosses, she was able to drop 71,300 coins on purchasing the Forbidden Bow from another NPC in Grandport. This weapon had the highest physical attack value that I could find for the moment, and it reversed the situation from the early game with Tressa now having a more powerful physical attack on her bow. The lowered elemental attack value was irrelevant because all of Tressa's elemental skills used her Rune Glaive spear with its 700 value for damage calculations. Of course, as I mentioned before all of the "Forbidden" items have a negative tradeoff of some kind, and this happened to be increased random encounters in the case of the Forbidden Bow. Fights became noticeably more common afterwards, to the point where clearing out the treasures in an area could become tedious. There was no real way around this however, as I felt obligated to use the best weapon possible in cases where Tressa needed to make a physical attack. More experience and levels were always good, I guess?
The only remaining Chapter 2 stories at this point belonged to H'aanit and Olberic. I embarked on H'aanit's story first which took Tressa to the town of Stoneguard in the Highlands. The plot quickly forced me into using H'aanit's Path Action known as Provoke:
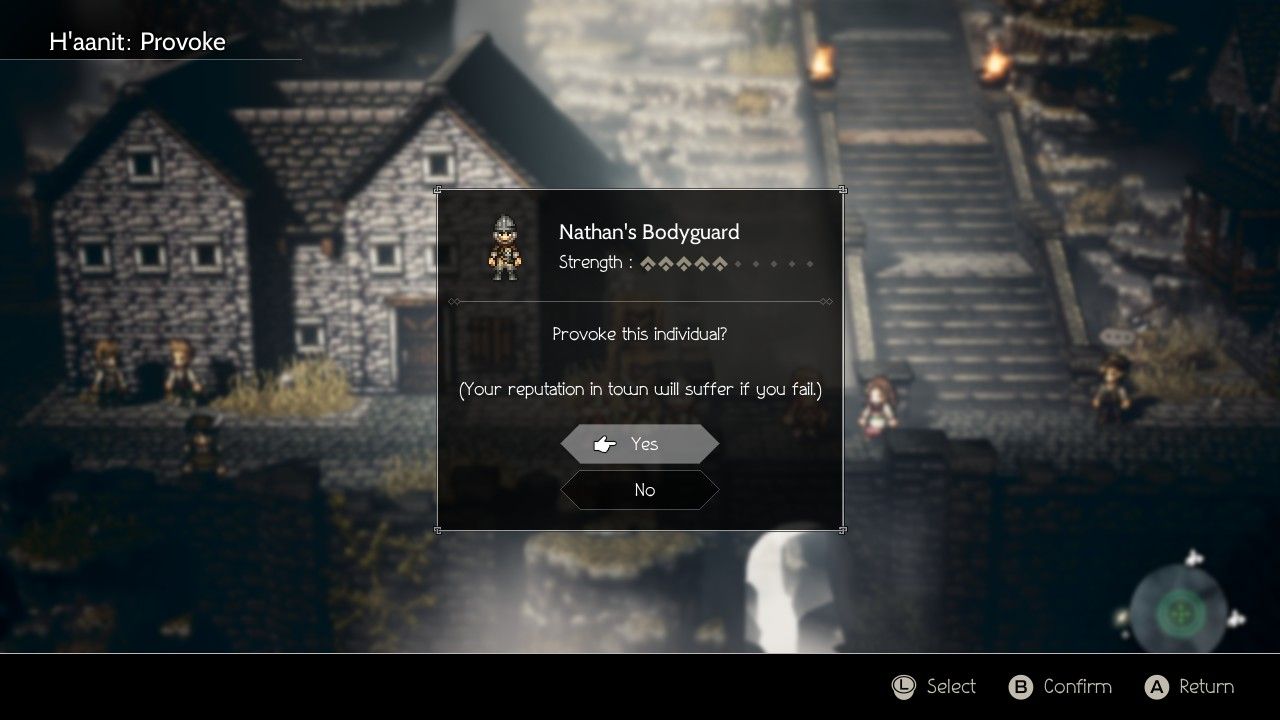
H'aanit and Olberic essentially share the same ability, the opportunity to fight NPCs in town for various rewards. Olberic's Challenge ability is the more straightforward of the two: Olberic fights a duel by himself against that individual (perfect for solo games). H'aanit fights the same opponents but doesn't engage in battle directly, instead acting as a Pokemon trainer by sending out various beasts to fight for her. She can Capture enemies when they get low on health and then use them for these Provoke encounters, and I suspect that a H'aanit solo game will involve a lot of careful preparation of what creatures to bring into each boss fight. This bodyguard had a five star difficulty rating, likely intended to be easy but a much greater challenge for a Level 1 character who had been dead the whole game. I managed to get through this situation by equipping H'aanit with all of Tressa's best defensive equipment and then adding the Empowering Necklace for +1000 HP and another accessory named the Beastly Scarf that regenerated 10% of her max HP every round. This was enough to defeat the bodyguard using only H'aanit's pet cat Linde after a long battle. There was no danger at all, as the bodyguard couldn't make it through H'aanit health regen, just a lot of tedious rounds of dealing a mere 100 damage at a time. H'aanit went up eight levels afterwards for winning, heh.
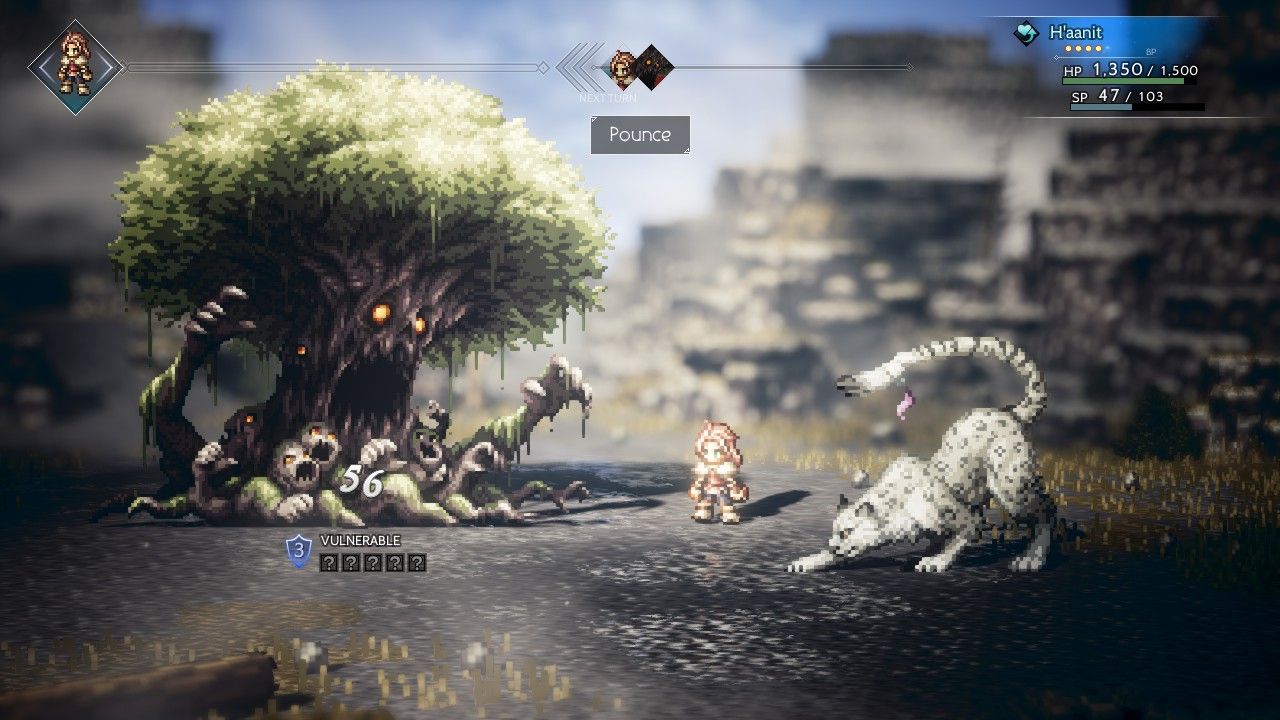
That wasn't all though, as I had to break out H'aanit again for another Provoke battle to reach the dungeon area for this storyline. This tree creature hit a bit harder than the bodyguard and liked to inflict poison as a status condition on H'aanit. I would have been better served to equip the Antidote Stone accessory over the Beastly Scarf's HP regneration because the damage done by ticking poison was significantly greater. H'aanit spent most of this duel poisoned, forcing me to stop and use medium Healing Grape items over and over again, thus prolonging this battle. With H'aanit only able to deal 250 damage even on a max boosted attack against the broken creature, this duel went on and on without end. I'd say the whole thing needed about 15 minutes of real world time in all, time spent repeating the same actions endlessly in succession. The lesson that I learned here is that H'aanit can get past these Provoke situations even at low level, it just takes long rounds of repeated dullness.

The enemies in H'aanit's Spectrewood dungeon were exceedingly annoying due to their constant use of the silence status ailment. Seemingly everything in this accursed forest was breaking out a silencing move of one kind or another, and then the little plants would pull out a move called "Proliferate" to split and create a new enemy, an enemy which yielded zero additional experience upon defeat. Tressa could have blown everything away with Trade Tempest rather easily, if only she were able to use her skills without being silenced constantly!  The solution here was to leave the dungeon completely and head to a different part of the map. I searched out where I could find the Articulate Stone, the anti-silence accessory item, and discovered that there was one in an optional dungeon named the Captain's Bane. This area had a suggested character level of 35 and was full of some nasty enemies, but fortunately since the dungeon was located in the Coastlands a lot of them were weak against wind element. Tressa was wiped out several times in the Captain's Bane by unlucky random encounters, and there were enough terror-inducing opponents in there that I ended up equipping the Calming Stone to block that status ailment. Eventually Tressa managed to find the Articulate Stone, then it was back to Stoneguard for the remainder of the Spectrewood. With no more chance to silence Tressa, the plant creatures were easily smashed into a pulp. Good riddance!

The boss of this area was the Lord of the Forest and this was not an easy customer at all. The main boss had 43k health and packed two different nasty status ailments on its attacks, one of them inflicting silence and one of them inflicting unconsciousness. The Lord of the Forest also started out the battle with two Weeping Treant minions, who could use a blinding attack, then replaced them with two Toxic Spore minions (poison), and then finally two Flitting Fungoid minions (silence again). Tressa ended up having to equip the Articulate Stone for this battle again because the silencing attacks were so prevalent, while still leaving herself vulnerable to blind and poison and unconscious possibilities. Nasty stuff for a solo game here. The Lord of the Forest would occasionally consume one of its own minions to restore 5000 HP, then summon new minions afterwards (this ability was amusingly named "Circle of Life"). Apparently the boss will not summon more minions after these three sets are defeated, and I'll have to remember for the future to focus on taking them down before going after the boss itself.
When the Lord of the Forest drops under 50% health remaining it starts using an ability named Consume Life, described this way in an online Wiki entry: "Reduces HP of a single ally to 1, restores health by damage dealt, changes weaknesses, increases shield points by 1." Ouch, nasty stuff there. I had the unpleasant experience of seeing Tressa taking 3000+ damage from this move as her health dropped from full down to the cricial range. At least Consume Life only appears after the Lord of the Forest recovers from being broken. The situation was too dangerous to wear down the boss with Bifelgan's Bounty and instead I had Tressa opt for the Veteran Mercenaries option, roughly 18k damage when used against a broken target. Two such uses were enough to finish off the boss for good. This was an ugly encounter for solo characters with all of the status threats, and it might be easier to complete some of the Chapter 3 stories while coming back to this later.

Last up among the Chapter 2 stories was Olberic's trip to Victor's Hollow. You may remember that Victor's Hollow was the second ring town that Tressa had visited earlier in the game to Purchase a Victor's Spear, and it holds an arena used for gladitorial combat. Olberic's story here does not involve a dungeon at all, the only such chapter in the main quest that lacks one, and instead consists of a series of fights against different bosses and minibosses. It begins with Olberic having to use his Path Action to Challenge some poor saps in town to build a reputation. These foes were easy to defeat after loading up Olberic with all of the same armor and accessories that I'd given to H'aanit in the previous chapter for her Provoke duels. (Note to self: make sure to carry a good sword at all times for Olberic even in solo games for these Challenges.) Then there was a short miniboss fight against a pirate named Victorino in the town square, which fortunately went back to the full party once again. He and his minion retainers were weak to swords, thus making them prime targets for the Mercenaries + Bifelgan's Bounty combination that I had repeatedly used earlier.
This victory granted access to the arena where Olberic had to defeat three opponents in succession to complete the chapter. The first opponent was Joshua Frostblade, the dapper-looking fellow pictured above who stated in his cliched dialogue that he was fighting in this contest for love. His weaknesses didn't line up with Tressa's normal attacks (axes, staffs, fire, light) but of course that just meant that it was time to dip into the magical Hired Help and break out the Bandits with their axe-tossing prowess. Hired Help did the breaking and then Bifelgan's Bounty piled on the damage from there. Joshua was not a tough opponent.

Archibold was next, a boss that dealt entirely physical damage along with his minions. Those two minions had the pictured weakness to axes and that meant another run back of the Bandits + Bifelgan's Bounty combination from the previous battle. The trick here was the fact that Tressa needed to equip a Conscious Stone, as those minions could inflict unconscious status otherwise and quickly stunlock her for the rest of the fight. Once they were gone, bow attacks were sufficient to break Archibold and then use the standard Bifelgan's Bounty from there. None of these opponents were the big baddie of the chapter and it wasn't surprising that they all fell rather easily.

The champion of the arena was named Gustav, a significantly more dangerous opponent packing just under 40k health along with jet-black armor obscured above by Bifelgan's showy graphics. Gustav was another opponent that dealt all physical damage, and this was a situation where it might have been worthwhile to trade out the Robe of the Flame for something with higher physical defense. (I continued to avoid doing so because the massive elemental defense on that item was very helpful for boosting the HP recovery on Rest.) Gustav spawned with a pair of Shield Booster minions and I had to be careful with them because they would switch over to an attack that causes unconsciousness after falling below 50% health. The solution: don't let them fall below half health, break their sword weakness using Mercenaries and then one-shot them with Bifelgan's Bounty. This allowed Tressa to avoid equipping a Conscious Stone and keep the Elemental Augmenter in place for additional damage. Bifelgan's Bounty seemed to be working pretty well on the boss as well, after first attacking with a bow to break through his shields.
Gustav would occasionally use an ability named Black Blade which dealt physical damage and had a chance to inflict the terror status. This was annoying whenever it popped up, but curable with Rest and therefore not too worrying overall. A problem appeared when Gustav dropped under 50% HP remaining, however, as he used an ability called "My Blade Sunders All" and went up to 3 actions per turn as opposed to 2 actions. Gustav's third action would take place at the end of each round, and it would always consist of a use of Black Blade. It took me a few rounds to realize what was happening, until I eventually spotted that we were repeating Rest/Black Blade, Rest/Black Blade over and over again in endless circles. How was I supposed to deal with this given the inability to ever use boost points, or even accumulate them outside of item use? Well, the simplest answer would be to redo the battle again with a Calming Stone to block the terror status, but I was hoping to avoid that if possible. I managed to have Tressa launch another Bifelgan's Bounty when Gustav failed to land the terrify status ailment (it only succeeded about 90% of the time), however that wasn't really a solution either. Instead, I broke Gustav once last time using unboosted bow attacks and then broke a medium soulstone, an item that did fantastic damage since Tressa's elemental attack had such a high value. Item usage can't be boosted so the terrify status presented no problems here, and the soulstone managed to seal the deal by winning the fight. I'll probably use the Calming Stone option for the future but the soulstone mechanic worked for now.
Whew, some of those Chapter 2 bosses were tricky to get through. Tressa was starting to move into the later sections of the gameplay now, which we'll cover on the next page of the report.


