
Tressa's journey resumed after completing all of the Chapter 2 stories as she began shifting her focus towards the next set of challenges. The bosses at the end of each additional set of chapters become significantly more difficult to defeat, with more health to work through and more dangerous abilities that must be countered. I wasn't eager to dive right into the next set of stories and instead decided to devote some time to clearing out a number of the other optional side dungeons. The open world nature of Octopath Traveler is wonderful in this respect, allowing your character to head into 23 different dungeons that have no connection to the main storyline, all of which can be accessed at any point in time. Your character just needs to be strong enough to survive the enemies lurking inside.
I started out with the Tomb of the Imperator up in the Frostlands, a place where Tressa found herself using a lot of Trade Tempest for area of effect damage against swarms of opponents. The max boosted Trade Tempest could inflict a little bit more than 2000 damage against unbroken enemies, and double that of course against anything that had lost all of its shields. This was often effecting at clearing out monsters, with Tressa swapping over to Bifelgan's Bounty against targets that had too much health for Trade Tempest to be effective. Eventually she reached the miniboss at the end of the Tomb, the creature known as the Behemoth:

This opponent had a simple AI routine: it would use a physical attack of some kind that did enormous damage. The strongest of these was the "Boar Rush" move which resulted in the displayed incredible damage output. Tressa certainly couldn't take that kind of a pounding for very long! There was similarly no easy way to get through the 10 shields on the Behemoth to break it, and the weaknesses that it had (dagger, staff, and light) weren't a great fit for Tressa's abilities. This was a battle where I lost my first few tries, prompting the need to sit and think for a few minutes on what to do. Ultimately I was able to take advantage of the low HP total of the Behemoth which was only a little above 12k health. I had Tressa start the battle with the Veteran Soldiers option for about 4000 damage, then immediately use Veteran Soldiers against at max boost for 8000 more damage and finish off the miniboss. This cost Tressa a cool 60,000 money but the inelegant solution did get the job done. I was not satisfied with how this had played out and thought that I could probably do better if I found myself in a similar situation down the road.

The Derelict Mine was the next optional dungeon that I chose to take on with Tressa. This actually had a lower difficulty rating (30) as compared to the Tomb of the Imperator (35) and it was a bit easier to navigate in terms of the random encounters. The miniboss at the end was the plant creature pictured above named Manymaws, which fortunately did not hit anywhere near as hard as the Behemoth. Manymaws largely relied on status effects, in particular poison, which was one thing that Tressa could counter easily with her Rest ability. Like many other bosses in this game, Manymaws gained a new ability after dropping below half health, with "Foul Odor" inflicting sleep, silence, darkness, and confusion statuses simultaneously. The only one of these that was actually dangerous was silence though, as sleep and confusion were both dispelled as soon as Manymaws landed another attack and darkness was irrelevant for Tressa. Manymaws conveniently had a weakness to swords and that opened up use of the Mercenaries option for extra physical defense, followed by Bifelgan's Bounty for damage after being broken. Two uses of Bifelgan's Bounty were sufficient to down this opponent.
With a few more levels under her belt, I felt that Tressa was ready at this point to take on the first Chapter 3 stories. I decided to begin with Olberic's Chapter 3 tale due to its low suggested level of 32. This story took Tressa to the desert sands of Wellspring where she was tasked with defending the town from a band of marauding lizardmen. There's an introductory story sequence where your character must fight off two waves of lizardmen opponents, and somewhat surprisingly these throwaway battles actually killed Tressa a few times! The Sand Lizardking opponents in these fights had around 6000 HP, too much to be one-shotted by Bifelgan's Bounty without being broken first, and their physical attacks were strong enough that they could wear down and eliminate Tressa if I wasn't careful. Eventually I realized that the solution was use to Mercearies again to attack their weakness to swords, then use Bifelgan's Bounty once they were broken for the one-shot kill, interspersed with healing by using medium Healing Grapes. This wasn't the most ideal start to this area.

The Lizardmen's Den that followed had about the same difficulty rating as the two optional dungeons that Tressa had already completed, and it didn't prove to be overly tough. I took my time and cleaned out all of the treasure chests as usual, picking up more money and experience along the way. Money was a big deal for Tressa due to the need to keep her coffers full for using Hired Help repeatedly against bosses. The opponent at the end of the dungeon was the Lizardman Chief, a ferocious-looking individual who spawns with two attending lizardman minions. I tried to capture a picture of them and ended up getting the gibberish seen above since I took the screenshot in the middle of a use of Veteran Soldiers. The Lizardman Chief had a series of powerful physical attacks, with the worst being a move called "Rampage" that hit 5 times in succession. He could also pull out an attack that inflicted unconsciousness which necessitated equipping a Conscious Stone accessory to counter.
I struggled with this battle a fair bit before hitting on a two-part solution. The first and more important part was to pull out Veteran Soldiers as soon as the lizardman minions appeared and to use it again whenever they showed up. The minions only had about 3000 HP each and would die immediately to any use of Veteran Soldiers, even with no boost points invested in the skill. (Important side note: the formulas guide doesn't list numbers for the Hired Help skill but it has become clear from testing that Veteran Soldiers has a low boost modifier, something around 0.25-0.30 at a guess. This means that boosting Veteran Soldiers doesn't actually do all that much, and a max boosted version of the skill only does about 2x damage, not the expected 4x damage. In other words, using Veteran Soldiers with no boost points invested can be highly effective.) This allowed Tressa to blow away the minions instantly whenever they appeared and concentrate solely on the boss. Fortunately the Lizardman Chief was weak against swords and that meant a lot of Mercenaries for physical defense protection. The combination of these two tactical innovations allowed me to prevail, albeit at a cost of more than 100k money spent. Oh well, plenty of chances to get more money elsewhere! 

Defeating the Lizardman Chief did not end Olberic's Chapter 3 story, however. Olberic also had to face off alone against his rival Erhardt afterwards and that was potentially problematic for a solo game. I loaded up Olberic with all of the best defensive gear that Tressa had to offer, in particular the +1000 HP Empowering Necklace and the +80 physical/elemental defense Protective Necklace. To my delight I found that Erhardt was effectively stymied by this defensive setup, only able to deal about 100 damage at a time to Olberic. Unfortunately Olberic wasn't able to do much damage in return, breaking Erhardt over and over again only to deal something like 500 HP on each sequence (Erhardt has 12k HP). This was slow but it was effective. However, when Erhardt fell below 50% HP he began to use Blazing Blade as an attack on every single round of combat, a move which inflicted the terror status condition. This would prevent Olberic from ever gaining or using boost points and that would drag the battle out forever. My solution: break Erhardt with normal, unboosted attacks and then smash some soulstones into his weakened state. Using items is about the only action in this game that can't be boosted and therefore the soulstones would function at full effectiveness. Two medium soulstones were sufficient to put this battle to rest and complete Olberic's storyline.
By the way, the better solution would have been equipping the accessory that blocks terror as a status, the Calming Stone, but I didn't have that available yet. I could have picked it up in an optional side dungeon, and I'll try to make sure to have that available in future solo games.
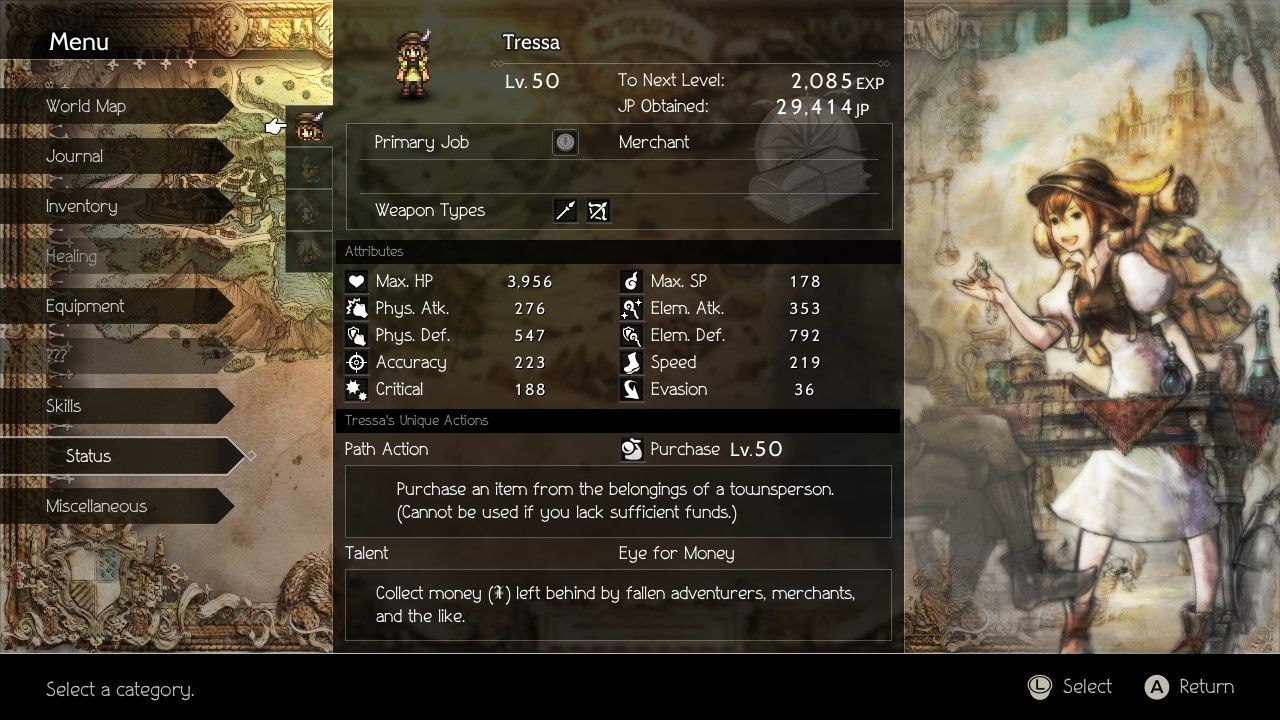
Tressa hit Level 50 shortly after finishing the Lizardmen's Den and I thought this would be a useful time to show her character screen again. She was sitting right around a healthy 4000 HP, although keep in mind that that number is boosted by the Empowering Necklace's +1000 HP that Tressa had been wearing for a long time. The SP total was similarly boosted by the Robe of the Flame armor, and thanks to SP Saver and Rest, running out of SP was never something that Tressa had to worry about. The status screen somewhat bizarrely does not include the bonus from weapons in the physical and elemental attack categories, so add about 280 to physical attack and 350 to elemental attack to get the actual numbers from Tressa's Forbidden Bow and Rune Glaive equipment. By contrast, the status screen DOES include the bonus from armor and accessories which is why the numbers are so much greater on the defensive side. I had been using the Robe of the Flame for a long time to buff up the power of Rest with its massive elemental defense, and that explains why the physical defense stat was so much lower. The remaining stats (accuracy, speed, critical, and evasion) don't seem to matter nearly as much as physical/elemental attack and defense as far as I can tell. Tressa never seemed to miss her attacks and no one ever seemed to miss her so I'm not sure what role accuracy and evasion play in this game. Speed is similarly much less important in a turn-based combat system as opposed to the active time battle of the classic Final Fantasies. Finally, having a higher crit chance was obviously good to get off more crits, but no one seems to have a breakdown of how this stat functions and crits only deal +25% more damage anyway. They just aren't as important in this game as compared to crits in many others.

The other Chapter 3 story that had a lower difficulty rating was Alfyn's, and therefore I headed to Saintsbridge next to try my hand at this challenge. Tressa was sent into the Rivira Woods to search for a kidnapped child (a storyline that's used way too often in this game, by the way). The most dangerous enemies in these woods were the giant boars who could deal as much as 1200 damage when using their "Boar Rush" charging move. Tressa was wiped out several times when she came across a random encounter that had multiple such boars show up at once. (I also salvaged some deadly situations by pulling out Veteran Soldiers to wipe all the monsters even as Tressa winced at the cost to her pocketbook.) Less deadly but far more annoying were these flying owls who kept putting Tressa to sleep over and over again. This largely served to drag out random encounters for long stretches of time as Tressa would miss her turn in the order. Eventually I grew tired enough (pun intended!) to equip a Wakeful Stone and block the status altogether. One of the downsides of Octopath Traveler being a modern game is the fact that the animations are much better than the classic Final Fantasies... and therefore often a bit slower. Combine that with the need to wait for the boost meter to charge up and the average random encounter takes significantly longer in real world time, roughly 2 minutes as opposed to maybe 30 seconds in Final Fantasy 5. This all added up: I had already clocked something like 30 hours of time with Tressa and I was nowhere close to finishing the game yet.

The boss at the end of the Rivira Woods was a bandit named Miguel. He dealt entirely physical-based damage and had two specific attacks that combined together to create a nightmarish scenario. The first of these was his "Hurl Spear" attack, which would toss five spears into the air on one turn and then have them all land on the following turn. As the screenshot above suggests, these spears were each dealing a little over 300 damage apiece which added up to 1500+ damage when added together. Miguel would combine this with his "Twin Spears" move that hit twice and lowered Tressa's physical defense. On an unlucky sequence when the two attacks hit simultaneously, Tressa could easily take almost 3000 damage at once - yikes! I did my best to counter with Mercenaries for the bonus to physical defense, which would cancel out the debuff from Twin Spears, but it just wasn't enough. When Miguel started to get low on health, he would temporarily increase to five actions (!) per turn and that overwhelmed Tressa completely. There was no way to survive the damage output that Miguel was tossing out. For the first time since running into the Guardian of the First Flame back at the start of the Tressa solo run, I had a boss that I couldn't defeat.

It was clear that I would need to regroup elsewhere and come up with a different strategy. I started by heading into the outer third ring to reach some more of the game's most inaccessible towns. After another hair-raising journey that involved a whole bunch of deaths while trying to run away, Tressa managed to limp into the desert town of Marsalim. This was an important location because it contained a new armor for Purchase with a significantly higher physical defense. The Dragonscale Armor has the second-highest physical defense in the whole game at a whopping 235 points, and physical defense was exactly what I needed against Miguel. If you recall how the damage formulas work in Octopath Traveler, the core calculation is based on taking physical attack and subtracting out physical defense, then running that through a ton of different modifiers. The single most important thing for Tressa to do was increase her physical defense, as that would cut down on the pain that those spears could inflict. If she could get her physical defense high enough, the physical defense down property from Miguel's Twin Spears wouldn't even matter. (The Effect Multiplier part of the calculation multiplies the damage after the core calculation, not before. Multiplying the damage by 1.5 wouldn't matter if the base value was down near zero.)
While Tressa was out in Marsalim, I figured that I might as well pick up some of the nuts available for Purchase as well. Nuts are items that permanently increase your character's stats, with ten different types keyed to all ten of the game's core stats. The nuts come in regular, medium, and large varieties, with the medium nuts having 2x the value of the regular ones and the large nuts having 4x value. The benefit from the nuts are quite significant too, as most stats go up by about 7-8 points for a regular nut and therefore roughly 25-30 points for a large nut. These things are insanely valuable for a solo game in particular, and a Large Magic Nut increased Tressa's elemental attack by a whopping 29 points! That was equal to about five or six additional levels and the other nuts functioned similarly. The nuts are also scaled for each character to reflect their inherent stat biases, and so for example Olberic will get more physical attack from a Fortifying Nut than Cyrus. I had a real incentive to track as many of these nuts down as possible to keep buffing up Tressa's stats beyond what she could get from leveling and equipment.

After finishing up at Marsalim, I had Tressa venture off to another town in the third ring in the form of Riverford. This was another highly inaccessible location as it required passing through the town of Orewell, also out in the third ring, before I could make it to the final destination in the Riverlands. It was while Tressa was fighting the frog monsters in this region that I finally hit on a key observation: the vast majority of attacks in Octopath Traveler are physical damage, not elemental damage. I had been so locked onto maximizing elemental defense because it powered up Tressa's Rest ability that I had been overlooking this. The River Frogkings in this screenshot had been battering the living daylights out of Tressa while she was wearing all of that elemental defense gear, and when I realized that she should swap over to some of her physical stuff instead, suddenly the battles became manageable. Helped by the fact that these frogs were mostly weak against wind element, I found that Tressa was finally able to fight opponents out in the third ring instead of simply running away from them. There were times when I'd honestly doubted that I would ever reach that point, but no, it was indeed finally happening. Tressa could indeed hang with these endgame monsters once she had the right physical defense gear in place. Although the tradeoff was Rest dropping back down to a mere 500 HP restored per use, this was still a major step forward. Tressa could always consume medium Healing Grapes for 1750 HP as needed.
Why did I want to get out to Riverford so badly? That was the place where Tressa could purchase a new helmet with a higher physical defense value. This was the Platinum Helmet with 137 physical defense; while it didn't have any elemental defense on it at all, that wouldn't matter against a boss like Miguel who only used physical attacks. As Tressa drew closer towards the ending stages of the game, I was having to specialize her gear setup more and more to reflect the specific nature of each opponent.

I also realized that I should be equipping the Protective Necklace for its +80 physical/elemental defense at all times rather than the Elemental Augmentor for its +100 elemental attack. I mean sure, more damage was nice and all that, but Hired Help was doing plenty of damage on its own. What I really needed was more survivability, not more damage. Note the net effect above: by swapping over to physical defense equipment, I was able to increase Tressa's physical defense all the way up to 782. It had been 550 in my previous encounter with Miguel when Tressa was wearing the Robe of the Flame, and although elemental defense fell by a corresponding margin from 795 down to 469, I wasn't going to need elemental defense against Miguel. Remember, the vast majority of the damage in Octopath Traveler is physical in nature. As I continued to grow more familiar with the gameplay, I was changing around my defensive setup to counter whatever monsters happened to be using at the moment in each area. And, most of the time, that was physical damage.

When Tressa returned to face Miguel again, I came up with two other tactical innovations. Miguel starts out the battle with a weakness to swords, very nice for using Mercenaries to break his shields and counter his Twin Spears physical defense debuff, but after he recovers from his first break he switches over to a new set of weaknesses. I used the Dancers from Hired Help to attack his new weakness to daggers, getting lucky in the process and seeing them land both the poison and darkness status ailments. Both the extra ticking damage from poison and the inaccuracy caused by darkness were welcome additions to this battle, although unfortunately the Dancers were completely random in terms of when they would land those statuses. Second, I also realized that tactical use of the Defend command could be extremely helpful. Defend gives up your character's turn to increase their defenses (both physical and elemental defense function as though they had the Effect Multiplier buff in place) and move their action to the front of the order list for the following turn. In the picture above, I had seen that Miguel was going to get four actions in a row after Tressa's current turn. I also knew that he was going to Hurl Spears and have them come crashing down at the start of the following turn. It would be more cost effective to move to the front of the following turn order and Defend against those incoming attacks while still stocking up more boost points for later use. Intelligent use of the Defend command therefore also became a major part of navigating this boss fight.
Let's put it all together now. What happened when Tressa combined a tactical Defense against Miguel's spears together with her shiny new physical armor?

Something like that: no damage at all.  Note the situation here: Miguel has boosted himself (that's the glowing purple aura around him) and he's making this Hurl Spear attack while Tressa's defenses were debuffed from Twin Spears. Back at the time that I fought this battle initially, that would have made for 500+ damage per spear that landed. Instead, he was completely foiled by Tressa's armor and could only scratch her for single digits. (Octopath Traveler picks a random number between 1 and 10 in situations where the defense value is higher than the attack value.) Total success in other words, the complete opposite from the situation a bit earlier. This was still a tricky fight where I needed to have Tressa pull out the Veteran Soldiers option for safety, but the roadblock obstacle had been overcome. I had been legitimately worried that Miguel might be an unbeatable boss and it was a huge relief to see Tressa find a way to get the job done, and with flying colors no less.
Now that I had discovered the key insight on the importance of emphasizing physical defense in most situations, the gameplay felt like it was opening itself up to me. It hadn't been too long ago that the random encounters near Wellspring in the second ring had been a real challenge. The difficulty rating of these desert areas are in the mid-30s and I'd struggled here as recently as Tressa's last visit to take on the lizardmen in Olberic's Chapter 3 story. Time to check back in on the situation around Wellspring:

The monsters proved to be completely unable to crack Tressa's defenses, single digit attacks from the scorpions whenever they acted. The only slightly dangerous thing that they could do was poison Tressa and she had Rest as a counter to that. The game's math can be pretty brutal in this regard, as characters can find themselves completely helpless if the numbers aren't in their favor, and similarly immortal if the numbers line up on their side. I'm sure that things would look much the same in a game like Final Fantasy 5 if you could access every area from the start of the game as you can in Octopath Traveler. The open world nature of this game means that characters with low stats can expect to get pummeled if they stroll into the wrong parts of the map. Anyway, the big takeaway from this experience was the fact that Tressa was now clearly strong enough to visit all of the remaining towns in the third ring. Anything in the inner two rings was no longer a challenge in terms of moving around the world map.

Tressa was in Wellspring to complete Therion's Chapter 3 storyline, which involves breaking into a Black Market in search of another mission Dragonstone. I didn't find any of the random encounters on the path through this latest dungeon to be particularly challenging, which meant that soon enough it was time to face the boss at the end. Gareth is another thief much like Therion, and fortunately he had a weakness to swords that could be exploited with Tressa's Mercenaries while simultaneously picking up the physical defense buff. This was another battle where nearly all of the damage was physical in nature and Tressa was able to load up on the physical defense gear as she had done against Miguel. The stars of the first half of the battle were the Dancers again, who were very good at hitting the dagger weakness of Gareth's minions and inflicting a whole bunch of status ailments. Unfortunately Gareth went up to three actions per turn after his minions were gone and that started to flip the math of this encounter in his favor. It might be better to avoid killing one of the minions to limit Gareth to only two actions per turn; I'll have to think about that with future characters.

Gareth's big gimmick is that he can "steal" all of your items and lock out use of the item command. They are restored when your character breaks Gareth and unlike a lot of other bosses he never gains more than 5 shields to make him relatively easy to break. With that said though, sometimes Tressa could find herself in a position like the one above where there was no answer possible: she immediately died afterwards and had to try again. It certainly didn't help that Gareth locked out three of his five weaknesses when he started to get low in health, leaving only weaknesses to staffs (nope) and wind (yes!) This precluded the use of Mercenaries or Veteran Soldiers to attack into that swords weakness and forced me to be more creative. As if that wasn't enough, Gareth can also steal your character's SP and make it impossible to use any skills with an SP cost. This was pretty nasty stuff. On the attempt that finally ended in success, Tressa was down to 750 HP with no boost points remaining and no SP left after Gareth had stolen them away. She had one last turn before Gareth was about to take six turns in a row, and I broke out a Large Wind Soulstone into his last weakness to deal 3500 damage and win the battle. Wow, that was not easy at all. Thank goodness Gareth only had 38k health or my slapdash approach would have come up short. I think that this boss is going to pose problems for other solo characters with his ability to lock out item and SP use with various abilities.

With that potential roadblock out of the way, I had Tressa explore the Refuge Ruins optional dungeon next. I was heading in there because it contained a chest with a Clarity Stone (blocks confusion status) and I wanted to pick up all of the status protection accessories before progressing any further. This turned out to be a subdungeon where Tressa needed to defeat the miniboss in order to explore most of the place, and that meant having to deal with the dinosaur-like Gigantes pictured above. I quickly discovered that Gigantes was effectively another version of the Behemoth fight, a purely physical attacker who hit really, really hard. Gigantes would spend a round buffing his physical attack followed by delivering a tremendously powerful blow on the following rounds. However, he only received one action per round and that allowed me to break out one of Tressa's seldom-used abilities: Sidestep. This allowed Tressa to dodge the next physical attack with 100% success, and the rounds that Gigantes wasted buffing himself gave Tressa plenty of time to use this ability while still having time to launch attacks. (Each additional boost point also grants an extra dodge from Sidestep so I could store up multiple rounds of dodging ahead of time as needed.) Long story short, Gigantes never laid a finger on Tressa and she actually won the battle with the extra "Untouched" bonus of +10% money. Talk about a rarity for boss fights!
The Refuge Ruins held the Clarity Stone which I was able to find with no further issues. Next up was the Calming Stone for its anti-terror properties, located in the Quicksand Cave optional dungeon. This place is best known for having the dangerous Giant Python boss at the end of it, an enemy which yields the awesome Transcendent Bow of Shadows upon defeat. Tressa really wanted that bow but sadly would never get her hands on it, as the Giant Python can only be fought by triggering a story even with Cyrus or Alfyn's Path Actions. Then it was into the Moldering Ruins out in the third ring of towns near Duskbarrow to pick up the Vivifying Stone that blocks instant death attacks. None of them had shown up yet but I knew they were inevitably coming down the road. This allowed Tressa to complete the whole set:

I was pleased to find that all eight of these accessories can be accumulated without needing any particular Path Action or individual character skills. They can all be found lying around in normal chests at some point in the gameplay. Many of the bosses in the final two chapters would be completely impossible for a solo character to defeat without protecting themselves against various status ailments. Unfortunately Octopath Traveler only allows two accessory slots on each character and that can force some tough choices when picking between the various options. For example, Tressa needed to bring the Antidote Stone for her next boss encounter because I had seen ahead of time that all of its abilities involved poison in some fashion. This meant giving up either the Empowering Necklace or the Protective Necklace though, both of which had been core parts of Tressa's build for some time now. Ultimately I decided that 3600 HP would be sufficient for this fight and dropped the Empowering Necklace to maintain a high physical defense.

The boss in question was the Venomtooth Tiger, the final opponent in Tressa's own Chapter 3 storyline. Tressa sets out to find a buried treasure only to have this monster show up completely out of nowhere and attack her for no real reason at the end. Uh sure, why not. In any case, the Venomtooth Tiger can inflict poison on pretty much all of its attacks, and it has a special ability called "Peerless Poison" that causes poison ticks to drain SP and boost points as well as the standard HP. The easy solution is to ensure that your character can never be poisoned in the first place by blocking the status with the aforementioned Antidote Stone. While the attacks from the boss were not trivial and I had to pay close attention to Tressa's health total, this was ultimately a fairly easy battle, easy enough that Tressa was able to use Bifelgan's Bounty as a damage source instead of Hired Help. Apparently the Venomtooth Tiger had fairly low elemental defense as well since this was the first time that I'd seen Bifelgan's Bounty printing those lovely 9999 damage readouts. All in all this was the easiest of the Chapter 3 bosses to date.
I decided to take on Cyrus' portion of the story next, with this part of his tale seeing the absent-minded Scholar get himself captured in an easily-spotted trap. It's highly amusing that a teenage student proves to be more effective at thwarting the villain's plans than Cyrus himself in this story's plot. Once again the random encounters in this part of the gameplay proved to be little more than a source of experience and additional money generation from Bifelgan's Bounty. Tressa simply had too many levels and too much armor to be overly threatened by the rank and file critters. The boss at the end spawned with two Research Fellow minions who had a weakness to axes; Tressa broke the pair of them using the Bandit option from Hired Help and then finished them off together with a max boosted Veteran Soldiers to wipe them from the battlefield.

That left only Yvon himself to deal with as the boss of this area. You would think that this figure would be a magic-casting boss based on the story, but nope, Yvon only uses physical attacks. The primary precaution that Tressa needed to take here was equipping an Articulate Stone to block the silencing attacks that Yvon could use, a status ailment which would have rendered her essentially helpless. Yvon lacked my desired swords weakness but did have a dagger vulnerability to exploit, something that the Dancers were able to leverage to great effectiveness. Once again darkness and poison statuses served to cripple the opposing boss, leading to misses like the one seen above. When Yvon dropped under 50% HP remaining, he started breaking out attacks that had the potential to drain SP and boost points. This would have been much more dangerous if Hired Help consumed SP like almost every other ability, which fortunately enough it didn't. I concentrated on breaking Yvon with the Dancers, keeping him debuffed as much as possible with darkness status, and using Veteran Soldiers whenever he was broken for roughly 18k damage each time. Ultimately this was a relatively straightforward victory, with ticking poison damage providing a major contribution to the total result. (Bosses lose 1% of their HP per poison tick which does add up over time.)
Tressa was getting closer to finishing her tour through the remaining Chapter 3 storylines at this point. I snapped a quick picture of the map to demonstrate the progress she had made in the wider world:

This was the northeast corner of the Octopath world map, with Tressa finally reaching the outer ring town of Wispermill (highlighted in yellow here). This was the eighth and final town that Tressa had reached in the third ring and completed the full set of destinations where she could use the game's fast travel feature. There were times when I wasn't sure that she would even be able to make it to all of the outer ring towns, and there was a real sense of triumph to know that Tressa had managed to survive the dangerous monsters lurking out in the wilds. By this point she could basically go anywhere on the map and handle the resulting random encounters, more or less, with the remaining challenges coming in the form of the bosses lurking at the end of each dungeon.

I headed for Ophilia's Chapter 3 storyline next, and after passing through the easy Seaside Grotto dungeon, Tressa came face to face with a pair of opponents. This duo is named the "Mystery Man" and the "Shady Figure" and their real names are not revealed at any point in this chapter's story. The Mystery Man uses various different elemental spells to attack while the Shady Figure tosses out various different buffs: elemental attack up for both opponents, elemental defense down used against the player, that sort of thing. The Shady Figure also heals the two enemies for 800 HP at the end of every single round so long as both of them are still alive, which makes this a difficult battle for any kind of low-offense strategy. The trick is that the player wants to defeat both opponents at the same time if at all possible, since they both gain additional and more dangerous abilities once the other one is downed. Unfortunately that constant healing makes it very tough to kill both of these bosses at the same time, and in practical terms the Shady Figure will likely need to be removed first just to stop with that annoying health regeneration.
My strategy for this battle was to take out the Shady Figure first while weakening the Mystery Man as much as possible in the process. These two individuals have 32k and 28k health respectively which meant that even the Veteran Soldiers option wasn't enough to make this an easy encounter. There was also the problem of the Mystery Man's elemental attacks with double buffs in place:

That was the damage output from a Fireball spell with the Mystery Man's elemental attack buffed and Tressa's elemental defense debuffed - ouch!  (Not bad effects work on the part of the designers there either.) Fortunately the Mystery Man only took one action per round so long as both of them were still alive. I had Tressa use the Mercenary options to attack the sword weakness on the Shady Figure and then hit them both with Veteran Soldiers once the healer was broken. In retrospect, I think this was the wrong pattern; I could have broken the Mystery Man and used Bifelgan's Bounty against him for some solo damage, followed by using non-boosted Veteran Soldiers to hit both of them at once, taking advantage of the 30% extra damage that the Shady Figure would take due to his sword weakness. Timed properly, this might have been enough to wipe them both out at the same time. Instead, I finished off the Shady Figure and left the Mystery Man alive at roughly 50% health remaining.
Now left alone, the Mystery Man went into a more dangerous AI routine. He used "Channel Energy" (elemental attack up) at the start of each round, then would follow this with "Arcane Blade" as a second action. Arcane Blade was incorrectly labeled as a physical attack in the online Octopath wiki, but I discovered here that it was actually a dark elemental attack that benefitted from the Channel Energy elemental attack boost. It turns out that both of these opponents only use elemental attacks and therefore physical defense can be skipped entirely for this fight. Arcane Blade did tremendous damage to Tressa, enough that it would have killed her instantly except that her Hang Tough passive kicked in and left her alive with 1 HP remaining. That was enough to get off one final max boosted Veteran Soldiers usage for 9k damage and finish off the battle. Whew, nasty stuff there. I'll have to try to do a better job of finishing off this duo at the same time in the future, that and look to itemize against those elemental damage types more properly.

I sent Tressa off to the Maw of the Ice Dragon optional dungeon next, with the goal of picking up a piece of equipment named the Adamantine Hat hidden within. This item has the highest elemental defense of any helmet in the game, along with good physical defense and a secondary unusual boost of 88 points to elemental attack. This would be perfect for Tressa's frequent use of Bifelgan's Bounty and I was eager to get my hands on it. Unfortunately I discovered that the treasure chest holding the Adamantine Hat was a purple one that could only be opened by Therion, with this annoying revelation prompting me to go through my spreadsheet of Octopath equipment and label everything that was located within Therion-locked chests. It actually turned out that it was impossible for Tressa to unlock the Adamantine Hat without using the Path Actions of other characters, with the three versions of this item all requiring either Therion or Cyrus/H'aanit to Challenge/Provoke a townsperson out of the way. Very annoying.
I did loot the remainder of the Maw of the Ice Dragon while Tressa was there, including fighting the optional miniboss at the end pictured above. This opponent is surprisingly not a dragon but instead a lupine foe named the Dreadwolf. The evil wolf hit incredibly hard when it used its Rampage attack and there was no easy way to counter this. I tried to use Tressa's Sidestep ability as she had broken out against Gigantes earlier, only to find that this was useless because the Dreadwolf could also break out something called Wild Scratch which hit four times in a row. (Sidestep was less useful than I anticipated throughout this solo run because so many bosses had multi-hit attacks.) The solution was to prey on the Dreadwolf's very low 10k HP total: one non-boosted use of Veteran Soldiers to down the wolf minions, then a second max boosted use to finish off the boss. In other words, the same thing that Tressa had pulled against the Behemoth earlier. That cost a cool 60k money but it did get the job done via an inelegant fashion.

With only two Chapter 3 stories left to go, I sent Tressa back to Noblecourt once again to continue Primrose's tale. Once again the dungeon here (the Obsidian Manse) was a cinch to complete and Tressa advanced rapidly to the boss at the end. This oppponent was Albus the Right Hand Man and his whole gimmick involved inflicting the blindness status ailment. Multiple different attacks could cause blindness (Eye Gough, Eye Slash) and I get the feeling that this could be a tricky foe for a physical attacker. I assumed that this wouldn't matter at all for Tressa, as both Bifelgan's Bounty and Hired Help didn't need to worry about reduced physical accuracy - who cared about blindness? Then Albus broke out a move called "Death to the Unseeing" which inflicted instant death on anyone who had blindness status. Ummm, whoops. I guess Tressa would be equipping that Bright Stone (prevents bindness) after all!  With the Bright Stone in place this battle became a real joke, with Tressa using Mercenaries to break the swords weakness on Albus while simultaneously keeping her own physical defense buffed against the all-physical damage Albus. I was using Bifelgan's Bounty to raise some more money because the whole thing was so easy.
When Albus dropped below 50% HP, he locked out all of his weaknesses and summoned two Obsidian Officer minions. This was more serious but still not too bad, with Tressa blowing them away quickly through a pair of Veteran Soldiers hirings. Once it was down to just Albus again, Tressa could continue leisurely Bifelgan-ing him to death. I'll note one other thing in this picture: see how Tressa had only 3670 HP instead of her standard 4600+ HP total? This was due to me dropping her Empowering Necklace and its +1000 HP in favor of the Protective Necklace with its +80 physical/elemental defense. Normally I ran both of them in the two accesory slots at the same time, but of course I had to drop one of them to equip the Bright Stone, and I actually favored the additional 80 points of physical defense over having another 1000 HP. As long as Tressa was relying on eating medium Healing Grapes with their 1750 HP restoration, it was better to have a tougher physical defense as opposed to more total health.

After wrapping up this portion of Primrose's story, I sent Tressa off to finish up with a task that I should have done earlier: Purchasing the remaining stat-boosting nuts that she hadn't already acquired. The large versions of these nuts were particularly useful, with four times the benefits of the basic nuts and double the value of the medium ones. Note that the large version of the Nourishing Nut increased her max health total by 330 points, holy cow! A large version of the Tough Nut similarly added 28 points to physical defense. I noted sadly that a fair number of the nuts were forever unavailable because they required the Path Actions of other characters to obtain. This could have been worse though: a clear majority of the nuts are only obtainable via the Purchase or Steal actions and would therefore be locked out for anyone but Tressa or Therion. That could end up being really tough since Tressa was benefitting enormously from the various nuts she'd been able to turn up thus far. (Quick example: the sum total of all 11 Fortifying Nuts in the game would be worth 1898 additional max HP for Tressa. A solo character who couldn't Purchase/Steal these would be pretty crippled compared to a character who could. Hmmm, I may need to think more about this.)
One item that Tressa could acquire without worrying about character Path Actions was the Crystal Helm, the helmet with the strongest physical defense in the game. This was hiding in a normal treasure chest in the Dragonsong Fane, a dangerous optional dungeon located in the Cliftlands near Orewell. Tressa was strong enough at this point to make her way in there and grab the Crystal Helm, which would prove highly useful against any physical damage bosses in the future. The Crystal Helm has 180 physical defense but zero elemental defense which makes it a highly unbalanced choice. I would have had Tressa try her hand at the boss of this optional area except that the Dragonsong Fane is one of the areas that doesn't have one.

Last up among the Chapter 3 stories was H'aanit. I had been deliberately avoiding this storyline because I was worried about one of the abilities used by the boss, something that I'll discuss in a minute. Before reaching that point though, I had to get past another story-mandated Provoke battle with H'aanit. This took place against a six starred opponent named Alaic, and while I could load H'aanit up with enough defensive equipment that she was in no real danger of ever losing the battle, the problem came in the form of dealing damage. Linde dealt all of 250 damage on a max boosted attack against Alaic when he was broken, and I knew from past experience that he had somewhere in the realm of 8000 HP. With no desire to sit around for the next hour tediously fighting this battle, I had H'aanit break one of my large soulstones and the dark elemental attack inflicted an impressive 5400 damage. (Is the damage from soulstones independent of your character's elemental attack value? I still need to test this.) Another medium soulstone use the next time that Alaic was broken proved to be sufficient to defeat this foe with ease. That was well worth sacrificing two soulstones - Tressa had plenty and they can be farmed as drops from monsters if needed.
The boss at the end of H'aanit's Chapter 3 storyline is an actual Dragon. Finally! After all of those various teases with the "dragon" name, this was the first chance to see one in practice. I had been greatly worried about this boss fight because the Dragon uses an ability called "Swept Away": removes one ally from battle who will be returned when the Dragon recovers from a break. Obviously if Tressa was swept away there would be no one remaining and this would be an instant loss. Much to my relief the designers had a sense of mercy and the Dragon never used Swept Away at any point in time; the game must be programmed such that the Dragon won't use this move if there's only one party member alive at the time. Thank goodness! I had been worried for some time that a solo game might be completely impossible due to this move.
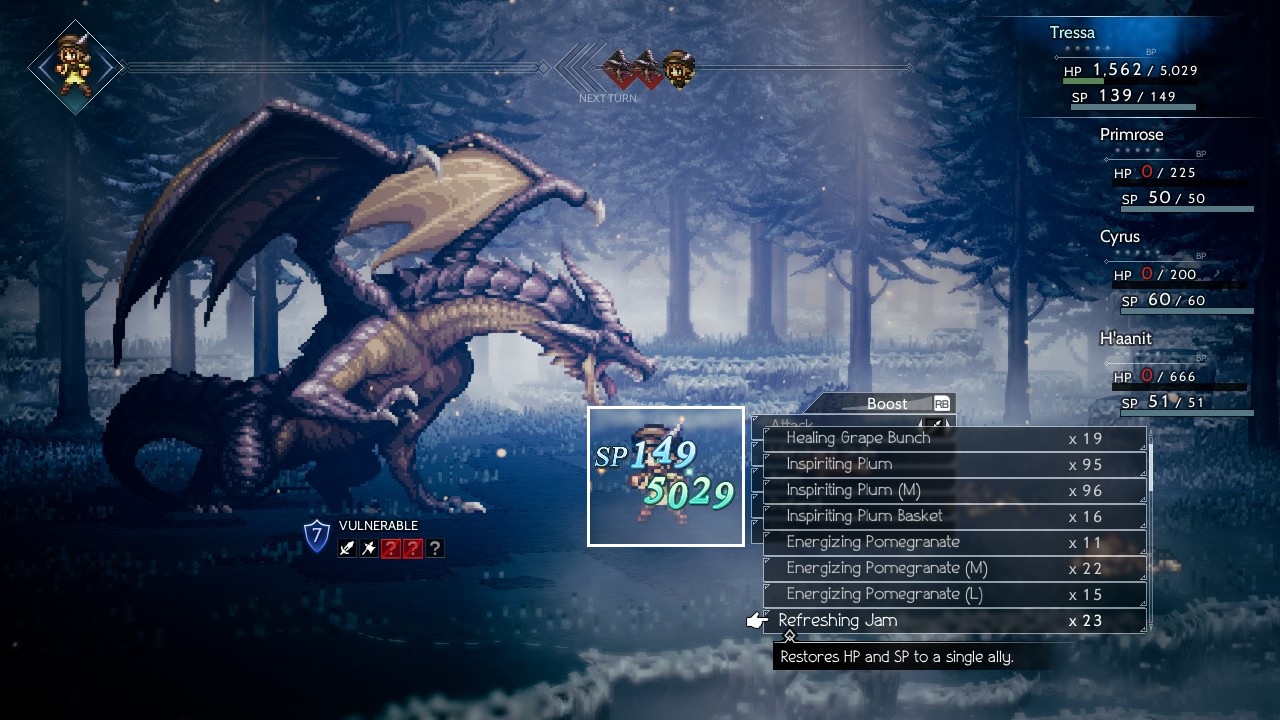
Without Swept Away to concern me, I only needed to focus on having Tressa defeat the Dragon itself. The most dangerous attack proved to be the appropriately-named "Dragonfire", a heavy fire elemental attack that was well in excess of 1000 damage at a time. It was painful enough that Tressa needed to break out a Refreshing Jam at one point, Octopath Traveler's version of an Elixir that fully restores HP and SP to maximum. From there Tressa was able to keep using Mercenaries for breaking purposes/physical defense buffing into Veteran Soldiers for damage, and that proved to be sufficient to win out. Looking back at this battle, there was definite room for improvement on my part. I had overloaded Tressa with physical defense gear and that was part of the reason why the Dragonfires were hitting so hard. Better yet would have been equipping an accessory that reduced fire element damage, something that I'll keep in mind for the future. Most of the danger in this fight can be removed by nullifying that fire damage.
The defeat of the Dragon brought an end to all of the Chapter 3 storylines. The gameplay had been getting more and more difficult as Tressa continued to progress further, and I still had eight more nasty bosses left to contend with. Would Tressa be able to finish them all and bring the game to a close? I was about to find out.


